1
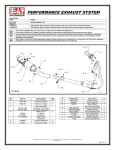
PERFORMANCE EXHAUST SYSTEM
APPLICATION
MAKE
MODEL
Polaris
PRODUCT
394000G551
RZR800/S/4/XC
RS8 SS Full-System Exhaust with Stainless Steel Sleeve; Spark Arrested
This product is designed for use in closed course racing and is not intended for highway use.
In the state of California, it is illegal to modify the emission control system, which includes the fuel injection of any vehicle.
You must know how to remove and replace your stock exhaust in order to install this product otherwise have it installed by a professional
mechanic. Keep all stock parts from your existing system as some components may be necessary to install your new Yoshimura exhaust
depending on the application.
Read through all instructions before beginning installation. Exhaust system can be extremely hot. Let vehicle cool down before beginning
installation. Always wear hand and eye protection and take precautionary measures to avoid injury.
13
2
5
1
9
15
7
8
9
16
10
11
12
9
3
4
17
12
9
9
16
14
10
10
11
11
12
6
No.
Part #
Description
Qty
1
2
3
4
5
6
7
8
9
10
11
12
13
14
15
16
17
**
**
**
**
394000-101
394000-102
394000-103
394000-140
394000-144
394000G551
39400-TPBRKT
39400-BRKT
8MMNUT
Z1022
ALS-003
M8X30
M8X40
8MMWASHERXL
ALS-027
RACE-SPS-1
RACE-SPX-1
ST-200
347PLUG
17029
39400-HS
Yoshimura Header
Yoshimura Hdr Leg 1
Yoshimura Hdr Leg 2
Yoshimura Midpipe
Yoshimura Tailpipe
Yoshimura Muffler
TP Hanger Bracket
Muffler Hanger Bracket
8mm Nut
Rubber Grommet
Aluminum Spacer
8mm x 30mm Head Cap Screw
8mm x 40mm Head Cap Screw
8mm Flat Washer XL
Aluminum Spacer
Medium Spring
Short Spring
Spring Puller Tool
End Cap Plug
Yoshimura Sticker Sheet
Aluminum Heatshield
1
1
1
1
1
1
1
1
6
3
3
4
2
1
1
6
2
1
1
1
1
Optional Replacement Parts
SA-01-K
REPACK-RS8T-P22
5420 Daniels Street Chino, CA 91710
Replacement SA Kit
Re-pack Kit
Tel (800) 634-9166 Fax (909) 591-2198
394000G551_1.doc
www.yoshimura-rd.com
Page 1 of 4
-TOOLS REQUIRED-
Metric Socket Set • Combination Wrench Set • Torque Wrench • Metric Allen Wrench Set
Power Drill and 5/16” Drill Bit
-REMOVAL1. Removing the stock exhaust system.
a)
b)
c)
d)
e)
f)
Remove rear fenders and bed assembly as per Factory Service Manual (FSM).
Remove the stock heat shield.
Remove the (2) springs attached to the header and tailpipe.
Remove the (4) header bolts and remove header.
Loosen exhaust clamp and remove stock tailpipe.
Remove stock muffler and stock muffler grommet in frame. See Fig. 1
Fig. 1
Fig. 2
Fig. 3
-INSTALLATION1. Small parts installation.
a) Install provided spacer and muffler hanger bracket on frame. See Fig. 2,3 and Parts Diagram
for orientation.
b) Using a drill and a 5/16” drill bit, drill out the 2 holes near the middle of the heat shield.
c) Place tailpipe hanger bracket on crossbeam aligning the mounting holes. Then place the
stock heat shield over the tailpipe hanger bracket and bolt down using supplied hardware.
See Fig. 4,5. (Note: Drain hole must be closer to the rear of the vehicle.)
d) Remove the two rear brace bolts and install supplied heatshield on top of rear support brace
using the stock bolts as shown in Fig. 6. Check to make sure the two heatshield holes align
to the rear bed mounting holes. Torque brace bolts to factory specification.
e) Install rubber grommets and spacers onto muffler bracket.
f) Install rubber grommets and spacers onto tailpipe bracket.
Stock Heatshield
39400-HS
Fig. 4
Fig. 6
Fig. 5
2. Installing the header.
a) Install Yoshimura header using stock bolts. Inspect stock exhaust manifold gasket and
replace if necessary (P/N: 5811511). Do not torque header bolts at this time.
5420 Daniels Street Chino, CA 91710
Tel (800) 634-9166 Fax (909) 591-2198
394000G551_1.doc
www.yoshimura-rd.com
Page 2 of 4
3. Installing the muffler tailpipe assembly.
a)
b)
c)
d)
e)
f)
g)
h)
Install midpipe to header.
Install stock exhaust ring gasket to tailpipe.
Install muffler and tailpipe assembly from the rear.
Connect midpipe to tailpipe and install springs.
Install midpipe to header springs.
Torque header bolts to 16.5 lb-ft. (23 Nm)
Torque tailpipe bolt to 9.5 lb-ft. (13 Nm)
Torque muffler bolts to 9.5 lb-ft. (13 Nm)
4. Reinstall bed assembly and fenders.
a) Re-install bed assembly and fenders as per FSM.
5. Fitment check and Notes.
a) Before starting vehicle, check for proper clearance between new exhaust system and rear
suspension (i.e. tire, control arm, brake, rear shock, engine, and etc.) If any problem is
found, please carefully follow through the installation steps again. If problem still persists,
please call Yoshimura Tech Department at (800) 634-9166 / in CA (909) 628-4722.
b) It is recommended that the muffler and tailpipe be wiped down with rubbing alcohol to
remove oil and fingerprints. This will help prevent tarnishing of the finish after the exhaust
is heated up.
c) NOTE: After starting vehicle, it is normal for new exhaust system and muffler to emit smoke
until oil residue burns off.
5420 Daniels Street Chino, CA 91710
Tel (800) 634-9166 Fax (909) 591-2198
394000G551_1.doc
www.yoshimura-rd.com
Page 3 of 4
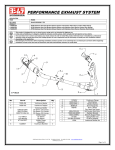
Spark Arrester Cleaning Information
Read through all instructions before beginning installation. Exhaust system can be extremely hot. Let vehicle cool down before beginning
installation. Always wear hand and eye protection and take precautionary measures to avoid injury.
4
3
2
1
No.
Part #
Description
Qty
1
M6X18BHS
6mm x 18mm Button Head Cap Screw
1
2
RS8-RING-1625
RS8 Spark Arrester Ring 1.625”
1
3
TEC-SD7
Low Volume Insert for RS8
1
4
**
Yoshimura Muffler Assembly
1
-TOOLS REQUIRED-
4mm Allen Key
Wire Brush
Pair of Gloves
Safety Glasses
-Cleaning Steps1. Using a 4mm Allen key, remove the 6mm x 18mm Button Head Bolt located under the muffler
exhaust tip. (See Parts Diagram for location)
2. Remove the spark arrester from the muffler.
3. Using a wire brush, remove carbon deposits from spark arrester screen. Inspect the screen for
excessive wear or damage. If spark arrester is excessively worn or damaged, the spark arrester
must be replaced. Cleaning and inspection should be performed at the same time as muffler repacking. Re-packing is recommended every 1,000 miles.
CAUTION: Gloves and safety glasses should be worn while cleaning spark arrester.
4. Re-install spark arrester and 6mm x 10mm bolt into muffler assembly. Torque bolt to 1.0 kg-m (7.3
lb-ft).
NOTE: It is highly recommended that a low strength “Loc-tite” is used on the bolt.
5420 Daniels Street Chino, CA 91710
Tel (800) 634-9166 Fax (909) 591-2198
394000G551_1.doc
www.yoshimura-rd.com
Page 4 of 4