1
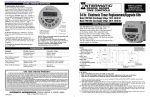
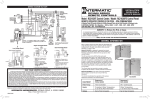
INSTALLATION OPERATION & SERVICE MANUAL PB300E SERIES TIME CONTROLS 24 Hr. Electronic Timer Replacement/Upgrade Kits Model: PB313EK; Clock Supply Voltage: 120 V. 50-60 HZ Model: PB314EK; Clock Supply Voltage: 240 V. 50-60 HZ GENERAL INFORMATION The PB300EK Series Electronic Timers are made to fit and replace most PB series Intermatic and certain other brand mechanical or electronic timers. The connected load however, must not exceed the rating of this timer. The timer is completely enclosed and a replaceable lithium battery will hold up memory for up to three years. The kit contains all the necessary hardware for a speedy repair or exchange. SPECIFICATIONS Rating: 16A-Resistive, 8A FLA Contact Configuration: Single Pole, Double Pole Power Consumption: 8V A Battery Type: CR2032 (1.5V Lithium) Battery Life: 3 Years Minimum No. of Programming Periods: 8 On/8 Off Minimum Interval: 1 minute MYLAR INSULATOR PROTECTING BATTERY CONTACTS-REMOVE BEFORE INSTALLATION INDEPENDENT CLOCK SUPPLY NC NO C .250 MALE QUICK CONNECT TERMINALS. INSTALLATION CAUTION: • Prior to installation, disconnect electricity at main panel • Make sure the clock supply voltage of the timer slated for replacement is the same as this timer. • Make sure the intended load is within the capacity of this timer-see specifications above. 1. Both the old and the new timers have two sets of terminals: LOAD and CLOCK SUPPLY. Identify and mark the leads connected to these terminals. 2A.Old Timer with four 1/4 inch tabs: Remove female terminals from tabs and remove timer. Install new timer, using the screws and nuts supplied. Reconnect the two clock supply leads to CLOCK SUPPLY terminals and either one of the load leads to terminal C and the other load lead to N.O. (normally open) terminal. 2B.Old Timer with two CLOCK SUPPLY LEADS and two 1/4 inch LOAD tabs: Disconnect leads at twist on wire connectors and remove female terminals from tabs. Remove timer. Install new timer, using the screws and nuts supplied. Connect the stripped ends of either leads (supplied) to either wire-nutted junctions. Connect either one of the load leads to terminal C and the other load lead to N.O. (normally open) terminal. 2C.For other than Intermatic made timers, timers with 5 tabs and/or permanently attached leads, identify first each lead or tab then follow 2A or 2B above and corresponding markings on back of new timer. SETTING / OPERATING INSTRUCTIONS Programming Instructions To Set or Change the Time of Day: To clear entire memory, press key. Hold down the CLOCK key while pressing either the HOUR or MINUTE keys. Continue pressing until the desired number is shown. Then simply lift finger off the CLOCK key to set. To Set Program (ON/OFF times): Press TIMER key once to enter into program mode. Display will show “1 ON-- --”. Press the HOUR key and then the MINUTE key to select the desired first ON time. Press TIMER key once. Display will show “1 OFF -- --”. Repeat previous step to select the desired first OFF time. Repeat the entire sequence to complete up to eight total ON/OFF times as desired. When programming is done, press the CLOCK key then the SELECT key repeatedly until the indicator bar is above the word “AUTO”. To Review Program: Press TIMER key repeatedly. When done, press CLOCK key to return to the time of day. To Cancel/Change Part of the the Program: Program: Press Press TIMER key key repeatedly repeatedly until TIMER until the the particular particular ON ON or or OFF OFF time appears. Set new ON or of OFF time. time. (See: (See: To Toset Set Programs). Programs). To Override the the Automatic Automatic Operation Operation one one time: time: To Override KEY. Press OVR. KEY. Display Reset port to cancel all prior settings ON/AUTO/OFF Select Key Indicator LED “ON” when connected to power source and contacts are closed Function Keys . NOTE: Timer will resume automatic operation with the next opposite setpoint. To Override Automatic Operation Permanently: Press SELECT key to move indicator bar to the desired ON or OFF position. Note: Timer will not resume automatic operation until indicator bar is repositioned above the word AUTO. TROUBLESHOOTING Symptom Blank Display Possible Cause(s) Corrective Action Discharged battery.................................Replace battery Defective timer......................................Replace timer Timer will not function as programmed Timer is in the wrong ...........................Press SELECT key and move SELECT mode indicator bar over to AUTO Timer will not respond to programming Timer is ON at all times Memory is full.......................................Press to clear memory Timer is in ON mode.............................See above Defective timer......................................Replace timer ONE YEAR LIMITED WARRANTY If within the warranty period specified, this product fails due to a defect in material or workmanship, Intermatic Incorporated will repair or replace it, at its sole option, the unit free of charge. This warranty applies only to the original purchaser and is not transferable. This warranty does not apply to: (a) damage caused by accident, abuse, mishandling, dropping, acts of God, or any negligent use; (b) units which have been subject to unauthorized repair, opened, taken apart, or otherwise modified; (c) units not used in accordance with instructions; (d) damages exceeding the cost of the product. Some states do not allow a limitation of damages, so the foregoing limitation may not apply to you. This warranty gives you specific legal rights and you may have other rights that vary from state to state. INTERMATIC INCORPORATED WILL NOT BE LIABLE FOR INCIDENTAL OR CONSEQUENTIAL DAMAGES. THIS WARRANTY IS IN LIEU OF ALL OTHER EXPRESS OR IMPLIED WARRANTIES. ALL IMPLIED WARRANTIES, INCLUDING THE WARRANTY OF MERCHANTABILITY AND THE WARRANTY OF FITNESS FOR A PARTICULAR PURPOSE, ARE HEREBY MODIFIED TO EXIST ONLY AS CONTAINED IN THIS LIMITED WARRANTY, AND SHALL BE OF THE SAME DURATION AS THE WARRANTY PERIOD STATED ABOVE. This warranty service is available by either (a) returning the product to the dealer from whom the unit was purchased, or (b) mailing postage prepaid to the nearest authorized service center listed. Please be sure to wrap the product securely when mailing to avoid shipping damage. This warranty is made by: Intermatic Incorporated/After Sales Service, 7777 Winn Rd., Spring Grove, IL 60081-9698/815-675-7000 http://www/intermatic.com Because of our commitment to continuing research and improvements, Intermatic Incorporated reserves the right to make changes, without notice, in the specifications and material contained herein and shall not be responsible for any damages, direct or consequential, caused by reliance on the material presented. INTERMATIC INCORPORATED, SPRING GROVE, IL 60081-9698 http://www.intermatic.com 158PB12524