1
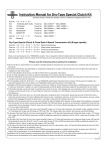
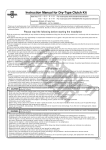
5 disc Conversion Kit for Old type dry clutch
Instruction Manual
:00―02―0151
Item No.
Fitting models :Monkey ・ Gorilla
Requirement :The vehicle equipped with our old type dry clutch which are three clutch discs
and front mount type oil filter.
CO
・Thank you for purchasing one of our products. Please strictly follow the instructions in installing and using the kit.
・Before installing the kit, please be sure to check the kit contents. Should you have any questions about the kit, please contact your local TAKEGAWA dealer.
◎ Please note: Illustrations and photos may vary from actual hardware.
Read all instructions before starting the installation.
◎ We shall be held free and harmless from any and all liabilities or claims for any accidents or damages whatsoever arising from the use of the products
not in conformity with the instructions in the manual.
◎ The products is installed and being used, when you have troubles with the parts during operation, we shall be held free and harmless from any and all
liabilities or claims for any defects of the parts unless they are genuine parts manufactured by our company.
◎ TAKEGAWA does not accept returns on any parts which have been modified, or installed on a vehicle.
◎ We do not have any information or service data on the combination of our products and other manufacturers'.
◎ This Kit is designed for exclusive use in the above-mentioned fitting models with the specified requirement only. Please take note that this Kit cannot be
mounted on any other types of motorcycles.
◎ Be sure to do the disassembly work properly, referring to the HONDA’s genuine service manual for the above-mentioned relative motorcycles.
◎ If the friction disk gets covered with water, for example when running in the rain, clutch slippage may occur causing the clutch to be nonfunctional.
If possible, avoid running in the rain, or when driving your motorcycle is inevitable, try to skirt puddles as much as possible to prevent the friction discs
from getting wet.
◎ Water adhering to the friction discs, etc. will corrode these parts, rendering the clutch nonfunctional. Always wipe the water off the friction discs, a clutch plate and other parts and dry them sufficiently after riding in the rain or washing the motorcycle. In the humid or rainy seasons, store your vehicle
with the clutch disengaged to prevent the friction discs, clutch plate or other parts from sticking to each other.
◎ This instruction manual, as well as the service manual, is prepared for those who have acquired basic skill and knowledge. Therefore, technically inexperienced people or people without sufficient knowledge may not be able to fix these products correctly. Improper installation because of insufficient
skill and knowledge could lead to parts breakage.
◎ Always engage the clutch smoothly, otherwise it may damage the clutch or transmission.
PY
The following shows the envisioned possibility of injuries to human bodies or property damage as a result of disregarding the
CAUTION following cautions.
・Keep the speed limit and enforce the driving law.
(Riding a motorcycle at a speed exceeding the legal speed limit is subject to punishment for overspeeding in violation of the Law.)
・Work only when the engine and the exhaust system are cool to avoid getting burn injury.
・Prepare appropriate tools and work properly to avoid the breakage of parts or injuries
・Tighten the bolts and nuts securely to the specified torque with a torque wrench. (Otherwise, these parts may get damaged or come off.)
・As some products and frames have sharp edges or protruding portions, please work with your hands protected. (Otherwise, you will suffer injuries.)
・Before riding, always check every hardware for slack in parts like screws. If you find slack ones, screw them securely up to the specified torque.
(Or improper torque may cause parts to come off.)
The following shows the envisioned possibility of human death or serious injuries to human bodies as a result of disregarding the
WARNING following cautions.
・Those who lack technical skill or knowledge are required not to do the work.
(Improper installation could lead to a motorcycle’s overturning or accidents as a result of parts breakage.)
・Rotating parts in the dry-type clutch, such as a clutch outer, are touchable through an opening in a cover. Please never look into or touch them
when the engine is running. Moreover, be dressed to protect your legs when riding so you do not get your clothes caught in the rotating parts of the
clutch. (Otherwise, the motorcycle may overturn, and you will suffer injury or burn yourself.)
・Always drive the engine in a well-ventilated place, and do not start the engine in an airtight place.
(Otherwise, you will suffer from carbon monoxide poisoning.)
・When you notice something abnormal with your motorcycle, stop riding immediately and part your motorcycle in a safe place to avoid an accident.
・Before working, place the motorcycle on level ground to stabilize its position for safety to avoid the motorcycle overturning.
・Carry out inspection or maintenance of your motorcycle correctly according to the procedures in the instruction manual or service manual. (Improper inspection or maintenance could lead to accidents.)
・If you find damaged parts when checking or performing maintenance of your motorcycle, do not use these parts any longer, and replace them with
new ones. (The continued use of these damaged parts as they are could lead to accidents.)
・As gasoline is highly flammable, never place it close to fire. Make sure that nothing flammable is near the gasoline. Since vaporized accumulation of
gasoline is at high risk of explosion, work in a well-ventilated place.
◎ Please be informed that, mainly because of improvement in performance, design changes, and cost increase, the product specifications and prices are
subject to change without prior notice.
◎ This manual should be retained for future reference, and keep it at hand so you can refer it any time.
∼ Features ∼
・This kit can convert our old type dry clutch with three clutch discs into the five clutch discs the same as the current type.
・The number of the primary driven gear dampers increased to six, so that the shock of the gear engagement is less than that of the old type.
・The Clutch outer is now made of the diecast aluminum, changed from the former aluminum casting, so that the durability and strength improved.
-1-
Sep./05/’
12
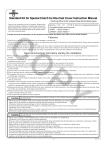
∼ The clutch consists of ∼
N
CO
9
99
2
3
4
5
N
7
24
6 22
9
24
23
25
13
10
8
99
15
11
1
PY
19 19
14 16
20
12
26
17 18
19
19
21
21
21
21
※A component marked “N” shows a genuine part.
No.
1
2
3
4
5
6
7
8
9
10
11
12
13
14
15
16
17
18
19
20
21
22
23
24
25
26
Part name
Right side crankcase cover gasket
Primary drive gear (18T)
Lock washer
Conical spring washer
Lock nut
Bearing seat
Primary driven gear COMP. (67T)
Clutch outer
Flat head screw, 6x15
Seal bearing, 6903
Clutch pressure plate
Clutch plate
Clutch friction disk (Kevlar)
Clutch friction disk B
Judder spring
Judder spring seat
Clutch center
External circlip, 17mm
Clutch spring
Clutch lifter plate
Flange hex bolt, 6x22
Thrust bearing
Thrust washer
Ball bearing, 6803
Oil seal, 17X28X7
Shield bearing, 6001
Qty
1
1
1
1
1
1
1
1
6
1
1
4
4
1
1
1
1
1
4
1
4
1
1
2
1
1
Repair part item No.
00-01-0095
23121-181-T01
00-01-0098
00-02-0036
90232-181-T00
22301-181-T00
00-02-0071
23101-165-T10
00-00-0031
00-00-0035
22350-181-T10
00-02-0029
02-02-0003
00-02-0202
00-02-0203
22125-GEF-T10
22120-165-T10
00-02-0005
22401-181-T00
22361-GEY-T10
00-02-0098
00-02-0061
00-02-0060
00-00-0024
00-02-0020
00-00-0026
In packs of
1
1
1
1
1
1
1
1
5
1
1
1
5
1
1
1
1
5
1
1
4
1
1
1
1
1
∴Please note that in ordering repair parts, be sure to quote the Repair Part Item No. Otherwise, we may not be able to accept your orders.
There are some parts, however, for which we are not in a position to accept your order in just the quantity to be used. In this case, please
take them in the quantity packed.
-2-
Sep./05/’
12
∼ On installation ∼
Place the vehicle on the flat surface with the maintenance stand properly.
Drain the engine oil, and remove the clutch cover and clutch parts.
※ The clutch cover will be reused. Check the damages of the oil seal and
other parts and replace it if necessary.
※Also the genuine parts are to be checked with the reference to the genuine service manual and replace it if necessary.
CO
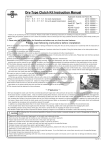
(On installation of the primary gear)
1.Install the parts on the crankshaft as following order.
1.The stock collar 2.Primary driven gear 3.Lock washer 4.Conical spring washer. After installing as above, tighten temporarily with the
lock nut.
※ Locate the lock washer and conical spring washer, being careful of
their direction.
※When installing the conical spring washer, make sure the curved side
is to be fitted toward the lock nut.
Lock nut
Lock washer
Drive gear
4.Tighten the lock nut to the specified torque with the crankshaft being
seated in detent.
Caution: Apply the specified torque.
Torque: 39 N・m (4.0 kgf・m)
※After tightening the lock nut to the specified torque, and if the hook on
the lock washer does not fit in the lock nut grooves, turn the lock nut
in the direction of tightening so the hook fits in the lock nut groove.
※ Keep other hooks on the lock washer folding back the lock nuts.
Set the hooks to be folded back the lock nut.
PY
Conical spring washer
(Be careful of its direction)
Turn the lock nut in the tightening
direction to the hooks and
grooves in place.
Fit the hooks into the lock nut grooves.
(Installation of the right side crankcase cover)
2.Install the clutch bearing seat into the transmission mainshaft.
(Set the bearing seat so its folded portion fits well with the crankcase
so as to prevent it from rotating.)
Then, install the thrust bearing and thrust washer in this order into the
mainshaft.
1.Degrease both crankcase mating surfaces and install two dowel
pins and R crankcase cover gasket on the crankcase.
Apply grease to the lip of the oil seal in the right side crankcase cover.
Dowel pin
Gasket
Dowel pin
2.Install the oil seal of the R crankcase cover COMP., and tighten the R.
3.Apply engine oil to the ball bearing of the primary driven gear COMP.,
and then the grease to the oil seal. And insert the primary driven gear
COMP. into the mainshaft.
Primary driven gear COMP.
crankcase cover temporarily with the cap screw on the crankcase.Then tighten the cap screw in a crisscross pattern to the
specified torque.
Caution: Apply the specified torque.
Torque: 10 N・m (1.0 kgf・m)
-3-
Sep./05/’
12
7.Fix the 6x22 hex flange bolt on the clutch pressure plate and tighten
(Installation of clutch)
1.
Install and tighten the clutch outer on the mainshaft loosely with flat head screws, placing it with the dowel pins. And then screw them up
diagonally to the specified torque.
Caution: Apply the specified torque.
Torque: 10 N・m (1.0 kgf・m)
CO
2.Attach the seal bearing to the mainshaft.
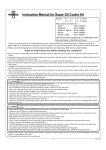
3.Into the clutch center, install the clutch friction disk, clutch plate, clutch
friction disk B, judder spring seat and, judder spring as shown in the
figure below. And attach the clutch plate and clutch disk alternately.
※ Be careful about the direction of the spring when installing it.
(Install the spring in the direction edged portion of the spring placed the Judder spring seat, as shown in the fig. below.)
them with hand properly, with the bearing of the clutch lifter plate facing outside.
※ Pull the clutch lifter plate toward you and see if there is a clearance
between the friction disks. If there is a clearance, this shows that the
clutch center and the clutch pressure plate have got out of place with
each other. Therefore, turn the clutch lifter plate to the right and left a
little until they fit each other.
After making sure they fit closely, gradually tighten the 6x22 hex flange bolt diagonally, while pulling the clutch lifter plate toward you.
Finally, tighten them to the specified torque.
Caution: Apply the specified torque.
Torque: 10 N・m (1.0 kgf・m)
Clutch friction disk
Clutch friction disk B
Clutch plate
Clutch plate
Clutch center
Judder spring
Judder spring seat
PY
※ Degrease the oil completely not to remain oil on the clutch plates.
※ Check that the clutch center and the clutch pressure plate fit in each
other exactly.
4.Holding the boss of the clutch pressure plate, align the protruding portion of the clutch friction disk with the clutch outer grooves.
At the same time, align the clutch center with the mainshaft spline, and insert the mainshaft.
5.Attach the supplied external circlip to the grooves in the main shaft.
Make sure to place the circlip with the angular side facing out.
※ Do not expand the external circlip more than necessary.
※If the external circlip does not easily fit into the main shaft grooves, please pull the mainshaft toward the outside.
External circlip
8.Install the dry clutch cover referring to the instruction manual.
※ Please adjust the clutch with the clutch lifter rod.
※Please put the engine oil.
(Inspection after installation)
1.With the engine turned off, shift the transmission to the first gear. Squeeze the clutch lever. Then, check that the rear wheel rotates when you move the machine, and that the rear wheel does not rotate
when you have released the clutch lever.
2.Shift the transmission into NEUTRAL, and start the engine.
Then check each component for oil leak.
If nothing is wrong, do a test run at slow speed in a safe place to check how the clutch works.
6.Fix the clutch spring to the boss of the clutch pressure plate.
Co.,Ltd.
3-5-16 Nishikiorihigashi Tondabayashi Osaka Japan
TEL : 81-721-25-1357 FAX : 81-721-24-5059
URL : http://www.takegawa.co.jp
-4-
Sep./05/’
12