1
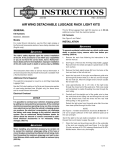
-J05186
REV. 2010-04-30
AIR WING DETACHABLE LUGGAGE RACK LIGHT KITS
This Air Wing Luggage Rack Light Kit requires up to 52 mA
additional current from the electrical system.
GENERAL
Kit Numbers
Kit Contents
68000005, 68000006
See Figure 3 and Table 1.
Models
For model fitment information, see the P&A retail catalog or
the Parts and Accessories section of www.harley-davidson.com
(English only).
The rider's safety depends upon the correct installation
of this kit. If the procedure is not within your capabilities
or you do not have the correct tools, have a Harley-Davidson dealer perform the installation. Improper installation
of this kit could result in death or serious injury. (00308a)
INSTALLATION
To prevent accidental vehicle start-up, which could cause
death or serious injury, remove main fuse before proceeding. (00251b)
1.
Remove the main fuse following the instructions in the
service manual.
2.
See Figure 3. Remove the Air Wing Detachable Luggage
Rack (A) from the vehicle and place it upside-down on the
work surface.
3.
Remove the black plastic plugs (B) from the holes at the
front and back of the left side rail.
4.
Insert the loop end of the nylon monofilament guide wire
(8) through the forward hole (C) in the rail, and out through
the rear hole (D). Allow the straight end to remain outside
the forward hole.
5.
Loop approximately 2.0 in (51 mm) of the light wires
through the closed end of the guide wire. Fold wires neatly
and completely to enable threading the wires through the
rack tubing.
6.
Carefully pull the straight end of the guide wire to draw
the wires and shrink tubing into and through the rail, and
out the forward hole. Feed the wires into the rear hole
while pulling on the guide wire.
NOTE
This instruction sheet refers to service manual information. A
service manual for this year/model motorcycle is available from
a Harley-Davidson dealer.
Additional Parts Required
This Light Kit is designed to mount to an Air Wing Detachable
Luggage Rack.
See the P&A retail catalog or the Parts and Accessories section
of www.harley-davidson.com (English only) for these items,
and for model fitment information.
Electrical Overload
It is possible to overload your vehicle's charging system
by adding too many electrical accessories. If the combined
electrical accessories operating at any one time consume
more electrical current than the vehicle's charging system
can produce, the electrical consumption can discharge
the battery and cause damage to the vehicle's electrical
system. See an authorized Harley-Davidson dealer for
advice about the amount of current consumed by additional electrical accessories or for necessary wiring
changes. (00211c)
Detach the light wires from the guide wire after the wires
have been pulled through the front hole.
NOTE
See Figure 1. Ambient temperature should be at least 60 °F
(16 °C) for proper adhesion of the foam adhesive pads (2) to
the rack and light.
Test-fit the light to the rack before installation. Do not remove
the pad liners until ready to apply the pads.
7.
When installing any electrical accessory, be certain not
to exceed the maximum amperage rating of the fuse or
circuit breaker protecting the affected circuit being modified. Exceeding the maximum amperage can lead to electrical failures, which could result in death or serious injury.
(00310a)
-J05186
Clean the foam pad mounting areas (E) on the underside
of the rack rear crossbar and (see Figure 1) on the light
(3) with a mixture of 50-70% isopropyl alcohol and 30-50%
distilled water. Allow to dry thoroughly.
Many Harley-Davidson® Parts & Accessories are made of plastics and metals which can be recycled.
Please dispose of materials responsibly.
1 of 4
is06313
4
1
Disconnect the tail light connector and install the threeway harness (7).
2
3.
Mount the luggage rack to the docking points on the
vehicle per the instructions in the Luggage Rack Kit.
4.
Route the light assembly wires along the frame rail to the
three-way connector. Fasten the light assembly wires to
the vehicle with adhesive-backed clips (9) from the kit.
3
Cut the light assembly wires to eliminate excess but allow
easy connection to the extension harness.
1.
2.
3.
4.
Air Wing Luggage Rack light assembly
Foam pad (2)
Pad mounting area (2)
Pad adhesive backing liner (4)
5.
Refer to the service manual and follow the instructions to
crimp the pin terminals (5) to the three wires of the light
assembly harness.
6.
Insert the wires and terminals from the light assembly
harness into the pin housing (6) from the kit:
Figure 1. Attach Foam Pads to Light
8.
9.
See Figure 1. Remove the liner (4) from the adhesive
backing on one side of a pad (2). Carefully position the
pad to the top surface of the light (1), between the clearance notches, and press firmly into place. Repeat with the
second pad.
Remove the remaining liner from both pads, and install
the light to the rear cross bar with two socket head screws
(3) and flat washers (4), drawing the wiring out the forward
hole (C) as the light is set in place. Tighten the screws
securely.
Insert the blue wire into cavity 1.
b.
Insert the red/yellow wire into cavity 2.
c.
Insert the black wire into cavity 3.
7.
Apply the contents of the dielectric grease packet (11) to
the light and extension harness connector terminals.
8.
Connect the light assembly harness to the luggage rack
light extension wire harness.
RETURN TO SERVICE
1.
Refer to the service manual, and follow instructions to
install the main fuse.
2.
Turn the ignition key switch to IGNITION, but do not start
the motorcycle.
WIRING
Test the luggage rack light and the motorcycle lamps for
proper operation:
To prevent accidental vehicle start-up, which could cause
death or serious injury, remove main fuse before proceeding. (00251b)
1.
a.
a.
With the ignition switch on, the LEDs in the luggage
rack light should be illuminated, along with the vehicle
tail lamp(s).
b.
When either the brake hand lever of foot pedal are
activated, the LEDs in the luggage rack light should
noticeably brighten, along with the vehicle stop
lamp(s).
c.
When either turn signal switch is activated, the LEDs
in the luggage rack light should remain lit steadily,
and not flash.
d.
Turn the ignition key switch to OFF. the luggage rack
light should turn off immediately, along with the
vehicle tail lamp(s).
Refer to the service manual and follow the instructions to
remove the seat.
is06538
1
1. Tail lamp connector [7]
Figure 2. Tail Lamp Connector
2.
See Figure 3. Locate the tail light connector [7] between
the main wiring harness and the rear fender harness under
the seat.
-J05186
After installing seat, pull upward on seat to be sure it is
locked in position. While riding, a loose seat can shift
causing loss of control, which could result in death or
serious injury. (00070b)
3.
Refer to the service manual, and follow instructions to
install the seat.
2 of 4
SERVICE PARTS
is06311a
3
10
1
4
B
2
E
A
9
11
8
D
B
C
5
6
7
Figure 3. Service Parts: Air Wing Detachable Luggage Rack Light Kits
-J05186
3 of 4
SERVICE PARTS
Table 1. Service Parts
Item
Description (Quantity)
Part Number
1
Light assembly, Air Wing detachable luggage rack
Not sold separately
2
Foam pad, adhesive both sides (2)
Not sold separately
3
Screw, socket head, #8-32, stainless steel (2)
Not sold separately
4
Flat washer, stainless steel (2)
Not sold separately
5
Pin terminal, 20-16 AWG (3)
73190-96
6
Pin housing, three-way
73103-96BK
7
Wire harness extension, luggage rack light
Not sold separately
8
Guide wire (nylon monofilament), with loop end
Not sold separately
9
Clip, adhesive-backed (4)
10102
10
Cable strap (4)
10006
11
Dielectric grease packet
76001-04
Items mentioned in text, but not included in kit:
A
Air Wing Detachable Luggage Rack
B
Plastic plug, black (2)
C
Forward hole in left side rail
D
Rear hole in left side rail
E
Foam pad mounting area (2) on underside of rack rear crossbar
-J05186
4 of 4