1
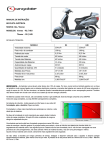
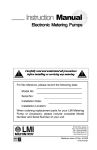
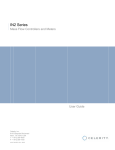
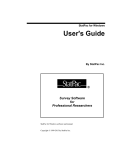
PB-Tech-2000
2002
$7.95
Remanufactured Manual & Power Steering Gear Boxes ٠ Valves
Cylinders ٠ Pumps ٠ Related Hydraulic Components
Technical Assistance
800-783-3748
www.babsteering.com
TABLE OF CONTENTS
Air Bleeding Procedures ……………………………………………1
Dual (Integral) Steering ……………………………………………..2
Saginaw Power Assist ………………………………………………3
Linkage System ……………………………………………………..4
Turning Geometry Diagram…………………………………………5
Steering Stop Diagram ……………………………………………..6
Turning Geometry and Poppet Adjustment ………………………7
Adjustment For Manual Poppet Valves …………………………...8
Adjustment For Automatic Poppet Valves ………………………..9
Re-Adjustment For Automatic Poppet Valves …………...……..10
Cut-A-Way Flow Chart…………………………..…………………11
System Flow Test ………………………………………………….12
Sheppard Pitman Arm Installation ……………………………….13
Troubleshooting Guide …………………………………………….15
Flushing Instructions ………………………………………………20
TAS Series Gear Cut-Away ……………………………………….21
TAS Poppet Valves….………………………………………….….22
Adjustment Procedures for M Series Sheppard ……………..…23
AIR BLEEDING PROCEDURES
1.
BE AWARE OF ALL MOVING PARTS THAT CAN CAUSE PERSONAL INJURY!
2.
During all steps of these procedures do not allow reservoir to run low on fluid.
3.
Inspect reservoir and ensure that it is mounted above the pump level. Check that hoses are routed
to prevent going above the reservoir.
4.
Inspect all components and hoses for tightness, and leaks. Repair if needed.
5.
Fill system with approved fluid. Do not mix types of fluid!
TRW - HF, HFB AND TAS SERIES
SHEPPARD - 272, 292, 392, 492, 592
1.
Adjust poppets as required.
2.
If steering gear is inverted and has a bleed screw, remove/loosen screw and allow fluid to flow until it is clear of air bubbles. Re-install screw and start engine. With engine at idle, crack screw
open. Tighten screw again and turn steering gear full travel both directions 3 or 4 times. Repeat
procedure as required.
3.
If steering does not have a bleed screw or if it is not located on the top of the gear, turning stop to
stop several times should remove air from system providing that the stops are properly adjusted.
4.
If your vehicle is equipped with a slave box, do not forget to bleed it as well. It is recommended to
start bleeding procedure here and then go back to the main gear. You may need to remove the
pitman arm from the slave gear while turning wheel full travel to allow poppets to activate on slave
gear.
POWER ASSIST CYLINDERS
1.
If you have a tie rod mounted assist cylinder you may need to slightly loosen the return side of
hose while pressure is applied to the other hose. Be sure to retighten before the cylinder hits the
end of its stroke. Extreme care should be given to avoid placing hands or arms between the
tie rod and axle or cylinder. Same care should also be given to avoid wheel travel. Severe
personal injury could occur if either of these circumstances were to occur! Since both hoses
act as both pressure and return hoses, it will be necessary to repeat this procedure for both directions several times.
2.
If your vehicle is equipped with a frame mounted assist cylinder the same procedure as in Step I
will apply but it may be necessary to disconnect one end of the cylinder to allow the ports to be positioned above the cylinder. If this is done again extra care should be given to prevent Injury
as the cylinder Is extended and retracted.
1
Secondary
Cylinder
or Helper
Gear
Pump
Main
Steering
Gear
NOTES:
2
Pressure and
Return Ports
for Pump
NOTES:
3
Valve
Pressure &
Return Ports
for Pump
Cylinder
NOTES:
4
A=B
C
TOE
B
A
D
TOE
5
1/8"
NOTES:
6
TURNING GEOMETRY AND POPPET PIN ADJUSTMENTS
A.1 Always begin by checking all related components for wear, breakage, looseness and damage.
A.2 CHECK LIST
1.
2.
3.
4.
5.
6.
7.
8.
9.
king pins
spring shackles and pins
springs for height and level
spring u bolts (looseness or damaged center bolt)
drag link
tie rod ends
steering stops
steering gear mounting (looseness)
steering column slip joints, u joints or coupler
CAUTION:
IF ANY DAMAGE IS FOUND DUE TO COLLISION ON SUSPENSION OR FRAME. REMOVAL, TEAR DOWN AND INSPECTION IS STRONGLY ADVISED.
B.1 For best possible results, all procedure of alignment (camber caster & axle square front, axle
square rear) must be checked, adjusted or repaired as required.
B.2
Lift front axle and check tires for round. If scribe line is required for toe set, you may do so now.
B.3
Square driver side tire to frame. (fig. A)
a. A must equal B
B.4
Check timing mark alignment on pitman arm to sector.
B.5
Check pitman arm alignment to frame. (fig. B)
a. If pitman arm is forward or back of spec remove drag link and adjust. If drag link is
not adjustable and A & B in fig. A and pitman arm alignment in fig. B do not match
re-inspect for bent or wrong parts.
NOTE:
Some after market springs may have mispunched spring pin holes. Check manufacturers spring specifications.
C.1
Check toe (refer to manufacturers and/or tire manufacturers spec. chart)
a. Adjust to original equipment specifications.
C.2
Check steering stops at axle to spindle.
NOTE:
Steering stops must stop axle before steering gear bottoms out. Failure to do so WILL
cause damage to spring and suspension components.
7
C.3 Always check manufacturers spec. on steering stop adjustments.
C.4 If steering stops are a suspected problem you may check by disconnecting drag link at pitman
arm. Lift the axle, turn wheels to right until stop bottoms. Turn gear to right, pitman arm must travel
past drag link 3/8 of an inch minimum. Repeat procedures to left.
CAUTION: NEVER USE THE ABOVE PROCEDURES WITH ROSS TAS SERIES POWER
STEERING BOX. DAMAGE TO AUTOMATIC POPPETS WILL OCCUR.
CAUTION: NEVER CHECK PITMAN TRAVEL ON POWER STEERING WITH ENGINE
RUNNING.
ADJUSTMENT PROCEDURES
FOR MANUAL POPPET VALVES
D 1 Begin poppet adjustment by installing test loop between pump pressure line and steering gear
as shown in system test flow chart.
NOTE: Arrow on flow meter indicates direction of flow from pump to box or control valve.
MIS-INSTALLATION WILL DAMAGE FLOW METER.
D.2 REFER TO CUT-AWAY FLOW CHART. Determine piston position for right turn.
a.
Check manufacturers spec. on clearance between axle stop and axle (most 1/8 to 3/8 of an
inch)
b.
Place spacer between stop and axle. BAB suggests using a socket determined by the size of
the head on the axle stop. For most highway applications use an impact socket, the web at
the drive end is approximately 3/8 of an inch. For most non-highway applications, waste management, concrete, construction and equipment that needs a tighter turning radius you should
use a standard socket. The web of a standard socket at the drive end is approximately 1/8 of
an inch. At this time system pressure should read maximum 1200 to 2600 P.S.I. (maximum
pressure is controlled by relief valve built Into steering pump.)
CAUTION: AVOID HOLDING MAXIMUM PRESSURE LONGER THAN 15 SEC.
OR DAMAGE WILL OCCUR.
D.3 Loosen jam nut and begin adjustment.
a. If pressure gauge reads over 1200 P.S.I. adjust in until gauge reads 750 to 400 P.S.I. Tighten
jam nut.
b.
If pressure gauge reads under 1200 P.8.1. adjust out until gauge reads over 800 P.S.1. At
that time adjust it to 750 to 400 P.S.I. Tighten jam nut. DONE DEAL.
8
ADJUSTMENT PROCEDURES AUTOMATIC POPPET VALVES
TAS40, 50, 65, and 85 INSTALLATION
1.
Ensure that steering gear is not rotated from the center position prior to installation!
2. Make sure that the axle stops are present and set for the proper turning radius as per manufacturers specifications (Using turntables in this operation is highly recommended.)
3. Install steering gear to frame.
4. Attach and torque input yoke. Connect hydraulic hoses.
5. Attach pitman arm and torque nut and bolt assembly.
6.
Make sure that the timing mark on the sector shaft is:
A.
90° from center line of worm shaft
B.
Properly aligned with the mark on the pitman arm.
7.
Make sure that the pitman arm positioning allows for the center point of the sector and the center
point of the drag link to be plumb with each other. (Refer to illustration B.)
8.
With the wheels square to the frame, check the drag link for proper adjustment and install.
9.
Fill reservoir, start engine and allow to idle only. Do not allow the reservoir to run low on fluid.
10.
With the vehicle unloaded and engine at idle, turn the steering wheel all the way in one direction
until the steering stops bottom out. Repeat procedure in the opposite direction. Maximum input
torque to be applied during this procedure is 25 ft. lbs.! (30 lbs. on a 20" steering wheel.) If
excess input shaft torque is encountered, stop the procedure, safely allow vehicle to roll forward
slightly or jack up both sides of the axle evenly to remove weight and repeat step 10.
11.
Poppets are now set and any remaining air should be bled.
ALTERNATE MANUAL ADJUSTMENT FOR TAS POPPETS
NOTE THAT BAB SETS SLEEVE ASSEMBLIES FOR AUTOMATIC POPPET ADJUSTMENT. IF AFTER INSTALLATION THE AXLE STOPS ARE ADJUSTED TO DECREASE TRAVEL, OR THE GEAR
IS INSTALLED ON ANOTHER VEHICLE THE FOLLOWING STEPS ARE RECOMMENDED BY THE
MANUFACTURER. (PLEASE NOTE THAT BAB HAS NOT HAD A GREAT DEAL OF SUCCESS IN
THIS PROCEDURE AND WE RECOMMEND SENDING GEAR IN TO HAVE IT RESET FOR AUTOMATIC ADJUSTMENT.)
1.
Ensure that the axle stops are set and that they will allow at least 1-3/4 steering wheel turns in
both directions from center.
9
2.
Obtain the correct manual adjusting screw and lock assembly.
3. Install nut onto screw until top surface of nut is flush with the top of screw. Note that the nylon
side of the nut is for sealing purposes and should go toward the case. This is not a standard nylock
nutl
4. With engine off and wheels straight ahead, remove fixed stop screw from lower end of gear
assembly.
5.
Install new screw assembly until nut is firmly against the housing. Nut and screw head should still
be flush. Torque nut to 33-37 ft. lbs.
6.
Recheck and adjust power steering fluid level as needed.
7.
In the next steps if the steering wheel input torque exceeds 475 inch lbs. (48 lbs.) on a 20" steering
wheel prior to hitting axle stops, stop procedure, safely allow vehicle to roll forward slightly or jack
up both sides of the axle evenly to remove weight and repeat step.
8.
With engine at idle, slightly turn steering wheel and observe the sector shaft to determine correct
steering wheel rotation to move piston rack toward adjustable screw installed in the closed end of
the housing.
9.
Continue turning the steering wheel in this direction until the axle stop makes contact.
10.
Loosen sealing nut and back out adjusting screw 1.00 - 1.06 inch while holding sealing nut close to
housing. Re-torque the nut to 33-37 ft. lbs.
11.
With engine at idle turn steering wheel in opposite direction from step 9 until axle stop makes contact.
12.
With engine at idle rotate wheel all the way in the same direction in step 9 until axle stop is contacted. At this point the system is only bypassing in the pump and pressure should not be
held for more than 5 seconds at a time.
13.
Loosen sealing nut 1 turn. While holding sealing nut from turning, turn adjusting screw in until an
increase of 10-20 in. lbs. on the adjusting screw is achieved. Back out screw four complete turns
and re-torque the sealing nut to 20 ft. lbs.
14.
Measure screw protrusion from top of sealing nut surface. If screw exceeds 1.06 inches loosen nut
and turn screw in until the 1.06 inch dimension is achieved.
15.
Torque sealing nut to 33-37 ft. lbs.
16.
Turn steering wheel full travel in both directions with engine at idle. Poppets are now set. NOTE
THAT IF THE AXLE STOP DIMENSIONS ARE CHANGED FOR ANY REASON, THESE PROCEDURES WILL HAVE TO BE DUPLICATED.
10
Cut-Away Flow Chart
for manually adjusted poppet valves
To Lower
Cylinder
From Upper
Cylinder
Steering Wheel Input
clockwise rotation
Right Hand Turn
Optional Construction
Automatic Bleed System
Neutral (no steering action)
From Lower
Cylinder
To Upper
Cylinder
Steering Wheel Input
counter-clockwise rotation
Left Hand Turn
Optional Construction
Automatic Bleed System
11
Supply Pressure
Return Pressure
System Test Flow Chart
Pressure
Return
Suction
12
PITMAN ARM INSTALLAWhen the pitman arm is installed, the timing arrows on the arm and the output shaft must be aligned. The following charts details the various pitman arm installation methods for Sheppard steering gears.
NOTE: DO NOT WELD ON THE ARM OR SHAFT
DO NOT USE A HAMMER AR YOUR INSTALLATION TOOL
TYPE 2
PITMAN ARM
INSTALLATION BOLT
INSTALLATION
WASHER
SERIES
TORQUE BOLT TO
292, 292SI
85
392, 392SI
85
492
160
592
170
TORQUE SET SCREW TO 12-15 FT.
SET SCREWS
TYPE 3
SERIES
BOLT
592S5
TORQUE BOLT TO
170
WASHER
TYPE 3 A
SERIES
RETAINER
13
TORQUE BOLT TO
292S4, 5, 6
225
392S4, 5, 6
225
492S5
450
592S5
450
PITMAN ARM INSTALLATION, CONT….
TYPE 3 B
SERIES
RETAINER
TORQUE BOLT TO
292S6
225
392S6
225
492S5
450
592S5
450
TYPE 4
SERIES
NUT
39
410
292, 392
450
491
450
59
500
TYPE 4 A
SERIES
CAPSCREW
NUT
TORQUE BOLT TO
TORQUE BOLT TO
292
285
392, 392S
285
492
675
592
775
TORQUE CAPSCREW TO 12-15 FT.
LBS.
NOTE: Use lock-tight or a suitable substitute on
all threads and on the output shaft splines.
14
NOTE: All torque values are measured in foot
pounds. (Ft. Lbs).
TROUBLESHOOTING GUIDE
NORMAL NOISES
You or your driver may hear a hissing noise on steering systems not equipped with
poppet valves when steering is turned to lock.
NOTE:
1. On these systems drivers should be advised to reduce turn slightly so that noise dissipates.
2. Holding steering to stop will damage system and will not assist in tighter turns
You and your driver may hear hissing noise at extreme turn on systems equipped with poppet
valves.
NOTE:
1. Advise driver to remain in cabin of truck due to difficulties of operation while standing next to
steering gear.
POSSIBLE STEERING PROBLEMS
ROAD WANDER
TIRES
a. Incorrect pressure
b. Separated or defect in tire
SUSPENSION
a. Loose or worn steering and/or suspension components, front or rear
BEARINGS
a. Improperly adjusted or worn
ALIGNMENT
a. Front or rear alignment out of specifications
FIFTH WHEEL
a. Dry fifth wheel
b. Poor finish on fifth wheel or trailer plate
c. Fifth wheel king pin worn damaged or not properly lubricated
STEERING GEAR
a. Steering gear mounting bolts loose on frame
b. Steering gear improperly adjusted
c. Steering gear mounting bracket too tight
d. Bent steering gear mounting bracket
STEERING COLUMN
a. Steering, coupler, u-joints or slip joint worn
b. Dry or damaged steering mast jacket
C. Mast jacket misaligned
15
d.
e.
TRAILER
a.
b.
c.
d.
Dry or damaged upper or lower mast jacket bearings
Misadjusted mast jacket tube and/or steering column shaft
Loose or worn parts on trailer suspension
Incorrect trailer axle alignment
Bearings worn and/or not properly adjusted
Tires:
a. Incorrect pressure
b. Separated or defect in tire
NO RECOVERY (Steering Wheel Does Not Return To Center)
TIRES
a.
b.
Worn or Separated
Separated belt (radial design)
FRONT END
a. Components binding
1. King pins
2. Tie rod ends
3. Drag link
b. Front end alignment out of specifications
1. Excessive toe
2. Insufficient caster
REAR END
a. Rear axles out of alignment
b. Worn bent suspension components
NOTE: Rear suspension problems will affect the last 180° of steering wheel recovery
STEERING COLUMN
a. Steering coupler, u-joints or slip joint insufficient lubrication
b. Dry or damaged steering mast jacket
c. Mast jacket misaligned
d. Dry or damaged upper or lower mast jacket bearings
e. Misadjusted mast jacket tube and/or steering column shaft
f.
Bent steering shaft
g. Steering column u-joints out of phase
STEERING GEAR
a. Restricted power steering filter and/or return hose
b.
c.
NOTE: Restriction of return or supply flow will always develop heat
Out of adjustment or failing steering gear box
bent or misaligned steering gear mounting bracket
FIFTH WHEEL
a. Dry fifth wheel or poor finish on fifth wheel of trailer or trailer plate
16
SHIMMY
1. Shimmy (consistent at specific mph every time)
NOTE: Felt predominately in steering wheel
a. Badly worn or unevenly worn tires
b. Improperly mounted tire or wheel
a. Front wheels or brake drum out of balance
2. Shimmy (inconsistent any mph)
NOTE: Felt predominately in steering wheel. May be affected by road conditions such
as railroad tracks or potholes
a. Out of adjustment front wheel bearings
b. Loose and/or worn steering parts
c. Air in the hydraulic steering system
d. Caster set too high on front suspension
e. Excessive toe
f. Improperly adjusted steering gear
g. Loose or worn steering u joints or coupler
3. Shimmy (less than 10 mph consistent)
a. Tire separation or badly worn tires
b. Improperly mounted tire or wheel
4. Shimmy (in entire truck above 35 mph affected by acceleration or deceleration) a. Drive shaft
1. Worn u joints and/or center support
2. Out of balance drive shaft
3. Loss of proper angle of drive shaft (worn springs, worn track arms)
4. Out of balance or improperly mounted wheels
5. Shimmy (while truck is sitting perfectly still and steering wheel has been activated)
a. Damaged control valve in steering. DO NOT attempt to adjust
REPLACEMENT of steering gear only
b. With Garrison steering control valve problem occurred after lubrication
(refer to Garrison service manual for disassembly of ball stud area)
NOTE: Excessive grease to Garrison control valve stud may cause lack of power in one
direction
6. Shimmy (after repair has been done on power steering system)
a. Hoses or lines crossed
b. Air in hydraulic steering system
c. All of the above
IMPORTANT: SHIMMIES IN VEHICLE MAY NOT NECESSARILY DEVELOP UNTIL TWO OR
MORE OF THE ABOVE MENTIONED PROBLEMS HAVE OCCURRED.
IMPORTANT: SHIMMIES MAY DEVELOP AFTER REPLACEMENT OR ADJUSTMENT OF ANY
OF THE ABOVE COMPONENTS. ESPECIALLY IF A COMPLETE DIAGNOSTIC HAS NOT BEEN
THOROUGHLY DONE.
17
OVERSTEERING OR DARTING
a. Dry fifth wheel or poor finish on fifth wheel or trailer plate
b. Front end components binding or loose
1. King pins
2. Drag link
3. Tie rod ends
4. Spring shackle or pins
5. Out of spec, toe
6. Out of spec, caster
c. Rear suspension loose or out of track
d. Steering column binding
1. Steering gear improperly adjusted
2. Steering gear control valve spool or sleeve binding
3. Steering gear mounting bent or distorted
4. Steering u joints worn or frozen
5. Steering column mast jagged, bearings, or misaligned
e. Steering column binding every 90 or 180
1. Worn or frozen u joint cap
2. Dry slip yoke shaft
3. Dry slip yoke and/or u joints out of phase
4. Bent steering shaft
HARD STEERING IN ONE DIRECTION
a. Control valve malfunction
NOTE: Steering column slip yoke dry worn or bottom out
b. Loose fan belt, stalling belt on pulley (Will only occur when flow is on input shaft
side)
c. Low pressure (one in a million)
d. Internal leakage in steering gear or steering cylinder (Verify with internal leakage
test)
e. Excessive caster split (hard pull when driving)
f. Overload on front axle
HARD STEERING EFFORT IN BOTH DIRECTIONS
a.
b.
c.
d.
Low tire pressure
Overload on front axle
Hydraulic fluid level low
Low flow or no flow (Install test loop, check flow and pressure of pump and internal
leakage steering gear test)
e. Frozen king pin, drag link, tie rod end, u joint on steering column
f. Restriction in return line, suction line, pressure line, filter clogged, or a too small diameter of hose or fitting.
18
LOST MOTION (LASH) AT THE STEERING WHEEL
a. Steering wheel loose at the column shaft
b. Loose or worn u joints, coupler, slip yoke or mast jacket bearings
c. Steering gear loose on frame
d. Pitman arm loose on output shaft
e. Components in steering linkage loose or worn
f. Steering gear improperly adjusted
EXCESSIVE HEAT (140° OVER AMBIENT)
a. Air implosion (air leakage)
b. Wrong pump, excessive pump flow
c. Vehicle overloaded
d. Undersized or incorrect replacement hoses, line or fittings
e. Clogged filter
f. Restricted hose or line that is kinked, or severely bent, or internally blocked
g. Restricted recentering of gear valve caused by column bind or side load on the input shaft
h. Poppets not adjusted properly (Only for gears equipped with poppets)
i. Improper fluids
19
FLUSHING INSTRUCTIONS
WHEN ONLY THE PUMP IS BEING REPLACED
1. Begin by lifting front axle off the ground and support with axle stands, block rear tires.
2. Install pump as required, except for reconnecting the return line from the gear to where it attaches to the
reservoir, use a plug on the reservoir to contain fluid during flushing. Place return hose into a 5 gallon container.
3. Select proper oil as recommended for the steering gear or linkage system.
NOTE: A GOOD RULE OF THUMB IS TO USE TWICE THE AMOUNT OF FLUID AS THE CAPACITY OF
THE ENTIRE SYSTEM.
4. When ever possible disconnect the ignition so that the engine won’t start. An assistant is required to crank
over the engine and to rotate the steeling wheel at the same time. CAUTION: AVOID HITTING OR HOLDING
AGAINST STEERING STOP OR DAMAGE WILL OCCUR!! At the same time fill reservoir with fluid and make
a reasonable attempt at not letting the pump run dry, this can be difficult at best. This will allow the valve to
open and the piston to force clean fluid through the pressure hose, valve, piston area and out the return hose
into the 5 gal. container. Flush until fluid comes out clean.
5. Take return line from container and re-attach to reservoir, top off reservoir, re-connect the ignition system,
start engine and move steering wheel to one side. Stop engine and re-check fluid.
CAUTION:
DO NOT OVER FILL.
6. Start engine and turn steering wheel stop to stop approximately six times. Let run until system is at running
temp and repeat turning steering stop to stop six times.
CAUTION:
DO NOT HOLD AGAINST AXLE STOPS!
MANY STEERING SYSTEMS HAVE ADDITIONAL BLEEDERS OR PROCEDURES.
NOTE:
REFER TO THE O.E.M. MANUAL.
7. Remove axle stands and lower to ground, top off reservoir. Re-test system and test drive.
WHEN REPLACING GEAR ONLY
1. Begin by lifting front axle off the ground, support with axle stands, block rear tires.
2. Install gear except pressure and return hoses. Place pressure hose into a 5 gal. container.
3. Select proper oil as recommended for steering gear or linkage system.
NOTE: A GOOD RULE OF THUMB IS TO USE TWICE THE AMOUNT OF FLUID AS THE CAPACITY OF
THE ENTIRE SYSTEM.
4. When ever possible disconnect ignition so engine won’t start. An assistant is required to crank over the engine. At the same time fill reservoir with fluid. Make a reasonable attempt at not letting the pump run dry. This
can be difficult at best.
5. Remove return the hose from the reservoir, clean with solvent and air blow dry. Re-install.
NOTE: MANY AIR LEAK PROBLEMS MAY OCCUR DUE TO HARDENED OR IMPROPER HOSE APPLICATION.
6 After re-connecting hoses, fill reservoir and crank engine over 5 seconds. At this time turn steering wheel stop
to stop without cranking engine. This may or may not help pull fluid into gear or cylinder. Top off reservoir.
7. Re-connect the ignition system, start engine and turn steering wheel stop to stop approximately six times. Let
run until system is at running temp and repeat turning steering stop to stop six times.
CAUTION:
DO NOT HOLD AGAINST AXLE STOPS!!
NOTE:
MANY STEERING SYSTEMS HAVE ADDITIONAL BLEEDERS OR PROCEDURES.
REFER TO O.E.M. MANUAL
8. Remove axle stands and lower to ground. Top off reservoir. Re-test system and test drive.
20
Ross TAS Series Gear
Cylinder
Lower Poppet
Lower Poppet Seat
Fixed Stop
Bolt
Lower Poppet
Upper Poppet,
Sleeve &
Valve Housing
21
Poppet Valve Setup For
Ross TAS Series Gear
SPRING
POPPET
POPPET
SPACER ROD
POPPET SEAT
SEAT & SLEEVE ASSY
PUSH TUBE
POPPET SLEEVE
Basic Operation of the TAS Poppet Valves
Rotating the input shaft causes the piston to move.
The lower poppet (see Figure on page 21) located in the piston rack contacts the
fixed stop bolt or adjusting screw.
The upper poppet (see Figure on page 21) located in the piston rack contacts the
valve housing.
When the poppet contacts either the stop bolt or the valve housing it pushes the
poppet away from its seat which allows the fluid to pass through the piston rack reducing the pressure.
The poppets should contact either the stop bolt or the valve housing just before the
axle stops contact the axle.
22
Sheppard Auto Plunger Adjustment Procedures
Auto relief plunger setting should always be checked during the pre-delivery inspection. Any time the tire size is
changed, the axle stops tampered with, changed, bent/broken or the steering gear changed an auto relief
plunger adjustment is necessary. It is always the installer’s responsibility to insure this adjustment is
made!
How To Adjust
“Auto Relief Plungers”
Required tools: 1/4” punch, ball peen hammer and the vehicle manufacturer’s service
manual :
1. Park the vehicle on a clean, dry surface (preferably concrete). Place the transmission in neutral
and set the parking brake. The front tires need to be in the straight ahead position.
2. Verify the steering gear you are working on is equipped with auto relief plungers.
3. Remove the plastic caps from both plunger holes. Insert the punch into the hole. Using the hammer, tap the punch until the plunger “bottoms” in the plunger bore. Repeat this procedure for both
plungers. Replace the plastic caps after setting the plungers to the maximum depth. NOTE: Take
care when using the punch to insure the plunger bore is not damaged when adjusting the auto
plunger.
4. Raise the steer tires until the tires clear the surface. Start the engine and allow it to run at idle
speed.
5. Turn the wheel to a full turn in one direction. (Turn until the axle stop contacts the axle.) Pull hard
on the wheel to set the auto plungers. Turn the wheel to a full turn in the opposite direction. Return
wheel to straight ahead.
6. Lower the vehicle and remove the jack.
7. Verify the proper setting of the auto relief plungers. With the steer tires on the ground and the full
weight of the vehicle on the tires, turn the wheels a full turn in one direction. When properly adjusted, there will be a small gap between the axle stop and the axle. Repeat for the opposite turn.
23
SHEPPARD
M SERIES GEAR
with
“Auto Plungers”
Yellow
Plastic
Cap
Yellow Plastic
Cap
It is the purpose of “Tech Tips” to provide the basic fundamentals of the
power steering system, to include testing procedures and act as a troubleshooting guide.
“Tech Tips” should always be used in conjunction with original equipment
manuals. Always refer to O.E. manual prior to performing any maintenance
or repair of the steering and suspension systems.
BAB Steering Hydraulics assumes no liability from any standpoint on misdiagnosis an/or improper installation.
The material contained in “Tech Tips” has been assembled with the utmost
care and is designed to be used only as a reference guide.