1
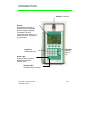
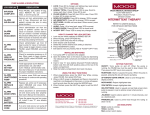
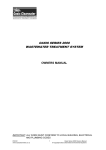
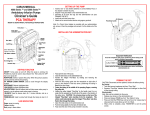
Vista® basic
Instructions for Use
Software IFVB
Rx Only
950983 Rev B 03/04
The CE mark confirms compliance
with the “Council Directive on
Medical Products 93/42/EEC”
dated the 14th of June, 1993.
B. Braun Melsungen AG
INSPECTION ON DELIVERY
Despite careful packaging, the risk
of transport damage cannot be
entirely excluded. Upon delivery,
please check that nothing is
missing. Do not use a damaged
device! If the device is damaged,
contact the Service Department.
See “Maintenance, Storage, &
Service.”
®
Vista basic Instructions for Use
950983 Rev B 03/04
RESPONSIBILITY OF
MANUFACTURER
Manufacturer, assembly, and
installation personnel or instructors
can only be held responsible for any
effects on device safety, reliability,
and performance if
♦ Installation, expansion work,
readjustments, modifications, or
repairs are carried out by
personnel authorized by the
above,
♦ The electrical wiring for AC power
satisfies the requirements of VDE
0100, 0107, and/or the IEC
publications, or regional and/or
national variations,
♦ The device is operated in line with
the Instructions for Use, and
♦ Regular technical inspections
(Preventative Maintenance) are
carried out every 2 years as
outlined in the Service Manual.
Packaging: The pump packaging is
reusable.
Package Contents: Vista basic
Infusion Pump, drop sensor, power
cable, pole clamp, Instructions for
Use.
1/26
Vista® basic
Contents
CONTENTS
Warnings & Cautions.................................................................. 3
Introduction ................................................................................ 5
Preparing the Infusion ................................................................ 7
Continuous Mode ....................................................................... 8
Options: Clear All .................................................................... 11
Piggyback ................................................................. 11
Ramp/Taper Mode .................................................... 12
Program Mode .......................................................... 14
Delay A Mode ........................................................... 16
Dosage Calculation................................................... 17
Bolus Mode, Interval Bolus (Intermittent Mode) ........ 18
Total Infused, Standby .............................................. 19
Occlusion Pressure, Drop Sensor, Battery ............... 20
Data Lock, Contrast Selection .................................. 21
Adjust Clock, Loudness ............................................ 22
Alarms ........................................................................................ 23
AC, 12V, Battery, & CC Interface ............................................... 24
Maintenance, Storage, & Service............................................... 25
Specifications ............................................................................. 26
The Vista basic is a volumetric infusion
pump intended to provide accurate and
continuous flow of parenteral and
enteral fluids.
Qualified medical staff should decide
how the device should be used based
on its features and specifications.
Rx only.
®
Vista basic Instructions for Use
950983 Rev B 03/04
2/26
WARNINGS & CAUTIONS
The following should be observed to avoid patient/user injury. This Instructions
for Use manual contains detailed instructions and warnings on the use of the
Vista® basic Infusion Pump. Please read it completely prior to using this device.
This manual is intended to reinforce the teaching given to the user by a trained
health care professional or an authorized B. Braun representative.
WARNINGS
♦
♦
♦
♦
♦
♦
♦
♦
B. Braun will assume no
responsibility for incidents which
may occur if the product is not used
in accordance with product labeling.
Make sure the pump is stable, either
fastened securely to the IV pole or
resting on a flat surface.
Prior to use, always check the
audible and visual alarms (and staff
call, where applicable).
Connection of pump tubing to the
patient should only be made after
the tubing is loaded and the unit is
turned on. Disconnect tubing from
patient when changing solution
containers to avoid the danger of
incorrect dosage.
Ensure there are no kinks in the
tubing.
Always read and follow the
instructions that accompany the
source container and IV
administration sets you are using.
Carefully follow the instructions for
loading, removing, and reloading the
set, as well as the recommended set
change intervals.
Change pumping section on tubing
every 24 hours. Do not use tubing
for more than 72 hours or per
current facility protocol.
Always check pump data prior to
starting infusion.
®
Vista basic Instructions for Use
950983 Rev B 03/04
♦
♦
♦
Do not operate this device in
environments where there is an
explosion hazard! A possible
explosion hazard exists if the pump
is used in the presence of
flammable anesthetics.
The EMC-limits (Electro-magnetic
compatibility) according to IEC/EN
60601-1-2 and IEC/EN 60601-2-24
are maintained. If the equipment is
operated near other equipment
which may cause high levels of
interference (e.g. HF surgical
equipment, nuclear spin tomography
units, mobile telephones, etc.)
maintain the recommended
protective distances for these
devices. Under certain conditions,
malfunctions may occur which lead
to a device alarm with permanent
alarm tone. Interference may occur
e.g. at electro-magnetic fields > 10
[V/m] resp. electro-magnetic
discharges > [8 kV].
Monitoring of the patient and
infusion status is necessary to
ensure the infusion is being
delivered as anticipated. The Vista
basic has been designed to stop
fluid flow to the patient under certain
alarm conditions. Also, prior to
starting an infusion, verify that no
drops are falling in the drip chamber
and the programmed information is
correct.
3/26
WARNINGS & CAUTIONS
♦
♦
♦
♦
After starting an infusion, make sure
drops are falling in the drip chamber.
If no drops are falling, make sure the
roller clamp is open. If the roller
clamp is open and still no drops are
falling, replace and dispose of the
set.
The air detector cannot recognize
the introduction of air at 3-way
stopcocks, infusion ports, and other
lines/tubes below the pump.
See section entitled “Drop Sensor”
for additional information on using
the device without a drop sensor.
To avoid mechanical or electronic
damage, do not steam autoclave or
immerse the pump in any fluids or
cleaning solutions. Always
disconnect electrical power cord
from outlet before cleaning to
prevent electrical shock.
CAUTIONS
♦
♦
♦
♦
Rx only.
Do not attempt to infuse two fluids
simultaneously using the Vista®
basic.
Variations in pressure, e.g. caused
by change in level of fluid container,
may affect the accuracy of the
device.
If several pieces of infusion
equipment are connected together,
it is possible there may be mutual
influence. Possible incompatibilities
can be found in the instructions for
use for the drug or for the other
appliances.
®
Vista basic Instructions for Use
950983 Rev B 03/04
♦
♦
♦
♦
♦
Use only equipment, accessories,
parts, and disposables that are
intended for use with the Vista
basic.
Do not clean, disinfect, or sterilize
any part of the device by autoclaving
or with ethylene oxide gas. Doing
so may damage the device and void
the warranty. Only external parts of
the pump should be disinfected.
See “Maintenance, Storage, &
Service” for suggested cleaning
solutions.
Technical specifications are not
guaranteed with any other tubing
than that approved for use with the
Vista basic.
Any analog and digital components
connected must demonstrate that
they meet EN specifications (i.e. EN
60950 for data processing
equipment and EN 60601 for
electrical medical equipment).
Only an authorized system
configuration technician responsible
for meeting the specifications of
standard EN 60601-1-1 may
connect additional devices to the
signal inputs or outputs.
SAFETY STANDARD
The Vista basic meets all safety
standards for medical electrical devices,
corresponding to IEC 60601-1 and IEC
60601-2-4.
NOTE: IEC 60601-1 corresponds to
European Standard EN 60601.
4/26
INTRODUCTION
Handle for carrying
Display
All essential information is
displayed in plain language.
Green background lighting
illuminates only when
connected to AC power, or, in
battery operation, only when a
key is pressed.
Keyboard
Allows data entry
Clear Key
Resets a
value to
zero
Alarm Light
Lights up during an alarm.
Display will also show
flashing AAA.A.
Infusing Light
Indicates pump is infusing
®
Vista basic Instructions for Use
950983 Rev B 03/04
5/26
INTRODUCTION
Door Open Button
Aluminum Case
Easy upkeep, drip proof, and
resistant to disinfectants
Function Keys
Allow choices of YES, NO, OK,
INFO, OPTS, etc.
ON/OFF (Power) Key
Alarm Silence Key
Silences alarm tone for 2
minutes
START/STOP Key
®
Vista basic Instructions for Use
950983 Rev B 03/04
6/26
PREPARING THE INFUSION
Prepare the Pump
1. Check for cleanliness, completeness, and damage. If unit appears
damaged, do not use it.
2. Attach the pump to an IV pole by turning the knob on the pole clamp
clockwise, or place the pump on a flat, stable surface.
3. Plug the pump’s power cord into an electrical outlet.
Turn on the Pump
1. Press
(ON/OFF).
2. Listen for 3 loud beeps.
3. Check screen for completeness of all pixels on the display. The Alarm ()
and Infusing (6) lights will blink once.
Load the Set
1. Prepare the solution container and prime the administration set according to
the instructions provided on the set package. Close the roller clamp.
2. Check that the drip chamber is about 1/3 full
and there is no air in the set.
3. Open the pump door by pressing the Door
Open Button on the top right corner of the
pump.
4. Push and hold open the clamp at the top of
the fluid path.
5. Insert tubing in clamp and release clamp.
6. Thread the tubing down the fluid path, making
sure the tubing is pressed into the Air-in-Line
detector at the bottom of the fluid path. The
roller clamp should be below the pump.
7. Close the door and open the roller clamp.
Check that no drops are falling in the drip
chamber.
8. Place drop sensor on drip chamber (optional).
9. Connect set to patient site.
Turning off the Pump
1. Press
to stop the infusion.
2. Close the roller clamp.
3. Press and hold
for 2 seconds.
®
Vista basic Instructions for Use
950983 Rev B 03/04
7/26
Continuous Mode
When the pump is turned on, it may display: Tubing Type
Confirm you are using a Vista® Pump Set, then press YES.
VISTA Pump Set
The pump may then display: Therapy stopped at mm/dd/yy 00h00m
Resume?
YES
NO
Resumes the last therapy with all data
Moves to the next screen
retained
The pump may then display: Is This a New Therapy?
YES
NO
Begins in Continuous Mode with all
Returns to the beginning of the last
data cleared.
program with all data retained.
The pump may then display: Prime Set?
YES
YES
Press YES to begin priming set.
Press YES to begin priming set.
• Press STOP to end priming.
• Press STOP to end priming.
• Press EXIT to begin Continuous
• Press EXIT to return to the
Mode.
beginning of the last program with
all data retained.
NO
NO
Returns
to
the
beginning
of the last
Begins in Continuous Mode with all
program
with
all
data
retained.
data cleared.
Press the green key below your
answer.
CONTINUOUS MODE
This section explains how to program a Continuous Mode infusion. For
directions on how to program other Modes and Options, refer to those sections
later in this manual.
There are three ways to enter infusion data in Continuous Mode:
®
Vista basic Instructions for Use
950983 Rev B 03/04
8/26
Continuous Mode
RATE and VTBD (Volume To Be Delivered)
1. Enter rate in ml/hr.
2. Press VTBD (Volume To Be Delivered).
3. Enter bag volume in ml.
4. Press OK. (To leave screen without saving changes, press EXIT.)
5. Press
to begin the infusion. Check for drops in the drip
chamber.
VTBD and TIME
1. Press VTBD.
2. Enter bag volume in ml.
3. Press OK. (To leave screen without saving changes, press EXIT.)
4. Press TIME.
5. Enter infusion time in hours and minutes.
NOTE:
For a 2 hour infusion, enter 2, 0, 0. The pump will show: Time: 02h00m
6. Press OK. (To leave screen without saving changes, press EXIT.) The
pump calculates the rate and asks: Accept Rate?
7. Press OK.
8. Press
to begin the infusion. Check for drops in the drip
chamber.
RATE and TIME
1. Enter rate in ml/hr.
2. Press TIME.
3. Enter infusion time in hours and minutes.
4. Press OK. (To leave screen without saving changes, press EXIT.)
5. Press
to begin the infusion. Check for drops in the drip
chamber.
To Change the Rate
1. Press
to stop the infusion.
2. Press
. The display will reset to 000.0 ml/h.
3. Enter a new rate.
4. Press
to begin the infusion. Check for drops in the drip chamber.
®
Vista basic Instructions for Use
950983 Rev B 03/04
9/26
Continuous Mode
To Change the Rate While Infusing
1. Enter a new rate.
2. Press OK.
NOTE: If the OK key is not pressed within 10 seconds of the change, the infusion will
continue at the old rate.
KEEP VEIN OPEN RATE
After an infusion is complete, the pump will alarm and begin pumping at 1.0 ml/hr
or the current infusion rate, whichever is less.
1. Stop the infusion.
2. Turn off the pump or reset the program.
INFORMATION KEY
This key is only available while the pump is infusing.
1. Press INFO.
2. The Total Infused value and the Total Time of the infusion completed are
displayed.
3. Press INFO again and the Battery Left and Total Operation time of the pump
is displayed.
4. The pump will return to the main infusion screen after 10 seconds.
®
Vista basic Instructions for Use
950983 Rev B 03/04
10/26
OPTIONS
Clear All/Piggyback
The Vista® basic contains many options to allow custom programming. To
access the various options, press OPTS while the pump is stopped. Pressing
OPTS each time will move you to the next option. Eventually, the OPTS key will
bring you back to the mode from which you began.
Depending on the model, some modes/options may have been disabled and will
not appear on the display when the OPTS key is pressed.
CLEAR ALL
The Clear All feature allows the user to clear all programming data within pump.
1. Press OPTS until the display shows CLEAR ALL.
2. Press CLR.
Note: The pump will display “This will clear all data in all modes”
3. Press YES
4. Press END to return to Continuous Mode
PIGGYBACK
The Piggyback feature allows programming of a secondary (Piggyback) infusion.
The pump automatically switches from the Piggyback to the Continuous Mode
infusion when the Piggyback program is complete. The option is only available if
there is data in the Continuous Mode.
1. Connect the Piggyback set to the injection site on the
tubing above the pump on the primary set. Open the
roller clamp on the Piggyback set.
2. Hang the Piggyback solution container at least 8 inches
above the primary solution container.
3. Program the continuous infusion in the Continuous Mode
(see “Continuous Mode”).
4. Press OPTS until the display shows PIGGYBACK MODE.
5. Press ON to turn the Piggyback feature on.
6. Press END. PIGY will now be displayed in the lower left corner.
7. Press PIGY.
8. Enter the Piggyback infusion data as you would Continuous Mode data.
9. Press
to start the Piggyback infusion.
10. Check that drops are falling in the Piggyback drip chamber
®
Vista basic Instructions for Use
950983 Rev B 03/04
11/26
OPTIONS
Piggyback, Ramp/Taper Mode
CAUTION: Do not attempt to infuse both Continuous and Piggyback fluids at the same time. Use
primary sets with check valves.
NOTE: To prevent incorrect delivery, the programmed Piggyback volume to be delivered must equal
the amount of fluid in the Piggyback container. Automatic Piggyback is not intended for the infusion
of fluids requiring flushing before and after administration.
NOTE: If the Piggyback container is not empty, the remaining Piggyback fluid will be delivered at the
Continuous Mode rate once the pump transitions back to the Continuous Mode.
To Exit Piggyback
1.
2.
3.
4.
5.
Press
to stop the infusion.
Press END.
Press OPTS.
Press OFF to turn Piggyback off
Press END to return to Continuous Mode.
RAMP/TAPER MODE
The Ramp/Taper Mode is designed to deliver infusions, such as Total Parenteral
Nutrition (TPN), which require gradual ramp up and taper down rates. The pump
automatically calculates the rate changes required to match the volume, total
time, and ramp/taper time parameters.
1.
2.
3.
4.
5.
Press OPTS until display shows RAMP TAPER MODE.
Press ON.
Enter the total bag VOLUME to be delivered.
Press OK.
Enter the RAMP UP time, in hours and minutes.
NOTE: The pump defaults to 01h00m. To change, press
, and enter the time.
6. Press OK.
7. Enter the TAPER DOWN time, in hours and minutes.
NOTE: The pump defaults to 01h00m. To change, press
, and enter the time.
8. Press OK.
9. Enter the TOTAL Time for the infusion.
10. Press OK
Note: The pump calculates the maximum rate and asks: Accept Rate?
11. Press OK.
12. Press
to start the infusion. Check for drops in the drip chamber.
®
Vista basic Instructions for Use
950983 Rev B 03/04
12/26
OPTIONS
Ramp/Taper Mode
To Review or Change Ramp/Taper Mode Data
1. Press OPTS until display shows RAMP TAPER MODE.
2. Press ON.
3. Review the data on each screen and press OK if data is correct or press
to clear the current data and re-enter new data. Press OK to accept
new data.
To Clear Ramp/Taper Mode
1. Press OPTS until display shows RAMP TAPER MODE.
2. Press CLR.
3. Press YES to clear all the data in Ramp/Taper Mode.
4. Press ON and continue to program a new Ramp/Taper program.
To Exit Ramp/Taper Mode
1. When infusion is complete, press
to stop the KVO.
2. Press EXIT.
3. Press END to return to Continuous Mode.
Fast Taper
The infusion can be interrupted to begin an early taper down process during the
Ramp/Taper Mode Infusion.
1.
2.
3.
4.
5.
Stop the infusion.
Press FAST.
Enter the FAST Taper Time in hours and minutes.
Press OK.
Press
to start the infusion. Check for drops in the drip chamber.
®
Vista basic Instructions for Use
950983 Rev B 03/04
13/26
OPTIONS
Program Mode
PROGRAM MODE
Program Mode is for infusions requiring up to 9 separate rates and volumes to be
delivered one after another. This is designed to deliver infusions for stepped
oncology drugs, circadian medication delivery, and other custom programs.
1.
2.
3.
4.
5.
6.
7.
8.
9.
Press OPTS until display shows PROGRAM MODE.
Press ON.
Enter the rate of the first Step.
Press OK.
Enter the volume of the first Step.
Press OK.
Continue to enter the rates and volumes for Steps 2-9.
If less than 9 Steps are needed, press OK with a rate of zero.
Press OK to accept the total Program Volume.
NOTE: Pressing CHNG on this screen returns to Step 1 for review and changes.
10. Press OK to accept the total Program Time
NOTE: PRESSING CHNG ON THIS SCREEN RETURNS TO STEP 1 FOR REVIEW AND CHANGES.
11. Press
to start the infusion. Check for drops in the drip chamber.
To Review or Change Program Mode data
1. Press OPTS until display shows PROGRAM MODE.
Note: If Program Mode is infusing, stop the infusion and press EXIT.
2. Press ON.
3. Review the data on each screen and press OK if data is correct or press
to clear the current data and re-enter new data. Press OK to accept
new data.
4. OR, press CHNG on Accept Program or Accept Program Time screens (see
#9 & #10 Notes above)
To Clear Program Mode
1. Press OPTS until display shows PROGRAM MODE.
Note: If Program Mode is infusing, stop the infusion and press EXIT.
2. Press CLR.
3. Press YES to clear all the data in Program Mode.
4. Press ON and continue to program a new Program.
®
Vista basic Instructions for Use
950983 Rev B 03/04
14/26
OPTIONS
Program Mode
To Exit Program Mode
1. When infusion is complete, press
to stop the KVO.
2. Press EXIT.
3. Press END to return to Continuous Mode.
®
Vista basic Instructions for Use
950983 Rev B 03/04
15/26
OPTIONS
Delay A Mode
DELAY A MODE
The start of Continuous, Piggyback, Ramp/Taper, and Program Modes may all
be delayed. The Vista® basic also provides an option to extend the Infusion
Complete alarm at the end of the infusion.
1.
2.
3.
4.
5.
6.
7.
8.
9.
10.
Program the infusion.
Press OPTS until display shows DELAY A MODE.
Press ON.
Enter in how many hours and minutes the infusion should begin.
NOTE: This is NOT a clock time like 12:30 pm.
Press OK.
Enter how long, in hours and minutes, after the end of the infusion the pump
should wait before alarming.
Press OK.
Press YES if the pump should run at KVO during the delay times. Press NO
if the pump should not infuse during the delay times.
Review the data and press OK. To change the data, press EXIT and begin
with #3 above.
Press
to begin the delayed infusion.
To Exit Delay A Mode
1. Stop the infusion.
2. Press OPTS until display shows DELAY A MODE.
3. Press OFF.
4. Press END to return to the previously active mode.
®
Vista basic Instructions for Use
950983 Rev B 03/04
16/26
OPTIONS
Dosage Calculation
DOSAGE CALCULATION
This feature allows a rate to be calculated given the concentration and dose.
1. Press OPTS until display shows DOSAGE CALC.
2. Press ON.
3. If concentration unit desired is other than the one displayed, press button
under the mcg? until units desired appear in the CONCENTRAT. (0*/ml) line.
4. Enter the concentration of the solution. If the concentration of the solution is
not known, go to #6 below. Press C to clear current data and re-enter new
data.
5. Press OK.
6. To calculate the concentration of the solution, use ← to move the * to the mg
field. Enter the amount of drug in the solution. Then press → to move the *
to the ml field. Enter the amount of solution.
7. Press OK.
8. Enter the body weight if part of the dosing parameters, then press OK. If
body weight is not part of the dosing parameters, press OK with 0 in the body
weight field.
9. If time unit desired is other than the one displayed, press button under the
/h? until time unit desired appears in the first line. Enter the dose or use Æ to
move the * to the rate field and enter the rate.
10. Press OK.
11. Press
to begin the infusion.
To Review Data During Infusion
1. Press INFO twice.
To Exit Dosage Calculation
1. Stop the infusion.
2. Press OPTS until display shows DOSAGE CALC.
3. Press OFF.
4. Press END.
®
Vista basic Instructions for Use
950983 Rev B 03/04
17/26
OPTIONS
Bolus Mode, Interval Bolus (Intermittent Mode)
BOLUS MODE
This feature allows a bolus to be given during a Continuous Mode infusion.
1.
2.
3.
4.
5.
6.
7.
8.
Press OPTS until display shows BOLUS MODE.
Press ON.
Press RATE.
Enter the rate at which the bolus should infuse, then press OK.
Press END.
To give a bolus during the infusion, press BOL.
Enter the amount of bolus to be given in ml.
Press OK.
Bolus Without Entering a Volume
1. During the infusion, press BOL and hold down until a second BOL is
displayed to the right.
2. Continue to hold down the first BOL while also pressing the second BOL.
A bolus will be given as long as both BOL keys are held down. The pump
will display the amount of bolus being administered and will beep once after
each milliliter delivered.
INTERVAL BOLUS (INTERMITTENT MODE)
The basal/KVO rate and entire bag volume must be entered in CONTINUOUS
MODE first.
1. Press OPTS until display shows BOLUS MODE.
2. Press ON.
3. Press TIME.
4. Enter the time between the start of each dose, then press OK.
5. Press RATE.
6. Enter the rate at which the dose is to be given, then press OK.
7. Press VTBD.
8. Enter the volume of each dose, then press OK.
9. Press END.
10. Press
. The pump will deliver at the basal/KVO rate for the interval time,
then begin delivery of the first dose.
®
Vista basic Instructions for Use
950983 Rev B 03/04
18/26
OPTIONS
Total Infused, Standby Function
TOTAL INFUSED
The Total Infused information screen displays the total amount of fluid in ml that
has been pumped since the last time the Total Infused was cleared.
To Clear the Total Infused
1. Press OPTS until display shows Tot Infused=.
2. Press
3. Press END.
STANDBY
This function allows the pump to be put on standby while retaining all set infusion
data. This function is only available in Continuous Mode.
1.
2.
3.
4.
Press OPTS until display shows STANDBY
Press ON.
Enter time in hours and minutes the pump is to stand by.
Press C to clear the current data and re-enter new data. Press OK to
accept new data.
4. Press OK.
The pump will count down to zero and then alarm Pump Stopped!
To Exit Standby Function
1. Press EXIT to return to Continuous Mode.
Note: If countdown has already started, press END to return to Continuous
Mode.
®
Vista basic Instructions for Use
950983 Rev B 03/04
19/26
OPTIONS
Occlusion Pressure, Drop Sensor, Battery
OCCLUSION PRESSURE
The pressure at which a downstream occlusion alarm will be triggered may be
varied. The higher the pressure limit, the less sensitive the pump is to changes
in fluid resistance.
1. Press OPTS until display shows OCCLUSION PRESSURE.
2. Press (--) to change pressure to Low. Press (+) to change pressure to High.
3. Press END to return to Continuous Mode.
NOTE: Low corresponds to approximately 8 PSI and high to approximately 17 PSI.
High pressure limits may increase the severity of an infiltration without alarming.
DROP SENSOR
Using a drop sensor eliminates the need for pre-setting a VTBD in Continuous
Mode and senses upstream occlusions and empty solution containers.
NOTE: Turning the Drop Sensor feature off forces volumes to be entered and prevents
sensing of upstream occlusions.
To Turn On the Drop Sensor
1. Press OPTS until display shows DROP SENSOR.
2. Press ON.
3. Press END to return to Continuous Mode.
To Turn Off the Drop Sensor
1. Press OPTS until display shows DROP SENSOR.
2. Press OFF.
3. Press END to return to Continuous Mode.
BATTERY CAPACITY
This is an indicator of the remaining battery time in hours and minutes. This
screen also indicates the amount of time the pump has been in operation.
1. Press OPTS until display shows Battery Left =.
2. Press END to return to Continuous Mode
®
Vista basic Instructions for Use
950983 Rev B 03/04
20/26
OPTIONS
Data Lock, Contrast Selection
DATA LOCK
This feature prevents unauthorized use by locking out all keys except ,
,and
.
1. Press OPTS until display shows DATA LOCK.
2. Press ON.
3. Press END to return to Continuous Mode.
To Turn Off Data Lock
1. Press OPTS until display shows DATA LOCK.
2. Press the decimal key.
3. Press OFF.
4. Press END to return to Continuous Mode.
CONTRAST SELECTION
This feature allows the contrast of the screen to be changed for best possible
viewing.
1. Press OPTS until display shows CONTRAST SELECTION.
2. Press (+) to increase the contrast (make the text darker). Press (--) to
decrease the contrast (make the text lighter).
3. Press END to return to Continuous Mode.
®
Vista basic Instructions for Use
950983 Rev B 03/04
21/26
OPTIONS
Adjust Clock, Loudness
ADJUST CLOCK
This feature allows the time and date to be changed.
1. Press OPTS until display shows ADJUST CLOCK.
2. Press DAT to enter the date. (Press C to clear the current data and reenter new data.)
3. Enter the date using two digits for month, day and year.
Example: November 5, 2001 is entered as 11 05 01
4. Press OK
5. Press TIME to enter the time of day.
Note: The time is set using 24 hour Military Time.
Example: 6:30pm is entered as 18:30
6. Press OK
7. Press END to return to Continuous Mode.
LOUDNESS
This feature allows the volume of the alarm tone to be changed.
1. Press OPTS until display shows LOUDNESS.
2. Press (+) to increase the alarm volume. Press (--) to decrease the volume.
3. Press END to return to Continuous Mode.
®
Vista basic Instructions for Use
950983 Rev B 03/04
22/26
OPTIONS
Alarms
In alarm situations, press
the infusion by pressing
Alarm
to silence the alarm. Correct the problem. Resume
.
Possible Cause
Action
Air-In-Line!
Air bubble in air-in-line sensor
Remove air from system
Check Drop
Sensor!
Free Flow!
Solution container empty
Roller clamp closed
Set loaded incorrectly
Replace solution container
Open roller clamp
Re-load set, close roller
clamp
Not Enough Drops!
Kinks, closed clamps, or
blockage
Droplets on wall of drip chamber
Drop sensor out of position
Check for blockage
Door Open!
Door opened during infusion
Close door
Dwnstream
Occlusion!
Downstream tubing kinked
Filter blocked
Closed clamp
IV positional or infiltrated
Catheter or vein too small
Occlusion limit too low
Correct kinks
Correct blocked filter
Open clamps
Check IV site
Increase occlusion limit
Invalid data!
Entered data is out of range
Press
Keep Vein Open
Rate: Infusion
Complete
Programmed infusion is
complete
Stop infusion
Low Battery!
30 minutes until battery is fully
discharged
Silence alarm and connect
pump to AC power
Plug In Now!
Battery is discharged
Connect pump to AC power
Pump Stopped!
No key panel activity for 2
minutes or Standby time expired
Silence alarm; begin infusion
Unit Malfunction!
Internal error
Press
until display reads:
“Do not press any key until
display is off;” wait until
pump turns off, turn device
on. If alarm repeats, return
for service.
Too Many Drops!
®
Vista basic Instructions for Use
950983 Rev B 03/04
Shake drip chamber
Reposition drop sensor
; re-enter data
23/26
AC, 12 V, BATTERY, & CC INTERFACE
AC and 12 V
♦ Check AC voltage as per
rating label.
♦ Insert/screw on power lead
(12 V lead in ambulance car)
on back.
Battery Operation
♦ Switching to internal battery is
automatic in the event of
power failure or if 12 V or AC
is not connected.
♦ Charge battery on initial use,
following a battery alarm, or
after 2 months of non-use.
♦ Charging time: approx. 16
hours. Longer charging has
no detrimental effect.
♦ Full battery provides operation
for 3.5 hours at 125 mL/hr.
♦ Battery capacity is approx.
50% after 2 years.
♦ The service life of the battery
can be extended by
completely discharging it from
time to time and then fully
recharging it on AC power.
®
Vista basic Instructions for Use
950983 Rev B 03/04
CC Interface
Interface descriptions available from
B. Braun. Connection to interface
input uses MFC plug.
Documentation
♦ All operating data of the
Vista® basic can be called up
and logged via external
computer
24/26
MAINTENANCE, STORAGE, & SERVICE
Maintenance
Clean the pump with a soft, lint-free
cloth or swab dampened with soap
and water, a general non staining
chemical disinfectant, isopropyl
alcohol (15%), derivatives of
phenylphenol (5%) or ammonium
chloride (10%).
As a general recommendation for
cleaning and disinfecting this
device, use a lint-free cloth
dampened (not soaked) with a 0.5%
bleach (Sodium Hypochlorite)
solution (10% solution with water).
The solution is most effective when
prepared weekly and allowed to
remain on the device for
approximately 10 minutes prior to
wiping off.
♦ Do not use acetone solutions
containing glutaraldehyde or
abrasive cleansers on the
pump. If necessary, Betadine
or Iodine solutions may be
used, but they will stain the
pump.
♦ Do not use abrasive cleaning
tools or pressurized spraying
devices as these may damage
the device.
♦ Do not sterilize the pump using
ethylene oxide (EtO) gas.
♦ Do not steam autoclave or
immerse the pump in any fluids
or cleaning solutions.
♦ Always turn off the pump and
disconnect it from the electrical
outlet prior to cleaning.
®
Vista basic Instructions for Use
950983 Rev B 03/04
Storage
Store the pump away from excessive
heat, cold, or humidity. Keep devices
plugged into electrical power during
storage.
Service
If the pump fails to respond to the
operating or troubleshooting procedures
listed in this manual and the cause
cannot be determined, discontinue use
and forward it to an authorized B. Braun
Service Center.
Should it be necessary to return a pump
for repair, contact Technical Support at
B. Braun Customer Service at 800-627PUMP. A Returned Materials
Authorization number will be provided.
Carefully pack the pump (preferably in
the original packing) and ship it prepaid
to:
B. Braun Medical Inc.
Attn: Service Manager
1601 Wallace Drive
Suite 150
Carrollton, TX 75006 USA
B. Braun cannot assume responsibility
for loss or damage to returned pumps
while they are in transit.
Product complaints may be sent to the
Quality Manager at the above address.
With each complaint, please include
pump serial number and full description
of difficulty, including all settings, types
of fluids, times, and alarm messages.
Return set used if possible. Contact
Technical Support for an RMA number
prior to return.
25/26
SPECIFICATIONS
Mechanism
Dimensions WxHxD
Weight
Power Requirements
Leakage Current
Battery
Battery Operating Time
Rate Range
Volume to be Infused
Range
Occlusion Pressure
KVO Rate
Flow Rate Accuracy
Alarms
Air-in-Line Alarm
Memory
Tubing
Modes/Features
Operating
Temperatures
®
Vista basic Instructions for Use
950983 Rev B 03/04
Linear peristaltic volumetric infusion pump
5.5 in (14cm) x 9.4 in (24cm) x 7.8 in (20cm)
6.8 lbs. (3.1 kg)
100-120 VAC, 50-60 Hz, 13 Watts
Max 30µA
7.2V, 1.2 Ah NiCd (rechargeable)
=3.5 hours at 125 mL/hr
0.1 to 800.0 mL/hr in 0.1 mL increments with Vista®
tubing
0.1 to 9999.9 mL
Variable Settings Low: 8 PSI High: 17 PSI
1 mL/hr or selected rate, whichever is lower
± 5% measurement time 8hr, temp. 71.6° F
Air-in-Line, Low Battery, Plug In Now, Bag Empty,
Downstream Occlusion, Door Open, Pump Stopped,
KVO, Unit Malfunction
Air bubble size of 0.3ml. (default value) The
value can be set from 0.01 to 0.3 ml in service
program.
Cumulative air in line alarm: Can be set from 0 to
3.5 ml/h in service program. (0= cumulative air in
line alarm is deactivated). Default setting for the
cumulative air in line alarm is 0=deactivated.
User option to retain last Continuous and Piggyback
Mode data upon power up. Permanent data
retention in Program and Ramp/Taper Modes after
pump is turned off
B. Braun Vista® administration sets
Continuous and Piggyback Modes, Program Mode
for variable infusions, Ramp/Taper Mode for TPN
infusions and Delay A Mode for postponing infusion
start and finish
Operating: 64.4° F to 95° F, 10.15 PSI to 15.37PSI
Non-Operating: -13° F to 131° F, 10.15 PSI to
15.37 PSI
26/26
B. Braun Medical Inc.
824 Twelfth Ave.
Bethlehem, PA 18018
©2004 B. Braun Medical Inc.
®
Vista basic Instructions for Use
950983 Rev B 03/04
Tel 800-227-2862
www.bbraunusa.com