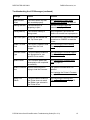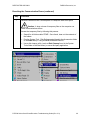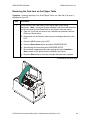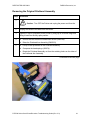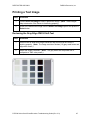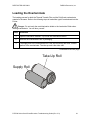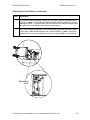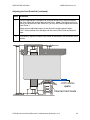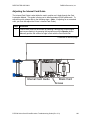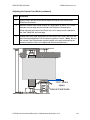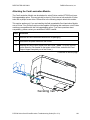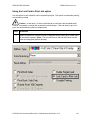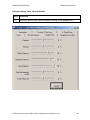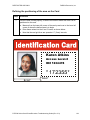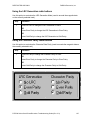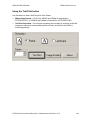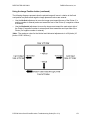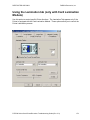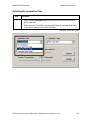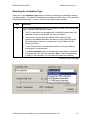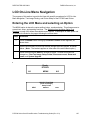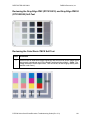
1
RESTRICTED USE ONLY
FARGO Electronics, Inc.
DTC500 Series Card Printer/Encoders
Troubleshooting Guide (Rev. 3.0)
P/N: L000315
DTC500 Series Card Printer/Encoders Troubleshooting Guide (Rev. 3.0)
1
RESTRICTED USE ONLY
FARGO Electronics, Inc.
DTC500 Series Card Printer/Encoders Troubleshooting Guide (Rev. 3.0), property of
FARGO Electronics, Incorporated
Copyright 2002, 2003, 2004, 2005, 2006 by FARGO Electronics, Incorporated. All rights
reserved. Printed in the United States of America. Exclusive permission is granted to
authorized resellers of FARGO products to reproduce and distribute this copyrighted
document to authorized FARGO customers, who have signed a “no disclosure agreement”
regarding the restricted, proprietary use of said document.
The revision number for this document will be updated to reflect changes, corrections,
updates, and enhancements to this document.
Revision Control
Number
Date
Document Title
Revision 3.0
10 March 2003
DTC500 Series Card Printer/Encoders
Troubleshooting Guide (Rev. 3.0)
These reference documents were thoroughly reviewed to provide FARGO with professional
and international standards, requirements, guidelines, and models for our technical, training,
and user documentation. At all times, the Copyright Protection Notice for each document
was adhered to within our FARGO documentation process. This reference to other
documents does not imply that FARGO is an ISO-certified company at this time.
•
ANSI/ISO/ASQ Q9001-2000 American National Standard, (sub-title) Quality Management
Systems - Requirements (published by the American Society of Quality, Quality Press,
P.O. Box 3005, Milwaukee, Wisconsin 53201-3005)
•
The ASQ ISO 9000:2000 Handbook (editors, Charles A. Cianfrani, Joseph J. Tsiakals,
and John E. West; Second Edition; published by the American Society of Quality, Quality
Press, 600 N. Plankinton Avenue, Milwaukee, Wisconsin 53203)
•
Juran's Quality Handbook (editors, Joseph M. Juran and A. Blanton Godfrey; Fifth
Edition, McGraw-Hill)
Any questions regarding changes, corrections, updates, or enhancements to this document
should be forwarded to:
FARGO Electronics, Incorporated
Support Services
6533 Flying Cloud Drive
Eden Prairie, MN 55344 (USA)
(952) 941-9470
(800) 459-5636
FAX: (952) 941-7836
www.fargo.com
E-mail: [email protected]
DTC500 Series Card Printer/Encoders Troubleshooting Guide (Rev. 3.0)
2
RESTRICTED USE ONLY
FARGO Electronics, Inc.
Table of Contents
DTC500 Series Card Printer/Encoders Troubleshooting Guide (Rev. 3.0) _________ 1
Safety Messages (review carefully) _________________________________________ 8
General Troubleshooting__________________________________________________ 9
Reviewing the LCD display and LED light ___________________________________ 9
Troubleshooting the LCD Messages ______________________________________ 9
Communications Errors _________________________________________________ 16
Resolving the Communication Errors ____________________________________ 16
Card Feeding Errors ____________________________________________________ 21
Resolving the Card Feeding Errors ______________________________________ 21
Resolving the Card Jam on the Flipper Table ______________________________ 24
Resolving the Card Hopper Jam Error Message ____________________________ 26
Resolving the Card Hopper Empty Error Message __________________________ 27
Encoding Errors _______________________________________________________ 28
Resolving the No Magnetic Encoder Error Message_________________________ 28
Resolving the No ENC Response Error Message ___________________________ 28
Replacing the Main Board _______________________________________________ 29
Replacing the Main Board (D850426) ___________________________________ 30
Reviewing the DTC500 Board Cable Connections Reference _________________ 33
Replacing the Main Board (D850427) ___________________________________ 35
Replacing the Main Board (D850428) ___________________________________ 37
Replacing the Main Board (D850429) ___________________________________ 39
Resolving the Failed Magnetic Encode Error Message _______________________ 41
Resolving the No Prox Encoder Error Message ____________________________ 41
Resolving the No Smart Encoder Error Message ___________________________ 42
Resolving the Failed Smart Encode Error Message__________________________ 42
Removing the Card Jam in the Printer’s Magnetic Encoding Area ______________ 43
Removing the Card Jam in the Printer’s Smart Card Encoding Area ____________ 44
Resolving the Printer not reading Encoded Magnetic Track Data_______________ 45
Resolving the Magnetic Stripe Data being printed on a Card problem ___________ 47
Printing Process Errors__________________________________________________ 48
Resolving the Ribbon Alignment Error Message ___________________________ 48
Replacing the Ribbon Sensor Array Assembly (840108) _____________________ 49
Resolving the Print Ribbon Error Message ________________________________ 50
Resolving the Print Ribbon Out Error Message_____________________________ 50
Resolving the Ribbon Jam / Broke Error Message __________________________ 50
Resolving the Wrong Print Ribbon Error Message __________________________ 51
Resolving the Unknown Ribbon Type Error Message _______________________ 52
Resolving the Headlift Error Message ____________________________________ 53
Replacing the Headlift Motor (A000124) _________________________________ 54
Replacing the Headlift Sensor (A000126) _________________________________ 55
Resolving the Printer pausing between panels error _________________________ 57
Replacing the Printhead Components ______________________________________ 58
Replacing the Printhead Assembly (850102)_______________________________ 58
Removing the Original Printhead Assembly _______________________________ 61
DTC500 Series Card Printer/Encoders Troubleshooting Guide (Rev. 3.0)
3
RESTRICTED USE ONLY
FARGO Electronics, Inc.
Installing the New Printhead Assembly___________________________________
Resolving the Printhead Temp Error Message______________________________
Resolving the Flipper Alignment Error Message____________________________
Replacing the Flipper Home Sensor (140407) _____________________________
Firmware Errors _______________________________________________________
Resolving an Upgrade Failed error ______________________________________
Resolving a Program Exception Error ____________________________________
Diagnosing the Image Problems __________________________________________
Resolving the Pixel failure problems _____________________________________
Resolving the Card surface debris problems _______________________________
Resolving the incorrect Image Darkness problems __________________________
Resolving the Ribbon wrinkle problems __________________________________
Resolving the excessive Resin Printing problems ___________________________
Resolving the incomplete Resin Printing problems __________________________
Resolving the cut off or off-center Card Image problems _____________________
Resolving the poor Image Quality problems _______________________________
Printing a Test Image ___________________________________________________
Reviewing the Gray/Align YMC/K Self-Test ______________________________
Reviewing the Color/Resin YMCK Self-Test ______________________________
Reviewing the Color Bars YMC Self-Test ________________________________
Reviewing the Card Count Self-Test _____________________________________
Reviewing the Magnetic Test option _____________________________________
62
63
64
65
66
66
69
70
70
73
76
79
81
83
85
86
87
87
88
88
89
89
Card Lamination Module ________________________________________________ 90
Safety Messages (review carefully) ________________________________________ 90
Loading the Overlaminate _______________________________________________ 91
Adjusting the Card Lamination Module ____________________________________ 94
Adjusting the Card Flattener ___________________________________________ 94
Adjusting the Card Guide Rail__________________________________________ 96
Adjusting the Internal Card Guide ______________________________________ 100
Attaching the Card Lamination Module _________________________________ 102
Printer Adjustments____________________________________________________
Safety Messages (review carefully) _______________________________________
Adjusting the Internal Card Guide ______________________________________
Printer Driver options__________________________________________________
Using the Device options tab ____________________________________________
Adjusting for the Ribbon Type ________________________________________
Adjusting for the Color matching ______________________________________
Adjusting for the Resin Dither _________________________________________
Using the Print Both Sides option (DTC520 / DTC525 only) _________________
Using the Split 1 Set of Ribbon Panels option (DTC520 / DTC525 only) _______
Using the Print on Back Side Only option (DTC520 / DTC525 only) __________
Using the Rotate Front by 180 Degrees option ____________________________
Using the Rotate Back by 180 Degrees option (DTC520 / DTC525 only) _______
Using the Buffer Single Card option ____________________________________
Using the Link Card to Print Job option _________________________________
Using the Disable Printing option ______________________________________
DTC500 Series Card Printer/Encoders Troubleshooting Guide (Rev. 3.0)
108
108
109
111
111
112
113
114
115
116
117
118
119
120
121
122
4
RESTRICTED USE ONLY
FARGO Electronics, Inc.
Using the Image Color tab ______________________________________________
Using the K Panel Resin tab_____________________________________________
Selecting the Full Card with the K Panel Resin tab _________________________
Selecting the Defined Area(s) with the K Panel Resin tab ___________________
Selecting the Undefined Area(s) with the K Panel Resin tab _________________
Defining the Area to activate the Card Grid ______________________________
Measuring the Total Card area_________________________________________
Defining the positioning of the area on the Card ___________________________
Selecting the Print YMC under the K and Print K Only options _______________
Using the Magnetic Encoding tab ________________________________________
Using the Encoding Mode option ______________________________________
Encoding the Mode / Coercivity / Magnetic Track Selection _________________
Using the Magnetic Track Selection option_______________________________
Using the Magnetic Track options ______________________________________
Using the Bit Density radio buttons _____________________________________
Using the Character Size radio buttons __________________________________
Using the ASCII Offset ______________________________________________
Using the LRC Generation radio buttons_________________________________
Using the Character Parity radio buttons _________________________________
Using the Verification option__________________________________________
Reviewing the Shift Data Left _________________________________________
Reviewing the ISO Track Locations ____________________________________
Reviewing the Sample String__________________________________________
Sending the Track Information ________________________________________
Reviewing the ASCII Code and Character Table __________________________
Using the Overlay / Print Area tab________________________________________
Using the Overlay / Print Area dropdown menu ___________________________
Using the Overlay / Print Area_________________________________________
Using SmartShield Area dropdown menu ________________________________
Using the Card tab ____________________________________________________
Selecting the Card Size ______________________________________________
Using the Card Hopper Selection (DTC515 / DTC525 only) option ___________
Reviewing the Orientation ____________________________________________
Specifying the Copies _______________________________________________
Using the Test Print button ___________________________________________
Clicking on the About button__________________________________________
Using the Image Position button _______________________________________
Using the Lamination tab (only with Card Lamination Module) ________________
Selecting the Lamination Position ______________________________________
Selecting the Lamination Side _________________________________________
Selecting the Lamination Type ________________________________________
Selecting the Lamination Type ________________________________________
Adjusting the Transfer Dwell Time and Transfer Temperature________________
Selecting the Sensors button and Defaults button __________________________
Calibrating the Card Lamination Module’s Lamination Sensor _______________
123
127
128
129
130
131
132
134
136
138
139
141
143
144
145
145
146
147
147
148
149
150
150
151
152
153
154
155
161
162
163
165
168
168
169
170
171
174
175
176
177
178
179
179
180
Board Level Diagnostics ________________________________________________ 181
DTC500 Series Card Printer/Encoders Troubleshooting Guide (Rev. 3.0)
5
RESTRICTED USE ONLY
FARGO Electronics, Inc.
Board Errors _________________________________________________________
Resolving the EE Memory Error _______________________________________
Resolving the EE Checksum Error _____________________________________
Resolving the DRAM Memory Error ___________________________________
Resolving the RAM Memory Error _____________________________________
Resolving the FPGA Error ____________________________________________
Resolving the Update Firmware Now ___________________________________
Sensor Testing _______________________________________________________
Reviewing the Sensor Location and Voltages _____________________________
Reviewing the Sensor Layout on Ribbon Sensor array ______________________
181
181
181
182
182
183
184
184
185
186
LCD On-Line Menu Navigation __________________________________________
Entering the LCD Menu and selecting an Option ____________________________
Using the Softkey and Scroll buttons____________________________________
Accessing the Menu Option Structure Tree _________________________________
Selecting from the Menu Option Structure Tree ___________________________
Using the LCD Menu __________________________________________________
Printing the Self-test_________________________________________________
Reviewing the Gray/Align YMC (DTC510/515) and Gray/Align YMC/K
(DTC520/525) Self-Test _____________________________________________
Reviewing the Color/Resin YMCK Self-Test _____________________________
Reviewing the Card Count YMC Self-Test _______________________________
Reviewing the Standard Resin Self-Test _________________________________
Using the Magnetic Test option (only with Magnetic Encoding Module) _______
Setting up the Printer ________________________________________________
Print TOF and Print EOF Alignment Procedures ____________________________
Preparing to Adjust the Print TOF and Print EOF __________________________
Setting the Print TOF ________________________________________________
Setting the Print EOF ________________________________________________
Adjusting the Ribbon Tension _________________________________________
Setting the Printhead Resistance _______________________________________
Adjusting the Image Darkness _________________________________________
Changing the Encoder Settings ________________________________________
Adjusting the Magnetic TOF __________________________________________
Changing the Hopper Settings _________________________________________
Changing the BAUD Rate Settings _____________________________________
Adjusting the Flipper Offset___________________________________________
Viewing the Report Supplies __________________________________________
Using the Show the Error Count Tool ___________________________________
Showing the Card Count _____________________________________________
Selecting the System Upgrade (Firmware Upgrade) ________________________
187
187
188
188
189
190
190
Firmware Updates _____________________________________________________
Firmware Updater Application Program ___________________________________
Downloading Firmware Updates _________________________________________
Updating the Printer's Firmware _________________________________________
Updating the Main Firmware __________________________________________
Updating the LCD Firmware __________________________________________
208
208
209
209
210
213
DTC500 Series Card Printer/Encoders Troubleshooting Guide (Rev. 3.0)
191
191
192
192
193
193
194
195
195
196
198
199
200
201
202
204
205
205
206
206
207
207
6
RESTRICTED USE ONLY
FARGO Electronics, Inc.
Index ________________________________________________________________ 215
DTC500 Series Card Printer/Encoders Troubleshooting Guide (Rev. 3.0)
7
RESTRICTED USE ONLY
FARGO Electronics, Inc.
Safety Messages (review carefully)
Symbol
Critical Instructions for Safety purposes
Danger:
Failure to follow these installation guidelines can result in death or
serious injury.
Information that raises potential safety issues is indicated by a warning
symbol (as shown to the below).
Caution:
•
To prevent personal injury, refer to the following safety messages
before performing an operation preceded by this symbol.
•
To prevent personal injury, always remove the power cord prior to
performing repair procedures, unless otherwise specified.
•
To prevent personal injury, make sure only qualified personnel
perform these procedures.
This device is electrostatically sensitive. It may be damaged if
exposed to static electricity discharges.
Information that raises potential electrostatic safety issues is indicated
by a warning symbol (as shown to the below).
•
To prevent equipment or media damage, refer to the following
safety messages before performing an operation preceded by this
symbol.
•
To prevent equipment or media damage, observe all established
Electrostatic Discharge (ESD) procedures while handling cables in
or near the Circuit Board and Printhead Assemblies.
•
To prevent equipment or media damage, always wear an
appropriate personal grounding device (e.g., a high quality wrist
strap grounded to avoid potential damage).
•
To prevent equipment or media damage, always remove the
Ribbon and Cards from the printer before making any repairs,
unless otherwise specified.
•
To prevent equipment or media damage, take jewelry off of
fingers and hands, as well as thoroughly clean hands to remove oil
and debris before working on the printer.
DTC500 Series Card Printer/Encoders Troubleshooting Guide (Rev. 3.0)
8
RESTRICTED USE ONLY
FARGO Electronics, Inc.
General Troubleshooting
IMPORTANT! FARGO Card Printers require highly specialized print Ribbons to function
properly. To maximize Printer life, reliability, printed card quality and durability, you must use
only FARGO Certified Supplies. For this reason, your FARGO warranty is void, where not
prohibited by law, if you use non-FARGO Certified Supplies. To order additional materials,
please contact your authorized reseller.
Reviewing the LCD display and LED light
The LCD display provides the current status of the Printer. Refer to the following tables for a
complete list and cause of all possible LCD messages. The tables (in this section) display
the LCD messages. If the LCD message is communicating an error or requires an action,
these tables will also offer a solution to what should be done.
The purpose of this section is to provide the User with specific procedures relating to the
LCD/SmartGuard Messages, Communication Errors, Card Feeding Errors, Encoding Errors,
Printing Process Errors, and Diagnosing the Image Problems for the DTC500 series card
Printer.
Troubleshooting the LCD Messages
Message
Cause
Solution
Aligning Ribbon
If this appears as a prompt, it
indicates the print Ribbon is
self-aligning to the proper
position for printing.
See Resolving the Ribbon Alignment
Error Message on page 48.
If this appears as an
ERROR, it indicates the print
Ribbon is not installed
properly or is damaged.
Card Hopper
Empty
Indicates the Printer has run
out of blank cards.
See the Resolving the Card Hopper
Empty Error Message procedure on
page 27.
Card Hopper Jam
Indicates that the Card
Hopper is unable to move
from one hopper to the next.
Clear any obstructions, and close the
hopper door.
See Resolving the Card Hopper Jam
Error Message on page 26.
Continued on the next page
DTC500 Series Card Printer/Encoders Troubleshooting Guide (Rev. 3.0)
9
RESTRICTED USE ONLY
FARGO Electronics, Inc.
Troubleshooting the LCD Messages (continued)
Message
Cause
Solution
Card Jam
See Card Feeding Errors on page 21.
Indicates that a card is
jammed in the Print Station or
card flipping area of the
Printer.
Card Jam: Flipper
Indicates that a card is
jammed in the card flipping
area of the Printer.
See Resolving cards jamming on the
Flipper table on page 24.
Card Jam: Print
Indicates that a card is
jammed in the Print Station
of the Printer.
See Card Feeding Errors on page 21.
Card Jam: Mag
Indicates that a card is
jammed in the magnetic
encoding area of the Printer.
See Removing the Card jam in the
Printer’s Magnetic Encoding Area on
page 43.
Card Jam: Smart
Indicates that a card is
jammed in the Smart Card
encoding area of the Printer.
See Removing the Card jam in the
Printer’s Smart Card Encoding Area
on page 44.
Data Input
Indicates that the print data
sent to the Printer is corrupt
or has been interrupted.
See Resolving the Communication
Errors on page 16.
Data Timeout
Indicates that the print data
sent to the Printer is corrupt
or has been interrupted.
See Resolving the Communication
Errors on page 16.
DRAM Memory
Error
Indicates that the Printer's
Memory Module is bad or is
not installed properly.
See Resolving the DRAM Memory
Error on page 182.
Continued on the next page
DTC500 Series Card Printer/Encoders Troubleshooting Guide (Rev. 3.0)
10
RESTRICTED USE ONLY
FARGO Electronics, Inc.
Troubleshooting the LCD Messages (continued)
Message
Cause
Solution
EE Checksum
Error
Indicates that the permanent
circuit board memory is bad.
See Resolving the EE Checksum
Error on page 181.
EE Memory Error
Indicates that the permanent
circuit board memory is bad.
See Resolving the EE Memory Error
on page 181.
Ejecting Used
Card
Indicates that the system
Firmware has detected a
card already in the Printer.
This card has been ejected; however,
it may contain encoded data and
should be disposed of in a proper
manner.
Failed To
Initialize
Indicates that an unexpected
hardware error has occurred.
See Board Errors on page 181.
Flipper Alignment
Indicates that the Printer is
unable to align the Flipper
table.
See Resolving the Flipper Alignment
Error Message on page 64.
FPGA
Indicates that an unexpected
hardware error has occurred.
See Resolving the FPGA Error on
page 183.
FPGA Load Fail
Indicates that an unexpected
hardware error has occurred.
See Resolving the FPGA Error on
page 183.
FPGA Timeout
Indicates that an unexpected
hardware error has occurred.
See Resolving the FPGA Error on
page 183.
Head Lift
Indicates that the Printer was
unable to raise or lower the
Printhead.
See Resolving the Headlift Error
Message on page 53.
Continued on the next page
DTC500 Series Card Printer/Encoders Troubleshooting Guide (Rev. 3.0)
11
RESTRICTED USE ONLY
FARGO Electronics, Inc.
Troubleshooting the LCD Messages (continued)
Message
Cause
Solution
Head Resistance
Error
The LCD requires that a
value be input for the Print
Head Resistance.
Enter a value for head resistance in
the LCD's Printer Setup menu.
See Setting the Printhead Resistance
on page 198.
Head Voltage
Error
A hardware fault has
prevented a correct setting
of the Printhead voltage.
A default value will be used.
Hopper 1 Empty
Card Hopper 1 has run out
of cards. (Note: The Printer
will continue printing from
Hopper 2 if First Available is
set as the Card Hopper
Selection in the Driver.)
See the Resolving the Card Hopper
Empty Error Message procedure on
page 27.
Hopper 2 Empty
Card Hopper 2 has run out
of cards. (Note: The Printer
will continue printing from
Hopper 1 if First Available is
set as the Card Hopper
Selection in the Driver.)
See the Resolving the Card Hopper
Empty Error Message procedure on
page 27.
Invalid Flip
Command
Indicates that the Printer
received a command to print
both sides of the card, but
this model does not support
dual-sided printing.
Press CANCEL to reset the Printer or
RESUME to print onto two separate
cards.
Invalid Print
Ribbon
Indicates an unauthorized
Ribbon.
Install a valid, FARGO-authorized
Ribbon, and press RESUME to
continue.
See Resolving the Unknown Ribbon
Type Error Message on page 52.
Continued on the next page
DTC500 Series Card Printer/Encoders Troubleshooting Guide (Rev. 3.0)
12
RESTRICTED USE ONLY
FARGO Electronics, Inc.
Troubleshooting the LCD Messages (continued)
Message
Cause
Solution
Mag Encode
Failed
Indicates that the card's
Magnetic Stripe was not
encoded properly.
See Resolving the Failed Magnetic
Encode Error Message on page 42.
Multiple Cards
Fed
Indicates that two or more
cards were fed from the
Card Hopper.
See Resolving the Card Feeding
Errors on page 21.
No ENC
Response
Indicates that there is no
response from the Encoder
control module.
See Resolving the No ENC Response
Error Message on page 28.
No MAG Encoder
Indicates that the Printer has
received encoding data, but
the Printer is not configured
with this Encoder type.
See Resolving the No Magnetic
Encoder Error Message on page 28.
No Ribbon
Installed
Indicates that the Printer is
trying to print with no print
Ribbon installed.
Install the proper print Ribbon, and
press RESUME to continue or
CANCEL to reset the Printer.
No Smart
Encoder
Indicates that the Printer has
received encoding data, but
the Printer is not configured
with this Encoder type.
See Resolving the No Smart Encoder
Error Message on page 42.
Pause...
Indicates the Printer is
paused.
Press the Printer's RESUME button to
continue or CANCEL to clear all
pending print jobs and reset the
Printer.
Please Clean
Printer
This message appears every
3,000 prints to remind you to
perform the recommended
Printer maintenance.
See the Cleaning the Printer
procedure on page 174.
Please Remove
Card
Indicates that the card is
jammed in the Print Station
or card flipping area of the
Printer.
See Card Feeding Errors on page 21.
Continued on the next page
DTC500 Series Card Printer/Encoders Troubleshooting Guide (Rev. 3.0)
13
RESTRICTED USE ONLY
FARGO Electronics, Inc.
Troubleshooting the LCD Messages (continued)
Message
Cause
Solution
Print Data
Indicates that the print data
sent to the Printer is corrupt
or has been interrupted.
See Communications Errors on page
16.
Print Ribbon Low
Indicates that the print
Ribbon will soon run out.
If printing a large number of cards,
replace the Ribbon now or monitor the
Printer until the Ribbon is gone, and
install a new Ribbon.
Print Ribbon Out
Indicates that the print
Ribbon has run out.
Install a new Ribbon, and press
RESUME to continue.
Print Station
Open
Indicates that the Print
Station is open during
printing.
Close the Station, and press the
Printer's RESUME button to continue
or CANCEL to reset the Printer.
Print Timeout
Indicates that the Printer was
unable to complete the print
process.
See Communications Errors on page
16.
Printhead Temp
Indicates that the Printhead
Temperature Regulator is
not functioning properly.
See Resolving the Printhead Temp
Error Message on page 58.
Program
Exception
Indicates that the system
Firmware has detected an
error while attempting to
process the current print job.
See the Updating the Printer’s
Firmware procedure on page 209.
RAM Memory
Error
Indicates that the Printer's
Memory Module is bad or
not installed properly.
See Resolving the DRAM Memory
Error on page 182.
Ribbon Jam /
Broken
The print Ribbon is either
jammed or broken.
See Resolving the Ribbon Jam /
Broke Error Message on page 50.
Continued on the next page
DTC500 Series Card Printer/Encoders Troubleshooting Guide (Rev. 3.0)
14
RESTRICTED USE ONLY
FARGO Electronics, Inc.
Troubleshooting the LCD Messages (continued)
Message
Cause
Solution
Smart Encode
Failed
The card's smart chip was
not encoded properly.
See Resolving the Failed Smart
Encode Error Message on page 42.
Starting Self-test
The self-test print is
preparing to print.
See the Printing the Self-test
procedure on page 190.
Testing Memory
The Printer's memory is
being tested.
Upon completion, the Printer will
continue its normal boot up sequence.
Top Cover Open
A print job was started with
the Top Cover open.
Close the Printer, and press RESUME
to continue or CANCEL to reset the
Printer.
Unable To Feed
Card
The Printer is unable to feed
a card from the Card
Hopper.
See Resolving the Card Feeding
Errors on page 21.
Unknown Ribbon
Type
The print Ribbon installed is
not appropriate for your
specific Printer model.
See Resolving the Unknown Ribbon
Type Error Message on page 52.
Update Failed
The Firmware update was
interrupted or not completed
successfully.
See Resolving an Upgrade Failed
error on page 66.
Update Firmware
Now
An error has occurred in
trying to load the Firmware.
The system Firmware MUST be
updated.
See Updating the Printer's Firmware
on page 209.
Wrong Print
Ribbon
The print Ribbon installed in
the Printer does not match
the Ribbon type selected in
the Printer driver.
See Resolving the Wrong Print
Ribbon Error Message on page 51.
DTC500 Series Card Printer/Encoders Troubleshooting Guide (Rev. 3.0)
15
RESTRICTED USE ONLY
FARGO Electronics, Inc.
Communications Errors
Resolving the Communication Errors
Symptom(s): Incorrect output, communications error on PC or Printer, stalling, no response
from Printer, no job printed, “Paper out” error.
Step
1
2
Procedure
Confirm that the system meets the minimum requirements, as shown here:
•
IBM-PC or compatible
•
Windows 95/98/ME/NT/2000/XP Pentium™ class 133 MHz computer with
32 MB of RAM or higher
•
200 MB free hard disk space or higher
•
ECP Parallel Port with DMA access
Confirm the correct installation of the Printer driver.
a. Close the software program and check the Printer driver.
b. Reboot the computer.
c. Be sure the correct setup options within the Printer driver are selected.
d. Confirm that the driver is current by checking at: www.fargo.com
3
Verify the use of an adequate data cable.
a. Use a double-shielded parallel cable (no longer than six feet in length).
(Note: Data transmission failure can be attributed to a long or faulty
parallel cable.)
b. Use an I-EEE 1284 compliant cable to reduce the effect of radio emissions
from computers, monitors, and other equipment that can broadcast Radio
frequency interference (RFI).
Continued on the next page
DTC500 Series Card Printer/Encoders Troubleshooting Guide (Rev. 3.0)
16
RESTRICTED USE ONLY
FARGO Electronics, Inc.
Resolving the Communication Errors (continued)
Step
4
Procedure
Determine if there is interference from an external device.
a. Do not use an A/B Switch Box or other peripheral in line with the parallel
cable.
b. If using a Switch Box or other peripheral, remove it while testing
communication between the computer and the Printer.
c. If needed, replace the Switch Box or other peripheral (once it is determined
that the cause of the interference is not the Switch Box or the peripheral).
d. Alternative: Add a second Parallel Port into the computer (if a second
Printer is required).
Continued on the next page
DTC500 Series Card Printer/Encoders Troubleshooting Guide (Rev. 3.0)
17
RESTRICTED USE ONLY
FARGO Electronics, Inc.
Resolving the Communication Errors (continued)
Step
5
Procedure
Determine the nature of the problem with printing from the application.
a. Print a self-test from the Printer to ensure that the Printer (itself) is
functioning properly. See the Printing the Self-test on page 190.
b. Print the Windows test page that is located in the General tab of the driver.
c. Use WordPad (a Windows 95/ 98/ ME/ NT/ 2000/XP word processing
program in the Accessories Program Group) via Start > Programs >
Accessories > WordPad. Follow this procedure:
•
Open the program and type: “This is a Test.”
•
Select File > Page Setup and click on the Printer button.
•
Ensure that the DTC500 Series Card Printer/Encodersis selected and
click OK.
•
Change all the margin settings to zero (0) and click OK.
•
Select File > Print on the Menu Bar.
•
Go to File on Menu Bar and select Print.
Continued on the next page
DTC500 Series Card Printer/Encoders Troubleshooting Guide (Rev. 3.0)
18
RESTRICTED USE ONLY
FARGO Electronics, Inc.
Resolving the Communication Errors (continued)
Step
6
Procedure
Determine if the Parallel Port mode is set correctly.
a. Ensure that the Parallel Port is set to the Enhanced Communication Port
(ECP) mode. (Note: The port mode can be determined by checking the
Device Manager tab in the System Control Panel.)
b. If the port mode is not set to ECP, it will need to be changed in the
computers BIOS. (Note: Refer to the appropriate computer manual for
instructions on how to change the Parallel Port mode.)
Continued on the next page
DTC500 Series Card Printer/Encoders Troubleshooting Guide (Rev. 3.0)
19
RESTRICTED USE ONLY
FARGO Electronics, Inc.
Resolving the Communication Errors (continued)
Step
7
Procedure
Determine whether there is an adequate or inadequate hard drive space.
Caution: A large volume of temporary files on the computer can
cause communications errors.
Access the temporary files by following this process:
•
Search for all folders called TEMP. Once found, clear out the contents of
the folders.
•
Run the System Tool - Disk Defragmenter (found in the Accessories folder
of the Start Menu) if using Windows 95/98/ME/2000/XP,.
•
Use a disk cleanup utility (such as Disk Cleanup found in the System
Tools folder of the Start menu) or use a third party application.
DTC500 Series Card Printer/Encoders Troubleshooting Guide (Rev. 3.0)
20
RESTRICTED USE ONLY
FARGO Electronics, Inc.
Card Feeding Errors
Resolving the Card Feeding Errors
Symptom: Two or more cards feed at the same time, or the cards will not feed at all.
Step
1
Procedure
Clean the Input Roller.
a. Open the Printer's top covers, and remove all cards, and print Ribbons from
the Printer.
b. Leave the Printer power ON and the top covers open throughout this
procedure. (Note: The card-cleaning cartridge can also remain within the
Printer during this cleaning process.)
c. Use a cleaning card from the Printer Cleaning Kit, and remove its adhesive
backing paper.
d. Insert the cleaning card into the Exception Card Slot until the card stops.
•
Verify that the longest non-adhesive end of the cleaning card enters the
Printer first and that the sticky side is facing DOWNWARD
e. Press the FORWARD button several times to feed the Cleaning Card all
the way through the Printer.
Continued on the next page
DTC500 Series Card Printer/Encoders Troubleshooting Guide (Rev. 3.0)
21
RESTRICTED USE ONLY
FARGO Electronics, Inc.
Resolving the Card Feeding Errors (continued)
Step
2
Procedure
Ensure the Card Thickness Lever is set correctly, as shown below.
a. Press the Card Thickness Lever Lock and then push the Card Thickness
Lever up or down to the appropriate setting.
b. with any of the Card Thickness settings, move the slide slightly toward a
higher setting until the cards begin feeding (if the Printer seems unable to
feed cards at the selected setting).
c. Move the slide slightly toward a lower setting (if the Printer seems to
double-feed cards). (Note: The card thickness slide is adjustable to
accommodate card thickness variations that often occur even within
standard card sizes.)
DTC500 Series Card Printer/Encoders Troubleshooting Guide (Rev. 3.0)
22
RESTRICTED USE ONLY
FARGO Electronics, Inc.
Resolving the Card Feeding Errors (continued)
Step
3
Procedure
a. Check for static build up between cards. (Note: Occasionally, a static
charge will build up between the surfaces of two or more cards causing
them to stick together.)
b. Reduce or eliminate this static charge by separating the cards manually
before placing them in the input hopper.
4
Ensure that the cards are loaded properly in the Input Hopper.
a. Load the cards into the Printer by inserting them straight into the hopper
and setting them on the feed Roller.
5
Verify that the Hopper Lift (A000124) is operational.
a. Reset Power to the Printer.
b. Open the Card Hopper Door and watch to verify that the Hopper Cycles
on startup.
c. If the Hopper does not cycle on startup, remove the top cover and verify
that the Hopper Lift Motor is plugged in properly.
d. If the Hopper Lift Motor is plugged in, disconnect it and attach a 9-volt
battery to the leads.
e. If the Motor turns, replace the Main Board (as needed). See the
Replacing the Main Board procedure on page 29.
Insert cards neatly stacked.
Card Hopper
(side view)
Cards
Card Feed Roller
DTC500 Series Card Printer/Encoders Troubleshooting Guide (Rev. 3.0)
23
RESTRICTED USE ONLY
FARGO Electronics, Inc.
Resolving the Card Jam on the Flipper Table
Symptom: Cards are jamming on or at the Flipper Table, or a Card Jam: Flip error is
displayed on the LCD.
Step
1
Procedure
Verify that the Card Feed Roller on the Flipper table is not running
backwards. (Note: Having an Encoder installed in the Printer will determine
the direction that the Card Feed Roller on the Flipper Table will rotate.)
a. Open the Top Cover and remove any cards that are jammed inside the
Printer, as shown below.
b. Reset power on the Printer to clear any error messages that are on the
LCD.
c. Press the MENU button on the LCD.
d. Press the Down Arrow button and select PRINTER SETUP.
e. Scroll through the menu and select ENCODER SETUP.
f.
Ensure that the appropriate Encoders settings are set to Installed or
None, based on the options that are installed in the Printer.
g. Press the Save button to save any changes that have been changed.
Continued on the next page.
DTC500 Series Card Printer/Encoders Troubleshooting Guide (Rev. 3.0)
24
RESTRICTED USE ONLY
FARGO Electronics, Inc.
Resolving cards jamming on the Flipper Table. (Continued)
Step
2
Procedure
Ensure that the Flipper Table is level. (Note: This procedure does not apply
to Printers with a Stationary Flipper Table, such as a DTC510/515 without
any Encoders installed.)
a. Open the Top Cover and remove any cards that are jammed inside the
Printer.
b. Reset power on the Printer to clear any error messages that are on the
LCD.
c. Press the MENU button on the LCD.
d. Press the Down Arrow button and select PRINTER SETUP.
e. Scroll through the menu and select FLIPPER OFFSET.
f.
Select Level.
•
If the cards are feeding over the feed Rollers on the card path, adjust
the value by +2.
OR
•
3
If the cards are feeding under the Card Feed Path, adjust the value
by –2.
Ensure that the Flipper Table Tension Spring is providing appropriate
tension.
a. Open the Top Cover on the Printer.
b. Remove the Ribbon.
c. Rotate the Flipper Table to an angle perpendicular to the Card Feed
Path.
d. Using the Forward button, insert a card onto the Flipper Table.
e. Once fed onto the Flipper Table (D850855), manually pull the card from
the Flipper table. (Note: There should be sufficient resistance to
prevent the card from slipping from the Flipper table.)
f.
If there is not sufficient resistance, replace the U-shaped spring on the
back of the Flipper Table.
DTC500 Series Card Printer/Encoders Troubleshooting Guide (Rev. 3.0)
25
RESTRICTED USE ONLY
FARGO Electronics, Inc.
Resolving the Card Hopper Jam Error Message
Step
1
Procedure
Clear any obstructions.
a. Open the Input Hopper Door, as shown below.
b. Remove any cards from the Input Hopper.
c. Ensure that there are no cards that are partially fed out of the Card
Hopper.
2
Verify the mechanical operation.
a. Remove the Top Cover.
b. Ensure that the guide belt for the Hopper Travel Assembly (D850253) is
intact and moves smoothly.
c. Verify that the Hopper Travel Motor is properly meshed with the gear
assembly.
DTC500 Series Card Printer/Encoders Troubleshooting Guide (Rev. 3.0)
26
RESTRICTED USE ONLY
FARGO Electronics, Inc.
Resolving the Card Hopper Empty Error Message
Symptom: The Hopper Empty error message is displayed on the LCD.
Step
Procedure
1
Refill the hopper when convenient.
2
Be sure to load cards with the mag stripe toward the rear of the Printer.
3
Turn the Card Sensor off if it is determined that the Hopper’s Card Sensor
cannot see these types of cards. (Note: with the Sensor turned on, the
Printer can believe the Card Input Hopper is empty, and cards will not feed.)
DTC500 Series Card Printer/Encoders Troubleshooting Guide (Rev. 3.0)
27
RESTRICTED USE ONLY
FARGO Electronics, Inc.
Encoding Errors
Resolving the No Magnetic Encoder Error Message
Symptom: The Printer is receiving encoding data, but the Printer is not configured with this
Encoder type.
Step
1
Procedure
Ensure the LCD Setting correct.
a. Press Select on the LCD.
b. Select Setup Printer and Encoder Settings.
c. Change the Mag Setting from None to Installed.
2
If the encoding data was sent in error, check the in-house, software user’s
manual for encoding instructions.
Resolving the No ENC Response Error Message
Symptom: There is no ENC response.
Step
1
Procedure
Check the Magnetic Offset Setting.
a. Press Menu on the LCD.
b. Select Setup Printer and Encoder Settings
c. Select Magnetic TOF.
d. Verify that the current value matches the default value listed on the back of
the Printer.
2
Determine if the Main Board is bad.
a. Replace the Main Board. See the Replacing the Main Board procedure on
page 29.
b. Determine if the error repeats itself after replacing the Main Board.
DTC500 Series Card Printer/Encoders Troubleshooting Guide (Rev. 3.0)
28
RESTRICTED USE ONLY
FARGO Electronics, Inc.
Replacing the Main Board
J24
J13, J14
J30
J27 J26
J23
J25
J12
J18
J21
J8
J9
J7
J15
J16
J4
J31
J33
J6
J26
DTC500 Series Card Printer/Encoders Troubleshooting Guide (Rev. 3.0)
29
RESTRICTED USE ONLY
FARGO Electronics, Inc.
Replacing the Main Board (D850426)
For Use with DTC510/DTC515 without Embedded Fonts and Barcodes
Tools Required: Phillips-head Screwdriver, Torx T10 Screwdriver, Needle-nose Pliers, Wire
Cutter
Step
Procedure
1
Caution: Turn OFF the Printer and unplug the power cord from the
Printer.
2
Lift up on the bottom edge of the Top Lid (D850289); tilt it back into the fully
open position.
3
Use the Phillips-head Screwdriver to remove the two screws (130939) located
near the hinges. Open the Card Hopper Door before raising the cover.
4
Pull back the plastic tabs at each of the four corners of the cover.
5
a. Carefully lift the cover off of the Printer.
b. Remove the LCD interface cable (D850481) at the main circuit board.
c. Disconnect the grounding cable at the power supply casing.
6
a. Completely remove the Card Output Hopper (D850290) from the Printer by
pulling back the release tab at the bottom of the Printer.
b. Remove the two circuit board mounting screws located in the hopper
opening. (Note: See the next page for a photo display.)
7
Remove the Circuit Board mounting screw located below the Printhead lifter arm
pivot.
8
Go to the back of the Printer. Use the Torx T10 Screwdriver to remove the top
three circuit board mounting screws located at the left, middle, and right
sections. (Note: See the next page for a photo display.)
9
Remove the two mounting screws at the middle and lower section (along the left
edge of the circuit board).
Continued on the next page
DTC500 Series Card Printer/Encoders Troubleshooting Guide (Rev. 3.0)
30
RESTRICTED USE ONLY
FARGO Electronics, Inc.
Replacing the Main Board (D850426) (Continued)
This is a view of the bottom of the discharge end of the Printer. (Note: This shows the
release tab from Step 6 in the previous procedure in this section.)
This is the discharge end of the Printer. The arrows point to the screws described in Step 8.
DTC500 Series Card Printer/Encoders Troubleshooting Guide (Rev. 3.0)
31
RESTRICTED USE ONLY
FARGO Electronics, Inc.
Replacing the Main Board (D850426) (Continued)
Step
10
Procedure
At the bottom mid-section of the circuit board, remove the last mounting screw.
a. Use the Torx T10 Screwdriver to remove the three screws from the
Magnetics Board (if a Magnetics Board is installed on the Main Board).
b. Use the needle-nose pliers to remove the three Standoff screws from the
Main Board (where the Magnetics Board had been installed).
11
Carefully disconnect the cables from the main circuit board. All cables should be
factory-labeled.
Caution: Some nylon tie wraps may need to be cut to remove cables
attached to the main circuit board. Carefully cut these tie wraps using a wire
cutter.
12
Remove the Main Board.
Caution: When replacing the circuit board, be sure all cables are
carefully routed, as not to bind with pulleys, belts and any other moving parts.)
13
Once the new board is installed, the Printer will have to be recalibrated, and
other presets will have to be entered from the front panel display.
•
See the LCD On-Line Menu Navigation instructions on page 187.
•
See the Reviewing the DTC500 Board Cable Connections Reference table
on the next page.
DTC500 Series Card Printer/Encoders Troubleshooting Guide (Rev. 3.0)
32
RESTRICTED USE ONLY
FARGO Electronics, Inc.
Reviewing the DTC500 Board Cable Connections Reference
Purpose
Location
Power Supply
J1
No Cable Assembly: Parallel Port Connection
J11
No Cable Assembly: DRAM Connector
J12
Fan
J13
Fan
J14
Card Detection Sensor and Flipper Table Card Sensor
J15
Ribbon Sensor Array
J16
Unpopulated
J17
LCD
J18
Background Mode Debugger Connection, Program Loading
J19
Smart/Proximity Card Interface
J21
Ribbon Supply Motor, Ribbon Take-up Motor and Headlift Motor
J23
Continued on the next page
DTC500 Series Card Printer/Encoders Troubleshooting Guide (Rev. 3.0)
33
RESTRICTED USE ONLY
FARGO Electronics, Inc.
DTC500 Board Cable Connections Reference (continued)
Description
Location
Hopper Lift Motor and Hopper Transport Motor
J24
RFID Antenna Coil
J25
Main Stepper Motor
J26
Flipper Table Angle Stepper
J27
Unused, Spare Sensor Circuitry
J29
Flipper Feed/Encoding Feed Stepper
J30
Print TOF Sensor
J31
Hopper Position Sensor
J32
Unused, SCI Interface
J33
P1 = Card Detection Sensor, P3 = Hopper Lift Sensor, P4 =
Hopper Transport Sensor
J4
P1 = Printhead Arm Sensor, P2 = Headlift Sensor, P3 = Ribbon
Encoder Sensor
J6
P1 = Flipper Home Sensor, P2 = Encoding TOF Sensor
J7
Printhead: 12-Pin Connector
J8
Printhead: 20-Pin Connector
J9
Magnetics Board
JP1
No Cable Assembly: Serial Port Connection
P1
DTC500 Series Card Printer/Encoders Troubleshooting Guide (Rev. 3.0)
34
RESTRICTED USE ONLY
FARGO Electronics, Inc.
Replacing the Main Board (D850427)
For Use with DTC520/DTC525 without Embedded Fonts and Barcodes
Tools Required: Phillips-head Screwdriver, Torx T10 Screwdriver, Needle-nose Pliers, Wire
Cutter
Step
Procedure
1
Caution: Turn OFF the Printer and unplug the power cord from the
Printer.
2
Lift up on the bottom edge of the Top Lid (D850289); tilt it back into the fully
open position.
3
Use the Phillips-head Screwdriver to remove the two screws (130939) located
near the hinges. Open the Card Hopper Door before raising the cover.
4
Pull back the plastic tabs at each of the four corners of the cover.
5
Carefully lift the cover off of the Printer. Remove the LCD interface cable
(D850481) at the main circuit board, and disconnect the grounding cable at the
power supply casing.
6
Completely remove the Card Output Hopper (D850290) from the Printer by
pulling back the release tab at the bottom of the Printer. Remove the two circuit
board mounting screws located in the hopper opening.
7
Remove the circuit board mounting screw located below the Printhead lifter arm
pivot.
8
From the back of the Printer, use the Torx T10 Screwdriver to remove the top
three circuit board mounting screws located at the left, middle and right sections.
9
Along the left edge of the circuit board, remove the two (2) mounting screws at
the middle and lower section.
Continued on the next page
DTC500 Series Card Printer/Encoders Troubleshooting Guide (Rev. 3.0)
35
RESTRICTED USE ONLY
FARGO Electronics, Inc.
Replacing the Main Board (D850427) (Continued)
Step
10
Procedure
At the bottom mid-section of the circuit board, remove the last mounting screw.
a. Use the Torx T10 Screwdriver to remove the three screws from the
Magnetics Board (if a Magnetics Board is installed on the Main Board).
b. Use the needle-nose pliers to remove the three Standoff screws from the
Main Board (where the Magnetics Board had been installed).
11
Carefully disconnect the cables from the main circuit board. All cables should be
factory-labeled.
Caution: Some nylon tie wraps may need to be cut to remove cables
attached to the main circuit board. Carefully cut these tie wraps using a wire
cutter.
12
Remove the Main Board.
Caution: When replacing the circuit board, be sure all cables are
carefully routed, as not to bind with pulleys, belts and any other moving parts.
13
Once the new board is installed, the Printer will have to be recalibrated, and
other presets will have to be entered from the front panel display.
•
See the LCD On-Line Menu Navigation instructions on page 187.
•
See the Reviewing the DTC500 Board Cable Connections Reference table
on page 33.
DTC500 Series Card Printer/Encoders Troubleshooting Guide (Rev. 3.0)
36
RESTRICTED USE ONLY
FARGO Electronics, Inc.
Replacing the Main Board (D850428)
For Use with DTC510/DTC515 with Embedded Fonts and Barcodes
Tools Required: Phillips-head Screwdriver, Torx T10 Screwdriver, Needle-nose Pliers, Wire
Cutter
Step
Procedure
1
Caution: Turn OFF the Printer and unplug the power cord from the
Printer.
2
Lift up on the bottom edge of the Top Lid (D850289); tilt it back into the fully
open position.
3
Use the Phillips-head Screwdriver to remove the two screws (130939) located
near the hinges. Open the Card Hopper Door before raising the cover.
4
Pull back the plastic tabs at each of the four corners of the cover.
5
a. Carefully lift the cover off of the Printer.
b. Remove the LCD interface cable (D850481) at the Main Circuit Board.
c. Disconnect the grounding cable at the power supply casing.
6
a. Completely remove the Card Output Hopper (D850290) from the Printer by
pulling back the release tab at the bottom of the Printer.
b. Remove the two (2) circuit board mounting screws (located in the hopper
opening).
7
Remove the circuit board mounting screw located below the Printhead lifter arm
pivot.
8
From the back of the Printer, use the Torx T10 Screwdriver to remove the top
three (3) Circuit Board mounting screws (located at the left, middle and right
sections).
9
Along the left edge of the circuit board, remove the two (2) mounting screws at
the middle and lower section.
Continued on the next page
DTC500 Series Card Printer/Encoders Troubleshooting Guide (Rev. 3.0)
37
RESTRICTED USE ONLY
FARGO Electronics, Inc.
Replacing the Main Board (D850427) (Continued)
Step
10
Procedure
At the bottom mid-section of the circuit board, remove the last mounting screw.
a. Use the Torx T10 Screwdriver to remove the three screws from the
Magnetics Board (if a Magnetics Board is installed on the Main Board).
b. Use the needle-nose pliers to remove the three Standoff screws from the
Main Board where the Magnetics Board had been installed.
11
Carefully disconnect the cables from the main circuit board. All cables should be
factory-labeled.
Caution: Some nylon tie wraps may need to be cut to remove cables
attached to the main circuit board. Carefully cut these tie wraps using a wire
cutter.
12
Remove the Main Board.
Caution: When replacing the circuit board, be sure all cables are
carefully routed, as not to bind with pulleys, belts and any other moving parts.)
13
Once the new board is installed, the Printer will have to be recalibrated, and
other presets will have to be entered from the front panel display.
•
See the LCD On-Line Menu Navigation instructions on page 187.
•
See the Reviewing the DTC500 Board Cable Connections Reference table
on page 33.
DTC500 Series Card Printer/Encoders Troubleshooting Guide (Rev. 3.0)
38
RESTRICTED USE ONLY
FARGO Electronics, Inc.
Replacing the Main Board (D850429)
For Use with DTC520/DTC525 with Embedded Fonts and Barcodes
Tools Required: Phillips-head Screwdriver, Torx T10 Screwdriver, Needle-nose Pliers, Wire
Cutter
Step
Procedure
1
Caution: Turn OFF the Printer and unplug the power cord from the
Printer.
2
Lift up on the bottom edge of the Top Lid (D850289); tilt it back into the fully
open position.
3
a. Use the Phillips-head Screwdriver to remove the two screws (130939)
located near the hinges.
b. Open the Card Hopper Door before raising the cover.
4
Pull back the plastic tabs at each of the four corners of the cover.
5
a. Carefully lift the cover off of the Printer.
b. Remove the LCD interface cable (D850481) at the main circuit board, and
disconnect the grounding cable at the power supply casing.
6
a. Completely remove the Card Output Hopper (D850290) from the Printer by
pulling back the release tab at the bottom of the Printer.
b. Remove the two circuit board mounting screws located in the hopper
opening.
7
Remove the circuit board mounting screw located below the Printhead lifter arm
pivot.
8
From the back of the Printer, use the Torx T10 Screwdriver to remove the top
three circuit board mounting screws located at the left, middle and right sections.
9
Remove the two mounting screws at the middle and lower section (along the left
edge of the circuit board).
Continued on the next page
DTC500 Series Card Printer/Encoders Troubleshooting Guide (Rev. 3.0)
39
RESTRICTED USE ONLY
FARGO Electronics, Inc.
Replacing the Main Board (D850429) (Continued)
Step
10
Procedure
a. Remove the last mounting screw at the bottom mid-section of the Circuit
Board. (Note: If a Magnetics Board is installed on the Main Board, use the
Torx T10 Screwdriver to remove the three screws from the Magnetics
Board.)
b. Use the needle-nose pliers to remove the three Standoff screws from the
Main Board where the Magnetics Board had been installed.
11
Carefully disconnect the cables from the main circuit board.
Caution: All cables should be factory-labeled. Some nylon tie wraps
may need to be cut to remove cables attached to the main circuit board.
Carefully cut these tie wraps using a wire cutter.
12
Remove the Main Board.
Caution: When replacing the circuit board, be sure all cables are
carefully routed, as not to bind with pulleys, belts and any other moving parts.
13
Once the new board is installed, the Printer will have to be recalibrated, and
other presets will have to be entered from the front panel display.
•
See the LCD On-Line Menu Navigation instructions on page 187.
•
See the Reviewing the DTC500 Board Cable Connections Reference table
on page 33.
DTC500 Series Card Printer/Encoders Troubleshooting Guide (Rev. 3.0)
40
RESTRICTED USE ONLY
FARGO Electronics, Inc.
Resolving the Failed Magnetic Encode Error Message
Symptom: The Magnetic Stripe was not encoded properly.
Step
Procedure
1
Check to ensure that the cards are loaded with the Magnetic Stripe facing
down and towards the back of the Printer.
2
Verify the Driver Settings.
a. Ensure that the Coercivity setting in the driver corresponds to the type of
cards that are being used.
•
High Coercivity = 2750 Oersted
•
Low Coercivity = 300 Oersted
(Note: See the Using the Magnetic Encoding tab procedure on page 138.)
Resolving the No Prox Encoder Error Message
Symptom: The Printer is receiving encoding data, but the Printer is not configured with this
Encoder type.
Step
1
Procedure
Ensure the LCD Setting correct.
a. Press Select on the LCD.
b. Select Setup Printer and Encoder Settings.
c. Change the Prox Setting from None to Installed.
2
Check the appropriate software user’s manual for specific encoding
instructions if the encoding data was sent in error.
DTC500 Series Card Printer/Encoders Troubleshooting Guide (Rev. 3.0)
41
RESTRICTED USE ONLY
FARGO Electronics, Inc.
Resolving the No Smart Encoder Error Message
Symptom: The Printer is receiving encoding data, but the Printer is not configured with this
Encoder type.
Step
1
Procedure
Ensure the LCD Setting correct.
a. Press Select on the LCD.
b. Select the Setup Printer and Encoder Settings.
c. Change the Smart Setting from None to Installed.
2
Check the software user’s manual for encoding instructions if the encoding
data was sent in error.
Resolving the Failed Smart Encode Error Message
Symptom: The card's smart chip was not encoded properly.
Step
Procedure
1
Check to ensure that the cards are loaded with the smart chip facing up and
are being fed into the Printer first.
2
Verify that the card is entering the E-card Docking Station properly..
a. Send an encoding print job from the computer.
b. Watch the card feed into the Printer and enter the E-card Docking Station.
c. Adjust the Flipper Offset (as needed) if the card is not feeding into the Ecard Docking Station properly. See Resolving the Card Jam on the Flipper
Table in page 24.
DTC500 Series Card Printer/Encoders Troubleshooting Guide (Rev. 3.0)
42
RESTRICTED USE ONLY
FARGO Electronics, Inc.
Removing the Card Jam in the Printer’s Magnetic Encoding Area
Symptom: A card is jammed in the magnetic encoding area of the Printer.
Step
1
Procedure
Clear the jammed card.
a. Open the Top Cover.
b. Use the arrows on the LCD panel to move the card forward or backward to
free the card.
2
Inspect the Card Feed Roller Motor for proper operation.
a. Leave the power ON and open the Top Lid and Printhead Arm.
b. Press the FORWARD button to advance the card or the BACK button to
reverse the card. Use these buttons to move the card through the Printer.
3
Ensure that the cards are feeding into the Encoding Module properly.
a. Reset power on the Printer to clear any error messages.
b. Select the Menu from the LCD.
c. Select the Print Test Image from the menu. See the Printing the Self-test
on page 190.
d. Select the Magnetic Test from the menu. (Note: A card is fed from the
input hopper onto the Flipper table and rotated into the Encoding Module.)
e. If the card appears to jam against the components of the encoding
assembly, adjust the Encoder angle of the Flipper Offset. See the
Resolving the Card Jam on the Flipper Table procedure on page 24.
4
Adjust the Flipper Offset.
a. Select Menu on the LCD display.
b. Select Setup Printer.
c. Select Flipper Offset.
d. Select Encoder Angle.
e. Change the setting on the small increments. (Note: A negative
adjustment will lower the side of the Flipper Table closest to the Exit
Hopper.)
f.
Press Select to save the new value.
DTC500 Series Card Printer/Encoders Troubleshooting Guide (Rev. 3.0)
43
RESTRICTED USE ONLY
FARGO Electronics, Inc.
Removing the Card Jam in the Printer’s Smart Card Encoding Area
Symptom: A card is jammed in the Smart Card encoding area of the Printer.
Step
1
Procedure
Clear the jammed card.
a. Open the Top Cover.
b. Use the arrows on the LCD panel to move the card forward or backward to
free the card.
2
Inspect the Card Feed Roller Motor for proper operation.
a. Leave the power ON and open the Top Lid and Printhead Arm.
b. Press the FORWARD button to advance the card or the BACK button to
reverse the card. (Note: Use these buttons to move the card through the
Printer.)
3
Adjust the Flipper Offset.
a.
Select Menu on the LCD display.
b.
Select Setup Printer
c.
Select Flipper Offset.
d.
Select Encoder Angle
e.
Change the setting on small increments. (Note: A negative adjustment
will lower the side of the Flipper Table closest to the Exit Hopper.)
f.
Press Select to save the new value.
DTC500 Series Card Printer/Encoders Troubleshooting Guide (Rev. 3.0)
44
RESTRICTED USE ONLY
FARGO Electronics, Inc.
Resolving the Printer not reading Encoded Magnetic Track Data
Step
Procedure
1
Verify that the cards are loaded properly with the Magnetic Stripe facing down
and towards the back of the Printer.
2
Verify that the card is encoded with magnetic data by using a magnetic imager
or developer solution.
3
Use WordPad (a Windows 95/ 98/ ME/ NT/ 2000/XP word processing program
in the Accessories Program Group), as shown on the next page.
a. Open the program and type in: ~1%JULIEANDERSON^1234567890?
b. Select File > Page Setup and click on the Printer button.
c. Ensure that the DTC500 Series Card Printer/Encodersis selected and click
on OK.
d. Change all the margin settings to zero (0) and click on OK.
e. Go to File on Menu Bar and select Print. (Note: The Printer should then
feed a card into the Encoder and magnetically encode it.)
4
Caution: Ensure that the Coercivity of the cards matches the setting
in the driver.
5
Compare the settings for the card reader to the settings in the driver.
6
Caution: Ensure that the Magnetic Stripe on the card is free of
scratches or voids.
DTC500 Series Card Printer/Encoders Troubleshooting Guide (Rev. 3.0)
45
RESTRICTED USE ONLY
FARGO Electronics, Inc.
Resolving the Printer not reading Encoded Magnetic Track Data (continued)
See the previous procedure in this section.
DTC500 Series Card Printer/Encoders Troubleshooting Guide (Rev. 3.0)
46
RESTRICTED USE ONLY
FARGO Electronics, Inc.
Resolving the Magnetic Stripe Data being printed on a Card
problem
Step
Procedure
1
Confirm that the application is formatting the magnetic string correctly. See the
Sending the Track Information procedure on page 151.
2
Use WordPad (a Windows 95/ 98/ ME/ NT/ 2000/XP word processing program
in the Accessories Program Group). See previous page for display.
a. Open the program and type: “~1%JULIEANDERSON^1234567890?”
b. Select File > Page Setup and click on the Printer button.
c. Ensure that the DTC500 Series Card Printer/Encodersis selected and click
OK.
d. Change all the margin settings to zero (0) and click OK.
e. Go to File on Menu Bar and select Print. (Note: The Printer should then
feed a card into the Encoder and magnetically encode it.)
DTC500 Series Card Printer/Encoders Troubleshooting Guide (Rev. 3.0)
47
RESTRICTED USE ONLY
FARGO Electronics, Inc.
Printing Process Errors
Resolving the Ribbon Alignment Error Message
Step
Procedure
1
Check that the Ribbon is loaded properly and completely seated on the hubs.
2
Check that the marks on the Ribbon are complete.
3
Check the Motor operation to ensure that the Ribbon moves in both Forward
and Backward directions on Power Up.
4
Test the Ribbon Sensor.
a. Remove the back cover and locate the connector labeled J16 on the main
board.
b. Check the voltage for each of the five (5) Ribbon Sensors at their
connection to the Main Board.
c. Use a Multimeter to ground the negative lead to the chassis and put the
positive lead on pins 3, 5, 7, 9, and 11 of J16 on the main board.
d. Place a RibbonTraq™ mark over the Ribbon Sensor. (Note: The voltage
should be less than 1 VDC.)
e. Remove the RibbonTraq mark from the Ribbon Sensor. (Note: The
voltage should be greater than 4 VDC.)
f.
Replace the Sensor if the voltages are incorrect. See the Replacing the
Ribbon Sensor Array Assembly (840108) procedure on the next page.
5
Install a new Ribbon and press the Resume button to continue if the Ribbon is
out.
6
Clear the jam and reboot the Printer if the Ribbon is jammed.
7
Repair the Ribbon.
a. Repair the Ribbon by taping it back on to the take-up core if the Ribbon is
broken.
b. Press the Resume button to continue or Cancel to reset the Printer.
DTC500 Series Card Printer/Encoders Troubleshooting Guide (Rev. 3.0)
48
RESTRICTED USE ONLY
FARGO Electronics, Inc.
Replacing the Ribbon Sensor Array Assembly (840108)
Tools Required: Phillips-head Screwdriver, Torx T10 Screwdriver
Step
Procedure
1
Caution: Turn OFF the Printer and unplug the power cord from the
Printer.
2
Lift up on the bottom edge of the Top Lid (D850289); tilt it back into the fully
open position.
3
Use the Phillips-head Screwdriver to remove the two screws (130939) located
near the hinges.
4
Release the plastic tabs in the four corners of the cover.
5
Lift the cover off of the Printer.
6
Use the Torx T10 Screwdriver to remove the screw (F000169) from the front side
of the Ribbon Sensor Array.
7
Remove the Retainer Clip from the end of the shaft just above the Ribbon
Sensor Array.
8
Use the Torx T-10 Screwdriver to remove the screw (F000169) from the front
side of the cross-member to the right of the Ribbon Sensor Array
9
Spread the sides of the Printer apart until there is enough clearance to remove
the Ribbon Sensor Array.
10
Take the Ribbon Sensor Array Assembly from the Printer.
11
Disconnect the two cable connectors from the back of the Sensor board.
DTC500 Series Card Printer/Encoders Troubleshooting Guide (Rev. 3.0)
49
RESTRICTED USE ONLY
FARGO Electronics, Inc.
Resolving the Print Ribbon Error Message
Symptom: The Print Ribbon is not installed properly, or it has run out, jammed, broken, or
been damaged.
Step
1
Procedure
See Resolving Ribbon Alignment Errors on page 48, for details.
Resolving the Print Ribbon Out Error Message
Symptom: The Print Ribbon has run out.
Step
1
Procedure
Install a new Ribbon, and press Resume to continue.
Resolving the Ribbon Jam / Broke Error Message
Symptom: An error message is displayed on the LCD, and the Ribbon is broken.
Step
1
Procedure
Verify that the Print TOF and Print EOF are set correctly.
a. If the break occurs before anything is printed to the card, reduce the Print
TOF by 5.
b. If the break occurs after the yellow panel is transferred to the card, reduce
the Print EOF by 5.
c. Print a self-test to verify operation. See Printing the Self-test on page 190.
DTC500 Series Card Printer/Encoders Troubleshooting Guide (Rev. 3.0)
50
RESTRICTED USE ONLY
FARGO Electronics, Inc.
Resolving the Wrong Print Ribbon Error Message
Symptom: The Print Ribbon (installed in the Printer) does not match the Ribbon type
(selected in the Printer driver).
Step
1
2
Procedure
Verify that the Ribbon is installed properly by ensuring that:
•
The Ribbon is loaded with the supply side closest to the Card Input
Hopper.
•
The Ribbon is rolling from the bottom of the spool to the bottom of the take
up spool.
Verify if the Driver has been set correctly.
a. Open the Printer control panel from the computer.
•
If using Windows 95/98/ME, right click on the DTC500 Series Card
Printer/EncodersIcon and select Properties.
•
If using Windows NT 4.0, right click on the DTC500 Series Card
Printer/Encodersand select Document Defaults.
•
If using Windows 2000/XP, right click on the DTC500 Series Card
Printer/Encodersand select Printing Preferences.
b. Click on the Device Option tab. See the Using the Device options tab
procedure on page 111.
c. Verify that the Ribbon Type setting that is listed matches the Ribbon that is
installed in the Printer. (Note: It may be possible to have Driver settings
that are different from those found in the Printer control panel within the
application.)
d. Check any page setup functions in the software to verify that the Ribbon
type matches.
DTC500 Series Card Printer/Encoders Troubleshooting Guide (Rev. 3.0)
51
RESTRICTED USE ONLY
FARGO Electronics, Inc.
Resolving the Unknown Ribbon Type Error Message
Symptom: The Printer is unable to determine the type of Ribbon installed.
Step
1
Procedure
Verify the Ribbon type.
a. Ensure that the print Ribbon installed in the Printer is a DTC Ribbon.
(Note: Although similar in appearance, an HDP Ribbon installed in a DTC
Printer will produce an Unknown Ribbon Type error message.)
2
Test the Ribbon Sensor (840108).
a. Remove the back cover and locate the connector labeled J16 on the main
board.
b. Check the voltage for each of the five (5) Ribbon Sensors at their
connection to the main board.
c. Use a Multimeter to ground the negative lead to the chassis and put the
positive lead on pins 3, 5, 7, 9, and 11 of J16 on the main board.
d. Place a RibbonTraq™ mark over the Ribbon Sensor. (Note: The voltage
should be less than 1 VDC.)
e. Remove the RibbonTraq mark from the Ribbon Sensor. (Note: The
voltage should be greater than 4 VDC.)
f.
Replace the Sensor if the voltages are incorrect. See the Replacing the
Ribbon Sensor Array Assembly (840108) procedure on page 49.
DTC500 Series Card Printer/Encoders Troubleshooting Guide (Rev. 3.0)
52
RESTRICTED USE ONLY
FARGO Electronics, Inc.
Resolving the Headlift Error Message
Symptom: The Printer was unable to raise or lower the Printhead.
Step
Procedure
1
Press the Resume button to retry.
2
If the Headlift does not rotate, check the Headlift Motor (A000124) to ensure
that it is running.
3
If the Headlift Motor is not running, replace the Headlift Motor. See the
Replacing the Headlift Motor (A000124) procedure in the next two pages.
4
If the head cycles but does not stop at the position every time, check the
Headlift Sensor as described in Sensor Testing on page 184.
5
If the Headlift Sensor is failing, replace it. See the Replacing the Headlift
Sensor (A000126) in the next two pages.
DTC500 Series Card Printer/Encoders Troubleshooting Guide (Rev. 3.0)
53
RESTRICTED USE ONLY
FARGO Electronics, Inc.
Replacing the Headlift Motor (A000124)
Tools Required: Phillips-head Screwdriver, Torx T-10 Screwdriver
Step
Procedure
1
Caution: Turn OFF the Printer and unplug the power cord from the
Printer.
2
Lift up on the bottom edge of the Top Lid (D850289); tilt it back into the fully
open position.
3
Use the Phillips-head Screwdriver to remove the two screws (130939) located
near the hinges.
4
Release the plastic tabs in the four corners of the cover.
5
Lift the cover off of the Printer.
6
Use the Torx T-10 Screwdriver to remove the two screws that secure the Headlift
Motor to the front side plate.
7
Tip the Printer carefully on its back and remove the Headlift Motor through the
bottom access hole.
8
Set the Printer upright carefully.
9
Disconnect the cable connector.
DTC500 Series Card Printer/Encoders Troubleshooting Guide (Rev. 3.0)
54
RESTRICTED USE ONLY
FARGO Electronics, Inc.
Replacing the Headlift Sensor (A000126)
Tools Needed: Phillips-head Screwdriver, Torx T10 Screwdriver,
Step
Procedure
1
Caution: Turn OFF the Printer and unplug the power cord from the
Printer.
2
Lift up on the bottom edge of the Top Lid (D850289); tilt it back into the fully
open position.
3
Use the Phillips-head Screwdriver to remove the two screws (130939) located
near the hinges.
4
Release the plastic tabs in the four corners of the cover.
5
a. Carefully lift the cover off of the Printer.
b. Remove the LCD interface cable at the main circuit board, and disconnect
the grounding cable at the power supply casing.
6
a. Completely remove the Card Output Hopper from the Printer by pulling back
the release tab at the bottom of the Printer.
b. Remove the two (2) Circuit Board mounting screws located in the Hopper
opening.
Continued on the next page
DTC500 Series Card Printer/Encoders Troubleshooting Guide (Rev. 3.0)
55
RESTRICTED USE ONLY
FARGO Electronics, Inc.
Replacing the Headlift Sensor (A000126) (Continued)
Step
Procedure
7
Remove the circuit board mounting screw located below the Printhead lifter arm
pivot.
8
From the back of the Printer, use the Torx T10 Screwdriver to remove the top
three (3) Circuit Board mounting screws located at the left, middle and right
sections.
9
Along the left edge of the circuit board, remove the two (2) mounting screws at
the middle and lower section.
10
At the bottom mid-section of the circuit board, remove the last mounting screw.
11
Carefully disconnect the cables from the main circuit board. All cables should be
factory-labeled.
(Note: Some nylon tie wraps may need to be cut to remove cables attached to
the main circuit board. Carefully cut these tie wraps using a wire cutter.)
12
Remove the Main Board.
(Note: When replacing the circuit board, be sure all cables are carefully routed,
as not to bind with pulleys, belts and any other moving parts.)
13
Locate the Sensor near the bottom of the Printer.
14
Use the Torx T-10 Screwdriver to remove the two screws.
15
Disconnect the cable connector.
DTC500 Series Card Printer/Encoders Troubleshooting Guide (Rev. 3.0)
56
RESTRICTED USE ONLY
FARGO Electronics, Inc.
Resolving the Printer pausing between panels error
Symptom: The Printhead Fan is not operating properly.
Step
1
Procedure
Confirm that the fan operates correctly.
a. Upon power up, the fan should run momentarily and shut off.
b. Verify that the fan is plugged into the Main Print Board properly on J13.
2
Check the Printhead fans for pinched wires.
a. Inspect the wires that are routed under the top cover and through to the
back of the board to ensure that they are not pinched.
3.
Verify if the thermal Regulator on the Printhead has failed.
a. Remove the Printhead and reseat cable connections. See the Removing
the Original Printhead Assembly procedure on page 61.
b. If problem persists, replace with a new Printhead. See the Replacing the
Printhead Components procedure on the next page.
4
Ensure that the Printer has received data (at the speed that it requires). See
Communication Errors on page 16.
DTC500 Series Card Printer/Encoders Troubleshooting Guide (Rev. 3.0)
57
RESTRICTED USE ONLY
FARGO Electronics, Inc.
Replacing the Printhead Components
Replacing the Printhead Assembly (850102)
Tools Required: Phillips-head Screwdriver
Step
1
Procedure
Before removing the Old Printhead Assembly, follow this procedure:
a. Print a test card with the current Printhead by selecting MENU from the front
display panel, then selecting [Print Test Image] and then selecting
[Gray/Align YMC/K]. See the Printing the Self-test in page 190. (Note: This
provides a card to use as a guide for when printing test cards with the new
Printhead.)
b. Record the R-value from the white label attached to the new Printhead.
(Note: This label can be found beneath the Printhead mounting bracket
located in the mid-section of the Printhead Assembly.)
Locate the value labeled R=XXXX, where XXXX are numbers that represent
the average resistance value of the Printhead.
Example: R=3400
DTC500 Series Card Printer/Encoders Troubleshooting Guide (Rev. 3.0)
58
RESTRICTED USE ONLY
FARGO Electronics, Inc.
Replacing the Printhead Assembly (850102) (continued)
Compress these 2 springs to remove the Printhead, as shown below.
These arrows (below) show how the Printhead fits into the mounting bracket.
DTC500 Series Card Printer/Encoders Troubleshooting Guide (Rev. 3.0)
59
RESTRICTED USE ONLY
FARGO Electronics, Inc.
Replacing the Printhead Assembly (850102) (continued)
When you remove the Printhead, you can see the circled area, as shown in the photo below.
(Note: This is where the Printhead serial number and resistance value is located. It can
only be seen when you hold the Printhead, as shown here.)
DTC500 Series Card Printer/Encoders Troubleshooting Guide (Rev. 3.0)
60
RESTRICTED USE ONLY
FARGO Electronics, Inc.
Removing the Original Printhead Assembly
Step
Procedure
1
Caution: Turn OFF the Printer and unplug the power cord from the
Printer.
2
Unplug the Parallel Port cable from the Printer.
3
Open the Top Lid (D850289) of the Printer by lifting up on its bottom edge and
tilting it back into the fully open position.
4
a. Unhook the blue-colored Printhead latch levers (D850189).
b. Raise the Printhead Arm Assembly (D850252).
5
a. Lift up on the top bracket of the Printhead Assembly.
b. Compress the head springs (150074).
c. Rotate the Printhead Assembly out from the retaining hooks on the sides of
the Printhead Arm Assembly.
Continued on the next page
DTC500 Series Card Printer/Encoders Troubleshooting Guide (Rev. 3.0)
61
RESTRICTED USE ONLY
FARGO Electronics, Inc.
Removing the Original Printhead Assembly (continued)
Step
Procedure
6
Gently disconnect the Printhead Harness Cable (D850185) from the mid-section
of the Printhead Assembly.
7
On the back of the Printhead Assembly, use the Phillips Screwdriver to remove
the grounding screw and grounding strap.
Installing the New Printhead Assembly
Step
Procedure
1
Reverse steps 3 through 6 above to install the new Printhead Assembly.
2
When completed, apply power to the Printer and allow the Printer to follow its
normal power-up cycle.
3
From the front panel display, select the MENU button.
4
At the Select Function window, press the down arrow once and select [Setup
Printer].
5
At the Change Parameter window, press the down arrow three times and select
[Head Resistance].
6
Use the up and down arrows to change the Current Value to closely match the
resistance value recorded from the new Printhead. (Note: The value on the
display will change at 50-ohm increments. Adjust the value as closely as
possible.)
7
When the Current Value is set, press the Select button, then the Exit button to
return to the main display.
8
Print a test card by selecting MENU from the front display panel, then selecting
[Print Test Image] and then selecting [Gray/Align YMC/K]. See the Printing the
Self-test on page 190. (Note: This confirms that the new Printhead Assembly is
functioning properly. If the test print looks good and is consistent with the overall
position of the test print printed with the old Printhead, the Printhead installation
is complete.)
DTC500 Series Card Printer/Encoders Troubleshooting Guide (Rev. 3.0)
62
RESTRICTED USE ONLY
FARGO Electronics, Inc.
Resolving the Printhead Temp Error Message
Symptom: The Printhead Temperature Regulator is not functioning properly.
Step
1
2
Procedure
Reboot the Printer.
•
If the problem persists, remove the Printhead and ensure that the
Printhead Cables are seated properly. See the Replacing the Printhead
Components procedure on page 58.
•
Remove the back cover (as needed) to verify the Printhead Cable
connection to the Main Print Board. See the Replacing the Main Board
procedure on page 29.
Replace the Printhead if (after checking the Printhead Cable connection at
both the Printhead and the Main Print Board) the error is still displayed on
startup.
See the Replacing the Printhead Components procedure on page 58.
3
Confirm that the cooling fan above the Printhead is operating properly. (Note:
Upon power up, the fan should run momentarily and shut off.)
4
Replace the Main Print Board if problem still remains.
See the Replacing the Main Board procedure on page 29.
DTC500 Series Card Printer/Encoders Troubleshooting Guide (Rev. 3.0)
63
RESTRICTED USE ONLY
FARGO Electronics, Inc.
Resolving the Flipper Alignment Error Message
Symptom: A Flipper Alignment error was displayed on the LCD.
Step
1
Procedure
Check for any obstruction.
a. Open the Top Lid.
b. Remove the Ribbon.
c. Ensure that there are no obstructions.
2
Verify the Motor operation.
a. Test the Flipper Table Home Sensor (140407) by entering the FLIPPER
OFFSET in the PRINTER SETUP menu on the LCD display.
b. Ensure that Level is selected and press the Select button.
c. without making any adjustment, press the Select button.
(Note: This should cause the Flipper Table to attempt to home itself.)
3
Test the Flipper Home Sensor (140407).
a. Remove the screws from the rear cover.
b. Tilt the back cover outwards from the Printer
c. Using a Digital Voltmeter, connect the negative lead to its ground.
d. Connect the positive lead to Pin 4 of J7.
•
If blocked, the voltage should read
•
If unblocked, the Sensor should read > .4 VDC.
3.2 VDC.
e. If the voltages from the Flipper Home Sensor do not match, replace the
Sensor. See the Replacing the Flipper Home Sensor (140407)
procedure on the next page.
DTC500 Series Card Printer/Encoders Troubleshooting Guide (Rev. 3.0)
64
RESTRICTED USE ONLY
FARGO Electronics, Inc.
Replacing the Flipper Home Sensor (140407)
Tools Required: Phillips-head Screwdriver, Torx T10 Screwdriver
Step
Procedure
1
Caution: Turn OFF the Printer and unplug the power cord from the
Printer.
2
Lift up on the bottom edge of the Top Lid (D850289); tilt it back into the fully
open position.
3
Use the Phillips-head Screwdriver to remove the two screws (130939) located
near the hinges.
4
Release the plastic tabs in the four corners of the cover.
5
Lift the cover off of the Printer.
6
Use the Torx T10 Screwdriver to remove the two screws that secure the Sensor
Board Assembly.
7
Disconnect the Sensor Board Assembly Cable.
DTC500 Series Card Printer/Encoders Troubleshooting Guide (Rev. 3.0)
65
RESTRICTED USE ONLY
FARGO Electronics, Inc.
Firmware Errors
Resolving an Upgrade Failed error
Symptom: An Upgrade Failed error is displayed on the LCD during the upgrade process
Step
1
Procedure
Determine if there is interference from an external device.
a. Do not use an A/B Switch Box, dongle key or other peripheral in line with
the parallel cable.
b. If using a Switch Box, dongle key or other peripheral, remove it while
testing communication between the computer and the Printer.
c. If needed, replace the Switch Box, dongle key or other peripheral (once it is
determined that the cause of the interference is not the Switch Box or
peripheral). See the Updating the Main Firmware procedure on page 210.
Alternative: Add a second Parallel Port into the computer (if a second Printer
is required).
Continued on the next page.
DTC500 Series Card Printer/Encoders Troubleshooting Guide (Rev. 3.0)
66
RESTRICTED USE ONLY
FARGO Electronics, Inc.
Resolving an Upgrade Failed error (continued)
Step
2
Procedure
Ensure that the proper procedure is being used. See the Firmware Updater
Application Program procedure on page 208.
a. Follow the instructions on the attached DTC Firmware Upgrade Guide to
insure that the correct data is being transferred to the Printer.
b. If the Firmware Update Program is corrupt, then uninstall the entire
program from the PC, and download the newest version of the program
and install it from FARGO’s web site via:
http://www.fargo.com
See the Downloading Firmware Updates procedure on page 209. See the
next page.
3
Update from the 32-bit Print Spooler.
a. Install and open the 32-bit Print Spooler program.
b. Click on File in the menu and select the Open option.
c. Point this window to the directory (where the latest Firmware is located on
the PC). (Note: This Firmware file will always have a *.s19 extension)
d. Once the Firmware file is selected, the Printer needs to be restarted into
SYSTEM UPGRADE mode. Follow this procedure:
•
At the PRINTER READY screen, select the Menu option.
•
Press the DOWN arrow, until the brackets are around the “System
Upgrade”.
•
Press the Select option.
•
Select YES when the screen displays: Are you sure you want to
continue? (Note: When the Printer reboots, it will be in System
Upgrade mode, and will begin to count up from 0 seconds to 60 sec.)
•
Click the Print button on the 32-bit Print Spooler as the DTC LCD
display begins its countdown. (Note: The DTC Display should then
run through its Update process. See the next page.)
e. Reboot the Printer after it has completed the process.
Continued on the next page
DTC500 Series Card Printer/Encoders Troubleshooting Guide (Rev. 3.0)
67
RESTRICTED USE ONLY
FARGO Electronics, Inc.
Resolving an Upgrade Failed error (continued)
See the previous procedure in this section.
Continued on the next page
DTC500 Series Card Printer/Encoders Troubleshooting Guide (Rev. 3.0)
68
RESTRICTED USE ONLY
FARGO Electronics, Inc.
Resolving a Program Exception Error
Symptom: An error has occurred in the Printers Firmware and a Program Exception Error.
Step
1
Procedure
Restart the Printer and attempt to print the card again.
a. If no Error is displayed, continue printing.
b. If a Program Exception is displayed again, continue to step 2.
2
Reload the Firmware. See the Updating the Printer's Firmware on page 209.
3
Replace the Main Board. See the Replacing the Main Board procedure on
page 29.
DTC500 Series Card Printer/Encoders Troubleshooting Guide (Rev. 3.0)
69
RESTRICTED USE ONLY
FARGO Electronics, Inc.
Diagnosing the Image Problems
Resolving the Pixel failure problems
Symptom: A thin line or scratch travels the entire length of the card.
Step
Procedure
1
Check the card stock for scratches. Replace the cards (as needed).
2
Examine the Printhead for visible damage.
3
Clean the Printhead.
a. Remove watches, rings, bracelets, and other jewelry.
b. Open the Top Cover and Printhead Arm.
c. Use a Printhead Cleaning Pen from the Printer Cleaning Kit to firmly wipe
back and forth across the surface of the Printhead.
d. Close the Top Cover and Printhead Arm once the Printhead is completely
dry.
DTC500 Series Card Printer/Encoders Troubleshooting Guide (Rev. 3.0)
70
RESTRICTED USE ONLY
FARGO Electronics, Inc.
Resolving the Pixel failure problems (continued)
Step
4
Procedure
Replace the Cleaning Tape.
a. Open the Printer's Top Cover.
b. Pull the Cleaning Cartridge out of the Printer.
c. Open the Cleaning Cartridge by pressing on the release tab of the clear
Cleaning Cartridge Cover and pulling the cover up.
d. Pull up on the used cleaning tape and lift it and the two Tape Rollers out of
the Cartridge. (Note: The Cleaning Roller can stay within the Cartridge.)
e. Insert the two Tape Rollers into the new Cleaning Tape loop.
f.
Place the Tape Rollers and the new tape back into the cartridge.
•
Be sure to orient the new tape loop so that it extends over the Cleaning
Roller once installed.
•
Place the Roller closest to the cartridge's handle in first, and then press
the second Roller into place.
g. Set the clear Cleaning Cartridge Cover back into place.
•
Be sure the tabs on the cover are seated properly into the slots on the
cartridge as shown below.
•
When in place, press down on the top of the cover until it snaps shut.
h. Pull on the tape loop's tab to remove the backing from the tape.
i.
Insert the Cleaning Cartridge back into the Printer.
•
Be sure to push down on the cartridge until it clicks into place.
•
If the cartridge is not inserted properly, the Printer will not feed cards.
Continued on the next page
DTC500 Series Card Printer/Encoders Troubleshooting Guide (Rev. 3.0)
71
RESTRICTED USE ONLY
FARGO Electronics, Inc.
Resolving the Pixel failure problems (continued)
Step
5
Procedure
Clean the Platen Rollers.
a. Leave the Printer power ON and open the Top Cover and Printhead Arm.
b. Remove the print Ribbon.
c. Locate the Print Platen Roller, as shown below.
d. Use a Cleaning Pad from the Printer Cleaning Kit to wipe the Roller clean.
e. Locate the Transfer Platen Roller, as shown below.
f.
Use a Cleaning Pad from the Printer Cleaning Kit to wipe the Roller clean.
•
Press the FORWARD and BACK buttons to move the Roller back and
forth while cleaning.
g. Replace the printing supplies.
h. Close the Print and Transfer Stations after the Rollers are clean and
completely dry.
DTC500 Series Card Printer/Encoders Troubleshooting Guide (Rev. 3.0)
72
RESTRICTED USE ONLY
FARGO Electronics, Inc.
Resolving the Card surface debris problems
Symptom: Prints have spots (white or colored voids) and/or dust on them, as shown after
Step 4 in this procedure.
Step
1
Procedure
Be sure the cards are clean and stored in a dust-free environment.
Caution: Cards with embedded contaminants in the surface should
not be used.
2
Clean the inside of the Printer.
a. Open the Top Cover and Printhead Arm.
b. Remove the print Ribbon from the Printer.
c. Use a can of compressed air to blow out all visible areas of the Printer
interior.
d. Use a cleaning pad from the Printer Cleaning Kit to wipe out all visible areas
inside the Printer.
e. Remove any debris that may be inside.
Caution: Be extremely careful not to let any alcohol drip inside the
Printer!
f.
Re-install the printing supplies.
g. Close the Top Cover and Printhead Arm.
DTC500 Series Card Printer/Encoders Troubleshooting Guide (Rev. 3.0)
73
RESTRICTED USE ONLY
FARGO Electronics, Inc.
Resolving the Card surface debris problems (continued)
Step
3
Procedure
Replace the Cleaning Tape.
a. Open the Printer's Top Cover.
b. Pull the Cleaning Cartridge out of the Printer.
c. Open the Cleaning Cartridge by pressing on the release tab of the clear
Cleaning Cartridge Cover and pulling the cover up.
d. Pull up on the used cleaning tape and lift it and the two Tape Rollers out of the
Cartridge. (Note: The Cleaning Roller can stay within the Cartridge.)
e. Insert the two Tape Rollers into the new Cleaning Tape loop.
f.
Place the Tape Rollers and the new tape back into the cartridge.
Caution: Be sure to orient the new tape loop so that it extends over the
Cleaning Roller once it is installed.
g. Place the Roller closest to the cartridge's handle.
h. Press the second Roller into place.
i.
Set the clear Cleaning Cartridge Cover back into place.
Caution: Be sure the tabs on the cover are seated properly into the slots
on the cartridge as shown below.
j.
When in place, press down on the top of the cover until it snaps shut.
k. Pull on the tape loop's tab to remove the backing from the tape.
l.
Insert the Cleaning Cartridge back into the Printer.
Caution: Be sure to push down on the cartridge until it clicks into place.
If the cartridge is not inserted properly, the Printer will not feed cards.
DTC500 Series Card Printer/Encoders Troubleshooting Guide (Rev. 3.0)
74
RESTRICTED USE ONLY
FARGO Electronics, Inc.
Resolving the Card surface debris problems (continued)
Step
4
Procedure
Clean the Platen Roller.
a. Leave the Printer power ON and open the Top Cover and Printhead Arm.
b. Remove the print Ribbon.
c. Locate the Platen Roller, as shown below.
d. Use a Cleaning Pad from the Printer Cleaning Kit to wipe the Roller clean.
e. Press the FORWARD and BACK buttons to move the Roller back and forth
while cleaning.
f.
Replace the printing supplies and close the Top Cover and Printhead Arm after
the Rollers are clean and completely dry.
DTC500 Series Card Printer/Encoders Troubleshooting Guide (Rev. 3.0)
75
RESTRICTED USE ONLY
FARGO Electronics, Inc.
Resolving the incorrect Image Darkness problems
Symptom: Printed cards are too dark or too light, as shown on the next page.
Step
1
Procedure
Run a Self-Test from the Printer. See the Printing the Self-test on page 190.
a. Select Menu from the LCD.
b. Select Print Test Image from the menu.
c. Select Gray/Align Self-test from the Menu.
d. If the Self test card does not appear to have the same darkness issues,
continue to step 2 (Adjusting the Dye sub intensity).
e. If the self test card does appear to have the same darkness issues, continue to
step 3 (Adjusting the image darkness).
2
Adjust the Dye-Sub Intensity setting within the Image Color tab of the Printer
driver. See the Using the Image Color tab procedure on page 123.
a. Open the Printer control panel from the computer.
•
If using Windows 95/98/ME, right click on the DTC500 Series Card
Printer/EncodersIcon and select Properties.
•
If using Windows NT 4.0, right click on the DTC500 Series Card
Printer/Encodersand select Document Defaults.
•
If using Windows 2000/XP, right click on the DTC500 Series Card
Printer/Encodersand select Printing Preferences.
b. Click on the Image Color tab.
•
If the image is too light, adjust the Dye-Sub Intensity to a more positive
value.
•
If the Image is too dark, adjust the Dye-Sub Intensity to a more negative
value.
OR
Correct the Image Darkness in the LCD. See the Adjusting the Image Darkness
procedure on page 200.
a. Select Menu from the LCD.
b. Select Setup Printer, and then select Image Darkness.
•
If the image is too light, adjust the current value to a more positive number.
•
If the Image is too dark, adjust the current value to a more negative
number.
Continued on the next page
DTC500 Series Card Printer/Encoders Troubleshooting Guide (Rev. 3.0)
76
RESTRICTED USE ONLY
FARGO Electronics, Inc.
Resolving the incorrect Image Darkness problems (continued)
See previous procedure in this section.
DTC500 Series Card Printer/Encoders Troubleshooting Guide (Rev. 3.0)
77
RESTRICTED USE ONLY
FARGO Electronics, Inc.
Resolving the incorrect Image Darkness problems (continued)
See previous procedure in this section.
Continued on the next page
DTC500 Series Card Printer/Encoders Troubleshooting Guide (Rev. 3.0)
78
RESTRICTED USE ONLY
FARGO Electronics, Inc.
Resolving the Ribbon wrinkle problems
Symptom: Printed cards have off-colored lines or streaks on them, as shown on the next
page.
Step
1
Procedure
Confirm that the Printer is using the most current driver from:
http://www.fargo.com
2
Adjust the Dye-Sub Intensity setting within the Image Color tab of the Printer
driver. See the Using the Image Color tab procedure on page 123.
a. Open the Printer control panel from the computer.
•
If using Windows 95/98/ME, right click on the DTC500 Series Card
Printer/EncodersIcon and select Properties.
•
If using Windows NT 4.0, right click on the DTC500 Series Card
Printer/Encodersand select Document Defaults.
•
If using Windows 2000/XP, right click on the DTC500 Series Card
Printer/Encodersand select Printing Preferences.
b. Click on the Image Color tab.
c. Adjust the Dye-Sub Intensity to a more negative value in increments of 10%.
OR
Correct the Image Darkness in the LCD. See the Adjusting the Image Darkness
procedure on page 200.
a. Select Menu from the LCD.
b. Select Setup Printer, and then select Image Darkness.
c. Adjust the current value to a more negative number in increments of 2.
3
Adjust the Ribbon Tension. See the Adjusting the Ribbon Tension procedure on
page 198.
a. Select Menu from the LCD.
b. Select Setup Printer, and then select Ribbon Tension.
c. Adjust the current value to a more positive number.
Continued on the next page
DTC500 Series Card Printer/Encoders Troubleshooting Guide (Rev. 3.0)
79
RESTRICTED USE ONLY
FARGO Electronics, Inc.
Resolving the Ribbon wrinkle problems (continued)
Step
5
Procedure
Check the Printhead for debris and burrs.
DTC500 Series Card Printer/Encoders Troubleshooting Guide (Rev. 3.0)
80
RESTRICTED USE ONLY
FARGO Electronics, Inc.
Resolving the excessive Resin Printing problems
Symptom: Black resin text and barcodes appear smeared or too thick, as shown below.
Step
1
Procedure
Reduce the Resin Heat setting within the Image Color tab of the Printer driver.
See the Using the Image Color tab procedure on page 123. See the next page.
a. Open the Printer Control Panel from the computer.
•
If using Windows 95/98/ME, right click on the DTC500 Series Card
Printer/EncodersIcon and select Properties.
•
If using Windows NT 4.0, right click on the DTC500 Series Card
Printer/Encodersand select Document Defaults.
•
If using Windows 2000/XP, right click on the DTC500 Series Card
Printer/Encodersand select Printing Preferences.
b. Click on the Image Color tab.
c. Adjust the Resin Heat to a more negative value in increments of 5%.
OR
Correct the Image Darkness in the LCD. See the Adjusting the Image Darkness
procedure on page 200. See the next page.
a. Select Menu from the LCD.
b. Select Setup Printer, and then select Image Darkness.
c. Adjust the current value to a more negative number in increments of 2.
DTC500 Series Card Printer/Encoders Troubleshooting Guide (Rev. 3.0)
81
RESTRICTED USE ONLY
FARGO Electronics, Inc.
Resolving the excessive Resin Printing problems (continued)
See the previous procedure in this section.
DTC500 Series Card Printer/Encoders Troubleshooting Guide (Rev. 3.0)
82
RESTRICTED USE ONLY
FARGO Electronics, Inc.
Resolving the incomplete Resin Printing problems
Symptom: Black resin text and barcodes appear faded or too light, as shown below.
Step
1
Procedure
Reduce the Resin Heat setting within the Image Color tab of the Printer driver.
See the Using the Image Color tab procedure on page 123. See the next page.
a. Open the Printer control panel from the computer.
•
If using Windows 95/98/ME, right click on the DTC500 Series Card
Printer/EncodersIcon and select Properties.
•
If using Windows NT 4.0, right click on the DTC500 Series Card
Printer/Encodersand select Document Defaults.
•
If using Windows 2000/XP, right click on the DTC500 Series Card
Printer/Encodersand select Printing Preferences.
b. Click on the Image Color tab.
c. Adjust the Resin Heat to a more positive value in increments of 5%.
OR
Correct the Image Darkness in the LCD. See the Adjusting the Image Darkness
procedure on page 200. See the next page.
a. Select Menu from the LCD.
b. Select Setup Printer, and then select Image Darkness.
c. Adjust the current value to a more positive number in increments of 2.
Continued on the next page
DTC500 Series Card Printer/Encoders Troubleshooting Guide (Rev. 3.0)
83
RESTRICTED USE ONLY
FARGO Electronics, Inc.
Resolving the incomplete Resin Printing problems (continued)
See the previous procedure in this section.
DTC500 Series Card Printer/Encoders Troubleshooting Guide (Rev. 3.0)
84
RESTRICTED USE ONLY
FARGO Electronics, Inc.
Resolving the cut off or off-center Card Image problems
Symptom: The printing is cut off or is not centered on the card. This causes a white border
to appear on the card, as shown below.
Step
1
Procedure
Use the Image Position within the Card tab of the Printer driver to precisely
center the image. See Using the Image Position button on page 171.
DTC500 Series Card Printer/Encoders Troubleshooting Guide (Rev. 3.0)
85
RESTRICTED USE ONLY
FARGO Electronics, Inc.
Resolving the poor Image Quality problems
Symptom: The photos on the cards look pixilated or grainy, as shown below.
Step
1
Procedure
Use a high-resolution, 24-bit color image to always capture an image:
•
at a 24-bit color setting
•
at 300 dpi
•
at the same size that it will be printed on the card, (as captured either with a
scanner or with a digital camera)
Caution: If a small or low-resolution image is stretched or blown up, a
pixilated or grainy effect will occur when printing, as shown below.
Good
Bad
DTC500 Series Card Printer/Encoders Troubleshooting Guide (Rev. 3.0)
86
RESTRICTED USE ONLY
FARGO Electronics, Inc.
Printing a Test Image
Step
Procedure
1
Choose Print Test Image to select a preset test image. (Note: These images
help to determine if the Printer is functioning properly.)
2
Scroll to the desired test image from the Select Test Image options and press the
Select button.
Reviewing the Gray/Align YMC/K Self-Test
Step
Procedure
1
Use this card to determine Image Placement and confirm that the Printer is
working properly. (Note: The image consists of sixteen (16) gray scale boxes and
alignment arrows.)
2
Adjust the Image Placement. (Note: The gray boxes are composed from a
composite of YMC color panels.)
DTC500 Series Card Printer/Encoders Troubleshooting Guide (Rev. 3.0)
87
RESTRICTED USE ONLY
FARGO Electronics, Inc.
Reviewing the Color/Resin YMCK Self-Test
Step
1
Procedure
Use this card to determine Image Placement and confirm that (a) the image colors
are properly reproduced and (b) the Resin Panel is printing properly. (Note: The
Image consists of twelve spot colors, YMC and RGB, as well as gray density bars
and thin resin lines.)
Reviewing the Color Bars YMC Self-Test
Step
1
Procedure
Use this card to confirm that image colors are properly reproduced. Image consists
of sixteen graduated steps of RGB and YMCK. (Note: This print will provide
maximum image size, giving complete card coverage on a CR-80 sized card.)
DTC500 Series Card Printer/Encoders Troubleshooting Guide (Rev. 3.0)
88
RESTRICTED USE ONLY
FARGO Electronics, Inc.
Reviewing the Card Count Self-Test
Step
1
Procedure
Use this card to view counts for Card Count (CC), Pass Count (PC), and Transfer
Count (TC), and Lamination Count (LC).
•
The Card Count is the total number of cards the Printer has produced. Pass
Count is the total number of print passes made by the Printhead. (Note: A
pass is measured each time a single Ribbon panel is printed or passes
beneath the Printhead.)
•
The Transfer Count is the total number of times the Printer transfers an image
to a card.
Reviewing the Magnetic Test option
Step
1
Procedure
Use this option only applies if a Magnetic Encoding module is installed in the
Printer. (Note: The Printer will feed, encode, and eject a card. Be sure to have
high Coercivity cards installed when running this test.)
DTC500 Series Card Printer/Encoders Troubleshooting Guide (Rev. 3.0)
89
RESTRICTED USE ONLY
FARGO Electronics, Inc.
Card Lamination Module
The purpose of this section is to provide the User with specific information on Printer
adjustment procedures.
Safety Messages (review carefully)
Symbol
Critical Instructions for Safety purposes
Danger:
Failure to follow these installation guidelines can result in death or
serious injury.
Information that raises potential safety issues is indicated by a warning
symbol (as shown to the below).
Caution:
•
To prevent personal injury, refer to the following safety messages
before performing an operation preceded by this symbol.
•
To prevent personal injury, always remove the power cord prior to
performing repair procedures, unless otherwise specified.
•
To prevent personal injury, make sure only qualified personnel
perform these procedures.
This device is electrostatically sensitive. It may be damaged if
exposed to static electricity discharges.
Information that raises potential electrostatic safety issues is indicated by a
warning symbol (as shown to the below).
•
To prevent equipment or media damage, refer to the following safety
messages before performing an operation preceded by this symbol.
•
To prevent equipment or media damage, observe all established
Electrostatic Discharge (ESD) procedures while handling cables in or
near the Circuit Board and Printhead Assemblies.
•
To prevent equipment or media damage, always wear an appropriate
personal grounding device (e.g., a high quality wrist strap grounded to
avoid potential damage).
•
To prevent equipment or media damage, always remove the Ribbon
and Cards from the Printer before making any repairs, unless otherwise
specified.
•
To prevent equipment or media damage, take jewelry off of fingers
and hands, as well as thoroughly clean hands to remove oil and debris
before working on the Printer.
DTC500 Series Card Printer/Encoders Troubleshooting Guide (Rev. 3.0)
90
RESTRICTED USE ONLY
FARGO Electronics, Inc.
Loading the Overlaminate
The loading process for both the Thermal Transfer Film and the PolyGuard overlaminate
material is the same. Refer to the following steps to load either type of overlaminate into the
Printer.
Danger: Do not touch the metal lamination shield or the Lamination Roller when
loading overlaminate. You will burn yourself.
Step
Procedure
1
Open the lamination module's Top Cover and Lamination Station.
2
Remove the overlaminate from its packaging.
3
The supply end of the overlaminate roll is the side containing the fresh, unused
portion of the overlaminate. The take-up end is the other side.
Continued on the next page
Take-Up Roll
Supply Roll
DTC500 Series Card Printer/Encoders Troubleshooting Guide (Rev. 3.0)
91
RESTRICTED USE ONLY
FARGO Electronics, Inc.
Loading the Overlaminate (continued)
Step
4
Procedure
Place the supply end of the overlaminate roll in between the two black
Lamination Drive Hubs. (Note: The smaller Lamination Drive Hub closest to the
front of the lamination module is spring loaded. Use the end of the supply roll
with the black core plug to push this hub in when inserting the overlaminate roll.
Make certain the overlaminate material is fed from beneath the roll as shown.)
Continued on the next page
DTC500 Series Card Printer/Encoders Troubleshooting Guide (Rev. 3.0)
92
RESTRICTED USE ONLY
FARGO Electronics, Inc.
Loading the Overlaminate (continued)
Step
5
Procedure
Close the lamination module. When you start to print, the Lamination Drive Hubs
will automatically engage the overlaminate core notches.
Caution: Do not reverse the overlaminate roll. Damage may occur to
the lamination Roller!
DTC500 Series Card Printer/Encoders Troubleshooting Guide (Rev. 3.0)
93
RESTRICTED USE ONLY
FARGO Electronics, Inc.
Adjusting the Card Lamination Module
The Card Printer supports the attachment of an optional Card Lamination Module. This
module can be ordered pre-installed on the Printer from the factory or can be ordered
separately as a field upgradeable module. Once attached, the Card Lamination Module
allows you to apply FARGO certified overlaminates for more secure, tamper-resistant cards.
This section explains all aspects of the Card Lamination Module's operation and the
overlaminate materials available.
IMPORTANT! FARGO Card Printers require highly specialized print Ribbons to function
properly. To maximize Printer life, reliability, printed card quality and durability, you must use
only FARGO Certified Supplies. For this reason, your FARGO warranty is void, where not
prohibited by law, if you use non-FARGO Certified Supplies. To order additional materials,
please contact your authorized reseller.
Adjusting the Card Flattener
The Card Lamination Module provides an adjustable Card Flattener that allows you to finetune the flatness of laminated cards. This flattener works by reverse bending cards as they
eject from the laminator while they are still warm.
In most cases, card warpage is only a concern when laminating on a single side of card
stock which has a PVC-based core rather than a polyester-based core. Cards with a PVCbased core are not as heat resistant, and are not recommended for use when laminating
By default, the Card Flattener is configured at the factory to accommodate UltraCard III type
card stock. (Note: If you are experiencing an unacceptable amount of card warpage, please
refer to the following to adjust the Card Flattener.)
Step
Procedure
1
Open the Card Lamination Module.
2
Remove the overlaminate material if installed.
Continued on the next page
DTC500 Series Card Printer/Encoders Troubleshooting Guide (Rev. 3.0)
94
RESTRICTED USE ONLY
FARGO Electronics, Inc.
Adjusting the Card Flattener (continued)
Step
Procedure
3
If laminated cards are bowing upward, turn the Card Flattener Adjustment Knob
clockwise. (Note: This pushes the flattener Roller down to increase the reverse
bending pressure. For best results, turn the knob one full rotation, then print and
laminate a test card. Repeat this process as necessary.)
4
If the card is bowing downward, the reverse bending pressure may be too great.
In this case, rotate the adjustment knob counter-clockwise. (Note: Some card
types have very low heat resistance and may not be acceptable for laminating.)
Adjustment
Knob
DTC500 Series Card Printer/Encoders Troubleshooting Guide (Rev. 3.0)
95
RESTRICTED USE ONLY
FARGO Electronics, Inc.
Adjusting the Card Guide Rail
If applying PolyGuard overlaminate, you may find that the individual patch from the
overlaminate roll may be off-center when applied to a card. (Note: Although the patch
placement will vary slightly from card to card, they should never hang over the edge of the
card.) See the Using the Lamination tab (only with Card Lamination Module) procedure on
page 174.
To center the vertical placement of these patches across the card width, a mechanical
adjustment can be made. If the PolyGuard patches are being applied too closely to, or
overlapping, a card's top or bottom edge (as the card travels through the Printer), the
laminator's Card Guide Rail should be adjusted. (Note: This adjustment is described
below.)
Step
Procedure
1
Open the lamination module's Top Cover and Lamination Station.
2
a. Feed a blank card into the module by inserting it through the output hopper
and reverse feeding it by pressing the Lamination module's Resume button.
b. Manually position the card so its edge is flush with the Card Guide Rail.
Continued on the next page
Card Guide Rail
Screws
CR100
CR90
CR80
Blank Card
Card Flipping
Mechanism
DTC500 Series Card Printer/Encoders Troubleshooting Guide (Rev. 3.0)
96
RESTRICTED USE ONLY
FARGO Electronics, Inc.
Adjusting the Card Guide Rail (continued)
Step
Procedure
3
Slightly loosen the two (2) screws which fasten the Card Guide Rail to the
Printer's main chassis.
4
If the PolyGuard patch is being placed more toward a card's top edge (as
shown), move the Card Guide Rail slightly toward the rear of the Printer
(opposite the direction you would like the patch to move).
Continued on the next page
DTC500 Series Card Printer/Encoders Troubleshooting Guide (Rev. 3.0)
97
RESTRICTED USE ONLY
FARGO Electronics, Inc.
Adjusting the Card Guide Rail (continued)
Step
Procedure
5
If the PolyGuard patch is being placed more toward a card's bottom edge (as
shown), move the Card Guide Rail slightly toward the front of the Printer
(opposite the direction you would like the patch to move).
6
Always make very slight adjustments to the Card Guide Rail, and run a test print
after each adjustment until the optimum patch position is found. (Note: Be sure
the Card Guide Rail always remains parallel to the card path and that the screws
loosened in step 1 are retightened after each adjustment.)
Continued on the next page
DTC500 Series Card Printer/Encoders Troubleshooting Guide (Rev. 3.0)
98
RESTRICTED USE ONLY
FARGO Electronics, Inc.
Adjusting the Card Guide Rail (continued)
Step
7
Procedure
Once the adjustment is complete, be sure that the card is not binding between
the Card Guide Rail and the Internal Card Guide. (Note: Depending upon how
much you adjusted the Card Guide Rail, you may also need to adjust the Internal
Card Guide.)
When both are adjusted properly, there should be a slight space of about
.010"/.25mm between the card edge and the Internal Card Guide as indicated
here:
8
If necessary, adjust the Internal Card Guide as described in the remainder of this
section.
.010“/.25mm
space
CR100
CR90
CR80
Internal Card Guide
DTC500 Series Card Printer/Encoders Troubleshooting Guide (Rev. 3.0)
99
RESTRICTED USE ONLY
FARGO Electronics, Inc.
Adjusting the Internal Card Guide
The Internal Card Guide is what holds the card in position as it feeds through the Card
Lamination Module. This guide is factory-set to handle standard CR-80 sized cards. To
adjust this guide, please refer to the following steps. (Note: If adjusting for an oversized
card, you must also adjust the Printer’s Internal Card Guide.)
Step
1
Procedure
Feed a blank card into the module by inserting it through the Output Hopper
and reverse feeding it by pressing the lamination module's Resume button.
Manually position the card so its edge is flush with the Card Guide Rail.
Continued on the next page
CR100
CR90
CR80
Internal Card Guide
Blank Card
Screws
DTC500 Series Card Printer/Encoders Troubleshooting Guide (Rev. 3.0)
100
RESTRICTED USE ONLY
FARGO Electronics, Inc.
Adjusting the Internal Card Guide (continued)
Step
Procedure
2
Slightly loosen the two screws which fasten the Internal Card Guide to the
Printer's main chassis.
3
Move the Internal Card Guide so there is a slight space of about .010"/.25mm
between the card edge and the Internal Card Guide as indicated below.
When adjusting the Internal Card Guide, be sure it always remains parallel to
the Card Guide Rail and card edge.
4
Always make very slight adjustments to the Internal Card Guide, and run a test
print after each adjustment until the optimum position is found. (Note: Be sure
the Internal Card Guide always remains parallel to the card path and that the
screws loosened in Step 1 are retightened after each adjustment.)
CR100
CR90
CR80
.010“/.25mm
space
Internal Card Guide
DTC500 Series Card Printer/Encoders Troubleshooting Guide (Rev. 3.0)
101
RESTRICTED USE ONLY
FARGO Electronics, Inc.
Attaching the Card Lamination Module
The Card Lamination Module can be attached to select Printer models (DTC525 only) as a
field upgradeable option. This can typically be done in 20 minutes or less and with no other
tools than a phillips screw driver. Please refer to the following steps to attach this module.
This section applies only if you are installing the field upgradeable Card Lamination Module
onto a Printer. Your Printer model must be capable of accepting this module as not all Printer
models are compatible with this field upgradeable option. If you have questions about
compatibility, please contact your authorized FARGO reseller.
Step
Procedure
1
Remove the Card Lamination Module from its packaging.
2
Disconnect the power cable from the Printer.
3
Remove the Card Output Hopper from the Printer. (Note: To do this, pull out
on the Securing Tab located on the bottom of the Printer, and slide the Card
Output Hopper completely out of the Printer.)
Continued on the next page
Securing Tab
DTC500 Series Card Printer/Encoders Troubleshooting Guide (Rev. 3.0)
102
RESTRICTED USE ONLY
FARGO Electronics, Inc.
Attaching the Card Lamination Module (continued)
Step
4
Procedure
Set the Printer on the lamination module's Baseplate at an angle as shown.
(Note: This position will make it easier to connect the Power and
Communication cables.)
Continued on the next page
DTC500 Series Card Printer/Encoders Troubleshooting Guide (Rev. 3.0)
103
RESTRICTED USE ONLY
FARGO Electronics, Inc.
Attaching the Card Lamination Module (continued)
Step
5
Procedure
a. Connect the lamination module's Power Cable to the Printer's Power Port.
(Note: both are labeled with a red Power label.)
b. Push firmly to ensure both are securely connected. (Note: The port and
cable are keyed for one way installation.)
Continued on the next page
DTC500 Series Card Printer/Encoders Troubleshooting Guide (Rev. 3.0)
104
RESTRICTED USE ONLY
FARGO Electronics, Inc.
Attaching the Card Lamination Module (continued)
Step
6
Procedure
Set the Printer completely into the lamination module's Baseplate. (Note: The
rubber pads on the bottom of the Printer will rest securely in the holes in the
lamination module's Baseplate when the Printer is seated properly.)
Continued on the next page
Rubber pads
through Baseplate
DTC500 Series Card Printer/Encoders Troubleshooting Guide (Rev. 3.0)
105
RESTRICTED USE ONLY
FARGO Electronics, Inc.
Attaching the Card Lamination Module (continued)
Step
Procedure
7
Gently tilt the entire Printer and Lamination Module back onto its rear cover, as
shown below. (Note: Be careful not to slide the unit around in this position as
scratching could occur.)
8
Using a Phillips screw driver, insert each of the four (4) screws into the
Baseplate, and tighten the screws to secure the Printer to the Lamination
Module's Baseplate.
Continued on the next page
4 screws to secure
printer to Baseplate
DTC500 Series Card Printer/Encoders Troubleshooting Guide (Rev. 3.0)
106
RESTRICTED USE ONLY
FARGO Electronics, Inc.
Attaching the Card Lamination Module (continued)
Step
Procedure
10
While being careful not to scratch the plastic cover, remove the FARGO
DTC525 model number label from the front of the Printer, and replace it with
the included FARGO DTC525-LC model number label. (Note: This is
important so users know the exact Printer model when ordering supplies, when
calling for technical assistance, or when downloading Printer Driver / Firmware
Updates.)
11
If you have not already done so, install the LC version of your Printer model's
Printer Drive.
•
For lamination-related Printer Driver options, see the Using the Lamination
tab (only with Card Lamination Module) on page 174.
•
For overlaminate information, see the Loading the Overlaminate on page
91.
The packaging for the Card Lamination Module has been designed to
accommodate shipping either the lamination module-only or the fully
assembled Printer with lamination module.
After assembling the complete Printer/lamination system, please re-use the
lamination module packaging when transporting the unit.
12
Once all print supplies are installed, run a test print to make sure installation
was successful.
•
You must have PolyGuard™ overlaminate and a full-color print Ribbon
installed to print this test image.
•
To test, go to the Printer’s LCD display and select MENU, PRINT TEST
IMAGE, and run the lamination Self Test named: Color/Resin YMCK+L.
•
The test image will begin printing after a few seconds, and will both print
and laminate the card.
DTC500 Series Card Printer/Encoders Troubleshooting Guide (Rev. 3.0)
107
RESTRICTED USE ONLY
FARGO Electronics, Inc.
Printer Adjustments
The purpose of this section is to provide the User with specific information on Printer
adjustment procedures.
Safety Messages (review carefully)
Symbol
Critical Instructions for Safety purposes
Danger:
Failure to follow these installation guidelines can result in death or
serious injury.
Information that raises potential safety issues is indicated by a warning
symbol (as shown to the below).
Caution:
•
To prevent personal injury, refer to the following safety messages
before performing an operation preceded by this symbol.
•
To prevent personal injury, always remove the power cord prior to
performing repair procedures, unless otherwise specified.
•
To prevent personal injury, make sure only qualified personnel
perform these procedures.
This device is electrostatically sensitive. It can be damaged if
exposed to static electricity discharges.
Information that raises potential electrostatic safety issues is indicated by a
warning symbol (as shown to the below).
•
To prevent equipment or media damage, refer to the following safety
messages before performing an operation preceded by this symbol.
•
To prevent equipment or media damage, observe all established
Electrostatic Discharge (ESD) procedures while handling cables in or
near the Circuit Board and Printhead Assemblies.
•
To prevent equipment or media damage, always wear an appropriate
personal grounding device (e.g., a high quality wrist strap grounded to
avoid potential damage).
•
To prevent equipment or media damage, always remove the Ribbon
and Cards from the Printer before making any repairs, unless otherwise
specified.
•
To prevent equipment or media damage, take jewelry off of fingers
and hands, as well as thoroughly clean hands to remove oil and debris
before working on the Printer.
DTC500 Series Card Printer/Encoders Troubleshooting Guide (Rev. 3.0)
108
RESTRICTED USE ONLY
FARGO Electronics, Inc.
Safety Messages (review carefully) (continued)
IMPORTANT! FARGO Card Printers require highly specialized print Ribbons to function
properly. To maximize Printer life, reliability, printed card quality and durability, you must use
only FARGO Certified Supplies. For this reason, your FARGO warranty is void, where not
prohibited by law, if you use non-FARGO Certified Supplies. To order additional materials,
please contact your authorized reseller.
Adjusting the Internal Card Guide
The Internal Card Guide holds the card in position as it feeds through the Printer. This guide
is factory-set to handle both CR-79 sized cards and standard CR-80 sized cards (with
thicknesses ranging from 20 to 50 mil).
Internal Card
Guide
Securing Peg
Continued on the next page
DTC500 Series Card Printer/Encoders Troubleshooting Guide (Rev. 3.0)
109
RESTRICTED USE ONLY
FARGO Electronics, Inc.
Adjusting the Internal Card Guide (continued)
Step
Procedure
1
If loading CR-80, 10 mil cards, adjust this guide (as needed) to accommodate very
thin, flexible card stock.
2
Open the Printer's Top Cover and Print Station.
3
Rotate the guide's Securing Peg until it is parallel to the card guide, and push it
down. (Note: This widens the card path so it holds thinner cards with less force.)
DTC500 Series Card Printer/Encoders Troubleshooting Guide (Rev. 3.0)
110
RESTRICTED USE ONLY
FARGO Electronics, Inc.
Printer Driver options
These Driver options and pictures are from the DTC500 Series driver (Version 1.3.3).
Using the Device options tab
DTC500 Series Card Printer/Encoders Troubleshooting Guide (Rev. 3.0)
111
RESTRICTED USE ONLY
FARGO Electronics, Inc.
Adjusting for the Ribbon Type
Use the Ribbon Type dropdown menu to match the Ribbon type.
Step
1
Procedure
Adjust to match the Ribbon Type selection with the Ribbon Type already loaded in
the Printer.
•
YMCKO: Yellow, Magenta, Cyan, Resin Black, Overlay
OR,
•
YMCKOK: Yellow, Magenta, Cyan, Resin Black, Overlay, Resin Black
OR,
•
BO: Dye Sub Black, Overlay
OR
•
K: Standard or Premium Resin
OR
•
Colored Resin: Colored Resin is available in Red, Blue, Green, or White
OR
•
Metallic Resin: Metallic Resin is available in Gold or Silver
OR
•
Scratch-Off Resin
DTC500 Series Card Printer/Encoders Troubleshooting Guide (Rev. 3.0)
112
RESTRICTED USE ONLY
FARGO Electronics, Inc.
Adjusting for the Color matching
Use the Color Matching option to meet the requirements for the print job.
Step
1
Procedure
Select None (a) if interested in print speed rather than print color, (b) if color
correcting the image for printing has already been done, or (c) if using third party
Color Matching software.
OR
Select Algebraic to allow the Printer driver to make very simple, fast, color
balance adjustments. (Note: This option gives a natural-looking image without
slowing down the processing speed of the Printer driver. It also allows further
customization of the printed color of the cards through the Image Color tab.)
OR
Select Monitor to allow the Printer driver to make color corrections similar to the
Algebraic option but through an RGB color matching algorithm. (Note: This
option shifts colors more radically so the colors in the image will more closely
match how they appear on screen.)
DTC500 Series Card Printer/Encoders Troubleshooting Guide (Rev. 3.0)
113
RESTRICTED USE ONLY
FARGO Electronics, Inc.
Adjusting for the Resin Dither
Use the appropriate Dither method according to the type of image to be printed. (Note: This
option only affects those objects printed with the resin black panel.)
Step
1
Procedure
Select Optimized for Graphics when printing lower quality images (e.g., clipart,
logos, etc.) with resin.
OR
Select Optimized for Photo when printing photo quality images with resin.
DTC500 Series Card Printer/Encoders Troubleshooting Guide (Rev. 3.0)
114
RESTRICTED USE ONLY
FARGO Electronics, Inc.
Using the Print Both Sides option (DTC520 / DTC525 only)
Use this option to automatically print on both the front and backside of a card.
Step
1
Procedure
Select this option in conjunction with any application program that supports a
multiple-page document, duplex printing. (Note: The program must be able to
send down two or more separate pages to be printed within the same
document.)
DTC500 Series Card Printer/Encoders Troubleshooting Guide (Rev. 3.0)
115
RESTRICTED USE ONLY
FARGO Electronics, Inc.
Using the Split 1 Set of Ribbon Panels option (DTC520 / DTC525
only)
Use this option to provide the most economical means of printing a dual-sided card since a
single set of Ribbon panels is essentially split to print both the front and backsides of a card.
Step
1
Procedure
Select this option to automatically print full-color (on the front of a card) and resin
black (on the back of a card), using either of the Full-Color YMCKO or YMCKOK
print Ribbons.
•
YMCKO Ribbon type usage: The front of the card is printed with the
Ribbon's YMC and O panels and the back is printed with the K panel.
•
YMCKOK Ribbon type usage: The front of the card is printed with the
YMCKO panels and the back is printed with the second K panel.
(Note #1: This option is automatically enabled when the YMCKOK Ribbon type
is selected.)
(Note #2: The Print Both Sides option is automatically enabled when this
option is selected.)
DTC500 Series Card Printer/Encoders Troubleshooting Guide (Rev. 3.0)
116
RESTRICTED USE ONLY
FARGO Electronics, Inc.
Using the Print on Back Side Only option (DTC520 / DTC525 only)
Use this option to print only onto the backside of cards.
Step
1
Procedure
Select this option to print only onto the backside of cards that must have their
Magnetic Stripe or Smart Card chip encoded. (Note: Load the cards in the usual
fashion.)
•
When this option is selected, the Print Both Sides option is automatically
disabled.)
•
When attempting to print a two-page document (if Print Back Side Only is
selected), the first page of the document will print on the backside of the card.
The second page of the document will then be printed on the back of a second
card.
DTC500 Series Card Printer/Encoders Troubleshooting Guide (Rev. 3.0)
117
RESTRICTED USE ONLY
FARGO Electronics, Inc.
Using the Rotate Front by 180 Degrees option
Use this option to change the position of the printed image in relation to the set location of a
card's Magnetic Stripe or smart chip.
Step
1
Procedure
Select the Rotate Front 180 Degrees option to rotate the image on the front of
the card by 180 degrees when printed.
DTC500 Series Card Printer/Encoders Troubleshooting Guide (Rev. 3.0)
118
RESTRICTED USE ONLY
FARGO Electronics, Inc.
Using the Rotate Back by 180 Degrees option (DTC520 / DTC525
only)
Use this option to change the position of the printed image in relation to the set location of a
card's Magnetic Stripe or smart chip.
Step
1
Procedure
Select the Rotate Back 180 Degrees option to rotate the image on the back of
the card by 180 degrees when printed.
DTC500 Series Card Printer/Encoders Troubleshooting Guide (Rev. 3.0)
119
RESTRICTED USE ONLY
FARGO Electronics, Inc.
Using the Buffer Single Card option
Use this option to force the Printer's memory to Buffer or to hold only one print job at a time.
Step
1
Procedure
Select this option only when printing to multiple Printers sharing print jobs over a
network, which ensures that all Printers evenly share all print jobs.
OR
Do not select this option, and the Printer's memory will Buffer as many print jobs
as possible until the Printer's memory is full. (Note: This is ideal for most
applications where Printers are not networked together.)
DTC500 Series Card Printer/Encoders Troubleshooting Guide (Rev. 3.0)
120
RESTRICTED USE ONLY
FARGO Electronics, Inc.
Using the Link Card to Print Job option
Use this option to link a specific card to a specific print job. This option is used when printing
and encoding e-cards.
Caution: In this case, it is often critical that an e-card with a pre-encoded serial
number, for example, coincide with a particular printed image. If the two were to get out of
sync, the card's security could be compromised.
Step
1
Procedure
Select this option to cause the Printer to dispense with the print job if a blank card
is removed or ejected. (Note: The next card is then fed into the Printer and the
next coinciding print job then printed.)
DTC500 Series Card Printer/Encoders Troubleshooting Guide (Rev. 3.0)
121
RESTRICTED USE ONLY
FARGO Electronics, Inc.
Using the Disable Printing option
Use this option to disable the printing capabilities of the Printer, yet still allow the Printer to
encode cards. (Note: This option is useful to encode or re-encode cards without additional
time, effort, or printing supplies.)
Step
1
Procedure
Select this option to ensure no print data will be sent to the Printer (while all
encoding instructions will be sent according to how they are configured within the
software).
DTC500 Series Card Printer/Encoders Troubleshooting Guide (Rev. 3.0)
122
RESTRICTED USE ONLY
FARGO Electronics, Inc.
Using the Image Color tab
Use this tab to adjust the color properties.
Step
1
Procedure
Select the Algebraic Color Matching option (see the Device options tab window,
shown below) to control the Contrast and Gamma of the printed image, as well as
the individual color balance of Yellow, Magenta, and Cyan (see the Image Color
tab window, shown below).
In most cases, the default settings of these options will suffice.
Continued on the next page
DTC500 Series Card Printer/Encoders Troubleshooting Guide (Rev. 3.0)
123
RESTRICTED USE ONLY
FARGO Electronics, Inc.
Using the Image Color tab (continued)
Step
Procedure
2
Select the None or Monitor option (see the Device options tab, shown below) to
only display the Dye-Sub Intensity and Resin Heat sliders.
3
Control the overall darkness and lightness of the dye-sub printed image by
adjusting the Dye-Sub Intensity slide by clicking and dragging the slide's box.
•
Move the slide to the left to cause less heat to be used in the printing process,
thus generating a lighter print.
OR
•
Move the slide to the right to cause more heat to be used, thus generating a
darker print.
(Note: This slide only affects those images printed with Dye-Sublimation Ribbon
panels (YMC).)
Continued on the next page
DTC500 Series Card Printer/Encoders Troubleshooting Guide (Rev. 3.0)
124
RESTRICTED USE ONLY
FARGO Electronics, Inc.
Using the Image Color tab (continued)
Step
4
Procedure
Control the amount of heat the Printer uses (a) when printing with the resin black
panel of a full-color Ribbon or (b) when printing with a resin-only Ribbon by
adjusting the Resin Heat slide.
•
Move the slide to the left to cause less heat to be used in the printing process,
causing resin images to be lighter or less saturated.
OR
•
Move the slide to the right to cause more heat to be used, causing resin
images to be darker or more saturated.
(Note: This control can be helpful for fine-tuning the sharpness of resin text and
bar codes. See the Resolving the excessive Resin Printing problems procedure
on page 81.)
Continued on the next page
DTC500 Series Card Printer/Encoders Troubleshooting Guide (Rev. 3.0)
125
RESTRICTED USE ONLY
FARGO Electronics, Inc.
Using the Image Color tab (continued)
Step
5
Procedure
Return all options to their factory settings by clicking on the Default button.
DTC500 Series Card Printer/Encoders Troubleshooting Guide (Rev. 3.0)
126
RESTRICTED USE ONLY
FARGO Electronics, Inc.
Using the K Panel Resin tab
Use this tab to adjust the Print All Black with K Panel (options), and the Defined Areas. Use
this tab to control where the resin black (K) panel of a full-color Ribbon is printed.
•
Resin black text is desirable due to its sharp, saturated color, and resin black barcodes
are required to ensure readability when scanned by an infrared barcode reader. (Note:
The Printer driver will automatically print all TrueType black text and TrueType barcodes
only with the resin black (K) panel of the print Ribbon by default.)
•
If printing black text or barcodes that are not TrueType fonts or black graphics, select one
of the three options listed under Print All Black with K Panel. See the Selecting the Full
Card with the K Panel Resin tab procedure on the next page. (Note: The Printer driver
will print areas of the image where it finds black coloring with the print Ribbon's resin
black (K) panel, as specified by each of the following options.)
DTC500 Series Card Printer/Encoders Troubleshooting Guide (Rev. 3.0)
127
RESTRICTED USE ONLY
FARGO Electronics, Inc.
Selecting the Full Card with the K Panel Resin tab
Step
1
Procedure
Select the Full Card option to print the resin black (K) panel for all black found
within all areas of the image, as shown below.
DTC500 Series Card Printer/Encoders Troubleshooting Guide (Rev. 3.0)
128
RESTRICTED USE ONLY
FARGO Electronics, Inc.
Selecting the Defined Area(s) with the K Panel Resin tab
Step
1
Procedure
Select the Defined Area(s) option to print the resin black (K) panel for all black
found only in an area or areas defined, as shown below.
DTC500 Series Card Printer/Encoders Troubleshooting Guide (Rev. 3.0)
129
RESTRICTED USE ONLY
FARGO Electronics, Inc.
Selecting the Undefined Area(s) with the K Panel Resin tab
Step
1
Procedure
Select the Undefined Area(s) option to print the resin black (K) panel for all
black found only in the space outside the areas defined, as shown below. (Note:
In the card grid, black indicates the area in which the resin black (K) panel will be
printed.)
DTC500 Series Card Printer/Encoders Troubleshooting Guide (Rev. 3.0)
130
RESTRICTED USE ONLY
FARGO Electronics, Inc.
Defining the Area to activate the Card Grid
Step
1
Procedure
Select on the appropriate Defined Area (see below) to activate the card grid in the
upper half of the window. (Note: It is through this card grid that up to five areas
can be defined, as shown below.)
When the card grid is first activated, a small black square will appear at its:
•
default size of .2" x .2" (5mm x 5mm)
•
default location in the lower left-hand corner (0,0)
(Note: This square represents the first defined area.)
DTC500 Series Card Printer/Encoders Troubleshooting Guide (Rev. 3.0)
131
RESTRICTED USE ONLY
FARGO Electronics, Inc.
Measuring the Total Card area
Step
Procedure
1
Determine the area of the card to define. (Note: This area is indicated by the
dashed outline, as shown below. The easiest way to determine the size of this
area is to actually print a card, and look at it in the same orientation as when it
exits the Printer.)
2
Measure the total area, and enter those dimensions into the Dimension boxes.
(Note: The minimum size for an area is .2" x .2" (5mm x 5mm).) See the next
page.
Karen Atkins
Access Level-2
ID# 1234478
1.2“
* 172355*
1.8“
DTC500 Series Card Printer/Encoders Troubleshooting Guide (Rev. 3.0)
132
RESTRICTED USE ONLY
FARGO Electronics, Inc.
Measuring the Total Card area (continued)
See the previous procedure in this section.
DTC500 Series Card Printer/Encoders Troubleshooting Guide (Rev. 3.0)
133
RESTRICTED USE ONLY
FARGO Electronics, Inc.
Defining the positioning of the area on the Card
Step
1
Procedure
Once the area is sized properly, measure the location where this area is to be
positioned on the card.
a. Measure from the lower left corner of the card up and over to the lower left
corner of where the defined area is to begin.
b. Enter these values into the X and Y boxes, as shown below.
c. Note that the card grid lines are spaced at .2” (5mm) intervals.
Karen Atkins
Access Level-2
ID# 1234478
* 172355*
X=1.4“
Y=0.2“
DTC500 Series Card Printer/Encoders Troubleshooting Guide (Rev. 3.0)
134
RESTRICTED USE ONLY
FARGO Electronics, Inc.
Defining the positioning of the area on the Card (continued)
See the previous procedure in this section.
DTC500 Series Card Printer/Encoders Troubleshooting Guide (Rev. 3.0)
135
RESTRICTED USE ONLY
FARGO Electronics, Inc.
Selecting the Print YMC under the K and Print K Only options
Step
1
Procedure
Select the Print YMC Under K option to print all black in the designated areas
with the Yellow (Y), Magenta (M), and Cyan (C) Ribbon panels directly beneath
the resin black (K) panel. (Note: Select this option if printing resin black text or
barcodes onto a colored background to provide a more gradual transition
between the two.)
OR
Select the Print K Only option (a) to print all black in the designated areas only
with the resin black (K) panel or (b) to print resin black onto a white background
to maximize the sharpness of printed text and barcodes.
Continued on the next page
DTC500 Series Card Printer/Encoders Troubleshooting Guide (Rev. 3.0)
136
RESTRICTED USE ONLY
FARGO Electronics, Inc.
Selecting the Print YMC under the K and Print K Only options (continued)
See the previous procedure in this section.
DTC500 Series Card Printer/Encoders Troubleshooting Guide (Rev. 3.0)
137
RESTRICTED USE ONLY
FARGO Electronics, Inc.
Using the Magnetic Encoding tab
Use these options only if the Printer has an optional Magnetic Stripe Encoding Module
installed.
Step
1
Procedure
Select the Magnetic Encoding tab to display options for controlling the
Magnetic Stripe encoding process. (Note: The following describes these
options and the Printer's magnetic encoding process.)
DTC500 Series Card Printer/Encoders Troubleshooting Guide (Rev. 3.0)
138
RESTRICTED USE ONLY
FARGO Electronics, Inc.
Using the Encoding Mode option
Use the Encoding Mode option to specify which magnetic encoding standard to use.
•
The DTC500 Series Card Printer/Encoderscan be installed with one of two types of
factory-installed Magnetic Stripe Encoding Modules.
•
Change the encoding mode and Coercivity setting or modify the ISO standards for tracks
1, 2, and 3, by correctly modifying these Magnetic Encoding options.
Step
1
Procedure
Select the ISO Standard Encoding Module with a dual-Coercivity (high or low)
encoding head. (Note: By default, the Printer driver is set to encode according
to ISO standards onto High Coercivity Magnetic Stripes.)
OR
Select the JIS II Standard Encoding Module commonly used in Japan. Select
the JIS II mode to encode only Track 2.
(Note #1: The JIS II option provides encoding compatibility with the JIS C 6220
Type II cards commonly used in Japan. No encoding customization options are
available with the JIS II mode.)
(Note #2: The JIS II Magnetic Head must be installed in the Printer to use any
of the JIS II options in the driver.)
Continued on the next page
DTC500 Series Card Printer/Encoders Troubleshooting Guide (Rev. 3.0)
139
RESTRICTED USE ONLY
FARGO Electronics, Inc.
Using the Encoding Mode option (continued)
See the previous procedure in this section.
DTC500 Series Card Printer/Encoders Troubleshooting Guide (Rev. 3.0)
140
RESTRICTED USE ONLY
FARGO Electronics, Inc.
Encoding the Mode / Coercivity / Magnetic Track Selection
Use the ISO option for encoding capability for either high- or low-Coercivity cards on tracks
1, 2, and 3.
Step
1
Procedure
Select the Coercivity option to select the Magnetic Stripe type that matches the
card type.
•
High Coercivity = 2500-4000 Oersted (FARGO’s High Coercivity UltraCards
are 2750Oe)
•
Low Coercivity = 250-600 Oersted (FARGO’s Low Coercivity UltraCards are
300Oe)
2
Select the Magnetic Track Selection option to specify which track is to be
configured through the Magnetic Track options (if the application being used
requires customization of the standard ISO encoding process).
3
Customize these options if the application requires it; even though, the default
ISO Magnetic Track options should be correct for most applications. (Note: All
options must be changed separately for each of the three individual tracks.)
a. Set these options back to the ISO standard settings once they have been
changed by selecting the Default button for each of the separate tracks.
Continued on the next page
DTC500 Series Card Printer/Encoders Troubleshooting Guide (Rev. 3.0)
141
RESTRICTED USE ONLY
FARGO Electronics, Inc.
Encoding the Mode / Coercivity / Magnetic Track Selection
See the previous procedure in this section.
DTC500 Series Card Printer/Encoders Troubleshooting Guide (Rev. 3.0)
142
RESTRICTED USE ONLY
FARGO Electronics, Inc.
Using the Magnetic Track Selection option
Use these options to customize the ISO encoded data format for each of the Magnetic
Stripe's three tracks.
Step
1
Procedure
Specify which of the three (3) tracks to customize by selecting one of the three
track options.
•
After making the required selection, the Magnetic Track options box displays
the current set of customization options for the selected track.
•
Remember that each track must be customized independently of the other
two tracks.
DTC500 Series Card Printer/Encoders Troubleshooting Guide (Rev. 3.0)
143
RESTRICTED USE ONLY
FARGO Electronics, Inc.
Using the Magnetic Track options
Use the Magnetic Track options for these purposes:
•
Customize the ISO encoded data format for each of the Magnetic Stripe's three tracks.
•
Customize each track independently of the other two.
•
Specify which of the three tracks to customize by selecting one of the three track
options.)
(Note #1: After making the required selection, the Magnetic Track options box displays the
current set of customization options for the selected track.)
(Note #2: For most applications, the default settings for these options do not need to be
changed.)
DTC500 Series Card Printer/Encoders Troubleshooting Guide (Rev. 3.0)
144
RESTRICTED USE ONLY
FARGO Electronics, Inc.
Using the Bit Density radio buttons
Use this option to customize the Bit Recording Density (Bits per Inch) used to encode the
magnetic data on the currently selected track. The default ISO Standard selections for this
option are as follows:
Step
1
Procedure
Select 75 BPI to change the bits per inch to 75 BPI.
OR
Select 128 BPI to change the bits per inch to 128 BPI.
OR
Select 210 BPI to change the bits per inch to 210 BPI.
Using the Character Size radio buttons
Use this option to customize the Character Data Size (Bits per Character) used to encode
the magnetic data on the currently selected track. (Note: This character size includes the
parity bit (if enabled).)
Step
Procedure
1
Select 5 Bits to change the bits per character to 5 BPC.
OR
Select 7 BPI to change the bits per character to 7 BPC.
OR
Select 8 BPI to change the bits per character to 8 BPC.
DTC500 Series Card Printer/Encoders Troubleshooting Guide (Rev. 3.0)
145
RESTRICTED USE ONLY
FARGO Electronics, Inc.
Using the ASCII Offset
Use this option to customize the Character ASCII Offset used to encode the magnetic data
on the currently selected track. (Note: This character-offset value is subtracted from the
ASCII value of each Magnetic Stripe data character prior to encoding on the track.)
Step
1
Procedure
Select NULL to change the ASCII Offset to NULL.
OR
Select SPACE to change the ASCII Offset to SPACE.
OR
Select ZERO to change the ASCII Offset to ZERO.
DTC500 Series Card Printer/Encoders Troubleshooting Guide (Rev. 3.0)
146
RESTRICTED USE ONLY
FARGO Electronics, Inc.
Using the LRC Generation radio buttons
Use this option to customize the LRC Generation Mode (used to encode the magnetic data
on the currently selected track).
Step
1
Procedure
Select NO LRC to change the LRC Generation to none.
OR
Select Even Parity to change the LRC Generation to Even Parity.
OR
Select Odd Parity to change the LRC Generation to Odd Parity.
Using the Character Parity radio buttons
Use this option to customize the Character Data Parity (used to encode the magnetic data on
the currently selected track).
Step
1
Procedure
Select No Parity to change the Character Parity to none.
OR
Select Even Parity to change the Character Parity to Even Parity.
OR
Select Odd Parity to change the Character Parity to Odd Parity
DTC500 Series Card Printer/Encoders Troubleshooting Guide (Rev. 3.0)
147
RESTRICTED USE ONLY
FARGO Electronics, Inc.
Using the Verification option
Use the Verification option, which instructs the Printer to verify that all magnetic data has
been correctly encoded on each card. (Note: with either of these options, the number of
verification retries can be specified. A range of 1 to 5 retries is available.)
Step
1
Procedure
Select the Auto Eject 1st Error option, which instructs the Printer to
automatically eject a card containing magnetic data (that cannot be verified).
(Note: This option is helpful since Magnetic Stripe verification can sometimes
require more than a single pass.)
•
Manual Eject mode: Only the first mistakenly verified card would be
automatically ejected. If a second consecutive card cannot be verified, the
Printer will signal an error and go into a Manual Eject mode.
•
Auto Eject option: The Auto Eject option is the most direct means of
dealing with mistakenly-verified cards. However, it may be undesirable (if
batch printing) since mistakenly-verified blank cards are ejected into the
same stack as verified printed cards.
OR
Select the Manual Eject Each Error option so the Printer will signal an error on
its LCD display (stating that the magnetic data could not be verified). (Note:
When this occurs, press the Cancel soft key to manually eject the mistakenly
verified card.)
DTC500 Series Card Printer/Encoders Troubleshooting Guide (Rev. 3.0)
148
RESTRICTED USE ONLY
FARGO Electronics, Inc.
Reviewing the Shift Data Left
Use the Shift Data Left option, which applies to all tracks when selected.
Step
1
Procedure
Select this option to shift the recorded magnetic data to the left-hand side of the
card's Magnetic Stripe. (Note: This is useful in situations that require cards to be
readable with insert type readers.)
DTC500 Series Card Printer/Encoders Troubleshooting Guide (Rev. 3.0)
149
RESTRICTED USE ONLY
FARGO Electronics, Inc.
Reviewing the ISO Track Locations
The magnetic Encoding Module encodes onto tracks in accordance with an ISO 7811-2
Magnetic Stripe. For track locations, review the display below.
0.223" 0.353" 0.493"
TRACK1
0.110"
0.130"
TRACK2
0.110"
TRACK3
0.110"
0.140"
Reviewing the Sample String
•
Sending Data to Track 1: ~1%JULIEANDERSON^1234567890?
•
Sending Data to Track 2: ~2;1234567890987654321?
•
Sending Data to Track 3: ~3;1234567890987654321?
Track
Track 1
Start
Sentinel
%
End
Sentinel
?
Field
Separator
^
Valid Characters
ASCII 32-95
Maximum
Number of
Characters
78
(See Reviewing the
ASCII Code and
Character Table on
page 152.)
Track 2
;
?
=
ASCII 48-63
39
Track 3
;
?
=
ASCII 48-63
106
DTC500 Series Card Printer/Encoders Troubleshooting Guide (Rev. 3.0)
150
RESTRICTED USE ONLY
FARGO Electronics, Inc.
Sending the Track Information
Magnetic track data is sent in the form of text strings from the application software to the
Printer driver. Specific characters must be added to the magnetic data (to be encoded) in
order for the Printer driver to differentiate between Magnetic Track data and the rest of the
printable objects. (Note: These specify the data and the tracks to encode, and mark the
start and the stop of the data string.)
•
Automatic: In some cases, these specific characters are automatically added to the
string of track data by ID software applications.
•
Manual: In most cases, the User must manually add these characters to the string of
Magnetic Track data. (Note: If these characters are not added to the track data, the text
intended for the Magnetic Track will appear as printed text on the card.)
To avoid this, track information must be entered as described below.
Step
1
Procedure
When entering track data, the "~" (tilde) character is entered first, followed by the
track number (1, 2, or 3) on which the data should encode. This is followed by
the data to be encoded.
•
Start Sentinel and End Sentinel: The first character of this data string must
be the track's specific Start Sentinel (SS) and the last character must be the
specific End Sentinel (ES). (Note: The characters or data in between the
SS and ES can include all of the valid characters specific to each track.)
•
Maximum Character Capacity: The number of these characters, however,
is limited by each track's maximum character capacity.
•
Field Separator: When segmenting track data, the appropriate Field
Separator (FS) must be used. (Note: See the table on the next page, which
displays the SS, ES, FS, and the valid characters defined for each track.)
DTC500 Series Card Printer/Encoders Troubleshooting Guide (Rev. 3.0)
151
RESTRICTED USE ONLY
FARGO Electronics, Inc.
Reviewing the ASCII Code and Character Table
ASCII Code
Character
ASCII Code
Character
ASCII Code
Character
32
space
56
8
80
P
33
!
57
9
81
Q
34
"
58
:
82
R
35
#
59
;
83
S
36
$
60
<
84
T
37
%
61
=
85
U
38
&
62
>
86
V
39
'
63
?
87
W
40
(
64
@
88
X
41
)
65
A
89
Y
42
*
66
B
90
Z
43
+
67
C
91
[
44
'
68
D
92
\
45
-
69
E
93
]
46
.
70
F
94
^
47
/
71
G
95
_
48
0
72
H
49
1
73
I
50
2
74
J
51
3
75
K
52
4
76
L
53
5
77
M
54
6
78
N
55
7
79
O
DTC500 Series Card Printer/Encoders Troubleshooting Guide (Rev. 3.0)
152
RESTRICTED USE ONLY
FARGO Electronics, Inc.
Using the Overlay / Print Area tab
Use this option to control how the Overlay (O) Panel and/or the print area will appear on a
card. (Note: This option is helpful if, to omit the overlay or printing around a card's smart
chip or Magnetic Stripe. By default, this option is set to print and overlay the entire card.)
Continued on the next page
DTC500 Series Card Printer/Encoders Troubleshooting Guide (Rev. 3.0)
153
RESTRICTED USE ONLY
FARGO Electronics, Inc.
Using the Overlay / Print Area dropdown menu
Step
1
Procedure
Select the Full Card option for the Printer to overlay and/or print the entire card.
OR
Select the Defined Area(s) option for the Printer to overlay and/or print only in
the selected and defined area or areas.
OR
Select the Undefined Area(s) option for the Printer to overlay and/or print only in
the space outside the selected and defined area.
OR
Select the Omit Smart Chip Area option for the Printer to overlay and/or print
only in the space outside the standard location of a smart chip.
OR
Select the Omit Mag Stripe Area option for the Printer to overlay and/or print
only in the space outside the standard location of an ISO Magnetic Stripe.
OR
Select the Omit Signature Area option for the Printer to overlay and/or print only
in the space outside the standard location of a signature panel.
(Note: In the card grid, black indicates the area in which the overlay and/or
printing will be applied.)
Continued on the next page
DTC500 Series Card Printer/Encoders Troubleshooting Guide (Rev. 3.0)
154
RESTRICTED USE ONLY
FARGO Electronics, Inc.
Using the Overlay / Print Area
Use these Overlay / Print Area options to control both the print and overlay together or
control each individually.
Step
1
Procedure
Select For Print and Overlay for the defined area to apply to both the printing and
overlay process.
OR
Select For Overlay Only for the defined area to apply only to the overlay process.
(Note: In this mode, printing will still be allowed over the entire card, and only the
overlay will be affected.)
OR
Select For Print Only (No Overlay) for the defined area to apply only to the print
process. (Note: In this mode, the overlay is completely disabled; so it will not be
applied.)
Caution: An overlay or an overlaminate must protect Dye-Sublimation
printing or it will quickly begin to wear or fade.
Continued on the next page
DTC500 Series Card Printer/Encoders Troubleshooting Guide (Rev. 3.0)
155
RESTRICTED USE ONLY
FARGO Electronics, Inc.
Using the Overlay / Print Area (continued)
Step
1
Procedure
Select the Defined Area(s) option to activate the card grid in the upper half of
the window. (Note: This allows defined areas to be created. It is through this
card grid that up to five areas can be defined.)
Continued on the next page
DTC500 Series Card Printer/Encoders Troubleshooting Guide (Rev. 3.0)
156
RESTRICTED USE ONLY
FARGO Electronics, Inc.
Using the Overlay / Print Area (continued)
Step
2
Procedure
When the card grid is first activated, a small black square will appear at its
default size of .2" x .2" / 5mm x 5mm and at its default location in the lower lefthand corner (0,0). (Note: This square represents the first defined area.)
•
3
Determine the area size by actually printing a card, and looking at it in the
same orientation as when it exits the Printer.
Measure the total size of the desired area, and enter those dimensions into the
Dimension boxes. (Note: The minimum size an area is .2" x .2" / 5mm x 5mm.)
Continued on the next page
DTC500 Series Card Printer/Encoders Troubleshooting Guide (Rev. 3.0)
157
RESTRICTED USE ONLY
FARGO Electronics, Inc.
Using the Overlay / Print Area (continued)
See the previous procedure in this section.
DTC500 Series Card Printer/Encoders Troubleshooting Guide (Rev. 3.0)
158
RESTRICTED USE ONLY
FARGO Electronics, Inc.
Using the Overlay / Print Area (continued)
Step
4
Procedure
Follow this procedure once the area is sized properly.
a. Measure the location this desired area to be positioned on the card.
b. Measure from the lower left corner of the card (up and over) to the lower left
corner (for the defined area to begin).
c. Enter these values into the X and Y boxes. (Note: The card grid lines are
spaced at .2 inch / 5mm intervals.)
Continued on the next page
Karen Atkins
Access Level-2
ID# 1234478
X=1.3“
Y=0.3“
DTC500 Series Card Printer/Encoders Troubleshooting Guide (Rev. 3.0)
159
RESTRICTED USE ONLY
FARGO Electronics, Inc.
Using the Overlay / Print Area (continued)
Step
5
Procedure
a. Print the card design.
b. Observe how the image is oriented on the card as it ejects from the Printer.
(Note: The location of a defined area is based on the card orientation as it
exits the Printer.)
c. Measure the defined area location based on the printed card. (Note: If
selecting the Rotate Front 180 Degrees option, the image will appear upside
down as it exits the Printer.)
d. Position the defined area opposite to the measurement of the onscreen card
design (which will appear right side up).
6
Use the Defined Area arrows to navigate back and forth from area to area.
(Note: The active area will always be highlighted with a dotted outline.)
a. Define another area by clicking on the Defined Area UP arrow.
•
Another .2" x .2" / 5mm x 5mm area will appear in the lower left-hand
corner. (Note: This is the location in which all newly defined areas will
first appear.)
•
Up to 5 areas can be defined. However, additional areas cannot be
added until the most recently created area has been moved or sized.
(Note: For this reason, size and position each area as it is created.)
b. Define areas for both the front and back sides (as needed) if printing onto
both sides of the card.
c. Delete an area by using the Defined Area arrows to select the area, and click
on the Delete button. (Note: If all areas are deleted, the Overlay / Print
Area options will automatically be deselected.)
DTC500 Series Card Printer/Encoders Troubleshooting Guide (Rev. 3.0)
160
RESTRICTED USE ONLY
FARGO Electronics, Inc.
Using SmartShield Area dropdown menu
Use the SmartShield Area options, which apply only if using the Printer's optional
SmartGuard Security Feature, and the SmartShield option is enabled.
Step
1
Procedure
Select the Apply SmartShield option to print the custom SmartShield Security
Image (a) if using the Printer's optional SmartGuard Security Feature and (b) if
the SmartShield option is enabled. (Note: Use the Front and Back options at
the top of this tab to designate the side or sides of the card to print the
SmartShield image.)
OR
Select No SmartShield (a) if not using the SmartShield option or (b) if not
printing the SmartShield image (even if it is encoded on the SmartGuard Access
Card).
(Note #1: This is a convenient way of turning the SmartShield Security Feature
ON or OFF.)
(Note #2: It is not possible to apply an overlay and a SmartShield image to the
same side of a card.
DTC500 Series Card Printer/Encoders Troubleshooting Guide (Rev. 3.0)
161
RESTRICTED USE ONLY
FARGO Electronics, Inc.
Using the Card tab
Use this option to control specific Printer functions.
DTC500 Series Card Printer/Encoders Troubleshooting Guide (Rev. 3.0)
162
RESTRICTED USE ONLY
FARGO Electronics, Inc.
Selecting the Card Size
Select either the CR-80 or CR-79 for the appropriate card size option from the two (2)
standard card sizes.
•
When designing a card format, always set the card size or page size within the card
design program to the exact Print Length and Width dimensions listed in the Printer
driver.
•
The dimensions of the total print area for each card size will appear in the Print Width and
Print Length boxes.
Step
1
Procedure
Select CR-80 to print onto standard "credit card" sized cards.
OR
Select CR-79 to print onto slightly smaller CR-79 sized cards (3.303"L x 2.051W
/ 83.9mmL x 52.1mmW).
2
•
The CR-79 card adhesive-backed card is used in applications where they are
printed and applied to thicker proximity cards.
•
Make a simple card size adjustment to the Printer's Card Thickness
Adjustment Lever if printing with CR-79 sized cards to decrease the accepted
card thickness.
Select either the inches or mm radio button (as needed).
Continued on the next page
DTC500 Series Card Printer/Encoders Troubleshooting Guide (Rev. 3.0)
163
RESTRICTED USE ONLY
FARGO Electronics, Inc.
Selecting the Card Size (continued)
See the previous procedure in this section.
DTC500 Series Card Printer/Encoders Troubleshooting Guide (Rev. 3.0)
164
RESTRICTED USE ONLY
FARGO Electronics, Inc.
Using the Card Hopper Selection (DTC515 / DTC525 only) option
This option only applies if using the DTC515 or DTC525 Card Printer models that provide a
dual-stack, 200-card capacity Card Input Hopper. (Note: The Printer driver always overrides
the LCD-based hopper selection. For example, the Printer will print from Hopper 2 even if
Hopper 1 (H-1) is selected on the LCD. This is because the print job was sent with Hopper 2
(selected from the Printer driver).)
Steps
1
Procedure
Select First Available for these purposes:
•
To print from the hopper currently selected as indicated on the Printer's LCD.
•
To automatically switch (via the Printer) to the other hopper once the current
hopper runs out of cards. (Note: In most cases, this option is used when
both hoppers are loaded with the same type of cards such as in higher
volume batch printing applications.)
•
To manually designate the hopper just prior to each specific print job by
pressing the H-1 or H-2 softkey buttons.
OR
Select Hopper 1 to print only from Hopper 1.
•
Select this option, and the hopper will not automatically switch to the other
hopper when running out of cards in Hopper 1.
•
Use this option when two different types of cards are loaded separately into
each hopper in order to print onto only one of those specific cards (e.g., Mag
stripe cards in Hopper 1 versus non stripe cards in Hopper 2).
OR
Select Hopper 2 to print only from Hopper 2 in this same fashion.
DTC500 Series Card Printer/Encoders Troubleshooting Guide (Rev. 3.0)
165
RESTRICTED USE ONLY
FARGO Electronics, Inc.
Using the Card Hopper Selection (DTC515 / DTC525 only) option (cont.)
See the previous procedure in this section.
DTC500 Series Card Printer/Encoders Troubleshooting Guide (Rev. 3.0)
166
RESTRICTED USE ONLY
FARGO Electronics, Inc.
Using the Card Hopper Selection (DTC515 / DTC525 only) option (continued)
See the previous procedure in this section.
DTC500 Series Card Printer/Encoders Troubleshooting Guide (Rev. 3.0)
167
RESTRICTED USE ONLY
FARGO Electronics, Inc.
Reviewing the Orientation
Select either the Portrait or Landscape radio buttons for Orientation. (Note: An icon
illustrating a printed card helps represent the difference between the two.)
Step
1
Procedure
Select Portrait to cause the card to print in a vertical orientation.
OR
Select Landscape to cause the card to print in a horizontal orientation, as shown
on the below.
Specifying the Copies
Specifies the number of copies to be printed, as shown above.
DTC500 Series Card Printer/Encoders Troubleshooting Guide (Rev. 3.0)
168
RESTRICTED USE ONLY
FARGO Electronics, Inc.
Using the Test Print button
Use this button to send a Self-Test print to the Printer.
•
Ribbon Requirement: A Full-Color YMCKO print Ribbon is required for a
DTC510/DTC515, or YMCKOK print Ribbon is required for a DTC520/DTC525.
•
Test Print Procedure: This test print procedure can be helpful in ensuring (a) that the
computer is effectively communicating with the Printer, and (b) that the Printer is
functioning properly.
DTC500 Series Card Printer/Encoders Troubleshooting Guide (Rev. 3.0)
169
RESTRICTED USE ONLY
FARGO Electronics, Inc.
Clicking on the About button
Click this About button to open a dialog containing the copyright and version information
about this Printer driver software.
DTC500 Series Card Printer/Encoders Troubleshooting Guide (Rev. 3.0)
170
RESTRICTED USE ONLY
FARGO Electronics, Inc.
Using the Image Position button
Use the Image Position controls to adjust the position of the overall print area to be
precisely centered on a card.
Step
1
Procedure
Adjust the Image Position values by clicking on the Vertical and Horizontal
adjustment arrows, as shown below.
DTC500 Series Card Printer/Encoders Troubleshooting Guide (Rev. 3.0)
171
RESTRICTED USE ONLY
FARGO Electronics, Inc.
Using the Image Position button (continued)
When adjusting these values, keep in mind that cards always remain in the same position as
they travel through the Printer, regardless of image orientation.
To illustrate this, the card illustration shown in the Image Position box will flip and rotate
according to whether you have selected the Portrait or Landscape radio buttons. However,
the outline around the illustration will always remain in the same landscape orientation.
DTC500 Series Card Printer/Encoders Troubleshooting Guide (Rev. 3.0)
172
RESTRICTED USE ONLY
FARGO Electronics, Inc.
Using the Image Position button (continued)
The following diagram represents how the printed image will move in relation to the fixed
card position as positive and negative image placement values are entered.
•
Use the Vertical adjustment to move the image more toward the rear of the Printer (if a
positive number is entered) and more toward the front of the Printer (if a negative number
is entered).
•
Use the Horizontal adjustment to move the image more toward the card output side of
the Printer (if a positive number is entered) and more toward the card input side of the
Printer (if a negative number is entered).
(Note: The maximum value for the Vertical and Horizontal adjustments is ±100 pixels (10
pixels =.0333"/.847mm).)
DTC500 Series Card Printer/Encoders Troubleshooting Guide (Rev. 3.0)
173
RESTRICTED USE ONLY
FARGO Electronics, Inc.
Using the Lamination tab (only with Card Lamination
Module)
Use this option to control specific Printer functions. The Lamination Tab appears only if the
Printer is equipped with the Card Lamination Module. These options allow you to control the
Printer's lamination process.
DTC500 Series Card Printer/Encoders Troubleshooting Guide (Rev. 3.0)
174
RESTRICTED USE ONLY
FARGO Electronics, Inc.
Selecting the Lamination Position
Step
1
Procedure
The Lamination Position control allows you to adjust the horizontal position of
the PolyGuard overlaminate. This control functions in the exact same fashion
as the Image Position controls, except only the horizontal position of the
overlaminate requires adjustment.
•
To adjust the lamination position, click on the Horizontal adjustment
arrows.
•
To move the overlaminate more toward the Card output side of the Printer,
enter a positive number.
•
To move the overlaminate more toward the card input side of the Printer,
enter a negative number. (Note: The adjustment arrows point in the
direction the patch will move on the card. The maximum value for the
Horizontal adjustment is ±100 pixels (10 pixels = about .03"/.8mm).)
•
To adjust the Vertical placement of the PolyGuard overlaminate, see the
Loading the Overlaminate procedure on page 91.
Continued on the next page
DTC500 Series Card Printer/Encoders Troubleshooting Guide (Rev. 3.0)
175
RESTRICTED USE ONLY
FARGO Electronics, Inc.
Selecting the Lamination Side
Step
1
Procedure
a. Select the No Lamination option if you do not want to use the Printer's
built-in laminator.
b. Select Laminate Front Side, Laminate Back Side, or Laminate Both Sides
to specify the side(s) of the card to laminate.
Continued on the next page
DTC500 Series Card Printer/Encoders Troubleshooting Guide (Rev. 3.0)
176
RESTRICTED USE ONLY
FARGO Electronics, Inc.
Selecting the Lamination Type
Select one of the Lamination Type options, according to which type of lamination media is
currently installed. Two types of overlaminates are supported by the driver: Film Lamination
and PolyGuard lamination. Custom versions of each type are also available.
Step
1A
Procedure
Select the Film Lamination option if the Thermal Transfer Film Overlaminate
type is installed in the Lamination Module.
•
The Film Lamination may be applied with or without the application of an
additional overlay from a paneled, full-color print Ribbon.
•
The Overlay (O) Panel provides additional Ultra-Violet (UV) light
protection and additional abrasion resistance not found when using film
laminations alone; however, it requires use of a print Ribbon with an
Overlay (O) Panel.
•
If using Film lamination, the additional protection of the print Ribbon's
overlay panel is recommended.
•
If the Film Lamination option is selected, the film lamination is applied to
the printed card, then the card is ejected. (Note: This is the fastest way
to apply the film lamination, yet it provides the lowest film durability.)
Continued on the next page
DTC500 Series Card Printer/Encoders Troubleshooting Guide (Rev. 3.0)
177
RESTRICTED USE ONLY
FARGO Electronics, Inc.
Selecting the Lamination Type
Step
1B
Procedure
Select the Overlay then Film Lamination option when using a Ribbon which
provides a clear overlay panel. The Ribbon types which do not provide an
overlay panel or support overlay printing are the resin-only Ribbons and the
Full-Color YMC, YMCK, and YMCKK Ribbons.
OR
Select the 0.6 PolyGuard Lamination option or 1.0 PolyGuard Lamination
option for either patch thickness. (Note: These both offer equivalent
protection but require different heat settings and lamination speeds.
•
Select the appropriate option according to the thickness of the PolyGuard
material you are using.)
•
Select the PolyGuard Alternating Patch option only if using PolyGuard
material that has alternating patch configurations on the same roll (e.g.,
full patch on the front of the card and half patch on the back).
Caution: with any of these PolyGuard options, do not apply the
Ribbon overlay (O) when laminating with PolyGuard.
OR
Select the PolyGuard Alternating Patch option only if using PolyGuard
material that has alternating patch configurations on the same roll (e.g., full
patch on the front of the card and half patch on the back).
DTC500 Series Card Printer/Encoders Troubleshooting Guide (Rev. 3.0)
178
RESTRICTED USE ONLY
FARGO Electronics, Inc.
Adjusting the Transfer Dwell Time and Transfer Temperature
Step
1
Procedure
Adjust the Transfer Dwell Time and the Transfer Temperature to control the
Lamination Dwell Time or through-put speed of a card in seconds/inch and the
Lamination Temperature.
Selecting the Sensors button and Defaults button
Step
Procedure
1
Select the Sensors button to bring up a separate dialog to calibrate the
Lamination Sensor. See the next page.
2
Adjust the Default settings as needed when using other types of cards. (Note:
The Default settings for the Lamination Dwell Time and Temperature are
preset for factory-recommended card stocks and overlaminate types.)
DTC500 Series Card Printer/Encoders Troubleshooting Guide (Rev. 3.0)
179
RESTRICTED USE ONLY
FARGO Electronics, Inc.
Calibrating the Card Lamination Module’s Lamination Sensor
Step
1
Procedure
Select the Lamination Tab's Sensors button to display options for calibrating
the Card Lamination Module’s Lamination Sensor. The Lamination Sensor is
what detects the start of each PolyGuard patch throughout the roll. This
Sensor may occasionally need to be recalibrated.
•
If the lamination module seems to skip PolyGuard patches or wind the
PolyGuard roll until the lamination module's LED flashes, recalibrate the
Lamination Sensor according to the instructions given the in the Calibration
window.
•
Be sure the Printer is powered ON and that the lamination module's Top
Cover and Lamination Station are closed when calibrating. (Note: This
Sensor is not used if applying Thermal Transfer Film overlaminate.)
DTC500 Series Card Printer/Encoders Troubleshooting Guide (Rev. 3.0)
180
RESTRICTED USE ONLY
FARGO Electronics, Inc.
Board Level Diagnostics
The purpose of this section to provide the User with specific Board Level Diagnostic
procedures for Board Errors and Sensor Testing for the DTC500 card Printer.
Board Errors
Resolving the EE Memory Error
Symptom: An error has occurred in the permanent circuit memory.
Step
Procedure
1
Reboot the Printer.
2
If the problem persists, the Main Board will need to be replaced. See the
Replacing the Main Board procedure on page 29.
3
As an alternative to replacing the Main Print Board, the chip U16 (080239) can
be replaced. (Note: FARGO recommends that only a qualified electronics
technician perform this procedure.)
Resolving the EE Checksum Error
Symptom: An error has occurred in the permanent circuit memory.
Step
Procedure
1
Reboot the Printer.
2
If the problem persists, the Main Board will need to be replaced. See the
Replacing the Main Board procedure on page 29.
3
As an alternative to replacing the Main Print Board, the chip U16 (080239) can
be replaced. (Note: FARGO recommends that only a qualified electronics
technician perform this procedure.)
DTC500 Series Card Printer/Encoders Troubleshooting Guide (Rev. 3.0)
181
RESTRICTED USE ONLY
FARGO Electronics, Inc.
Resolving the DRAM Memory Error
Symptom: An error has occurred in the removable Memory Module (SIMM).
Step
Procedure
1
Reboot the Printer.
2
If the problem persists, remove the rear cover and ensure that the SIMM
(080229) is seated properly.
3
If the Memory Module is not seated properly, remove the memory simm and
reinstall.
4
If the installation appears correct, and the error persists, the SIMM (080229) on
the Main Print Board will need to be replaced.
Resolving the RAM Memory Error
Symptom: An error has occurred in the permanent circuit memory.
Step
Procedure
1
Reboot the Printer.
2
If the problem persists, the Main Board will need to be replaced. See the
Replacing the Main Board procedure on page 29.
3
As an alternative to replacing the Main Print Board, the chip U17 (080229) can
be replaced. (Note: FARGO recommends that only a qualified electronics
technician perform this procedure.)
DTC500 Series Card Printer/Encoders Troubleshooting Guide (Rev. 3.0)
182
RESTRICTED USE ONLY
FARGO Electronics, Inc.
Resolving the FPGA Error
Symptom: An unexpected hardware error has occurred.
Step
Procedure
1
Reboot the Printer.
2
If the problem persists, the Main Board will need to be replaced. See the
Replacing the Main Board procedure on page 29.
3
As an alternative to replacing the Main Print Board, the chip U2 (080066) can be
replaced. (Note: FARGO recommends that only a qualified electronics
technician perform this procedure.)
DTC500 Series Card Printer/Encoders Troubleshooting Guide (Rev. 3.0)
183
RESTRICTED USE ONLY
FARGO Electronics, Inc.
Resolving the Update Firmware Now
The system Firmware must be updated for one of these reasons:
•
The previous Firmware update was unsuccessful.
•
The program data is corrupt.
•
The Printer model does not correspond with the installed Firmware model number.
•
The revision number of the Firmware does not match on all system components.
See the Updating the Printer’s Firmware procedure on page 209.
Sensor Testing
Step
Procedure
1
Check the voltage to determine if a Sensor is working.
2
a. Test the voltage of each Sensor using ground (GRD = Chassis) to the correct
pin on each connector. See the Sensor Location and Voltages table on
the next page).
b. Block a slot Sensor with a card.
c. Cover a reflective Sensor with a card.
3
a. Troubleshoot the Ribbon Sensor by using the RibbonTraq marks on the
Ribbon and Film to cover the Ribbon and Film Sensors. (Note: The
numbers indicate the location on J16, as shown in the Sensor Location and
Voltages table on the next page).
b. Open the upper module to find the Ribbon Sensor orientation. (Note: The
numbers indicate the location on J16, as shown in the Sensor Location and
Voltages table on the next page.)
DTC500 Series Card Printer/Encoders Troubleshooting Guide (Rev. 3.0)
184
RESTRICTED USE ONLY
FARGO Electronics, Inc.
Reviewing the Sensor Location and Voltages
Sensor
Location
Pin
Low Range VDC
High Range VDC
Card Sensor
(near Cleaning
Cart)
J15
4
Unblocked .17 - .9
Blocked 3.0 – 3.3
Cover Open
Sensor (plastic
top)
J4
16
Unblocked .17 - .9
Blocked 3.0 – 3.3
Encoding TOF
Platen Home
J29
4
Unblocked .17 - .9
Blocked 3.0 – 3.3
Flipper Table
Card Sensor
J15
8
Unblocked .17 - .9
Blocked 3.0 – 3.3
Flipper Table
Sensor
J7
4
Covered
Uncovered 3.0 - 3.3
Hopper Lift
Sensor
J4
12
Unblocked .17 - .9
Blocked 3.0 – 3.3
Dual Hopper
Position
J32
4
Unblocked .17 - .9
Blocked 3.0 – 3.3
Printhead lift
Sensor
J6
8
Unblocked .17 - .9
Blocked 3.0 – 3.3
Magnetic Card
Sensor
J7
8
Covered
.9
Uncovered 3.0 - 3.3
Bypass
Feed/Hopper
Card Sensor
J4
4
Covered
.9
Uncovered 3.0 - 3.3
Hopper Door
Sensor (not used)
J4
8
Unblocked .17 - .9
.9
Blocked 3.0 – 3.3
Continued on the next page
DTC500 Series Card Printer/Encoders Troubleshooting Guide (Rev. 3.0)
185
RESTRICTED USE ONLY
FARGO Electronics, Inc.
Reviewing the Sensor Location and Voltages (continued)
Sensor
Location
Pin
Low Range VDC
High Range VDC
Print Station
Open Sensor
J6
4
Unblocked .17 - .9
Blocked 3.0 – 3.3
Print TOF Sensor
J31
4
Unblocked .17 - .9
Blocked 3.0 – 3.3
Ribbon Encoder
J6
12
Unblocked .17 - .9
Blocked 3.0 – 3.3
Ribbon Sensor
(5)
J16
3
Covered
0.9
Uncovered 3.5 – 5.0
Ribbon Sensor
(4)
J16
5
Covered
0.9
Uncovered 3.5 – 5.0
Ribbon Sensor
(3)
J16
11
Covered
0.9
Uncovered 3.5 – 5.0
Ribbon Sensor
(2)
J16
7
Covered
0.9
Uncovered 3.5 – 5.0
Ribbon Sensor
(1)
J16
9
Covered
0.9
Uncovered 3.5 – 5.0
Reviewing the Sensor Layout on Ribbon Sensor array
(5)
(4)
(3)
(2)
(1)
DTC500 Series Card Printer/Encoders Troubleshooting Guide (Rev. 3.0)
186
RESTRICTED USE ONLY
FARGO Electronics, Inc.
LCD On-Line Menu Navigation
The purpose of this section to provide the User with specific procedures for LCD On-Line
Menu Navigation, Test Image Printing, and Printer Setup for the DTC500 card Printer.
Entering the LCD Menu and selecting an Option
The MENU option is above the center softkey button, as shown below. This allows access to
several test, setup, and reporting functions. The Selecting from the Menu Option Tree
Structure on page 188, shows the available menu options. A description of each option and
its function is included on the pages following the on-line menu.
Step
1
Procedure
Press the MENU button to bring up the Select Function screen appears, as
shown here.
Use the scroll buttons to move up or down through the menu options, as shown
below. (Note: The brackets appear on either side of the active Menu option.)
Press the button below Select to choose an option. Choose from these five
categories: Print Test Image, Setup Printer, Show error count, Show card
count, and System Upgrade.
MENU
Ready
DTC5XX
MENU
H-1
HELP
SELECT FUNCTION
[Print Test Image]
Setup Printer
SELECT
H-2
EXIT
DTC500 Series Card Printer/Encoders Troubleshooting Guide (Rev. 3.0)
187
RESTRICTED USE ONLY
FARGO Electronics, Inc.
Using the Softkey and Scroll buttons
Step
1
Procedure
The Printer has three Softkey buttons that appear below the LCD display. Their
current function is indicated by the words appearing above them. This function
will change according to the Printer's current mode of operation.
•
2
Press the corresponding softkey button under the choice you wish to select.
(Note: If no word appears above a particular button, this indicates it has no
function in that particular mode of operation.)
The Printer has another type of button on its control pad called Scroll buttons.
These buttons are located just to the right of the LCD display.
•
Use these buttons to scroll through the help text, to navigate through the
Printer's menu, and to adjust certain Printer setting. (Note: The Printer will
indicate when the scroll buttons are active by displaying on the right-hand
side of the LCD display. If scrolling through a list, this symbol will change to
if you have reached the bottom of the list or if you have reached the top.)
Accessing the Menu Option Structure Tree
When the Printer is powered on and sitting idle, a MENU option appears above the center
softkey button.
•
Use this menu option to access several test, setup, and reporting functions.
•
Refer to the Menu Option Structure Tree for all available menu options, on the next page.
DTC500 Series Card Printer/Encoders Troubleshooting Guide (Rev. 3.0)
188
RESTRICTED USE ONLY
FARGO Electronics, Inc.
Selecting from the Menu Option Structure Tree
SELECT FUNCTION
Print Test Image
SELECT TEST IMAGE
Gray/Align YMC/K
Color/Resin YMCK
Standard Resin
Magnetic Test
Card Count
CHANGE PARAMETER
Print TOF
-99 min
Print EOF
-99 min
Ribbon Tension
-25 min
Head Resistance
+2400 min +3600 max
Current Value X
Image Darkness
-99 min
Setup Printer
Encoder Settings
+99 max
Current Value X
+99 max
Current Value X
+25 max
Current Value X
+99 max
Current Value X
Mag: None / Installed
Smart: None / Installed
Prox: None / Installed
Position: CR-80
Magnetic TOF
-99 min
+99 max
Current Value X
MENU
Hopper Settings
Input: Single / Dual
Card Sensor: On / Off
Exception Feed: On / Off
BAUD Rate Settings
19200
9600
Flipper Offset
Level
Encoder Angle
-10 min
+10 max
Current Value X
Report Supplies
SUPPLIES REPORT
Print Ribbon
PRINT RIBBON
Type: XX
Show Error Count
EXCEPTION LOG
Type of Error
Occurrences: XX
Prints Remaining:
Not Available
Example:
Wrong Print Ribbon
Occurrences: 2
Error Log End
Show Card Count
CARD STATISTICS
CC: XX
PC: XX
System Upgrade
SYSTEM UPGRADE
Are you sure you
want to continue?
Yes
NO
Part Number: XX
Lot Number:
Not Available
DTC500 Series Card Printer/Encoders Troubleshooting Guide (Rev. 3.0)
189
RESTRICTED USE ONLY
FARGO Electronics, Inc.
Using the LCD Menu
Step
1
Procedure
a. To enter the Printer's LCD menu, press the center button labeled MENU.
(Note: The Select Function screen will appear.)
b. Use the scroll buttons to scroll up or down the list of menu options. (Note:
Brackets will appear on either side of the active menu option.)
c. Press the SELECT button to enter or select the desired option.
Printing the Self-test
Use this option to print a variety of preset test images that can be helpful in ensuring your
Printer is functioning properly.
•
Once the print Ribbon and cards are installed, a self-test should be performed to check
for proper operation of the Printer.
•
The standard self-test function requires only that a full-color print Ribbon and at least one
card be installed. (Note: The Printer will begin printing this image as soon as the image
has finished processing. Generally, processing only takes about 5 to 10 seconds.)
Step
1
Procedure
When the Printer is powered ON and is sitting idle, its READY screen will display
on the LCD.
Press the MENU button to enter the MAIN MENU screen.
2
Press the SELECT button to enter the PRINT TEST IMAGE menu.
3
Use the scroll buttons to scroll to the type of self-test you would like the Printer to
perform.
•
Note the name of each self-test indicates the Ribbon panels required in order
for the self-test to print.
•
For example, the Color/Resin YMCK self-test can be printed with either a
YMCKO or YMCKOK full-color print Ribbon.
Press the SELECT button to begin printing. The self-test print will begin as soon
as the test image is processed.
DTC500 Series Card Printer/Encoders Troubleshooting Guide (Rev. 3.0)
190
RESTRICTED USE ONLY
FARGO Electronics, Inc.
Reviewing the Gray/Align YMC (DTC510/515) and Gray/Align YMC/K
(DTC520/525) Self-Test
Reviewing the Color/Resin YMCK Self-Test
Step
1
Procedure
Use this card to determine Image Placement and confirm that (a) the image colors
are properly reproduced and (b) the Resin Panel is printing properly. (Note: The
Image consists of twelve spot colors, YMC and RGB, as well as gray density bars
and thin resin lines.)
DTC500 Series Card Printer/Encoders Troubleshooting Guide (Rev. 3.0)
191
RESTRICTED USE ONLY
FARGO Electronics, Inc.
Reviewing the Card Count YMC Self-Test
Step
1
Procedure
Use this card to view counts for Card Count (CC), and Pass Count (PC).
•
The Card Count is the total number of cards the Printer has produced. Pass
Count is the total number of print passes made by the Printhead. (Note: A
pass is measured each time a single Ribbon panel is printed or passes
beneath the Printhead.)
Reviewing the Standard Resin Self-Test
Step
1
Procedure
Print this card with any resin Ribbon. However, it will work best with a standard
resin black Ribbon.
DTC500 Series Card Printer/Encoders Troubleshooting Guide (Rev. 3.0)
192
RESTRICTED USE ONLY
FARGO Electronics, Inc.
Using the Magnetic Test option (only with Magnetic Encoding
Module)
Use this option only if Magnetic Encoding Module is installed in your Printer.
Step
1
Procedure
Select this option to test the module. (Note: This test will not print on a card, but
will simply feed, encode, and eject a blank card.)
Be sure to have Magnetic Stripe cards installed in your Printer when running this
test.
Setting up the Printer
In most cases, these settings should only be modified by qualified service personnel.
•
If adjustment is necessary, refer to the Printer's Technical Service and Maintenance
Manual (available upon request) for detailed instructions, or call for technical assistance.
•
If you would like to make small adjustments to Print TOF/EOF (offset) or Image
Darkness, first try making these changes through the Printer driver's Image Position and
Image Color controls prior to changing the internal Printer settings.
Caution #1: These settings are optimized at the factory and will rarely need to be
changed.
Caution #2: Do not alter these settings unless it is absolutely necessary.
Caution #3: If you do need to change these settings, it is important to note that the
factory settings for each specific Printer are recorded on a label on the bottom of the Printer.
Refer to this label if you ever need to reset the Printer settings back to the factory defaults.
Use this option to change the Printer's internal settings for controlling the procedures in this
section.
DTC500 Series Card Printer/Encoders Troubleshooting Guide (Rev. 3.0)
193
RESTRICTED USE ONLY
FARGO Electronics, Inc.
Print TOF and Print EOF Alignment Procedures
The Print TOF and Print EOF procedures must be performed as a single alignment process.
The goal of these procedures is to align the printed image to precisely line up with the edges
of the card as shown below. Notice that when aligned properly, the test print's Alignment
Arrows will fall just inside the edges of the card.
This information pertains to the two procedures on the next page:
•
Alignment Test Image: The alignment test image is designed for setting these
parameters. Be sure to run this test after each adjustment. Run the Alignment Test
Image by selecting the following options: MENU, Print Test Image, and Gray/Align
YMC (DTC510/515) or Gray/Align YMC/K (DTC520/525).
•
Value and Settings Changes: Change the settings in the procedures below by
choosing the following options: MENU, Setup Printer, and the parameter to be changed.
Change the value by pressing the appropriate scroll button, and press SELECT to save
the value.
Continued on the next page
DTC500 Series Card Printer/Encoders Troubleshooting Guide (Rev. 3.0)
194
RESTRICTED USE ONLY
FARGO Electronics, Inc.
Preparing to Adjust the Print TOF and Print EOF
Step
1
Procedure
Before starting the alignment procedures, you must first establish a baseline
from which to start your adjustments.
To do this, select MENU, Setup Printer, and set these starting parameters in
each of the following Setup Printer options: Print TOF: +30 and Print EOF: -30.
Setting the Print TOF
Use this procedure to position the printed image correctly on the leading edge of the card.
Step
Procedure
1
Choose MENU, Print Test Image, and Gray/Align YMC to print a test card.
2
Select MENU, Setup Printer, and Print TOF.
3
Record the Print TOF value on the test card (you just printed).
4
Examine the test card. (Note: When centered properly, the Alignment Arrows
should appear just at the edge of the card's leading edge. If your test card does
not look like the sample shown below, go to Step 5 to adjust the Print TOF.)
Continued on the next page
DTC500 Series Card Printer/Encoders Troubleshooting Guide (Rev. 3.0)
195
RESTRICTED USE ONLY
FARGO Electronics, Inc.
Setting the Print TOF (continued)
Step
5
Procedure
a. Decrease the Print TOF value to move the printed image more toward the
leading edge of the card.
b. Increase the Print TOF value to move the printed image more toward the
trailing edge of the card.
•
The numbers being entered for the settings are in ½ pixels.
•
The number of pixels is equal to the measurement in inches times 600 or
the measurement in mm times 23.6. (For example, 0.100 inches or
2.54mm equals 60 increments on the LCD.)
6
Press SELECT to save the value, and print another test card.
7
Repeat steps 1 to 6 until the test image is correctly positioned as shown above.
Setting the Print EOF
This procedure positions the printed image correctly on the trailing edge of the card.
Step
Procedure
1
Choose MENU, Print Test Image, and Gray/Align YMC to print a test card.
2
Select MENU, Setup Printer, and Print EOF.
3
Record the Print EOF value on the test card you just printed.
4
Examine the test card.
a. When centered properly, the Alignment Arrows should appear just at the
edge of the card's Trailing edge.
b. If the test card does not look like the sample shown below, go to step 5 to
adjust the Ribbon Tension.
Continued on the next page
DTC500 Series Card Printer/Encoders Troubleshooting Guide (Rev. 3.0)
196
RESTRICTED USE ONLY
FARGO Electronics, Inc.
Setting the Print EOF (continued)
Step
5
Procedure
a. Decrease the Print EOF value to move the printed image more toward the
leading edge of the card.
b. Increase the Print EOF value to move the printed image more toward the
trailing edge of the card.
•
The numbers being entered for the settings are in ½ pixels.
•
The number of pixels is equal to the measurement in inches times 600 or
the measurement in mm times 23.6. (For example, 0.100 inches or
2.54mm equals 60 increments on the LCD.)
6
Press SELECT to save the value. Print a test card as described in step 1.
7
Repeat Steps 1 to 6 (above) until the Test Image is correctly positioned or
Ribbon wrinkle is alleviated.
DTC500 Series Card Printer/Encoders Troubleshooting Guide (Rev. 3.0)
197
RESTRICTED USE ONLY
FARGO Electronics, Inc.
Adjusting the Ribbon Tension
Step
Procedure
1
Choose MENU, Print Test Image, and Gray/Align YMC to print a test card.
2
Select MENU, Setup Printer, and Ribbon Tension.
3
Record the Ribbon Tension value on the test card (you just printed).
4
Examine the test card. (Note: When centered properly, the Alignment Arrows
should appear just at the edge of the card's Trailing edge. If the test card does
not look like the sample shown below, go to step 5 to adjust the Ribbon
Tension.)
DTC500 Series Card Printer/Encoders Troubleshooting Guide (Rev. 3.0)
198
RESTRICTED USE ONLY
FARGO Electronics, Inc.
Adjusting the Ribbon Tension (continued)
Step
5
Procedure
a. Decrease the Ribbon Tension value to move the end of the image toward the
leading edge of the card if the alignment arrows are not printing on the card,
b. Increase the Ribbon Tension value to move the end of the image toward the
trailing edge of the card.
Caution: Be sure to make adjustments in small increments of ±2, to
avoid over-adjusting this setting. For example, the Ribbon may jam or break if
the setting is set too high.
6
Press SELECT to save the value, and print another test card.
7
Repeat Steps 1 to 6 until the test image is correctly positioned. See the previous
page.
Setting the Printhead Resistance
Step
1
Procedure
Locate the Printhead Setting Number on the bottom of the Printhead.
The number reads R=XXXX.
2
Select MENU, Setup Printer, and Printhead Resistance. Enter the given value
for the Printhead.
3
Press the Select button to save the value.
DTC500 Series Card Printer/Encoders Troubleshooting Guide (Rev. 3.0)
199
RESTRICTED USE ONLY
FARGO Electronics, Inc.
Adjusting the Image Darkness
Step
Procedure
1
Choose MENU, Print Test Image, and Gray/Align YMC to print a test card.
2
Select MENU, Setup Printer, and Image Darkness.
3
Record the Image Darkness value on the test card last printed.
4
Examine the test card.
5
Adjust the Image Darkness value if needed. Enter a negative value to lighten
the printed image.
OR
Input a positive value to darken the printed image.
Caution: Be sure to make adjustments in small increments of ± 4, to
avoid over-adjusting this setting. The Ribbon can jam or break if the setting is
too high.
6
Press SELECT to save the value.
7
Print a test card as described in Step 1.
8
Repeat Steps 1 to 7 until the image darkness is correct.
DTC500 Series Card Printer/Encoders Troubleshooting Guide (Rev. 3.0)
200
RESTRICTED USE ONLY
FARGO Electronics, Inc.
Changing the Encoder Settings
Use this option to choose the settings that coincide with the Printer's current encoding
configuration. Use the scroll buttons to select the option (you want to change).
Step
Procedure
1
Select MENU, Setup Printer, and Encoder Settings.
2
Change the desired option as needed.
•
Mag: Press the CHANGE button to select None or Installed according to
whether or not a Magnetic Stripe Encoder is installed.
•
Smart: Press the CHANGE button to select None or Installed according to
whether or not a Smart Card Encoder is installed.
•
Prox: Press the CHANGE button to select None or Installed according to
whether or not a Prox Card Encoder is installed.
•
Position: This option is set according to the card size for which your Encoder
is physically positioned inside the Printer. (Note: All DTC500 Series Printers
are configured only for CR-80 size cards.)
Do not change this setting.
3
Press SAVE to save the value.
DTC500 Series Card Printer/Encoders Troubleshooting Guide (Rev. 3.0)
201
RESTRICTED USE ONLY
FARGO Electronics, Inc.
Adjusting the Magnetic TOF
Use this setting to position the magnetic data at the correct distance from the leading edge of
the card.
•
The Magnetic TOF is the distance from the edge of the card to the Start Sentinel (SS).
•
The Start Sentinel marks the beginning of the encoded data. (Note: According to the
magnetic recording standard (ISO 7811), the correct Start Sentinel distance is 0.293
inches ± 0.020 inches (7.44 mm ± 0.51 mm) from the leading edge of the card.)
Step
1
Procedure
a. From the application program, print and encode a test card.
b. Measure this distance by making the data visible using a magnetic viewer or
developer solution.
c. Alternatively, use a Magnetic Card Analyzer to measure the Start Sentinel
distance.
2
a. Use a magnetic viewer or developer solution or spray to make the magnetic
data visible (in order to identify the Start Sentinel as the first set of magnetic
lines or first one-bit, which are visibly closer together than the large number
of evenly spaced lines or leading zero-bits that fill the space to the edge of
the card, as shown on the next page).
b. Use a magnifying device with a built-in measuring scale to measure the
distance from the edge of the card to the Start Sentinel in the data, as shown
on the next page.
3
If the Start Sentinel is too far from the leading edge of the card, reduce (or make
negative) the Magnetic TOF setting needs.
OR
If the Start Sentinel is too close to the leading edge of the card, increase (or
make positive) the Magnetic TOF setting needs.
4
Select MENU, Setup Printer, and Magnetic TOF.
5
Record the Magnetic TOF value on the test card last printed.
Continued on the next page
DTC500 Series Card Printer/Encoders Troubleshooting Guide (Rev. 3.0)
202
RESTRICTED USE ONLY
FARGO Electronics, Inc.
Setting the Magnetic TOF (continued)
Step
6
Procedure
Enter a Magnetic TOF value appropriate for the direction for the magnetic data to
move.
•
As a rule, a shift of ±27 equals about .0625" (1/16") or 1.6mm. (Note: Keep
this in mind when adjusting this option to avoid over-adjusting.)
•
If the negative value is set too high, for example, the Printer may start
encoding before the card's Magnetic Stripe reaches the encoding head.
7
Repeat steps 1 to 5 until the Magnetic TOF is correct.
8
Press SELECT to save the value.
.293“ / 7.44mm
Magnetic Track Data
Leading Edge
of Card
+
DTC500 Series Card Printer/Encoders Troubleshooting Guide (Rev. 3.0)
-
Trailing Edge
of Card
203
RESTRICTED USE ONLY
FARGO Electronics, Inc.
Changing the Hopper Settings
Use this option to choose settings related to your Printer's Card Input Hopper. Use the scroll
buttons to select the option to change.
Step
Procedure
1
Select MENU, Setup Printer, and Hopper Settings.
2
Change the desired option as needed for Input.
•
3
Press the CHANGE button to select Single or Dual (based on whether your
Printer model includes a single or dual Card Input Hopper).
Change the desired option as needed for Card Sensor.
•
Press the CHANGE button to turn the Hopper's Card Sensor On or Off.
Note #1: The default setting is for this Sensor to be turned ON. This Sensor
only needs to be turned OFF if you are using blank cards with pre-printed backs,
non-white, dark colored blank cards, or with cards that have a Magnetic Stripe in
the non-ISO standard position.
Note #2: In some cases, these types of cards cannot be seen by the Sensor.
This leads the Printer to assume that the Card Input Hopper is empty, and that
cards will not feed. Turn the Sensor to OFF to correct this problem.
Change the desired option as needed for Exception Feed.
•
Press the CHANGE button to turn the Hopper's Exception Card Feed feature
On or Off.
Note #1: The default setting is for this feature to be turned OFF. In this case,
the Card Input Hopper rests in the DOWN position when the Printer is sitting idle
as this promotes easier card loading.
Note #2: If you would like to use the exception feed feature, change this setting
to ON. This will cause the Card Input Hopper to rest in the UP position, allowing
the necessary space (below the Hopper) for exception cards to be inserted. The
only caution when using this feature is that cards must be loaded properly.
3
Press SAVE to save your settings.
DTC500 Series Card Printer/Encoders Troubleshooting Guide (Rev. 3.0)
204
RESTRICTED USE ONLY
FARGO Electronics, Inc.
Changing the BAUD Rate Settings
Apply this setting only if the Printer provides support for the Embedded Fonts and Bar Codes
option.
Step
Procedure
1
Select MENU, Setup Printer, and BAUD Rate Settings.
2
Change to the appropriate option: 19200 or 9600.
3
Press the Select button to save the value.
Adjusting the Flipper Offset
Step
Procedure
1
Select MENU, Setup Printer, and Flipper Offset.
2
Select Level or Encoder Angle.
3
4
•
Use the Level option to set the position of the Flipper so it is level with the
card path.
•
Use the Encoder Angle option to fine tune the position of the Flipper in
relation to the Printer's built-in Encoder if your Printer is equipped with this
option.
Change these settings in small increments if the card is not feeding correctly off
the Card Flipper onto the card path or into he Encoder.
•
Decrease the Flipper Offset setting to lower the lip of the Flipper.
•
Increase the setting to raise it.
Press the Select button to save the value.
DTC500 Series Card Printer/Encoders Troubleshooting Guide (Rev. 3.0)
205
RESTRICTED USE ONLY
FARGO Electronics, Inc.
Viewing the Report Supplies
Step
Procedure
1
When using monochrome resin-only print Ribbons, use this option to view all of
the following information about the print Ribbon installed in the Printer.
2
When using Dye-Sublimation print Ribbons, it is possible to view only the Type
and Part Number fields.
•
Type: This displays the name or type of print Ribbon installed.
•
Prints Remaining: This displays the approximate number of prints
remaining on your Ribbon. This information is helpful for determining about
how many cards you can produce before the next Ribbon change.
•
Part Number: This displays the specific part number for your Ribbon which
can be helpful when re-ordering.
•
Lot Number: This displays the print Ribbon's lot number.
Using the Show the Error Count Tool
Use the Show the Error Count tool to (a) troubleshoot the Printer, (b) maintain a log of up to
255 errors, (c) track how many times specific errors occur, and (d) determine if certain errors
are occurring more than others (in order to pinpoint an area in the Printer requiring attention).
Step
1
Procedure
a. Use the scroll buttons to move through the list of errors.
b. Press the Reset button to clear the entire existing error log and start a new
log. (Note: The error log will stop logging errors once it has reached its
error occurrence limit of 255.)
DTC500 Series Card Printer/Encoders Troubleshooting Guide (Rev. 3.0)
206
RESTRICTED USE ONLY
FARGO Electronics, Inc.
Showing the Card Count
Step
1
Procedure
Choose SHOW CARD COUNT to view counts for Card Count (CC) and Pass
Count (PC).
•
Card Count is the total number of cards the Printer has produced.
•
Pass Count is the total number of print passes made by the Printhead.
(Note: A pass is measured each time a single Ribbon panel is printed or
passes beneath the Printhead.)
Selecting the System Upgrade (Firmware Upgrade)
This option is used to upgrade the Printer Firmware.
Step
1
Procedure
Upgrade by selecting SYSTEM UPGRADE.
The LCD will prompt: Are you sure you want to continue?
2
Select YES to begin the System Upgrade.
OR
Select NO to return to the READY screen. See the the Updating the Printer’s
Firmware procedure on page 209.
DTC500 Series Card Printer/Encoders Troubleshooting Guide (Rev. 3.0)
207
RESTRICTED USE ONLY
FARGO Electronics, Inc.
Firmware Updates
The purpose of this section is to provide the User with information on the internal software or
Firmware, which controls all aspects of the Printer's operation. New Firmware versions can
be released containing enhancements, such as improved reliability, added features, or better
print quality. New Firmware updates can be downloaded from the Internet and loaded into
the Printer through its parallel interface port, and no chip replacement is needed. Refer to
the instructions in this Section to download and install Firmware updates.
Firmware Updater Application Program
The Firmware Updater application program is the software required to send Firmware
updates from the computer to the Printer. To download and install the Firmware Updater
from this site, refer to the following steps:
Step
1
Procedure
Go to FARGO Electronics Technical Support Web site:
http://www.fargo.com/tech_support/
2
Click on the Firmware Updater Program link.
3
Click on OK when prompted to Save this Program to Disk and then select a
folder in which to save the Updater file.
4
a. Once the file has been downloaded, navigate to the location where the file
was saved. The Firmware Updater program has been compressed for ease
of downloading.
b. Decompress the file by double-clicking on the UPDATER.EXE icon.
5
Double-click on the SETUP.EXE file to launch the Firmware Updater Setup
Program
6
Follow the on-screen instructions to complete installation. Once installed, the
Firmware Updater icon will appear in the Start / Programs / FARGO folder .
7
Select the icon displayed below to open the Firmware Updater application
program.
DTC500 Series Card Printer/Encoders Troubleshooting Guide (Rev. 3.0)
208
RESTRICTED USE ONLY
FARGO Electronics, Inc.
Downloading Firmware Updates
Step
Procedure
1
Refer to the following steps to download Firmware updates:
2
Go to FARGO Electronics Technical Support Web site:
http://www.fargo.com/tech_support/
3
Click on the Firmware file link labeled for the specific Printer model.
4
Click on OK when prompted to Save this Program to Disk and then select a
folder in which to save the Update file.
5
a. Once the file has been downloaded, navigate to the location where the file
was saved. (Note: The Firmware Update file has been compressed for
ease of downloading.)
b. Decompress the file by double-clicking on the designated icon.
Updating the Printer's Firmware
The Main Firmware and the LCD Firmware are type types of Firmware for FARGO Printer
models. Each Firmware type has a different update process.
•
If the Printer model has two types of Firmware available for download from the Web site,
be sure to use the appropriate Procedure: each.
•
If the Printer model only shows a single type of Firmware available for download, use
only the Main Firmware update procedure.
DTC500 Series Card Printer/Encoders Troubleshooting Guide (Rev. 3.0)
209
RESTRICTED USE ONLY
FARGO Electronics, Inc.
Updating the Main Firmware
Step
Procedure
1
From the Firmware Updater program, click the Select Update File button.
2
Go to the folder (already saved to the update file), select it, and click Open.
(Note: The file name, location, and version will appear in the Firmware Updater
window, as shown on the next page.)
3
Click the Select Printer button and select the specific FARGO Printer model,
click OK.
4
At this time, the Printer must be prepared to receive the Firmware update file.
a. Ensure the Printer is powered ON and in its READY mode.
b. Press the Printer's MENU button.
5
a. Use the scroll buttons to scroll down to the System Upgrade option, and
press SELECT.
b. When the Printer asks if you would like to continue, press YES.
6
a. Wait while the Printer restarts into the System Upgrade mode.
b. Verify that the interface cable is securely connected to both the Printer and
the computer, and press the START button.
7
•
The Printer will wait up to 60 seconds to receive the Firmware update
before timing out.
•
The clock will be indicated on the LCD display.
From the Firmware Updater software, click the Send Update button to bring up
the Sending Update to Printer dialog, as shown on the next page.
Continued on the next page
DTC500 Series Card Printer/Encoders Troubleshooting Guide (Rev. 3.0)
210
RESTRICTED USE ONLY
FARGO Electronics, Inc.
Updating the Main Firmware (continued)
See the previous procedure in this section.
Continued on the next page
DTC500 Series Card Printer/Encoders Troubleshooting Guide (Rev. 3.0)
211
RESTRICTED USE ONLY
FARGO Electronics, Inc.
Updating the Main Firmware (continued)
Step
8
Procedure
Wait: The Firmware update will now take a few minutes.
Check the Printer's LCD for the status. (Note: When the update is complete,
the LCD will indicate if the update was successful.)
9
If the Upgrade Successful is displayed, click on Exit on the Sending Update to
Printer dialog screen.
10
Press the Printer's Exit button.
11
When prompted, turn the Printer power OFF for a few seconds and then back
ON to complete the update process. (Note: As the Printer restarts, the new
Firmware version appears on the LCD.)
12
a. If the upgrade was not successful, the LCD will either display Upgrade
Failed or Upgrade Firmware Now on boot up.
b. If this message is received, try updating the Firmware again.
DTC500 Series Card Printer/Encoders Troubleshooting Guide (Rev. 3.0)
212
RESTRICTED USE ONLY
FARGO Electronics, Inc.
Updating the LCD Firmware
Step
Procedure
1
Make sure the Printer is powered ON, connected to the PC, and in its READY
mode.
2
From the Firmware Updater program, click on the Select Update File button.
3
Go to the folder (already saved in the update file), select it, and click Open.
(Note: The file name, location, and version will appear in the Firmware Updater
window, as shown on the next page.)
4
Click on the Select Printer button and select the specific FARGO Printer model,
click OK.
5
Click on the Send Update button to bring up the Sending Update to Printer
dialog, as shown on the next page.
6
Wait a few minutes while the Firmware updates itself. Check the Printer's LCD
for the status. When the update is complete, the LCD will indicate if the update
was successful.
•
If Upgrade Successful is displayed, click Exit on the Sending Update to
Printer dialog screen. Press the Printer's EXIT button. When prompted,
turn the Printer power OFF for a few seconds and then back ON to complete
the update process. As the Printer restarts, the new Firmware version
appears on the LCD.
•
If the upgrade was not successful, the LCD will display Upgrade Failed or
Upgrade Firmware Now on boot up.
•
If this message is received, try updating the Firmware again.
Continued on the next page
DTC500 Series Card Printer/Encoders Troubleshooting Guide (Rev. 3.0)
213
RESTRICTED USE ONLY
FARGO Electronics, Inc.
Updating the LCD Firmware (continued)
See the previous procedure in this section.
DTC500 Series Card Printer/Encoders Troubleshooting Guide (Rev. 3.0)
214
RESTRICTED USE ONLY
FARGO Electronics, Inc.
Index
A
A/B Switch Box, 66
About button, 170
Accessories Program Group, 18
Adjusting the Flipper offset, 43, 44
Adjusting the Image Darkness, 81
Adjusting the Ribbon Tension, 79
Algebraic, 113
Align Ribbon error, 48
Aligning Ribbon, 9
all Printers share all print jobs, 120
Apply SmartShield option, 161
ASCII Offset, 146
Auto Eject 1st Error option, 148
auto eject option, 148
B
batch printing, 148
BAUD Rate Settings, 205
Bit Density, 145
black graphics, 127
black text or barcodes, 127
BO or Dye Sub Black, Overlay, 112
Buffer single card, 121
C
Cancel soft key, 148
Card Cleaning Cartridge, 21
Card Count, 89, 192
Card Count (CC), Pass Count (PC), and
Transfer Count (TC), 207
Card Feed Roller Motors, 43, 44
Card Feeding Errors, 21, 22, 23, 24, 25,
26, 27
card grid, 131, 157
card grid area, 156
card grid lines, 159
Card Hopper Door, 39
Card Hopper Jam, 9
Card Input Guide adjustment, 94, 95, 96,
97, 98, 99
Card is encoded, 45
Card Jam
Flipper, 10
Mag, 10
Print, 10
Smart, 10
Card Jam, 10
Card jam in Printer’s Smart Card encoding
area, 44
Card Lamination Module, 106, 107
card orientation, 160
Card Sensor, 27
Card Size, 163
Card statistics, 188
card surface debris problems, 73, 74, 75
card thickness settings, 22
Card Thickness Slide, 22
cards look pixilated or grainy, 86
card's Magnetic Stripe / smart chip, 118,
119
Card's smart chip encoded improperly, 42
Change parameter, 189
Changing the Encoder settings, 28, 41
Changing the Encoder Settings, 42
Character ASCII Offset, 146
Character Parity, 147
Character Size radio buttons, 145
chip U2 (080066), 183
Clean Printer, 13
Cleaning Card, 21
Cleaning Cartridge, 71, 74
Cleaning Inside Printer, 73
Cleaning Kit, 70
Cleaning Pen, 70
Cleaning Platen Rollers, 75
Cleaning Tape, 71, 74
Coercivity, 45
Coercivity of cards matches driver setting,
47
Coercivity option, 141
Color Bars YMC, 88
color correcting, 113
color matching, 113
color matching algorithm, 113
Color Matching software, 113
Colored Resin, 112
DTC500 Series Card Printer/Encoders Troubleshooting Guide (Rev. 3.0)
215
RESTRICTED USE ONLY
Colors misregistered, 16
Communication Errors, 16, 20
compressed Firmware Update file, 209
Contrast / Gamma, 124
Copies, 168
copyright / version information, 170
correct Printer installation, 16
CR-80, CR-90, and CR-100, 163
Current value, 188
customization options, 143
cut off or off-center Card, 85
D
Data for Magnetic Stripe printed on card,
47
Data Input, 10
Data Timeout, 10
Data to Track 1, 150
Data to Track 2, 150
Data to Track 3, 150
Decrease / Increase the Print Offset value,
196
Default button, 126
default ISO Standard selections, 145, 147
defined area, 160
Defined Area(s) check box, 131
Defined Area(s) option, 129, 154, 156
Delete button, 160
Device Manager TAB, 19
Device Option tab, 51, 76
Device options tab, 111
Digital Voltmeter, 64
Dimension boxes, 132
disable printing, 122
disk cleanup utility, 20
Dither method, 114
DRAM Connector, 33
DRAM Memory Error, 10, 182
DTC Film, 72, 75
DTC Ribbon, 52
DTC500 Main Board-A000048, 33, 34
DTC515 / DTC525 only, 165
dual-sided card, 116
Dye-Sub Intensity slide, 124
dye-sub printed image, 124
Dye-Sublimation Ribbon panels, 124
FARGO Electronics, Inc.
E
edge of card, 202
EE Checksum Error, 11, 181
EE Memory Error, 11, 181
Ejecting Used Card, 11
Encoder Settings, 41, 42, 201
encoding data, 42
Encoding data sent in error, 28
encoding instructions, 122
Encoding Mode, 141
Encoding Module, 43
End Sentinel (ES)., 151
Enhanced Communication Port (ECP)
mode, 19
Error displayed on startup, 63
ESD, 8, 108
Exception log, 188
Exception Log, 206
excessive resin printing problems, 81, 83
Exit Hopper, 43
external device interference, 17, 18, 19
F
Failed magnetic encode, 41
Failed Smart Encode, 42
Failed To Initialize, 11
feed card into Encoder/magnetically
encode, 47
Field Separator (FS), 151
Firmware file link, 209
Firmware update, 212, 213
Firmware Updater Application Program,
208
Firmware Updater window, 210
Firmware Updates, 208, 209
Firmware Upgrade, 207
First Available, 165
Flipper Alignment, 11
Flipper Home Sensor, 64
Flipper Offset, 43, 44, 205
Flipper Table, 24, 25
Flipper Table Card Sensor, 33
Flipper Table Home Sensor, 64
Flipper Table Tension Spring, 25
For Overlay Only, 155
For Print and Overlay, 155
DTC500 Series Card Printer/Encoders Troubleshooting Guide (Rev. 3.0)
216
RESTRICTED USE ONLY
For Print Only (No Overlay), 155
formatting magnetic string, 47
FPGA, 11
FPGA error, 183
FPGA Load Fail, 11
FPGA Timeout, 11
Full Card option, 128, 154
G
Gray/Align YMC, 200
Gray/Align YMC (DTC510/515) and
Gray/Align YMC/K (DTC520/525), 191
Gray/Align YMCK, 87
H
H-1 or H-2 softkey buttons, 165
hard drive space
adequate or inadequate, 20
Head Lift, 11
Head Resistance Error, 12
Head Voltage Error, 12
Headlift Motor, 33, 53
Headlift Motor (A000124), 54
Headlift Sensor (A000126), 55, 56
High Coercivity, 141
High Coercivity Magnetic Stripes, 139
High Coercivity UltraCards, 141
high-resolution, 24-bit color images, 86
Hopper 1, 165
Hopper 1 Empty, 12
Hopper 2, 165
Hopper 2 Empty, 12
Hopper Lift, 23
Hopper Settings, 204
Hopper Travel Assembly, 26
Hopper Travel Motor, 26
I
ID software applications, 151
I-EEE 1284 compliant cable, 16
Image Color tab, 79, 81, 83, 113, 124, 126
Image Darkness, 76, 200
Image Position controls, 171
inadequate data cable, 16
incorrect image darkness problems, 76
Input Hopper, 23
FARGO Electronics, Inc.
Input Hopper Door, 26, 42
interface cable, 210
Interpreting LCD display Messages, 206
Invalid Print Ribbon, 12
ISO 7811-2 Magnetic Stripe, 150
ISO encoded data format, 143, 144
ISO option, 141
ISO Standard Encoding Module, 139
ISO Standard selections, 147
ISO Track Locations, 150
J
jammed card, 44
jewelry, 70
JIS C 6220 Type II cards, 139
JIS II option / JIS II mode / JIS II
Magnetic Head, 139
JIS II Standard Encoding Module, 139
K
K Panel Resin options, 160
K Panel Resin tab, 128, 129
L
Lamination Board, 64
LCD, 43, 76, 79, 81, 83
LCD display, 43, 148
LCD error, 28
LCD Firmware, 213
LCD Menu, 187
LCD Menu and Selecting an Option, 188
LCD On-Line Menu Navigation, 187
LCD panel, 43, 44
LCD Setting, 41, 42
less heat, 125
less saturated resin images, 125
Loading the Overlaminate, 93
Low Coercivity, 141
LRC Generation, 147
LRC Generation Mode, 147
M
Mag Encode Failed, 13
Magnetic Card Analyzer, 202
Magnetic Encoder, 28
DTC500 Series Card Printer/Encoders Troubleshooting Guide (Rev. 3.0)
217
RESTRICTED USE ONLY
Magnetic encoding area of Printer, 43
Magnetic Encoding tab, 138
Magnetic Offset Setting, 28
Magnetic Stripe, 45
Magnetic Stripe Encoding Modules, 139
Magnetic Stripe encoding process, 138
Magnetic Stripe verification, 148
Magnetic Test, 43
Magnetic TOF, 202, 203
Magnetic TOF setting, 202
Magnetic Track data, 151
Magnetic Track options, 143, 144
Magnetic Track Selection, 141
Magnetic Track Selection option, 141
Main Board, 28
Main Firmware, 210, 212
Main Firmware / LCD Firmware, 209
Main Firmware update, 209
Main Print Board, 57, 63, 181
Manual Eject Each Error option, 148
manual eject mode, 148
Measuring area positioned on card, 134
MENU button, 187
MENU, Setup Printer, and Encoder
Settings, 201
Metallic Resin, 112
mistakenly-verified card, 148
more heat, 125
Motor operation, 48, 64
Multimeter, 48, 52
Multiple Cards Fed, 13
N
new value, 44
No ENC Response, 13
No MAG Encoder, 13
No Magnetic Encoder, 28
No Smart Encoder, 13, 41, 42
No SmartShield, 161
O
obstruction, 64
Omit Mag Stripe Area option, 154
Omit Signature Area option, 154
Omit Signature Area setting, 157
Omit Smart Chip Area option, 154
FARGO Electronics, Inc.
Original Printhead Assembly, 61
overall print area, 171
Overlay (O) Panel, 153
Overlay / Print Area, 153, 156, 157, 159
Overlay / Print Area options, 155
P
Parallel Port mode, 19
Pass Count, 89, 192
Pause..., 13
permanent circuit memory, 181
Photo, 114
pixel failure problems, 70, 71, 72
Platen Rollers, 72, 75
Please Remove Card, 13
poor image quality problems, 85, 86
Portrait / Landscape, 168
Position magnetic data, 202
Power Supply, 33
Print / Transfer Stations, 43
Print All Black with K Panel, 128
Print back side only, 117
print both sides, 115, 116
Print Both Sides option, 116, 117
Print Data, 14
Print Offset, 196
Print Offset, Transfer TOF, and Transfer
EOF, 195
print Ribbon, 73
Print Ribbon Low, 14
Print Ribbon Out, 14
Print Ribbon problem, 50
Print Ribbon replacement, 50
Print Station, 70
Print Test Image, 43, 87
Print Test Image, Setup Printer, Show error
count, Show card count, and System
Upgrade, 188
Print Timeout, 14
Print YMC Under K / Print K Only
options, 136
Print YMC Under K and Print K Only
options, 136
printed text and barcodes, 136
Printer cannot align Flipper, 64
Printer cannot read encoded data, 45
DTC500 Series Card Printer/Encoders Troubleshooting Guide (Rev. 3.0)
218
RESTRICTED USE ONLY
Printer Cleaning Kit, 70, 72
Printer mat, 57
Printer pausing between panels, 57
Printer's Firmware, 209
Printer's memory full, 120, 121
Printer's memory to Buffer, 121
Printhead Cables, 63
Printhead Fan, 57
Printhead NO raise/lower, 53
Printhead Resistance, 198, 199
Printhead Temp, 14
Printhead temperature malfunctioning, 63
Printhead Temperature Regulator, 63
Printing a Test Image, 87
Printing Process Errors, 48, 50
Program Exception, 14
Prox Setting, 41
R
RAM Memory Error, 14, 182
Receiving encoding data, 28
recorded magnetic data, 149
Regulator, 57
removable Memory Module (SIMM), 182
Repair by taping Ribbon, 48
Replacing Headlift Sensor Assembly, 53
Replacing Main Board, 23, 28, 63, 69, 181,
182, 183
Replacing the Headlift Motor Assembly,
53
Replacing the Main Board (D850426), 30
Replacing the Main Board (D850426), 32
Report Supplies, 206
reseat cable, 57
resin black (K) panel, 129, 130, 131
resin Dither, 114
Resin Heat slide, 125
resin images, 125
Resolving card feeding problem, 66, 67, 69
Resume button, 48, 53
retries, 148
RFID Tag, 14
RGB, 88
Ribbon / Cards, 8, 108
Ribbon jammed, 48
Ribbon panels, 116
FARGO Electronics, Inc.
Ribbon Sensor, 48, 52, 184
Ribbon Sensor Array, 33
Ribbon type, 51, 112
Ribbon Type setting, 51
Ribbon wrinkle problems, 79, 80
RibbonTraq mark, 48, 52
RibbonTraq marks, 184
Rotate Front 180 Degrees option, 160
rotate front by 180 Degrees, 118
rotates image, 118, 119
S
safety issues, 8, 90, 108
Save this Program to Disk, 209
second K panel, 116
Select Function, 188
Select Function screen, 187
Select Printer button, 210, 213
Select Test Image, 188
Select Update File button, 210, 213
Sending Update to Printer dialog, 210,
212, 213
Sensor, 186
Sensor Location / Voltage, 185
Sensor Location and Voltages, 184
Sensor Testing, 184
Setup Printer, 43, 44, 200
SETUP.EXE file, 208
Shift Data Left option, 149
Show card count, 207
Show card count, 188
Show error count, 206
Show the Error Count Tool, 206
Slide Lock, 22
Smart Encode Failed, 15
Smart Setting, 42
SmartGuard Access Card, 161
SmartShield Area dropdown menu, 161
software user’s manual, 41
special precautions, 8, 108
Split 1 Ribbon Panels, 115
Split 1 Ribbon Panels, 116
Split 1 Set - Ribbon Panels, 116
SS, ES, FS, 151
Standard or Premium Resin or K, 112
Start Sentinel, 203
DTC500 Series Card Printer/Encoders Troubleshooting Guide (Rev. 3.0)
219
RESTRICTED USE ONLY
Start Sentinel (SS), 151, 202
Start Sentinel distance, 202
Starting Selftest, 15
static build up, 23
Switch Box, 66, 67
System Control panel, 19
System Upgrade, 207, 210
System Upgrade, 188
T
Tape Rollers, 74
Test Image, 191
Test Print option, 169, 172
Testing Memory, 15
to Buffer / to hold, 120, 121
total card area, 132
Track Information, 151
track number (1, 2, or 3), 151
Transfer Count, 89, 192
Transfer Platen Roller, 72, 75
Transfer Station, 73
TrueType black text and TrueType
barcodes, 127
U
Unable To Feed Card, 15
unable to read encoded data, 28
Undefined Area(s) - K Panel Resin tab,
130
Undefined Area(s) option, 130, 154
Unknown Ribbon Type, 52
Update Failed, 15
FARGO Electronics, Inc.
Update file, 209
Update Firmware Now, 15
Upgrade Failed or Upgrade Firmware
Now on, 212
Upgrade Successful, 213
V
Verification, 148
visible damage, 70
W
Windows 2000/XP, 51, 76, 79, 81, 83
Windows 95/98/ME, 51, 76, 79, 81, 83
Windows NT 4.0, 51, 76, 79, 81, 83
wires not pinched, 57
wrong Print Ribbon, 15, 51
X
X and Y boxes, 134, 159
Y
Yellow (Y), Magenta (M), Cyan (C)
Ribbon panels, 136
Yellow, Magenta, and Cyan, 123, 124,
125
YMC, YMCK, or YMCKK print Ribbon,
170
YMCK, 112
YMCK / YMCKK print Ribbons, 116
YMCK or YMCKK print Ribbon, 114
YMCKH, 112
DTC500 Series Card Printer/Encoders Troubleshooting Guide (Rev. 3.0)
220