1
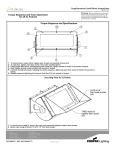
Page 1 of 2
PRODUCT: VL3500 Wash and VL3500 Wash FX Luminaires
SUBJECT: Front Lens Assembly Inspection and Captive Mounting Screw Torque Specifications
OVERVIEW
Vari-Lite would like to remind all owners, Authorized Dealers, and Service Centers to inspect, as
part of their normal maintenance routine, the front lens assemblies in all VL3500™ Wash and
VL3500™ Wash FX luminaires for proper installation and captive mounting screw torque as
described herein.
If you have any questions as to any aspect of this Technical Notice, please contact Vari-Lite
customer service at 1-877-VARILITE or +1-214-647-7880.
WARNING: Any repairs or maintenance to VARI❋LITE® luminaires should only be performed
by a trained and qualified service technician or at an Authorized VARI❋LITE® Service facility.
VL3500 WASH AND VL3500 WASH FX FRONT LENS INSTALLATION INSPECTION
CAUTION: The luminaire head is a precisely balanced unit. The weight of
the front lens assembly is counter-balanced inside the head. Removal of the
front lens assembly can result in instantaneous uncontrolled head movement.
To avoid uncontrolled movement when the luminaire is sitting on upper enclosure, point the head straight up. To avoid uncontrolled movement when the
luminaire is hanging, point the head up at an angle until it rests against the tilt
stops as shown.
•
Make sure the lens is properly positioned and installed according to the luminaire’s user’s and
service manuals.
•
When installing the front lens (all versions) assembly (as shown in Figure 1), the captive
screws in the assembly should be properly positioned in their corresponding mounting holes
and torqued to 24 in-lbs (2.71 N-m).
WARNING: Torquing the captive mounting screws greater than 24 in-lbs (2.71 N-m) can result
in damaging the screws, or the threaded inserts in the side rails, and could cause them to fail.
•
Any damaged captive mounting screw (refer to service manual for part numbers) must be
replaced with the specified screw. Do not use another type of screw.
•
Special care should be given when using an electric or automated screwdriver. Be careful not
to cross-thread or over torque the screws.
Vari-Lite ❋ 10911 Petal Street Dallas, Texas 75238 USA ❋ 1.877.VARILITE ❋ 1.214.647.7880 ❋ www.vari-lite.com
VARI❋LITE®, VLX™, VL500™, VL1000™, VL2000™, VL3000™, and VL3500™ are trademarks of Genlyte Thomas Group LLC
07 JANUARY 2010
NOTICE NO.
TN-297
Page 2 of 2
CAUTION
Lens is heavy. Horizontal orientation shown for clarity. If lens is removed as shown, head
assembly will instantaneously rotate to face upwards. See Caution on page 1of this notice.
Luminaire Head (see Detail A)
Front Lens Assembly (see Detail B)
Captive Mounting Screws
Detail A
Detail B
Luminaire Head
Front Lens Assembly
Front Lens Assembly
Mounting Holes with
Threaded Inserts (4 each)
Front Lens Assembly
Guide Pins (4 each)
Captive Mounting
Screws (4 each)*
*Torque to 24 in-lbs (2.71 N-m)
Figure 1: Front Lens Assembly and Captive Mounting Screws
•
Refer to the latest version of the VL3500™ Wash and VL3500™ Wash FX Service Manual for
front lens removal and installation procedure.
•
Clean and fingerprints on lenses with isopropyl alcohol and a lint-free cloth.
CONTACT INFORMATION
For more information on this technical notice or on VARI❋LITE® products, please contact your
Authorized VARI❋LITE® Dealer or Vari-Lite customer service.
07 JANUARY 2010
NOTICE NO.
TN-297