Transcript
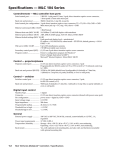
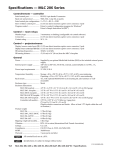
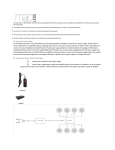
Supplementary Installation Instructions
Sheet 1 of 1
Warning: Before starting any work ensure
Torque Sequence and Visor attachment
for all XL Fixtures
that all sources of power are turned off. All
work must meet local/national codes and be
performed by a certified electrician. Do not
mount fixtures vertically.
Torque Sequence and Specifications
2
10
3
5
8
7
6
1
4
9
1.
2.
3.
4.
5.
To remove door, loosen all ten captive door screws and carefully remove door.
To seal door, tighten each door screw in the order specified above.
Using torque allen driver, and beginning with screw one, tighten screws to five(5) inch pounds of torque.
Next, tighten second screw to five(5) inch pounds of torque.
Continue through all screws, following the above sequence, tightening each door screw to five(5) inch pounds of
torque.
6. Repeat sequence tightening all screws to final then(10) inch pounds of torque.
Securing Visor to XL Fixture
10-32 x1/2"
Pan head screws
(4x)
THRU hole for
captive door screw
(x7)
1. To secure visor to any XL fixture, slip visor over previously tightened captive door screws.
2. Secure visor using all four(4) 10-32 x 1/2" Pan head screws.
ADY080875 REV A(ECN080377)