1
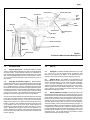
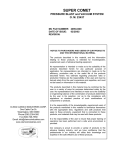
EDUCT-O-MATIC
O.M. 04112
®
MC FILE NUMBER:
DATE OF ISSUE:
REVISION:
117-1077
12/15/77
G, 04/08
WARNING
1.
2.
3.
4.
5.
6.
7.
8.
Tool operator and anyone within 50 feet of work area must wear safety goggles.
Check for possible silicosis or other toxic hazards.
Do not blast with damaged or worn equipment.
Point nozzle only toward area being cleaned.
Use only abrasives specially intended for blasting.
Keep unprotected workers out of the blast area.
Before blasting check fittings for wear.
Do not substitute for parts from other manufacturers, or modify equipment in any way.
NOTICE TO PURCHASERS AND USERS OF OUR
PRODUCTS AND THIS INFORMATIONAL MATERIAL
The products described in this material and the information relating to those products, is intended for knowledgeable,
experienced users of abrasive blasting equipment.
No representation is intended or made as to the suitability of the products described herein for any particular purpose or
application. No representations are intended or made as to the efficiency, production rate, or the useful life of the product
described herein. Any estimate regarding production rates or production finishes are the responsibility of the user and must
be derived solely from the user's experience and expertise, and must not be based on information in this material.
The products described in this material may be combined by the user in a variety of ways for purposes determined solely by
the user. No representations are intended or made as to the suitability or engineering balance of the combination of
products determined by the user in his selection, nor as to the compliance with regulations or standard practice of such
combinations of components or products.
It is the responsibility of the knowledgeable, experienced users of the products mentioned in this material to familiarize
themselves with the appropriate laws, regulations and safe practices that apply to these products, equipment that is connected to these products, and materials that may be used with these products.
It is the responsibility of the user to insure that proper training of operators has been performed and a safe work environment is provided.
Our company is proud to provide a variety of products to the abrasive blasting industry, and we have confidence that the
professionals in our industry will utilize their knowledge and expertise in the safe efficient use of these products.
© CLEMCO INDUSTRIES CORP.
One Cable Car Drive • Washington, MO 63090 • Phone (636) 239-4300 • Fax (636) 239-0788
Email: [email protected] • www.clemcoindustries.com
Page 1
Control Valve
Primary Valve Seat
Suction Jet
From
Air
Supply
Hose
Main Body
Blast Jet
To Dust Bag
Blast Head
Exhaust Tube
Air Hose
Blast
Nozzle
Valve
Handle
Secondary Valve
Seat
Screen
Abrasive Container
Adaptor
Boot
Abrasive Hose
Blast Cone
Blast Surface
1.0
INTRODUCTION
1.1
General Description. The Educt-O-Matic is a lightweight, portable abrasive blasting tool with an integral abrasive
recovery system. During blasting, abrasive is continually recycled, while dust and other debris are collected in a slip-on dust
bag. Interchangeable adaptor boots for level surfaces, corners,
etc. fit over the swivel blast head to assure efficient recovery on
any surface.
1.2
Principles of Operation (Figure 1). When the dualseated valve is fully open, compressed air entering the tool is split
into two streams. The first rushes through the air hose to the blast
jet. A partial vacuum is created in the blast head at the point
where this air stream passes from the blast jet to the blast nozzle,
and abrasive is drawn up to this point from the abrasive container
via the abrasive hose. (This is the principle of eduction which
gives the tool its name.) The air/abrasive mixture then passes
through the nozzle and strikes the surface being blasted.
The second air stream passes along the tube at the top of the unit
to the suction jet, which creates ( again by eduction) the vacuum
necessary for abrasive recovery. The region surrounding the
adaptor boot's blast cone is under vacuum whenever the tool is
blasting. Abrasive, dust and debris are drawn up the outer part
of the adaptor boot into the main body, where abrasive is
separated from lighter particles of debris and dust by cyclonic
action. Abrasive falls through a screen into the abrasive container to be reused for blasting. Debris and dust spiral inward to
the center of the main body, and from there move out the top and
into the dust bag.
Figure 1.
The Educt-O-Matic Abrasive Blasting Tool
2.0
SET-UP
2.1
Air Supply. The Educt-O-Matic requires 90 c.f.m. at 90
p.s.i. Use a 1/2" or 3/4" air supply line; 3/4" is preferred. The
shorter the air supply line, the better. An air filter and moisture
separator are recommended to prevent clogging of the tool.
2.2
Adaptor Boots. The adaptor boots available for the
Educt-O-Matic are shown in figure 5. If you ordered your unit with
only the standard adaptor, you may order the others separately,
or as a set. (See paragraph 5.0) The standard and master
adaptors fit onto the blast head and are held in place by friction.
The four special boots fit the master adaptor only. They too are
held in place by friction. Make sure that the boots are properly
seated before beginning to blast.
2.3
Abrasive/Abrasive Loading. Any standard 40 to 100
mesh blasting abrasive may be used. Fragile abrasives such as
silica sand are not recommended because of the rapid breakdown
of the abrasive particles which cause excessive dust and fines.
Extremely sharp abrasives such as aluminum oxide and silicon
carbide may be used, however the cutting action of these abrasives will cause excessive wear on the tool. For both efficiency
and tool protection, Clemco recommends steel grit or iron grit. To
load the Educt-O-Matic unsnap the abrasive container and place
a small amount of abrasive into it. Make sure the abrasive hose
is still inserted all the way into the main body after you do this. The
tool may also be loaded by suction. See paragraph 3.2. Never
overload the tool. Use as little abrasive as possible to reduce
operational problems and extend tool life.
Page 2
To reattach the bag, shove the exhaust tube into the bag (figure
3) until the end of the metal clip is beyond the place where the
seam joins. Tuck both of the reinforcing wires into the clip and pull
the bag away from the main body (figure 4), shoving the reinforcing wires into the clip as you pull. Don't forget to resnap the
elastic.
Figure 2.
3.0
OPERATION
3.1
Handling the tool. Grip the valve handle with one hand
and the adaptor boot with the other as shown in figure 2. The
main body of the tool must remain more or less upright, with the
abrasive container pointing downward. The Educt-O-Matic has
a swivel blast head which permits blasting in any direction (up,
down, sideways) without rotating the main body. Hold the
adaptor boot firmly against the surface being blasted to insure a
proper seal and prevent abrasive from escaping.
Figure 3.
NEVER BLAST UNLESS THE ADAPTOR BOOT IS WELL
SEALED AGAINST THE SURFACE BEING BLASTED.
3.2
Dual Action of the Valve Handle. Note that the control
valve (figure 1) has two seats. The first 3/16" of the valve handle's
travel opens the primary seat only, and the Educt-O-Matic functions essentially like a vacuum cleaner. This is because the
primary seat supplies air to the suction jet only. Squeezing the
handle further opens the secondary seat as well. Air is supplied
to the blast jet, and blasting begins.
For best abrasive recovery, hold the valve handle in the "suction
only" position for two or thee seconds after blasting. This will
recapture any abrasive that happens to be in the blast head at the
time. The "suction only" position can also be used for loading.
Place a handful of abrasive on any level surface and simply suck
it into the tool.
4.0
Figure 4.
4.2
Inspecting for Blockages.
MAINTENANCE
NEVER LOOK INTO THE NOZZLE WHEN THE TOOL IS CONNECTED TO A PRESSURIZED AIR SUPPLY LINE.
ALWAYS TURN THE AIR OFF AT THE SOURCE
WHEN THE EDUCT-O-MATIC IS NOT IN USE.
4.1
Dust Bag. Empty the dust bag regularly. The dust bag
is held in place by an elastic strap and by a wire-reinforced split
seam on the top of the bag. The seam tucks into a metal clip on
the exhaust tube. To remove the dust bag, unsnap the elastic
strap grab the end of the bag and pull it toward the main body until
the place where the split seam joins together clears the end of the
metal clip. The bag can then be removed and shaken out.
The nozzle can be removed for inspection by loosening the thumb
screw on the blast head. The interior passages can be inspected
by unscrewing the swivel nut which connects the air hose to the
blast head.
4.3
Adaptor Boot. Inspect the adaptor boot regularly and
replace it when excessively worn. Pay particular attention to the
sleeve which fits over the blast nozzle. This sleeve protects the
outside of the blast nozzle from recycling abrasive and must not
be allowed to wear through.
Page 3
(44)
(24)
(42,43)
(13)
(14)
(15)
(25)
(45)
(22 Complete Bag)
(30)
(26)
(46)
(10)
(8)
(9)
(6)
(1)
(7)
(23)
(29)
(31)
(32)
(11)
(18)
(6)
(5)
(3, 4)
(16)
(27)
(19)
(20)
(12)
(2)
(17)
Adaptor Boots
(34)
(33)
(36)
(35)
(37)
(40)
(38)
(39)
(41)
Master Adaptor
Level Surface
(47)
(28)
Inside Corners
(21)
(48)
Rough Surfaces
Outside Corners
Figure 5
Educt-O-Matic Attachments and Replacement Parts
4.4
Blast Nozzle. Inspect the blast nozzle regularly and
replace it when worn out. The blast nozzle can be removed by
loosening the thumb screw on the blast head. Never tighten the
thumb screw more than finger tight.
5.0
ATTACHMENTS (FIGURE 5).
Item Description
Stock No.
Attachment set (includes all items listed below) .... 00753
Master adaptor (must be purchased with any of
the four adaptors listed below) ........................... 00757
Edge attachment (outside corners) ....................... 00755
Serrated attachment (rough surfaces) ................... 00756
Angle attachment (inside corners) ......................... 00758
Flat lip attachment (smooth surfaces) ................... 00759
5.1
(-)
1.
2.
3.
4.
5.
6.
7.
8.
9.
10.
11.
12.
13.
14.
Replacement Parts (figure 5).
Educt-O-Matic complete ................................ 00751
Blast head ...................................................... 00761
Standard adaptor ........................................... 00762
Nozzle, 3/8", tungsten carbide ........................ 00754
Nozzle, 3/8", steel ............................................ 00763
Blast jet .......................................................... 00765
Jet gasket,.675 O.D. x .475 I.D. .................... 00766
Thumb screw, 1/4" NC x 1" ............................. 03131
Blast head nipple, 3/8" x 4" ............................. 00767
Swivel connector ............................................ 00768
O-ring ............................................................. 00769
Main body ...................................................... 00770
Abrasive hose ................................................ 00771
Thumb screw,10-24 x 1/2" .............................. 03887
Ferrule ............................................................ 00774
15.
16.
17.
18.
19.
20.
21.
22.
23.
24.
25.
26.
27.
28.
29.
30.
31.
32.
33.
34.
35.
36.
37.
38.
39.
40.
41.
42.
43.
44.
45.
46.
47.
48.
49.
Air hose assy (includes ferrule) ..................... 00775
Suction jet ...................................................... 00776
Baffle assembly ............................................. 00778
Baffle (plastic only) ................................ See 00778
Screen .................................................... See 00778
Screen gasket ........................................ See 00778
Abrasive container ......................................... 00814
Dust bag ......................................................... 00785
Exhaust tube includes wire form ................... 00784
Valve body ..................................................... 00789
O-ring ............................................................. 00786
Valve bushing ................................................ 00792
Valve bushing gasket .................................... 00793
O-ring ............................................................. 00794
Washer ........................................................... 00795
Retaining ring ................................................. 00796
Spring, 1 1/2" long ......................................... 00797
Valve stem ..................................................... 00798
Washer, 13/16" O.D. x 1/8" ........................... 00799
Washer, brass, .80 O.D. x 1/8" ...................... 00800
Hex nut, 10-32 ............................................... 03885
Washer, brass, 9/16" O.D. x 3/64" ................ 00802
Spring, 1-1/4" long ......................................... 00803
Washer, 9/16" O.D. x 5/32" ........................... 00804
Eyelet, brass .................................................. 00805
Washer, brass, 1/2" O.D. x 1/32" ................... 00806
Retaining ring ................................................. 00807
Nipple and grip assy. ..................................... 00810
Pipe nipple, aluminum, 6" long ...................... 00808
Molded handle grip ........................................ 00812
Valve handle/yoke assy. ................................ 00811
Swivel nut/insert assy. ................................... 00815
Container latch hook ...................................... 00782
Container latch ............................................... 00781
Exhaust tube gasket (not shown) .................. 00846