1
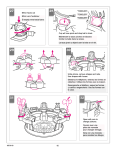
Customer Service 1-800-858-8323 501 S. 9th St. Reading, PA 19602 4-in-1 Bassinet, Bedside Sleeper, Changing Table, & Rocking Cradle MoisОs, Cuna, y Cambiador Berceau, co-dormeuse et table langer. Fashion design: Disney Pooh Model No: 3112 DOH For Customer Service call 800-858-8323 Bassinet Warnings Thank you for purchasing the 4-IN-1 BASSINET. This product is manufactured by Simplicity, Inc. Your 4-IN-1 BEDSIDE BASSINET will be able to be used as a Bassinet, Bedside Sleeper and a Changing Table and Rocking Cradle. PLEASE FOLLOW ALL OF THE FOLLOWING DIRECTIONS IN ASSEMBLING AND MOVING THE 4-IN-1 BASSINET THROUGH ITS VARIOUS STAGES OF A. Basket frame with foam sleeve (1) Do not remove foam from frame Parts WARNING USE. If you have any questions regarding this product, contact Simplicity, Inc. 501 South 9th St., Reading, PA 19602(USA), phone 1-800-858-8323, or our distributor Elfe Juvenile Products in Canada: 4580 Hickmore, St-Laurent, Quebec H4T 1K2, 1-800-667-8184 (Canada) 1-514-344-3533 (Montreal) Screws Canopy anchor B. Cross tube with foam sleeve (1) Do not remove foam D. Removable top tube with foam sleeve (1) Do not remove foam C. Small Phillips cross tube screw (2) P. Medium Phillips screw (2) E. Rocker base (2) F. Rocker legs (4) Z. Mobile base assembly screws G. Support tubes (2) H. End plate (2) K. Accessory basket tubes (2) I. Large Phillips screw (8) L. Accessory basket fabric assembly (1) M. Medium lock nuts (2) O. Mattress support (1) Q. Mattress (1) R. Canopy (1) S. Retainer plate and strap (1) T. Strap connectors (2) W. Mobile toys and propeller X. Mobile arm Y. Mobile inside and outside base Do not leave child unattended in the Bassinet in the rocking mode with wheels retracted. SUFFOCATION HAZARD–Infants can suffocate: • In gaps between an extra pad and side of the bassinet/cradle NEVER add a mattress, pillow, comforter or padding. Use ONLY the pad provided by the manufacturer. If a sheet is used with the pad, use only the one provided by the bassinet or cradle manufacturer or one specifically designed to fit the dimension of the bassinet or cradle mattress. N. Fabric assembly (1) V. Phillips screwdriver FALL HAZARD–To help prevent falls, do not use this product when the infant begins to push up on hands and knees or has reached manufacturer’s recommended maximum weight, whichever comes first. Maximum recommended weight is 14 lbs. • On soft bedding. J. Large lock nuts (4) U. Allen wrench WARNING – Failure to follow these warnings and instructions could result in serious injury or death. Inside with power cable Outside Do not leave child unattended in the bassinet with the wheels on the bassinet frame in the "up " position. -Toys are not to be “mouthed” by the baby and should be positioned clearly out of reach of the baby’s face and mouth. -Always attach all provided fasteners tightly according to the instructions. Check frequently. -Do not add additional strings or straps to a crib or playpen. Instructions for assembly as a Bassinet/Bedside Sleeper–Lower Frame Assembly 1. Unpack the 4-IN-1 BASSINET. Check parts against the parts list on the inside front cover. DO NOT REMOVE FOAM PADDING FROM ANY FRAME PARTS. c. Insert the large Phillips head screws through the caster housings into the tubes and tighten. Illustration 3c. 2. Assemble rocker a. Insert a rocker leg (F) into the opening at one end of a rocker base. Make sure that snap buttons do not go into the base. (E). Snap buttons must face inwards. Illustration 2a. 2a. Insert rocker leg into rocker base 3. Install the accessory basket. a. Slide the two basket tubes (K) into the pockets of the accessory basket fabric assembly (L). Illustration 3a. 3c. Screw basket tubes to end 4. Assemble Support Tubes and Strap Connectors c. Install the end plates (H) by snapping over the vertical support tubes. Make sure to have strap connectors (T) above end plates. illustration 4c. d. Attach the basket straps to the two support tubes (G), adjusting the tension so the accessory basket is pulled up tight. Wrap excess strap around tubes. Illustration 3d. WHENEVER THE BASKET ASSEMBLY HEIGHT IS CHANGED, THE ACCESSORY BASKET STRAPS MUST BE ADJUSTED TO KEEP THE ACCESSORY BASKET STRETCHED TO ITS FULL HEIGHT. a. Slide both strap connectors (T) onto one support tube (G). Then slide the rocker leg tubes into each end of the support tube (G). Repeat with the other support tube. Support tubes should be in the lowest position. (G). Illustration 4a.. 3d. Snap basket straps Strap connector b. Press the wheel release buttons and rotate wheels into the “down” position so that the unit will not rock. Illustration 4b. Snap button 4a. Assemble lower frame 3a. Insert basket tubes into basket assembly Strap connector b. Click the basket tubes into the slots in the caster housing. Illustration 3b. 4b. top–Press wheel release button bottom–Rotate wheel to “down” position Basket tube 3b. Click basket tubes into ends 4c. Install end plates WARNING Be sure that the unit is level. Refer to the inside front cover for identification of parts. Page 1 Instructions for assembly as a Bassinet/Bedside Sleeper Support tubes 5. Set up the basket frame (A). velcro on both ends of the panel. a. Fold out the two support tubes. Illustration 5a. Mobile base screw holes 5a. Unfold support tubes 5b. Screw cross tube into basket Head end this way a. Drape the fabric assembly over the assembled basket frame with the fold down panel over the removable cross tube. Illustration 7a. b. Using the two threaded holes in the support tubes, install cross tube (B) using the two Phillips cross tube screws (C). These screws must remain in place regardless of configuration. Illustration 5b. c. Install the removable top tube (D) of the basket frame by sliding one end into the hole in the plastic corner and snapping the other end into the opposite plastic corner. One end has square end and the other has round. Illustration 5c.. 5d. bolt basket to lower frame d. Using the supplied wrench (U), attach the basket frame to the lower frame with the four large Phillips head screws (I) and four large lock nuts (J). Be sure the removable cross tube of the upper basket and the two strap connectors are on the same side, and that the connectors are positioned outside the support tubes as shown in Illustration 5e. 6. Mobile Base Assembly a. Locate 2 screw holes in fixed top rail of the Triad. Illustration 5a. 7a. Drape fabric over frame c. Make sure fabric assembly is around the top rail of the basket, and the canopy attachment openings in the fabric assembly are aligned with the canopy anchors. Lift skirt and snap ALL snaps. Illustration 7c. BE SURE ALL SNAPS ARE FIRMLY ENGAGED, INCLUDING THOSE OVER THE REMOVABLE TOP TUBE. 8. Mobile Attachment, Phase Two 6b. 7b 5c. Snap in removable cross tube Page 2 c. Using two base assembly screws, fasten both halves of base around tube. Bolts pass through holes in tube. Nuts contained are in the outer base half. Illustration 6c 7. Install the fabric assembly (N) in the basket frame. The fabric assembly has a fold-down panel with Refer to the inside front cover for identification of parts. b. Thread mobile power wire through button hole in bottom of the fabric assembly, from the outside of the fabric assembly into the inner area of the fabric assembly. Illustration 8b c. Turn mattress support over, so the battery pack is up. Install 6 AA batteries in the battery pack: b. Hold outer base half on tube, aligned with holes on tube, and assemble inner half. Illustration 6b Canopy anchor b. Push the fabric assembly down into the basket frame, smoothing out along the top rail as much as possible to form a “pocket” in the basket. a. Locate “button hole” in fabric on the rail and pull fabric down tightly around mobile base. Illustration 7b Remove both battery cover screws, slide out cover exposing battery compartments. Install batteries in the direction shown inside compartment. Illustration 8c 6c. 7c. Snap fabric to top rail d. With mattress support upside down on top of Triad, plug power cord from base into battery pack.Illustration 8d e. Turn mattress support over so that battery pack is down, and install bottom board in Triad. Illustration 8e f. Loosely fasten one end of the mattress support to the frame using one small assembly bolt (P) and a small locking nut (M). The bolts pas through holes in the fabric. Repeat process for other end of mattress support. Smooth fabric and tighten both bolts with the supplied wrench. g. Tie fabric laces that are under skirt to metal frame. AT THIS POINT THE BASKET FABRIC WALLS MUST BE TIGHT 9. Connect connectors of the mobile base and mobile arm. Illustration 9 10. Line up the rectangular slot in the mobile arm with the triangle on the mobile base. Insert arm into base. rotate arm 90 degrees to lock arm into base. Illustration 10. 11. Snap mobile blade with toys onto the mobile drive motor stem. Illustration 11. If assembling the 3-IN-1 BEDSIDE BASSINET into a Bedside Sleeper, skip to page 9, Instructions for Bedside Sleeper. 10. 8d. 8f. Screw mattress support to frame 8b. 8e. 8c. 9. OPERATING INSTRUCTIONS 6AA batteries required. 1. After batteries are in place, turn on switch at base of stem (A) to light LED on light button (B). This is the main power button and also aids in finding the light button F at night because it illuminates without activating other E functions. • Bottom button (B) - light bulb D design - activates the mobile C light. Press to turn on mobile light for 5 minutes. To turn light off sooner than 5 minutes, B press again. Press the button A again to start another 5 minute cycle. This operating cycle is the same for all functions except music. 3. The second from bottom button (C) - wave design - operates the vibrator. Press to start 5 minute cycle, press again to stop. The strength of vibration is adjusted with the round knob on the side of the mobile stem. This adjustment knob is also marked with waves. Turning towards the + sign increases vibration, towards the – 11. sign reduces vibration. 4. The third button from the bottom (D) - musical note design -operates the music function. Press the button successive times to cycle the music through two modes of music, one of musical chimes, and back to off. Music volume is adjusted with the knob - speaker design on the other side of the mobile stem. Turning towards the + sign increases volume, towards the – sign reduces volume. 5. The button second from top (E) - light bulb design - operates the light show. Press to start the five-minute show. Press again to stop the music. If the music button is pressed during a light show, the show will restart, synchronized with the music. 6. The top button (F) - circling arrows design - controls the mobile. Press to begin a five minute cycle. Press again to stop the mobile. Press again to start a new five minute cycle. If the mobile button is pressed while the mobile is operating, the mobile cycle will restart, synchronized with the music. Refer to the inside front cover for identification of parts. Page 3 Instructions for assembly as a Bassinet/Bedside Sleeper TROUBLESHOOTING - If any function does not work, replace the pair of batteries associated with that function: Compartment 1: Compartment 2A: music, mobile Compartment 2B: vibration unit Sequential lights, Light, music Use only the same type of batteries in any one compartment. Do not mix old and new batteries. Always install batteries in the direction shown in inside of battery compartment. Dispose of batteries properly, according to the manufacturer’s directions. Do not mix old and new batteries, or different types of batteries. Remove the batteries when storing the unit. CAUTION This crib mobile is intended for visual stimulation and is not intended to be grasped by the child. If attached to the crib or playpen, remove when baby begins to push up on hands and knees. Always attach all provided fasteners tightly to a crib and playpen according to the instructions., Check frequently. Do not add additional strings and straps to attach to a crib or playpen. STORING THE UNIT Short Storage Time: Turn off main power switch. Disconnect power pack by disconnecting power cord from power unit. Long Storage Time: Remove batteries. 12. Install the canopy. The canopy clicks into the canopy anchors that are attached to the side of the top rails of the basket frame. See illustration12 for component identification. a. Open slots in fabric on the top rail of the basket frame to expose canopy anchors. b. Stand at the head end of the unit. Holding the canopy as shown in illustration 12b, insert bottom of canopy bracket into the canopy anchor through the S-hole in the fabric. Push the canopy brackets down until both brackets click into place. Pull up on the canopy to make sure it is locked into place. Canopy Canopy bracket Canopy anchor Top tube 12. Canopy components Canopy slots c. Stretch the canopy fabric around the end of the basket assembly so that the elastic around the end of the basket assembly is snug. Then snap the three canopy buttons to the basket. Illustration 12c. Adjust canopy by moving front hoop up or down. 12c.Stretch canopy fabric 1a. Upper basket assembly WARNING 2B Page 4 Converting unit from bassinet to cradle. REMOVE CHILD FROM UNIT. Remove upper basket assembly from base assembly. Illustration 1a. Turn upper basket assembly on its side and open or close rockers as you choose. NEVER CARRY CRADLE WITH CHILD INSIDE. NEVER LEAVE CHILD UNATTENDED IN CRADLE WITH ROCKERS DOWN. Bedside Sleeper WARNINGS! WARNING–Failure to follow these warnings could result in serious injury or death. FALL HAZARD–Stop using this product when infant can push up on hands and knees. Do not leave in the rocking mode with wheels retracted. SUFFOCATION HAZARD–To help prevent suffocation from entrapment, use only the mattress pad provided with this unit. Never use a pillow or additional mattresses or padding In the 3-IN-1 BEDSIDE BASSINET. If a sheet is used with the pad, use only one that will securely tuck under the mattress pad on all sides to prevent entrapment. Always use the retainer strap and be sure the bedside sleeper is tightly drawn against the bed. Instructions for assembly as a Bedside Sleeper Canopy anchor 1. Be sure the 3-IN-1 BEDSIDE BASSINET is in the non-rocking mode with the wheels down and locked. 2. Remove the canopy if installed, by pushing in on either side of the canopy connectors. 2A 1 Close the Velcro™ slots on the top rails whenever canopy is not attached. 13. Install mattress and sheet - make sure sheet is snug. 14. Install diaper bag on foot of upper basket. (Some models do not have diaper bag.) 12b. Insert through fabric slots. Refer to the inside front cover for identification of parts. 2. Canopy connector 3. The top rail of the 3-IN-1 BEDSIDE BASSINET may be removed to make the sleeping area more accessible. To remove the top rail: a. Unsnap the fabric fold-down panel under skirt and separate the Velcro© area from basket. b. Pull out the open end of the removable top tube (D) and slide out the other end. Illustration 3b. NEVER REMOVE THE SCREWED-ON CROSS RAIL FROM THE UNIT. c. Tuck the fabric end of the folddown panel around the bottom of the support tube of the 3-in-1 bedside that the height of the opening of the 3-IN-1 BEDSIDE BASSINET most nearly matches the height of the mattress. Illustration 4. Note: Before adjusting height, unsnap basket snaps. After adjustment, re-snap basket straps to the new height. bassinet frame into the mesh pocket that is sewn underneath of upper basket. Make sure fabric is tight. Illustration 3c. 4. Adjust the height of the 3-IN-1 BEDSIDE BASSINET by pushing in snap buttons so 3b. Take out removable top bar from basket 3c. Tuck in fabric under basket Instructions for assembly as a Bassinet/Bedside Sleeper–Lower Frame Assembly Box spring Mattress opposite side of bed CHANGING TABLE WARNINGS WARNING–To prevent serious or fatal injury from falls, always keep child within arm’s reach. Never leave child unattended. Read all instructions before use of the changing table. Keep instructions for future use. Do not use the changing table if it is damaged or broken. Maximum weight of child: 25 lbs. Care and Use Instructions FABRIC ASSEMBLY 1. Fabric assembly may be removed for washing. Always follow connectors (T) on the horizontal support tube of the 3-IN-1 BEDSIDE BASSINET. 3-IN-1 BEDSIDE BASSINET must be pulled snugly alongside the bed. Tighten strap connector. d. Lock the 3-IN-1 BEDSIDE BASSINET’s wheels. When changing from a Bedside Sleeper to a bassinet, refer to instructions on page 3. Put directions into pocket on the underside of the top basket. instructions for disassembly and reassembly. 2. Fabric assembly may be hand washed in mild detergent. Never use bleach. 3. Dry and touch up iron for best appearance. FRAME 1. Frame paint may be touched up as needed. Use only non-toxic paints approved for children’s products. 2. Check all frame fasteners occasionally. Tighten all screws and bolts as necessary. Instructions for using the 4-IN-1 BEDSIDE BASSINET as a changing table 1. Changing table against a wall 5b. Deploy strap, connect to 3-IN-1 BEDSIDE BASSINET 5.Prepare bed and retainer a. Unpack the retainer plate and strap (S), which come assembled and ready for use. b. With the retainer plate on the side of the bed OPPOSITE where the Bedside Sleeper will be, thread the retainer strap through the space between the mattress and box spring. Make sure retainer plate is vertical and flush against the mattress and box spring. Illustration 5b. c. Connect the strap ends to the snap WARNING 1. USE AS A CHANGING TABLE. The 3-IN-1 BEDSIDE BASSINET may be used as a changing table in the non-rocking mode with or without the removable cross tube in place. When used as a changing table, the unit should always be situated against a wall. If converting from Bassinet, follow directions on Bedside Sleeper step 1 thru 3. Then proceed with the rest of these directions. If wheels are not down and locked, do so now. a. Raise 3-IN-1 BEDSIDE BASSINET to highest position Illustration 1. a. If 3-in-1 bedside bassinet is NOT in its highest position, unsnap accessory basket snaps and raise unit. Then resnap basket straps, making sure basket is tight. Illustration a. b. Lower and lock wheels so the unit will not rock. Tuck in the fabric that is hanging in front. There is a mesh pocket under the top basket. Refer to the inside front cover for identification of parts. Page 5