1
Outdoor Unit Connected to Factory-- Approved Indoor
Unit
Outdoor unit contains correct system refrigerant charge for
operation with factory--approved, AHRI--rated smallest indoor unit
when connected by 15 ft. (4.57 m) of field--supplied or
factory--accessory tubing, and factory--supplied filter drier. Check
refrigerant charge for maximum efficiency.
NOTE: If the indoor furnace coil width is more than the furnace
casing width, refer to the indoor coil Installation Instructions for
transition requirements.
Install Liquid-- Line Filter Drier Indoor
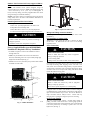
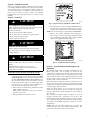
Refer to Fig. 6 and install filter drier as follows:
1. Braze 5--in. (127 mm) liquid tube to the indoor coil.
2. Wrap filter drier with damp cloth.
3. Braze filter drier to above 5--in. (127 mm) liquid tube.
4. Connect and braze liquid refrigerant tube to the filter drier.
CAUTION
!
A05227
Fig. 6 -- Liquid--Line Filter Drier
Refrigerant Tubing connection Outdoor
Connect vapor tube to fitting on outdoor unit vapor service valves
(see Table 1).
UNIT DAMAGE HAZARD
Failure to follow this caution may result in unit damage or
improper operation.
Installation of filter drier in liquid line is required.
NO Installation of Adapter Tube
Although it is a heat pump this unit has a standard AC liquid
service valve. An EXV inside the unit serves as the heating
expansion device.
Sweat Connections
Factory Supplied Muffler (part # LM10KK003)
Installation is Required On Every Installation:
S A muffler is required to reduce noise transmitted to indoor
through the line set.
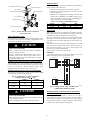
S Muffler may be installed in the vertical or the horizontal
direction, maintaining at least 12 in. (304.8 mm) straight pipe
length from the OD unit (See Fig. 5).
S Maintain at least 12 in. (304.8 mm) to any bend from the muffler
shell inlet and outlet stubs.
EXTERIOR
WALL
!
UNIT DAMAGE HAZARD
Failure to follow this caution may result in equipment
damage or improper operation.
S Use a brazing shield
S Wrap service valves with wet cloth or heat sink material.
Use refrigerant grade tubing. Service valves are closed from factory
and ready for brazing. After wrapping service valve with a wet
cloth, braze sweat connections using industry accepted methods
and materials. Consult local code requirements. Refrigerant tubing
and indoor coil are now ready for leak testing. This check should
include all field and factory joints.
Evacuate Refrigerant Tubing and Indoor Coil
12” (304.8 mm) MIN
MUFFLER
!
12” (304.8 mm) MIN
TO DWELLING
VAPOR SERVICE VALVE
12”
(304.8 mm) MIN
CAUTION
CAUTION
UNIT DAMAGE HAZARD
VAPOR LINE
Failure to follow this caution may result in equipment
damage or improper operation.
EXTERIOR
WALL
Never use the system compressor as a vacuum pump.
Refrigerant tubes and indoor coil should be evacuated using the
recommended deep vacuum method of 500 microns. The alternate
triple evacuation method may be used. See Service Manual for
triple evacuation method. Always break a vacuum with dry
nitrogen prior to opening the refrigerant system for servicing.
MUFFLER
TO DWELLING
VAPOR SERVICE VALVE
Deep Vacuum Method
12”
(304.8 mm) MIN
VAPOR LINE
A11108
Fig. 5 -- Muffler Installation
The deep vacuum method requires a vacuum pump capable of
pulling a vacuum of 500 microns and a vacuum gauge capable of
accurately measuring this vacuum depth. The deep vacuum method
is the most positive way of assuring a system is free of air and
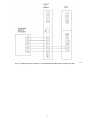
liquid water. (See Fig. 7)
6