1
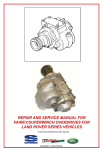
M:\Product Information\128-225_3H2865\Instructions\Drafts\128-225_3H2865_461-868_3H2865K_INST.docx
Created on 11 February by Michael Grant Revised by Michael Grant, Mick Pratt & Davis Aidnik on 11 March 2014
1
Supplemental Information & Instructions for
2
4
128-225 or 3H2865 Bearing Assembly, 20 Needle Roller
and/or
461-868 or 3H2865K Layshaft Bearing Kit w/ Spacer Tube
5
MGA (all), MGB w/standard gearbox to engine number GB74719
3
6
7
The 461-868 or 3H2865K Layshaft Bearing Kit
8
1a
A
9
10
11
MGB w/overdrive gearbox to engine number GB74528
12
13
14
15
16
17
18
19
20
21
22
23
24
25
26
27
28
29
30
31
32
33
34
35
36
37
38
39
40
41
42
43
44
45
46
47
48
49
50
51
52
53
1d
1c
1b
1e
1g
1f
1h
1a Each bearing assembly comes in the original box.
1b Each bearing assembly is wrapped in protective paper
1c Once unwrapped the assembly inside the outer shell is visible.
1d The special retaining washers with the “lip” or “”flange” on the inner edge.
1e Some, but not all bearing assemblies come with one snap ring
1f The 20 needle bearings. Note the pins on each end – these are trapped under the lip or flange of the retaining washers (11d)
1g We include 4 snap rings with each kit ; any that you get with a bearing assembly will be “extra”.
1h The spacer tube, which we make on the Moss Machine Shop
We suggest you leave the bearing assembly (1c) alone until you have read the rest of
this… the bearing assembly is a lot easier to deal with as a unit than as 20+ separate bits.
About this Kit…..
The 461-868 or 3H2865K Layshaft Bearing Kit represents a return to the original design specification for
the layshaft bearings for the three-synchro gearbox fitted to the MGA and early MGB. By reintroducing the
original bearings and dropping the caged bearings sold for this application, Moss Motors has eliminated
what many have blamed for the excessive wear of the layshaft- the caged roller bearings that cut the
number of load bearing rollers in half. This kit is intended for stock engines in a street application where
your laygear does not need replacing. If you need a laygear, or if you have a modified engine and/or a
more spirited driving style, we suggest our Uprated Laygear Kit (461-571 or 22H54K). Developed by Moss
Europe, this is another Moss exclusive. Built around the stock layshaft, it comes with a new laygear fitted
with uncaged needle roller bearings that are longer than stock, effectively doubling the load bearing area
over the original MG design. It is the most durable package we offer for the early layshaft/laygear. Please
see our website www.mossmotors.com for more information on these options. For pretty much everything
but the fire-breathing race car, Moss has a solution.
And everyone wants to know where we found them…
Suffice it to say we discovered a substantial quantity in a warehouse in England, and we bought them all.
The bearings are from two manufacturers. The yellow boxed bearings (shown above) are from RHP and
the blue boxed bearings (not shown) are from R&M. These bearings have not been manufactured for
many years. For us, this is the ultimate “barn find”.
Page 1 of 6
M:\Product Information\128-225_3H2865\Instructions\Drafts\128-225_3H2865_461-868_3H2865K_INST.docx
Created on 11 February by Michael Grant Revised by Michael Grant, Mick Pratt & Davis Aidnik on 11 March 2014
54
55
56
57
58
59
60
61
62
63
64
65
66
67
68
69
70
71
72
73
74
75
76
77
2a
2b
A Little History…..
Fig 2
The MGA and early MGB three synchro gearbox share a layshaft that is 0.645”
in diameter, which is smaller than the later shafts. Initially, three 3H2865 layshaft
bearings were used, each being made up of 20 loose needle roller bearings (2b)
that had pins on each end. These pins were “trapped” under the lip of the
special washers (2a) supplied as part of the bearing assembly. Two of the three
th
bearing sets were fitted on the 4 gear end of the layshaft (toward the front),
st
leaving a single bearing set for the 1 gear end toward the rear.
2b
2b
As supplies of the 3H2865 loose needle bearing assembly dried up, it was
replaced by AAU3052, a caged needle roller bearing assembly (3a). While the
caged assembly greatly simplified the assembly procedure, each one only has
11 or 12 needles (depending on the manufacturer) compared to the 20 in the
original bearings. In time the caged bearings became associated with premature
layshaft wear. The wear is always most severe at the first gear end of the
th
layshaft (toward the rear) because it is more heavily loaded than the 4 gear
end (toward the front). It certainly does not help that the first gear end is
th
supported by a single bearing assembly while the 4 gear end has two.
Fig 3
3a
The three layshafts in Figure 4 show a progression from almost no wear (4a) to
very severe wear (4c).There is a great deal of discussion on the web about this
problem, and there are several causes mentioned, one being the reduced load
bearing surface available related to the number of needles in the caged bearing
assembly.
78
79
80
81
82
83
84
85
86
87
88
89
90
91
92
93
94
95
96
97
98
99
100
101
102
103
104
105
106
How can I tell if my layshaft is “going”?
Anyone can tell if you need a new layshaft with the old one in hand. John
Esposito (Quantum Mechanics, British Gearbox specialist) explains how you can
get a pretty good idea about the condition of the layshaft and layshaft bearings
just by listening to the 3-synchro gearbox.
Fig 4
4c
th
4 gear is your bench mark. It is direct drive; the laygear is not loaded or
involved, so 4th is very quiet.
rd
In 3 gear the laygear is engaged. If the layshaft and layshaft bearings are fine, it
th
should not be any noisier than 4 gear. If there is any increase in noise when
th
rd
moving from 4 to 3 , the layshaft is suspect.
nd
Same thing applies to 2 gear – the laygear is engaged. If there is any increase
rd
nd
in noise when moving from 3 to 2 , the layshaft/layshaft bearing problems are
confirmed.
st
1 gear is going to be ignored because it uses straight cut gears which are
inherently noisy. That noise will mask any layshaft related noise that might be
there.
4b
4a
The layshaft/layshaft bearing related noise you can hear when down shifting can also be heard when up
nd
rd
th
shifting. If 2 gear is noisy, and the noise decreases going to 3 , and it goes away after shifting to 4 , the
layshaft/layshaft bearings are the probable cause. And another good rule of thumb – when it is time to
change out the clutch, it is time to check the layshaft and the inside of the laygear for wear.
If you detect layshaft/layshaft bearing noise, plan on dealing with it soon. It will not be long before more
serious problems (like broken gear teeth) develop. You can avoid all that by taking action quickly. It is
much easier (and much less expensive) to replace the layshaft and bearings by themselves without
adding a gear or two to the bill.
Page 2 of 6
M:\Product Information\128-225_3H2865\Instructions\Drafts\128-225_3H2865_461-868_3H2865K_INST.docx
Created on 11 February by Michael Grant Revised by Michael Grant, Mick Pratt & Davis Aidnik on 11 March 2014
107
108
109
110
111
112
113
114
115
Before you install anything…
Make sure you have a transmission with the 0.645” diameter layshaft and that it can be rebuilt. Nobody
should go to the trouble of pulling a gearbox apart without a complete inspection. Plan on replacing all
worn components – usually synchros, bearings, gaskets and seals. The factory workshop manual is
essential and Barney Gaylord’s website (mgaguru.com) has a good section on disassembly and
inspection of the gearbox. Both will tell you to carefully check the gears, and we’ll say pay particular
attention to the inside of the laygear where the needle roller bearings ride. If the surface inside the
laygear is worn, renewing the bearings will be a bad investment- you need a new laygear.
116
117
118
119
120
121
122
123
124
125
126
127
128
129
130
131
132
133
134
135
136
137
138
139
140
141
142
143
144
145
146
147
148
149
150
151
152
153
154
155
156
157
158
159
160
Why Not Just Tell People to Follow the Factory Workshop Manual?
Section F.5 (June 1956 revision, at right) from the
MGA Service Manual has been inserted here for
your review.
Fig 5
We found it to be not entirely helpful. First and
foremost, neither the MGA or MGB workshop
manuals address the pre-assembled bearing. Most
likely, they were not available until well after the
manuals were written.
However, if you have never had your gearbox apart
before, we felt there was too much left to be
discovered the hard way. Given the frustration and
aggravation inherent in a “trial & error” process and
the potential for an expensive mistake or two,
providing instructions seemed to be essential.
We hope to develop these instructions further using
your tips and suggestions. So please – if you have
come up with a better way let us know so we can
share.
6b
6
a
Before we start, take a closer look at the bearing assembly.
6a The thin outer shell used to hold the assembly together until it is
installed.
6a
Fig 6
6b One of three folded-over edges holding the bearing in.
6c
6c The rolled over lip at the front securing the bearing.
6f
6f
6d One of 2 special retaining washers holding the needles in place.
6e The thin snap ring supplied in some bearing assemblies
6d
6f The needle bearings.
Page 3 of 6
6e
6
e
M:\Product Information\128-225_3H2865\Instructions\Drafts\128-225_3H2865_461-868_3H2865K_INST.docx
Created on 11 February by Michael Grant Revised by Michael Grant, Mick Pratt & Davis Aidnik on 11 March 2014
161
162
163
164
165
166
167
168
169
170
171
172
173
174
175
176
177
178
179
180
181
182
183
184
185
186
187
How it All Goes Together
th
4 gear end, or “Big End” of
Laygear
Fig 7
th
4 gear end
1st gear end, or
“Small End” of Laygear
7n
1st gear end
7
k
7j
7g
7a
7f
7g
b
7b
7l
7h
7d
7d
7h
7c
7e
7i
b
Moss
Description
Europe
7abc 128-225 3H2865
Bearing Assembly, as originally fitted
7d NPN
NPN
Retaining washer, w/lip
7e NPN
NPN
Needle Roller Bearings, loose (uncaged)
7f NPN
NPN
Snap Ring (included with some bearings)
7ghi 326-190 11G3027 Circlip or Snap Ring
7j 461-580 11G3026 Tube, layshaft bearing spacer
The following items are not included - thay are illustrated & listed
7k 461-590 1G3576
Thrust Washer, Front (0.154")
7l 461-600 1G3577
Thrust washer rear, (0.155)
461-610 1G3578
Thrust washer rear, (0.157)
461-620 1G3579
Thrust washer rear, (0.158)
461-630 1G3580
Thrust washer rear, (0.163)
7m 461-560 1H3305
Layshaft, 0.645" nominal diameter
7n 461-570 22H54
Laygear, for 1H3305 layshaft (If you need a
laygear, consider the 461-571 Laygear Kit
Ref Moss US
188
189
190
191
192
193
194
195
Page 4 of 6
Notes
3 in kit
2 per bearing assembly
20 per bearing assembly
slightly smaller than 326-190
4 included in kit
1 in kit
here for clarity.
M:\Product Information\128-225_3H2865\Instructions\Drafts\128-225_3H2865_461-868_3H2865K_INST.docx
Created on 11 February by Michael Grant Revised by Michael Grant, Mick Pratt & Davis Aidnik on 11 March 2014
196
197
198
199
200
201
202
203
204
205
206
207
208
209
210
211
212
213
214
215
216
217
218
219
220
221
222
223
224
225
226
227
228
229
230
231
232
233
234
235
236
237
238
239
240
241
242
243
244
245
246
247
248
249
250
251
Installation Tips (refer to Fig 7)
1.
2.
3.
4.
5.
6.
7.
8.
9.
10.
11.
12.
13.
14.
15.
Fig 8
About Snap Rings. Four snap rings are needed. Some of the bearing assemblies come with a
snap ring, but some don’t so we include four snap rings in the kit. If you end up with an extra
snap ring-great - they are handy in case one popped into the wrong groove; removing them
usually damages them enough to make them unusable.
The first snap ring to install is (7h). Shine a light down inside the laygear from the 4th gear (big)
end– you can see 3 snap ring grooves clearly. The groove for the (7h) snap ring is the 3 rd groove,
1 ¾” deep inside the laygear and therefore hardest to fit.
Hold the snap ring (7h) it so that it is 90º to the long axis of the laygear (Fig 9)
Fig 9
th
and insert it in the opening at the 4 gear end (aka “the big or front end”) of the
89
laygear using a pair of long needle nose pliers. Using the same pliers, push the
snap ring straight in until it is past both of the outer snap ring grooves.
Once safely past the 2 outer grooves, rotate the (7h) snap ring back 90º so that
it is in full contact with the bore of the laygear. Push the snap ring into the
internal snap ring groove with a suitably sized brass drift, brass tube, or a
Craftsman 5/8” socket (0.862” OD) on a long extension as shown in Fig 9. Note
Fig 10
that the snap ring is not very wide – if the nose of the socket is rounded, it may not work very
well. In that case, flip the socket around and use the “back” to push the snap ring. The “back of
the socket is usually unaffected by wear and should make good contact with the snap ring. You
can square the snap ring up in the bore by running a second socket in from the other end. When
the sockets are pressed together, the snap ring will “square up” in the laygear bore. The next
step will be to install the (7b) set of needle bearings in the laygear and press it against the (7h)
snap ring you just fitted.
Pick one of the three bearing assemblies. Liberally apply grease to the bearing
whilst still in its outer shell. This provides sticktion and will help in keeping the bearing
Fig 11
together. Make sure all the rollers inside the outer shell are running parallel to the long axis of the
assembly and not at an angle.
Locate the three bent over sections of the lip shown in Fig 11. These hold the
bearing assembly inside the shell.
Using a pair of long needle nose pliers, straighten out the bent sections
completely. The outer shell material is quite thin and it is easily straightened. Make sure the lip
of the outer shell will not interfere with the bearing assembly when it is pushed out of the shell.
This is now “the open end of the bearing assembly.”
Have laygear lying flat on the workbench - not on its end.
th
Insert the layshaft into the laygear from the 4 gear (big or front) end.
Using the layshaft as a guide, slide the open end of the bearing assembly
(including the outer shell) onto the layshaft. Slide the bearing assembly up the
shaft until the outer shell touches the laygear. The outer shell of the bearing assembly
will not fit inside the laygear- it stays outside.
The next step is to push the bearing assembly out of the shell and into the laygear. Using the small end of the
tubular drift described above, start pushing the bearing out of the shell and into the laygear. As
soon as the snap ring in the bearing assembly clears the end of the outer shell, stop. The reason for
stopping is that this 2nd snap ring (7g) must be pushed over the outer snap ring groove. If you simply push it in straight,
it will pop into the outer groove and you will have fun trying to get it out.
Remove the tubular drift and extract the snap ring and set it aside.
Use the full-sized end of the tubular drift to push the bearing with the two retaining washers into
the layshaft until the inner retaining washer comes up against the first snap ring (7h) you
installed.
Remove the layshaft carefully from the laygear while you press on the tubular drift, holding the
bearing assembly in position as you withdraw the layshaft. Now remove the drift. Once the bearing
assembly is seated, the two special retaining washers overlap the pins on the ends of the needle bearings, making it
impossible for the needles to “fall out” when the layshaft is removed. In reality, the grease on the bearings and on the
layshaft would hold the needles in place without the special washers.
Install the (7g) snap ring and push it over the outer snap ring groove following the procedure used
in steps 3-4-5 above. Once the (7g) snap ring is in the proper groove, the inner bearing is secured and you can
proceed to install the outer or second bearing (7a).
Page 5 of 6
M:\Product Information\128-225_3H2865\Instructions\Drafts\128-225_3H2865_461-868_3H2865K_INST.docx
Created on 11 February by Michael Grant Revised by Michael Grant, Mick Pratt & Davis Aidnik on 11 March 2014
252
253
254
255
256
257
258
259
260
261
262
263
264
265
266
267
268
269
270
271
272
273
274
275
276
277
278
279
280
281
282
283
284
285
286
287
288
th
16. To install bearing (7a) on the 4 gear or front end, you will be repeating steps 5 – 12.
17. As soon as the snap ring (if included) in the (7a) bearing assembly clears the end of the outer
shell, stop.
18. You may use the snap ring from the assembly or, if you wish, you can replace it with one of the four
326-190 (11G3027) snap rings supplied in the kit. Insert the snap ring in the outer snap ring groove.
This completes the installation of the two bearings and the three snap rings in the 4 th gear or front end of the laygear.
19. Moving to the 1st gear end of the laygear, we have only a spacer tube (7h), one bearing (7c) and the outer snap ring (7i) to
deal with, and they are fitted in that order.
st
20. Insert the spacer tube (7j) into the 1 gear end of the laygear and press it home. It will stop when it
comes up against the inner most of the three snap rings (7h) installed from the 4 th gear end.
rd
21. Install the 3 bearing assembly (7c), using steps 4-11 (above) as a guide.
22. You may use the snap ring from the assembly if there was one, or, if you wish, you can replace it
with one of the four 326-190 (11G3027) supplied in the kit. Insert the snap ring (7i) in the outer snap
ring groove. This completes the installation of the spacer tube, bearing and the snap ring in the 1st gear or back end of
the laygear.
Some Final Questions, and one last Tip…
The most obvious question is this: How long can I expect this bearing set to last? The answer is going to
depend on the state of tune of the engine and how you drive, but remember that this is the original three-bearing
configuration the factory used in the MGA/early MGB gearbox, and it has much greater load bearing capacity
than the caged needle bearings fitted as replacements for many years. Properly maintained, you can expect 50
to 75,000 miles with a stock MGA engine driven normally on the street.
Almost forgot the most important tip of all – how do you remove the 2 old snap rings that are down inside the
laygear? The outer snap rings can be levered out fairly easily. The two snap rings the trap the inner bearing
must be bashed with a brass drift and a hammer until the snap ring is either bent out of shape or actually
broken. Honest – we asked a lot of folks that rebuild these for a living. Be careful not to damage the bearing
surface (which is why we specify a brass drift).
Special thanks to John Esposito of Quantum Mechanics ([email protected]), Barney Gaylord
(mgaguru.com) the R&D Team at Moss Europe, particularly Michael Pratt, and David Aidnik, Product
Development Engineer at Moss Motors, Ltd.
Notes
289
290
291
292
293
294
295
296
297
298
299
Any suggestions that you may have that will improve the information (especially detailed installation notes) are welcome. Please use
the simple email form on the “Contact Us” page on the Moss website:http://www.mossmotors.com/AboutMoss/ContactUs.aspxIf you
prefer, you may call our Technical Services Department at 805-681-3411. So many people call us for help that we are often not able to
answer the calls as fast as we’d like, and you may be asked to leave a message. We respond to every call for help as quickly as we
can, which is normally within 2 business days, but when the volume of calls and emails is high, it may take longer. We apologize in
advance for the inconvenience.
Moss Motors, Ltd.
440 Rutherford Street, Goleta, California 93117
In the US & Canada Toll Free (800) 667-7872 FAX (805) 692-2510
(805) 681-3400
Moss Europe Ltd.
Hampton Farm Industrial Estate, Hampton Road West, Hanworth Middlesex, TW13 6DB
In the UK: 020-8867-2020 FAX: 020-8867-2030
6 of 6
Instruction Page
Sheet 128-225_3H2865_461-868_3H2865K
March 2014