1
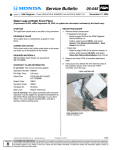
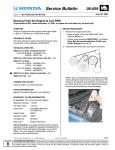
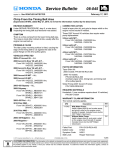
Service Bulletin
Applies To:
07-082
2006 Ridgeline – From VIN 2HJYK1...6H500001 thru 2HJYK1...6H521114
2007 Ridgeline – From VIN 2HJYK1...7H500001 thru 2HJYK1...7H550722
April 15, 2008
Diagnosing and Repairing Water Leaks
(Supersedes 07-082, dated November 28, 2007, to update the information marked by the black bars)
(Replaces 05-045, Water Leak at Right Front Floor, dated November 17, 2005, and 06-016, Water Leak Near
the Right Rear Door, dated April 11, 2006.)
SYMPTOM
There is a strong damp odor in the passenger’s
compartment and/or the carpet is wet.
PROBABLE CAUSE
Improperly applied seam sealer is causing one or more
water leaks.
CORRECTIVE ACTION
Apply seam sealer where it is missing. It is not
necessary to cut apart the body panels.
NOTE: Replace any carpet or insulation material that
has been wet.
2006:
Repair Procedure A:
Lower cowl/A-pillar
From VIN 2HJYK1...6H500001 thru
2HJYK1...6H503867
Repair Procedure B:
Upper cowl/A-pillar
From VIN 2HJYK1...6H500001 thru
2HJYK1...6H517911
Repair Procedure C:
Lower corner of windshield/A-pillar
From VIN 2HJYK1...6H500001 thru
2HJYK1...6H519293
Repair Procedure D:
C-pillar
From VIN 2HJYK1...6H500001 thru
2HJYK1...6H551855
Repair Procedure E:
Rear roof trim grommet at C-pillar
From VIN 2HJYK1...6H500001 thru
2HJYK1...6H555666
Repair Procedure F:
A-pillar insulator drain hole
From VIN 2HJYK1...6H500001 thru
2HJYK1...6H521114
Repair Procedure H:
Under cowl at A-pillar (gaps in sealer, or poor
adhesion of sealer to painted body)
From VIN 2HJYK1...7H500001 thru
2HJYK1...7H550722
REQUIRED MATERIALS
NOTE: Once an Ultrapro tube is opened, the contents
begins to dry. Each tube can be used to repair only one
vehicle.
3M Ultrapro Urethane Seam Sealer*, requires 3M
caulking gun (repairs one vehicle):
3M P/N 051135-08360
3M Ultrapro Autobody Sealant*, requires standard
caulking gun (repairs one vehicle):
3M P/N 051135-08300
3M Brushable Seam Sealer* (repairs five vehicles):
3M P/N 051135-08656
*Either one of the sealers or the sealant can be used to
seal a seam.
3M Urethane Windshield Adhesive, use only for
REPAIR PROCEDURE G (repairs one vehicle):
3M P/N 051135-08693
PARTS INFORMATION
Replace these parts if the rear roof trim is removed:
Roof Grommet B (six required):
P/N 91506-SJC-A01, H/C 7985096
Roof Grommet A:
P/N 91505-SJC-A01, H/C 7985088
Cowl Top Clip (seven required):
P/N 90602-SX0-003, H/C 4634838
C-Pillar Outer Trim Clip A (three required):
P/N 91502-SCV-A00, H/C 7291792
2007:
Repair Procedure G:
Under middle of rear window
From VIN 2HJYK1...7H500001 thru
2HJYK1...7H510756
© 2008 American Honda Motor Co., Inc. – All Rights Reserved
ATB 38045-38997 (0804)
1 of 6
CUSTOMER INFORMATION: The information in this bulletin is intended for use only by skilled technicians who have the proper tools, equipment,
and training to correctly and safely maintain your vehicle. These procedures should not be attempted by “do-it-yourselfers,” and you should not assume
this bulletin applies to your vehicle, or that your vehicle has the condition described. To determine whether this information applies, contact an
authorized Honda automobile dealer.
WARRANTY CLAIM INFORMATION
In warranty: The normal warranty applies.
OP#
Description
FRT
Seal the seam. Repair Procedure A.
1.0
Seal the seam. Repair Procedure B.
1.0
8240A7
Seal the seam. Repair Procedure C.
1.0
81302B
Seal the seam. Repair Procedure D.
0.5
8420A1
Clean the grommet sealing area.
Repair Procedure E.
0.5
8570A1
848004
Drill a drain hole. Repair Procedure F.
0.5
8320A1
Remove, and reinstall the rear
window. Repair Procedure G.
2.5
8410A9
Seal the seam. Repair Procedure H.
6.7
Failed Part:
P/N 04636-SJC-A90ZZ
H/C 7924772
Defect Code:
07407
Symptom Code:
05905
Skill Level:
Repair Technician
Out of warranty: Any repair performed after warranty
expiration may be eligible for goodwill consideration by
the District Parts and Service Manager or your Zone
Office. You must request consideration, and get a
decision, before starting work.
DIAGNOSIS
1. Interview the customer to get as much information
as possible. Strong odors in the interior of the
vehicle can be caused by a water leak. To
determine where the repair is needed, listen
carefully to how the customer describes the
symptom.
2. Procedures A, B, and C are for repairs on the
outside front of the vehicle. Procedures D, E, and G
are for repairs on the outside rear of the vehicle.
Procedures F and H are for repairs on the inside
front of the vehicle.
• Remove the fender as shown in the photo. Spray
water on the lower left corner of the windshield. If
water enters the interior of the vehicle, go to
REPAIR PROCEDURE C. (Do not confuse this
procedure with REPAIR PROCEDURE F.)
Remove the fender.
• Spray water on the C-pillar. If there is water on
the right rear floor or the right rear seat belt is
wet, do REPAIR PROCEDURE D.
• If there is water on the rear floor, do REPAIR
PROCEDURE E and/or G.
• If water is entering the vehicle at the A-pillar clip,
do REPAIR PROCEDURE F.
• If water is entering the vehicle through the seam
sealer at the junction of the A-pillar and the
underside of the cowl, do REPAIR
PROCEDURE H.
Once your diagnosis is complete, do the needed
repairs. After speaking with the customer, if you
cannot diagnose the problem using the information
in step 2, this service bulletin does not apply.
Continue looking for other sources of the leak.
Based on the customer’s descriptions of where the
dampness or odor is, and the VIN ranges shown in
CORRECTIVE ACTION, use the appropriate
information below to help determine which repair
procedure to do (repair procedures are for both the
driver’s and the passenger’s side). More than one
repair may be needed.
• Remove the front inner fender, and spray water
inside the fenderwell. Check the floor on the
inside of the vehicle. If water enters the vehicle
onto the floor, do REPAIR PROCEDURE A and/
or B.
2 of 6
07-082
REPAIR PROCEDURE A
3. Apply sealer/sealant where it is missing.
1. Remove the inner fender:
• Refer to page 20-178 of the 2006–2008
Ridgeline Service Manual, or
• Online, enter keyword FENDER, and select
Front Inner Fender Replacement from the list.
2. Inspect the seam sealer on the lower A-pillar
behind the inner fender for gaps or incomplete
sealing.
Inspect the seam sealer on the upper A-pillar
between the front door hinges.
4. Reinstall all removed parts.
REPAIR PROCEDURE C
Inspect the seam sealer on the lower A-pillar
behind the inner fender.
1. Check for missing sealer between the A-pillar and
the cowl near the lower corner of the windshield.
(Procedures C and F are different. See step 2 of
DIAGNOSIS.)
3. Apply sealer/sealant where it is missing.
4. Reinstall all removed parts.
REPAIR PROCEDURE B
1. Remove the inner fender:
• Refer to page 20-178 of the 2006–2008
Ridgeline Service Manual, or
• Online, enter keyword FENDER, and select
Front Inner Fender Replacement from the list.
2. Inspect the sealer on the upper A-pillar between the
front door hinges for gaps or incomplete sealing.
Check for missing sealer between
the A-pillar and cowl next to the lower
corner of the windshield.
2. Apply sealer/sealant where it is missing.
3. Reinstall all removed parts.
07-082
3 of 6
REPAIR PROCEDURE D
REPAIR PROCEDURE E
1. Remove the right-side bed rail trim:
• Refer to page 20-134 of the 2006-2008 Ridgeline
Service Manual, or
1. Remove the rear roof trim:
• Refer to page 20-175 of the 2006–2008
Ridgeline Service Manual, or
• Online, enter keyword BED RAIL, and select
Pickup Bed Rail Trim Replacement from the
list.
2. Remove the top-right TORX bolt from the front bed
panel:
• Refer to page 20-136 of the service manual, or
• Online, enter keyword FRONT BED PANEL, and
select Front Bed Panel Removal/Installation
from the list.
• Online, enter keywords ROOF TRIM, and select
Rear Roof Trim Replacement from the list.
2. Remove the roof trim grommet, and check for seam
sealer underneath it. Clean any sealer that may be
keeping the grommet from sealing to the body.
Check for seam sealer underneath
the roof trim grommet.
3. Lay a protective cover (towel or blanket) on the roof
near the rear roof trim. Remove the trim, and lay it
on the cover (you don’t need to disconnect the
electrical connectors):
• Refer to page 20-150 of the service manual, or
• Online, enter keyword ROOF TRIM, and select
Rear Roof Trim Replacement from the list.
4. Remove the C-pillar outer trim and the cargo area
front light:
• Refer to page 20-135 of the service manual, or
• Online, enter keyword C-PILLAR, and
select C-pillar Outer Trim Replacement from
the list.
5. Apply 3M Brushable Seam Sealer to the
area shown.
SEAM SEALER
3. Reinstall all parts in the reverse order of removal,
and use new clips and grommets for the rear roof
trim.
REPAIR PROCEDURE F
1. Remove these parts:
• Passenger’s kick panel:
- Refer to page 20-59 of the 2006-2008
Ridgeline Service Manual, or
- Online, enter keyword KICK, and select
Interior Trim Removal/Installation - Door
Areas from the list.
• Glove box:
- Refer to page 20-84 of the service manual, or
- Online, enter keyword GLOVE, and select
Glove Box Removal/Installation from the list.
6. Reinstall all parts in the reverse order of removal
(use new clips and grommets).
2. Remove the three VTM-4 controller attachment
bolts.
7. If needed, dry the interior carpet, the pad, the seat
belt, and the seat.
4 of 6
07-082
3. Using a pry tool, detach the wire harness clips at
the locations shown, then move the VTM-4
controller out of the way.
VTM-4 CONTROLLER
5. Drill a new drain hole where you removed the clip:
• Wrap a piece of tape around a 3/16 inch drill bit
1 inch from the end.
• Position the drill so the bit is pointing at an
upward angle, and drill a hole into the A-pillar
noise block.
1 INCH
UPPER
CLIP
HOLE
(Drill
upward.)
VTM-4
CONTROLLER
BRACKET HOLE
WIRE HARNESS CLIPS
(Detach in two places.)
4. Using a chisel, remove the exposed black clip near
the controller bracket.
• Reposition the drill so the bit is pointing at a
downward angle, and drill a second hole into the
noise block.
A-PILLAR
NOISE BLOCK
Drill upward,
then downward
through the
A-pillar
noise block.
CLIP
6. To prevent rusting, apply primer to any surface
area cut with the drill bit.
7. Clean the area around the clip hole and the hole
under the VTM-4 controller bracket with isopropyl
alcohol.
8. Coat the clip hole and the open hole under the
VTM-4 controller bracket with seam sealer, and let
it to dry for about 15 minutes. Use 3M Brushable
Seam Sealer or equivalent.
NOTE: Do not fill the drilled hole with seam sealer.
It will block the flow of water.
07-082
5 of 6
9. To verify the repair, pour about 3 to 4 oz. (100 ml)
of water inside the A-pillar using a funnel and hose.
The water should drain out through the bottom of
the A-pillar below the passenger compartment
floor.
GLOVE BOX
OPENING
FUNNEL
AND HOSE
REPAIR PROCEDURE H
1. Remove the front seats:
• Refer to page 20-97 of the Service Manual, or
• Online, enter keywords SEAT REMOVAL, and
select Front Seat Removal/Installation from the
list.
2. Remove the instrument panel:
• Refer to page 20-81 of the 2006–2008 Ridgeline
Service Manual, or
• Online, enter keywords INSTRUMENT PANEL,
and select Instrument Panel Removal/
Installation from the list.
3. Remove the insulation from the area shown below.
SEAM
SEALER
(Cover the
top clip hole.)
NOISE
BLOCK
Remove the insulation from this area.
Drains
under the
vehicle
4. Check for missing sealer under the instrument
panel, where the cowl area on the left and right
sides meet the A-pillar.
10. Reinstall the VTM-4 controller, the glove box, and
the passenger’s kick panel.
REPAIR PROCEDURE G
Remove the rear window, and reinstall it (be sure the
window and the frame are properly positioned). Be
sure to reinstall all parts in the reverse order of
removal, and use new clips and grommets for the rear
roof trim:
• Refer to page 20-37 of the 2006–2008 Ridgeline
Service Manual, or
• Online, enter keywords REAR WINDOW, and select
Rear Window Replacement from the list.
Check for missing sealer.
5. Apply sealer to any areas where there are gaps or
where it is missing.
6. Reinstall all removed parts.
6 of 6
07-082