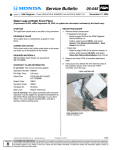
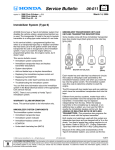
1
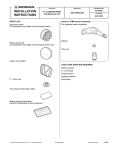
Service Bulletin
Applies To:
2006 Ridgeline – From VIN 2HJYK1...6H500001 thru 2HJYK1...6H536968
05-029
September 21, 2005
Steering Wheel Creak Noise
(Supersedes 05-029, dated August 30, 2005, to update the information marked with the black bar)
SYMPTOM
REPAIR PROCEDURE
A creaking sound when pushing or pulling on the
steering wheel.
1. Remove the driver’s airbag from the steering
wheel. Discard the Torx bolts.
• Refer to page 24-149 of the 2006 Ridgeline
Service Manual, or
• Online, enter keyword AIRBAG, and select
Driver’s Airbag Replacement from the list.
• For an RTL, go to step 7.
• For an RT or RTS, go to step 2.
PROBABLE CAUSE
The steering wheel finisher (chrome trim) rubs against
the bottom of the airbag module.
CORRECTIVE ACTION
Add wool felt between the finisher and the steering
wheel and to the airbag locator pins.
PARTS INFORMATION
3. Remove the steering wheel finisher.
• Refer to page 17-22 of the 2006 Ridgeline
Service Manual, or
• Online, enter keyword STEERING WHEEL, and
select Steering Wheel Disassembly/
Reassembly from the list.
T30 Torx Bolts (2 required): P/N 90134-S7S-N81
H/C 6831218
REQUIRED MATERIALS
Wool Felt (One roll will repair 5 vehicles)
P/N 06993-SA5-000, H/C 2086676
4. Cut three 5 mm x 130 mm strips of wool felt.
5. Clean the portions of the finisher that contact the
steering wheel with alcohol, and allow the alcohol
to dry.
WARRANTY CLAIM INFORMATION
In warranty: The normal warranty applies.
OP#
Description
FRT
Template ID
510003
For the RTL:
Remove the driver’s airbag,
apply wool felt, and
reassemble.
0.4
05-029A
A For the RT/RTS:
Remove the driver’s airbag,
steering wheel, steering
wheel finisher, apply wool
felt, and reassemble; add
0.2
05-029B
Failed Part:
2. Remove the steering wheel.
• Refer to page 17-21 of the 2006 Ridgeline
Service Manual, or
• Online, enter keyword STEERING WHEEL, and
select Steering Wheel Removal from the list.
P/N 78503-SJC-A11ZA
H/C 7992712
Defect Code:
07403
Symptom Code:
04205
Skill Level:
Repair Technician
Out of warranty: Any repair performed after warranty
expiration may be eligible for goodwill consideration by
the District Parts and Service Manager or your Zone
Office. You must request consideration, and get a
decision, before starting work.
© 2005 American Honda Motor Co., Inc. – All Rights Reserved
ATB 29314-30887 (0509)
1 of 2
CUSTOMER INFORMATION: The information in this bulletin is intended for use only by skilled technicians who have the proper tools, equipment,
and training to correctly and safely maintain your vehicle. These procedures should not be attempted by “do-it-yourselfers,” and you should not assume
this bulletin applies to your vehicle, or that your vehicle has the condition described. To determine whether this information applies, contact an
authorized Honda automobile dealer.
6. Apply the wool felt strips to the finisher. Position the
strips about 1 mm from the top edge of the finisher
so they are not visible when the finisher is installed.
Trim away any excess felt.
8. Cut two 25 mm x 25 mm wool felt squares. Cut
holes (or an “X”) in the wool felt at the locations
shown, large enough for the airbag locating pins to
poke through.
25 mm x 25 mm
WOOL FELT
(Cut a hole as
shown.)
STEERING
WHEEL
FINISHER
5 mm x 130 mm
WOOL FELT
(3 places)
1 mm
7. Inspect the airbag module locating pins on the
finisher. If they are chromed, scrape off the chrome
carefully with a knife.
AIRBAG MODULE
LOCATING PIN
9. Clean the felt mounting area on the finisher with
alcohol. Let the alcohol dry.
10. Apply the two wool felt squares.
11. Reinstall all removed parts. Torque the steering
wheel nut to 49 N.m (36 lb-ft). Do not overtighten.
NOTE: Always use new Torx bolts when installing
the driver’s airbag.
2 of 2
05-029