1
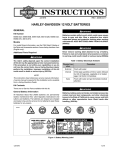
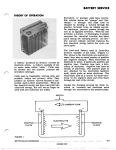
INSTRUCTIONS
®
REV. 05-25-2004
-J00597
Kit Numbers 66006-70 and 66007-84
HARLEY-DAVIDSON 12 VOLT BATTERIES
General
i00858
1
This instruction sheet provides service information for DRYCHARGED batteries.
REM
Sea OVE an
led
d
filling Tube bDISCAR
D
efo
with
PUL
Acid re
L
There are no Service Parts available with this product.
POIS
ON/D
ANG
ER
1WARNING
The rider’s safety depends upon the correct installation
of this kit. Use the appropriate service manual procedures. If the procedure is not within your capabilities or
you do not have the correct tools, have a HarleyDavidson dealer perform the installation. Improper
installation of this kit could result in death or serious
injury. (00333a)
NOTE
This instruction sheet references Service Manual instructions. A Service Manual for your motorcycle is available from
your Harley-Davidson dealer.
1.
2.
OFF
- C
AUS
ES
SEV
ERE
BUR
NS
Tag
Sealed tube
2
Figure 1. Reminder Tag/Sealed Shipping Tube
i00859
1WARNING
Engine exhaust from this product contains chemicals
known to the State of California to cause cancer and
birth defects or other reproductive harm. (00004b)
1WARNING
Do not run motorcycle in a closed garage or confined
area. Inhaling motorcycle exhaust, which contains poisonous carbon monoxide gas, could result in death or
serious injury. (00005a)
1CAUTION
Batteries, battery posts, terminals and related accessories contain lead and lead compounds, and other
chemicals known to the State of California to cause cancer and birth defects or other reproductive harm. Wash
hands after handling. (00019c)
1WARNING
Batteries contain sulfuric acid, which could cause
severe burns to eyes and skin. Wear a protective face
shield, rubberized gloves and protective clothing when
working with batteries. KEEP BATTERIES AWAY FROM
CHILDREN. (00063a)
UPPER
LEVEL
LOWER
LEVEL
POIS
CAUS ON/DAN
ES SE
G
VERE ER
Conta
ins su
BURN
lfu
conta
S
ct wit ric acid.
- Avoid
h skin,
Antid
ote
ey
Conta INTERN es or clo
th
ins su
AL
lfuric - FLUSH
conta
ac
ct
wi
Antid with skin, id. - Avoid
ote
ey
Conta INTERNALes or cloth
i
Figure 2. Vent Tube Clamp
(only smooth vent elbow requires clamp)
1DANGER - EXPLOSIVE GASES
Cigarettes, flames, or sparks could cause battery
to explode. Always shield eyes and face from
battery. Do not charge without proper instruction
and training. Securely connect cables to the
proper terminals. Check vent tube to avoid any
crimping or obstruction of the tube.
KEEP FILLING PLUGS
TIGHT AND LEVEL
POISON - CAUSES SEVERE BURNS
Contains sulfuric acid. Avoid contact with skin,
eyes and clothing. In event of accident, flush with
water and call a physician immediately.
KEEP OUT OF REACH OF CHILDREN
Figure 3. Battery Warning Label
1 of 5
Activate Battery
1WARNING
Never remove warning label attached to top of battery.
Failure to read and understand all precautions
contained in warning, could result in death or serious
injury. (00064a)
1. Place battery on a level surface.
CAUTION
Do not perform battery activation/charging with the
battery installed on the motorcycle. If electrolyte is
accidentally spilled, it could severely damage the
motorcycle.
ANTIDOTE
EXTERNAL: Flush with water.
INTERNAL:
Drink large quantities of milk or water
followed by milk of magnesia, vegetable
oil or beaten eggs. Call doctor
immediately.
EYES:
Flush eyes with water and get immediate
medical attention.
2. See Figure 1. Remove reminder tag and short sealed
tube from battery vent elbow.
1WARNING
A sealed tube which is left in place could cause a buildup of internal gas pressure. Internal gas pressure can
cause a battery to explode causing death or serious
injury.
3. Verify that battery vent elbow is dry and clean and
install long vent tube as follows:
a.
See Figure 2. On models with a smooth vent
elbow, clamp long vent tube to elbow of battery.
Rotate prongs of clamp toward side of battery.
b.
On models with a barbed vent elbow, install long
vent tube over elbow of battery.
c.
Place other end of long vent tube in a suitable
container to collect any electrolyte which might
overflow through vent tube.
5. Carefully fill each cell of battery with electrolyte (diluted
sulfuric acid) of 1.265 specific gravity. Fill to indicated
upper level. Let battery stand for 1/2 hour.
●
●
NOTES
DO NOT ACTIVATE BATTERY WITH WATER OR ANY
LIQUID OTHER THAN DILUTED SULFURIC ACID.
Electrolyte should be at room temperature
(approximately 70° F/21° C) before filling.
6. After 1/2 hour, gently tap battery to dislodge air bubbles
from cell plates. If electrolyte level has fallen during
standing, refill battery with electrolyte to upper level.
7. Install filler caps.
4. Remove all battery cell filler caps.
i06385
1.
2.
3.
4.
5.
6.
KEEP FLAMES AWAY
CONTENTS ARE EXPLOSIVE
READ INSTRUCTIONS
WEAR SAFETY GLASSES
DO NOT ALLOW CHILDREN TO PLAY WITH BATTERY
CONTENTS ARE CORROSIVE
Figure 3. Battery Warning Label
-J00597
2 of 5
Charge Battery
I00857
Safety Precautions
Never charge a battery without first reviewing the
manufacturers instructions for the charger. In addition to the
manufacturer’s instructions, follow these safety precautions:
1WARNING
●
Always wear proper eye, face and hand protection.
●
Always charge batteries in a well-ventilated area.
●
Turn the charger OFF before connecting the leads to
the battery to avoid dangerous sparks.
●
Never try to charge a visibly damaged or frozen battery.
●
Connect the charger leads to the battery; red positive
(+) lead to the positive (+) terminal and black negative
(-) lead to the negative (-) terminal. If the battery is still
in the vehicle, connect the negative lead to the chassis ground. Be sure that the ignition and all electrical
accessories are turned off.
●
Make sure that the charger leads to the battery are not
broken, frayed or loose.
●
If the battery becomes hot, or if violent gassing or
spewing of electrolyte occurs, turn off the charger
temporarily.
●
Always turn the charger “OFF” before removing
charger leads from the battery to avoid dangerous
sparks.
Failure to adhere to these precautions, could result in
death or serious injury.
1WARNING
Explosive hydrogen gas, which escapes during charging,
could cause death or serious injury. Charge battery in a
well-ventilated area. Keep open flames, electrical sparks
and smoking materials away from battery at all times.
KEEP BATTERIES AWAY FROM CHILDREN. (00065a)
1WARNING
Unplug or turn OFF battery charger before connecting
charger cables to battery. Connecting cables with charger
ON can cause a spark and battery explosion, which could
result in death or serious injury. (00066a)
Figure 4. Measuring Specific Gravity of Electrolyte with
Hydrometer
●
●
NOTES
A trickle charger or CHRISTIE charger with a 1 amp
charging rate (or less) may be used. However, it will take
at least 24 hours for the 100% initial charge with these
types of chargers.
The recommended alternative is a variable/tapered rate
charger with a maximum charging rate of 2 to 8 amps.
With this type of charger, the initial charging rate should
be the maximum charging rate for the particular charger
(ie. 2 to 8 amps). However, over a period of time, possibly as little as 1 to 2 hours, the charging rate will taper off
to near 0 amps. At this point, the battery has probably
attained a charging voltage of 14 volts or greater.
Continue charging the battery for at least the remainder of
the 12 hours total charge time, even though the battery
electrolyte has probably attained its proper specific gravity. This additional charging time is necessary to “set” the
cell plates in a low-maintenance battery.
CAUTION
If battery gets hotter than 110° F (43° C) during charging,
discontinue charging and let battery cool. If battery
releases an excessive amount of gas during charging,
decrease charging rate.
-J00597
3 of 5
●
Charge Battery
Procedure
CAUTION
Remove battery from motorcycle before charging.
electrolyte leakage will damage motorcycle parts. (00213a)
1. Follow instructions in applicable Service Manual to remove
the battery from the motorcycle.
2. Place the battery on a level service.
3. Refer to Table 1. Set battery charger to the recommended
charging rate.
Table 1. Recommended Charging Rates
Battery
Part No.
Volt
Capacity
(AMP-hr.)
Bench Charge
Max. Rate
66006-70
12
7.5
1 AMP
66007-84
12
32
3 AMP
1WARNING
Unplug or turn OFF battery charger before connecting
charger cables to battery. Connecting cables with charger
ON can cause a spark and battery explosion, resulting in
death or serious injury. (00066a)
CAUTION
Do not reverse the charger connections described in the
following steps or the charging system of the motorcycle
could be damaged. (00214a)
4. Connect the red battery charger lead to the positive (+)
battery terminal.
5. Connect the black charger lead to the negative (–)
terminal of the battery.
6. See Figure 4. Charge battery until specific gravity of
electrolyte increases to 1.260 - 1.270 at 80° F (27° C).
Measure with HYDROMETER (Part No. HD-96910-35).
●
NOTES
Cell variance must not exceed 0.010 specific gravity.
●
If recommended charging time has elapsed but specific
gravity is still below 1.270 at 80° F (27° C), continue
charging until desired specific gravity is attained.
●
When using a syringe hydrometer, read electrolyte level at
bottom of meniscus (curved upper surface of fluid).
Specific gravity changes with temperature differences.
When the temperature increases, specific gravity of a
typical fluid decreases, and vice versa. If electrolyte
temperature in battery is not 80° F (27° C), use the
following formula to compute temperature-corrected
specific gravity:
▼
▼
For each 10° F (5.5° C) above 80° F (27° C), add
0.004 to actual specific gravity reading.
For each 10° F (5.5° C) below 80° F (27° C),
subtract 0.004 from actual specific gravity reading.
For example:
Electrolyte temperature
Hydrometer reading
Adjustment for temperature
Corrected specific gravity
100° F (38° C)
1.272
+ 0.008
1.280
7. After initial charge, gently tap battery to dislodge air
bubbles from cell plates.
NOTE
If electrolyte level has fallen, refill battery with distilled water
to the upper level and charge an additional 1 - 2 hours.
8. After the battery is fully charged, disconnect the black
lead to the negative (–) terminal of the battery.
9. Disconnect the red charger lead from the (+) terminal of
the battery.
10. Install all battery filler caps.
11. Wash off any acid spillage from battery using water.
Wipe battery dry.
12. Mark charge date on battery.
Install Battery
1. Using a wire brush or sandpaper, clean battery terminals
and cable connectors to remove oxidation.
2. Follow instructions in the appropriate Service Manual to
install the fully charged battery with vent tube onto
motorcycle.
3. Follow the Service Manual instructions to secure battery
to battery tray using original mounting hardware.
1WARNING
Connect positive (+) battery cable first. If positive (+) cable
should contact ground with negative (–) cable connected,
the resulting sparks can cause a battery explosion, which
could result in death or serious injury. (00069a)
CAUTION
Connect cables to correct terminals of battery;
otherwise, serious damage to motorcycle electrical
system may occur.
-J00597
4 of 5
4. Connect positive cable to positive (+) battery terminal.
NOTE
Be sure to install a spacer (if required) between each cable
terminal and battery terminal.
5.After positive cable has been connected to positive
terminal, connect negative cable to negative (–) battery
terminal.
6. Apply light coat of Harley-Davidson Electrical Contact
Lubricant (Part No. 99861-02) to both terminals.
CAUTION
Store and Maintain Battery
Check battery electrolyte level after the first 500 miles.
Thereafter, check battery electrolyte level after every 500
miles or every week on conventional batteries and after
every 5,000 miles or once a month on low-maintenance
batteries. Check and clean battery terminals each time you
check the electrolyte level.
If motorcycle will not be operated for several months, such as
during the winter season, remove the battery from the
motorcycle and charge the battery until the correct specific
gravity is obtained. Refer to the Service Manual for detailed
instructions.
Route battery vent tube on the vehicle side opposite the
secondary drive belt/chain, or tube may be damaged by
rubbing against belt/chain.
If the battery is stored at temperatures below 60° F (16° C),
charge the battery every month (according to Service Manual
instructions). If stored in a warm area, above 60° F (16° C),
charge battery more frequently than once a month.
1WARNING
1WARNING
Route battery vent tube away from ends of mufflers, or
sparks from mufflers could cause battery to explode,
which may cause death or serious injury.
Store batteries where they cannot be reached by
children, to protect children from death or serious injury.
CAUTION
CAUTION
Battery vent tube has a small slit near each end of tube.
The slit near battery vent elbow provides a pressure
release for battery gases should bottom of tube become
obstructed (internal gas pressure can cause a battery to
explode). You may trim off bottom end of tube after tube
is properly routed; however, always make sure that end
with remaining slit is attached to battery vent elbow.
5.
6.
Route battery vent tube per Service Manual, making
sure that it does not become kinked or obstructed, that it
does not chafe or touch any moving parts, and that its
outlet is directed away from any metal component.
The electrolyte in a discharged battery will freeze if
exposed to freezing temperatures. Freezing may crack
battery case and buckle battery plates.
Table 2. State of Charge
State of Charge
Voltage
Charge Period
100%
13.0V
None
75%
12.8 V
3-5 hours
50%
12.5 V
4-7 hours
25%
12.2 V
10 hours
Following the Service Manual, install motorcycle seat
and any other components.
1WARNING
After installing seat, pull upward on front of seat to be sure
it is locked in position. If seat is loose, it could shift
position during vehicle operation, resulting in loss of
control of vehicle and death or serious injury. (00070a)
-J00597
5 of 5