1
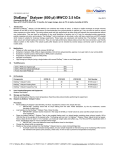
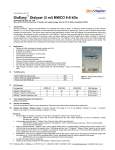
F15/F21/F31
F41/F51/F61
Service Manual
Table of Contents
General Installation Check List ................................................................01
Valve Start-up Procedure ........................................................................03
Dimensional Drawings ............................................................................07
Timer Assembly ......................................................................................13
Control Drive Assembly ...........................................................................19
Valve Body Assembly ..............................................................................27
Brine Valve Assembly ..............................................................................39
Meter Assembly ......................................................................................42
Wiring Diagram ....................................................................................47
Trouble Shooting ....................................................................................51
General Installation Check List
1. The Surroundings Of Installation
Water Pressure
A minium of 0.2 Mpa of water pressure is required for valve to operate effectively.
Electrical Facilities
A continuous current supply is required, check voltage compatibility.
Existing Plumbing
Condition of existing plumbing should be free from any deposit such as lime and
iron build up. Piping that is clogged heavily with these deposit should be cleaned in
time and connect according to plumbing codes.
Location Of Installation
The softener should be located close to a drain pipe
By-pass Valves
Always provide for the installation of a by-pass valve
CAUTION
¤ Water pressure is not to exceed 0.8Mpa
¤ Water temperature is not to exceed 38℃
WARNING
¤ The unit cannot be subjected to freezing conditions.
2. Instruction Of Valve Installation And Resin Filling
①Fit the distrubutor firmly to the bottom of the central tube, cut the tube from the point
that is 0.5mm lower than the top of the tank and chamfer ,then insert it into the central
of resin tank ,and seal the central tube with tape in case of the resin leakage.
②Add sand to fill the space around the central tube unit it is 20 mm above the bottom
distributor. The sand should be paved based on the graded particle size in order to
distribute the water. No need to fill the tank with sand if the diameter of the tank is less
than 500 mm.
③Fill the tank evenly with sand to the standard height then add 10% salt water until it
overflows the resin. Let resin fully expands. then take off the tape on the central tube
and keep it always in the middle of tank .
④To install the top distributor on the valve, then insert the central tube into valve
through top distributor, and carefully turns the valve clockwise until it screws tightly
on the tank .( Pay attention: valve and tank mouth, top distributor and valve、central
tube, buttom distributor and central tube must be sealed, in case of the resin leakage;
central tube and valve must be sealed, other wise the water will leak).
01
General Installation Check List
3. Pipe Connection
①To connect the in-outlet pipe according to the valve's dimension (water supply pipe
should not less than inlet pipe for keeping sufficient flow).
②The manual valve should be installed on the in-outlet pipe, the bypass valve should be
installed between in-outlet pipe, the sampling valve should be installed before the
outlet pipe, the Y filter is recommended to installed on the inlet pipe; in case of the
deposit in the pipe would clog the valve and make the system can't work well.
③The length of drain pipe should not exceed 6 m, tr y to avoid bending.
④The length of the pipe for brine water should be less than 2 meters, keep the pipes
sealed in good condition, other wise it may influence the regeneration effect.
4. System Adjustment
① Wash the deposit away from the pipe. To set the bypass valve in bypass position, wash
the deposit away from the pipe until the water runs clean. Then close the inlet-outlet
valve, and set the bypaass valve to ser vice position.
② To set the valve on the ser vice position, open the inlet valve,to refill the water into the
resin tank until the water stop flowing. Open the outlet valve to clean up the air and
deposit of the resin tank .
③ To set the valve on backwash position, and the water outflow from drainage for 3-4
minutes. Keep draining off the water until the water is clean.
④ To set the valve on the brine position,and suck the water from brine tank until stop.
⑤ To set the valve on refill postion, refill the salt and water into the tank until exceed the
air check valve. Note: keep the salt water for 6 hours.
⑥ To set the valve on ser vice postion, check if the bypass valve is in ser vice postion and
the out water is qualified.
02
Valve Start-up Procedure
Mechanical valve has 3 type: timer, meter immediately, meter delayed.
The current time of day should be set before operating the timer or meter delayed valves, but no
needs for meter immediate valve.
How to set the time of day:
① Press and hold the time set button to disengage the 24 hour gear.
② Turn the 24 hour gear until the actual time of day is at the time of day pointer.
NOTE: the 24 hour gear would stop running when power fails, it needs to reset the time of day
when the power switched on.
24 Hour Gear
Time Indication
Time Set Button
1. Model timer
Manual
Regeneration Knob
24 Hour Gear
Regeneration Timer Pointer
TO SET TIME OF DAYPRESS WHITE BUTTON AND
TURN LARGE DIAL UNTIL
TIME IS AT ARROW.
TO MANUALLY START
CYCLE-TURN KNOB
CLOCKWISE.
Screw
TO SET TIME OF DAYPRESS WHITE BUTTON AND
TURN LARGE DIAL UNTIL
TIME IS AT ARROW.
TO MANUALLY START
CYCLE-TURN KNOB
CLOCKWISE.
Gap
Red pointer
TI
M
TI
EO
M
FD
AY
EO
FD
AY
Time Indication
Time Set Button
Skipper Wheel
Mechanical valve was defaut set the regeneration time at 2:00 AM before leave factor y, it means after
setting time of day, the regeneration starts when 2:00AM on the 24 hour gear and time indication arrow
in same point.
03
Valve Start-up Procedure
1.1.How to adjust the regeneration time
①Disconnect the power source .
②Locate the three screws behind the manual regeneration knob by pushing the red button in and rotating
the 24 hour dial until each screw appear in the cut out portion of the manual regeneration knob.
③Loosen each screw slightly to release the pressure on the time plate from the 24 hour gear.
④Locate the generation time pointer on the inside of 24 hour dial in the cut out.
⑤Turn the time plate so the desired regeneration time aligns next to the raised arrow .
⑥Push the red button in and rotate the 24 hours dial . Tighten each of the three screws .
⑦Push the red button and locate the pointer one more time to ensure the desired regeneration time is
correct.
⑧Reset the time of day and restore power to the unit.
NOTE: the 24 hour gear would stop running when power off, it should be reset when the power switched on.
1.2. How to set the inter val days of regeneration
The skipper wheel indicates 12 days on the timer model, ever y tab presents one day. the tab at the red
pointer is today. Pull or push the tab to set the regeneration date. For example, firstly push down all the
tabs then pull up the tab ever y other one, the valve will regenerate ever y other day. For example, pull all
the skipper wheel pieces firstly, then pick up ever y other one, that means the regeneration date is
regenerate one time ever y other day.
2. Model Meter
24Hour Gear
Manual Regeneration Knob
TO SET TIME OF DAYPRESS WHITE BUTTON AND
TURN LARGE DIAL UNTIL
TIME IS AT ARROW.
TO MANUALLY START
CYCLE-TURN KNOB
CLOCKWISE.
CAPACITE
CAPACIT..Y
KAPAZITAT
CAPACITA
CAPACIDAD
GAL
Capacity
(gallons remaining or M³ remaining)
Program wheel
TI
M
EO
FD
AY
Time Set Button
White Dot
Gallon Label(or M³ label)
NOTE: Immediate regeneration times do not have 24 hours gear, no time of day can be set. And they have
same way to set the regeneration.
2.1.How to set the regeneration cycle program
① Pull out the cable from the meter.
② Set program wheel by lifting the middle small dial and rotating it until the desired capacity on the
label aligned with the white dot.
③ Release the middle small dial and check for firm engagement at setting.
④ Rotate the manual regeneration knob and let the program wheel return to the position.
⑤ Re-insert the meter cable back .
04
Valve Start-up Procedure
3. How to manual regenerate
Turn the manual regeneration knob clockwise until hear the clatter. This sight movement will switch on
the micro switch attached and starts the regeneration. Program wheel would spend about 3 hours for
rotate a cycle .it's also available to clockwise rotate manual regeneration knob until to the next desired
regeneration steps, but before next step, please wait the motor running to corresponding regeneration
step and stop.
NOTE: Don't rotate the manual regeneration knob before the motor stop. If the program wheel and
piston on the valve runs in different position, please cut the power and check the valve position first,
then rotate the manual regeneration knob to corresponding position, then apply the power again.
4. How to set the regeneration cycle program
Brine &Rinse Section
( 2 Min. Per Hole)
Pin Storage
Program Wheel
Repid Rinse Section
( 2 Min. Per Pin)
Back Wash
(2 Min. Per Pin)
Brine Tank
( 2 Min. Per Hole )
the back of timer
① The regeneration cycle program on your water conditioner has been factor y preset, however,
portions of the cycle or program may be lengthened or shortened in time to suit local conditions.
② To expose cycle program wheel , grasp timer in upper left - hand corner and pull, releasing snap
retainer and swinging timer to the right.
To change the regeneration cycle program the program wheel must be removed. Grasp program
wheel and squeeze protruding lugs towards center, lift program wheel off timer.(Switch arms may
require movement to facilitate removal.)
Return timer to closed positions engaging snap retainer in back plate. Make certain all electrical
wires locate above snap retainer post.
05
Valve Start-up Procedure
How To Change The Length Of The Backwash Time:
The program wheel as shown in the drawing is in the ser vice position. As you look at the numbered
side of the program wheel, the group of pins starting at zero determines the length of time your
unit will backwash.
FOR EXAMPLE: If there are six pins in this section, the time of backwash time will be 12 min. (2 min.
Per pin).To change the length of backwash time, add or remove pins as required. The number of pins
times two equals the backwash time in minutes.
How To Change The Length Of Brine And Rinse Time:
The group of holes between the last pin in the backwash section and the second group of pins
determines the length of time that your unit will brine and rinse (2 min. Per hole.)
To change the length of brine and rinse time, move the rapid rinse group of pins to give more of
fewer holes in the brine and rinse section. Number of holes time two equals brine and rinse time in
the minutes.
How To Change The Length Of Rapid Rinse:
The second group of pins on the program wheel determines the length of time that your water
conditioner will rapid rinse.(2 min. Per pin.)
To change the length of rapid time, add or remove pins at the higher numbered end of this section
as required. The number of pins times two equals the rapid rinse time in minutes.
How To Change The Length Of Brine Tank Refill Time:
The second group of holes in the program wheel determines the length of time that your water
conditioner will refill the brine tank .(2 min. Per hole.)
To change the length of refill time, move the two pins at the end of the second group of holes as
required.
The regeneration cycle is complete when the outer micro-switch is tripped by the two pin set at end
of the brine tank refill section. The program wheel, however, will continue to rotate until the inner
micro-switch drops into the notch on the program wheel.
06
Dimensional Drawing
F15
The unit of the number in brackets is inch,rest is millimeter.
07
Dimensional Drawing
F21
The unit of the number in brackets is inch,rest is millimeter.
08
Dimensional Drawing
F31
The unit of the number in brackets is inch,rest is millimeter.
09
Dimensional Drawing
F41
The unit of the number in brackets is inch,rest is millimeter.
10
Dimensional Drawing
F51
The unit of the number in brackets is inch,rest is millimeter.
11
Dimensional Drawing
F61
The unit of the number in brackets is inch,rest is millimeter.
12
Timer Assembly
Time-Clock Timer
13
Timer Assembly
Time-Clock Timer
Item No.
1
2
3
4
5
6
7
8
9
※ 10
11
12
13
14
15
16
※ 17
18
19
20
21
22
23
24
25
26
27
28
29
30
31
Quantity
………………………
………………………
………………………
………………………
………………………
………………………
………………………
………………………
………………………
………………………
………………………
………………………
………………………
………………………
………………………
………………………
………………………
………………………
………………………
………………………
………………………
………………………
………………………
………………………
………………………
………………………
………………………
………………………
………………………
………………………
………………………
1
1
1
1
1
1
2
4
3
1
2
1
1
1
1
1
1
1
1
1
1
1
3
2
1
1
2
1
1
1
1
Part No.
Description
……………………… 13206 ……………………… Ider shaft
……………………… 13253 ……………………… Spring
……………………… 13205 ……………………… Ider gear
……………………… 13204 ……………………… Drive gear
……………………… 15650 ……………………… Motor mounting plate
……………………… 07057 ……………………… Wire
……………………… 07011 ……………………… Terminal
……………………… 02106 ……………………… Screw
……………………… 02008 ……………………… Screw
…………………………………… ……………………… Motor
……………………… 02081 ……………………… Screw
……………………… 33104 ……………………… Switch assy
……………………… 06051 ……………………… Insulator
……………………… 06002 ……………………… Switch
……………………… 13214 ……………………… Stretch pin
……………………… 13211 ……………………… Cycle actuator staff
……………………… B0006 ……………………… Time gear assy
……………………… 13215 ……………………… Knob
……………………… 13281 ……………………… Label
……………………… 02107 ……………………… Screw
……………………… 13210 ……………………… Pointer
……………………… 66109 ……………………… Skipper wheel assy
……………………… 09001 ……………………… Ball
……………………… 13254 ……………………… Spring
……………………… 13208 ……………………… Skipper wheel ring
……………………… 13250 ……………………… Hinge bracket
……………………… 02004 ……………………… Screw
……………………… 13212 ……………………… Timer housing
……………………… B0003 ……………………… Program wheel assy
……………………… 13203 ……………………… Main drive gear
……………………… 13252 ……………………… Spring
※For more options
14
Timer Assembly
Meter Imm. Timer
15
Timer Assembly
Meter Imm. Timer
Item No.
1
2
3
4
5
6
7
8
9
※ 10
11
12
13
14
15
16
17
18
19
20
21
22
23
24
25
※ 26
27
28
29
30
Quantity
………………………
………………………
………………………
………………………
………………………
………………………
………………………
………………………
………………………
………………………
………………………
………………………
………………………
………………………
………………………
………………………
………………………
………………………
………………………
………………………
………………………
………………………
………………………
………………………
………………………
………………………
………………………
………………………
………………………
………………………
1
1
1
1
1
1
2
5
3
1
1
1
1
1
1
1
1
1
2
1
1
1
1
2
1
1
1
2
1
1
Part No.
……………………… 13206
……………………… 13154
……………………… 13205
……………………… 13204
……………………… 15650
……………………… 07057
……………………… 07011
……………………… 02106
……………………… 02008
……………………………………
……………………… 12271
……………………… 13106
……………………… 13151
……………………… 13110
……………………… 13111
……………………… 06002
……………………… 06051
……………………… 33104
……………………… 02081
……………………… 13214
……………………… 13212
……………………… 13102
……………………… 13215
……………………… 13281
……………………… 13109
……………………… B0004
……………………… 13250
……………………… 02004
……………………… B0003
……………………… 13101
※For more options
16
………………………
………………………
………………………
………………………
………………………
………………………
………………………
………………………
………………………
………………………
………………………
………………………
………………………
………………………
………………………
………………………
………………………
………………………
………………………
………………………
………………………
………………………
………………………
………………………
………………………
………………………
………………………
………………………
………………………
………………………
Description
Ider shaft
Spring
Ider gear
Drive gear
Motor mounting plate
Wire
Terminal
Screw
Screw
Motor
Soft shaft
Spring retainer
Spring
Clutch
Drive pinion
Switch
Insulator
Switch assy
Screw
Stretch pin
Timer housing
Cycle actuator gear
Knob
Lable
Program wheel assy
Flow gear assy
Hinge bracket
Screw
Program wheel assy
Main drive gear
Timer Assembly
Meter Delay Timer
17
Timer Assembly
Meter Delay Timer
Item No.
1
2
3
4
5
6
7
8
9
※10
11
12
13
14
15
16
17
18
19
20
21
22
※ 23
24
25
26
※ 27
28
29
30
31
32
33
Quantity
………………………
………………………
………………………
………………………
………………………
………………………
………………………
………………………
………………………
………………………
………………………
………………………
………………………
………………………
………………………
………………………
………………………
………………………
………………………
………………………
………………………
………………………
………………………
………………………
………………………
………………………
………………………
………………………
………………………
………………………
………………………
………………………
………………………
1
1
1
1
1
1
2
5
3
1
1
1
1
2
1
1
1
1
2
1
1
1
1
1
2
1
1
1
2
1
1
1
1
Part No.
……………………… 13026
……………………… 13253
……………………… 13205
……………………… 13204
……………………… 15650
……………………… 07057
……………………… 07011
……………………… 02106
……………………… 02008
……………………………………
……………………… 12271
……………………… 13106
……………………… 13151
……………………… 13107
……………………… 13108
……………………… 06002
……………………… 06051
……………………… 33104
……………………… 02081
……………………… 13214
……………………… 13212
……………………… 13102
……………………… B0006
……………………… 13215
……………………… 13281
……………………… 13109
……………………… B0004
……………………… 13250
……………………… 02004
……………………… B0003
……………………… 13203
……………………… 09001
……………………… 13252
※For more options
18
………………………
………………………
………………………
………………………
………………………
………………………
………………………
………………………
………………………
………………………
………………………
………………………
………………………
………………………
………………………
………………………
………………………
………………………
………………………
………………………
………………………
………………………
………………………
………………………
………………………
………………………
………………………
………………………
………………………
………………………
………………………
………………………
………………………
Description
Ider shaft
Spring
Ider gear
Drive gear
Motor mounting plate
Wire
Terminal
Screw
Screw
Motor
Soft shaft
Spring retainer
Spring
Clutch
Drive pinion
Switch
Insulator
Switch assy
Screw
Stretch pin
Timer housing
Cycle actuator gear
Time gear assy
Knob
Lable
Program wheel assy
Flow gear assy
Hinge bracket
Screw
Program wheel assy
Main drive gear
Ball
Spring
Control Drive Assembly
F15、F21、F31 upper
19
Control Drive Assembly
F15、F21、F31 upper
Item No.
※1
2
3
4
5
▲
6
▲
7
8
9
10
11
12
13
14
15
16
17
▲ 18
19
20
※ 21
▲ 22
▲ 23
24
25
26
27
28
29
Quantity
………………………
………………………
………………………
………………………
………………………
………………………
………………………
………………………
………………………
………………………
………………………
………………………
………………………
………………………
………………………
………………………
………………………
………………………
………………………
………………………
………………………
………………………
………………………
………………………
………………………
………………………
………………………
………………………
………………………
………………………
………………………
………………………
………………………
1
1
1
1
1
1
2
1
2
1
2
1
1
1
2
1
8
2
1
1
1
2
1
1
1
1
2
1
2
2
4
1
1
Part No.
……………………………………………………………
……………………… 07003 ………………………
……………………… 13200 ………………………
……………………… 13100 ………………………
……………………… 13100E ………………………
……………………… 07012 ………………………
……………………… 06051 ………………………
……………………… 06051 ………………………
……………………… 06003 ………………………
……………………… 06003 ………………………
……………………… 02081 ………………………
……………………… 10003 ………………………
……………………… 10005 ………………………
……………………… 10030 ………………………
……………………… 00103 ………………………
……………………… 10004 ………………………
……………………… 02006 ………………………
……………………… 02056 ………………………
……………………… 10001 ………………………
……………………… 19041 ………………………
……………………… 19042 ………………………
……………………… 02054 ………………………
……………………… 10031 ………………………
……………………… 10002 ………………………
…………………………………… ………………………
……………………… 33106 ………………………
……………………… 02106 ………………………
……………………… 19001 ………………………
……………………… 19043 ………………………
……………………… 19044 ………………………
……………………… 02103 ………………………
……………………… 19048 ………………………
……………………… 19045 ………………………
※For more options
▲Only for F31
20
Description
Power cord
Strain relief
Timer 13200
Timer 13100
Timer 13100E
Strain relief
Insulator
Insulator
Switch
Switch
Screw
Connecting link
Connecting link pin
Drive cam
Pin
Pin
Screw
Screw
Bracket
Cover
Plate cover
Screw
Brine valve cam
Brine valve bracket
Motor
Terminal assy
Screw
Back plate
Plate plug(small)
Plate plug(middle)
Screw
Screw cap
Plate plug(big)
Control Drive Assembly
F31 lower
21
Control Drive Assembly
F31 lower
Item No.
1
2
3
4
5
6
7
8
9
10
11
12
13
14
15
16
17
18
※ 19
20
Quantity
………………………
………………………
………………………
………………………
………………………
………………………
………………………
………………………
………………………
………………………
………………………
………………………
………………………
………………………
………………………
………………………
………………………
………………………
………………………
………………………
1
1
4
2
1
1
1
1
1
1
2
1
1
2
2
1
1
2
1
1
Part No.
……………………… 19102
……………………… 19101
……………………… 02006
……………………… 02055
……………………… 29509
……………………… 00103
……………………… 29530
……………………… 19103
……………………… 10020
……………………… 04051
……………………… 02054
……………………… 06003
……………………… 06051
……………………… 02104
……………………… 04002
……………………… 29541
……………………… 29539
……………………… 02002
……………………………………
……………………… 19048
※For more options
22
………………………
………………………
………………………
………………………
………………………
………………………
………………………
………………………
………………………
………………………
………………………
………………………
………………………
………………………
………………………
………………………
………………………
………………………
………………………
………………………
Description
Back plate
Bracket
Screw
Screw
Drive bearing
Roll pin
Drive cam
Connecting link
U-pin
Retaining ring
Screw
Switch
Insulator
Screw
Washer
Transparent board
Housing
Screw
Motor
Lock relief
Control Drive Assembly
F41、F51、F61 upper
23
Control Drive Assembly
F41、F51、F61 upper
Item No.
1
2
3
4
5
6
7
8
9
10
11
12
13
14
15
16
17
18
19
20
21
22
23
24
25
26
27
▲ 28
29
▲30
31
32
33
34
※ 35
36
※ 37
Quantity
………………………
………………………
………………………
………………………
………………………
………………………
………………………
………………………
………………………
………………………
………………………
………………………
………………………
………………………
………………………
………………………
………………………
………………………
………………………
………………………
………………………
………………………
………………………
………………………
………………………
………………………
………………………
………………………
………………………
………………………
………………………
………………………
………………………
………………………
………………………
………………………
………………………
………………………
………………………
………………………
………………………
1
2
2
7
1
1
1
1
1
1
1
1
1
1
1
1
1
1
1
4
4
1
1
2
4
2
1
1
4
1
1
1
1
2
2
3
2
1
1
4
1
Part No.
……………………… 19046 ………………………
……………………… 19047 ………………………
……………………… 03005 ………………………
……………………… 02006 ………………………
……………………… 10108 ………………………
……………………… 10108-2 ……………………
……………………… 13200 ………………………
……………………… 13100 ………………………
……………………… 13100E ………………………
……………………… 00102 ………………………
……………………… 10101 ………………………
……………………… 10101-2 ……………………
……………………… 10106 ………………………
……………………… 10140 ………………………
……………………… 04071 ………………………
……………………… 04052 ………………………
……………………… 31514 ………………………
……………………… 10103 ………………………
……………………… 04056 ………………………
……………………… 02104 ………………………
……………………… 04002 ………………………
……………………… 31549 ………………………
……………………… 31545 ………………………
……………………… 02011 ………………………
……………………… 02055 ………………………
……………………… 10143 ………………………
……………………… 10142 ………………………
……………………… T0002 ………………………
……………………… 02052 ………………………
……………………… 04006 ………………………
……………………… 04055 ………………………
……………………… 33106 ………………………
……………………… 10102 ………………………
……………………… 02106 ………………………
……………………… 02083 ………………………
……………………… 06003 ………………………
……………………… 06051 ………………………
……………………… 10104 ………………………
…………………………………… ………………………
……………………… 03004 ………………………
……………………………………………………………
※For more options
▲Only for F61
24
Description
Meter cable guide
Screw cap
Nut
Screw
Back plate
Back plate(F51)
Timer 13200
Timer 13100
Timer 13100E
Roll pin
Bracket-motor
Bracket-motor(F51)
Drive bearing
Drive gear
Retainer ring
Retainer
Pin-drive link
Connecting link
Retaining ring
Screw
Washer
Look-in
Housing
Screw
Screw
Bushing
Drive pinion
Cam assembly
Screw-drive mounting
Washer
Retaining ring
Terminal assembly
Bracket-brine valve side
Screw
Screw
Switch
Insulator
Bracket switch
Motor
Nut
Power cord
Control Drive Assembly
F61 lower
25
Control Drive Assembly
F61 lower
Item No.
1
2
3
4
5
6
7
8
9
10
11
12
13
14
15
16
17
18
19
20
21
22
23
24
25
26
27
28
29
※ 30
31
Quantity
………………………
………………………
………………………
………………………
………………………
………………………
………………………
………………………
………………………
………………………
………………………
………………………
………………………
………………………
………………………
………………………
………………………
………………………
………………………
………………………
………………………
………………………
………………………
………………………
………………………
………………………
………………………
………………………
………………………
………………………
………………………
4
1
1
5
1
1
1
1
1
1
1
1
1
2
4
1
2
1
6
4
4
1
1
1
1
2
1
1
1
1
1
Part No.
……………………… 03004 ………………………
……………………… 10108-1 ……………………
……………………… 10101-1 ……………………
……………………… 02006 ………………………
……………………… 00102 ………………………
……………………… 10142 ………………………
……………………… 04052 ………………………
……………………… 31514 ………………………
……………………… 10103 ………………………
……………………… 04056 ………………………
……………………… 04071 ………………………
……………………… 10140 ………………………
……………………… 10106 ………………………
……………………… 10143 ………………………
……………………… 02055 ………………………
……………………… 31549 ………………………
……………………… 02011 ………………………
……………………… 31545 ………………………
……………………… 04002 ………………………
……………………… 02104 ………………………
……………………… 02052 ………………………
……………………… T0001 ………………………
……………………… 04055 ………………………
……………………… 04006 ………………………
……………………… 10102 ………………………
……………………… 02084 ………………………
……………………… 06003 ………………………
……………………… 06051 ………………………
……………………… 10104 ………………………
…………………………………… ………………………
……………………… 19047 ………………………
※For more options
26
Description
Nut
Back cover board
Bracket
Screw
Pin
Pinion, drive
Ring, retaining
Pin, drive link
Link , drive
Ring, retaining
Ring, retaining
Drive gear
Bearing, drive link
Bushing
Bolt
Window
Screw
Cover
Washer
Screw
Bolt
Drive cam assembly
Ring, retaining
Washer
Bracket, brine side
Screw
Switch
Insulator
Bracket, switch mounting
Motor
Screw cap
Valve Body Assembly
F15
Filter
No Hard Water
27
Valve Body Assembly
F15
Item No.
1
2
3
※4
5
6
※7
8
9
10
※11
12
13
14
15
16
17
18
19
20
21
22
23
24
25
26
27
28
29
30
Quantity
………………………
………………………
………………………
………………………
………………………
………………………
………………………
………………………
………………………
………………………
………………………
………………………
………………………
………………………
………………………
………………………
………………………
………………………
………………………
………………………
………………………
………………………
………………………
………………………
………………………
………………………
………………………
………………………
………………………
………………………
2
1
1
1
1
1
1
1
1
1
1
1
2
1
1
1
1
1
6
5
2
1
1
1
1
1
1
1
1
2
Part No.
……………………… 02051 ………………………
……………………… 17056 ………………………
……………………… 17031 ………………………
……………………………………………………………
……………………… 17051 ………………………
……………………… 17059 ………………………
……………………………………………………………
……………………… 17030 ………………………
……………………… 29503-2 ……………………
……………………… 29511 ………………………
……………………………………………………………
……………………… 01024 ………………………
……………………… 01025 ………………………
……………………… 27501 ………………………
……………………… 01102 ………………………
……………………… 29508-1 ……………………
……………………… 66125 ………………………
……………………… 29507-1 ……………………
……………………… 29561 ………………………
……………………… 29535 ………………………
……………………… 02055 ………………………
……………………… 17052 ………………………
……………………… 27506-1………………………
……………………… 66126 ………………………
……………………… 56115 ………………………
……………………… 27504-1 ……………………
……………………… 27503 ………………………
……………………… 19040 ………………………
……………………… 27502 ………………………
……………………… 02082 ………………………
※For more options
28
Description
Screw
Injector cover
Injector cover gasket
Injector nozzle
Injector
Injector screen
Injector throat
Injector body gasket
Vice-valve body
Drain connector
DLFC
O-ring
O-ring
Adapter base
O-ring
Piston rod
Vice-end plug assy
Vice-piston
Vice-seal
Vice-spacer
Bolt
Brine valve connecto
Piston rod
Bypass piston assembly
Piston retainer
Piston
Bypass spacer
Spacer
Spacer
Bolt
Valve Body Assembly
F21
Filter
No Hard Water
29
Valve Body Assembly
F21
Item No.
1
2
3
4
5
6
7
※ 8
9
10
※ 11
12
13
14
15
16
※ 17
18
19
20
21
22
23
24
25
26
27
Quantity
………………………
………………………
………………………
………………………
………………………
………………………
………………………
………………………
………………………
………………………
………………………
………………………
………………………
………………………
………………………
………………………
………………………
………………………
………………………
………………………
………………………
………………………
………………………
………………………
………………………
………………………
………………………
1
1
1
1
6
6
1
1
1
1
1
2
1
1
1
1
1
2
1
1
1
1
1
1
2
1
1
Part No.
……………………… 19040 ………………………
……………………… 28554-1 ……………………
……………………… 66121 ………………………
……………………… 28552-1 ……………………
……………………… 28555 ………………………
……………………… 28530 ………………………
……………………… 28550 ………………………
……………………………………………………………
……………………… 28556 ………………………
……………………… 17052 ………………………
……………………………………………………………
……………………… 02051 ………………………
……………………… 17056 ………………………
……………………… 17031 ………………………
……………………… 17059 ………………………
……………………… 17051 ………………………
……………………………………………………………
……………………… 02053 ………………………
……………………… 17003 ………………………
……………………… 17030 ………………………
……………………… 28531 ………………………
……………………… 28551 ………………………
……………………… 01104 ………………………
……………………… 01012 ………………………
……………………… 02082 ………………………
……………………… 28557-1 ……………………
……………………… 66123 ………………………
※For more options
30
Description
Spacer
Piston rod
End-plug assembly
Piston
Spacer
Seal
Valve body
DLFC
Drain connector
Brine valve connector
Nozzle
Bolt
Injector cover
Injector cover gasket
Injector screen
Injector
Throat
Bolt
Air disperser
Injector body gasket
Seal
Adapter base
O-ring
O-ring
Bolt
Filter piston
No hard water bypass piston assy
Valve Body Assembly
F31
Hard Water
31
Valve Body Assembly
F31
Item No.
1
2
3
4
※ 5
6
※ 7
8
9
10
※ 11
12
13
14
15
16
17
18
19
20
21
22
23
24
25
26
27
28
29
30
31
32
Quantity
………………………
………………………
………………………
………………………
………………………
………………………
………………………
………………………
………………………
………………………
………………………
………………………
………………………
………………………
………………………
………………………
………………………
………………………
………………………
………………………
………………………
………………………
………………………
………………………
………………………
………………………
………………………
………………………
………………………
………………………
………………………
………………………
Part No.
2 ……………………… 02051 ………………………
1 ……………………… 17056 ………………………
1 ……………………… 17031 ………………………
1 ……………………… 17059 ………………………
1 ……………………………………………………………
1 ……………………… 17051 ………………………
1 ……………………………………………………………
1 ……………………… 17003 ………………………
1 ……………………… 17030 ………………………
1 ……………………… 29503-1 ……………………
1 ……………………………………………………………
1 ……………………… 29502 ………………………
1 ……………………… 29511 ………………………
1 ……………………… 01025 ………………………
1 ……………………… 01024 ………………………
1 ……………………… 29501 ………………………
1 ……………………… 01012 ………………………
1 ……………………… 01104 ………………………
1 ……………………… J 1007 ………………………
1 ……………………… 66127 ………………………
4 ……………………… 29560 ………………………
2 ……………………… 29533 ………………………
1 ……………………… 29532 ………………………
1 ……………………… 29508-1 ……………………
1 ……………………… 66125 ………………………
1 ……………………… 29507-1 ……………………
6 ……………………… 29561 ………………………
5 ……………………… 29535 ………………………
2 ……………………… 02055 ………………………
1 ……………………… 29504 ………………………
1 ……………………… 17052 ………………………
1 ……………………… J1008 ………………………
※For more options
32
Description
s crew
Injector cover
Injector cover gasket
Screen
Nozzle
Injector
Throat
Air disperser
Injector body gasket
Vice-valve body
DLFC
Coupling
Drainage connector
O-ring
O-ring
Valve body
O-ring
O-ring
Piston assembly
End plug
Seal
Spacer
Spacer
Vice piston rod
Vice end-plug assembly
Vice piston
Seal
Spacer
Bolt
Cap
Brine valve connector
Piston assembly
Valve Body Assembly
F41
No Hard Water
Filter
33
Valve Body Assembly
F41
Item No.
1
2
3
4
5
6
7
8
9
10
11
12
13
14
15
16
17
Quantity
………………………
………………………
………………………
………………………
………………………
………………………
………………………
………………………
………………………
………………………
………………………
………………………
………………………
………………………
………………………
………………………
………………………
1
1
8
5
2
2
1
1
1
1
1
1
4
2
2
2
1
………………………
………………………
………………………
………………………
………………………
………………………
………………………
………………………
………………………
………………………
………………………
………………………
………………………
………………………
………………………
………………………
………………………
Part No.
66129 ………………………
K1008 ………………………
29560 ………………………
29533 ………………………
31542 ………………………
02057 ………………………
31501-1 ……………………
00108 ………………………
28531 ………………………
31502 ………………………
01012 ………………………
01033 ………………………
02002 ………………………
31506 ………………………
01030 ………………………
31509 ………………………
K1007 ………………………
34
Description
End plug assembly
Piston assembly
Seal
Spacer
Spacer, narrow
Screw
Valve body
Straight pin
Seal
Adapter
O-ring
O-ring
Screw
Cover
O-ring
Nut
No hard water piston assembly
Valve Body Assembly
F51
No Hard Water
Filter
35
Valve Body Assembly
F51
Item No.
1
2
3
4
5
6
7
8
9
10
11
12
13
14
15
16
17
18
Quantity
………………………
………………………
………………………
………………………
………………………
………………………
………………………
………………………
………………………
………………………
………………………
………………………
………………………
………………………
………………………
………………………
………………………
………………………
Part No.
1 ………………………
1 ………………………
6 ………………………
7 ………………………
1 ………………………
2 ………………………
1-2 ……………………
1-2 ……………………
1-2 ……………………
1 ………………………
12 ……………………
2 ………………………
12 ……………………
12 ……………………
1 ………………………
1 ………………………
1 ………………………
1 ………………………
Description
P2001 ………………………
P1001 ………………………
38530 ………………………
38560 ………………………
38531 ………………………
02002 ………………………
31506 ………………………
01030 ………………………
31509 ………………………
38501-1 ……………………
02059 ………………………
39504 ………………………
04007 ………………………
03005 ………………………
01043 ………………………
01042 ………………………
P1002 ………………………
P1003 ………………………
36
End plug assembly
Piston assembly
Spacer
Seal
Spacer, narrow
Screw
Cover
O-ring
Nut
Valve body
Bolt
Flange segment
Washer
Nut
O-ring
O-ring
No hard water piston assembly
Filter piston
Valve Body Assembly
F61
Hard Water
37
Valve Body Assembly
F61
Item No.
1
2
3
4
5
6
7
8
9
Quantity
………………………
………………………
………………………
………………………
………………………
………………………
………………………
………………………
………………………
1
1
8
5
2
2
1
1
1
………………………
………………………
………………………
………………………
………………………
………………………
………………………
………………………
………………………
Part No.
66129 ………………………
K1008 ………………………
29560 ………………………
29533 ………………………
31542 ………………………
02057 ………………………
31501-1 ……………………
66130 ………………………
39506 ………………………
10 ……………………… 1 ……………………… 28531 ………………………
11
12
13
14
15
16
17
18
19
20
21
22
23
24
25
……………………… 1 ………………………
……………………… 12 ………………………
……………………… 1 ………………………
……………………… 1 ………………………
……………………… 2 ………………………
……………………… 1 ………………………
……………………… 1 ………………………
……………………… 12 ………………………
……………………… 12 ………………………
……………………… 4 ………………………
……………………… 2 ………………………
……………………… 1 ………………………
……………………… 1 ………………………
……………………… 1 ………………………
……………………… 1 ………………………
39501-1 ……………………
02059 ………………………
01042 ………………………
01037 ………………………
39504 ………………………
01036 ………………………
39503-1 ……………………
04007 ………………………
03005 ………………………
39560 ………………………
39531 ………………………
39530 ………………………
66131 ………………………
T1001 ………………………
T1005 ………………………
38
Description
End plug assembly
Piston assembly
Seal
Spacer
Spacer,narrow
Screw
Valve body
Coupling assembly
Slug
S eal
Valve body
Bolt
O -ring
O -ring
Flange segment
O -ring
Flange ring
Washer
Nut
Seal
Spacer
Spacer
End plug assembly
Piston assembly
Piston assembly
Brine System Assembly
1600 series brine system assembly
Item No.
Quantity
1 ……………………… 1
2 ……………………… 1
3 ……………………… 1
4 ……………………… 1
5 ……………………… 1
6 ……………………… 1
7 ……………………… 1
8 ……………………… 1
9 ……………………… 1
10 ……………………… 1
11 ……………………… 1
※ 12 ……………………… 1
13 ……………………… 1
14 ……………………… 1
15 ……………………… 1
16 ……………………… 1
17 ……………………… 2
18 ……………………… 1
※ 19 ……………………… 1
※ 20 ……………………… 1
21 ……………………… 1
22 ……………………… 1
23 ……………………… 1
Part No.
……………………… 04053 ………………………
……………………… 16080 ………………………
……………………… 66122 ………………………
……………………… 16053 ………………………
……………………… 56061 ………………………
……………………… 56023 ………………………
……………………… 56062 ………………………
……………………… 56060 ………………………
……………………… 16051 ………………………
……………………… 01004 ………………………
……………………… 16054 ………………………
………………………………………………………………
……………………… 56015 ………………………
……………………… 16050 ………………………
……………………… 66124 ………………………
……………………… 17056 ………………………
……………………… 02060 ………………………
……………………… 17031 ………………………
………………………………………………………………
………………………………………………………………
……………………… 56059 ………………………
……………………… 16001 ………………………
……………………… 17030 ………………………
※For more options
39
Description
Retaining ring
Spring
Brine stem assembly
Stem guide
B.L.F.C Fitting Nut
B.L.F.C Ferrule
B.L.F.C Tube Insert
Screen,Brine Line
Brine valve body
O-ring
End plug, brine valve
BLFC button
Brine dispenser
Fitting, Elbow
Brine tube
Injector cover
Screw
Injector cover gasket
Injector nozzle
Injector throat
Screen
Injector body
Injector body gasket
Brine System Assembly
1700 series brine system assembly
Item No.
Quantity
1 ……………………… 1
2 ……………………… 1
3 ……………………… 1
4 ……………………… 1
5 ……………………… 1
6 ……………………… 1
7 ……………………… 1
8 ……………………… 1
9 ……………………… 1
10 ……………………… 1
※ 11 ……………………… 1
12 ……………………… 1
13 ……………………… 1
※ 14 ……………………… 1
15 ……………………… 1
16 ……………………… 1
17 ……………………… 2
18 ……………………… 1
19 ……………………… 1
※ 20 ……………………… 1
21 ……………………… 1
Part No.
……………………… 66164 ………………………
……………………… 04052 ………………………
……………………… 04003 ………………………
……………………… 17058 ………………………
……………………… 66128 ………………………
……………………… 66175 ………………………
……………………… 17061 ………………………
……………………… 17053 ………………………
……………………… 01081 ………………………
……………………… 17055 ………………………
………………………………………………………………
……………………… 17052 ………………………
……………………… 66160 ………………………
………………………………………………………………
……………………… 17031 ………………………
……………………… 17056 ………………………
……………………… 02051 ………………………
……………………… 17059 ………………………
……………………… 17051 ………………………
………………………………………………………………
……………………… 17030 ………………………
※For more options
40
Description
brine valve cap assembly
Retaining ring
Washer
Spring
Brine stem assembly
B.L.F.C Fitting Nut
B.L.F.C Tube Insert
Brine valve body
O-ring
End plug, brine valve
BLFC button
Fitting, Elbow
Brine tube
Injector nozzle
Injector cover gasket
Injector cover
Screw
Screen
Injector body
Injector throat
Injector body gasket
Brine System Assembly
1800 series brine system assembly
Item No.
1
2
3
4
5
※ 6
7
▲
8
※9
10
11
12
13
14
15
16
17
※ 18
19
Quantity
………………………
………………………
………………………
………………………
………………………
………………………
………………………
………………………
………………………
………………………
………………………
………………………
………………………
………………………
………………………
………………………
………………………
………………………
………………………
………………………
1
2
6
1
2
1
1
1
2
1
1
1
1
1
1
1
1
1
1
1
Part No.
Description
……………………… 66161 ………………………
……………………… 31513 ………………………
……………………… 02002 ………………………
……………………… 18058 ………………………
……………………… 01030 ………………………
………………………………………………………………
……………………… 18056 ………………………
……………………… 18063 ………………………
……………………… 02011 ………………………
………………………………………………………………
……………………… 31509 ………………………
……………………… 31506 ………………………
……………………… 01031 ………………………
……………………… K1006 ………………………
……………………… 18057 ………………………
……………………… 18051 ………………………
……………………… 04056 ………………………
……………………… 66163 ………………………
………………………………………………………………
……………………… 18059 ………………………
※For more options
▲Only for F51
41
Brine tube
Tube fitting
Screw
Injector cover
O-ring
Injector nozzle
Injector body
Injector body
Screw
Injector throat
Nut
Cover
O-ring
Brine stem assembly
Brine valve body
Spring
Retaining ring
Stem guide assembly
BLFC button
Brine fitting
Meter Assembly
1'' meter assembly
Item No.
1
2
3
4
5
6
7
8
9
10
Quantity
………………………
………………………
………………………
………………………
………………………
………………………
………………………
………………………
………………………
………………………
1
1
1
1
1
1
1
1
1
4
………………………
………………………
………………………
………………………
………………………
………………………
………………………
………………………
………………………
………………………
Part No.
Description
12003 ………………………
12002 ………………………
01031 ………………………
56013 ………………………
12001 ………………………
12101 ………………………
12204A ……………………
01014 ………………………
1220D ………………………
02082 ………………………
Screw
Tube
O-ring
Flow straightener
Body
Impeller spindle
Impeller assembly
O-ring
Meter cover assembly
Screw
42
Meter Assembly
1.5'' meter assembly
Item No.
1
2
3
4
5
6
7
8
9
10
Quantity
………………………
………………………
………………………
………………………
………………………
………………………
………………………
………………………
………………………
………………………
1
1
1
1
1
1
1
1
1
4
………………………
………………………
………………………
………………………
………………………
………………………
………………………
………………………
………………………
………………………
Part No.
Description
12122 ………………………
12121 ………………………
01008 ………………………
17004 ………………………
12120 ………………………
12101 ………………………
12204A ……………………
01014 ………………………
1220D ………………………
02082 ………………………
Screw
Tube
O-ring
Flow straightener
Body
Impeller spindle
Impeller assembly
O-ring
Meter cover assembly
Screw
43
Meter Assembly
2'' meter assembly
Item No.
1
2
3
4
5
6
7
8
9
10
Quantity
………………………
………………………
………………………
………………………
………………………
………………………
………………………
………………………
………………………
………………………
1
1
1
1
1
1
1
1
1
4
………………………
………………………
………………………
………………………
………………………
………………………
………………………
………………………
………………………
………………………
Part No.
12303
12302
01032
12330
12301
12101
12331
01014
1220D
02082
Description
……………………… Screw
……………………… Tube
……………………… O-ring
……………………… Flow straightener
……………………… Body
……………………… Impeller spindle
……………………… Impeller assembly
……………………… O-ring
……………………… Meter cover assembly
……………………… Screw
44
Meter Assembly
2.5'' meter assembly
Item No.
1
2
3
4
5
6
7
8
9
10
11
Quantity
……………………… 1
……………………… 1
……………………… 1
……………………… 1
……………………… 1
……………………… 1
……………………… 1
……………………… 1
……………………… 1
……………………… 1
……………………… 4
………………………
………………………
………………………
………………………
………………………
………………………
………………………
………………………
………………………
………………………
………………………
Part No.
Description
12306
01060
12303
12304
01061
12305
12101
12331
01014
1220D
02082
Adapter
O-ring
Screw
Tube
O-ringr
Body
Impeller spindle
Impeller assembly
O-ring
Meter cover assembly
Screw
………………………
………………………
………………………
………………………
………………………
………………………
………………………
………………………
………………………
………………………
………………………
45
Meter Assembly
3'' meter assembly
Item No.
1
2
3
4
5
6
7
8
9
10
Quantity
………………………
………………………
………………………
………………………
………………………
………………………
………………………
………………………
………………………
………………………
8
2
3
8
1
1
6
1
1
1
………………………
………………………
………………………
………………………
………………………
………………………
………………………
………………………
………………………
………………………
Part No.
02058
12402
01041
03006
12401
12404
02082
1220G
12405
12408
Description
……………………… Screw
……………………… Connecting flange
……………………… O-ring
……………………… Screw
……………………… Body
……………………… Flow straightener
……………………… Screw
……………………… Meter cover assembly
……………………… Impeller assembly
……………………… Impeller spindle
46
Wiring Diagram
F15/21
Timer,meter delay control valve
Meter Imm. control valve
TM- Time Motor
VDM-Valve Drive Motor
SW1-Timer Homing Switch
SW2-Timer Program Switch
SW3-Valve Homing Switch
SW4-Valve Step Switch
TPCAM-Timer Program Cam
THCAM-Timer Homing Cam
SCAM-Valve Step Cam
HCAM-Valve Homing Cam
47
Wiring Diagram
F31
Timer,meter delay control valve
Meter Imm. control valve
TM- Time Motor
VDM-Valve Drive Motor
LDM-Lower Drive Motor
SW1-Timer Homing Switch
SW2-Timer Program Switch
SW3-Valve Homing Switch
SW4-Valve Step Switch
SW5-Brine Cam Switch
SW6-Lower Drive Switch
TPCAM- Timer Program Cam
THCAM-Timer Homing Cam
SCAM-Valve Step Cam
BVCAM-Brine Valve Cam
LDCAM-Lower Drive Cam
48
Wiring Diagram
F41/F51
Timer,meter delay control valve
Meter Imm. control valve
TM- Time Motor
VDM-Valve Drive Motor
SW1-Timer Homing Switch
SW2-Timer Program Switch
SW3-Valve Homing Switch
SW4-Valve Step Switch
TPCAM- Timer Program Cam
THCAM-Timer Homing Cam
SCAM-Valve Step Cam
HCAM-Valve Homing Cam
49
Wiring Diagram
F61
Timer,meter delay control valve
Meter Imm. control valve
TM- Time Motor
VDM-Valve Drive Motor
LDM-Lower Drive Motor
SW1-Timer Homing Switch
SW2-Timer Program Switch
SW3-Valve Homing Switch
SW4-Valve Step Switch
SW5-Brine Cam Switch
SW6-Lower Drive Switch
TPCAM- Timer Program Cam
THCAM-Timer Homing Cam
SCAM-Valve Step Cam
BVCAM-Brine Valve Cam
HCAM-Valve Homing Cam
50
Trouble Shooting
Problem
1. The control fails to
Regenerate automatically
2. Regeneration at wrong
Time
3. loss of capacity
Cause
Correction
A. Disconnected meter cable.
A. Reconnect the meter cable.
B. Transformer damaged.
B. Replace the transformer.
C. Electronic controller or sensor C. Replace or repair.
damaged.
A. Timer improperly set, due to
A. Reset timer.
power failure.
A. Increased raw water hardness
B. Brine concentration or
quantity.
C. Rinse fouling.
D. Poor distribution, channeling
(Uneven bed ser vice).
E. Internal control leak .
F. Ageing of rinse.
G. Loss of rinse.
A. reset unit to the new capacity.
B. Keep brine tank full of salt at all times. Clean it
yearly. Salt may be bridged. If using a salt grid
Plate insure refill water is over it.
C. Consolidate the rinse tank , clean the rinse and
prevent future fouling..
D. check distributors and back wash flow
E. Replace the spacer, seal or piston
F. Check for resin oxidation caused by Chlorine.
Mushy resin.
G. check for correct bed depth. Broken
distributors. Air or gas in bed: Well gas
Eliminator loose brine line.
4. Poor water quality
A. Check items listed in 3.
B. Bypass is open.
C. Channeling.
B. Close the bypass
C. Check for too slow or high ser vice
flow.
5. Excessive salt use
A. High salt setting.
B Excessive water in brine tank .
A. adjust salt setting
B. refer to problem 7 tank .
6.Loss of water pressure
A. Fouling of inlet pipe.
B. Fouled resin.
C. Improper backwash.
A. Clean or replace the pipe line
B. Clean the resin. Pretreat to prevent.
C. Too many resin fines. Reset the flow
Rate and time of back wash.
7. excessive water in brine
tank
A. Plugged drain line.
B. Brine valve plugged or
damaged.
C. Injector plugged.
D. Low inlet water pressure.
A. Check drain line and clean flow control
B. Clean or replace the brine valve
C. Clean injector, replace injector screen
D. Increase water pressure to allow
Injector to perform properly.
8. Softener fails to brine
Draw
A. Plugged drain line.
B. Plugged injector.
C. No water in the brine tank .
D. Low water pressure.
E. Brine line injects air during
brine draw.
F. Internal control leak .
A. Clean drain line and flow control
B. Clean or replace the injector and screen
C. Check for restriction in BLFC. Ensure
Safety float is not stuck .
D. Increase water pressure
E. Check brine line for air leaks.
F. check seal, spacer and piston for
scratches and dents.
9.Control cycles continuously A. Faulty timer.
10. continuous flow to drain
A. Replace timer
A. Foreign material in the control
B. Internal control leak .
C. Piston jammed in brine or back
wash position.
51
A. call dealer. Clean valve, rebuild
unit
B. same as above
C. same as above