1
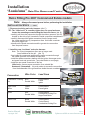
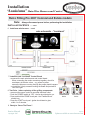
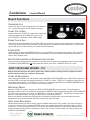
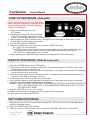
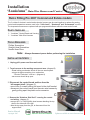
Installation
“Louisiana” Main Wire Harness and Control
Retro Fitting Pre 2007 Colonial and Estate models
The “Louisiana” electronic control and main wire harness can be used together to replace the analog
control and temperature sensors used in the “Little Louie”, “Kentwood” and “Greenwood” models.
The temperature sensors are replaced with pre-programed software within the new control board.
PARTS SUPPLIED
1 - “Louisiana” Control Board and Housing
1 - “Louisiana” Main Wire Harness
TOOLS REQUIRED
Phillips Screwdriver
Straight Head Screwdriver
Needle Nose Pliers
Note:
Always disconnect power before performing the installation
INSTALLATION STEPS
A
1. Unplug grill’s power cord from wall outlet.
2. To gain access to the working component area: (diagram B)
- locate locking mechanism found on the rear access panel.
- using a straight screwdriver, turn mechanism
“Counter Clockwise” a full turn. (diagram A)
- rear access should drop open.
B
3. Disconnect the control board and box from the
left support shelf: (diagram C)
- remove the 2 screws holding the board to the shelf bracket.
- disconnect the control board from the main wire harness by
gently pulling apart the plastic molex connector.
C
4. Remove the “Stainless Side Shelf” covering the control
and wiring: (diagram C)
- remove the 1 or 2 #8/32 phillip head screws attaching the top
shelf to the side wall of the grill.
- slide the top away from the grill, to disconnect from the
support shelf.
Service Manual
copyright 2007
04/07
Updates available at www.dansons.com
Installation
“Louisiana” Main Wire Harness and Control
Retro Fitting Pre 2007 Colonial and Estate models
Note:
Always disconnect power before performing the installation
INSTALLATION STEPS . . CONT
5. Disconnect existing main wire harness: (dia. C)
TIP: The “Little Louie” is a smaller, tighter area, for speed and ease,
loosen the mounting screws holding the fan to the frame. (dia. A)
- carefully pull the molex connector through the rubber grommet, (dia. B)
located on the side of grill, towards the inside component compartment.
- carefully disconnect the spade connectors from the auger motor,
fan, igniter and the two (2) temperature discs. Hold each connector
firmly and wiggle lose.
- disconnect the spade connectors and the ground wire connection
from the power source.
6. Install the new ‘Louisiana” main wire harness:
Note: The 2 (two) temperature discs are no longer used.
Leave attached to the grill. (dia. D)
- from inside the component area push the molex connector through
the rubber grommet out towards the side shelf
- install the spade connectors starting with the igniter, then auger motor,
and power cord and ground wire. (see chart below or next page)
- install the new spade connectors to the fan
Little Louie - ensure proper connection, then reinstall fan
Kentwood / Greenwood - it is much easier to access the connection
from the bottomside of the grill and from inside the cart or cabinet.
Connection
Wire Color
Diagram A
Diagram B
Igniter
Lead From
Auger
Motor
Combustion / Cooling
Fan
Blue
Double White
Control Board
Power
Igniter
Auger Feed
Motor
Yellow
White
Control Board
Power/Igniter
Igniter
Red
Double White
Control Board
Combustion/Cooling Fan
Auger Feed Motor
Power Cord
Black
Double White
Control Board
Control Board
Combustion/Cooling Fan
Temp.
Discs
Fan
Diagram C
Diagram D
Service Manual
copyright 2007
04/07
Updates available at www.dansons.com
Installation
“Louisiana” Main Wire Harness and Control
Retro Fitting Pre 2007 Colonial and Estate models
Note:
Always disconnect power before performing the installation
INSTALLATION STEPS . . CONT
6. Install new wire harness ... cont
wire schematic - “Louisiana”
AUGER
7. Install the new ‘Louisiana” Control Board
- reconnect the main wire harness and control board.
When connecting the molex connectors together, check for
consistancy in the wire colors. eg yellow to yellow
ensure the wires are running through the proper plastic hangers.
- re-install the 2 (two) screws mounting the board and protective
box to the grill.
8. Test Drive - before replacing all the grilling components.
- reconnect the power cord to a grounded electrical outlet.
- Push the POWER switch to “ON” - the fan should start to run.
- Press and hold the PRIME touch pad - the “Paddle Wheel”
should turn.
- Press the START touch pad - igniter should start to glow
within 1 to 2 minutes.
Control Board
Molex
Wire Harness
Molex
9. Ready to “Savor The Flavor”.
Service Manual
copyright 2007
04/07
Updates available at www.dansons.com
“ Louisiana
Control Board
Board Functions
POWER SWITCH
Used to turn power to the smokin grill “ON” and starts the
Fan. Used to activate the “SHUT DOWN” of the grill.
START TOUCH PAD
Used to activate the “START UP” mode of the smokin grill.
This illuminates the blue POWER LED, turns on the
AUTO IGNITER, and starts the FUEL FEED system.
PRIME TOUCH PAD
When touch pad is pressed and held, the FUEL FEED system will turn and feed more wood pellets to the burn grate.
This can be used to add more fuel just before opening the grill lid, to help with quicker heat recovery. It can also be
used to add more fuel while smoking, to increase the smoke intensity.
POWER LED
Will illuminate blue when the POWER SWITCH is on and the START touch pad has been pushed. Will continue to
stay illuminated until the POWER SWITCH has been pushed OFF and the board has completed the automatic 15
minute “SHUT DOWN” mode..
FEED POTENTIOMETER OR TEMPERATURE CONTROL
Used to control the frequency the wood pellet fuel is feed to the burn grate, thus effecting the heat or smoke output.
The FEED POTENTIOMETER is not active when the smokin grill is in the “7 MINUTE START UP” mode.
HOW THE BOARD WORKS - 101.
Always check the burn pot, burn grate, igniter holes, flame protector, cooking surfaces, hopper and wood
pellet fuel before starting or using your smokin grill.
START UP PROCEDURE
Upon turning the POWER to the “ON” position, setting the FEED POTENTIOMETER to the “PRE-HEAT” position, then
pressing START touch pad, the board will activate the “START UP” mode. “START UP” will start the cooling fan, the
feed system and the igniter. The “START UP” mode is for 7 minutes and the FEED rate is PREDETERMINED by the
control software and the igniter will “GLOW” for the entire procedure.
OPERATING MODE
When the “START UP” mode is complete, the FEED POTENTIOMETER is fully functional. The feed system is
designed to feed the fuel for 3 seconds then stop feeding at PRESET TIMES managed through the POTENTIOMETER.
The “OFF” times range from 25 seconds, for “SMOKE” to 2 seconds for “PRE HEAT”. Because the all natural wood
pellet fuel is dry and consistent, it is easy to keep a close to constant temperature.
Keep in mind that all Louisiana Wood Pellet Grills are designed to operate with the lid closed and that external
temperatures, wind, rain and humidity will effect cooking times and heat output.
SHUT DOWN PROCEDURE
When finished “Savoring the Flavor” simply push the POWER switch to the “OFF” position. The control will begin a
15 minute cool down cycle by stopping the FEED system from running, while keeping the FAN running to cool the
smokin grill. If you do find more food to grill, you can turn the POWER switch to the “ON” position within the first 3
minutes and the unit will continue to operate as normal. If you miss the 3 minute window, you must go through the
START UP PROCEDURE.
Service Manual
copyright 2007
04/07
Updates available at www.dansons.com
“ Louisiana
Control Board
START UP PROCEDURE - Automatic
NOTE: Always check the burn pot, burn grate,
igniter holes, flame protector, cooking surfaces
hopper and wood pellet fuel before starting or
using your smokin grill.
1. Ensure the POWER switch is in the
OFF position.
2. Plug the power cord into a 110 Volt grounded
outlet. Do not break the ground end off the
cord or use a non-grounded plug-in or extension cord.
3. Open the hopper lid. Ensure that there are no foreign objects in the hopper or feed system. Fill the
hopper with all natural flavored wood pellets.
4. Turn the FEED control to PREHEAT.
5. Switch the POWER to the “ON” position, then press the START touch pad.
The “START UP” mode will begin.
The FEED system will begin to feed fuel at the preset software rate, the igniter will begin to “glow”,
and the fan will begin to operate, both to cool the hopper and cause the pellets to burn.
The “START UP” mode is timed to last 7 minutes.
6. Always allow the grill to PREHEAT before adjusting the temperature to the desired output.
START UP PROCEDURE - Manual (if igniter fails)
1. Ensure the POWER switch is in the OFF position.
2. Plug the power cord into a 110 Volt grounded outlet. Do not break the ground end off the cord or use a
non-grounded plug-in or extension cord.
3. Open the hopper lid. Ensure that there are no foreign objects in the hopper or feed system. Fill the hopper
with all natural flavored wood pellets
4. Remove the cooking grids, flavor guard system and the U shaped flame guard (if equipped with one) to
expose the burn grate in the bottom of the unit.
5. Place two generous handfuls of pellets into the burn grate.
6. Squirt gelled fire starter, or other approved pellet starter, into the burn grate over the top of the pellets.
7. Light the starter using a long fireplace match or long lighter.
WARNING: NEVER ATTEMPT TO ADD MORE STARTER INTO A FIRE THAT IS ALREADY BURNING OR
INTO A HOT BURNGRATE. YOU COULD EXPERIENCE A BURN BACK AND YOU COULD
GET SERIOUSLY BURNT.
8. Allow the STARTER to burn for 3 to 5 minutes.
9. Replace the flame guard (if supplied), the flavor guard and the cooking grids.
10, Follow steps 4 to 6 found in AUTOMATIC.
SHUT DOWN PROCEDURE
1. Allow the grill to run for 5 to 10 minutes before turning OFF. This cooks off any foods that might attract
wild life or unwanted visitors.
2. Switch the POWER to the “OFF” position.
3. After the 15 minute “SHUT DOWN” cycle is complete the POWER L.EDand FAN will turn OFF.
Service Manual
copyright 2007
04/07
Updates available at www.dansons.com