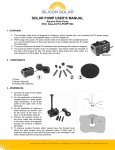
1
geodyna 980 L
Operation manual
Form ZEEWB710A03
Wheel balancer for truck wheels
INSTRUCTIONS
IMPORTANT SAFETY INSTRUCTIONS
When using your garage equipment, basic safety precautions should always
be followed, including the following:
1.
Read all instructions.
2.
Care must be taken as burns can occur from touching hot parts.
3.
Do not operate equipment with a damaged cord or of the equipment has been dropped
or damaged - until it has been examined by a qualified serviceman.
4.
Do not let cord hang over edge of table, bench, or counter or come in contact with hot
manifolds or moving fan blades.
5.
If an extension cord is necessary, a cord with a current rating equal to more than that
of the equipment should be used. Cords rated for less current than the equipment
may overheat. Care should be taken to arrange the cord so that it will not be tripped
over or pulled.
6.
Always unplug equipment from electrical outlet when not in use. Never use the cord
to pull the plug from the outlet. Grasp plug and pull to disconnect.
7.
Let equipment cool completely before pulling away. Loop cord loosely around
equipment when storing.
8.
To reduce the risk of fire, do not operate equipment in the vicinity of open containers
of flammable liquids (gasoline).
9.
Adequate ventilation should be provided when working on operating internal
combustion engines.
10.
Keep hair, loose clothing, fingers, and all parts of body away from moving parts.
11.
To reduce the risk of electric shock, do not use on wet surfaces or expose to rain.
12.
Use only as described in this manual. Use only manufacturer’s recommended attachments.
13.
ALWAYS WEAR SAFETY GLASSES. Everyday eyeglasses only have impact
resistant lenses, they are NOT safety glasses.
SAVE THESE INSTRUCTIONS
Operator’s Manual
2
geodyna 980L
INSTRUCTIONS
DISCLAIMER OF WARRANTIES AND LIMITATIONS OF LIABILITIES
While the authors have taken care in the preparation of this manual, nothing contained herein:
- modifies or alters in any way the standard terms and conditions of the purchase, lease or rental agreement under the
terms of which the equipment to which this manual relates was acquired,
- increases in any way the liability to the customer or to third parties.
TO THE READER
While every effort has been made to ensure that the information contained in this manual is correct, complete and up-to
date, the right to change any part of this document at any time without prior notice is reserved.
Before installing, maintaining or operating this unit, please read this manual
carefully, paying extra attention to the safety warnings and precautions.
geodyna 980L
3
Table of Contents
Table of Contents
Safety ......................................................................................................................................................... 5
1.1
Typographical conventions ........................................................................................................... 5
2.0
Specifications. ................................................................................................................................ 6
2.1
Conditions. ...................................................................................................................................... 6
3.1
Accessories. .................................................................................................................................... 8
3.2
Optional Accessories ...................................................................................................................... 9
4.0
Layout. ........................................................................................................................................... 10
4.1
The display. .................................................................................................................................... 11
4.2
The input panel ............................................................................................................................. 12
5.0
Operation ....................................................................................................................................... 14
5.1
Operation of the pneumatic loading device ............................................................................... 14
5.1.1
Clamping a truck wheel ................................................................................................................ 15
5.1.2
Clamping a car wheel .................................................................................................................. 16
5.2
Preparation .................................................................................................................................... 17
5.2.1
Power up ........................................................................................................................................ 17
5.2.2
Emergency stop ............................................................................................................................. 17
5.2.3
Shutting down ............................................................................................................................... 18
5.2.4
Settings .......................................................................................................................................... 18
5.3.2
Balancing ....................................................................................................................................... 19
5.3.2.1 Normal weight mode .................................................................................................................... 19
5.3.2.2 ALU weight modes ........................................................................................................................ 19
5.3.2.3 Alu2P and Alu3P (HWM) mode ..................................................................................................... 20
5.3.2.4 Static balancing ............................................................................................................................ 20
5.3.2.5 Internal Balancing ......................................................................................................................... 21
5.3.3
Spinning the Wheel ...................................................................................................................... 21
5.3.4
Weight application ........................................................................................................................ 22
5.3.5
Check spin ..................................................................................................................................... 24
5.3.6
Results recalculation ..................................................................................................................... 24
5.3
Balancing procedure .................................................................................................................... 25
5.3.1
Rim data input ............................................................................................................................... 26
5.4
Special modes ............................................................................................................................... 28
5.4.1
Split Weight Mode ......................................................................................................................... 28
5.4.2
Balancing optimisation / Weight minimisation ........................................................................... 28
5.5
Special functions ........................................................................................................................... 37
5.5.1
Non-skid function ........................................................................................................................... 37
5.6
Calibration ..................................................................................................................................... 38
5.6.1
User calibration ............................................................................................................................. 38
5.7
Selecting the operating mode ..................................................................................................... 39
8.
Instructions For Disposal In Eu Countries .................................................................................... 51
9.0
Appendices .................................................................................................................................... 51
Appendix: Installation Instructions .............................................................................................................. 52
iii
Installation procedures ................................................................................................................. 55
iv
Test procedures ............................................................................................................................. 57
v
Instructing the operator ................................................................................................................ 57
May 2005 - Revision B note:
- Chapter 3.1: HNA accessories information, added
November 15 2006 - Rev D note:
Streamlined book to include only one language
per pub. Spanish and French available on layers
April 2006 - Revision C note:
- Page2:
Safety Information, added
- Chapter 8.1: New chapter implementation
Operator’s Manual
geodyna 980L
geodyna 980L 4
Safety
1 Safety
All Safety Precautions relevant to the unit are described
in the Safety Booklet, refer to Figure 1 – 1.
The Safety Precautions should be fully understood and
observed by every operator. We suggest you store (a
copy) of the Safety Booklet near the unit, within easy
reach of the operator.
The Operator’s Manual will contain specific warnings
and cautions when dangerous situations may be
encountered during the procedures described.
1.1 Typographical conventions
This manual contains text styles intended to make the
reader pay extra attention:
Note:
Suggestion or explanation.
CAUTION: INDICATES THAT THE FOLLOWING
ACTION MAY RESULT IN DAMAGE TO THE UNIT OR
OBJECTS ATTACHED TO IT.
WARNING: INDICATES THAT THE FOLLOWING
ACTION MAY RESULT IN (SERIOUS) INJURY TO THE
OPERATOR OR OTHERS.
• Bulleted list:
• Indicates that action must be taken by the operator
before proceeding to the next step in the sequence.
1-1
Operator’s Manual
geodyna 980L
geodyna 980L
5
Specifications
2.0 Specifications.
Power:
Power Supply 115/120V AC, 0.3 kW, 50/60 Hz, 1 ph
Power consumption
2.0 A
Power Supply 200/240V AC, 0.3 kW, 50/60 Hz, 1 ph
Power consumption
1.0 A
Motor rating
0.25 kW
Mains fuses
2x IEC 127 T5A
Protection class
IP23
Measurements:
Measuring time
< 20 s
Measuring speed
< 100 rpm
Offset
0–340 mm
Resolution:
(see Product Requirements table)
Wheel dimensions:
Max. width
Max. diameter
Max. weight
Rim width
Rim diameter:
Shaft and cones:
Stub shaft diameter
Light truck, cone
Light truck, cone HNA
Dimensions:
Weight
Shipping weight
Dimensions (hxdxw)
Shipping dimensions
Miscellaneous:
Noise level
650 mm
1300 mm
250 Kg
76-510mm / 2-20”
205-635mm / 8-30”
40 mm
122 - 174 mm
113 - 170 mm
255 kg
285 kg
1920x1370x1390 mm
1470x1100x1280 mm
<70 db(A)
2.1 Conditions.
During use or long term storage, the conditions should
never exeed:
Temperature range
0-50 °C
Humidity range
10-90 %, non condensing
6
geodyna 980L
Introduction
3.0
Introduction.
This wheel balancer combines advanced, highperformance technology, robustness and reliability with
very simple, user-friendly operation.
The low rotation speed of the wheel ensures that this
balancer is very safe.
It is characterised by a display and input panel which
are easy to use and guarantee rapid, intuitive operation.
Operator time and effort are reduced to a minimum, while
maintaining accuracy and reliability.
Always work in a clean area and with clean wheels, no
dirt stuck in the tyre or on the rim. That way proper
mounting of the wheel and an optimal balancing result
can be achieved.
Application.
The off-the-vehicle wheel balancer is designed for
dynamic and static balancing of truck, light-truck and
passenger car wheels, that fall within the limits stated
in the technical specifications.
This is a high precision measuring device. Handle with
care.
Manuals for the unit.
Information related to the unit is in:
- Safety Booklet (standard supplement)
Supplied with the unit.
7
-
Operator’s Manual
(Chapter 1 – 9)
The operator must be familiar with it.
-
Service Manual (Chapter 10 and up)
Manual for use by service personnel only.
geodyna 980L
Introduction
3.1 Accessories.
Refer to Figure 3.1-1.
Standard accessories (for HWT):
1
2
3
4
1
Basic centering device
EAA0260D31A
2
Adaptor
EAA0260D32A
3
Centering cone 122-174mm
EAA0260D36A
4
Distance ring
EAA0317D24A
5
Wing nut Tr 40x4
EAA0260D34A
6
Hexagon socket head key SW14
8-01350A
7
Hexagon socket head key SW8
8-01450A
8
Hexagon socket head key SW5
8-03550A
9 User Calibration weight
5
EAM0005D40A
6
Standard accessories for HNA (USA-CANADA only):
7
8
Figure 3.1-1.
9
1
Basic centering device
EAA0306D13A
2
Adaptor
EAA0260D32A
3
Centering cone 113-170 mm
EAA0304G39A
4
Distance ring
EAA0277D59A
6
Hexagon socket head key SW14
8-01350A
7
Hexagon socket head key SW8
8-01450A
8
Hexagon socket head key SW5
8-03550A
9
User Calibration weight
EAM0005D40A
10
10 Quick-Nut
EAA0277D61A
11 4/5 Point Adaptor
EAA0307G80A
11
3.1-1
8
geodyna 980L
Introduction
Standard accessories for HNA
Figure 3.2-1.
1 2
3
4
5
6
EAA0260D37A
3 Universal drum cushion
EAC0058D15A
4 Universal drum
EAC0058D07A
5 Spacer ring
EAC0058D08A
7 Large cone
EAA0247G39A
8 Medium cone
EAA0247G38A
9 Small cone
EAA0247G37A
3.2 Optional Accessories
7
(HWT only) Refer to Figure 3.2-1.
8
9
3.2-1
9
1-2 Cones 198-225 + 270-286,5mm
1-2 Cones 198-225 + 270-286,5mm
EAA0260D37A
3 Universal drum cushion
EAC0058D15A
4 Universal drum
EAC0058D07A
5 Spacer ring
EAC0058D08A
6 Quick-Release Hub Nut
EAA0263G66A
7 Large cone
EAM0005D25A
8 Medium cone
EAM0005D24A
9 Small cone
EAM0005D23A
geodyna 980L
Layout
4.0 Layout.
Refer to Figure 4-1.
Functional description of the unit:
1
2
8
1. Display
Refer to Chapter 4.1.
2. Input panel
Refer to Chapter 4.2.
3. Internal gauge arm
6
4. Flange
5. Stub shaft with hub nut
3
4
6. Weight compartments
7. Storage areas for cones and hub nuts
7
5
8. Wheel guard
Refer to Figure 4-2.
4-1
1.Mains switch (ON/OFF)
4-2
10
geodyna 980L
Layout
4.1 The display.
Refer to Figures 4.1-1, 4.1-2.
4
3
1
1
2
3
1. Rotation indicators of the correction plane.
The indicators show the direction the operator has
to rotate the wheel (by hand) after a balancing run.
2. Weight Application Position (WAP) indicator.
The indicator will light up when the wheel is in the
correct position for weight application. This indicator
will be referred to as the WAP indicator.
Refer to the weight mode selected before applying
a weight!
5 6
3. Display.
Depending on the stage of the program the display
gives the operator information about rim sizes,
balancing weights, error codes, etc.
4
5
6
4.1-1
4. Weight units indicator, “Oz”.
The indicator will light if the weight is displayed in
ounces instead of grams (default).
5. INT function.
This indicator lights up when the "INTERNAL"
balancing mode is selected.
6. Flange compensation.
This indicator lights up when flange compensation
is activated
7. Truck, Light-Truck and Car Mode Indicator.
This indicator lights up as follows depending on which
mode is active.
- Truck Mode: both LEDs are OFF .
- Light-Truck Mode: the 7a LED is ON.
- Car Mode: the 7b LED is ON.
7a
7a
8,12
Weight Position Indicator.
Apply a clip-on weight to the rim at the position
indicated when the WAP indicator for this plane
lights up.
9,10,11
Weight Position Indicator.
Apply a stick-on weight to the rim at the position
indicated when the WAP indicator for this plane
lights up.
8
9
8
10 11 12
9
10 11
7b
12
7b
4.1-2
11
geodyna 980L
Layout
4.2 The input panel
Refer to Figure 4.2-1.
1. Diameter key with indicator.
Press to select “rim diameter” mode, the current
diameter or “dia” value will appear and the unit will
beep.
The current value will be shown on the display and
can be edited.
6
7
10
12
11
8
3
1
6
2
7
10
3
2
13
1
4
3. Offset key with indicator.
Press to select “Offset” mode, the ---I or current
offset value will appear and the unit will beep.
4. + key.
To increase an input value (e.g. rim diameter, offset,
rim width).
Hold the key down to increase the values shown
automatically.
5. - key.
To decrease an input value (e.g. rim diameter, offset,
rim width).
Hold down the key to reduce the values shown
automatically.
5
13
11
2. Width key with indicator.
Press to select “rim width” mode, the [¦- - -¦] symbol
will appear, representing the width value and the unit
will beep.
The current value will be shown on the display and
can be edited.
12
8
10
5 4.2-14
4.2-1
9
6. Function key.
Activates the second function of multi-function keys
(indicated by the graphics on the lower section of
the keys). Press this key and F appears on the left
display then disappears when you press one of the
function keys. The F on the display also disappears
when you press the function key again (it is
sometimes used like enter).
7. Fine key.
Press to toggle the read-out accuracy between
Normal, or 25, 50 or 100 (0,5,1 or 2 oz) depending
on the registered value and Fine i.e. 10 grams
(0.5oz) regardless of the registered value. The unit
will beep. Release the key to return to normal
accuracy. F+Fine key activates the car wheel
optimisation and minimisation operation. The unit
will beep.
Release the key to return to normal accuracy.
F+Fine key; activates the PRO MATCH function,
optimisation and minimisation procedure.
12
geodyna 980L
Layout
8. Weight key.
Press to select the required weight application mode
(weight mode), the unit will beep.
F+Weight key; activates the SWM function, hidden
weight split. This can only be activated after selecting
the ALU2P/ALU3P application mode.
9. Stop key.
Press to stop spinning the wheel.
The STOP key also has an emergency stop function.
6
7
10.g/oz key.
Toggles between reading in grams and in ounces,
and vice versa.
F+g/oz; activates the C-Code functions, special user
functions.
10
12
11
6
8
7
10
3
2
13
1
3
1
2
4
12.Truck/Light-Truck/Car key.
Toggles between the vehicle type setting: Truck,
Light-truck or car
F+Vehicle; allows you to change the unit of
measurement according to the size of the wheel.
Switches from millimetres to inches and vice versa.
13.START key.
Starts the machine spinning the wheel.
5
11
11. Static/Dynamic key.
Toggles between dynamic and static modes.
F+Stat/Dyn; activates the function for balancing with
a stick-on counterweight inside the tyre.
The INT LED on the panel lights up.
12
8
5
9
4
13
10
4.2-1
13
geodyna 980L
Operation
5.0 Operation
This chapter describes how to operate the unit in order
to balance a wheel.
The standard balancing runs will be described first.
In chapter 5.4 and up special modes and functions will
be described.
Be sure to be familiar with:
- possible dangers, refer to chapter 1
- the unit, refer to chapter 4.
5.1 Operation of the pneumatic
loading device
(optional)
The loading device is required by truck wheel legislation
but it is not included with the unit.
Fig. 5.1-1 Control column and function of the pneumatic
loading device
1 Switch lever for UP - DOWN travel
2 Air connection
3 Hook for storage of adaptors when not in use
• Lower loading device to bottom position.
• Roll wheel onto sliding carriage and lean it against
the handle.
• Raise loading device to the required height.
• Position the wheel on the adaptor using the sliding
carriage and clamp.
• Lower loading device until the wheel can rotate freely.
5.1-1
14
To remove a wheel proceed as follows:
• Remove the wing nut and then the cone or centring
star.
• Remove the wheel using the loading device.
geodyna980L
Operation
5.1.1 Clamping a truck wheel
The machine is delivered with an adaptor for light–truck
wheels. The relative centring cone is suitable for pitch
circles of 120 - 174 mm.
Clamping accessories for truck wheels are optional extras,
but they are indispensable for balancing the following types
of wheel:
Option A: Truck standard kit with centring cone for
pitch circle 198 - 225 mm and 270 - 286.5
mm.
Fig. 5.1-2 Clamping a truck wheel using an adaptor
and a centring cone
1 Truck wheel flange
2 Rim
3 Centring cone for pitch circle 198 - 225 mm or
270 - 286.5 mm
4 Wing nut for clamping
5.1-2
Option B: Truck professional kit with 4-arm and 5arm star and a 5 column flange.
Fig. 5.1-3 Clamping a truck wheel using an adaptor
and a centring star
1 Truck wheel flange
2 Rim
3 Centring star
4 Wing nut for clamping
Note
To clamp a truck wheel with flange and centring star,
the golden truck wheel flange has to be used.
Clamping procedure
• Before clamping the wheel, check that the centre
bore is machined sufficiently accurately and not
deformed (e.g. uniformly round) and that the contact
surface of the wheel (central rim disc) is clean and
intact.
• Select and prepare a suitable clamping adaptor for
the wheel to be balanced (Fig. 5.1-2 and 5.1-3).
5.1-3
• Position the wheel bore at the centre of the clamping
adaptor (Fig. 5.1-1).
• Fit the cone or centring star and partly tighten the
wheel with the wing nut.
• Lower the loading device until the wheel can rotate
freely.
• As the wheel is further clamped continue rotating
the wheel slightly and further tighten the wing nut. In
this way the wheel will be aligned evenly with the
centring cone or centring star and will run smoothly
when clamped.
Note
For perfect balancing results the adaptors must always
be kept clean and stored correctly when not in use.
15
geodyna980L
Operation
5.1.2 Clamping a car wheel
Fig. 5.1-4 illustrates clamping a conventional car wheel
using a clamping adaptor on the central bore.
Fig. 5.1-5 illustrates clamping a stud hole located car
wheel or a car wheel without centre bore using a universal
clamping adaptor.
The centring cones for clamping car wheels are not part
of the standard equipment. These cones as well as
various special clamping and centring means are
available on request.
The range and applications of the clamping means are
described in separate leaflets.
5.1-4
Fig. 5.1-4 Clamping adaptor to clamp centre bore
located car wheels
1 Cone for car wheels
2 Rim
3 Clamping head with clamping nut (quick–clamping
nut)
4 Wing nut for clamping
Fig. 5.1-5 Universal clamping adaptor for clamping stud
hole located wheels or wheels with closed
rim. This clamping adaptor is also capable of
clamping centre bore located wheels when
suitable centring rings are used.
1 Rim
2 Quick–clamping nut
3 Centring ring for centre bore located car wheels
(optional extra)
5.1-5
16
geodyna980L
Operation
5.2 Preparation
• The operator should be familiar with the warnings
and cautions.
• The operator should be qualified to work with the
unit.
• Always ensure that the wheel guard (when
applicable) is lifted and the gauge arm is in its home
position (far left position) when the unit has been
switched off.
5.2.1 Power up
• Do not keep any key pressed down during power
up.
Refer to Figure 5.2.1-1.
• Insert the power cable plug in the mains socket.
• Set the switch on the socket to the “I” position.
5.2.1-1
Note:
If the unit beeps and does not proceed or
if an error code is shown, refer to Chapter
7.
The unit will beep and perform a self-test now.
The display and the weight position indicators relating
to the current weight mode will stay on (default).
Refer to Figure 5.2.1-2 for an example.
The unit is now ready to receive input.
5.2.2 Emergency stop
Refer to Figure 5.2.2-1.
To perform an emergency stop:
• Select the STOP key to apply the electronic
brake.
5.2.1-2
In the event of an emergency stop due to an unexpected
action by the unit, rethink the steps that were made:
Did the operator make an error or omit to do
something?
Correct the input and continue working. No special
procedure is required.
Did the unit do something unexpected?
• Read the relevant chapters again.
• Prepare the unit for a restart:
switch off the unit
switch on the unit again.
• Carefully repeat the commands with the manual
available.
• If the unit does not function correctly, call the service
team immediately and:
WARNING: PREVENT ANY FURTHER USE OF THE
UNIT.
5.2.2-1
17
geodyna 980L
Operation
5.2.3 Shutting down
Always shut down properly when work is complete:
• Remove the wheel from the balancer.
• Remove the cones and hub nut from the stub shaft.
Check the surfaces (internal and external) of the
cones for damage. The condition of the cone is very
important for a good balance quality.
• Check the thread of the hub nut and stub shaft.
• Clean all threads and surfaces with a dry, soft cloth.
• Store the cones and the hub nut in the correct place.
• Unplug the mains cable from the power outlet.
• Check the power cable for damage or wear.
• Tidy up the storage areas.
• Clean the display and input panel with a soft, dry
cloth.
• Remove old wheel weights and other material from
under the balancer. The balancer must rest on its
three feet only.
5.2.4 Settings
After switching on the unit, a default weight mode is
shown. If the unit then shows another weight mode,
refer to Chapter 5.3.2.
The unit of measurement indicated at power up is inches,
but the setting selected before switching off for grams
/ ounces remains.
5.2.4.1
Changing the Weight Unit
Default weight unit setting: grams.
Proceed as follows to change the weight unit, whether
you have already spun the wheel or not.
• Press and hold down the "F" key and then press
"-Gr/Oz".
Repeat the procedure to turn the display back to grams.
5.2.4.2
Changing the Dimensions Unit
Default diameter and width unit setting: inches.
• Press and hold down the "F" key and then press
"-mm-inch".
Repeat the procedure to turn the display back to inches.
18
geodyna 980L
Operation
5.3.2 Balancing
This chapter describes how to balance a wheel.
For help on:
rim data input
refer to Chapter 5.3.1
spinning the wheel refer to Chapter 5.3.3
weight application refer to Chapter 5.3.4
the check spin
refer to Chapter 5.3.5
5.3.2.1-1
5.3.2.1-2
5.3.2.1 Normal weight mode
(Available in TRUCK and CAR/LIGHT-TRUCK modes)
When selected, the display is as shown in Figure 5.3.2.11.
Figure 5.3.2.1-2 shows the rim reference point.
• Establish the following dimensions:
- Rim diameter of the reference point.
- Rim width.
- Offset of the reference point.
• After entering the dimensions, spin the wheel.
• Apply the clip-on weights at the indicated positions,
at the 12 o’clock position.
• Perform a check spin when done.
5.3.2.2-1
5.3.2.2 ALU weight modes
Select an ALU weight mode if one or more stick-on
weights will be used.
ATTENTION: IN TRUCK MODE ONLY THE NORMAL,
ALU1 AND ALU2P MODES ARE AVAILABLE.
5.3.2.2-2
When selected, the display shows:
ALU1: Refer to Figure 5.3.2.2-1.
ALU2: Refer to Figure 5.3.2.2-2.
ALU3: Refer to Figure 5.3.2.2-3.
ALU4: Refer to Figure 5.3.2.2-4.
ALU5: Refer to Figure 5.3.2.2-5.
5.3.2.2-3
• Establish the following dimensions:
- Rim diameter of the reference point.
- Rim width.
- Offset of the reference point.
Note:
For ALU2 and ALU3 the right hand plane
is equal to the front surface of the flange.
The weight should be applied in that plane.
Deviations in that plane should be
compensated by increasing or reducing
the weight applied. Refer to Figure 5.3.2.26.
• After entering the dimensions, spin the wheel.
• Apply the clip-on/stick-on weights at the indicated
12 o’clock positions.
• Perform a check spin when done.
5.3.2.2-4
5.3.2.2-5
5.3.2.2-6
19
geodyna 980L
Operation
5.3.2.3 Alu2P and Alu3P (HWM)
mode
5.3.2.3-1
5.3.2.3-2
5.3.2.3-3(1)
5.3.2.3-3(2)
Select this mode for more exact balancing, weight
positioning behind spokes or special rims (PAX, TRX,
CTS, etc.).
When selected, the display shows:
HWM1: Refer to Figure 5.3.2.3-1.
Two stick-on weights.
HWM2: Refer to Figure 5.3.2.3-2.
Left plane: clip-on weight
Right plane: stick-on weight.
Note:
The relevant HWM indicator is lit.
Figure 5.3.2.3-3 (1) and (2) shows the rim reference
points.
• Use the gauge arm to enter the two rim reference
points.
The distance between the left plane and right plane
offset points must be 77 mm (3”) minimum.
Note:
To balance a PAX wheel (HWM1 only):
• Select mm mode (Chapter 5.2.4.2).
• The rim diameter can only be changed to the
predefined values. Enter dimensions.
• After entering the dimensions, spin the wheel.
Always apply the stick-on weights with the gauge arm
at the positions indicated. Check the correct weight
application distance when the display shows the value
“0“ and the machine beeps.
Note:
If the arm is extracted with the wheel
incorrectly positioned, warning H21
appears on the display, see Chapter 7.
• Apply the weight in the left plane.
Note:
If the weight is to be split and put exactly
behind two spokes, select SWM now.
Refer to Chapter 5.12.
• Apply the weight in the right plane.
• Perform a check spin.
5.3.2.4 Static balancing
5.3.2.4-1
Only static imbalance is measured and corrected.
When selected, the display is as shown in Figure 5.3.2.41.
Figure 5.3.2.4-2 shows the recommended rim reference
point.
• Establish the following dimensions:
- Rim diameter of the reference point.
- Width. If the rim width is ≤ 3”, enter 3”.
- Offset of the reference point.
• After entering the dimensions, spin the wheel.
• Apply the stick-on or clip-on weight at the 12
o’clock position.
• Perform a check spin when done.
5.3.2.4-2
20
geodyna 980L
Operation
5.3.2.5 Internal Balancing
Application of a patch inside a tyre.
To activate the procedure press key “F” (1) then the
“INT” (2) key, Figure 5.3.2.5-1. The left-hand display
shows the text "
", which means you must enter
the external tyre diameter which will be shown on the
right-hand display.
Note:
1
2
The procedure is the same as for static
balancing; the only difference being that
you need to enter the external tyre
diameter in order to calculate the weight.
5.3.2.5-1
5.3.3 Spinning the Wheel
The wheel data must be acquired and the type of rim to
be used must be entered.
• Lower the tilting frame to its horizontal position.
• Press “START” to spin the wheel, Figure 5.3.3-1.
The motor starts up and the wheel spins.
Wheels must turn towards the right, seen from the side
of the unit on which they are mounted.
The measurement is completed as soon as the direction
indicators light up. The unit beeps. The brake will be
applied automatically and the wheel will stop in the
correct left plane weight application position.
The weight(s) to be applied will be shown on the display.
For higher precision, select Fine.
1
3
• Lift the wheel guard to its vertical position.
5.3.3-1
2
21
geodyna 980L
Operation
5.3.4 Weight application
5.3.4-1
The following weight types and application methods are
available:
- clip-on weights.
Always apply by hand.
- stick-on weights.
Must be applied by hand or with the gauge arm,
depending on the weight mode.
Note:
Hand applied weights must always be
applied exactly perpendicular to the shaft
(12 o’clock position).
After spinning the wheel (refer to Figure 5.3.4-1):
• Look at the rotation indicators for the left plane of
the wheel.
If one or more indicators are lit:
• Turn the wheel to find the application point.
5.3.4-2
As the correct angular position of the wheel is
approached the indicator will light. When all indicators
are lit, the position is correct, Figure 5.3.4-2.
Note:
At the correct angular position all rotation
indicators will be lit. If the wheel has been
rotated too far, only the indicators for the
other half will be lit. Refer to Figure 5.3.43. The wheel has to be gently reversed.
The weight to be applied in that plane is shown on the
display.
5.3.4-3
In Truck and Light-truck modes an electromechanical
brake stops the wheel turning.
- Press the STOP key to release the brake.
- Turn the wheel manually until it reaches the
counterweight application point
Attaching a clip-on weight.
Refer to Figure 5.3.4-4.
• Clip-on weights must always be applied in the 12
o’clock position.
• The lip should rest on the rim edge. Use the weight
pliers to position it.
In STATIC mode only the left hand display is used.
5.3.4-4
22
geodyna 980L
Operation
Attaching a stick-on weight.
ALU or STATIC weight modes only:
Refer to Figure 5.3.4-5.
• Apply the weight on the rim in the 12 o’clock position
at the correct offset position.
• The lit indicator on the display gives an indication of
the correct position.
Note:
With STATIC weight modes, always apply
the weight at the rim centre line. If not
possible, split the weights evenly and
apply on another surface of the rim
(symmetrical to the rim centre line).
Alu 2P and Alu 3P (HWM) weight modes:
Refer to Figure 5.3.4-6.
The gauge arm must be used to apply the stick-on
weight(s).
• Place the stick-on weight on the gauge arm. Refer
to Figure 5.3.4-7.
• Bring the gauge arm to the left plane reference point.
Note:
When the value “0“ appears while moving
the arm, the machine beeps to indicate
that the correct application position has
been reached.
• Apply the weight to the correct point on the rim.
• Decide to use Weight Mode now (Chapter 5.4.1).
• Rotate the wheel to the next WAP position, put the
stick-on weight on the gauge arm and apply the
weight at the right plane reference point.
Note:
When the internal gauge is removed, the
data is normally displayed, unless the left
plane has reached the angular position for
weight application and a stick-on weight
is used.
Or
The right plane has not reached the angular
position for weight application.
When this happens, the appropriate weight
and a variable number appear on the other
display to indicate the direction in which
the gauge arm must be moved in order to
find the correct weight application position.
23
geodyna 980L
Operation
5.3.5 Check spin
It is good practice to perform a check spin after applying
the weights.
• Spin the wheel.
If the wheel has been balanced properly, “000” will be
displayed for both planes. To check how much
imbalance is left:
• Select the fine key.
• Rotate the wheel by hand.
The weight to be applied is shown on the display.
Note:
The operator should decide if applying the
stated weight is necessary.
5.3.6 Results recalculation
1
5.3.6-1
After spinning a wheel it is possible to enter new rim
data or select another weight mode. The results are
recalculated automatically, if possible.
Editing rim data:
- non-HWM: automatic recalculation
- HWM: both plane reference points should be entered
again.
Selecting another weight mode
- Between NORMAL, ALU and STATIC: no additional
steps required.
- From non-HWM to HWM: input of plane reference
points is required.
Note:
-
The minimum HWM diameter differs from
the non-HWM types.
From HWM to non-HWM: check diameter, offset
and width.
Note:
These dimensions relate to the latest input
done in NORMAL, ALU or STATIC mode.
-
From HWM1 to HWM2: no additional steps required.
From HWM2 to HWM1: input of plane reference
points required.
• Select “fine” Figure 5.3.6-1 to toggle between Weight
Application Mode and Data Entry Mode.
• State the new plane reference points.
• Apply the weight(s).
To have a recalculation done:
• Select the required weight mode. Check and/or edit
rim or plane data when necessary.
• Rotate the wheel to the left plane WAP position and
apply the weight.
• Rotate the wheel to the right plane WAP position
and apply the weight.
• Perform a check spin
24
geodyna 980L
Operation
5.3 Balancing procedure
The unit always has a weight mode automatically
selected, refer to the display. Select the appropriate
key (refer to Figure 5.3-1) to scroll through the weight
modes continuously. The weight mode currently
selected is shown by the illuminated indicator(s).
NORMAL
Used for steel rims.
ALU mode
Used for light alloy rims or where one or more stickon weights are to be used.
The stick-on weight(s) must be applied by hand.
5.3-1
Hidden Weight Mode
Used for light alloy rims or for wheels that are difficult
to balance.
The stick-on weight(s) must be applied with the
gauge arm. This guarantees more accurate weight
positioning compared to applying the stick-on
weight(s) by hand.
Note:
If the stick-on weight must be hidden
behind two spokes, select the Split Weight
Mode before applying the weight in the right
plane. Refer to Chapter 5.4.1.
STATIC
Retrieve the function with key 12 fig. 5.3-2. Two LEDs
light up and flash.
Used for small wheels that are not balanced
dynamically, e.g.: small moped wheels.
No “left” or “right” weight is calculated.
Mount the wheel according to Chapter 5.1 and select
the correct weight mode.
12
25
5.3-2
geodyna 980L
Operation
5.3.1 Rim data input
Dimensions can be entered either automatically using
the gauge arm or measured by hand and then typed in
on the keyboard.
Dimension Units
diameter:
inches (default) or mm.
rim width: inches (default) or mm.
offset:
millimetres.
To change the units, refer to Chapter 5.2.4.2.
5.3.1-1
Automatic data entry by using the GAUGE ARM
Non HWM mode:
- Rim diameter
• Ensure that the gauge arm is in the home position.
• To position the arm correctly on the rim, pull the
gauge head holding ring inwards and hold it there
until it has taken the measurement (1-Fig. 5.3.1-3)
• Position the gauge arms correctly on the rim, so
that the reference point on the arm is in contact with
the reference point on the rim (2-Fig. 5.3.1-3)
• Hold the gauge arm steady for at least one second.
The machine will beep to indicate that the
measurement has been taken and is within the
program's parameter range.
- Rim width
• Measure the rim manually with the callipers (refer to
Fig. 5.3.1-1) or read the measurement directly on
the rim itself if it's written there.
• Press the "Rim width" key.
• Enter the value manually using the keyboard.
Note: when the Automatic Measurer has registered the
Diameter and Offset, the machine is immediately
ready for the Wheel Width measurement to be
entered.
5.3.1-2
26
-
Offset
Offset equals the distance from the unit zero point
to the rim reference or weight fixing plane reference
point. Refer to Figure 5.3.1-2.
The rim or plane reference point depends on the
type of wheel, refer to Chapter 5.3.2.
These measurements are always taken at the same
time as that of the diameter. If you need to repeat
the operation.
Proceed as described above for the rim diameter.
geodyna 980L
Operation
At this point the LEDs on the control panel show again
the weight application method selected and the width
and diameter measurements appear on the display.
If a measurement operation has already been performed
you can recalculate the measurements according to
the new wheel data by activating a machine function,
for example, by changing the weight allocation method
or the imbalance precision display (Fine key) etc
HWM mode
HWM mode data entry is as described above apart
from after a diameter or offset has been measured by
the gauge arm and the machine indicates exactly where
the counterweights should be placed.
5.3.1-3
MANUAL data entry
Manual data entry is required only if the gauge arm
malfunctions. In that case proceed as follows:
- Rim or tyre diameter
• Read the nominal rim diameter directly on the rim
or tyre itself.
• Select the diameter key on the control panel. The
last value entered appears.
• Enter the value read previously using the appropriate
keys (refer to Chapter 4.2).
• Select another measurement to edit (if necessary)
or spin the wheel.
Note: the MANUAL data entry is also used for the
"Tyre diameter" measurement requested for certain
special Internal Balancing operations (Chapter
5.3.2.5).
- Rim width
•
Proceed as described above for the Automatic
Data Entry operation.
- Offset:
•
Position the gauge arm correctly as described
above in the "Rim Diameter" phase of the Automatic
Data Entry operation
•
Read the arm extraction value on the gauged
column.
•
Enter the value read previously using the
appropriate keys.
27
geodyna 980L
Operation
5.4 Special modes
Selecting the F key enables the operator to scroll the
following modes in sequence:
- Split Weight Mode (SWM),
- Minimisation mode.
5.4.1 Split Weight Mode
Selecting is possible only after balancing a HWM wheel
that has an imbalance ≥ 10 gram in the right plane.
Note:
The “fine” read-out accuracy is not available
with this mode.
Select this mode to “hide” the right plane weights split
into two parts behind the two spokes that are nearest
to the calculated weight application position. That way,
the weights are not visible from “outside”.
5.4.1-1
1
Take into account the following limitations (refer to Figure
5.4.1-1):
- The whole enclosed angle is limited to 120°.
- both angles (from “visible weight position” and
“hidden weight position”) must be greater than 0°.
• Apply the weight in the left plane of an HWM wheel.
• Don't apply the weight on the right plane but in the
recommended application point press F (1)+ Spoke
(2) figure 5.4.1-2. S1 appears.
• Turn the wheel until one of the spokes is in the 12
o'clock position, near the application position.
• Press F (1 Fig. 5.4.1-2). S2 appears.
• Turn the wheel until the adjoining spoke is in the 12
o'clock position.
• Press F (1 Fig. 5.4.1-2). The weight is now split.
The machine can now indicate the two weights and the
relative application points.
5.4.2 Balancing optimisation /
Weight minimisation
Note: even if the optimisation procedure can be
carried out on truck wheels, it is mainly
used for car wheels.
2
5.4.1-2
28
General
Optimisation is a refined form of matching.
For optimisation the tyre is mounted relative to the rim
in a position selected according to the results of various
measurements. This normally further reduces any radial
and axial run-out as well as lateral and radial forces,
making the wheel run as silently as possible. In addition,
geodyna 980L
Operation
the correction weights needed for balancing can also
be reduced.
If optimisation is not required, weight minimisation (also
known as matching) is possible.
For example, when the rim has no shape defects,
meaning that wheel imbalance depends exclusively on
tyre irregularities. In such cases, the rim imbalance
may be positioned relative to the tyre imbalance so
that they compensate one another and the machine
calculates a minimum correction weight.
1
3
2
4
5.4.2-1
Instructions for balancing
optimisation / weight minimisation
During tyre changing operations required for balancing
optimisation / weight minimisation, the wheel balancer
can be used as a conventional wheel balancer by
another operator.
For this purpose, interrupt the optimisation /
minimisation program by pressing the STOP key (4).
The electronic unit will store the current program step,
the rim dimensions and all measurements taken so
far.
To continue with the optimisation / minimisation
program, press the F key (1) in succession. The program
then continues from the step where it was interrupted,
with the relative measurement values and the balancing
optimisation / weight minimisation may continue.
If a measuring run is interrupted by operation of the
STOP key (e.g.: to clamp the wheel better or due to an
emergency), the machine returns to the previous
program step. Reset the valve position and continue
balancing optimisation / weight minimisation.
After interruption by operation of the STOP key the
readings refer to the imbalance of the latest measuring
run.
To restart balancing optimisation / weight minimisation
after an interruption, simply press the PRO-MATCH key
(2).
During balancing optimisation / weight minimisation a
measuring run always has to be started with the START
key (3). The “Start measuring run by closing wheel
guard” operating mode is not operative in this case.
Wheel clamping means compensation is cancelled by
starting the balancing optimisation / weight
minimisation cycle.
Balancing optimisation program cycle
The following is a description of the balancing
optimisation program cycle (code OP) and weight
minimisation (code UN).
Balancing optimisation
If after the measuring run the imbalance in the left or
right correction plane and/or the static imbalance is
more than 30 grams, perform automatic optimisation
by activating the F+PRO-MATCH symbol.
• Before optimisation check that the rim dimensions
have been set correctly.
You cannot correct the data later.
29
geodyna 980L
Operation
• Demount the tyre and clamp only the rim for the
compensation run.
• Press the PRO-MATCH key (2).
The OP.1 reading appears.
In all figures in which the valve symbol appears on the
edge of the rim, shift the tyre on the rim then press
the PRO-MATCH key (2) to set the valve position
(exactly perpendicular to and above the main shaft).
• Readjust the rim so that the valve is exactly
perpendicular to and above the main shaft.
• Press the PRO-MATCH key (2) to acquire the valve
position.
The OP.2 reading appears.
An incorrect valve position entry can be corrected
afterwards.
1
3
2
4
5.4.2-1
Weight minimisation
If no optimisation, but only weight minimisation (i.e.
without compensation run for the rim without tyre),
proceed as follows:
• Clamp the complete wheel (rim and tyre).
• Press F (1) + PRO-MATCH (2) if minimisation is
starter separately from optimisation.
The OP.1 reading appears.
• Press the F key (1) to activate the weight
minimisation program.
The Un.3 reading appears. Run the minimisation
program.
• With program OP.2 the rim compensation run can
still be omitted. Go to the next step in the program
by pressing the F key (1).
The UN.4 reading appears.
• Continue the minimisation program.
The valve position entered with OP.1 is automatically
used.
Continuing balancing optimisation
• Press the START key (3) to start the rim
compensation run without the tyre.
After the measuring run the OP.3 reading appears.
• Mount the tyre and inflate correctly (see note below).
Note
For mounting and demounting (tyre changer) and tyre
turning or readjustment on the rim, always apply a
sufficient amount of tyre lubricant on the tyre beads
and the rim edges and shoulders. Each time the
position of the tyre is changed on the rim, inflate the
tyre to overpressure (approx. 3.5 bar) then deflate to
correct tyre pressure.
Make sure the centring line is correctly positioned on
the tyre bead.
30
geodyna 980L
Operation
• Clamp the wheel.
• Position the valve exactly perpendicular to and
above the main shaft.
• Press the PRO-MATCH key (2) to acquire the valve
position.
OP.4 appears.
• Press the START key.
The measuring run is carried out. After the measuring
run two readings are possible:
OP.5 - H1
Further optimisation is not recommended, but possible.
OP.5 – Reference mark
Continue with the OP program.
1
3
2
4
5.4.2-1
Reading OP.5 - H1
If OP.5 - H1 appears, further optimisation is not
recommended, since the measurement values which
activated the optimisation recommendation are below
the limit value. However, it is possible to continue
optimisation for the most silent possible wheel running,
reducing imbalances below the limit value (critical
vehicle).
To continue optimisation
• To continue with the OP program proceed as
specified for OP.5 – Reference mark (see next page).
To abort optimisation
• Press the STOP key to return to the balancing
program and balance the wheel according to the
readings.
Reading OP.5 - Reference mark
• After the measuring run readjust the wheel following
the direction indicator and make a chalk mark on
the right side of the tyre exactly perpendicular to
and above the main shaft.
• Readjust the tyre on the rim so that the reference
mark made is aligned with the valve (use tyre
changer).
• Clamp the wheel on the balancer and readjust it
until the valve is exactly perpendicular to and above
the main shaft.
• Press the PRO-MATCH key (2) to acquire the valve
position.
The OP.6 reading appears.
• Press the START key.
After the measuring run four readings are possible:
=== - OP.7
Proceed with the OP program. It is recommended that
the tyre be turned over on the rim.
OP.7 - ===
Proceed with the OP program. It is recommended that
the tyre be turned over on the rim.
H0
31
geodyna 980L
Operation
Optimum condition has been achieved and cannot be
improved.
H2
Silent running cannot be improved.
However, it is possible to readjust the tyre relative to
the rim to achieve significant weight minimisation (i.e.:
smaller balance weights) without having an adverse
effect on silent running.
Depending on the readings, there are several
possibilities for proceeding with the program. These
possibilities are described below.
1
3
2
4
5.4.2-1
Reading === - OP.7
Turn the tyre over on the rim (the left display bars are
rotating).
Option 1: Turn the tyre over on the rim (normal
program).
- Readjust the wheel according to the left direction
indicator and make a double mark on the left side of
the tyre exactly perpendicular to and above the main
shaft.
- Remove the wheel from the machine.
- Turn the tyre over on the rim and readjust until the
double mark coincides with the valve.
- Clamp the wheel on the balancer and readjust it so
that the valve is exactly perpendicular to and above the
main shaft.
- Press the PRO-MATCH key (2) to acquire the valve
position.
Reading OP.8 appears.
- Press the START key (3) (check run).
If balancing optimisation (silent running) has been
carried out correctly (according to the program cycle),
after the check run the machine automatically returns
to the type of weight positioning previously selected
and indicates the residual dynamic imbalance on the
wheel.
- Balance the wheel according to the readings.
Both optimisation and balancing are accomplished.
Message E9
Message E9 means that at least one error occurred
during the optimisation cycle. Press the STOP key (4)
to exit the optimisation program and repeat optimisation
if necessary.
Option 2: Do not turn the tyre over on the rim
- Press the F key (1).
The result is recalculated.
Reading OP.7 - = = = or H0 or H2 appears
- To go to === - OP.7 (turning over the tyre) press the F
key (1) again.
Option 3: Abort optimisation
- Press the STOP key (4) to exit the OP program and
return to the balancing program
The imbalance on the wheel is shown on the readout.
- Balance the wheel according to the readings.
Reading OP.7 - ===
32
geodyna 980L
Operation
Readjust the tyre on the rim (the right display bars light
up permanently).
Option 1: Readjust the tyre on the rim
(normal program)
• Readjust the wheel following the right direction
indicator and make a double mark on the right side
of the tyre exactly perpendicular to and above the
main shaft.
• Remove the wheel from the machine
• Readjust the tyre on the rim until the double mark
coincides with the valve.
• Clamp the wheel on the balancer and readjust so
that the valve is exactly perpendicular to and above
the main shaft.
• Press the PRO-MATCH key (2) to acquire the valve
position.
Reading OP.8 appears.
• Press the START key (3) (check run).
1
3
2
4
5.4.2-1
If balancing optimisation (silent running) has been
carried out correctly according to the program cycle,
after the check run the machine automatically returns
to the type of weight positioning previously selected
and indicates the residual dynamic imbalance on the
wheel.
• Balance the wheel according to the readings.
Both optimisation and balancing are accomplished.
Message E9
Message E9 means that at least one error occurred
during the optimisation cycle. Press the STOP key (4)
to exit the optimisation program and repeat optimisation
if necessary.
Option 2: do not adjust the tyre on the rim
•
Press the STOP key (4) to exit the OP program
and return to the balancing program.
The imbalance on the wheel is shown on the readout.
•
Balance the wheel according to the readings.
Reading H0
• Press the STOP key (4) to exit the OP program
and return to the balancing program.
The imbalance on the wheel is shown on the readout.
• Balance the wheel according to the readings.
The optimum balancing optimisation condition has been
achieved and cannot be improved.
Reading H2
Silent wheel running cannot be improved. However, it
is possible to achieve weight minimisation (readings
with code UN.).
Option 1: Weight minimisation
• Press the F key to continue the program.
As a result reading is === - Un.7 or Un.7 - ===
33
geodyna 980L
Operation
Option 2: Abort optimisation
• Press the STOP key (4) to exit the OP program
and return to the balancing program.
The imbalance on the wheel is shown on the readout.
• Balance the wheel according to the readings.
Weight minimisation program cycle
If the rim compensation run was omitted and the F key
(1) was pressed to go directly into the minimisation
program (reading Un.), proceed as follows.
• Clamp the wheel.
• Position the valve exactly perpendicular to and
above the main shaft.
• Press the PRO-MATCH key (2) to acquire the valve
position.
Reading Un.4 appears.
• Press the START key (3).
1
3
2
The measuring run is carried out. After the measuring
run two readings are possible:
Un.5 - H1
Further minimisation is not recommended, but is
possible.
Un.5 – Reference mark
Continue with the UN program.
4
5.4.2-1
Reading Un.5 - H1
If Un.5 - H1 appears, further minimisation is not
recommended since the measurement values do not
exceed the limit values. However, it is possible to
continue minimisation so as to achieve an improvement,
if only slight (e.g.: for critical vehicles).
To continue minimisation:
• Proceed as indicated for reading Un.5 – Reference
mark.
To abort minimisation:
• Press the STOP key to return to the balancing
program and balance the wheel according to the
readings.
Reading Un.5 – Reference mark
• After the measuring run readjust the wheel according
to the direction indicator and make a chalk mark on
the right side of the tyre exactly perpendicular to
and above the main shaft.
• Readjust the tyre on the rim so that the mark
coincides with the valve (use the tyre changer).
• Clamp the wheel on the balancer and readjust it so
that the valve is exactly perpendicular to and above
the main shaft.
• Press the PRO-MATCH key (2) to acquire the valve
position.
Reading Un.6 appears.
• Press the START key (3).
34
geodyna 980L
Operation
The machine performs the second measuring run with
the tyre. After the measuring run three readings are
possible:
=== - Un.7
Proceed with the UN program. It is recommended that
the tyre be turned over on the rim.
Un.7 - ===
Proceed with the UN program. It is recommended that
the tyre be readjusted on the rim.
H0
The optimum minimisation condition has been achieved
and cannot be improved.
Depending on the readings, there are several
possibilities for proceeding with the program. These
possibilities are described below.
1
3
2
4
5.4.2-1
Reading === - Un.7
Turn the tyre over on the rim (the left display bars are
rotating).
Option 1: Turn the tyre over on the rim
(normal program)
• Readjust the wheel according to the left direction
indicator and make a double mark on the left side of
the tyre exactly perpendicular to and above the main
shaft.
• Remove the wheel from the machine.
• Turn the tyre over on the rim and readjust until the
double mark coincides with the valve.
• Clamp the wheel on the balancer and readjust it so
that the valve is exactly perpendicular to and above
the main shaft.
• Press the PRO-MATCH key (2) to acquire the valve
position.
Reading Un.8 appears.
• Press the START key (3) (check run).
If weight minimisation was carried out correctly
(according to the program cycle), after the check
run the machine automatically returns to the type of
weight positioning previously selected and indicates
the residual dynamic imbalance on the wheel.
• Balance the wheel according to the readings.
Both weight minimisation and balancing are
accomplished.
Message E9
Message E9 means that at least one error occurred
during the minimisation cycle. Press the STOP key
(4) to exit the minimisation program and repeat
minimisation if necessary.
Option 2: Do not turn the tyre over on the rim
• Press the F key (1).
35
geodyna 980L
Operation
The result is recalculated.
Reading Un.7 - = = = or H0 appears
• To return to === - Un.7 (turning over the tyre) press
the F key (1) again.
Option 3:
- Press the STOP key (4) to exit the minimisation
program and return to the balancing program
The imbalance on the wheel is shown on the readout.
- Balance the wheel according to the readings.
1
3
2
4
5.4.2-1
Reading Un.7 - ===
Readjust tyre on the rim (the right display bars light up
permanently).
Option 1: Readjust the tyre on the rim
(normal program)
- Readjust the wheel according to the right direction
indicator and make a double mark on the right side of
the tyre exactly perpendicular to and above the main
shaft.
- Remove the wheel from the machine.
- Readjust the tyre on the rim until the double mark
coincides with the valve.
- Clamp the wheel on the balancer and readjust it so
that the valve is exactly perpendicular to and above the
main shaft.
- Press the PRO-MATCH key (2) to acquire the valve
position.
Reading Un.8 appears.
- Press the START key (3) (check run).
If weight minimisation was carried out correctly
(according to the program cycle), the machine
automatically returns to the type of weight positioning
previously selected and indicates the residual dynamic
imbalance on the wheel.
- Balance the wheel according to the readings.
Both weight minimisation and balancing are
accomplished.
Message E9
Message E9 means that at least one error occurred
during the minimisation cycle. Press the STOP key
(4) to exit the minimisation program and repeat
minimisation if necessary.
Option 2: Do not readjust the tyre on the rim
- Press the STOP key (4) to exit the minimisation
program and return to the balancing program
The imbalance on the wheel is shown on the readout.
- Balance the wheel according to the readings.
Reading H0
The optimum minimisation condition has been achieved
and cannot be improved.
- Press the STOP key (4) to return to the balancing
program and continue according to the readings.
36
geodyna 980L
Operation
5.5 Special functions
In this chapter all functions that may be accessed by
the operator are described. A special function is a
“mode” that is not necessarily required to balance a
wheel properly.
5.5.1 Non-skid function
On wheels with a limited weight, skid specifications
may make it impossible to perform a run at the normal
measuring speed.
This function may be disabled for a single run:
• Hold the START key down while the wheel guard is
lowered.
Note: the machine will start the wheel spinning
gradually in order to stop it from skidding and
avoiding the consequent error messages (E17).
37
geodyna 980L
Operation
5.6 Calibration
This chapter describes the calibrations that can be
performed by the operator.
5.6.1 User calibration
5.6.1-1
38
If a number of different measuring runs have to be
performed to balance a wheel and the values and
positions of the weights have to be changed, it generally
means that measuring is not precise.
In this case the operator can recalibrate the machine.
To perform a so-called "User Calibration", the operator
should use the calibration weight (réf. EAM0005D40A)
supplied with the machine (situated at the back of the
weights shelf)
A calibration run usually lasts longer than a measuring
run.
Clamping element imbalance compensation is deleted
following a User Calibration.
Important:
Before performing a User Calibration ensure the
clamping device supplied by the manufacturer is fitted.
Calibration (Cod. C14)
• Make sure that only the clamping device is fitted to
the main shaft (no wheel or any other clamping
accessories).
• Press F + C-Code.
The base C 0 value is displayed.
• Use the + and - keys to select the C14 Code.
• Press the C-Code key.
Value 1 is displayed.
• Close the wheel guard, press the START key (if
necessary) to perform the first calibration run (a
longer measuring run to detect any residual
imbalances).
At the end of the first calibration run value 2 is displayed.
• Screw the calibration weight into the threaded bore
on the machine flange (Figure 5.6.1-1).
• Press the START key to perform the second
calibration run (with the calibration weight to detect
the adjustment values).
After the second measuring run, the electronic system
processes the values registered in the calibration runs
and saves them in the permanent memory. At the end
of the processing phase the machine sounds a three
tone beep to indicate that recalibration is complete.
The machine is now ready to use again and the base
value is displayed.
• At the end of the calibration procedure unscrew the
calibration weight from the flange and put it back in
its place.
geodyna 980L
Operation
5
5.7 Selecting the operating
mode
6
To use the balancer normally you do not need to change
the operating mode and the relative states set by the
manufacturer. In special cases, however, or if working
conditions require it, the operating modes and states
can be changed by entering the appropriate codes.
Operating mode settings and values
1
2
3
5.7-1
4
• Press F (1) + C-Code (2) to enter the C-Code mode.
• Use the + and – keys (3) e (4) to select the relevant
C-Code, displayed on the left indicator (5).Press the
C-Code to confirm.
• Use the + and – keys to select the relevant operating
state, displayed on the right indicator (6). Press the
C-Code to confirm and return to the base value Fig. 5.7-2.
This changes the operating mode which is then saved
until a new setting is entered or until the machine is
turned OFF.
5.7-2
5.7-2
39
The operating modes that are changed in this way can
be saved permanently using the C10 code.
Now if the machine is turned OFF these modes are not
lost and every time the machine is turned ON they are
reinserted until they are changed again.
Code C4. Clamping device compensation
This cannot be saved permanently.
The editing codes and the key combinations for entering
them are listed below.
.
geodyna 980L
Operation
Code C0
Figure 5.7-3 setting operating modes preset by the
manufacturer
0*
=
No action
1
=
Set values preset by the manufacturer (state
1 is displayed only briefly)
The operating mode selected can be obtained from the
permanent memory.
5.7-3
Code C1
Figure 5.7-4 Selecting the definition of the imbalance
value in steps from 1 or 5 grams (= from 0.05 to 0.25
oz.).
0*
=
5 gram (0.25 oz) definition
1
=
1 gram (0.05 oz) definition
The operating mode selected can be obtained from the
permanent memory.
5.7-4
Code C2
Figure 5.7-5 Selecting the suppression of minor
imbalance values.
0*
=
Suppression OFF
1
=
Suppression ON
The operating mode selected can be obtained from the
permanent memory.
5.7-5
Code C3
Figure 5.7-6 Selecting the unit of measure for indicating
the imbalance (grams/oz) activated after the machine
has come on.
0*
5.7-6
=
Value in grams
1
= Value in oz
The operating mode selected can be obtained from the
permanent memory.
*=preset by the manufacturer
40
geodyna 980L
Operation
Code C4
Figure 5.7-7 Eventual residual clamping device
imbalance compensation.
5.7-7
High precision measuring (This operating mode cannot
be stored in the permanent memory).
Once compensation has been performed, if the clamping
device is changed, this value must be deleted or
recalculated using the new device.
To delete clamping device compensation , set the
operating state to 0.
Compensation should be deleted when the machine is
calibrated or recalibrated, if imbalance optimisation
(silencing) is performed or if the machine is turned OFF
.
0
= Perform compensation
1
= Compensation performed
0
= Disable compensation after the measuring run
Code C6
Figure 5.7-8 Entering the number of wheel spins per
measuring run. Between 10 and 30 spins are possible,
preset by the manufacturer at 10 spins per run.
Example > change to 15 spins per run.
5.7-8
WARNING: REDUCING THE NUMBER OF SPINS PER
RUN MEANS THAT THE MEASUREMENT WILL BE
LESS PRECISE.
The operating mode selected can be obtained from the
permanent memory.
Code C7
Figure 5.7-9 Adjusting beep volume, from 0 to 100 (quiet
- loud) preset by the manufacturer at 50*.
Example: Change volume to 60.
To confirm the volume change, exit the function by
pressing the C key.
5.7-9
41
The operating mode selected can be obtained from the
permanent memory.
geodyna 980L
Operation
Code C8
Figure 5.7-10 Selecting the threshold value for
suppressing minor imbalances in grams or oz. The unit
of measure depends on the C3 code setting.
Unit of measure: grams:
see table at end of manual.
Unit of measure: oz:
see table at end of manual.
5.7-10
The operating mode selected can be obtained from the
permanent memory.
Code C10
Figure 5.7-11 Saving an operating mode in the
permanent memory.
0*
1
•
= Don't save
= Save the data in the permanent memory.
The machine sounds a three tone beep to confirm
that the data has been saved permanently.
If you have to save the operating mode permanently,
first change the state, e.g. activate it, disable it and
then save it in the permanent memory using the C10
code (this does not apply to C4).
5.7-11
Code C12
Figure 5.7-12 Measuring run counter.
Example: 222.123 measuring runs performed
Press the Fine key and spin the wheel to display the
following counters:
1 = Total nr. of measuring runs performed
2 = Total nr. of measuring runs with a positive balancing
result (OK)
3 = Total nr. of optimisations and minimisations
4 = Total nr. of measuring runs in Service mode
5 = Total nr. of measuring runs since the last calibration
5.7-12
42
Every measuring run that is performed and concluded
is memorised. The counter can count up to 999,999
measuring runs. When this number is reached the
counter starts again from 0. This information is
interesting in terms of statistics, e.g. to demonstrate
how long faulty parts have lasted or to calculate how
much the machine is used per month or per year.
The measuring cycles performed while the machine is
running are saved in the permanent memory and totalled
every time the machine is turned OFF. Counter totals
cannot be deleted.
geodyna 980L
Operation
Code C13
Figure 5.7-13 Starting a measuring run by lowering the
wheel guard
0*
1
=
=
Start a run using the START key
Start a run by lowering the wheel guard
The operating mode selected can be obtained from the
permanent memory.
5.7-13
Code C14
Figure 5.7-14 User recalibration.
Code C21
Figure 5.7-15 This displays the program version number
and the model number.
Program version 1,22 for mod. 980L.
5.7-14
• to display the program version number release the C
key.
• to display the model number press the Fine key.
Code C28
Figure 5.7-16 Selecting one of 10 messages from the
error memory and deleting them from the error memory.
5.7-15
5.7-15
The last 10, unrepeated error messages are saved in
the error memory so that the balancer user can trace
malfunctioning via remote diagnosis. The last error
message is saved in the nr.1 memory slot. The previous
messages are stored in order of arrival in the memory
list.
• Select one of the 10 error messages.
• Press the OP key to display the number of the error
message (left) and the total number of times the
message has appeared (right), e.g. the error in
memory slot 7 has appeared 4 times.
• For the 2nd step press the C key.
• Press and hold down the Fine key, spin the wheel
and set the relevant code:
0 = Do not delete the error memory
1 = Delete the error memory
5.7-16
5.7-16
* = Factory adjusted mode
43
geodyna 980L
Maintenance
6.0 Maintenance
This unit is designed to operate for a long time.
At start-up the operator should check if all indicators
and displays light up.
If the operator shuts down correctly (Chapter 5.2.3) at
the end of each shift, no further maintenance is required.
This unit must not be opened by the operator, apart
from following the instructions below.
6.1
Storage
When the unit will be stored for a several weeks or
longer, prepare the unit correctly:
• Shut down the unit properly, refer to Chapter 5.2.3.
• Remove the threaded shaft from the balancer.
• Apply a thin layer of non-corrosive oil on all threads
and cones.
• Wrap oiled items in paper to keep the parts dustfree.
Before putting the unit into use again, clean all oiled
parts.
6.2 Changing the mains fuse
Refer to Figure 6.2-1.
• Switch off the unit.
• Unplug the power cable from the power outlet.
• Remove the power cable from the machine mains
socket.
• Press the fuse holder central tab upwards.
• Pull out the fuse holder.
• Replace the fuse with another fuse having an
identical rating.
• Return the unit to its original state.
6.2-1
44
geodyna 980L
Trouble shooting
7.0 Trouble shooting
If a problem arises with the wheel balancer, proceed in
the following order to solve the problem:
1. Rethink the last steps taken.
Did you work according to the manual?
Did the unit work as described and expected?
2. Check the unit according to the points listed in this
chapter.
3. Call your local sales agent for technical service.
The set up of this chapter is:
Problem
1. Possible cause #1
• Possible solution(s)
2. Possible cause #2
• Possible solution(s)
When switched on, nothing lights up.
1. Power switch in OFF position (not applicable for
handspin balancers).
• Set power switch in ON position.
2. No power cable connected.
• Connect power cable to power outlet.
3. No mains power
• Check power supply, power system fuses
4. Unit fuse(s) blown.
• Replace unit fuse(s).
If the fuse(s) has (have) recently been replaced, call
service to check the unit.
When switched on, a beep is heard for 1 second.
1. Configuration error.
• Call Service Team
When switched on, the unit beeps with a certain
sequence.
• Note down the sequence.
• Call Service Team
Display appears to freeze or lock up.
1. The unit may be in a program, waiting for a specific
action.
• Finish the program currently in use.
• Switch off the unit.
Wait for 20 seconds, switch on the unit.
Proceed.
2. Power to the balancer may have been interrupted.
• Switch off the unit.
Wait for 20 seconds, switch on the unit.
Proceed.
• If this happens frequently, have your power system
checked. If that is okay, call technical service team.
45
geodyna 980L
Trouble shooting
Gauge arm inputs differ from wheel dimensions
stated on rim or tyre.
1. Did you position the gauge arm correctly?
• Refer to Chapter 5.3.1.
2. Check the offset input of the gauge arm by entering
manually.
• Refer to the scale on the gauge.
• If not identical, proceed with step 4.
3. Check the diameter of the spot on the rim where
the diameter has been measured.
• If not identical, proceed with step 4.
4. Calibration is required.
• Have the gauge arm calibrated.
Balancing results are unreliable.
1. The balancer may not be installed properly.
• Make sure the unit rests on its 3 feet only.
• Make sure the floor is not relaying shocks, for
example from trucks passing close to the unit.
2. The wheel may be mounted incorrectly.
• Check the hub, cones and adapters for play.
• Use appropriate spacers to eliminate play.
• Perform measuring unit calibration.
3. The electronics are faulty.
• Call service team.
A mode, display segment or indicator is
continuously shown on the display.
1. A power dip may have occurred.
• Switch off the unit.
Wait for 20 seconds, switch on the unit.
• Call service team.
46
geodyna 980L
Trouble shooting
7.1
System messages
The wheel balancer can show messages to the operator.
These may be error related (E-codes) or warnings (Hcodes). The codes will be described in the following
chapters.
Whenever a code appears:
• make a note of it;
• look up the code in the list. If the code is not
described, call service team;
• perform the steps described.
7.1.1 E-Codes / H-codes
E1
Rim dimensions set are incorrect or incomplete.
When the message appears, set the data again.
E2
Wheel guard is not closed.
E3
The gauge for measuring the distance and diameter is
not in the home position.
E5
Compensation range was exceeded.
(Clamping means with excessive imbalance).
Press the STOP key.
Check the clamping means and repeat the
compensation run.
E6
The calibration weight was not attached for calibration.
Press the STOP key.
Repeat calibration.
E7
With this weight mode selection of a type of weight
positioning is not possible.
If possible, select another weight mode.
E8
Valve position was not set (message only appears with
balancing optimisation / weight minimisation program).
Position the valve so that it is exactly perpendicular to
and above the main shaft and press the PRO-MATCH
key.
47
geodyna 980L
Trouble shooting
E9
Optimisation / minimisation was not carried out
correctly.
1. Wheel was not exactly centred on clamping means
for at least one run.
2. Tyre was not centred on rim for at least one run.
3. Valve position was not set and acquired correctly at
least once.
4. Wrong reference mark (single or double) was used
when readjusting the tyre.
5. Wheel moved on clamping means during a measuring
run (sudden start or braking).
6. Wheel dimensions were not set correctly.
Repeat optimisation.
E15
Recalibration correction is out of range.
During recalibration values above or below the calibration
value envisaged were found. This message is only a
warning. Press key C to transfer the correction values
to the permanent memory.
Use the clamping means supplied with the machine or
perform basic calibration (Service).
E16
During the first recalibration run the calibration weight
was attached by mistake.
Unscrew the calibration weight and press START.
E17
Wheel slips on clamping means.
The clamping nut is not tightened properly, the main
shaft accelerates too quickly. The machine will stop.
Firmly tighten the clamping nut and in special cases
press the START key for longer.
E83
During a measuring run the values measured are
rendered useless due to outside interference pulses
(e.g.: strong vibrations). The run is interrupted.
Repeat the measuring run.
E88
The main shaft speed exceeds the safety limit.
48
geodyna 980L
Trouble shooting
E89
A key is jammed.
Find and release jammed key.
Or:
Press STOP or ESC to check the pedal switch.
If the error cannot be eliminated, the pedal function is
switched off by pressing the STOP key or the ESC
key. Call service team.
7.1.1-1
7.1.1-1
7.1.1-2
7.1.1-2
E92
The gauge for measuring the distance and diameter is
faulty.
Call service team.
As long as the geodata measuring gauge is defective,
set the distance and rim dimensions using the menu
key and turning the wheel (Chapter 2.3.3).
E93
The gauge for measuring wheel width is faulty.
Call service team.
As long as the width measurement gauge is faulty, enter
the rim width using the menu key and turning the wheel
(Chapter 2.3.1).
H0 - Figure 7.1.1-1
Wheel silent running cannot be improved with balancing
optimisation.
7.1.1-3
7.1.1-3
H1 - Figure 7.1.1-2
Further optimisation is not recommended but is
possible.
H2 - Figure 7.1.1-3
Weight minimisation is recommended, further
optimisation does not bring improvements.
7.1.1-4
7.1.1-4
7.1.1-5
7.1.1-5
H20 - Figure 7.1.1-4
Correction plane cannot be found with the gauge for
measuring distance and diameter.
Measure the correction plane and set the dynamic
imbalance indicator.
H21 - Figure 7.1.1-5
The position reached does not correspond to the
correction plane, in which the stick-on weight must be
applied with the gauge.
Turn the wheel to the position for application of the stickon weight on the relative correction plane.
H26 -Figure 7.1.1- 6
The gauge was moved too quickly.
Return the gauge at the starting position and repeat
the operation, making the gauge approach the weight
application point moreslowly.
7.1.1-6
7.1.1-6
49
geodyna 980L
Trouble shooting
H28 - Figure 7.1.1-7
The gauge was moved too slowly.
Return the gauge the starting position and repeat the
operation, bringing the gauge towards the weight
application point again.
7.1.1-7
H80 - Figure 7.1.1-8
Recalibration was not set up. As a result, it cannot be
performed by the operator.
Press the STOP key to clear the message.
Call the service team for machine calibration.
H82 - Figure 7.1.1-9
The self-test was disturbed (e.g.: by turning the wheel).
The message is displayed for 3 seconds, then the
measurement is repeated (max. 10 times) or aborted
by pressing the STOP key.
7.1.1-8
7.1.1-9
7.1.1-10
H90 - Figure 7.1.1-10
Wheel acceleration was too slow, or braking was too
weak after a measuring run.
If the main shaft does not reach the required speed,
check that the brake is not activated or the weight of
the wheel is too great. In this case:
Release the brake.
Make sure that the shaft with the wheel clamped on it
can rotate freely.
Turn the wheel by hand then press the START key.
If the error cannot be eliminated, call the service team.
H91 - Figure 7.1.1-11
Speed variations during measuring run. The brake may
be ON.
Release the brake.
Make sure that the shaft with the wheel clamped on it
can rotate freely.
Repeat the run.
7.1.1-11
50
geodyna 980L
Disposal / Appendices
8.0 Disposing of the unit
When you decide to get rid of your unit, contact your
reseller for a quote or for the regulations on disposal
which apply to the unit.
8.
INSTRUCTIONS
FOR
DISPOSAL IN EU COUNTRIES
For waste electrical and electronic equipment
At the time of disposal, at the end of the lifetime of this
equipment, you must:
1. NOT dispose of the equipment as municipal waste
and separate collection is mandatory.
2. Ask the retailer about collection points authorised for
regular disposal.
3. Stick to the standards for correct waste management,
to prevent potential effects on the environment and
human health.
This symbol indicates that separate collection of waste
electrical and electronic equipment is mandatory for
scrapping.
9.0 Appendices
This chapter contains additional information about the
unit.
If reference is made to the exact configuration of the
unit, please note that the exact configuration may be
different in your country. Consult the order confirmation
for details.
Operator’s Manual
geodyna 980L
geodyna 980L
51
Appendix: Installation Instructions
Installation Instructions
This appendix describes the installation requirements,
installation procedures and checks.
i. Installation requirements.
Space requirements.
The drawings show the minimum safety
requirements.
Refer to the drawings for space requirements:
i.1
geodyna 980L
Each drawing has two sets of dimensions:
1 dotted lines: for measurements regarding the holes
for fixing the machine to the floor
2 continuous lines: for measurements regarding overall
machine surface space
i-1
Floor requirements.
The floor should be:
- horizontal; within 2° tolerance
- even; within 2 mm
- able to bear the weight of the balancer as stated in
Chapter 2 of the Operator’s Manual.
The floor on which the balancer will be installed
should not relay vibrations from other devices or from
outside the building. External vibrations may affect
the accuracy of the unit.
Note:
The balancer must be positioned directly
on the floor. Do not use spacers to fill gaps.
If the above conditions are satisfied, the balancer
does not need fixing to the floor.
Power supply requirements.
Refer to Chapter 2 of the Operator’s Manual for mains
power requirements.
WARNING: ENSURE THAT AN APPROVED WALL
MAINS OUTLET IS AVAILABLE.
WARNING: NEVER GUIDE POWER SUPPLY CABLES
OVER THE FLOOR, UNLESS PROTECTED BY AN
APPROVED COVER.
53
geodyna 980L
Installation Instructions
ii Transportation, unpacking and contents.
Transportation.
The wheel balancer is supplied on a pallet.
• Use a pallet truck (Figure ii-1) to bring the wheel
balancer to its working area.
Unpacking.
WARNING: PREVENT THE STRAPS FROM
SPRINGING LOOSE AFTER BEING CUT.
• Cut the straps.
• Open the top of the box.
• Remove staples at the bottom of the box. Lift the
box up and over the unit.
• Carefully unwrap the balancer and spare parts
supplied.
• Check the contents of the shipment.
ii-1
Contents.
The shipment contains:
a wheel balancer
an Operator’s Manual with Declaration of
Conformity (CE)
the accessories mentioned in Section 3.1 of the
Operator’s Manual
4 storage hooks and flanges.
Handspin balancer only:
a transformer
Motor driven balancers only:
a mains power cable
a wheel guard assembly
2 bolts and nuts, fitted on the wheel guard shaft.
ii-2
Tools required.
screwdriver / bar (diameter 4.5-5 mm)
keys: 13, 17 mm
Positioning.
• Remove the bolts that secure the wheel balancer
on the pallet.
CAUTION: DO NOT LIFT OR MOVE THE WHEEL
BALANCER BY THE MAIN SHAFT OR MEASURING
UNIT.
• Refer to Figure ii-2. Move the wheel balancer from
the pallet to its working location.
Note: Use the storage hooks (mount as
instructed in Chapter iii) and/or the wheel guard shaft
(if present) to handle the wheel balancer.
54
geodyna 980L
Installation Instructions
iii Installation procedures
Wheel balancer:
Refer to the drawing in i for correct wheel balancer
positioning. If the wheel balancer needs securing, we
recommend fixing elements with a diameter of 8 mm,
quality 8.8 or higher.
Supports for Accessories:
• Unpack the 4 threaded accessory support studs and
the support plates.
• Refer to Figure iii-1. Fit the 4 threaded accessory
support studs and the plates.
Main shaft wheel adaptor:
Before fitting the wheel adaptor, clean the main shaft
support cone and the internal adaptor cone carefully.
iii-1
1
Fig. iii-2 Fitting the wheel adaptor
1 main shaft support cone.
2 wheel adaptor basic clamping adaptor.
3 Securing screws (hexagonal socket head CH14).
4 Hexagonal wrench (Allen key ) (included).
• Fit the wheel adaptor onto the main shaft support cone
so that the cylindrical headed screw at the end of the
cone is inserted in one of the slots on the basic
clamping adaptor.
• Fasten the wheel adaptor by tightening the securing
screw.
2
3
Wheel guard:
• Refer to Figure iii-3. Fix the wheel guard on the shaft
which sticks out at the back on the right.
Clamping devices:
• Put the clamping devices on the accessory studs.
4
iii-2
iii-3
55
geodyna 980L
Installation Instructions
Installing the pneumatic loading device
(OPTIONAL).
3
2
B
The loading device for truck wheels is provided
separately.
With the loading device wheels weighing up to 250 kg
can be pneumatically lifted and positioned exactly on
the clamping adaptor.
• The loading device has to be mechanically attached
(positive locking) to the machine.
A
Fig. iii-4 (1)
Attachment of pneumatic loading
device to the machine (seen from the top)
1 Pneumatic loading device
2 Clip
3 Locating stud
4 Machine
• Place the loading device over the locating stud from
above and insert the clip (A-B).
4
1
iii-4 (1)
Fig. iii-4 (2)
Connection of pneumatic loading
device - mounting the foot guard
1 Loading device fitted to the machine
2 Sliding carriage
3 Foot guard, has to be fitted to the loading device
4 Air connection (union)
5 Holder for foot guard, pre–fitted to loading device
6 Clamp for foot guard
• The air supply is provided by means of the pneumatic
hose supplied with the machine. The service pressure
is 8 bar. An integrated pressure reducer is factory–
adjusted to this value and must not be changed by
the customer. The line pressure should be at least 8
bar and must never exceed 15 bar.
• Slide the foot guard supplied with the machine into
the clamps in the direction shown by the arrow (2,
Fig. iii-4), adjust the distance of 30 mm as shown
and tighten the clamps.
For ease of transport the column side panel is facing
inwards (hook for storage of adaptors).
• Unscrew the side panel, turn it round and re–fasten.
iii-4 (2)
56
geodyna 980L
Installation Instructions
iv Test procedures
• Balance a wheel to less than 0.25 oz. (5 grams) per
plane.
• Perform a User Calibration. See Chapter 6.3.1.
v Instructing the operator
(Following applies only if a unit is installed by a service
Technician)
• Show and explain the Safety Booklet.
• Show the operator how to switch the unit on and off.
• Show the operator how to perform an emergency
stop.
• Show the operator how to select a wheel type, enter
data and apply a weight.
57
geodyna 980L
W3
W3
W4
W7
W5
W2
- Electrical diagram
58
geodyna 980L
Product requirements
Imbalance weight resolution/suppression
Truck WB:
Resolution
Normal
Fine
Suppression
Vehicle type
Truck rim
50, 75, 100, 150 g,
200 ... 900 g
in Increments of 100 g
1.00 ... 9.9kg
in Increments of 0.1 kg
0.5, 1, 2, 4, 6, ... 98 oz
in Increments of 2 oz
10 g - 0.50 oz
= 10 * vehicle type 1
1 g - 0.05 oz
= 2 * vehicle type 1
1 g - 0.05 oz
3.5 g - 0.12 oz
(Default values)
Light truck rim
10 g - 0.50 oz
Car rim
5 g - 0.25 oz
Rim dimensions
Truck WB:
Vehicle type
Truck [inch]
Truck [millimeter]
Light Truck [inch]
Light Truck [millimeter]
Car [inch]
Car [millimeter]
geodyna 980L
Distance
0 - 400 mm
0 - 400 mm
0 - 400 mm
0 - 400 mm
0 - 400 mm
0 - 400 mm
Width
min-max
2.0” - 20.0”
25mm - 505mm
1.0” - 20.0”
25mm - 505mm
1.0” - 20.0”
25mm - 505mm
Step
0.25”
10mm
0.5”
10mm
0.5”
10mm
Diameter
min-max
Step
8.0” - 14.0”
1”
14.0” - 30.0”
0.5”
190mm - 760mm
10mm
8.0” - 14.0”
1”
14.0” - 20.0”
0.5”
20.0” - 30.0”
1”
190mm - 760mm
10mm
8.0” - 14.0”
1”
14.0” - 20.0”
0.5”
20.0” - 30.0”
1”
190mm - 760mm
10mm
59
EC declaration of conformity
The company
Snap-on Equipment GmbH
Geschäftsbereich Hofmann Werkstatt-Technik
Werner-von-Siemens-Str. 2
D – 64319 Pfungstadt
declares herewith that the
wheel balancer
geodyna 980L
– Sr. No.
–
as designed, manufactured and put by
us on the market meets relevant basic
safety and health requirements as set
forth in the relevant EC guide-lines for
machines and electromagnetic
compatibility as specified hereafter (in
their latest versions):
98/37/EC
89/336/EC
Applied harmonized and national
standards:
EN 292–1, 292–2 / EN 294 / EN 349 / DIN 30 600 /
DIN 8418 / VDE 0100 / EN 5501 /
EN 50081-1 / EN 61000-6-2 / EN 61000-3-2 / EN 61000-3-3
This declaration becomes null and void
if the machine is not used as set forth
under „Scope of application” of this
operation manual, or if any
modifications or changes whatsoever
are made to the machine without prior
approval from our end.
ppa.
Hans-J. Rupp
Director Sales & Service
ZEEWB710A03.. wdc.. 11/15/06.. copyright 2006 Snap-on Equipment
All rights reserved