1
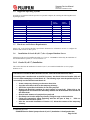
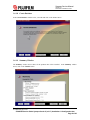
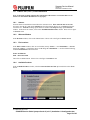
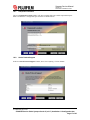
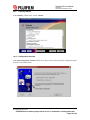
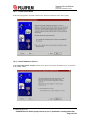
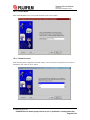
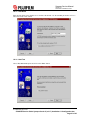
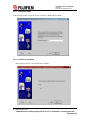
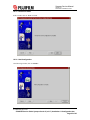
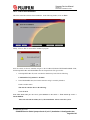
Synapse Service Manual
Version 3.2
Saved Date 9/9/2002 5:10 PM
ORACLE 8i (v.8.1.7) Installation & Configuration
1.1
Scope
This document details the steps to perform a new installation of Oracle8i (version 8.1.7) server, Oracle8i
Release 3 patch, and Oracle8i (v8.1.7) Client on a Windows 2000 system. The assumption is that no
Oracle products have ever been installed on this system before. All software for these installations is
provided on CD-ROM.
1.2
Document History
Version
3.0
3.1
3.2
Description
New Installation of Oracle 8i (v.8.1.7) and Patch (v.8.1.7.3)
Edited Patch and Client Installations
Updated for Oracle “Patch 4”
Date
05/23/02
07/16/02
08/19/02
Proprietary Information
FUJI Medical Systems USA
SYNAPSE Service Guide Synapse Oracle 8i (v8.1.7) Installation & Configuration.doc
Page 1 of 25
Synapse Service Manual
Version 3.2
Saved Date 9/9/2002 5:10 PM
1.3
Table Of Contents
ORACLE 8i (v.8.1.7) Installation & Configuration ....................................................................................... 1
1.1
Scope................................................................................................................................ 1
1.2
Document History ........................................................................................................... 1
1.3
Table Of Contents ........................................................................................................... 2
1.4
Supported Operating Systems ...................................................................................... 3
1.5
Hardware and Software Requirements ......................................................................... 3
1.6
Installation of Oracle 8i (v8.1.7) for a Synapse Database Server............................... 3
1.6.1
Oracle 8i (v8.1.7) Installation ..................................................................................... 3
1.6.1.1 Autorun............................................................................................................................... 4
1.6.1.2 Welcome Window .............................................................................................................. 4
1.6.1.3 File Locations ..................................................................................................................... 5
1.6.1.4 Available Products.............................................................................................................. 5
1.6.1.5 Installation Types ............................................................................................................... 6
1.6.1.6 Available Product Components .......................................................................................... 6
1.6.1.7 Component Locations......................................................................................................... 7
1.6.1.8 Create Database .................................................................................................................. 8
1.6.1.9 Summary Window.............................................................................................................. 8
1.6.1.10
Install .............................................................................................................................. 9
1.6.1.11
Net8 Configuration Assistant.......................................................................................... 9
1.6.1.12
End of Installation......................................................................................................... 10
1.7
Installation Oracle 8.1.7.4 and 8.1.7.4.4 “Patches” (Database Server & Client) ..... 11
1.7.1
Copy Orapatch8174 Folder ..................................................................................... 11
1.7.2
Stop Services, Tools and the Following Programs.................................................. 12
1.7.3
Installation of Oracle 8.1.7.4 “Patch” (No database) ............................................... 13
1.7.4
Installing Oracle 8.1.7.4 & 8.1.7.4.4 Patches on An Existing Database Server ...... 13
1.7.5
Installation of Oracle 8.1.7.4.4 “Patch” .................................................................... 14
1.7.6
Verification of Oracle 8.1.7.4.4 “Patch”.................................................................... 14
1.8
ORACLE 8i (v8.1.7) Client Installation ........................................................................ 15
1.8.1
Autorun .................................................................................................................... 15
1.8.2
Welcome Window .................................................................................................... 15
1.8.3
File Locations........................................................................................................... 15
1.8.4
Available Products ................................................................................................... 15
1.8.5
Installation Types ..................................................................................................... 16
1.8.6
Available Product Components ............................................................................... 16
1.8.7
Component Locations .............................................................................................. 17
1.8.8
Oracle Product Support ........................................................................................... 17
1.8.9
Summary Window.................................................................................................... 18
1.8.10 Configuration Assistant ............................................................................................ 18
1.8.11 Create Service Name............................................................................................... 19
1.8.12 Oracle Database or Service..................................................................................... 19
1.8.13 Service Name .......................................................................................................... 20
1.8.14 Network Protocol...................................................................................................... 20
1.8.15 Host Name ............................................................................................................... 21
1.8.16 Net8 Test ................................................................................................................. 21
1.8.17 Net Service Name.................................................................................................... 22
1.8.18 Another Service Name............................................................................................. 22
1.8.19 Net Service Name.................................................................................................... 23
1.8.20 Net8 Configuration ................................................................................................... 23
1.8.21 End of Client Installation .......................................................................................... 24
1.8.22 Install Oracle 8.1.7.4 & 8.1.7.4.4 Patch ................................................................... 25
Proprietary Information
FUJI Medical Systems USA
SYNAPSE Service Guide Synapse Oracle 8i (v8.1.7) Installation & Configuration.doc
Page 2 of 25
Synapse Service Manual
Version 3.2
Saved Date 9/9/2002 5:10 PM
1.4
Supported Operating Systems
Oracle8i server and client software operates on a personal computer (PC) running the following Microsoft
Operating Systems:
OS
Types
Windows 2000
Windows 2000 Professional
Windows 2000 Server
Windows 2000 Advanced Server
Windows 2000 Data Center
Windows NT Workstation 4.0
Windows NT Server 4.0
Windows Server Enterprise Edition 4.0
Windows NT 4.0
Windows 95
Windows 98
1.5
Oracle8i
Server
Software
YES
YES
YES
YES
YES
YES
YES
NO
NO
Oracle8i
Client
Software
YES
YES
YES
YES
YES
YES
YES
YES
YES
Hardware and Software Requirements
Please refer to the Software Release Specification document for information on how to configure the
hardware and software for this system.
1.6
Installation of Oracle 8i (v8.1.7) for a Synapse Database Server
Following are the steps for installing Oracle8i (v8.1.7) server. This must be followed by the installation of
the Oracle8i Release 3 patch (v8.1.7.4.4) in Section 1.7.
1.6.1 Oracle 8i (v8.1.7) Installation
This section describes the installation of Oracle 8i (v8.1.7) on a machine intended for use as a Synapse
database server.
FOR INSTALLATIONS ON MACHINES WITH INTEL PENTIUM P4 PROCESSORS ONLY:
If installing onto a machine with an Intel P4 Processor, the Oracle Universal Installer (OUI) will
not start when attempting to install Oracle 8i. The following steps must be performed prior to
successfully run the OUI and install Oracle 8i:
•
•
•
•
•
•
•
•
Create a temporary directory on the server hard drive
Copy the entire Oracle 8i CD to the temporary directory
Search the copied Oracle 8i folders for the file symcjit.dll
Remove the Read-Only attribute for each instance of symcjit.dll. Right-click on the
highlighted file and uncheck the Read-Only attribute box at the bottom of the window of
the General tab.
Rename each instance of symcjit.dll to symcjit.old
Run Setup.exe from the temporary directory using the copy on the hard drive
Follow the instructions below beginning with the last part of Step 1: “Click on
Install/Deinstall Products option.”
After the successful installation of Oracle 8.1.7, delete the contents of the temporary
directory.
Proprietary Information
FUJI Medical Systems USA
SYNAPSE Service Guide Synapse Oracle 8i (v8.1.7) Installation & Configuration.doc
Page 3 of 25
Synapse Service Manual
Version 3.2
Saved Date 9/9/2002 5:10 PM
1.6.1.1 Autorun
Insert the Oracle 8i Installation CD and allow the Autorun to start. The screen below will come up on the
screen. If the Autorun does not execute navigate to the CD drive and run the autorun.exe from Autorun
directory of your CD drive. For instance, if Drive E is your CD drive, you can execute like the following in
the Start, Run command:-E:\autorun\autorun.exe.
In the Oracle8i window above, click on “Install/Deinstall Products” option.
1.6.1.2 Welcome Window
Next the Welcome window below will show. Click on “Next” to begin the installation.
Proprietary Information
FUJI Medical Systems USA
SYNAPSE Service Guide Synapse Oracle 8i (v8.1.7) Installation & Configuration.doc
Page 4 of 25
Synapse Service Manual
Version 3.2
Saved Date 9/9/2002 5:10 PM
1.6.1.3 File Locations
In the File Locations window below, there are two headers named “Source…” and “Destination…”
Do not change the information under the “Source…” heading; however do change the “Destination…”
section with the following:
Name:
Path*:
OraHome81
D:\Oracle\Ora81
Then click on “Next” button
*Note: The path must set to D:\Oracle\Ora81.
1.6.1.4 Available Products
In the Available Products window below, select the Oracle 8i 8.1.7.0.0 option and Click on the “Next”
button.
Proprietary Information
FUJI Medical Systems USA
SYNAPSE Service Guide Synapse Oracle 8i (v8.1.7) Installation & Configuration.doc
Page 5 of 25
Synapse Service Manual
Version 3.2
Saved Date 9/9/2002 5:10 PM
1.6.1.5 Installation Types
In the Installation Types window below, select the Custom option and Click on the “Next” button.
In the Available Product Components window, choose the Oracle Universal Installer option and click
on “Next” button. This option can be found near the end of the components list.
1.6.1.6 Available Product Components
In the following Available Product Components windows, do the following:
Deselect the Oracle HTTP Server component
Expand Oracle Installation Products (following page) options and Select Oracle
Universal Installer at the end of the list and click on “Next” button
Proprietary Information
FUJI Medical Systems USA
SYNAPSE Service Guide Synapse Oracle 8i (v8.1.7) Installation & Configuration.doc
Page 6 of 25
Synapse Service Manual
Version 3.2
Saved Date 9/9/2002 5:10 PM
1.6.1.7 Component Locations
In the Component Locations window below, make sure that there is enough space on the hard drive for
the install then click on “Next.”
Proprietary Information
FUJI Medical Systems USA
SYNAPSE Service Guide Synapse Oracle 8i (v8.1.7) Installation & Configuration.doc
Page 7 of 25
Synapse Service Manual
Version 3.2
Saved Date 9/9/2002 5:10 PM
1.6.1.8 Create Database
In the Create Database window below, select No and click on the “Next” button.
1.6.1.9 Summary Window
The Summary window below shows all the products that will be installed. In the Summary window
below, click on the “Install” button.
Proprietary Information
FUJI Medical Systems USA
SYNAPSE Service Guide Synapse Oracle 8i (v8.1.7) Installation & Configuration.doc
Page 8 of 25
Synapse Service Manual
Version 3.2
Saved Date 9/9/2002 5:10 PM
1.6.1.10 Install
The Install window below shows the progress of the installation. This window will automatically invoke
the Net8 Configuration Assistant window.
1.6.1.11 Net8 Configuration Assistant
On the Net8 Configuration Assistant: Welcome window, check the box next to the Perform typical
configuration and click on “Next.”
Proprietary Information
FUJI Medical Systems USA
SYNAPSE Service Guide Synapse Oracle 8i (v8.1.7) Installation & Configuration.doc
Page 9 of 25
Synapse Service Manual
Version 3.2
Saved Date 9/9/2002 5:10 PM
1.6.1.12 End of Installation
In the End of Installation window, click on “Exit.”
In the Exit window below, click on “Yes” to answer the question “Do you want to exit?”
This is the end of the Oracle 8i (v8.1.7) installation. Please reboot your machine
before working with Oracle 8i (v8.1.7).
Proprietary Information
FUJI Medical Systems USA
SYNAPSE Service Guide Synapse Oracle 8i (v8.1.7) Installation & Configuration.doc
Page 10 of 25
Synapse Service Manual
Version 3.2
Saved Date 9/9/2002 5:10 PM
1.7
Installation Oracle 8.1.7.4 and 8.1.7.4.4 “Patches” (Database Server & Client)
After the installation of Oracle 8i (8.1.7), the Oracle 8i Release 4 Patch (v8.1.7.4.4) should be installed.
Following are the steps for installing.
Note: There are no issues with installing the Oracle 8.1.7.4 and 8.1.7.4.4
“Patches” over Oracle 8.1.7.3 “Patch.
1.7.1
Copy Orapatch8174 Folder
Copy the Orapatch8174 folder from Synapse Oracle 8.1.7.4 Patch CD (FUJIFILM’s part number NMFSCD-OR817-P4) onto the ROOT of the D drive (if copied from a CD change the Read-only attribute for
all files and subdirectories by running: attrib /s -r *.* from the command prompt at the root of the
temporary Orapatch817 directory). Do not execute Oracle patch directly from the Synapse Oracle 8.1.7.4
Patch CD FUJIFILM Part Number NMFS-CD-OR817-P4.
Proprietary Information
FUJI Medical Systems USA
SYNAPSE Service Guide Synapse Oracle 8i (v8.1.7) Installation & Configuration.doc
Page 11 of 25
Synapse Service Manual
Version 3.2
Saved Date 9/9/2002 5:10 PM
1.7.2
1.
Stopping of Services, Tools and the Programs
Stop the following services and place them in manual mode:
Note: Take care in keeping good notes regarding what services are being set to manual mode. At the
end of the upgrade they will need to be set back to Automatic.
1.
2.
3.
4.
OracleOraHome81TNSListener
OracleServiceFOOD (For existing database only)
Other Oracle Services (if started)
All Synapse Service (normally these service should have not been installed before the
database was created)
Note: Not all services may be installed or running on the system being upgraded, the list provided bellow
is a complete list of FUJIFILM service for the installer’s reference.
a.
b.
c.
d.
e.
f.
g.
BrokerServer
DicomServer
FujiDBUtility
HIISRouter
SynapseHIIS
SynapsePreCacheServer
etc…
5.
6.
FTP Publishing Service
IIS Admin Service (The following services will be stop as a result of stopping the IIS Admin
Service. This should be confirmed.)
a. Simple Mail Transport Protocol (SMTP) Service
b. World Wide Web Publishing Service
7. Distributed Transaction Coordinator
8. Stop Oracle Backup tool (if running, after the restart of the computer)
9. Stop any third party tools accessing Oracle Database (if running)
10. Stop Anti-Virus software
11. Stop IPSentry
12. Stop pcAnywhere Host Service
2.
Once the above is completed restart the server
Proprietary Information
FUJI Medical Systems USA
SYNAPSE Service Guide Synapse Oracle 8i (v8.1.7) Installation & Configuration.doc
Page 12 of 25
Synapse Service Manual
Version 3.2
Saved Date 9/9/2002 5:10 PM
1.7.3
Installation of Oracle 8.1.7.4 “Patch” (Database Server & Client)
•
•
•
•
Navigate to D:\Orapatch8174\Patch_1\Disk1 folder
Run the Setup.exe
Select the Next button on the Welcome Screen
The Oracle Universal Installer automatically will identify Source… And Destination… File
Locations, Select the Next button on this screen
Select the Install button on the Summary Screen
Select the Exit button the End of Installation Screen.
•
•
1.7.4
Installing Oracle 8.1.7.4 (Database)
This section must be complete only if the database was already created using Oracle 8.1.7 only.
Complete section 1.7- 1.7.2 then follow along bellow.
•
•
•
•
•
•
•
•
•
•
Navigate to ORAPATCH8174\Patch_1\Disk1 folder.
Execute setup.exe.
Click Next on Welcome Screen
The Oracle Universal Installer automatically will identify Source… And Destination… File
Locations, Select the Next button on this screen
Select the Install button on the Summary Screen
Select the Exit on End of Installation Screen.
Start the following services:
o OracleOraHome81TNSListener
o OracleServiceFOOD
Navigate to D:\Orapatch8174\PATCH_1\Database folder in local hard disk
Execute Load_catalog_catproc.bat
Complete section 1.7.5 – 1.7.6 from the chapter.
Proprietary Information
FUJI Medical Systems USA
SYNAPSE Service Guide Synapse Oracle 8i (v8.1.7) Installation & Configuration.doc
Page 13 of 25
Synapse Service Manual
Version 3.2
Saved Date 9/9/2002 5:10 PM
1.7.5
Installation of Oracle 8.1.7.4.4 “Patch” (Database Server & Client)
Proprietary Information
FUJI Medical Systems USA
SYNAPSE Service Guide Synapse Oracle 8i (v8.1.7) Installation & Configuration.doc
Page 14 of 25
Synapse Service Manual
Version 3.2
Saved Date 9/9/2002 5:10 PM
1.8
ORACLE 8i (v8.1.7) Client Installation
Note: To keep this segment compact, these instructions will reference screen shots that were in
Section 1.6: Oracle 8i for Database Server (Synapse).
1.8.1 Autorun
Insert the Oracle 8i Installation CD and allow the Autorun to start. If the Autorun does not execute
navigate to the CD drive and run the autorun.exe from the Autorun directory or run setup.exe from the
root of the CD. Autorun.exe brings up the Oracle 8i window and setup.exe brings up the Welcome
window. In the Oracle 8i window, click on the “Install/Deinstall Products” button. Please refer to figure
in Section 1.6.1.1.
1.8.2
Welcome Window
In the Welcome window, click on the “Next” button. Please refer to the figure in Section 1.6.1.2.
1.8.3
File Locations
In the File Locations window, there are two headers, namely “Source…” and “Destination…” Do not
change the “Source…” information; however do change the “Destination…” section with the following.
Under the Destination header enter/select:
Name: OraHome81
Path : D:\Oracle\Ora81
Then click on “Next” button. Please refer to the figure in Section 1.6.1.3.
1.8.4
Available Products
In the Available Products window, select the Oracle 8i Client 8.1.7.0.0 option and click on the “Next”
button.
Proprietary Information
FUJI Medical Systems USA
SYNAPSE Service Guide Synapse Oracle 8i (v8.1.7) Installation & Configuration.doc
Page 15 of 25
Synapse Service Manual
Version 3.2
Saved Date 9/9/2002 5:10 PM
1.8.5
Installation Types
In the Installation Types window below, select the Custom option and click on “Next”.
1.8.6
Available Product Components
In the Available Product Components window below, scroll down to and expand the Oracle Installation
Products component, choose the Oracle Universal Installer, and click on “Next” button. This option can
be found near the bottom of the components list.
Proprietary Information
FUJI Medical Systems USA
SYNAPSE Service Guide Synapse Oracle 8i (v8.1.7) Installation & Configuration.doc
Page 16 of 25
Synapse Service Manual
Version 3.2
Saved Date 9/9/2002 5:10 PM
1.8.7
Component Locations
The next Component Locations window will show available disk space and the required disk space.
Make sure that there is enough disk space and click on “Next” button.
1.8.8
Oracle Product Support
In the next Oracle Protocol Support window, don’t select anything. Click on “Next”.
Proprietary Information
FUJI Medical Systems USA
SYNAPSE Service Guide Synapse Oracle 8i (v8.1.7) Installation & Configuration.doc
Page 17 of 25
Synapse Service Manual
Version 3.2
Saved Date 9/9/2002 5:10 PM
1.8.9
Summary Window
In the Summary window below, click on “Install.”
1.8.10 Configuration Assistant
In the Net8 Configuration Assistant window below, please check the Perform typical configuration option
and click on the “Next” button.
Proprietary Information
FUJI Medical Systems USA
SYNAPSE Service Guide Synapse Oracle 8i (v8.1.7) Installation & Configuration.doc
Page 18 of 25
Synapse Service Manual
Version 3.2
Saved Date 9/9/2002 5:10 PM
1.8.11 Create Service Name
In the Net8 Configuration Assistant window below, choose No and click on the “Next” button.
1.8.12 Oracle Database or Service
In the Net8 Configuration Assistant window below, please select Oracle 8i database or service and click
on the “Next” button.
Proprietary Information
FUJI Medical Systems USA
SYNAPSE Service Guide Synapse Oracle 8i (v8.1.7) Installation & Configuration.doc
Page 19 of 25
Synapse Service Manual
Version 3.2
Saved Date 9/9/2002 5:10 PM
1.8.13 Service Name
Enter FOOD.WORLD as the Service Name and click on the “Next” button.
1.8.14 Network Protocol
In the following Net8 Configuration Assistant window, select TCP as the network protocol to connect to
the database with. Click on “Next” button.
Proprietary Information
FUJI Medical Systems USA
SYNAPSE Service Guide Synapse Oracle 8i (v8.1.7) Installation & Configuration.doc
Page 20 of 25
Synapse Service Manual
Version 3.2
Saved Date 9/9/2002 5:10 PM
1.8.15 Host Name
Enter the Host Name of the database server and leave the default “Use the standard port number of 1521.”
Then click on the “Next” button.
1.8.16 Net8 Test
Choose No, do not test option and click on the “Next” button.
Proprietary Information
FUJI Medical Systems USA
SYNAPSE Service Guide Synapse Oracle 8i (v8.1.7) Installation & Configuration.doc
Page 21 of 25
Synapse Service Manual
Version 3.2
Saved Date 9/9/2002 5:10 PM
1.8.17 Net Service Name
In the following window, ensure the Net Service Name is “food” and click “Next.”
1.8.18 Another Service Name
In the following window, select No and click on “Next.”
Proprietary Information
FUJI Medical Systems USA
SYNAPSE Service Guide Synapse Oracle 8i (v8.1.7) Installation & Configuration.doc
Page 22 of 25
Synapse Service Manual
Version 3.2
Saved Date 9/9/2002 5:10 PM
1.8.19 Net Service Name
In this window click on “Next” to finish.
1.8.20 Net8 Configuration
I the following window, click on “Finish.”
Proprietary Information
FUJI Medical Systems USA
SYNAPSE Service Guide Synapse Oracle 8i (v8.1.7) Installation & Configuration.doc
Page 23 of 25
Synapse Service Manual
Version 3.2
Saved Date 9/9/2002 5:10 PM
1.8.21 End of Client Installation
This is the end of the Oracle8i Client installation. In the following window, click on “Exit.”
Finally, click on “Yes” to exit from the installation program.
Once the Oracle 8i client is installed, navigate to the D:\ORACLE\ORA81\NETWORK\ADMIN folder,
and edit SQLNET.ORA and TNSNAMES.ORA in Notepad for the files given below:
1.
In the SQLNET.ORA file, make sure that the domain entry looks like the following:
NAMES.DEFAULT_DOMAIN = WORLD
2.
In the TNSNAMES.ORA, the FOOD connection string is created by default as:
FOOD.<machine name>
This must be edited to show as the following:
FOOD.WORLD
Note: This means that you can access your database as the service = Food instead of service =
FOOD.WORLD.
This is the end of the Oracle8i (v8.1.7) Client installation. Please restart the system.
Proprietary Information
FUJI Medical Systems USA
SYNAPSE Service Guide Synapse Oracle 8i (v8.1.7) Installation & Configuration.doc
Page 24 of 25
Synapse Service Manual
Version 3.2
Saved Date 9/9/2002 5:10 PM
1.8.22 Install Oracle 8.1.7.4 & 8.1.7.4.4 Patch
Note: This upgrade is mandatory for all Oracle installations Client and Database Server. Follow the
instructions given in section 1.7 throw 1.7.5 found within this chapter for completing the Installation of
Oracle 8.1.7.4 and 8.17.4.4 Patches.
(End of section)
Proprietary Information
FUJI Medical Systems USA
SYNAPSE Service Guide Synapse Oracle 8i (v8.1.7) Installation & Configuration.doc
Page 25 of 25