1
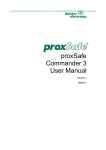
Installation Instructions For:
Part Number GDK20 for K20 engines
and GDK24 for K24 engines
into 2007 Honda Fit
Hasport Performance mounts are the result of extensive research and engineering. All
mounts are designed with up to date solid modeling software. Each mount is constructed of
lightweight 6061-T6-billet aluminum and CNC machined in our state of the art machining
facility. Hasport Performance motor mounts control engine movement, transferring more
power to the wheels. All mounts and brackets have a limited lifetime warranty against any
defects. Warranty information is printed on the back of this instruction booklet.
Please read all instructions before proceeding with the installation
GDK20 - GDK24
WARNING:
This is a complicated engine swap.
If you have never
performed an engine swap before, Hasport recommends that
you have this swap performed by a competent shop. The Kseries engines are much larger than the stock L-series. To
eliminate clearance issues the engine bay needs to be modified
by cutting away some of the sheet metal. Measurements given
are general and due to tolerance differences adjustments may
need to be made.
List of Parts included in this kit:
Quantity
Description
1
Billet Aluminum Upper Engine Mount Bracket
1
1
1
1
1
Steel Left Transmission Bracket
Steel Rear Transmission Bracket
Left Bracket Hardware
Right Bracket Hardware
Rear Bracket Hardware
INSTALLATION INSTRUCTIONS
HASPORT
PERFORMANCE
Extra Tools Required for this Swap
2.5 inch hole saw or Die Grinder with Cut-off Wheel & Sanding Disk, Hammer (BFH), Pry-bar,
Hose-Clamp Pliers, Sharpie® Marker, Two Post Automotive Lift
Additional Recommended Items
Factory Service Manuals for 2007 Honda Fit.
(Available from www.helminc.com or Honda/Acura Dealer)
Patience
Please read all instructions before proceeding with the installation
This is a complicated engine swap requiring modifications to the car. If you have never performed an engine swap before, Hasport
recommends that you have this swap performed by a competent shop. These instructions pertain ONLY to the ENGINE
MOUNTING of a K-Series motor into a GD Fit chassis. There are still many other parts that will be needed for proper operation.
These parts are under development by Hasport and other companies. Due to the sophisticated electronics of the Fit, use of a K-series
ECU results in the throttle by wire, HVAC and dash instruments ceasing to work. Hondata hopes to release a Fit/K-Pro adapter
harness to help with this problem in the near future. At the time of the Kits release the best bet is to run a stand alone K-series ECU
and gauges to give you the necessary information for vehicle operation.
Although our kit will allow the mounting the K-series transmissions from the 02-up RSX, 03 –05 Civic Si and 06 up Civic Si the
shifters and /or cables will have to be highly modified. We are currently working on these issues and will release products as soon as
they are available. This is for off-road use only.
A general list of additional parts needed for the K-Series swap in the 2007 Fit is listed below.
Quantity
Description
1
1
1
1
1
1
1
1
Hasport GDK20 or GDK24 Bolt In Mount Kit (This Kit)
K20 Manual Transmission Intermediate Shaft (from Civic or RSX)
Hasport GDKAX Axle Set
K-Series Engine complete with alternator
K20 Transmission from 03-06 Civic Si or 01-06 RSX
K-Series ECU and engine harness
12” Electric radiator cooling fan (2 if using AC)
K20 Fit Swap header
Removing the Engine: (Save all Bolts, You will Need Most of Them!)
1. Discharge R134A from AC system. Disconnect the hoses from the compressor. You will be removing the compressor with the
engine. (Have a professional evacuate your system.)
2. Follow the Fit Service Manual instructions for removing the engine. Although the Fit Service Manual shows a hoist being used
to support the engine from the top while also using a chassis lift, this process can be simplified. Instead, use a flat surface at
least 10 inches tall to support the engine from underneath while unbolting it from the vehicle. After it is unbolted use the lift
to raise the chassis off the engine. One key point to pay attention to, is to remove the front suspension crossmember while
leaving the steering rack in the vehicle. It’s very difficult to remove or install the new engine with the crossmember in place.
When you are done removing the engine, remove the clutch slave cylinder by disconnecting the fitting where the slave
cylinder hard line connects to the soft line from the clutch dampener. You will be using the K-series clutch slave and hard
line with the K-series engine and transmission.
Preparing the Engine Bay:
1.
If you have not already done so, remove the front bumper fascia, the condensor with
its associated hoses and the radiator and fans. See the Fit Service Manual for
Fit service manual pages:
20-113, 10-10, 21-49
instructions on removing these items.
2.
As shown in the picture, the brake lines and AC line run inside the frame rail and
will prevent the engine from fitting. The AC line will need to be removed. Custom
AC lines can be made if you wish to use air conditioning.
3.
By removing the plastic anchor clips and gently bending the brake lines they can be
moved to the area above the frame rail and allow for clearance with the K-series
engine.
4.
The ABS Modulator-control unit will also interfere with the K-series engine idler
pulley and tension pulley. Tuck the ABS unit under the frame near the headlamp to
clear the engine.
5.
Brackets will have to be made to hold the ABS unit away from the engine. We opted
to modify the stock bracket.
6.
Clearance needs to be made on the chassis frame rail to make room for the
transmission case. As shown in the photo of the driver’s side frame rail, measure
10.5 inches back from the bulkhead and cut a notch 2.5 inches in diameter. A hole
saw or die grinder can be used to make the hole. You can double-check your notch
by lowering the car on top of the engine and checking the clearance. The notch
should only be about .25 to .375 inches deep. Make sure you reinforce the frame rail
after you have removed the material!
7.
The engine mount will also need to be trimmed. Trim the metal that hangs down in
to the opening you just made in the frame rail.
8.
The core support sheet metal will need to be notched to clear the intake manifold.
You will need to lower the car over the engine to see where the core support will
interfere with the manifold. Make sure you have at least 1 inch of distance between
the manifold and the core support sheet metal. This is necessary to prevent the intake
manifold from coming into contact with the core support under acceleration.
Preparing the Motor:
1.
Remove all brackets and mounts from the K-series engine. You will be using the
Hasport brackets in their place.
2.
Remove the alternator and AC compressor from the K-series engine. These will be
reinstalled after the engine is in.
3.
Because of the Fit’s small engine bay only the snail style intake manifold will fit
without major modification to the core support and radiator. That manifold comes on
the following US engines, K20A3 from 2003-2005 Civic Si, K20A2 and K20Z1
from RSX Type S. A slightly better version of this manifold comes on the K20A
from the Japanese Civic Type R and Integra Type R with K20A motors. The
manifold can also be bolted onto the K24A1 with no modification. You can also use
the stock fuel injectors and fuel rail.
WARNING: The snail style manifold will interfere with the alternators from
the Accord, TSX and 06-07 Civic Si. An alternator from a 02-05 Civic, RSX or
CR-V must be used.
4.
If your engine is one of the following engines, K24A2, K20Z3, or K24A4, you will
need the Hasport Intake adapter to bolt the snail style manifold on. This adapter is to
bypass coolant through the head while the thermostat is closed during warm up.
5.
Cable operated throttle bodies should be removed from the manifold to prevent
possible damage to the TPS or EICV while installing the motor.
6.
Bolt the Hasport right-hand engine bracket to the block. Using two of the stock bolts
and one of the Hasport supplied bolts.
7.
Install the wiring harness on the engine. Make sure you connect the ground wire
securely to the engine. Failure to properly connect the ground may result in
damage to the ECU. You can read more about this by visiting this link:
http://www.hondata.com/techk20ground.html
8.
Install the intermediate shaft on the block with the proper Honda hardware. Use an
intermediate shaft from the K20 powered Civic or RSX. The intermediate shaft from
the Accord or TSX picture on top,is too long. The bottom two intermediate shafts
are the correct size. The intermediate shafts can be differentiated by reading the
numbers cast into the bearing carrier. The following will work:
6MN
S5T30
SNG30
9.
The right-hand engine mount from the Fit will need to be modified for clearance.
Grind down the small nub on the top near the upright stud. Notch the mount on the
forward inside edge as shown in the picture.
10.
Your engine and transmission should be bolted together already. Remove the bottom
bolt on the backside of the engine that holds the transmission and engine together.
We will install the bolt through the Hasport rear bracket later, when the engine is in
the car.
Installing the Motor:
1.
Place the engine and transmission on an engine stand or cart positioned under the
vehicle. Make the engine as level as possible on the cart, it will help aid installation.
2.
Lower the car slowly taking care not to hit the engine on the way down. Keep close
watch on the VTEC solenoid on the rear of the engine and the clutch actuator fork
and slave cylinder on the front of the transmission. You may need to twist the engine
while lowering the car to avoid contact. This is a two-man job.
3.
Once the car has been lowered and the engine is within a few inches of where the mounts are, install the left-hand transmission
bracket using the Hasport hardware. You will place a spacer under the bracket on the outside rear mount hole so the bracket
mounts flush. Leave the bolts finger tight at this time. Continue to lower the car until you can bolt the transmission bracket to
the mount. Use the stock bolt and Hasport supplied nylon lock nut.
4.
Put the passenger side mount in the frame rail. Without putting on the top of the
mount, insert a couple of the bolts in to keep the mount in its position.
5.
Install the Hasport right-hand bracket top on the mount and bolt it to the Hasport
engine bracket using the two socket head cap provided by Hasport. Make sure the
two Hasport parts are square to each other and torque the bolts to 45 lbs. Next torque
the passenger side bracket top to the engine mount using the stock nut. Now install
the top of the mount and torque the bolts to the factory specifications using the stock
hardware.
6.
Torque the right (driver side) mount and transmission bracket bolts to the factory specifications.
Mount / Bracket
Torque Specification (lbf-ft)
Hasport Bracket Top to Hasport Engine
Bracket
Hasport Transmission Bracket to
Transmission
Hasport Transmission Bracket to
Transmission Mount
Engine Bracket Top to Right Mount
Right Mount to Framerail
12mmsocket head cap screw to 45
40
33
40
3-10mm bolts to 43, 1-8mm bolt to16
7.
Lift the car and install the Fit K20 engine swap header using the stock hardware.
8.
Bolt the front suspension subframe to the car. At this time don’t attach the lower
control arms to the knuckles. Bolt the steering rack and gearbox back to the
subframe.
9.
Bolt the rear mount to the Hasport bracket using the stock rear mount bolt and
Hasport provided nylon lock nut. Leave it finger tight for now. Now install the
bracket and mount into the subframe together as a unit. You may need to lift the
front of the engine to make room for both parts to be installed and line up properly.
Install the rear mount using the factory hardware. Don’t tighten at this time.
No Image available
10.
Next bolt the Hasport rear bracket to the engine and transmission. The front hole
will use the stock bolt we removed in Step 10 while preparing the motor. The other
two holes will use the Hasport provided hardware. Once all three bolts are in, torque
to 47 lbf-ft. Torque the rear mount hardware to 43lbf-ft. Next torque the bolt holding
the rear bracket to the rear mount to 51 lbf-ft.
11.
Install the K-series Fit swap axles and torque axles nuts to 134 lbf-ft
12.
Reconnect the lower control arms and the steering linkage to the knuckles.
13.
While the car is still in the air, go ahead and install the shifter cables. They should
pass down through the car’s floor slightly ahead of the shift mechanism and then up
over the rack and to the right of the rear mount and up behind the motor.
14.
Lower the car and connect the shift linkage to the transmission.
15.
Feed the wiring harness in through the firewall where the original Fit harness went.
16.
Install the throttle body and connect the wiring to the appropriate connectors.
17.
Connect the clutch line, fuel line, vacuum line to the brake booster, and purge
canister line.
18.
Install one or two 12” cooling fans on the front of the Fit radiator and install it into
the vehicle. The driver side radiator mount should bolt up normally. The passenger
side mount will require modification to use. The upper and lower radiator hose
configuration will vary depending on which engine you are using. For our K20Z3
we used a 94 GSR lower hose and cut two sections from it to fit the upper and lower
fittings.
19.
Bolt the battery box and battery into the car and connect the cables to the battery and
the wiring harness to the Fuse box. Reconnect the ground cables to the engine and
chassis
20.
Make sure the fans are connected to the Fit harness and wired to turn the correct
way. Install the front bumper fascia.
21.
Fill the engine, transmission and radiator with the appropriate fluids.