1
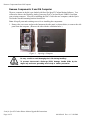
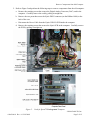
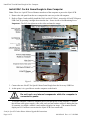
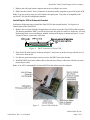
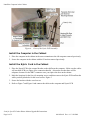
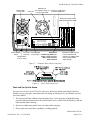
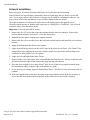
Deluxe Motion Upgrade Kit Instructions
040-0206-01 Rev. A
¾ Read this manual before use.
¾ Keep this manual with the machine at all times.
www.globalvr.com
http://service.globalvr.com
[email protected]
Phone: 408.597.3435
Fax: 408.597.3437
© 2008 Electronic Arts Inc. Electronic Arts, EA, the EA logo and Need for Speed are trademarks or registered trademarks of Electronic Arts Inc. in the U.S. and/or other countries. All Rights
Reserved. RenderWare is a trademark or registered trademark of Criterions Software Ltd. Portions of this software are Copyright 1998-2008 Criterion Software Ltd. and its Licensors. Aston Martin,
DB9 and the Aston Martin logo are trademarks owned and licensed by Aston Martin Lagonda © 2008 Aston Martin Lagonda. Trademarks, design patents and copyrights are used with the approval
of the owner AUDI AG. The BMW logo, wordmark and model designations are trademarks of BMW AG and are used under license. DaimlerChrysler, Three Pointed Star in a Ring and Three Pointed
Star in a Laurel Wreath and Mercedes-Benz are Trademarks of and licensed courtesy of DaimlerChrysler AG and are used under license to Electronic Arts. Dodge and HEMI are trademarks of
Chrysler LLC. Dodge Viper SRT10, Dodge Challenger Concept, Dodge Challenger, Dodge Charger SRT8, Dodge Charger R/T and their trade dress are used under license by Electronic Arts ©
Chrysler LLC 2008. Chrysler® Hemi® 300C® SRT8 and its trade dress are trademarks of Chrysler LLC and are used under license. © Chrysler LLC 2008 Chrysler® is a registered trademark of
Chrysler LLC. Plymouth® Hemi® Cuda, Road Runner and their trade dresses are used under license from Chrysler. © Chrysler LLC 2008. Alfa Romeo is a registered trademark owned by Fiat Auto
S.p.A. Under license from Fiat Auto S.p.A. Ford Oval and nameplates are registered trademarks owned and licensed by Ford Motor Company. Shelby® and GT-500® are registered trademarks and
intellectual property of Carroll Shelby and Carroll Shelby Licensing Inc. and are used under license. Jaguar, XK and the Leaper Device are trademarks owned and licensed by Jaguar Cars Limited ©
2008 Jaguar Cars Limited. General Motors Trademarks used under license to Electronic Arts. The trademarks Lamborghini, Gallardo, Murciélago and all associated logos are used under license of
Lamborghini ArtiMarca S.p.A., Italy. Elise, Europa S, Lotus and Lotus Round Device are registered trade marks of Group Lotus plc. Mazda, Mazdaspeed, RX-8, RX-7, Mazdaspeed3 and all other
associated marks, emblems and designs are used under approval of Mazda Motor Corporation. The McLaren name and logo are trademarks of McLaren Group Limited. Mitsubishi, Eclipse, and
Lancer Evolution names, emblems and body designs are trademarks and/or intellectual property rights of MITSUBISHI MOTORS CORPORATION and used under license to Electronic Arts Inc.
"NISSAN" and the names, logos, marks and designs of the NISSAN products are trademarks and/or intellectual property rights of NISSAN MOTOR CO., LTD. and used under license to Electronic
Arts Inc. Pagani, Zonda F and designs are trademarks and/or other intellectual property of Pagani Automobili and are used under license to Electronic Arts. Porsche, the Porsche crest, 911, Carrera
are registered trademarks of Dr. Ing. h.c. F. Porsche AG. Licensed under certain patents. RENAULT Official License Products are vehicle models and trademarks protected by intellectual property
laws. Used with permission from RENAULT. All rights reserved. SUBARU trademarks and body designs are properties of FUJI HEAVY INDUSTRIES, LTD. and used under license to ELECTRONIC
ARTS INC. Trademarks, design patents and copyrights are used with the permission of the owner VOLKSWAGEN AG. Toyota, Lexus, Supra, Corolla, MR2, Altezza, Sprinter TRUENO, IS300 and
associated symbols, emblems and designs are intellectual property of Toyota Motor Corporation and used with permission. Koenigsegg CCX names, emblems & body designs are trademark and/or
intellectual property rights of Koenigsegg Automotive AB and used under license to EA. Vauxhall, Monaro, all related Emblems, and vehicle model body design are Vauxhall Motor Company Limited
Trademarks used under license to Electronic Arts Inc. The names and logos of all after market car part companies are trademarks of their respective owners and are used by permission. CASTROL,
SYNTEC, UNLOCK THE POWER, GTX, MAXIMUM PROTECTION AGAINST SLUDGE BUILD UP and SYNTEC BLEND are trademarks of Castrol Ltd. Cooper and the Cooper Tires logo are trademarks of
Cooper Tire & Rubber Company. © 2008 Progressive Direct Insurance Company. All rights reserved. All other trademarks are the property of their respective owners. EA™ is an Electronic Arts™
brand.
GLOBAL VR and the GLOBAL VR logo are registered trademarks of Global VR, Inc. All other trademarks are the property of their respective owners.
U.S. Patent Nos. 5,269,687; 5,354,202; and 5,577,913 used under license from Midway Games West Inc.
Introduction
Table of Contents
Table of Contents...................................................2
Introduction........................................................2
Technical Support...............................................2
Upgrade Kit Contents.........................................3
Tools Required ...................................................3
Test and Clean Before Upgrade .........................3
Open Display Cabinet and Remove Computer ..3
Remove Components from Old Computer ........4
Install DAC Card & Game Dongle in New
Computer..................................................... 6
Install Nytric PCB in External Bracket .......... 7
Install the Computer in the Cabinet................... 8
Install the Nytric Card in the Cabinet................ 8
Test and Set Up the Game .............................. 9
Artwork Installation......................................... 10
Install the New Game Sign .............................. 12
Return old Game Dongle................................. 12
List of Figures
Figure 1. Opening a Computer .......................4
Figure 2. Need for Speed™
Underground Computer .......................5
Figure 3. New PC with DAC Card
Installed..................................................6
Figure 4. DB37 Connector on Nytric PCB ....7
Figure 5. Nytric PCB in Bracket ....................7
Figure 6. Parts of the Nytric PCB
Assembly ...............................................8
Figure 7. Computer Rear Panel
Connectors .............................................9
Figure 8. Nytric PCB Connectors ..................9
Figure 9. Graphics Placement ......................11
Figure 10. Applying Side Panel Graphics ....11
Introduction
This document describes the steps for upgrading a Need for Speed™ Underground Deluxe Motion
Cabinet to Need for Speed™ Carbon. The Upgrade Kit includes a new computer, Software,
Game Dongle, Artwork, and an external mounting bracket for the Nytric USB I/O PCB.
Need for Speed™ Carbon software requires a new computer. You will need to remove the DigitalAnalog Converter (DAC) card and Nytric USBI/O PCB from your existing computer.
Be sure to keep your Need for Speed™ Underground Operation and Service Manual for cabinet
setup, service, troubleshooting, parts, and general hardware reference information. Refer to the
Need for Speed™ Carbon Operation Manual from the kit for operation and game play
information, including detailed information on using the Operator Menus.
Technical Support
Need Help? Need a Part? Contact Technical Support:
Hours: 7:00AM–5:00PM Pacific Time, Monday–Friday
Phone: 408.597.3435
Fax: 408.597.3437
E-mail: [email protected]
Website: http://service.globalvr.com
Extended Service Hours: Monday–Friday 5pm—Midnight Pacific Time
Saturday & Sunday 7:00am—Midnight Pacific Time
Need for Speed™ Carbon Deluxe Motion Upgrade Kit Instructions
Page 2 of 12
040-0206-01 Rev. A 12/18/2008
Upgrade Kit Contents
Upgrade Kit Contents
•
New System Computer, Pre-Installed
with Need for Speed™ Carbon Motion
Software
•
System Recovery Disk (1 CD)
•
Motion Install Disk (1 CD)
•
Game Install Disk (1 DVD)
•
Game Dongle
•
Dongle Return Envelope
•
External Mounting Bracket for Nytric
PCB, with two (2) 4-40 screws and four
(4) wood screws
•
Documents:
− This Instruction Document
− Operation Manual
− Software Restore Guide
− Checklist for Optimal Cabinet Operation
•
Cabinet Artwork (see page 10)
•
New Game Sign
•
Serial Number Label
Note: Be sure to keep your Need for Speed™ Underground Operation and Service Manual for
cabinet setup, service, troubleshooting, parts, and general hardware reference information.
Tools Required
•
ESD-Protective Wristband or similar
•
Screwdriver with assorted Phillips & Torx® security bits (typically T-9, T-15, T-20, & T-25)
•
Squeegee for smoothing graphics
•
Exacto® Knife (or similar) and sharp blades
Test and Clean Before Upgrade
Installing new software will not fix existing hardware problems. Refer to the checklist included in
the kit, and perform the checks to make sure your cabinet is in optimal operating condition before
the upgrade. Refer to Chapter 5 of your Need for Speed™ Underground Operation and Service
Manual for detailed information and repair instructions.
Open Display Cabinet and Remove Computer
1. Turn off the game and disconnect both AC power cords from the back of the display cabinet.
2. Remove the rear panels and front access panel from the display cabinet.
3. Disconnect all of the cables from the back of the computer. Make sure they are labeled for easy
reconnection.
4. The computer is secured in place with a U-bracket. Remove the two (2) screws at each end of
the U-bracket and remove the bracket and the computer. Take the computer to a workbench.
040-0206-01 Rev. A 12/18/2008
©2008 Global VR, Inc.
Page 3 of 12
Remove Components from Old Computer
Remove Components from Old Computer
The new computer in the kit is pre-loaded with Need for Speed™ Carbon Motion Software. You
will need to remove the Digital to Analog Converter (DAC) Card and Nytric USBI/O Card from
your existing computer. You will be installing the DAC Card in the new computer, and the Nytric
Card in the external mounting bracket from the kit.
Note: Keep all posts and retaining screws for re-installing the components.
1. Remove the case screw and press the button on the side panel, as shown below, to remove the side
panel from the computer. (Remove the side with the ventilation holes.)
Figure 1.
Opening a Computer
Be very careful to avoid damaging the PCBs during handling!
CAUTION
To prevent electrostatic discharge (ESD) damage, handle PCBs by the
edges only and use a grounding wrist strap or similar precaution.
Need for Speed™ Carbon Deluxe Motion Upgrade Kit Instructions
Page 4 of 12
040-0206-01 Rev. A 12/18/2008
Remove Components from Old Computer
2. Refer to Figure 2 and perform the following steps to remove components from the old computer:
a. Remove the retaining screw that secures the Digital-Analog Converter (DAC) card in the
computer. Carefully remove the card by pulling it straight out.
b. Remove the two posts that secure the Nytric DB25 connector (on the Ribbon Cable) to the
back of the case.
c. Disconnect the Power Cable from the Nytric USB I/O PCB inside the computer.
d. Remove the retaining screw that secures the Nytric PCB in the computer. Carefully remove
the PCB by pulling it straight out.
Figure 2.
040-0206-01 Rev. A 12/18/2008
Need for Speed™ Underground Computer
©2008 Global VR, Inc.
Page 5 of 12
Install DAC Card & Game Dongle in New Computer
Install DAC Card & Game Dongle in New Computer
Note: There is a 4-pin PC Power Harness routed out of the computer to power the Nytric PCB.
1. Remove the side panel from the new computer the same way as the old computer.
2. Refer to Figure 3 and carefully install the DAC card in PCI Slot 1, next to the 4-Port PCI-Express
USB Card, by pressing it straight down into the slot. Secure it with a Card Retaining Screw.
Important: The PCI slot right next to the video card must be empty.
Figure 3.
New PC with DAC Card Installed
3. Connect the new Need™ for Speed Carbon Game Dongle from the kit to any USB Port.
4. At this point, it is a good idea to test the computer on the bench.
Do not touch any internal components while the computer is
connected to power.
WARNING
To test the computer, connect a computer power cord and power on the computer. Confirm
that all fans work (power supply, video card, and case fans) and no cables are hitting the fans.
If a monitor is available, connect it and confirm it displays an image. (The monitor should
display an I/O Card Error screen since the Nytric PCB is not connected.)
Need for Speed™ Carbon Deluxe Motion Upgrade Kit Instructions
Page 6 of 12
040-0206-01 Rev. A 12/18/2008
Install DAC Card & Game Dongle in New Computer
5. Replace the side panel on the computer and secure it with the case screw.
6. Make sure the 4-pin PC Power Connector is routed out of the computer to power the Nytric PCB.
Note: You may wish to keep your old computer for spare parts. The parts are compatible with
any Need™ for Speed Underground computer.
Install Nytric PCB in External Bracket
Perform the following steps to install the Nytric PCB in the external bracket. See Figure 6 to
identify parts of the Nytric PCB.
1. Remove the two posts from the faceplate that was used to secure the Nytric PCB in the computer.
The housing around the DB37 port will be loose once the posts are removed. Make sure you keep
the housing in the correct orientation, with the wider part facing up as shown in Figure 4, or you
will not be able to connect the cable later.
Figure 4.
DB37 Connector on Nytric PCB
2. Place the PCB in the bracket as shown in Figure 5, and secure it on the two legs with the two (2)
4-40 screws from the kit.
3. Use the two posts removed previously to secure the DB37 port to the bracket
4. Install the DB25 port on the ribbon cable to the bracket as shown, and secure with the two posts
removed previously.
Note: You will be mounting the bracket and PCB in the cabinet near the computer.
Figure 5.
040-0206-01 Rev. A 12/18/2008
Nytric PCB in Bracket
©2008 Global VR, Inc.
Page 7 of 12
Install the Computer in the Cabinet
Figure 6.
Parts of the Nytric PCB Assembly
Install the Computer in the Cabinet
1. Place the computer in the cabinet in the same orientation as the old computer removed previously.
2. Secure the computer in the cabinet with the U-bracket removed previously.
Install the Nytric Card in the Cabinet
1. Place the Nytric PCB in the external bracket on the shelf near the computer. Make sure the cables
will reach the PCB (see Figure 8 for connection details). Also make sure that there will be
adequate clearance for the DB37 connector once you replace the door on the cabinet.
2. Mark the locations for the four (4) mounting screws, and then remove the Nytric PCB and bracket
while you drill pilot holes for the wood screws. Figure 5
3. Secure the bracket with the wood screws.
4. Refer to Figure 7 and Figure 8 and connect the cables to the computer and Nytric PCB.
Need for Speed™ Carbon Deluxe Motion Upgrade Kit Instructions
Page 8 of 12
040-0206-01 Rev. A 12/18/2008
Install the Nytric Card in the Cabinet
Power Supply
Cooling Fan
Ethernet Port
For Cabinet Linking via
Case Fan LAN on Power Plate
DVI Port on Video Card
to Monitor HDMI Port
SCSI Port on DAC Card to
Data Distribution Box (DDB)
AC Power PS/2 Keyboard
Audio Ports
Connector Port (Purple) to Audio Amp PCB Ports:
Green to Front Speakers
Voltage Switch
Blue to Rear Speakers
(115V or 230V)
Red to Ctr/Sub
Power ON/OFF
Switch
Figure 7.
PCI-Express USB Ports (4)
- Force-Feedback PCB
- USB Port on USBI/O Card
- Players' Card Reader
- Game Dongle
Computer Rear Panel Connectors
Figure 8.
Nytric PCB Connectors
Test and Set Up the Game
See your new Need for Speed™ Carbon Operation Manual for details on using the Operator
Menus to set up your game, and instructions for setting up linked play if your cabinets were not
previously linked.
1. The steering will auto-calibrate when the game boots. Once the game is finished booting,
press the Operator button and set the sound volume levels, cabinet Link ID Numbers, and any
other desired cabinet settings.
2. Be sure to calibrate the pedals since you replaced the computer.
3. Play a game and verify that everything is working properly.
040-0206-01 Rev. A 12/18/2008
©2008 Global VR, Inc.
Page 9 of 12
Artwork Installation
Artwork Installation
Refer to Figure 9 for artwork locations, and Figure 10 for side panel decal placement.
If the old decals are in good shape, clean and dry them well and apply the new decals over the old
ones. If you need to remove the old decals, a heat gun can be useful for softening the adhesive. Be
sure to clean off all of the old adhesive or you will have bumps in the new decals.
Check the orientation of each decal first, then remove the backing paper and apply the decal.
Carefully smooth out any air bubbles with a squeegee or a folded piece of cardboard. You will need
to trim the edges of the side panel decals.
Important: Leave all safety labels in place.
1. Remove the five (5) screws that secure the retaining bracket above the marquee. Remove the
bracket and the marquee clear plastic. Clean the clear plastic.
2. Reinstall the clear plastic with the new marquee artwork.
3. Remove the four (4) screws that secure the seat-back artwork in place and install the new seat back
artwork.
4. Apply the Sub-Monitor Decal below the monitor.
5. Apply the new EA logo decal over the old EA logo on the Front Access Panel. (EA Games™ has
changed their logo; applying the new logo complies with EA's requirements and also helps your
customers see that you have a new EA game.)
6. Apply the Left and Right Side Fender Decals.
7. Refer to Figure 10 for placement of the Left and Right Side Panel Decals. Line up each decal with
the bottom and back edges of the cabinet, and apply starting at the bottom.
8. Once the decal is applied, use a sharp Exacto® knife to cut off the excess graphic material along
the front and top edges, using the edge of the cabinet as a guide.
9. If it is used on your cabinet, apply the Pedestal Rear Decal. This decal is only used on one style of
pedestal.
10. Write the Upgrade Date in the space provided on the Serial Number Label in the kit, and place it
next to the old serial number label on the back of the cabinet (leave the old label in place).
Need for Speed™ Carbon Deluxe Motion Upgrade Kit Instructions
Page 10 of 12
040-0206-01 Rev. A 12/18/2008
Artwork Installation
Figure 9.
Graphics Placement
Figure 10. Applying Side Panel Graphics
040-0206-01 Rev. A 12/18/2008
©2008 Global VR, Inc.
Page 11 of 12
Install the New Game Sign
Install the New Game Sign
The NEW GAME sign has adhesive strips to adhere it to the top of the cabinet. Peel the protective
backing and place the sign so that it can be seen above the marquee.
Return old Game Dongle
Please return the old Need™ for Speed Underground Game Dongle to GLOBAL VR for
recycling: Mail to: Dongle Returns, GLOBAL VR, 2350 Zanker Road, San Jose CA 95131.
For your convenience, a pre-addressed envelope is included in the kit. (You can also use the
envelope to return any other old dongles you may have.)
Need for Speed™ Carbon Deluxe Motion Upgrade Kit Instructions
Page 12 of 12
040-0206-01 Rev. A 12/18/2008


![BATTLEFIELD: BAD COMPANY [X360]](http://vs1.manualzilla.com/store/data/005724637_1-8a01f1e02d35e25dc4b532b2b3e1e619-150x150.png)