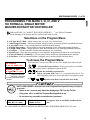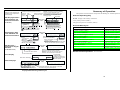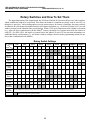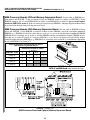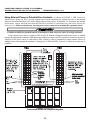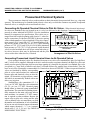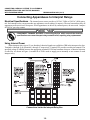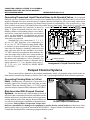
1
Published Manual Number/ECN: MATOUTWRAE/2000295V • Publishing System: TPAS • Access date: 07/17/2000 • Document ECN's: Latest Available Technical Reference— Mark II, III, IV and V 100 Formula, Single Motor Washer-Extractor PELLERIN MILNOR CORPORATION POST OFFICE BOX 400, KENNER, LOUISIANA 70063-0400, U.S.A. Please Read About the Manual Identifying Information on the Cover The front cover displays pertinent identifying information for this manual. Most important, are the published manual number (part number) /ECN (date code). Generally, when a replacement manual is furnished, it will have the same published manual number, but the latest available ECN. This provides the user with the latest information applicable to his machine. Similarly all documents comprising the manual will be the latest available as of the date the manual was printed, even though older ECN dates for those documents may be listed in the table of contents. When communicating with the Milnor factory regarding this manual, please also provide the other identifying information shown on the cover, including the publishing system, access date, and whether the document ECN’s are the latest available or exact. References to Yellow Troubleshooting Pages This manual may contain references to “yellow pages.” Although the pages containing troubleshooting procedures are no longer printed on yellow paper, troubleshooting instructions, if any, will be contained in the easily located “Troubleshooting” chapter or section. See the table of contents. Trademarks of Pellerin Milnor Corporation The following, some of which may be used in this manual, are trademarks of Pellerin Milnor Corporation: Ampsaver® Autolint® Auto-Purge® Autovac CBW® Dye-Extractor® Dyextractor® E-P Plus® Gear Guardian® Hands-Off® Hydro-Cushion® Mildata® Milnet® Milnor® Miltrac Miltron Comments and Suggestions Help us to improve this manual by sending your comments to: Pellerin Milnor Corporation Attn: Technical Publications P. O. Box 400 Kenner, LA 70063-0400 Fax: (504) 469-1849 Staph-Guard® System 4® System 7® Totaltrol® Table of Contents for MATOUTWRAE/2000295V Mark II, III, IV and V 100 Formula, Single Motor Washer-Extractor Page Description Document/ECN 1 About This Manual MHTOUTWRAE/9737AV 3 Section 1: Commissioning 4 6 9 10 39 40 50 52 57 58 63 68 74 83 84 85 90 96 101 105 106 107 113 Important Owner/User Information - Machines with a Keypay About the User Controls - Machines with a Keypad MSOP0237BE/9514DV MSOP0235BE/9836AV Section 2: Programming Programming the Mark II, III, IV and V 100 Formula, Single Motor Washer-Extractor Controller MSOP0266AE/9526FV Section 3: Operating Operating Mark II, III, IV and V 100 Formula, Single Motor Washer-Extractors Using the Five-Compartment Flushing Supply Injector Modifying Formulas in Progress MSOP0268AE/9530DV MSOP0207AE/9516BV MSOP0236BE/9516CV Section 4: Troubleshooting 100 Formula, Single Motor Washer-Extractor Error Messages Monitoring Inputs and Outputs for Mark II and III FxW Washer-Extractors Monitoring Microprocessor Inputs and Outputs for the Mark IV and V 100 Formula, Single Motor Washer-Extractors Manual Mode Menu Functions on Mark II, III, IV and V Washer-Extractors MSTS0210AE/9530CV MSOP0267AE/9530DV MSOP0267BE/9711BV MSOP0254BE/9514DV Section 5: Supplemental Information Notice About Hardware Sections The Hardware In Serial-Type Microprocessors The Hardware In Serial-Type Microprocessors for Mark IV and V Machines How to Change EPROMS in Microprocessors and Where to Check the DC Voltages The External Serial Link Cables and How to Construct Them Requirements and Settings for the Epson LX300 Printer How "Chemwait" Works in Milnor Mark I, II, III, IV and V Microprocessor Washer-Extractor Controllers Adjusting Level Sensing Apparatuses and Setting Levels on 100-Formula Washer-Extractors and Textile Machines Setting the Unit of Measure and Calibrating Electronic Water Flowmeters Used on Washer-Extractors and Textile Machines BMP970004/97071V MSFDA401DE/9020JV MSFDA401EE/9533CV MSSM0217AE/9020IV MSSM0227AE/9525AV MSSM0251BE/9525AV MSSM0248AE/9526BV MSSM0238BE/9527BV MSSM0269AE/9525CV Table of Contents, cont. Page 117 118 125 131 Description Notice - European-Style Wiring Replacing Conventional Wiring Connecting Chemical Systems to 100-Formula Washer-Extractors and Textile Machines Connecting Chemical Systems to 100-Formula Washer-Extractors and Textile Machines with European Wiring Definitions of Terms and Abbreviations Document/ECN BMP980025/9814AV MSSM0262BE/9808AV MSSM0262CE/9814AV MSFDD412CE/9905CV MHTOUTWRAE/9737AV (1 of 2) ABOUT THIS MANUAL Scope—This reference manual provides commissioning, programming, operating, and troubleshooting information for the Milnor Mark II, III, IV, and V 100 formula, single motor washer-extractor controllers. See the installation manual for information on machine installation procedures and mechanical requirements. See the service manual for preventive maintenance, service procedures, and mechanical parts identification. See the schematic manual for electrical parts identification and electrical troubleshooting. The Normal Display Sequence at Each Power Up—Verify that the messages appearing on the display at start up are as shown in “OPERATING THE MARK II, III, IV, AND V 100 FORMULA, SINGLE MOTOR WASHER-EXTRACTORS.” (see Table of Contents). Any other message(s) indicate an error condition that must be corrected before the machine will operate. See “100 FORMULA, SINGLE MOTOR WASHER-EXTRACTOR ERROR MESSAGES.” Quick Reference Tabs—The tabs along the right edge of the manual mark vital information. COMMISSIONING—Commissioning instructions ensure proper start up. CONTENTS—See Table of Contents for section/page numbers of cross references used herein. CHANGES/NEW MATERIALS—These, if any, will be found behind the “Changes . . .” divider. Manual Number/Date Code (When To Discard or Save)—The manual number/date code is located on the inside front cover, upper right corner just above the manual name. Whenever the manual is reprinted with new information, part of this number changes. If the date code after the “/” changes, the new version applies to all machines covered by the old version, but is improved— thus the old version can be discarded. If the manual number before the “/” changes, the new manual covers only new machines. Example: Discard MATMODELAE/8739CV when MATMODELAE/8739DV is received (minor improvements). Also, discard MATMODELAE/8739DV when MATMODELAE/8746AV is received (major improvements). But keep MATMODELAE/8746FV when MATMODELBE/8815AV is received, since the new manual no longer applies to machines originally shipped with the old manual. Documents and Change Bars—The individual documents comprising this manual use the same revision criteria as the manual. Text documents also display change bars. Example: When section MSOP0599AE/9135BV becomes MSOP0599AE/9135CV, change bars with the letter “C” appear next to all changes for this revision. For a major rewrite (e.g., MSOP0599AE/9226AV), all change bars are deleted. Comments and Suggestions—Help us to improve this manual by sending your comments to: Pellerin Milnor Corporation Attn: Technical Publications P. O. Box 400, Kenner, LA 70063-0400 1 Fax: (504) 469-1849 ABOUT THIS MANUAL MHTOUTWRAE/9737AV (2 of 2) Trademarks of Pellerin Milnor Corporation—The following, some of which may be used in this publication, are trademarks of Pellerin Milnor Corporation: Ampsaver® Autolint® Auto-Purge® Autovac CBW® Dye-Extractor® Dyextractor® E-P Plus® Gear Guardian® Hands-Off® Hydro-Cushion® Mildata® 2 Milnet® Milnor® Miltrac Miltron Staph-Guard® System 4® System 7® Totaltrol® Section Commissioning 3 1 MSOP0237BE/9514DV (1 of 2) IMPORTANT OWNER/USER INFORMATION— MACHINES WITH A KEYPAD Take the following important steps before placing this machine in operation: 1. Ensure safety of laundry personnel. 2. Protect against data loss. 3. Customize data (configure, formula, and productivity data). Ensure Safety of Laundry Personnel Ê Ensure that all personnel who will operate or maintain this machine read the safety manual before permitting them access to the machine. Ensure that all user manuals are available to the appropriate personnel and that all precautions explained in the safety and other user manuals are observed. Protect Against Data Loss Ê Follow the safeguards listed below to protect against data loss caused by human tampering, electromagnetic interference (EMI), physical damage to the data storage medium, or loss of power to random access memory (RAM). 1. Keep the Run/Program keyswitch set to run ( ) and secure the keys. Users must understand proper use of this control. See “ABOUT THE USER CONTROLS . . .” (see Table of Contents). 2. Keep all electric box doors closed and locked. Secure the keys. 3. Leave machine power on for 48 hours before customizing data. This fully charges the microprocessor battery, which will then supply power to the RAM for 90 days even if machine power is off. 4. Replace the battery board every five years. A capacitor on the processor board can supply power to the RAM for several hours with the battery removed. 5. Keep electronic back-up data and/or a printed record of all field-programmed data (e.g., wash formulas, configure values, step names, chemical names) in case of data loss. See the instructions for downloading and printing this data if the machine has this capability. 6. For machines that accumulate productivity data (e.g., count of loads processed), transcribe any needed data frequently, as described in the instructions for data accumulation. Customize Data Ê When To Customize Data Ë • • • • • • When commissioning the machine When restoring a machine to service after a lengthy shutdown When required by error message After replacing the CPU board After upgrading software (replacing EPROMs) After adding or removing optional equipment 4 IMPORTANT OWNER/USER INFORMATION— MACHINES WITH A KEYPAD MSOP0237BE/9514DV (2 of 2) What Customizing Requires—Verify configuration. Program formulas and clear productivity Ë data, if applicable. See the programming and operating sections in this manual for instructions. Data Accessibility—Configure and formula data can only be altered while the keyswitch is in the Ë program ( ) position (data is keyswitch-protected). Productivity data, because it is accumulated in the run mode, cannot be keyswitch-protected and is accessible to anyone. Data is accessible to the extent described in the following table: Ways Data Can Be + Used and Altered Data can be read Data can be over-written Data can be up/downloaded Data can be cleared Type of Data Configure Data Machines Data Applies To Contents after clearing dryer (includes gains) Yes Yes Yes Yes example values shuttle, single-stage press Yes Yes No Yes zeros two-stage press, Cobuc, Linear Yes Yes No Costo, discharge sequencer No n.a. washer (and textile)-extractor, centrifugal extractor Yes Yes Yes No n.a. Formula step, chemical washer (and textile)-extractor Data names Yes Yes Yes Yes example values washer (and textile)-extractor, centrifugal extractor, dryer Yes Yes Yes Yes empty washer (and textile)-extractor, centrifugal extractor, dryer Yes No No Yes empty formulas Productivity Data If Data Becomes Corrupt—If the microprocessor senses that data is unusable or unreliable, an error Ë message will appear (usually at power-up), possibly preventing machine operation. The consequences and appropriate actions for each error message are explained in the troubleshooting instructions. Follow these instructions exactly to ensure that corrupt data is completely eliminated and replaced with valid data. Failure to do so may result in unsafe operation or machine damage. 5 C B C D MSOP0235BE/9836AV (1 of 3) È BOUT THE USER CONTROLS— A MACHINES WITH A KEYPAD User controls are of two types—electro-mechanical controls (switches, buttons, and status lights) and microprocessor interface controls (display, keypad, keyswitch, and printer/download connection). Controls are mounted on one or more nameplates on the machine or a separate electric box. NOTE: Do not attempt to use your machine merely by referring to the descriptions of controls. Read the operating, programming, and troubleshooting instructions throughout this and the operator manual. Electro-Mechanical Controls Ê Electro-mechanical controls vary with machine model and are explained in the machine-specific operator manual furnished with the machine. 6 ABOUT THE USER CONTROLS— MACHINES WITH A KEYPAD MSOP0235BE/9836AV (2 of 3) ÏExample Key Symbols Used in the Text Symbology B What It Means , , Turn the keyswitch clockwise to program ( Turn the keyswitch counterclockwise to run ( ), then press and release the Enter/Next key. ), then press and release the Enter/Next key. Press and release the key shown. / , , , , , , + + hold + <xx> <response> <password> B , , A slash between symbols means use either key shown. The up and down arrow keys are often shown this way (i.e., scroll up or down the menu choices). Typical example of a word entry (spells out “POLY”). In word (alphanumeric) data fields, press the up or down arrow key to move right or left to the next character position. Press each key until the desired character appears (e.g., press until “P” appears). A comma between symbols means press and release each key sequentially. Typical example of a number entry (enters the value 155). In numeric data fields, the cursor automatically advances to the next character position when each numeral is entered. A “ + ” between symbols means press and hold each key in the order shown until all keys are depressed at the same time, then release all keys. Key(s) must be held depressed for the intended action to occur. Action will stop when key(s) is (are) released. This is an alternative way of depicting word and number entries when the exact values are determined by the user. <xx> means enter a two digit number. <response> means enter the value prompted for by the display. <password> means enter the password (or numeric passcode). Press and release the Stop button ( ). Press and release the Start button ( ). ÎFIGURE 1 (MSOP0235BE) ÎMicroprocessor Interface Controls and Example Key Symbols 7 ABOUT THE USER CONTROLS— MACHINES WITH A KEYPAD MSOP0235BE/9836AV (3 of 3) Microprocessor Interface Controls Ê These controls, shown in FIGURE 1, include the keyswitch, display, and keypad, located on the main nameplate (position on nameplate varies), and the printer/download connection, located on its own nameplate. These controls permit the user to pass data to and from the microprocessor controller. NOTE: This section folds out so that you may continue to refer to FIGURE 1 as you review the remainder of this manual. Keyswitch—This key-operated switch provides security for all field-programmed data in memory. With the Ë keyswitch set to run ( ), this data cannot be changed. The key cannot be removed in the program ( ) position. DATA LOSS HAZARD—Improper use of the keyswitch may corrupt program data. ☞ Return to the run mode only when the display says Ok Turn Key to Run. ☞ Only power off or on with the keyswitch at run. ☞ Do not leave the key accessible to unauthorized personnel. Display—This two- or four-line device displays messages and data entry screens. Messages inform the user as Ë to the machine’s operating status or alert the user to conditions that must be satisfied before operation can continue. Message displays in this manual are normally black. Data entry screens prompt the user to enter data at the keypad. As keys are pressed, the data appears in the data input field on the display. A blinking cursor always shows where the next character will be entered. Data input screens in this manual are gray, the data input field is black, and the starting cursor position is underlined. Keypad—The 12- or 30-key keypad is used for programming, making selections (e.g., selecting formulas in a Ë washer-extractor), responding to display messages, certain normal operating procedures, and manual operation. Applicable procedures are explained in the remainder of this manual and depicted using symbols to indicate pressing keys on the keypad. These symbols are explained in the “Example Key Symbols Used in the Text” in FIGURE 1. Keep FIGURE 1 folded out when reviewing procedures elsewhere in the manual that require the keypad. NOTE: Some keys on the 30-key keypad are not used on some machines. Printer/Download Connection (if so equipped)—Connect a Milnor®-supplied printer here to print Ë field-programmed data (e.g., formulas) and accumulated data (e.g., count of loads processed), if applicable. Connect a Milnor®-supplied serial downloader here or interconnect between machines to copy field-programmed data between devices. Printing and downloading, if applicable, are explained elsewhere in this manual. 8 Section Programming 9 2 MSOP0266AE/9526FV (1 of 28) ÈROGRAMMING THE MARK II, III, IV, AND V P 100 FORMULA, SINGLE MOTOR WASHER-EXTRACTOR CONTROLLER Fold out FIGURE 1 in “ABOUT THE USER CONTROLS . . .” (see Table of Contents) for the meaning of the display and key symbols used in this section. Selections on the Program Menu Ê 0 =Ok Turn Key To Run—Safely return to the run mode. See caution below. 1 =Add/Change Formula—Add a new formula, change or delete an existing formula, and add/delete steps. 2 =Copy Old To New—Copy existing formula to unused formula number. 3 =Change Step Names—Assign names to step name numbers for use when programming formulas. 4 =Change Chem Names—Assign names to chem name numbers for use when programming formulas. 5 =Configure —Tell the controller which model and options it is controlling. 6 =Down Load—Copy data electronically to avoid repetitive programming and provide secure backup. 7 =Clear All Memory (voluntarily)—Clear memory before completely reprogramming the machine. 8 =Print Data—Print out current formulas, configure codes, chemical names and step names. To Access the Program Menu Ê RUN FORMULA 00 OR OK POWER OFF PROGRAM 0 MENU OK TURN KEY TO RUN Program menu with selection 0 displayed Underline indicates cursor position When the Run Formula menu and selection 00 is displayed as shown at left, , Accesses the Program Menu. All program modes are available. When the Program Menu is displayed as shown at left, / Scrolls the available program modes. Selects a program mode, where <x> is a number from 0 to 8. See following pages for how to access and utilize each program mode. or <x> or ( ), , Returns to the Run Formula menu (run mode). DATA LOSS HAZARD—Improper use of the Program/Run keyswitch may corrupt program data. ☞ Return to the run mode only when the display says OK Turn Key To Run. ☞ Only power off or on with the Program/Run keyswitch at run. ☞ Do not leave key accessible to unauthorized personnel. If FORM xx INCOMPLETE or CLEAR MEMORY NOW ever appears, data is unreliable and must be deleted. TURN KEY TO PROG PRESS 4+5+6 See “100 FORMULA, SINGLE MOTOR WASHER-EXTRACTOR ERROR MESSAGES” for more. 10 D F PROGRAMMING THE MARK II, III, IV, & V 100 FORMULA, SINGLE MOTOR WASHER-EXTRACTOR CONTROLLER MSOP0266AE/9526FV (2 of 28) 1 = ADD/CHANGE FORMULA Ê At the start of formula programming, the controller prompts for a formula number and formula name. At the start of each step (e.g., flush, break, intermediate extract), the controller prompts for a step name and pauses to permit deleting or duplicating the step. Once in a formula, you may move around to specific data and use the help screens. You may end the formula with a bath or an extract. You may abort a new formula or delete an existing formula. When you end a formula, the controller prompts for type of rotation to end with. Formulas 01 through 98 are available for programming. NOTE: Two non-programmable formulas are also furnished—formula 00, used to commission a new machine (see “RUNNING . . .”) and formula 99, used to develop new formulas (see “MODIFYING FORMULAS . . .”). When the Program Menu and mode 1, Add/Change Formula is displayed, PROGRAM 1 MENU ADD/CHANGE FORMULA Accesses mode 1 and prompts for a formula number. To Select a Formula Number Ë ADD/CHANGE FORMULA ADD/CHANGE FORMULA 05 FORMULA 05 Formula name Formula number “ADD” or “CHANGE” blinks for unused or existing for- With the cursor at formula number as shown at left, / + or Scrolls the unused formula numbers. / + Scrolls the existing formulas. Accesses the selected formula. Cursor goes to formula name field. Aborts formula programming and returns to Program Menu. To Name or Rename a Formula—Every formula initially has the default formula name “FORMULA Ë xx” where xx is the formula number. This may be overwritten with any name up to 16 characters. With the cursor in the formula name field, as shown at left, F05 FORMULA 05 Moves the cursor right/left within the formula name field. / F05 SHEETS S01 <x> Enters a character at the cursor where <x> is any letter, numDefault formula name ber, or symbol on the alphanumeric keypad. Press key one or more times until desired character appears. Formula name field (Any name up to 16 characters may be entered) Accepts formula name and prompts for first step name. To Select a Step Name—Step names are selected by number from the 16 pre-named step names available Ë (see 3= CHANGE STEP NAMES). The default is 00 which names the step “STEPxx,” where xx is the step number. With the cursor at the step name number, as shown at left, / Scrolls the step names. <xx> Enters a step name by number, where <xx> is a number from 00 to 15. Accepts selected step name. Page A of this step appears with no cursor to permit deleting or duplicating this step, if desired. or Only if this is step 1, returns to formula name. 11 PROGRAMMING THE MARK II, III, IV, & V 100 FORMULA, SINGLE MOTOR WASHER-EXTRACTOR CONTROLLER MSOP0266AE/9526FV (3 of 28) To Delete or Duplicate a Step Ë F05 TMMQFFFHC3WLL S01 Deletes this step. The next higher step becomes the current step. The controller prevents deleting an End Formula or a bath between two extracts. To delete an entire formula, see “To Abort a New Formula in Step 1 or Delete an Existing Formula” in this section. Duplicates this step. If this is step 1, the duplicated step becomes the new step 1 and all following steps move one number higher. Controller prevents duplicating an End Formula or an extract. + + or S When page A, shown at left, first appears with no blinking cursor, the current step may be deleted or duplicated. or Advances to T (Type of Step) without deleting or duplicating this step. To Move Around in the Steps and Use the Help Screens—Each step has a step name screen Ë and three data pages (pages A, B, and C). Each data page has several decisions (e.g., duration, bath temperature, chemicals) represented by letters on pages A, B, and C. Move around among steps, screens, pages, and decisions as shown in FIGURE 1, below. See “The Step Decisions” in this section for a full explanation of each step decision. + + Scrolls the steps from anywhere in formula programming except PAGE A with no cursor, a chemical group, or decision E. Display returns to the step name screen for the selected step or to the formula name screen from step 1. Step Name Screen Page A With No Cursor See "To Select a Step Name" in this section. See " To Delete or Duplicate a Step" in this section. Data Pages Scrolls forward/backward through each valid decision. NOTE:Will not scroll backward out of a chemical group. Must scroll forward out of last chemical group, then backward to PAGE A. <x> Page A etc. etc. Formula Help Screens Each decision in Pages A and B has a help screen. When one is displayed, (See "The Step Decisions" in this section) Enters a value and advances cursor to next decision, where <x> is a valid one to four digit value. Chemical group (repeats for each chemical) etc. etc. Help screen appears if no valid = delay entry in 8 seconds 1 minute Page B Decision letters shaded gray are those that vary with configuration or only appear if configured. = accepts = appear immediately value and advances scrolls the valid values. ÎFIGURE 1 (MSOP0266AE) ÎHow To Move Around In a Formula and Use the Help Screens 12 PROGRAMMING THE MARK II, III, IV, & V 100 FORMULA, SINGLE MOTOR WASHER-EXTRACTOR CONTROLLER MSOP0266AE/9526FV (4 of 28) To End a Formula Ë a Final Extract Without (Following a Bath) To End a Formula Ë a Final Extract With To Abort a New Formula Ë Step 1 or Delete an in Existing Formula With the cursor at page A, decision T (as shown below), With the cursor at page A, decision T of the final extract (as shown be- Scroll to step 1, page A, decision T. when display is as shown be- F05 TMMQCCCHC3WLL S F05 T TYPE OF STEP S06 0 END FORMULA or Commands End Formula and prompts: END FORMULA #05 ? 0 NO [1=YES] , Confirms ending the formula and prompts How to End? ), Cancels ending the formula and returns to Type of Step. or ( Page A F05 TMMQCC S066050 <T> Page B F05 TMMQCCCHC3WLL S RPMDRC F05 T TYPE OF STEP S01 0 END FORMULA ----0-- Commands one of three ( ), Commands End types of final extract, Formula at step 1 where <T> is 4, 6, or 7, and prompts: and prompts for a duration (MMQ). See “The Step Decisions.” DELETE FORMULA #05? 0 NO [1=YES] <MMQ> Commands a duration where <MMQ> is a 3-digit number and prompts for a drain destination if applicable. or <R> Commands a drain destin- ( ation, where <R> is 0 or 1 and prompts or How to End? , Confirms deleting the formula and returns to the Program Menu. ), Cancels deleting the formula and returns to Type of Step. After confirmation, the Program Menu reappears. NOTE: Whether ending with or without a final extract, decisions continue as explained below. **PLEASE WAIT** PROGRAM 0 MENU OK TURN KEY TO RUN To Specify Cylinder Rotation at End of Formula (How To End)—When a formula ends withË out a final extract, selections 0, 1, and 2, explained below are available. When the formula ends with a final extract, all of the following selections are available: F05 XXX YYY F05 HOW TO END? S06 STOPPED REVERSING DRAIN SPEED BREAK CAKE TUMBLING E E 0 Operator presses or to silence the signal. 1 (at wash speed)–Operator press or to end. 2 Operator presses or to end. 3 Cylinder sequences through various motions for three minutes, then stops. Use to loosen goods that remain plastered to the cylinder after the formula ends. Operator presses or to silence the signal. 4 Like reversing except permits operator to press (to stop cylinder), open door, pull down any plastered goods, close door, and press (to continue tumbling). 13 PROGRAMMING THE MARK II, III, IV, & V 100 FORMULA, SINGLE MOTOR WASHER-EXTRACTOR CONTROLLER MSOP0266AE/9526FV (5 of 28) / <x> Scrolls the valid choices. Enters a valid choice. <x> is 0, 1, or 2 when following a final bath step. <x> is 0, 1, 2, 3, or 4 for a final extract. Accepts the selected choice. This ends programming for this formula. **PLEASE WAIT** PROGRAM 0 MENU OK TURN KEY TO RUN Program Menu reappears. The Step Decisions Ê As shown in FIGURE 2, several programming decisions on pages A and B vary with configuration. For example, bath temperature may be configured for Fahrenheit (FFF) or Centigrade (CCC) units and Third Water (3) only appears if enabled. Most decisions following Type of Step (T) only apply to bath steps, not extract steps. Applicable step decisions repeat for each step. Up to 98 formulas with a total of 499 steps may be programmed. Signal With When to Inject Page B S 1 Duration of Injection Liquor Steam Level Injection Chem Name Fill from Tank Chem Number Page A Chemicals Cylinder Flow Control Speed Water Valves H=hot C=cold C=cold 2=2nd 3=3rd Bath Temperature Step Duration Type of Step Drain/ Drain To fill Recirculation Wash/ extract F05 CC NN WSSS + RPM D R C S01 01 02 0 040 0 0 4 0 1 0 1 F05 T MMQ CCC H C W L L S01 1 0 2 FFF H C 3 17 C2 Variations based on configuration C2 3 Formula and step # Rotation How to End Cycle OnTime OffTime Page C F05 XXX YYY S01 005 002 Notes: 1. Decision is identified by an abbreviation on the top line. Current value appears on bottom line. 2. All decisions apply to bath steps; only underlined decisions apply to extract steps. 3. Dashes appear if decision does not apply. ÎFIGURE 2 (MSOP0266AE) ÎThe Step Decisions at a Glance 14 (occurs once per formula) E 0 PROGRAMMING THE MARK II, III, IV, & V 100 FORMULA, SINGLE MOTOR WASHER-EXTRACTOR CONTROLLER MSOP0266AE/9526FV (6 of 28) Type of Step: Types of Baths and Extracts Available—End Formula, three types of bath step, Ë F05 TMMQFFFHC3WLL S and four types of extract step are available. The control prevents an extract as step 01 or step 02 if step 01 is a no water bath. It also prevents two successive extract steps. See “To End a Formula Without a Final Extract. . .,” and “To Abort a New Formula in Step 1 or Delete an Existing Formula” in this section. 1-WAY WASH Increases mechanical action and saves energy. Use for small pieces which cannot tangle. 2-WAY WASH Reverses cylinder. Use for sheets or other large pieces which tangle unless cylinder reverses. SOAK WASH Cylinder does not turn. Use for delicate fabrics and overnight bath soak (see below). PRE+FIN EXT Performs motions toward cycle end to loosen plastered goods. Minimum time =180 (pre+final extract) seconds. Machine extracts for 90 seconds, then the timer stops while the cylinder stops, jogs, and redistributes. Then machine extracts (with a 90-second low speed extract before accelerating to E2 if the machine has E1 and E2) for the remaining commanded extract time. Use only for goods that tend to plaster, as this function may cause unwanted extract recycles. INT EXTRACT For extracts between baths and for final extract at low (E1) speed if machine is (intermediate extract) equipped with two-speed extract. FINAL EXT E1 duration dictated by configure decision G then E2 for remainder of commanded extract time. DOUBLE EXT Purges trapped water from goods. Minimum time = 180 seconds. Machine extracts for 90 seconds. Timer stops as cylinder slows and runs at drain speed for 30 seconds then re-enters extract for remaining commanded time. Use for mats. F05 T TYPE OF STEP S01 0 END FORMULA 1 2 3 4 5 6 7 Type of Step: Using Soak Wash To Create an Overnight Bath Soak Formula—To creË ate an overnight bath soak formula, for step 1, command Type of step (T)=3 (Soak Wash), duration of step (MMQ)=600 (one hour), and drain type (D)=2 (Do Not Drain). Then command the temperature, water valves, and level desired. For Step 2, accept End Formula to exit, then return to the formula and duplicate step 1 as many times as hours of soak are desired. See “To Delete or Duplicate a Step” in this section. Modify the formula to add chemicals and/or perform other functions where desired. Take care to delete any unnecessarily duplicated functions from steps. Power, air pressure, and steam (if used) must remain on as long as this formula is running. Duration of Step Ë F05 TMMQFFFHC3WLL S MMQ indicates minutes (MM) and quarter minutes (Q). F05 MMQ BATH TIME S01 001 = 00.25 MIN 010 = 01.00 MIN 113 = 11.75 MIN 633 = 63.75 MIN 0 minutes and 15 seconds (minimum) 1 minute (default) 11 minutes and 45 seconds (example) 63 minutes and 45 seconds (maximum) 15 PROGRAMMING THE MARK II, III, IV, & V 100 FORMULA, SINGLE MOTOR WASHER-EXTRACTOR CONTROLLER MSOP0266AE/9526FV (7 of 28) Bath Temperature—Appears if temp probes enabled (configure decision T). Accessible if this Ë F05 TMMQFFFHC3WLL S is a bath step (other than a no water bath). FFF(Fahernheit) or CCC(Centigrade) F05 S01 FFF 000 000 050 205 TEMP TEMP TEMP TEMP appears per configure decision A. If a temperature is commanded, thermo-modulation F or steaming is required; otherwise, the cursor returns here for temperature correction. o F No temperature requirement for this bath. Value displayed reverts to “---.” o o F = 50° F. 010 T EMP C= 10° C (default and minimum, if 000 not commanded) o o F = 205° F. 095 T EMP C= 95° C (maximum). o Water Valves: Available Valves and Ways To Control Them—Configure decision K d e t e rË mines which of the four combinations of water valves shown below is displayed. Valves are accessible if this is a bath step. The water valve(s) will function as commanded here either 1) at the start of fill, if tank fill is not commanded for this bath (see “Water Valves: Fill From Tank” in this section), or 2) when the tank valve closes, if level is not yet achieved. or hot and cold cold and 2nd or hot, cold, and 3rd or cold, 2nd, and 3rd hot cold 3rd F05 TMMQCCCHC3WLL S01 OFF 0 ON 1 o o ↑ C(or↑ F) 2 ↓oC(or↓oF) 3 Example: F05 TMMQCCCHC3WLL S01 110 001 Each water valve is a separate S decision. 3rd water appears only if enabled. Unless stated otherwise, all selections apply to each valve. Off for this bath On during fill On during fill if actual temperature is below commanded (raises temp). Not available for cold water valve. On during fill if actual temperature is above commanded (lowers temp). Not available for hot water valve. cold 2nd 3rd F05 TMMQCCCC23WLL S01 OFF 0 Off for this bath ON 1 On during fill No other selections are available. Example: F05 TMMQCCCC23WLL S01 110 S Split hot/cold 3rd only 001 16 S S Split cold/2nd 3rd only PROGRAMMING THE MARK II, III, IV, & V 100 FORMULA, SINGLE MOTOR WASHER-EXTRACTOR CONTROLLER MSOP0266AE/9526FV (8 of 28) Water Valves: Regulating Incoming Water Temperature With Thermo-Modulation Ë Accessible if hot water valve enabled (configure decision K). Thermo-modulation regulates incoming water temperature by turning the water valve(s) on and off during fill to maintain commanded temperature. When programming, it is helpful to know the split water temperature (temperature achieved by opening hot and cold simultaneously). F05 TMMQCCCHC3WLL S Hot and cold both modulate. Use this method when desired temperature is near S01 230 split or when split water temperature is unknown or varies significantly. 130 Hot=on, cold =modulates. This provides a faster more accurate fill (fewer temperature swings) when the commanded temperature is known to be hotter than split. 210 Hot=modulates, cold=on. This provides a faster more accurate fill (fewer temperature swings) when the commanded temperature is known to be colder than split. NOTE 1: If desired, modulate hot and 3rd when 3rd is cold water, or cold and 3rd when 3rd is hot water. NOTE 2: Modulation controls the average temperature of the incoming water. Bath temperature may vary due to inconsistant incoming water temperature/pressure and because it is influenced by the temperature of the preceding bath. Water Valves: Fill From Tank—Accessible if this is a bath step. If tank fill is called for in this bath, the tank Ë valve opens until either 1) level is achieved, or 2) the time specified in configure decision I (fill error) expires, after which, the water valve(s) continue filling to the commanded level. F05 TMMQCCCHC3WLL S01 0 1 S Do not fill from tank. Fill from tank. Water Valves: Lowering Bath Temperature with Cooldown—A bath with cooldown consists Ë of two bath steps with no drain between them. In the second step, specify the desired cooler temperature, all water valves off, and any bath level. The controller will automatically insert a one minute duration (MMQ=010) in the current step and Do Not Drain (D=2) in the former step. The cooldown temperature must always be 15°-20°F (8°-11°C) higher than the hottest ambient temperature or cold water temperature that will be encountered, or it may take a long time or be impossible to achieve the commanded cooldown temperature. Commanding no water (all water valves off) in a step following an extract or in a machine with no cooldown (configure decision J), will result in the error: F05 COOLDOWN ILLEGAL If the display at left appears, S01 PRESS NEXT returns the cursor to the first water valve decision. 17 PROGRAMMING THE MARK II, III, IV, & V 100 FORMULA, SINGLE MOTOR WASHER-EXTRACTOR CONTROLLER MSOP0266AE/9526FV (9 of 28) Liquor Level: Specifying Inches or Centimeters (Electronic Level Sensing) Ë F05 TMMQFFFHC3WLL S Accessible if this is a bath step. Units are inches or centimeters as specified in conF05 LEVEL S02 figure decision A. Value is two digits. No water Minimum level for a bath not preceding an extract, where <xx> is the value specified in the Low Level configure decision . Minimum level for a bath preceding an extract, where <yy> is the value specified in the Med Level configure decision. If a value lower than <yy> is entered and an extract is programmed for the next step, the controller will automatically replace this lower value with <yy>. Maximum level for any bath, where <zz> is the value specified in the High Level configure decision. 17 inches (or centimeters)—example. LL 00 <xx> <yy> <zz> 17 Steam Injection and How To Select the Steam Code—Steam enabled (configure decision H). Ë Accessible if this is a bath step . No steam and six steaming choices are available. Each steaming choice specifies the value shown in the list of choices below left, for each of three conditions (early, after, and timer) explained in the box below right. F05 TMMQFFFHC3WLL EARLY AFTER TIMER NO STEAM NO YES RUNS NO NO STOPS NO YES STOPS YES YES RUNS YES NO STOPS YES YES STOPS S S 0 1 2 3 4 5 6 Early: Yes starts steaming at lowest level. Use yes when machine has only cold water valve or when plant has only low-temperature hot water. No starts steaming when commanded level achieved. Use no when machine has both hot and cold water valves if commanded temperature is lower than hot water temperature. After: Yes resumes steam in this bath if temperature falls below commanded, once initially achieved. No prohibits further steam once temperature is achieved. Use no if chemicals or goods may be harmed by steam after chemical injection (as in bleach baths), otherwise use yes. Timer: Runs while steaming or stops until temperature first achieved. Use runs if temperature need not be exactly maintained throughout bath and/or when it is certain that commanded temperature will be nearly achieved while filling. Use stops if temperature must be achieved before adding chemicals; otherwise, software will suppress this chemical-add choice. 18 PROGRAMMING THE MARK II, III, IV, & V 100 FORMULA, SINGLE MOTOR WASHER-EXTRACTOR CONTROLLER MSOP0266AE/9526FV (10 of 28) Chemicals: Applicable Decisions—Chemical decisions are only accessible if this is a bath step, but any Ë number of available chemicals can be commanded in the same bath. The available chemicals are those enabled in the # of Chem Valves configure decision. For each chemical desired, the control repeats the chemical decisions highlighted at left, including chemical number (CC), chemical name (NN), when to F05 CCNNWSSS*RPMDRC start injection (W), duration of injection (SSS), and signal with chemical (*). If S01 chemical number 16 (signal only) is selected, the control skips SSS and *. If optional chemwait (chemsave) is functioning on this machine when a chemical injection is called for, the machine timer will stop in response to a wait signal from the chemical system. See “HOW CHEMWAIT WORKS.” This Chemical: Number (CC) and Name (NN) Ë F05 CCNNWSSS*RPMDRC Although chemical number and chemical name are separate decisions, they share CCNN 0000 0200 xx00 CHEM# AND NAME NO CHEMICAL CHEMICAL 02 ILLEGAL CHEM 1600 CHEMICAL 16 0100 CHEMICAL 01 0301 ALKALI the same help screen. No chemicals (or no additional chemicals) in this bath (default). Skips SSS and *. Chemical 02 (example). Cursor advances to NN from any valid chemical number. An invalid value was entered, where xx is a number outside the range specified in the # of Chemical Valves configure decision. Cursor remains at CC for correction. Operator signal sounds without chemical being injected. Cursor advances to NN, then W, but skips SSS and *. Operator must cancel signal to resume operation. Names chemical 01 (example) by chemical number (default). Gives chemical 03 the name Alkali (which was previously assigned to chemical name 01) (example). See “4= Change Chem Names” in this section. In the help screen, accepts the chemical number and name. The cursor advances to W for a valid chemical or to the next decision following the chemical decisions for chemical 00 (no chemical). This Chemical: When To Start Injection Ë F05 CCNNWSSS*RPMDRC Use this decision to ensure that chemicals are injected into the bath safely (e.g., acF05 S01 W WHEN START ceptable concentrations and bath temperatures). To avoid injecting two or more 0 WITH FILL chemicals simultaneously, use Do Not Drain (programming decision D=drain type) to combine two or more bath steps into one bath, with one injection in each. 0 WITH FILL As the machine is filling. 1 LEVEL OK When level is satisfied. 2 LEV+ oC OK or 2 L EV+ oF OK - When level and temperature are both satisfied (only available when steaming to a specified temperature with timer stops while steaming is commanded). This Chemical: Duration of Injection (in seconds) Ë F05 CCNNWSSS*RPMDRC F05 SSS CHEM ADD 001 SECS CHEM ADD 127 SECS One second (minimum and default). 127 seconds (maximum). This value automatically inserted if any higher value entered. 19 PROGRAMMING THE MARK II, III, IV, & V 100 FORMULA, SINGLE MOTOR WASHER-EXTRACTOR CONTROLLER MSOP0266AE/9526FV (11 of 28) This Chemical: Signal With Chemical Ë F05 CCNNWSSS*RPMDRC The signal occurs at the time specified by the when to start injection decision. The commanded injection will not start until the signal is cancelled by the operator. F05 SIGNAL? * S01 NO 0 S01 YES 1 Cylinder Speed—Accessible if this is not a soak wash (see “Type of Step . . .” in this section). Wash and Ë extract speeds are programmable. Value is percent of normal. During bath steps, the cylinder will rotate at the speed commanded here, during the on-time commanded below (see “Cylinder Rotation On-Time . . .” in this section). F05 CCNNWSSS*RPMDRC F01 SPEED RPM 15 RPMs wash speed (example) S01 WASH 015 WASH 005 5 RPMs—Minimum allowable wash speed WASH 040 40 RPMs—Maximum allowable wash speed EXTRACT 200 200 RPMs—Minimum allowable extract speed EXTRACT 835 835 RPMs—Maximum allowable extract speed Cylinder Rotation During Draining and Previous Fill (Drain Type)—Accessible if this is a Ë bath step and not a cooldown. F05 CCNNWSSS*RPMDRC Because the machine must enter extract from drain (distribution) speed, if the next step is an extract, the control changes a selected 1, 2, or 3 to 0; or a 5, 6, or 7 to 4. F05 DRAIN TYPE D STD DRAIN SPD 0 Basket turns clockwise at drain (distribution) speed. 2-WAY WASH SPD 1 Wash speed, reversing; more mechanical action while draining. DO NOT DRAIN 2 Use for functions later in this bath such as to inject chemicals, raise temperature or level or change basket speed without draining. Also see “Type of Step: Using Bath Soak To Create an Overnight Soak Wash Formula” in this section. STOP W DRAIN 3 Basket stationary; no mechanical action while draining. STOP W FILL 4 Basket stationary during previous fill; drain speed while draining. STP FILL+DRAIN 5 Basket stationary during draining and previous fill. STP FILL+NO DR 6 Basket stationary during previous fill; no drain. Drain Destination (Sewer or Tank) Ë F01 CCNNWSSS*RPMDRC Accessible if this is a bath step and not a Do Not Drain or if this is an extract step. F05 DRAIN TO S02 SEWER S02 TANK R 0 1 Drain to sewer (default) Drain to tank Recirculation Ë F05 CCNNWSSS*RPMDRC Accessible if this is a bath step. F05 RECIRCULATION C S03 NO [1=YES] 0 Do not recirculate. YES [0=NO] 1 Recirculate. 20 PROGRAMMING THE MARK II, III, IV, & V 100 FORMULA, SINGLE MOTOR WASHER-EXTRACTOR CONTROLLER MSOP0266AE/9526FV (12 of 28) Cylinder Rotation On-Time and Off-Time—Accessible if this is a bath step and not a soak wash (see Ë “Type of Step . . .” in this section). Cylinder rotates intermittently, as commanded here. On-time F05 XXX YYY E F05 ON TIME S03 003 3 seconds (example) 000 Cylinder does not rotate (minimum) 999 999 seconds (maximum) Off-time F05 XXX YYY E F05 OFF TIME S03 003 3 seconds (example) 001 One second (minimum) 999 999 seconds (maximum) How to end F05 XXX YYY E F05 OFF TIME 0 Finished S03 1 Reversing 2 Drain speed 3 Break cake 4 Tumbling 21 PROGRAMMING THE MARK II, III, IV, AND V 100 FORMULA, SINGLE MOTOR WASHER-EXTRACTOR CONTROLLER MSOP0266AE/9526FV (13 of 28) 2 = COPY OLD TO NEW Ê PROGRAM 2 MENU COPY OLD TO NEW Ë When the Program Menu and mode 2, Copy Old to New is displayed, Accesses mode 2 and waits for the user to scroll existing formulas. For Quick Return to Program Menu Aborts mode 2 and returns to the Program Menu any time during the following procedure. COPY OLD TO NEW When this display appears, / COPY SOURCE xx SHEETS Scrolls the existing formulas (must scroll, cannot select by number). When scrolling begins, this display appears, where xx is the formula number and Sheets is an example formula name. When the desired source formula appears, Confirms this is the source formula and prompts for a destination. COPY DESTINATION 00 When this display appears, / or <xx> Scrolls the unused formula numbers, Enters a destination formula number, where <xx> is a number from 01 to 98. COPY DESTINATION xx ALREADY EXISTS This display appears if the selected formula already exists, where xx is the existing formula number. The control prevents overwriting an existing formula. COPY DESTINATION yy FORMULA yy This display appears if the selected formula is unused, where yy is the unused formula number. Copies the source formula to the destination formula number except that the source formula name is not copied. The new formula is named the same as the formula number (e.g., Formula 12). PROGRAM 0 MENU OK TURN KEY TO RUN Program Menu re-appears. 22 PROGRAMMING THE MARK II, III, IV, AND V 100 FORMULA, SINGLE MOTOR WASHER-EXTRACTOR CONTROLLER MSOP0266AE/9526FV (14 of 28) 3 = CHANGE STEP NAMES Ê The following are the default English step names supplied with the controller. 00 This names the step the same as the step number and is not available for field-programming. 01 = Flush 02 = Break 03 = Wash 04 = Bleach 05 = Rinse 06 = Antichlor 07 = Sour 08 = Soursoft 09 = Softener 10 = Mildcide 11 = Finish 12 = Starch 13 = Name me 14 = Name me 15 = Name me Equivalent non-English names, in one other language specified by the customer, are also supplied. Configure decision B (Language) determines which language (English or foreign) is displayed. The names associated with step name numbers 01 through 15 may be field-changed. Because step names are selected by number when programming formulas, any change to a step name will change the name in all formulas its step name number is used in. DATA LOSS HAZARD—All field-changed step names are erased and lost whenever memory is cleared or configure decision B (Language) is changed. The English default step names or their foreign language equivalents will reappear. + ALWAYS re-enter any field-changed step names whenever memory is cleared. + ALWAYS configure language (English or foreign) before changing step names. When the Program Menu and mode 3, Change Step Names is displayed, PROGRAM 3 MENU CHANGE STEP NAMES Accesses the step name menu, and displays step name 01. Ë For a Quick Return to the Program Menu Aborts mode 3 and returns to the Program Menu any time during the following procedure. Any changes are retained. . CHANGE STEP NAMES When this display appears, where 01 is the step name number and Flush is the step name, 01 FLUSH Scrolls the step names, / Step name Step name number. When cursor is here, you are at the step name menu. , or Selects step name 03 (example) and displays the name associated with this number (can enter any number from 01 to 15). Accesses the selected step name. CHANGE STEP NAMES Example: Step name 03 can now be changed. Enter up to eight characters. 03 WASH Moves the cursor right/left within the eight character field. / Step name 03 accessed , , , , , , Enters Suds (example). Press each key one or more times until the desired character appears. CHANGE STEP NAMES When the new step name is entered, 03 SUDS Returns to the step name menu (select another step name to change), or Returns to the Program Menu. 23 PROGRAMMING THE MARK II, III, IV, AND V 100 FORMULA, SINGLE MOTOR WASHER-EXTRACTOR CONTROLLER MSOP0266AE/9526FV (15 of 28) 4 = CHANGE CHEM NAMES Ê The following are the default English chemical names supplied with the controller. 00 This names the chemical the same as the chem number and is not available for field-programming. 01 = Alkali 02 = Soap 03 = Detergent 04 = Soap+alkali 05 =Deterg+alkali 06 = Chlorine Bleach 07 = Oxygen Bleach 08 = Antichlor 09 = Sour 10 = Softener 11 = Sour+softener 12 = Starch 13 = Anti-mildew 14 = Anti-bacteria 15 = Finishing Chems 16-64 = Chem Name xx Equivalent non-English names, in one other language specified by the customer, are also supplied. Configure decision B, Language, determines which language (English or foreign) is displayed. The names associated with chem name numbers 01 through 64 may be field-changed. Because chemical names are selected by number when programming formulas, any change to a chemical name will change the name in all formulas its chem name number is used in. DATA LOSS HAZARD—All field-changed chemical names are erased and lost whenever memory is cleared or configure decision B (Language) is changed. The English default chemical names or their foreign language equivalents will reappear. + ALWAYS re-enter any field-changed chemical names whenever memory is cleared. + ALWAYS configure language (English or foreign) before changing chemical names. When the Program Menu and mode 4, Change Chem Names is displayed, PROGRAM 4 MENU CHANGE CHEM NAMES Accesses the chemical name menu and displays the first editable name. Ë For a Quick Return to the Program Menu Aborts mode 4 and returns to the Program Menu any time during the following procedure. Any changes are retained. CHANGE CHEM NAMES When this display appears, where 01 is the chemical name number and Alkali is the chemical name, 01 ALKALI Scrolls the chemical names, / Chemical name Chemical name number When cursor is here, you are at the chemical name menu. or , Selects chemical name 13 (example) and displays the name associated with this number (can enter any number from 01 to 64). Accesses the selected chemical name. CHANGE CHEM NAMES Example: Chemical name 13 can now be changed. Enter up to 15 characters. 13 ANTI-MILDEW Moves the cursor right/left within the 15 character field. / Chemical name 13 etc. Enters Mildistat , , , , , , , , , (example). Press each key one or more times until desired character appears. CHANGE CHEM NAMES When the new chemical name is entered, 13 MILDISTAT Returns to the chemical name menu (select another name to change), or Returns to the Program Menu. 24 PROGRAMMING THE MARK II, III, IV, AND V 100 FORMULA, SINGLE MOTOR WASHER-EXTRACTOR CONTROLLER MSOP0266AE/9526FV (16 of 28) 5 = CONFIGURE (and Why It Is Necessary) Ê Because the controller software is written to accommodate different machine models and options as well as certain user preferences (e.g., which language to display), it is necessary to configure the controller to match each specific machine. Hardware-based configure decisions must match the machine hardware and they must be changed to match subsequent hardware changes. User preferences may be set and subsequently changed as desired. Where To Find Configure Requirements—See “IMPORTANT OWNER/USER INFORMATION . . .” Ë (see Table of Contents) for the circumstances that require reconfiguring and reprogramming. The metal configure nameplate on the machine shows factory configuration. Make all hardware-based configure decisions conform to this nameplate, except to conform to any subsequent hardware changes. All configure decisions are explained in this section. Decisions are marked to indicate which are discretionary and which are hardware-based. Ë ow To Access, Move Through, and Exit Program Mode 5, CONFIGURE H and Use the Help Screens—The configure mode has two pages consisting of several decisions, each with a help screen. It also has several additional screens. Once you have accessed configure, you must move through all decisions to exit and return to the Program Menu. However, you need not view the help screens. When the Program Menu and mode 5, Configure is displayed, PROGRAM 5 MENU CONFIGURE Accesses mode 5, Configure and displays page AT. See FIGURE 3. ÎFIGURE 3 (MSOP0234BE) ÎHow To Move Around in Configure and Using the Help Screens 25 PROGRAMMING THE MARK II, III, IV, AND V 100 FORMULA, SINGLE MOTOR WASHER-EXTRACTOR CONTROLLER MSOP0266AE/9526FV (17 of 28) The Configure Decisions Ê A few configure decisions on page AT influence subsequent configure decisions on page AT and page UZ. For example, decision H (steam error)=1 mandates decision T (temp probes)=1 or 2. Although the control does not prevent the user from incorrectly entering T=0 in this instance, it will subsequently insert the value one. If the user commands T=2, the control will retain this value. Other similar lockouts are built into the configure decisions. Several of the additional screens that follow page UZ, will only appear if certain values are entered for certain previous decisions. All possible screens are shown and explained here. ÏConfigure Decisions for Pages AT and UZ Configure Decision (Page and Help Screen) D=Discretionary H=Must Accommodate Hardware Selections Explanation Page AT inches, ABCDEFGHIJKLMNOPQRST D 0=Fahrenheit, and month/day/year A TEMP UNIT 1 CENTIGRADE ABCDEFGHIJKLMNOPQRST B LANGUAGES 0 ENGLISH 1=Celsius, centimeters, and day/month/year D 0=English 1=Foreign Determines temperature units, length units, and date format for display and hard copy. Specifies whether to display prompts, messages, step names and chemical names in English or the customer-specified non-English language. DATA LOSS HAZARD—If step or chemical names were field programmed, these can be lost if the language choice is changed now. See modes 3 and 4. ABCDEFGHIJKLMNOPQRST C MACHINE TYPE 0 30022F8W H 0=30022F8W 1=42032F7P 2=3630 STAPHGUARD C F Configure decisions D and E are not currently used. ABCDEFGHIJKLMNOPQRST F ANTI-PLUG 0 1.7 SECS H Decision appears, but needn’t be configured as Decision YYY will override any value entered here. 26 This is the dwell time between when the wash motor turns off and restarts in the reverse direction. MACHINE DAMAGE HAZARD—A shorter dwell time than the factory selection can damage wash motor or belt/gear train. Longer dwell times are acceptable. PROGRAMMING THE MARK II, III, IV, AND V 100 FORMULA, SINGLE MOTOR WASHER-EXTRACTOR CONTROLLER MSOP0266AE/9526FV (18 of 28) Configure Decisions for Pages AT and UZ, continued Configure Decision (Page and Help Screen) ABCDEFGHIJKLMNOPQRST DRAIN G BATH EXTRACT 30 (SEC) 0 30 D=Discretionary H=Must Accommodate Hardware Selections Explanation H BATH EXTR E1-2 0= 30 30 45 1= 45 45 60 2= 60 60 90 3= 75 75 105 4= 90 90 90 5= 90 120 120 6= 30 60 90 H 0=no steam D 0=3 minutes 1=5 minutes 2=10 minutes 3=15 minutes H Permits filling for the time indicated before the too long to fill error appears. 0=no cooldown Cooldown is standard on certain machines and optional on others. It permits cooling down for time indicated before the too long to cool error appears. ABCDEFGHIJKLMNOPQRST 1=5 minutes COOLDOWN J ERROR D 2=10 minutes 3=50 minutes 1 5 MIN ABCDEFGHIJKLMNOPQRST WATER OPT K H+C 0 C ABCDEFHIJKLMNPOPQRST REUSE OPT. L NO [1=YES] 0 ABCDEFGHIJKLMNOPQRST O/H TANK M NO [1=YES] 0 ABCDEFGHIJKLMNOPQRST METERED WATER N NO [1=YES] 0 MACHINE MALFUNCTION AND DAMAGE HAZARDS— Shorter drain times than the factory selection may not permit a full drain before extract, resulting in possible damage to either or both extract motors. Longer drain times are acceptable. Steam injection is standard on certain machines and optional on others. It permits steaming for time indicated before the too long to steam error appears. ABCDEFGHIJKLMNOPQRST 1=5 minutes H STEAM ERROR D 2=10 minutes 3=50 minutes 1 5 MIN ABCDEFGHIJKLMNOPQRST I FILL ERROR 0 3 MIN This is drain time in seconds after each bath or before each extract, and also the delay time from E1 to E2 (low to high speed extract) if machine has two speed extract (see configure decision D, page AT). H 0=hot + cold water valves (standard in America) 1=cold + 2nd water valves (standard in Europe and other areas) 2=hot + cold + 3rd water valves (optional) 3=cold + 2nd + 3rd water valves (optional) H 0=no 1=yes Optional reuse tank permits draining to sewer or reuse (as commanded in formula programming). H 0=no 1=yes Optional overhead tank allows collection of bath liquor for future use. H 0=no 1=yes Optional metered water feature provides for commanding a metered quantity of water for each bath of a formula. Configure decision O is not currently used. 27 PROGRAMMING THE MARK II, III, IV, AND V 100 FORMULA, SINGLE MOTOR WASHER-EXTRACTOR CONTROLLER MSOP0266AE/9526FV (19 of 28) Configure Decisions for Pages AT and UZ, continued Configure Decision (Page and Help Screen) ABCDEFGHIJKLMNOPQRST BALANCING OPT P NO [1=YES] 0 ABCDEFGHIJKLMNOPQRST RECIRC. Q NO[1=YES] 0 D=Discretionary H=Must Accommodate Hardware Selections Explanation H 0=no 1=yes Hydraulic (water) balancing feature is standard on certain machines. It is not an option. Answer 1(yes) if speed sensing and automatic RPM adjusting is desired. H 0=no 1=yes Optional recirculation permits water spray through the load door. Configure decision R is not currently used. ABCDEFGHIJKLMNOPQRST AMPSAVER OPT S NO [1=YES] 0 ABCDEFGHIJKLMNOPQRST TEMP PROBES T 1 TEMP PROBE 1 H 0=no 1=yes Optional ampsaver feature reduces maximum amperes required by a group of machines. H 0=no temperature probes 1=one probe 2=two probes Number of temperature probes depends on model and method of filling with water. Page UZ UVWXYZ U ELEC. LEVEL 0 NO [1=YES] H 0=no 1=yes As of this writing, electronic level sensing is standard on machines with the nameplate model designation xxxxxExN (e.g., 64046E6N) only. It is not an option. Configure decision V is not currently used. UVWXYZ W VARIABLE SPD OPT 1 VARIABLE SPEED H 0=no 1=yes As of this writing, variable speed is standard on some machines, optional on some machines, and not available on some machines. Variable speed applies to wash speed only on some machines and to both wash and extract speeds on other machines. Answer 1(yes) if speed sensing and automatic RPM adjusting desired. E MACHINE MALFUNCTION AND DAMAGE HAZARDS—The variable speed inverter was programmed at the factory. The constants are written inside the electrical box housing the inverter. Changing these constants may result in damage to goods or the machine. 28 PROGRAMMING THE MARK II, III, IV, AND V 100 FORMULA, SINGLE MOTOR WASHER-EXTRACTOR CONTROLLER MSOP0266AE/9526FV (20 of 28) Configure Decisions for Pages AT and UZ, continued Configure Decision (Page and Help Screen) UVWXYZ X MANUAL PASSWORD 1 YES [0=NO] D=Discretionary H=Must Accommodate Hardware Selections Explanation D 0=no—Password (numerical pass code) not required for manual modifications to a running formula. 1=yes—Password reqd.. Configure decisions Y and Z are not currently used. ÏAdditional Configure Screens Configure Decision (Screen) D=Discretionary H=Must Accommodate Hardware Selections/Range Explanation Password (numeric pass code) Screen (only appears if decision X, page UZ = 1) D 0000-9999 PASSWORD: 1234 The four digit pass code configured here must be entered by the operator before making manual formula modifications. Electronic Level Sensing Screens (only appear if decision U, page UZ = 1) B NOTE: Low, med, and high levels shown below only provide safety lockouts. They do not set the levels for the machine; thus, they do not coincide with the traditional levels one (low), two (wash), and three (rinse). See “ADJUSTING LEVEL SENSING APPARATUS . . . ” for more information. D Inches (Centimeters) Minimum level that can be commanded for any LOW LEVEL bath and thus, the minimum level required for 06 4-6 (14-15) steaming. MED LEVEL 10 D 6-10 (15-25) Minimum level required in a bath preceeding an extract. If a lower level is commanded, the control will insert the value configured here when the wash formula is saved. HIGH LEVEL 16 D 10-16 (25-40) Maximum level that can be commanded for any bath. TAP OFFSET COUNTS 0000 H 0000-9999 counts This value adjusts the transducer output to compensate for offsetting conditions (such as location of level sensor) specific to each machine. It is determined for each machine at the factory (see configure nameplate), but may be re-calibrated in the field. To Calibrate Tap Offset Counts—Measure and mark a level in the basket (e.g., 10 inches (25 centimeters)) then command this level. If the level achieved is lower than marked, increase tap offset counts. If the level achieved is higher than marked, decrease tap offset ® counts, or if tap offset counts = 0000, consult the Milnor factory. 29 ENTRAPMENT HAZARD—You can be injured or killed if you become trapped in the washer cylinder. + Procedure must be done only by trained personnel. + Lock off and tag out power at the external disconnect before entering washer cylinder. PROGRAMMING THE MARK II, III, IV, AND V 100 FORMULA, SINGLE MOTOR WASHER-EXTRACTOR CONTROLLER MSOP0266AE/9526FV (21 of 28) Additional Configure Screens, continued Configure Decision (Screen) D=Discretionary H=Must Accommodate Hardware Selections/Range Explanation Screens that Always Appear (not dependent on prior configure decisions) # OF CHEM VALVES 05 H 00-15 valves This is the number of valves or pumps used to inject chemicals, whether flush valves on an optional flushing supply injector, peristaltic pumps (supplied by others) or optional liquid supply valves. Do not count the manifold flush valve, if any. DRAIN WASH OUT SS 00 D 00-45 seconds If a no-water bath is commanded (to shake out loose, dry soil) and do not drain is not commanded for a bath’s drain, when the drain valve opens at the end of the bath, the cold water valve also opens for the shorter of the time stipulated here or the drain time stipulated in configure decision G. AUTOSPOT RPM: 02 D 1-40 Enter the speed the cylinder turns during Autospot. MACHINE NAME 30022F8W MACHINE 07 D Any name (up to 20 characters) to identify this machine. Name appears on hard copy when mode 8, Print Data on the Program Menu is used. Machine name field (20 characters) <x> / Moves the cursor right/left within the machine name field. Enters a character in the current cursor position, where <x> is any keypad character. Accepts the displayed machine name and advances to the next decision. SIMULATOR VERSION? 0 NO [1=YES] H 0 = no 1 = yes Select 1 = yes only if this is a simulator. If yes, board will not operate a washer-extractor or any outputs, but the simulator can send data to a printer or download to a machine or tape. MILDATA 1 YES [0=NO] ® H 0 = no—Machine does not communicate with a Mildata computer ® 1 = yes —Machine communicates with a Mildata computer Mildata Screens (only appear if Mildata? above = 1) MILDATA ADDRESS? 005 H 000-255 This value must match the address (discrete indentification code) assigned to this machine in the Mildata® computer. See Mildata® manual. 30 F PROGRAMMING THE MARK II, III, IV, AND V 100 FORMULA, SINGLE MOTOR WASHER-EXTRACTOR CONTROLLER MSOP0266AE/9526FV (22 of 28) Configure Decision (Screen) DATA ENTRY FWGCEWPL 10000000 Formula F Work Order W Goods Code G Customer Code C Employee Code E Weight W Pieces P Lot Number L D=Discretionary H=Must Accommodate Hardware Selections/Range Explanation ® D For each of the following, 0=no and 1=yes Permits Mildata accounting by the code categories enabled here. 0 or 1, but 1 inserts 0 in next two decisions and skips them. 0 or 1 if formula above = 0, otherwise must be 0 and cursor skips over. 0 or 1 if formula and work order above are both = 0. Otherwise must be 0. 0 or 1 if work order above = 0. Otherwise must be 0. 0 or 1 0 or 1 0 or 1 0 or 1 For each of the above, <x> Enters no or yes, where <x> is 0 or 1. Cannot scroll decisions or values. Do not use / . Accepts the selected choice and advances to the next decision. Cursor moves forward only. Metered Water Screens (only appear if decision N, page AT = 1) COUNTS PER 100 1483 D 0000-9999 Establishes the units measured by the electronic flowmeter. Enter the number of flowmeter counts resulting from flowing 100 gallons, 100 liters, etc., whichever is the unit of choice. The same unit must be used when programming formulas. See flowmeter calibration procedures. OFFSET VALVE TIME 048 H 000-255 tenths of seconds Reduces, by the value entered here, the time the water valve will open to admit the metered quantity commanded. This compensates for the tendancy of the valve/flowmeter to overshoot the commanded quantity. See flowmeter calibration procedures. NOTE: Discharge time, discharge dwell time, and number of discharge sequences, below, control basket rotation and duration of discharge. Use these configure decisions to ensure all goods are discharged. 31 PROGRAMMING THE MARK II, III, IV, AND V 100 FORMULA, SINGLE MOTOR WASHER-EXTRACTOR CONTROLLER MSOP0266AE/9526FV (23 of 28) 6 = DOWN LOAD Ê What Downloading Does—Downloading transfers all formulas, step names, chemical names, and configure Ë codes (if specified) from one machine to another via a serial communication cable. This eliminates the need to enter the same data repeatedly. It can also transfer this data between a machine and a Milnor® serial downloader (Milnor® part number KXMIC00508) for convenient data retrieval in the event of computer memory loss. Downloading completely replaces all of the above mentioned data (configure codes are downloaded only if specifically commanded). Selective downloading (e.g., transferring only certain wash formulas) is not possible. When and When Not To Download—The reliability and usefulness of downloaded data depends on the Ë similarity between the sending machine and any receiving machines. Abide by the following table. Similarity between sending and receiving machines Should you download? Actions required after downloading Software Basic model Options Identical Identical Identical Yes –include configure. none Identical Identical Different Ok–probably exclude configure. Check configure (see caution). Identical Different Different Probably not. Reconfigure then revise formulas. Different doesn’t matter doesn’t matter No—will result in scrambled, unusable data. MACHINE MALFUNCTION HAZARD—Machine may malfunction, possibly causing unsafe operation, damage to machine and/or damage to goods if not properly configured. + After downloading, reconfigure in accordance with each receiving machine’s configure nameplate. This may be omitted only where all machines have identical configurations. The General Procedure—Downloading is done in the following stages: Ë 1. Connect all participating devices via a temporary serial cable (if a permanent cable is not already installed). 2. Set up each machine (not the serial downloader), using mode 6, Download. 3. Initiate and monitor the downloading. Making Connections Ê Machine To Machine—If a serial cable is not permanently installed (in conduit) between participating maË chines, install a temporary cable. See “THE EXTERNAL SERIAL LINK CABLES . . .” (see Table of Contents). MACHINE MALFUNCTION HAZARD—Temporary cables (not enclosed in conduit) are susceptable to electromagnetic interference (EMI) which can disrupt machine operation. + Remove temporary cable as soon as downloading is completed. Machine To/From Serial Downloader—Two sets of instructions appear on the downloader: To DownË load—copying data from a machine to the downloader and To Upload—copying data from the downloader to one or more machines. Connect the lead from the downloader box to the Printer/Download socket on the machine (step 1 on the downloader instructions for both downloading and uploading). Ready light should be on. 32 PROGRAMMING THE MARK II, III, IV, AND V 100 FORMULA, SINGLE MOTOR WASHER-EXTRACTOR CONTROLLER MSOP0266AE/9526FV (24 of 28) Setting Up Participating Machines (not the serial downloader) Ê Depending on the type of downloading, there will be none, one, or several slave (receiving machines), and none or one master (sending) machine. Designate all slave machines first. For each participating machine, access mode 6, Download. You will be prompted for the following information: type of download to be performed, whether this machine is a slave (sending) or master (receiving) machine, and for slave (receiving) machines, whether to receive configure data. PROGRAM 6 MENU DOWN LOAD Ë When the Program Menu and mode 6, Down Load is displayed, Accesses the Down Load Devices menu and displays the first selection. For a Quick Return to the Program Menu Aborts mode 6 prior to designating slave/master and returns to the Program Menu. After designating slave/master, see “Aborting Downloading In Progress” in this section. For each of the decisions explained below, / or <x> Scrolls the menu selections, Specifies a menu selection, where <x> is the menu item number. Accepts the displayed selection and advances to the next decision. Specify the Type of Download Ë Make the same selection for all participating devices. DOWN LOAD DEVICES 0 MACHINE<==>MACHINE.This is the correct choice for all types of downloading covered by this instruction. 1 MACHINE<==>TAPE....No longer used. See manual MATM2MICxE for instructions on retrieving data previously stored on cassette tape. 2 MILDATA=>MACHINE...Data will transfer from a Mildata® PC to machine(s). See Mildata® manual for procedure. Specify Slave (Receiving) or Master (Sending) Ë Make the appropriate selection for each participating machine. DOWN LOAD STATUS 0 SLAVE..............This machine will receive data (default). All receiving machines must be designated first. 1 MASTER.............This machine will send data. Must be designated last (see next page before accepting). Specify Whether To Download Configure Data (if this is a receiving machine) Ë RECEIVE CONFIG ? Make the selection likely to most closely match this machine’s configure nameplate. 0 NO [1=YES]......... Configure data will not be downloaded. This machine will retain its current configuration. 1 YES [0=NO].......... Configure data will be downloaded. Configuration will match the sending machine. (S) xxxx BAUD 0000 When the display at left appears, this receiving machine is ready to accept download data. xxxx=9600 (fast data transfer rate) for all types of downloading covered WAITING FOR MASTER by this instruction. If xxxx=0300 (slow data transfer rate), this indicates that 1=Machine<==>Tape was incorrectly specified above. 33 PROGRAMMING THE MARK II, III, IV, AND V 100 FORMULA, SINGLE MOTOR WASHER-EXTRACTOR CONTROLLER MSOP0266AE/9526FV (25 of 28) Initiating, Monitoring, and Aborting a Download Ê Once any receiving machine is set-up and awaiting data, downloading may be initiated. Displays are provided for monitoring the progress of downloading. You may abort the download process at any time. However, if a download in progress is halted, all receiving devices will contain a mixture of old and new data, and will not operate properly until program memory is successfully downloaded or reprogrammed. Initiating Downloading Ë Machine to Serial Downloader (see To Upload on downloader box) Between Machines Serial Downloader to Machine (see To Download on downloader box) 1. Designate master. Downloading 1. Clear memory in the serial 1. Command Transmit, as begins immediately. downloader as explained in the explained in the To Download To Upload instructions on the instructions on the serial serial downloader. downloader. 2. Designate master. Uploading begins immediately. Monitoring Downloading in Progress Ë Normal Displays During Downloading: (M) 9600 BAUD xxxx RECEIVING DATA (S) 9600 BAUD xxxx TRANSFERRING DATA Slave (receiving) machines Master (sending) machine Display indicating successful completion (appears on all machines): PROCESS COMPLETED NEXT TO PROCEED On each machine, returns to Program Menu. NOTE: After downloading to the serial downloader, label the downloader with the machine model and software version. Error Displays During Downloading: (S) 9600 BAUD 000 WAITING FOR MASTER The displays at left appear during downloading, where xxxx is a scrolling hexadecimal number, indicating byte location currently downloading. At 9600 baud, downloading takes about one minute. While downloading to/from the serial downloader, the Transmit light or Receive light (as appropriate) should be on. When downloading is successfully completed, If, during downloading, either display shown at left appears on a receiving machine, data transfer to that machine was unsuccessful. If the Receive light fails to illuminate when downloading from a machine to the serial downloader, data transfer was unsuccessful. Check the serial cable connections and repeat the download process. ERROR IN CHECK SUM NEXT TO PROCEED Aborting Downloading In Progress Ë Aborts the download process for any receiving machine on which it is commanded, or for all machines if commanded on the sending machine. The machine receiving the abort command displays the following: DOWN LOAD ABORTED Repeat the download process for any receiving machine on which downloading was aborted; otherwise, the machine will contain a mixture of old and new data. NEXT TO PROCEED 34 C PROGRAMMING THE MARK II, III, IV, AND V 100 FORMULA, SINGLE MOTOR WASHER-EXTRACTOR CONTROLLER MSOP0266AE/9526FV (26 of 28) 7 = CLEAR ALL MEMORY (VOLUNTARILY) Ê This mode clears all user-programmed formulas, step names, and chemical names on command. The step names and chemical names originally supplied with the machine will reappear. Configure codes are unaffected when memory is cleared voluntarily, but the control must be reconfigured after first commissioning the machine or after the display says Clear Memory Now. See “IMPORTANT OWNER/USER INFORMATION . . .” (see Table of Contents). When the Program Menu and mode 7, Clear All Memory, is displayed, PROGRAM 7 MENU CLEAR ALL MEMORY Ë Accesses mode 7 and prompts the user to clear memory or cancel. For a Quick Return to the Program Menu Aborts mode 7 without clearing memory and returns to the Program Menu. DATA LOSS HAZARD—The following key strokes will delete all user programmed data. + If this mode was entered accidently, press 4+5+6=CLEAR MEMORY CANCEL = ESCAPE CLEARING MEMORY **PLEASE WAIT** to cancel this procedure. When this display appears (no cursor), + + Clears all user-programmed formulas, step names, and chemical names. This display appears while the controller is clearing memory. When memory is cleared, the display returns to the Program Menu. or Aborts mode 7 without clearing memory. Display returns to the Program Menu. 35 PROGRAMMING THE MARK II, III, IV, AND V 100 FORMULA, SINGLE MOTOR WASHER-EXTRACTOR CONTROLLER MSOP0266AE/9526FV (27 of 28) 8 = PRINT DATA Ê This mode permits printing the current formulas, configure codes, chemical names, and step names (see FIGURE 4) on a printer that meets the requirements explained in “REQUIREMENTS AND SETTINGS FOR THE EPSON LX300 PRINTER” (see Table of Contents). The printer is connected to the machine through the Printer/Download socket. A mating plug is provided with the machine for wiring the printer interface cable. See “THE EXTERNAL SERIAL LINK CABLES. . .”. When the Program Menu and mode 8, Print Data is displayed, PROGRAM 8 MENU PRINT DATA Accesses mode 8 and prompts for the type of data to print. Ë For a Quick Return to the Program Menu Aborts mode 8 any time prior to the start of printing and returns to the Program Menu. When this display appears, select the type of data to print from the choices shown. PRINT DATA 0 FORMULAS...........Prints formulas 00, 99, and the range of formulas specified below. 1 CONFIGURATION......Prints the configure codes. 2 CHEMICAL NAMES.....Prints the 64 field-programmable chemical names. 3 STEP NAMES.........Prints the 15 field-programmable step names. or Scrolls the choices Accepts the selected choice and prompts for today’s date. DATE: MM - DD - YYYY mm - dd - yyyy When configure decision A=0 When configure decision A=1 DATE: DD - MM - YYYY dd - mm - yyyy This display permits entering today’s date, which will appear on the printout. mm, dd, and yyyy are numbers representing month, day, and year, respectively. Note that month/day or day/month order depends on configure decision A. The date is retained (in unprotected memory) for about 48 hours with power off. <mm> or <dd> or <yyyy> enters a value at the indicated cursor location, where <mm> is a number from 01 to 12, representing the month, <dd> is a number from 01 to 31 representing the day, and <yyyy> is a number representing the year (e.g., 1993). Accepts the displayed value and advances to next field or decision. START xx STOP yy This display only appears if Formulas was selected above. Formulas 00 and 99 are always printed. Enter the range of additional formulas to be printed, where xx is the starting formula and yy is the ending formula, inclusive. <xx>, Enters the lowest formula number, where <xx> is greater than 00 and less than or equal to <yy>. <yy>, Enters the highest formula number, where <yy> is greater than or equal to <xx> and less than 99. Printing begins. 36 PROGRAMMING THE MARK II, III, IV, AND V 100 FORMULA, SINGLE MOTOR WASHER-EXTRACTOR CONTROLLER MSOP0266AE/9526FV (28 of 28) C ÎFIGURE 4 (MSOP0234BE) ÎExample Printouts Using Mode 8, Print Data PRINTING . . . . ** PLEASE WAIT ** During printing, this display appears. When printing is concluded, the display returns to the Program Menu. 37 38 Section Operating 39 3 MSOP0268AE/9530DV OPERATING MARK II, III, IV, AND V 100 FORMULA, SINGLE MOTOR WASHER-EXTRACTORS B C This section provides information about 100 formula, single motor washer-extractors to assist management personnel in establishing procedures and training operators. Procedures Used in Normal Operation Fold out the “Summary of Operation” at the end of this section and use the “OPR” numbers to crossreference the operating steps for your machine with the procedures explained below. Fold out FIGURE 1 in “ABOUT THE USER CONTROLS . . .” (see Table of Contents) for the meaning of display and key symbols used in this section. See the “Description of Controls . . .” in the operator manual for the nameplate symbols used to identify the controls (switches, buttons, status lights) mentioned in these explanations. OPR 1: Verify Switch Positions—The machine must be in the run mode for operation. Verify that the Run/Program keyswitch is set to run and if not, consult management. DATA LOSS HAZARD—Improper use of the Program/Run keyswitch may corrupt program data. ☞ Return to the run mode only when the display says OK Turn Key To Run. ☞ Only power off or on with the Program/Run keyswitch at run. ☞ Do not leave key accessible to unauthorized personnel. Mildata—100 formula, single motor machines may link to a Mildata computer which permits a bank of machines to download formulas from and provide accounting and other data to the Mildata computer. Set the Remote/Local switch to remote to place a washer-extractor on-line. When on-line, each time the operator selects a formula, the controller requests the selected formula from Mildata. For example, if the operator selects formula 0005, the machine receives and runs whatever formula is currently associated with that formula number in the Mildata computer. When operating on line, the machine displays the message Please Wait, while it is requesting and downloading the formula from the Mildata computer. To take the machine off-line, set the Remote/Local switch to local. The machine will then run the selected formula stored in the machine’s formula memory. OPR 2: Energize the Microprocessor Controller—The external disconnect switch (furnished by the owner/user) provides/removes all power to/from the machine (but not necessarily to/from non-Milnor electrical devices mounted to the machine). The Master switch provides/removes power to/from the controller. 40 C ELECTROCUTION AND ELECTRICAL BURN HAZARDS—Contact with high voltage will electrocute or burn you. Power switches on the machine and the control box do not eliminate these hazards. High voltage is present at the machine unless the external disconnect switch is off. ☞ Do not unlock or open electric box doors. ☞ ☞ ☞ ☞ Do not remove guards, covers or panels. Do not reach into the machine housing or frame. Keep yourself and others off of machine. Know the location of the external disconnect switch and use it in an emergency to remove all electric power from the machine. To power-up the machine, verify that all utilities (electricity, water, air, and steam) and chemicals are on, set the Master switch to on, and view the start-up displays, as follows: COPYRIGHT PELLERIN MILNOR 1994 Copyright statement (may repeat). ALL RIGHTS RESERVED Example software date code/language version (/S indicates English/Spanish ’OUTERWEAR ’94003/S version). FORMULA CHECK SUM 02C8 C D The checksum changes with any programming changes. Record the check-sum after each programming session, to protect against unauthorized programming. On Staph-Guard type machines, the Soil Side light ( ) illuminates at this time. OPR 4A: Open/Close Soil Door—Hold the Autospot button ( + ) and Unlock Door button ( ) simultaneously until the display says Autospotting Is Completed and the operator signal sounds. The soil cylinder door will be aligned with the soil shell door. Release the buttons. Hold the Unlock door button ( ) until the locks release (7 second delay) and open the outer door. Open the cylinder door as follows: 1. Push the uppermost latches toward the door with your thumbs while holding the handle (see Figure 3). The latches will release the door and cause it to drop down. FIGURE 1 (MSOP0268AE) View of Cylinder Door from Side of Machine FIGURE 2 (MSOP0268AE) Correct Hand Position for Releasing Top Door Locks 41 FIGURE 3 (MSOP0268AE) Releasing Top Door Locks C D 2. Push the lowermost latches toward the door and release once the handles have been secured behind the retainer bolts (see FIGURE 4). 3. When both upper and lower door locks are unlocked, close the outer door. Hold the Autospot button ( + )and Unlock door button ( ) simultaneously. Do not be startled by the loud "bang" that occurs during Autospot. When the display says Autospotting Is Completed and the operator signal sounds, release the buttons. The inner door will be open. Hold the Unlock door button ( ) until the locks release (7 second delay) and open the outer door. FIGURE 4 (MSOP0268AE) Release the Bottom Door Locks 4. Open the outer door and ensure the inner door is locked in the open position by pulling the exposed handle. CRUSH HAZARD—Falling door can crush hands or arms. ☞ Do not place hands or arms into door opening before ensuring the door is locked in the open position. FIGURE 5 (MSOP0268AE) Partially Open Door FIGURE 6 (MSOP0268AE) Pull Top Handle Up To close the door after loading: 1. Push the revealed latches toward the door while holding the handle to unlock the door (see FIGURE 5). 2. Using the handle, pull the door downward until the lowermost handle is in the original position and the door is closed. 3. Pull the uppermost handle up and away from the machine (toward yourself) until it latches into place (see FIGURE 6). 4. Close the outer door. Resume operation. 42 C OPR 4B: Open/Close Shell Door—Machine power must be on to open the door. Safeguards prevent the door from being opened during, and immediately after, manually terminating a cycle. These safeguards are for the operator’s protection. Never attempt to bypass them, nor operate the machine if there is any evidence of malfunctioning safeguards. CRUSH, ENTANGLE AND SEVER HAZARDS—Contact with the turning cylinder can crush your limbs. Contact with the goods being processed can cause the goods to wrap around your body or limbs and dismember you. The turning cylinder and goods are normally isolated by the locked cylinder door. ☞ Do not attempt to open the door or reach into the cylinder until the cylinder is stopped. ☞ Do not operate the machine with a malfunctioning door interlock. ☞ Do not touch goods inside or hanging partially outside the turning cylinder. C On Staph-Guard style machines, return control to the clean side by pressing and closing the door. C OPR 5: Compose the Load and Load the Machine—The operator is responsible for maintaining after unloading the machine proper load size, as explained in “DETERMINING LOAD SIZE” (see Table of Contents). Effective centrifugal extraction (drawing the water from the goods by spinning the cylinder) depends on proper distribution in the cylinder. If the machine cannot adequately distribute the goods, it will be out of balance and its vibration safety devices will prevent it from achieving normal extract speed. The knowledgeable operator can minimize severe imbalances and intervene to correct those that occur. Open pocket models distribute the load by turning the cylinder at drain (distribution) speed, just prior to extract. Drain speed is just fast enough to hold the goods against the cylinder, but slow enough to permit the goods to spread out as they pass through the draining bath. If goods do not spread out sufficiently and a severe imbalance occurs, the machine will return to wash speed and attempt to redistribute the goods (extract recycle). Persistent recycles waste time and energy, and usually indicate a need for operator intervention. If goods are netted or tangled, distribution may not be possible. Observe the machine during extract and if necessary, stop the machine and untangle the goods. C OPR 6: Add Chemicals—A washer-extractor may be equipped with a five-compartment supply injector, a pumped chemical system by others, or a central liquid supply system (chemical inlet valve supplied by Milnor®, chemical storage and delivery system by others). If the machine has a supply injector, the operator adds measured quantities of chemicals to the appropriate compartments as required for each load. This is normally done before starting the cycle, but may also be done during the cycle (see OPR 8C), if required by the formula. Management personnel who determine the formulas, must instruct the operator as to chemical type, quantity, and location (supply injector pocket to load) for each formula. See “USING THE FLUSHING TYPE AUTOMATIC SUPPLY INJECTOR” for more information. If a pumped chemical or central liquid supply system is used, observe this system periodically to ensure that chemicals are automatically delivered to the machine when called for. OPR 7: Select a Formula—The machine can contain up to 98 field-programmed (local) wash formulas. The machine also contains two permanent formulas: formula 00, used to commission a new machine (explained below) and formula 99, used to develop new formulas (explained in “MODIFYING FORMULAS . . .”). The machine may also be connected to a Mildata computer providing access to up to 1000 (remote) formulas. With Mildata, the operator selects either a formula, a work order, or a goods code (as configured), then enters cake data. Cake data is the set of batch codes assigned to each load to identify it. It is preferable to select the formula just before starting the cycle. 43 Select a local formula when the machine is not on-line to Mildata as follows: When the Run Formula menu is displayed as shown at left, RUN FORMULA <xx> selects formula, where <xx> is a two digit number from 01 to 98. 00 OR OK POWER OFF The formula name and number appear if a valid formula was selected. Does Not Exist appears for a non-existent formula. A valid formula sounds the operator signal, if the shell door is closed. or / Scrolls the available formula numbers. Select a remote formula, work order, or goods code and enter cake data when on-line to Mildata as follows: When one of the prompts shown at left appears, <response> Selects formula, work order, or goods code, where <response> is a four, ten, or five digit number, respectively. Cannot scroll. Accepts the value entered above. When each prompt shown at left appears, <response> Enters the requested batch code where <response> is the number or alpha characters described at left. Codes are determined locally. • After each code, accepts entered value and prompts for next code. • After the last batch code, downloads the formula from Mildata® . Formula name and number appear if valid data was entered. “INVALID FORM DATA” (or similar) appears for any invalid data. • After formula is downloaded, displays and permits changing each code previously entered. Select Formula 00 to commission a new machine.—Formula 00 (see FIGURE 1) is similar to a medium soil formula. Because it may not take advantage of supplied options, it is only intended to help commission a new machine. It will run on any machine with two water valves to test the following: • Filling to levels 2 and 3. • Hot, cold, and split water (or cold, 2nd, and cold+2nd, if cold only). No temperatures are commanded. • 60 second chemical injections from valves 01 through 05. • Wash reversing, intermediate extract, and final extract. • Draining to sewer. The first drain is at wash speed and all others are at distribution speed. NOTE 1: Formula 00 is available provided the machine is not on-line to Mildata. NOTE 2: Even if the password is enabled, the controller permits modifying formula 00 (see “MANUAL FORMULA MODIFICATIONS...”) without the password. However, formula 00 cannot be copied, d e l e t e d , o r permanently changed. FIGURE 7 (MSOP0268AE) Printout of Formula 00 (used to commission a machine) 44 RUN FORMULA 00 OR OK POWER OFF When the Run Formula menu and selection 00 is displayed as shown at left, Accesses formula 00. RUN FORMULA 00 FORMULA 00 Silences the operator signal and starts the process (see OPR 7). or Cancels formula 00 access. OPR 8: Start/Stop the Cycle—The Start button ( ) starts processing and the Stop button ( ) stops processing, as further explained below. Spring-Mounted Models—On these models, the shell is permitted to vibrate within the frame during the entire cycle. CRUSH HAZARD—Machine can crush body parts caught in gaps around shell front and at rear of machine that close due to vibration and tilting. ☞ Keep clear of moving parts. When the machine loaded, the door is closed, and the supply injector (if any) is charged with chemicals, start processing as follows: RUN FORMULA With a valid wash formula displayed as in the example at left, 08 SHEETS Starts the cycle and silences the operator signal. Various displays appear so operator can monitor the formula in progress (FIGURE 4). A wash cycle can be stopped then either resumed or cancelled (OPR 8A). The cycle can also be resumed after a power interruption (OPR 8B), because the controller remembers the step it was in. If a supply injector is used and the formula in progress requires additional chemicals, the operator signal sounds, the timer stops, and the display shows which chemical(s) to add (OPR 8C). When the cycle ends, a signal and display message alert the operator (OPR 9). 45 OPR 8A—If necessary, stop, then either resume or cancel the wash formula in progress as follows: Disables the three-wire circuit, immediately stopping all machine functions and displaying an error message. If this is a bath, water, chemical, and steam valves close and the drain opens, draining the machine. (See “MANUAL FORMULA MODIFICATIONS . . .” for how to stop the formula timer without draining the machine.) 3 WIRE DISABLED FAULT: SEE MANUAL Cancels the formula. Display returns to the Run Formula menu. or Resumes the formula where the count left off in the interrupted step, as stipulated in the note below. NOTE: How the machine recovers depends on whether the interruption occurred during a bath, drain, or extract. • Bath—machine achieves level and temperature again, even if these were already achieved before the interruption. (If the machine is configured for metered water, the control prompts “REFILL WITH WATER?” Answer yes to inject the commanded quantity or no for no water.) • Drain—the drain duration will be repeated. • Extract—the machine will perform an extract recycle. OPR 8B—When power is restored after a power loss, resume or cancel the interrupted formula as follows: NEXT TO RESTART AT Fxxxx Syy When the display at left appears, where xxxx and yy are the interrupted formula/step, Confirms that the formula will be resumed, or PRESS START Cancels the formula and returns to Run Formula menu. Enter the password if requested (otherwise, resume the formula). When the display at left appears, Resumes the formula at the beginning of the interrupted step, as stipulated in the note in OPR8A. OPR 8C—Respond to the operator signal to add supplies as follows: 1. Read the display to determine chemical(s) to be added. 2. Load the supply compartment(s), add through soap chute, or flush manually as instructed locally. To flush supplies manually, load compartment one and hold the Flush/Spray switch to manual flush. 3. Press the Signal Cancel button. If a signal only was commanded, processing resumes immediately. If a signal with chemical was commanded, the supply compartment is flushed for the commanded time. OPR 9: Respond to the end-of-cycle signal message PLEASE UNLOAD ME When the display at left appears, where message describes cylinder motion, or Silences the signal and completes the cycle, except as follows: If message = “break cake,” cylinder motions continue until completed. If message = “tumbling,” the operator can open the door to pull down any plastered goods. After closing the door again, Resumes “tumbling” for two minutes. 46 OPR 10: Jog the Cylinder to loosen the goods—Jogging (briefly turning the cylinder with the door open) is controlled by the operator and should be performed to loosen the goods before unloading the machine. CRUSH HAZARDS—Contact with the turning cylinder can crush your limbs. ☞ Keep yourself and others clear of cylinder and goods during jogging operation. ☞ Keep both hands on the controls while operating. ☞ Do not operate the machine with malfunctioning manual two-hand controls. To jog the cylinder, simultaneously hold the Start button ( ) and hold the Jog switch to either position (clockwise ( ) or counter-clockwise ( ) as desired). The cylinder turns until buttons are released. 47 NOTE 1: Where data on the display is shown shaded, this information was explained on another display. Bath Displays Before Level Satisfied—No Chemicals Actuated (see NOTE 2) NOTE 2: If machine is not part of a Mildata system, formulas 0000-0099 are the Step time remaining internal formulas (of which 01-98 are field (minutes:seconds) programmable). With Mildata, formulas 0001-9999 are those requested from the Mildata computer. Step Name Formula Number (note 1) Step Number 10:38 F0005S03 02:37 * HC3 Alternates With 1 dC=A055/D090 1 Level currently 2 achieved 3 ( =below low) C23 2 dF=A093/D140 * Water valve(s) currently on: Hot, Cold, 2nd, 3rd 10:38 STEPO3 02:37 WAIT FOR LEVEL2 HC3 WAIT FOR LEV10" W=A00125/D00135 3 Bath Displays— Chemicals or Signal Actuated 10:38 F0005S03 02:37 dF=A093/D140 LEV 1 Level currently achieved: If preset levels Example if electronic level sensing If metered water, press to see Actual / Desired. LEV 2 LEV 3 LEV10" LEVEL 10:38 F0005S03 02:37 10:38 STEP 03 02:37 dF=A093/D140 SPD 0 Motor speed (only appears if speed is programmable): Chemical name Chemical name number Chemical number Drain Display Alternates With NOTE 3: Chemical information remains on display as long as chemical output is actuated. NOTE 4: If more than one chemical output is actuated, chemical information alternates. 20RPM Alternates With LO SPD EXT 0450 RPM Actual speed (example).Only appears on machines with RPM sensing and variable speed. 05:30 EXTRACT 05:30 LO SPD EXT 0450 RPM HI SPD EXT If machine has two speed extract. Otherwise, displays "HI SPD EXT" only. Actual speed (example). Only appears on machines with RPM sensing and variable speed. ÎFIGURE 2 (MSOP0268AE) ÎDisplays While Running a Wash Cycle 48 Be safe. Comply with all safety instructions. Verify switch positions (OPR 1). Run the Wash Cycle Ë Outerwear Models (FxW) Compose the load (OPR 5). Load the machine (OPR 5). Close the door (OPR 4B). Add chemicals, if required (OPR 6). Select a formula (OPR 7). Start the cycle (OPR 8). Respond to the end of cycle (OPR 9). Open the door (OPR 4B). Jog to loosen the goods (OPR 10). Unload the machine. 02-04 SOAP+ALKALI 01:20 05:30 F0005S06 05:30 Start the Operating Day Ë 10:38 STEP 03 02:37 DRAINING TO SEWER Drain time remaining SPD 1 15RPM If two speed wash (0=low 1=high) Example if variable speed (shows actual speed on machines with RPM sensing. Shows desired speed on others.) 02-04 SOAP+ALKALI (see NOTES 3 and 4) Extract Displays Alternates With The operator actions listed here correspond to the headings in “Normal Operation . . .” in the operator manual. Energize microprocessor controller (OPR 2). Level: 1 =Level desired (if preset levels) 2 =Inches/centimeters desired (if electronic level sensing) 3 =Units of water: Actual / Desired (if metered water) Bath temperature: degrees Fahrenheit or Centigrade; Actual / Desired. Only appears if temp probes configured. Press SKIP to see actual temperature read by TO each probe. Bath Displays After Level Satisfied—No Chemicals Actuated Summary of Operation Ê Formula time remaining (minutes:seconds) Monitor Normal Operation—See FIGURE 4. Ë Staph-Guard Models (FxS) Compose the load. (OPR 5) Open the soil side doors. (OPR 4A) Load the machine. (OPR 5) Close the soil side doors. (OPR 4A) Add chemicals, if required. (OPR 6) Select a formula. (OPR 7) Start the cycle. (OPR 8) Respond to end of cycle. (OPR 9) Open clean side door. (OPR 4B) Unload the machine. Close the clean side door. (OPR 4B) Transfer control to the soil side. (OPR 4B) NOTE 1: Where data on the display is shown shaded, this information was explained on another display. Bath Displays Before Level Satisfied—No Chemicals Actuated (see NOTE 2) NOTE 2: If machine is not part of a Mildata system, formulas 0000-0099 are the Step time remaining internal formulas (of which 01-98 are field (minutes:seconds) programmable). With Mildata, formulas 0001-9999 are those requested from the Mildata computer. Step Name Formula Number (note 1) Step Number 10:38 F0005S03 02:37 * HC3 Alternates With 1 dC=A055/D090 1 Level currently 2 achieved 3 ( =below low) C23 2 dF=A093/D140 * Water valve(s) currently on: Hot, Cold, 2nd, 3rd 10:38 STEPO3 02:37 WAIT FOR LEVEL2 HC3 WAIT FOR LEV10" W=A00125/D00135 3 Bath Displays— Chemicals or Signal Actuated 10:38 F0005S03 02:37 dF=A093/D140 LEV 1 Level currently achieved: If preset levels Example if electronic level sensing If metered water, press to see Actual / Desired. LEV 2 LEV 3 LEV10" LEVEL 10:38 F0005S03 02:37 10:38 STEP 03 02:37 dF=A093/D140 SPD 0 Motor speed (only appears if speed is programmable): Chemical name Chemical name number Chemical number Drain Display Alternates With Be safe. Comply with all safety instructions. Verify switch positions (OPR 1). Run the Wash Cycle Ë Outerwear Models (FxW) Compose the load (OPR 5). Load the machine (OPR 5). Close the door (OPR 4B). Add chemicals, if required (OPR 6). Select a formula (OPR 7). Start the cycle (OPR 8). Respond to the end of cycle (OPR 9). Open the door (OPR 4B). Jog to loosen the goods (OPR 10). Unload the machine. 02-04 SOAP+ALKALI NOTE 3: Chemical information remains on display as long as chemical output is actuated. NOTE 4: If more than one chemical output is actuated, chemical information alternates. 01:20 05:30 F0005S06 05:30 Start the Operating Day Ë 10:38 STEP 03 02:37 DRAINING TO SEWER Drain time remaining SPD 1 15RPM If two speed wash (0=low 1=high) Example if variable speed (shows actual speed on machines with RPM sensing. Shows desired speed on others.) 02-04 SOAP+ALKALI (see NOTES 3 and 4) Extract Displays Alternates With The operator actions listed here correspond to the headings in “Normal Operation . . .” in the operator manual. Energize microprocessor controller (OPR 2). Level: 1 =Level desired (if preset levels) 2 =Inches/centimeters desired (if electronic level sensing) 3 =Units of water: Actual / Desired (if metered water) Bath temperature: degrees Fahrenheit or Centigrade; Actual / Desired. Only appears if temp probes configured. Press SKIP to see actual temperature read by TO each probe. Bath Displays After Level Satisfied—No Chemicals Actuated Summary of Operation Ê Formula time remaining (minutes:seconds) 20RPM Alternates With LO SPD EXT 0450 RPM Staph-Guard Models (FxS) Compose the load. (OPR 5) Open the soil side doors. (OPR 4A) Load the machine. (OPR 5) Close the soil side doors. (OPR 4A) Add chemicals, if required. (OPR 6) Select a formula. (OPR 7) Start the cycle. (OPR 8) Respond to end of cycle. (OPR 9) Open clean side door. (OPR 4B) Unload the machine. Close the clean side door. (OPR 4B) Transfer control to the soil side. (OPR 4B) Monitor Normal Operation—See FIGURE 4. Ë Actual speed (example).Only appears on machines with RPM sensing and variable speed. 05:30 EXTRACT 05:30 LO SPD EXT 0450 RPM HI SPD EXT If machine has two speed extract. Otherwise, displays "HI SPD EXT" only. Actual speed (example). Only appears on machines with RPM sensing and variable speed. ÎFIGURE 2 (MSOP0268AE) ÎDisplays While Running a Wash Cycle 49 MSOP0207AE/9516BV (1 of 2) È SING THE FIVE-COMPARTMENT U FLUSHING SUPPLY INJECTOR Five-compartment supply injectors are optional on most rigid washer-extractor models and standard on most suspended models. FIGURE 1 depicts the supply injector used on 75-135 lb. capacity models. Injectors on other models vary in appearance but not in function. General Guidelines Ê Liquid or Dry Chemicals Dry Chemicals Compartments 1 and 2 are intended for dry chemicals (e.g., soap, alkali) which may be placed directly into the compartment. Compartments 3, 4, and 5 may be used for liquid or dry chemicals (e.g., bleach, sour, softener) and are furnished with plastic cups. Liquid chemicals are recommended because they are more easily measured and diluted. When dry chemicals are to be injected from cups, drill a 1/8" (3mm) diameter hole just above the base of the cup to allow it to drain automatically. Restrict starch to compartment 5, if possible. Water Injector Compartment Number 1 2 3 4 5 ÎFIGURE 1 (MSOP0207AE) ÎFive-Compartment Flushing Supply Injector for 75-135 Pound Washer-Extractors (Injectors for Other Machines Similar) NOTE: All machines are furnished with a soap chute which may be used to manually inject chemicals directly into the cylinder at any time. MACHINE DAMAGE HAZARD—Stainless steel surfaces can corrode if chemicals (e.g., bleach) dry on them, leaving residue. Rubber and plastic components (other than plastic cups) can deteriorate from exposure to chemical concentrates. ☞ Keep surfaces clean. Operator Guidelines Ê Load Chemicals According to Formula Instructions Ë For System 7 (non-programmable) controllers, refer to the wash formula descriptions for chemical loading instructions (which chemicals to preload into which pockets). For E-P Plus or Mark II, III, IV, and V controllers, refer to the wash formula descriptions for any fixed (factory-supplied) formulas employed. For field-programmed formulas, refer to instructions prepared locally. Load the supply injector before starting a cycle. Each chemical is automatically flushed into the washer at the proper moment. If supply compartments need to be re-loaded during the cycle, the operator signal and a display message will alert you. 50 B USING THE FIVE-COMPARTMENT FLUSHING SUPPLY INJECTOR MSOP0207AE/9516BV (2 of 2) Protect Against Corrosion Damage Ë • When loading compartment 3, 4, or 5, place chemical into cup and direct flushing water into it. Do not place chemical directly into the compartment. This is especially true for dry bleach. • Avoid spilling any chemically active concentrate directly onto machine surfaces. • Spray all supply compartments with water at the end of each day’s production. • Carefully clean away any rust from the supply injector at least once a week. • Notify management if injection water does not completely flush chemicals into the machine, or if machine components corrode. Some washer-extractors are equipped with a Manual Flush switch and/or spray hose shown in FIGURE 2. • Hold the switch at Manual Flush, to flush the contents of the first compartment into the basket. • Hold the switch at Spray and use the hose to assist chemicals into the cylinder and to clean the supply injector at the end of the day. ÎFIGURE 2 (MSOP0207AE) ÎManual Flush/Spray Switch and Spray Hose Formula Development Guidelines Ê Protect Against Corrosion Damage Ë • Verify that chemical injection durations ensure complete flushing. It is recommended to extend injections 30 seconds beyond the required time, for safety. • If surface deterioration persists, check for intermittent low water pressure. If dry bleach is used, try changing the brand of bleach. Determine Bleach Quantity and Concentration—Th e s u p Ë ply cups are large enough to contain all the chemicals required for a given bath. For bleaching, however, a concentration higher than 1% may be required. For the normal practice of 64 ounces (1893 ml) of 1% solution per 100 pounds (45 kg) of goods, use the quantities and concentrations shown in the table at right. These may be used with complete confidence since the diluting action of the supply injector will reduce the actual strength of the bleach to less than 1% prior to injection. Determine the Type of Starch—The supply injector is normally Ë connected to a source of hot water. However, some types of dry starch may require cold water to prevent them from becoming too “gooey.” If you have difficulty injecting dry starch automatically, the supply injector can be modified to flush one compartment with cold water. Consult the Milnor® factory for more information. 51 Washer Bleach Quantity Capacity and Concentration pounds (kg) ounces (ml) 35 (15.9) 6 ounces (177) of 4% 50 (22.7) 8 ounces (237) of 4% 55 (24.9) 9 ounces (266) of 4% 60 (27.2) 10 ounces (296) of 4% 75 (34.0) 12 ounces (355) of 4% 90 (40.8) 14 ounces (414) of 4% 125 (56.7) 15 ounces (444) of 4% 135 (61.2) 16 ounces (473) of 4% 200 (90.7) 16 ounces (473) of 8% 250 (113.4) 20 ounces (591) of 8% 300 (136.1) 24 ounces (710) of 8% 450 (204.1) 36 ounces (1065) of 8% 700 (317.5) 56 ounces (1656) of 8% MSOP0236BE/9516CV (1 of 4) MODIFYING FORMULAS IN PROGRESS The operator can manually override certain programmed values (e.g., commanded bath temperature) and invoke certain functions (e.g., chemical injection) on the Mark II, III, IV, and V microprocessor washer-extractor and FxW controllers, while a formula is in progress. This can be done either 1) one action at a time, with the formula running (method A), or 2) one or more actions simultaneously, with the formula temporarily suspended, using the manual mode (method B). Method A applies to baths, drains, and extracts. Method B only applies to baths. Certain actions are exclusive to each method. If a password is not enabled (configure decision X), both methods are available to anyone. If a password is enabled, both methods are password-protected. B Method A: Individual Modifications With the Formula Running Method A: General Procedure 10:38 F0005S03 02:37 When a formula is running and a run display such as the example at left appears, dF=A093/D140 LEV2 <command> Either 1) causes the commanded action to occur or 2) prompts for the password, where <command> is the key or key combination explained in “Method A: Actions Available. . .” below. ENTER PASSWORD : If the display shown at left appears, <password> Enters the password, where <password> is the four digit numerical pass code configured. The initial command that prompted the password must be re-entered; however, the controller will permit several actions to be performed after entering <password>, provided the key strokes are no more than ten seconds apart.The Start button ( ) and Stop button ( ) are not password-protected. INVALID PASSWORD : If the display shown at left appears, an invalid or no password was entered. Repeat <command>, <password>, <command> with the valid password. Method A: Actions Available During Wash, Drain, and Extract— The foll owing actions (other than manually stopping and starting the timer) can be invoked with the formula timer stopped or running. Stops the formula timer. Any functions in progress continue. Resumes timing if the timer is stopped. Stops the formula in progress. Any functions in progress, cease. , resumes the formula. Cancels the formula in progress. Formula cannot be resumed. Extends a bath or extract in progress one minute (repeat for each additional minute). Extends a drain in progress ten seconds (repeat for each additional ten seconds). Cancels a bath, a drain proceeding a bath, or an extract in progress, and proceeds to the next step. This action will not cancel a drain proceeding an extract. 52 MODIFYING FORMULAS IN PROGRESS MSOP0236BE/9516CV (2 of 4) Method A: Actions Available During Wash Only hold + / + / + / + <x> hold + hold + + Increases/decreases basket speed (if so equipped). If machine has two speed wash, during a bath, this action moves the commanded speed between 0 (normal) and 1 (low). If the machine is equipped with variable speed, this action increases/decreases the RPMs (if speed is programmed in RPMs), or increases/decreases the percent of normal speed (if speed is programmed in percent). The display skews approximately two units per second. Raises/lowers the commanded level. If the machine is configured for preset levels, this action moves commanded level between 1 (below low level), 2 (low level), and 3 (high level). If levels are programmed in inches/centimeters, this action increases/decreases the inches/centimeters commanded, within the allowable limits configured. This action is unavailable on machines with metered water. If level was previously achieved, the display only shows actual level, not commanded level. When commanded level is raised, the controller injects water using the water valves/thermo-modulation commanded for this bath in the formula. Lowering the commanded level has the following limitations: 1) the controller will not permit lowering the commanded level in a bath preceeding an extract and 2) the machine will not respond by draining, but it will remain at a lower level if the higher commanded level was not achieved. Raises/lowers commanded bath temperature (if so equipped). A higher commanded temperature can be achieved by thermo-modulation or steaming if conditions permit. The machine can only achieve a lower commanded temperature by thermo-modulation and only if the commanded level is not yet achieved. Injects a chemical (from Chem 1 to Chem 8, if so equipped) any time during a bath (without consideration for level/temperature achieved), as long as keys are held depressed. <x> is the chemical number from 1 to 8. Injection continues for one second after keys are released. <y> Chemical <y> Injects a chemical (from chem 9 to chem 15, if so equipped) any time during a bath (without consideration 1 9 for level/temperature achieved) as long as keys are held 2 10 depressed. <y> is the number from 1 to 7, indicated by 3 11 the table at right. 4 12 5 13 6 14 7 15 Flushes the supply injector manifold (if so equipped) as long as keys are held depressed. 53 MODIFYING FORMULAS IN PROGRESS MSOP0236BE/9516CV (3 of 4) Method B: Multiple Modifications With the Formula Temporarily Suspended Using Manual Mode (accessible during baths only) Method B: General Procedure 10:38 F0005S03 02:37 When a formula is running and a run display such as the example at left appears, dF=A093/D140 LEV2 Either 1) places the machine in manual mode or 2) prompts for the password. In manual mode, the timer stops, all water/steam/ chemical valves close, and the manual mode display appears. ENTER PASSWORD : If the display shown at left appears, <password> Enters the password, where <password> is the four digit numerical pass code configured. Press within ten seconds after entering <password>. Extract Wash Motor Wash Speed Hot Water Cold Water 3rd Water Liquor Level Drain Where Steam INVALID PASSWORD : Message area H C 3 LL D S M S E 2 If the display shown at left appears, an invalid or no password was entered. Repeat , <password>, with the valid password. 1 1=Speed 0 (normal) 2=Speed 1 (low) =Variable speed or stopped * +=Drain closed S=Draining to sewer R=Draining to reuse Shows actual level only. Not commandable here. Other functions: =off, + =on When the manual mode display appears, (alternating with the normal run displays) as shown at left, <command> Causes the commanded action to occur, where <command> is the key or key combination explained in “Method B: Actions Available” below. Turns off any action currently invoked. Exits manual mode (resumes timing and normal run displays) if all manual actions were cancelled. Any chemical injections that were interrupted will not be resumed. Method B: Actions Available—The following actions can be invoked in the manual mode. Any one or more actions invoked by the following commands, except for those that require holding the keys depressed, will be terminated with . Injects hot water (if so equipped). Water valve closes at level 3. Hold key depressed for more water. Injects cold water. Water valve closes at level 3. Hold key depressed for more water. Injects third water (if so equipped). Water valve closes at level 3. Hold key depressed for more water. Closes steam/water valves, displays cooldown message, and injects cooldown water (if so equipped). Injects steam (if so equipped and level 1 is satisfied). Steam valve closes once bath temperature reaches 270oF (27oC). Hold key depressed for more steam. 54 MODIFYING FORMULAS IN PROGRESS MSOP0236BE/9516CV (4 of 4) Closes water/steam/chemical valves, disables reuse drain (if equipped), and drains bath to sewer. Disables sewer drain, closes water/steam/chemical valves, and drains bath to reuse (if so equipped). Turns the wash motor on. Motor starts with a delay, but powers off instantly with brake not applied. Displays basket speed (if equipped with two-speed or variable speed wash). + / Increases/decreases basket speed as explained in method A. + If level 2 is satisfied, drains to sewer and either 1) accelerates to extract speed, or 2) prompts for an extract speed (if two-speed extract). + If level 2 is satisfied, drains to reuse (if so equipped) and either 1) accelerates to extract speed, or 2) prompts for an extract speed (if two-speed extract). HC3LLDS MS E EXTRACT If the extract speed prompt shown in the message area of the manual mode display at ---02*- -* - 0=L 1=H left appears, <x> hold + <x> hold + hold + Accelerates to the commanded extract speed if level 2 is satisfied, where <x> is 0 (low extract) or 1 (high extract). Injects a chemical (from chem 1 to chem 8, if so equipped) as long as keys are held depressed, where <x> is the chemical number. + <y> Injects a chemical (from chem 9 through chem 15, if so equipped), where <y> is the number from 1 through 7 indicated by the table at right. <y> 1 2 3 4 5 6 7 Chemical 9 10 11 12 13 14 15 Flushes the supply injector manifold (if so equipped) as long as the keys are held depressed. Using Formula 99 to Develop/Test a New Formula Formula 99 is a 63.75 minute bath with no water or any other functions and with the cylinder stopped. To develop/test a process without programming a new formula, run Formula 99 and use the “Method B” procedures described herein. NOTE 1: Formula 99 is available provided the machine is not on line to Mildata®. NOTE 2: Even if the password is enabled, the controller permits modifying Formula 99 without the password. However, Formula 99 cannot be copied, deleted, or permanently changed. 55 56 Section Troubleshooting 57 4 MSTS0210AE/9530CV (1 of 5) 100 FORMULA, SINGLE MOTOR WASHER-EXTRACTOR ERROR MESSAGES Errors at Power-Up (or Power Restoration) Memory Errors—These errors occur when field data stored in the microprocessor’s memory becomes unreliable as a result of: 1) a power loss while the controller is in a program mode, 2) improper use of the Run/Program keyswitch, 3) a loss of back-up power to microprocessor components, or 4) a power surge at power-up. The risk of these errors occurring is minimized and data restoration is simplified if the precautions in “IMPORTANT OWNER/USER INFORMATION . . .” (see Table of Contents) are followed. ACCUM. DATA ERROR Accumulator data (e.g., count of loads processed) has become unreliable. NEXT TO CLEAR DATA Resets counters to zero (the only action permitted). CLEAR MEMORY NOW PRESS 4 + 5 + 6 Formula data and possibly configure data have become unreliable. Clears field-programmed formulas, and step/chemical + + names (the only action permitted). After clearing formula data, perform the following actions: 1. Step through all configure decisions and verify each value (program mode 5, Configure). 2. Rename steps and/or chemicals, if desired (program modes 3, Change Step Names and 4, Change Chem Names) 3. Program the formulas (program mode 1, Add/Change Formulas) CONFIG ERROR TURN KEY TO PROG Configure data has become unreliable. LOST WATER DATA NEXT TO PROCEED (Machines with metered water only) Water data for a formula which was resumed after a power loss has become unreliable. Controller cannot tell if machine has water. Accesses mode 5, Configure, and displays Page A-T for reconfiguration Step through all configure decisions and verify each value. Clears the error message. The user is prompted whether or not to refill. Hardware Errors—These errors usually result from hardware failure. See precaution on next page. board name FAILED CHECK THIS BOARD These messages available in English only *--KEYPAD ERROR--* key name The controller detects a failed or missing control circuit board. board name can be 16/8 BOARD, 16 OUT #1, 16 OUT #2, A/D BOARD, or D/A BOARD. This error can also result from configuring the machine for an option not furnished, installing a new board, or installing software that was configured for an option not on this machine. Clears the error message, permitting access to the Program Menu. It also permits running a formula, if the cause of the error has been corrected. The keypad key named on the second line shorted or failed to release, requiring keypad replacement. See also display freezes in “Errors While Programming.” 58 B C 100 FORMULA, SINGLE MOTOR WASHER-EXTRACTOR ERROR MESSAGES MSTS0210AE/9530CV (2 of 5) Errors While Operating PRECAUTION: Before troubleshooting operating errors, review safety instructions in all applicable manuals. Errors That Disable the Three-Wire Circuit (Immediately Stops All Machine Functions)—The three-wire relay provides control circuit power to the machine. Once energized by momentarily depressing the Start button, the three-wire relay is held energized by its own normally open contact, in series with numerous other safety devices (e.g., motor overloads, tilt limit switches, door interlock). Should any of these contacts open, even momentarily, all machine functions stop immediately, inlet valves close, the drain opens, the operator alarm sounds, and the appropriate error message appears. The three-wire relay became de-energized for the reason indicated by message. 3 WIRE DISABLED FAULT : message These messages available in English only Message DOOR WASH OVERLOAD VARIABLE SPEED DRAIN OVERLOAD E1 OVERLOAD E2 OVERLOAD FRONT UP REAR UP SEE MANUAL Resumes the cycle (or enables the three-wire circuit), clears the error message, and silences the operator alarm, providing the cause of the error has been corrected. Explanation Door interlock relay indicates door is or was open. Wash motor overload opened. Variable speed drive unit malfunctioned. Check the variable speed drive unit display for an error code and refer to the manual for this unit. Drain motor overload opened. E1 (low-speed extract) motor overload opened. E2 (high-speed extract) motor overload opened. Front of machine not full down, or front down switch, relay, or circuitry malfunctioned. Rear of machine not full down, or rear down switch, relay, or circuitry malfunctioned. The controller cannot determine why the three-wire relay opened. Most often, this is the result of pressing a Stop button. Otherwise, see three-wire circuit in schematic manual. BRAKE FAULT MUST BE CLEARED TO RESTART Brake pressure switch detects insufficient air pressure in the brake release air cylinder to guarantee brake has released. Possible causes include low air pressure, a leaking air cylinder piston cup, pinched or leaking air lines, a leaking quick-release air valve, or a faulty pressure switch or pilot air valve. On Hydro-Cushion® models, low air pressure can result from an air line that is too small to handle the pushdown and the brake, which operate simultaneously. board name FAILED CHECK THIS BOARD The controller detects a failed or missing control circuit board. See “Hardware Errors” under “Errors At Power-Up . . .” in this section. 59 100 FORMULA, SINGLE MOTOR WASHER-EXTRACTOR ERROR MESSAGES MSTS0210AE/9530CV (3 of 5) Errors That Interrupt the Cycle, Usually Requiring Corrective Action—These errors stop the formula timer and sound the operator alarm, but they do not open the three-wire circuit. Except where noted otherwise, the operator alarm is silenced and operation resumes as soon as the error is rectified, without additional operator action. normal run data CHECK LEVEL SWITCH Controller detects an error in the level switch circuit (e.g., high level is made and low level is not made). normal run data CHECK type PROBE Controller detects a steam or water temperature probe malfunction (where type is STEAM or WATER). Check probe position and connections at resistor board. If OK, disconnect probe and verify that lead-to-lead resistance is 2K to 35K ohms and that lead-to-ground resistance is infinite. Once the cause of the error is remedied, press the Signal Cancel button to clear the error message, silence the operator alarm, and resume operation. normal run data TOO LONG TO COOL The allotted time to cool down to the commanded temperature was exceeded (configure decision J). Check cooldown procedures in “PROGRAMMING . . .” in this manual. normal run data TOO LONG TO FILL The allotted time to fill to the commanded liquor level (configure decision I) has been exceeded. Check for low water pressure. normal run data TOO LONG TO STEAM The allotted time to achieve the commanded temperature by steam injection (configure decision H) has been exceeded. Check for low steam pressure. Conditions That Interrupt the Cycle, Usually Not Requiring Corrective Action—These conditions are normally self-correcting. AMPSAVER HALT (Machines with Ampsaver® option) The machine desires to extract but the Ampmaster controller is delaying this action until the current drawn by other machines in the system falls below the specified level (an energy saving feature). normal run data RECYCLE FAILURE Machine recycled five times in a single extract step. The controller will now attempt to balance the load by repeating the previous step. If problem persists, check load balance and excursion switch adjustment. Errors That Interrupt User Actions—These error messages inform the user of proper procedure. INVALID PASSWORD An invalid password was entered or no password was entered within 10 seconds of the ENTER PASSWORD message, in response to a manual intervention command. MANUAL EXTRACT : MUST HAVE LEVEL 2 An attempt was made to command an extract manually from a bath in which level 2 (required prior to an extract) was not yet achieved. First, command level 2, then permit time to achieve this level before commanding an extract. 60 100 FORMULA, SINGLE MOTOR WASHER-EXTRACTOR ERROR MESSAGES MSTS0210AE/9530CV (4 of 5) Additional Errors That Interrupt User Actions (Mildata® Option) INVALID WORK ORDER User entered a work order number that is not programmed in Mildata®. Enter a valid number. INVALID GOODS CODE User entered a goods code that is not programmed in Mildata®. Enter a valid number. INVALID CUST CODE User entered a customer code that is not programmed in Mildata®. Enter a valid number. INVALID EMPLOYEE # User entered an employee number that is not programmed in Mildata®. Enter a valid number. INVALID FORM DATA User entered an formula number that is not programmed in Mildata®. Enter a valid number. DATA UNLOCATABLE User entered a valid code which has invalid data associated with it (e.g., user entered a goods code that is programmed in Mildata®, but the formula code assigned to that goods code is not programmed). Errors While Programming Keypad Error That Occurs While Programming display freezes If the display stops responding to valid keypad commands, a keypad malfunction probably occurred. (The controller cannot detect and display a Keypad Error in any program mode.) If a replacement keypad is available, it is permissible for authorized service personnel, observing the hazard statement below, to replace the keypad with power on. This procedure will usually regain keypad function, thus avoiding data loss due to power loss while the machine is in the program mode. ELECTRIC SHOCK HAZARD—Although the keypad conductors on the Mark II washerextractor controller are potential-free, accessing the keypad connections will expose other live conductors within the electric box/enclosure. ☞ Keypad replacement must be done only by qualified service personnel. ☞ Ensure that body parts and metal tools do not come in contact with conductors. Errors While Programming Formulas—See “1=ADD/CHANGE FORMULA” under “PROGRAMMING . . .” for a complete explanation of the following errors and the formula programming procedure. CCNN CHEM # AND NAME An attempt was made to program a chemical injection using a chemical number for which the machine is not configured (e.g., chemical 06 on a machine with only five 0600 ILLEGAL CHEM chemicals). ESCAPE? PUSH ENTER TIL END OF FORMULA An attempt was made to exit formula programming by pressing —an improper procedure. The user must first move to the end of the formula (end formula or final extract). 61 100 FORMULA, SINGLE MOTOR WASHER-EXTRACTOR ERROR MESSAGES FORM xx INCOMPLETE TURN KEY TO PROG MSTS0210AE/9530CV (5 of 5) An attempt was made to exit formula programming by turning the keyswitch to Run without first returning to the Program Menu. This is an improper procedure which causes the data for formula xx to become unreliable. xx is the formula number. Deletes the incomplete formula. If no other memory errors are detected, the controller permits returning to the run mode. Fxx TMMQCCCHC LS Syy ILLEGAL INSERT! An attempt was made to duplicate this step when this would result in an illegal condition (e.g., adjacent extract steps or two end formula steps). xx and yy are the formula and step numbers, respectively. Fxx TMMQCCCHC LS Syy ILLEGAL DELETE! An attempt was made to delete this step when this would result in an illegal condition (e.g., adjacent extract steps). Fxx COOLDOWN ILLEGAL An attempt was made to create a cooldown step when the prerequisites are not met. Prerequisites are: 1) cooldown is configured (configure decision J), 2) the coolSyy PRESS NEXT down is not the first step in a program, and 3) the preceding step is not an extract. MEMORY IS FULL PRESS NEXT Formula memory will be exceeded with the next step, so this formula must be deleted. Deletes this incomplete formula. Errors While Configuring—See “5=CONFIGURE” under “PROGRAMMING . . .” for a complete explanation of the configuration procedure. ESCAPE? GO TO END OF CONFIGURATION An attempt was made to exit the configure mode by pressing —an improper procedure. Once in this mode the user must move through all decisions, whether or not they are to be changed. Errors While Downloading—See “6=DOWNLOAD” under “PROGRAMMING . . .” for a complete explanation of the following errors and the download procedure. DOWN LOAD ABORTED NEXT TO PROCEED The user manually aborted the download on this machine, or on the sending machine, if this is a receiving machine. ERROR IN CHECK SUM NEXT TO PROCEED This receiving machine received unreliable data, possibly due to a bad connection in the serial link. Repeat the download once the problem is corrected. [S] 9600 BAUD 000 WAITING FOR MASTER If this display appears after downloading has begun, this receiving machine is not receiving data, possibly due to a bad connection in the serial link. Repeat the download once the problem is corrected. 62 MSOP0267AE/9530DV (1 of 5) MONITORING INPUTS AND OUTPUTS FOR MARK II AND III FxW WASHER-EXTRACTORS D C This section identifies all inputs and outputs used in the Mark II and III FxW washer-extractor controller. It also demonstrates how to access RPM information during operation. The current state of all inputs (made or not made) and the current state of most outputs (energized or not energized) can be displayed while a formula is running or stopped due to an error condition. This is real-time information. Any change in the state of the input or output is displayed as it occurs. NOTE: See “MANUAL MODE MENU FUNCTIONS . . .” (see Table of Contents) for instructions on testing outputs and viewing inputs while the machine is idle. 63 MONITORING INPUTS AND OUTPUTS FOR MARK II AND III FxW WASHER-EXTRACTORS MSOP0267AE/9530DV (2 of 5) Inputs 10:38 F0005S03 02:37 dF=A093/D140 LEV2 3 WIRE DISABLED FAULT : SEE MANUAL When a formula is running and a normal run display or error display similar to the displays at left appears, hold hold Displays the first 16 inputs: (0) A through P. + Displays the second 16 inputs: (1) A through P. When the input status display appears as in the example at left, see the “Table of Inputs” below, for input descriptions. Table of Inputs Display Code C B A B C D E F G H I J K L M N O P (0) A through P (direct inputs -processor board) Input Name Connector/Pin — — — — — — — — — — — — — — — — Mildata MTA38-8 Program key MTA38-3 Signal cancel MTA38-2 Course Balance MTA 38-5 Excursion MTA38-6 Three wire MTA38-7 — — — — (1) A through P (8/16 Board #1) Input Name Connector/Pin Tank is Full (Drain to Sewer) 1MTA3-10 Door Closed 1MTA3-9 Inverter Tripped 1MTA3-8 — — — — — — Don’t Allow Chems 1MTA3-2 — — Amp Saver 1MTA4-10 — — — — — — — — — — — — — — NOTE: Once the drain to sewer input (1MTA3-10) is made, the input is latched and the machine drains to the sewer until the drain cycle is over (even if the input is lost before then). The latch resets before the next drain cycle. 64 MONITORING INPUTS AND OUTPUTS FOR MARK II AND III FxW WASHER-EXTRACTORS MSOP0267AE/9530DV (3 of 5) Outputs 10:38 F0005S03 02:37 dF=A093/D140 LEV2 When a formula is running and a normal run display or error display similar to the displays at left appears, 3 WIRE DISABLED FAULT : SEE MANUAL hold hold hold Displays the first 16 outputs: (0) a through p. + + Displays the second 16 outputs: (1) a through p. Displays the third 16 outputs: (2) a through p. When the output status display appears as in the example at left, see the following tables of outputs for output descriptions. Table of First 16 Outputs: (0) a through p Display Code a b c d e f g h i j k l m n o p Output Name Connector/Pin Common Normally Open On 8/16 Board #1 Recirculation Pump 1MTA5-9 Cooldown 1MTA5-6 Flush 1MTA5-4 Chem 4 1MTA5-2 Chem 1 1MTA6-1 Chem 3 1MTA6-4 Chem 2 1MTA6-6 Chem 5 1MTA6-8 On 16 Out Board #1 Tank to Machine 1MTA13-9 Alternate Acelerate/Decelerate 1MTA13-6 Machine to Machine 1MTA13-3 CW Wash 1MTA13-1 CCW Wash 1MTA14-8 Steam Valve 1MTA14-5 Signal 1MTA14-3 Three Wire Relay 1MTA14-1 65 1MTA5-8 1MTA5-5 1MTA5-3 1MTA6-10 1MTA6-2 1MTA6-5 1MTA6-7 1MTA6-9 1MTA5-10 1MTA5-7 1MTA5-1 1MTA6-3 N/A N/A N/A N/A 1MTA13-8 1MTA13-5 1MTA13-4 1MTA13-2 1MTA14-7 1MTA14-6 1MTA14-4 1MTA14-2 1MTA13-10 1MTA13-7 1MTA14-10 1MTA15-10 1MTA14-9 N/A N/A N/A MONITORING INPUTS AND OUTPUTS FOR MARK II AND III FxW WASHER-EXTRACTORS MSOP0267AE/9530DV (4 of 5) Table of Second 16 Outputs: (1) a through h Display Code a b c d e f g h i-p Output Name Common — Water Valve #1 Water Valve #2 Water Valve #3 Sewer Drain Reuse Drain Door Unlock Machine to Tank — Connector/Pin Normally Open Normally Closed On 16 Out Board#1 — — 1MTA15-5 1MTA15-6 1MTA15-3 1MTA15-4 1MTA15-1 1MTA15-2 1MTA16-7 1MTA16-8 1MTA16-5 1MTA16-6 1MTA16-3 1MTA16-4 1MTA16-1 1MTA16-2 — — — N/A N/A N/A N/A N/A N/A N/A — Table of Third 16 Outputs: (2) a through p Display Code C a b c d e f g h i j k l m n o p Output Name Common Chem 14 Chem 9 Chem 13 Flush Chem 15 Chem 11 Chem Save Drain Save (Miltrench) Chem 10 Amp Saver Chem 6 Chem 7 Chem 8 Chem 12 — — Connector/Pin Normally Normally Closed Open On 16 Out Board #2 2MTA13-1 2MTA13-11 2MTA13-2 2MTA13-12 2MTA13-3 2MTA13-13 2MTA13-4 2MTA13-14 2MTA13-5 2MTA13-15 2MTA13-6 2MTA13-16 2MTA13-7 2MTA13-17 2MTA13-8 2MTA13-18 2MTA13-9 2MTA13-19 2MTA13-10 2MTA14-1 2MTA14-11 2MTA14-2 2MTA14-12 2MTA14-3 2MTA14-4 2MTA14-13 2MTA14-4 2MTA14-14 — — — — 66 2MTa13-10 2MTA13-7 2MTA14-10 2MTA15-10 2MTA14-9 N/A N/A N/A N/A N/A N/A N/A N/A N/A — — MONITORING INPUTS AND OUTPUTS FOR MARK II AND III FxW WASHER-EXTRACTORS MSOP0267AE/9530DV (5 of 5) RPM Display C 10:38 F0005S03 02:37 dF=A093/D140 LEV2 10:38 F0005S03 02:37 4000 0025RPM When a bath, drain, or extract is running as shown at left, Displays the speed value and machine RPM. The speed value is a numerical representation of of the analog voltage to the variable speed controller (i.e., 0000=0 volts and 4095=10 volts). Returns to the run display. 67 MSOP0267BE/9711BV (1 of 6) MONITORING MICROPROCESSOR INPUTS AND OUTPUTS FOR THE MARK IV AND V 100 FORMULA, SINGLE MOTOR WASHER-EXTRACTORS This section identifies all inputs and outputs used in the Mark IV and V microprocessor 100 formula, single motor washer-extractor controller. It also demonstrates how to access RPM information during operation. The current state of all inputs (made or not made) and the current state of most outputs (energized or not energized) can be displayed while a formula is running or stopped due to an error condition. This is real-time information. Any change in the state of the input or output is displayed as it occurs. NOTE: See “MANUAL MODE MENU FUNCTIONS . . .” (see Table of Contents) for instructions on testing outputs and viewing inputs while the machine is idle. 68 MONITORING MICROPROCESSOR INPUTS AND OUTPUTS FOR THE MARK IV AND V 100 FORMULA, SINGLE MOTOR WASHER-EXTRACTORS MSOP0267BE/9711BV (2 of 6) Inputs 10:38 F0005S03 02:37 dF=A093/D140 LEV2 3 WIRE DISABLED FAULT : SEE MANUAL When a formula is running and a normal run display or error display similar to the displays at left appears, hold hold Displays the first 16 inputs: (0) A through P. + Displays the second 16 inputs: (1) A through P. When the input status display appears as in the example at left, see the “Table of Inputs” below, for input descriptions. Table of Inputs Display Code A B C D E F G H I J K L M N O P (0) A through P (direct inputs -processor board) Input Name Connector/Pin Mildata MTA38-8 Program Key MTA38-3 Signal cancel MTA38-2 Course Balance MTA38-5 Excursion MTA38-6 Three wire MTA38-7 — — — — — — Drain Saver (Miltrench) MTA39-6 — — — — — — — — — — — — (1) A through P (8/16 Board #1) Input Name Connector/Pin Tank is Full (Drain to Sewer) 1MTA4-1 1MTA4-2 Inverter Tripped 1MTA4-3 — — — — — — Don’t Allow Chems 1MTA4-7 — — Amp Saver 1MTA4-11 — — — — I am spotted 1MTA39-4 — — — — — — — — NOTE: Once the drain to sewer input (1MTA3-10) is made, the input is latched and the machine drains to the sewer until the drain cycle is over (even if the input is lost before then). The latch resets before the next drain cycle. 69 MONITORING MICROPROCESSOR INPUTS AND OUTPUTS FOR THE MARK IV AND V 100 FORMULA, SINGLE MOTOR WASHER-EXTRACTORS MSOP0267BE/9711BV (3 of 6) Table of Inputs continued (2) A through P (8/16 Board #2)—StaphGuard Only Display Input Name Connector/Pin Display Input Name Code Code A I Want Clean Control 2MTA4-1 I — B Autospot Desired 2MTA4-2 J — C — — K — D — — L — E — — M — F — — N — G — — O — H — — P — Connector/Pin — — — — — — — — NOTE: The #3 Input/output board is a special peripheral board dedicated to the autospot feature. Because it does not communicate with the machine’s processor board, these inputs cannot be displayed. The inputs connectors are as follows: Autospot Desired: 3MTA4-12, I Am Spotted: 3MTA4-3. Outputs 10:38 F0005S03 02:37 dF=A093/D140 LEV2 When a formula is running and a normal run display or error display similar to the displays at left appears, 3 WIRE DISABLED FAULT : SEE MANUAL hold hold hold Displays the first 16 outputs: (0) a through p. + + Displays the second 16 outputs: (1) a through p. Displays the third 16 outputs: (2) a through p. When the output status display appears as in the example at left, see the following tables of outputs for output descriptions. 70 B MONITORING MICROPROCESSOR INPUTS AND OUTPUTS FOR THE MARK IV AND V 100 FORMULA, SINGLE MOTOR WASHER-EXTRACTORS MSOP0267BE/9711BV (4 of 6) Table of First 16 Outputs: (0) a through p Display Code a b c d e f g h i j k l m n o p Output Name Connector/Pin Common Normally Open On 16 Out Board#1 Recirculation Pump 1MTA5-10 Cooldown 1MTA5-9 Flush 1MTA5-8 Chem 4 1MTA5-7 Chem 1 1MTA5-4 Chem 3 1MTA5-3 Chem 2 1MTA5-2 Chem 5 1MTA5-1 On 24 Out Board #1 Tank to Machine 1MTA13-1 Alternate Accelerate/Decelerate 1MTA13-2 Door Unlock 1MTA13-3 CW Wash 1MTA13-4 CWW Wash 1MTA13-5 Steam Valve 1MTA13-6 Signal 1MTA13-7 Three Wire Relay 1MTA13-8 1MTA5-19 1MTA5-18 1MTA5-17 1MTA5-16 1MTA5-14 1MTA5-13 1MTA5-12 1MTA5-11 1MTA13-11 1MTA13-12 1MTA13-13 1MTA13-14 1MTA13-15 1MTA13-16 1MTA13-13 1MTA13-18 Table of Second 16 Outputs: (1) a through h Display Code Output Name Connector/Pin Common Normally Open On 16 Out Board#1 a b c d e f g h i j-p — — 1MTA13-10 1MTA14-11 1MTA14-12 1MTA14-4 1MTA14-4 1MTA14-10 1MTA14-10 1MTA14-10 — Water Valve #1 Water Valve #2 Water Valve #3 Sewer Drain Reuse Drain Machine to Machine Machnine to Tank Autospot Brake — 71 — 1MTA14-1 1MTA14-2 1MTA14-3 1MTA14-13 1MTA14-14 1MTA14-5 1MTA14-15 1MTA14-6 — MONITORING MICROPROCESSOR INPUTS AND OUTPUTS FOR THE MARK IV AND V 100 FORMULA, SINGLE MOTOR WASHER-EXTRACTORS MSOP0267BE/9711BV (5 of 6) Table of First 16 Outputs: (0) a through p Display Code a b c d e f g h i j k l m n o p Output Name Connector/Pin Common Normally Open On 8/16 Board #2—StaphGuard Only Transfer Control 2MTA5-10 2MTA5-19 Xfer Control Not 2MTA5-9 2MTA5-19 Transfer Control 1 2MTA5-8 2MTA5-18 Xfer Control Not 1 2MTA5-7 2MTA5-17 Clean Buzzer 2MTA5-4 2MTA5-14 Brake Release 2MTA5-3 2MTA5-13 Door Unlock 2MTA5-2 2MTA5-12 Spotting in Progress 2MTA5-1 2MTA5-11 24 Output Board #2 Chem 14 2MTA13-1 2MTA13-11 Chem 9 2MTA13-2 2MTA13-12 Chem 13 2MTA13-3 2MTA13-13 Flush 2MTA13-4 2MTA13-14 Chem 15 2MTA13-5 2MTA13-15 Chem 11 2MTA13-6 2MTA13-16 Chem Save 2MTA13-7 2MTA13-17 Drain Save (Miltrench) 2MTA13-8 2MTA13-18 NOTE: The #3 Input/output board is a special peripheral board dedicated to the autospot feature. Because it does not communicate with the machine’s processor board, these outputs cannot be displayed. The outputs connectors are as follows: Spotting in progress: 4MTA5-9 and 4MTA5-18, CW Wash: 4MTA5-8 and 4MTA5-17, Autospot Brake: 4MTA5-7 and 4MTA5-16, Signal: 4MTA5-3 and 4MTA5-13. 72 B MONITORING MICROPROCESSOR INPUTS AND OUTPUTS FOR THE MARK IV AND V 100 FORMULA, SINGLE MOTOR WASHER-EXTRACTORS MSOP0267BE/9711BV (6 of 6) Table of Fourth 16 Outputs: (3) a through p Display Code a b c d e f g h i-p Output Name Chem 10 Amp Saver Chem 6 Chem 7 Chem 8 Chem 12 — — — Connector/Pin Common Normally Open 24 Out Board #2 continued 2MTA13-9 2MTA13-19 2MTA13-10 2MTA14-1 2MTA14-11 2MTA14-2 2MTA14-12 2MTA14-3 2MTA14-4 2MTA14-13 2MTA14-4 2MTA14-14 — — — — — — RPM Display 10:38 F0005S03 02:37 dF=A093/D140 LEV2 10:38 F0005S03 02:37 4000 0025RPM When a bath, drain, or extract is running as shown at left, Displays the speed value and machine RPM. The speed value is a numerical representation of of the analog voltage to the variable speed controller (i.e., 0000=0 volts and 4095=10 volts). Returns to the run display. 73 MSOP0254BE/9514DV (1 of 8) È ANUAL MODE MENU FUNCTIONS ON M MARK II, III, IV, AND V WASHER-EXTRACTORS C This section describes functions on the Mark II, III, IV, and V microprocessor washer-extractor controllers B (including outerwear machines) that are available when the machine is idle (formula not running) and in the run mode. NOTE: See “MODIFYING FORMULAS IN PROGRESS” (see Table of Contents) for instructions on manually modifying a running formula. See “MONITORING MICROPROCESSOR INPUTS AND OUTPUTS . . .” for instructions on viewing inputs and outputs while the machine is running. Selections (Modes) on the Manual Menu Ê 0=Turn Output On—Actuate individual outputs for testing. This is called bare manual. 1=Look at Inputs—View the on/off status of each input during idle conditions. 2=Data Accumulation—View, print, and clear the accumulated counts of loads processed. To Access the Manual Menu Ê RUN FORMULA 00 OR OK POWER OFF When the Run Formula menu and selection 00 is displayed as shown at left, TURN OUTPUT ON 0 When selection 0, Turn Output On, on the manual menu is displayed as shown, Accesses the manual menu. / or <x> or Scrolls the available manual modes, Selects a manual mode, where <x> is a number from 0 to 2. See the following information for how to access and utilize each manual mode. Returns to the Run Formula menu (run mode). 74 MANUAL MODE MENU FUNCTIONS ON MARK II, III, IV, AND V WASHER-EXTRACTORS MSOP0254BE/9514DV (2 of 8) 0=Turn Output On (Bare Manual) Ê How Bare Manual Works—Bare manual permits turning certain outputs on and off, one at a time, for testË ing, when the machine is idle. Note that outputs appear in a different order on the bare manual menu herein, than on the output status displays (see “MONITORING MICROPROCESSOR INPUTS AND OUTPUTS . . .”). To Actuate Outputs in Bare Manual Ë TURN OUTPUT ON 0 When selection 0, Turn Output On on the manual menu is displayed as shown, Accesses mode 0 and displays Press Start. Closes the three-wire circuit permitting output actuation and displays the bare manual menu. ABORT MANUAL OPER 00 COUNTER CLOCKWISE 02 When selection 00 on the bare manual menu is displayed, as shown at left, / or <xx> Scrolls the outputs. Selects an output by number, where <xx> is a menu item number on the “Table of Bare Manual Outputs.” or Returns to the Run Formula menu. When an output is selected as in the example 02, Counter Clockwise, at left, Turns the output on. See table for consequences. Turns the output off and permits selecting any other output for testing. Ï able of Bare Manual Outputs T for 100-Formula, Multi-motor Washer-Extractor Controller Menu Output Name Applicable Standard Consequences of Actuating the Output Item on Display Machines or Option 00 Abort Manual Oper all S Return to Run Formula menu. 01 Clockwise all S Turn basket clockwise at wash speed. 02 Counter Clockwise all S Turn basket counterclockwise at wash speed. 03 Drain Speed all S Turn basket at drain speed (clockwise). 04 Clutch 1 all S Clutch is normally engaged when Master switch is on. Clutch disengages when this output is turned on then off. 05 Water Valve #1 all S Opens valve. 06 Water Valve #2 all S Opens valve. 07 Water Valve #3 all O Opens valve. 08 Sewer Drain all S Output on closes drain. 09 Reuse Drain all O Output on opens drain. 10 Brake all S Output on releases brake. 11–15 Chemical (1 thru 5) all S Operates selected chemical inject device. 16–25 Chemical (6 thru 15) all O Operates selected chemical inject device. 26 Steam all O Opens steam valve. 27 Cooldown all O Opens cooldown valve. 75 MANUAL MODE MENU FUNCTIONS ON MARK II, III, IV, AND V WASHER-EXTRACTORS Menu Item 28 29 30 31 32 33 34 35 36 37 38 39 40 41 42 43 44 45 46 47 48 49 50 51 MSOP0254BE/9514DV (3 of 8) Output Name on Display P-Dn (pushdown) Applicable Standard Consequences of Actuating the Output Machines or Option HydroS Actuates push-down devices, lowering shell onto pads. cushion® Output off de-actuates push-down and releases clutch. BotFil (bottom fill) BWP S Closes diverter valve to door and opens valve to bottom. W-Tilt springS Moves housing to the wash tilt position. (wash tilt position) mount,tilt Signal all S Sounds operator alarm. Aux Bal self-balance S Enables balancing circuit. Spray Down Rapid Load S Opens spray down valve. (transfer clean/soil) Staph S Transfers control to clean-side. Guard® Manifold Flush all S Operates manifold flush valve for supply injector. Disch. Command WTB+ S Moves machine to full up and door full open if prerequisites met. Load Command WTB+ S Moves machine to full down and door full open if prerequisites met. Ld/Unld Terminate WTB+ S Closes door if all other prerequisites are met. Disch. Terminated WTB+ S Signals allied receiving device that discharging is completed. Disch. Desired WTB+ S Signals allied receiving device that discharging is completed. Discharging WTB+ S Signals allied receive device that discharging is in progress. Start Loading WTB+ S Signals allied loading device to start loading the machine. Flag Down WTB+ S Signals shuttle to stop at the machine. Load Desired WTB+ S Signals allied loading device that machine desires a load. Dryell Up WTB+ O Moves dryell up if all prerequisites are met. Dryell Down WTB+ O Moves dryell down if all prerequisites are met. El Lock Release WTB+ O Releases the dryell up lock. Flush Dryell WTB+ O Injects flushing water into the dryell. Dryell Blow WTB+ O Turns on the valve that blows air into the dryell flush water line to purge it of water. Seq Load Desired WTB+ O Signals the discharge sequencer this machine desires a load. Seq Load Allowed WTB+ O Signals Milrail that a load is allowed. Seq Flag Dn Disch WTB+ O Actuates the flag on the shuttle rail that stops the shuttle in front of this machine. Seq Load/Unld Term WTB+ O Resets the discharge sequencer following loading or unloading. Seq Disch. Desired WTB+ O Signals the discharge sequencer this machine desires to discharge. Seq Disch. Allowed WTB+ O Signals the shuttle that discharge is allowed. 76 MANUAL MODE MENU FUNCTIONS ON MARK II, III, IV, AND V WASHER-EXTRACTORS MSOP0254BE/9514DV (4 of 8) Ï able of Bare Manual Outputs T for 100-Formula, Single Motor Washer-Extractor Controller D D D Menu Item 00 01 02 03 04 05 06 07 08 09 10-14 15-24 25 26 27 28 29 30 31 32 33 34 35 36 Output Name Standard Consequences of Actuating the Output on Display or Option Abort Manual Oper S Returns to run formula menu. Clockwise S Turns basket clockwise at wash speed. Counter Clockwise S Turns basket counterclockwise at wash speed. Door Unlock S Unlocks door. Water Valve #1 S Opens valve. Water Valve #2 S Opens valve. Water Valve #3 O Opens valve. Sewer Drain S Output on closes drain. Reuse Drain O Output on opens drain. Brake S Not Used Chemical (1 thru 5) S Operates selected chemical inject device. Chemical (6 thru 15) O Operates selected chemical inject device. Steam O Opens steam valve. Cooldown O Opens cooldown valve. Signal S Sounds operator alarm. Alternate S Signals inverter for use; Accelerator/Decelerator alternates acceleration or deceleration constants. Manifold Flush S Operates manifold flush valve for supply injector. Recirc. Pump O Enables recirculation pump. Machine to Machine O Enables valve from machine to machine. Machine to Tank O Enables valve from machine to tank. Tank to Machine O Enables valve from tank to machine. Transfer Control S Transfers machine control to clean side. Brake Release S Releases autospot brake. Clean Buzzer S Sounds the operator alarm on clean side. 77 MANUAL MODE MENU FUNCTIONS ON MARK II, III, IV, AND V WASHER-EXTRACTORS MSOP0254BE/9514DV (5 of 8) 1=Look at Inputs (While Idle) Ê The current state of all microprocessor inputs (made or not made) can be displayed while the machine is idle. This is real-time information. Any change in the state of the input is displayed as it occurs. NOTE: This procedure accesses the same input status displays explained in “MONITORING MICROPROCESSOR INPUTS AND OUTPUTS . . .” (see Table of Contents), but permits viewing these displays while the machine is idle. See the referenced section for discriptions of the displays, input descriptions, and for instructions on viewing these displays while a formula is running. LOOK AT INPUTS 1 When selection 1, Look At Inputs, on the manual menu is displayed as shown at left, Displays the first 16 inputs. + + Displays the second 16 inputs. Displays the third 16 inputs. Returns to the Run Formula menu. 2=Data Accumulation Ê How Data Accumulation Works—The controller stores data pertaining to loads processed. This data can Ë be used for both accounting purposes and to gauge efficiency of operation. The controller stores data for the last load processed and also accumulates totals per formula as well as for all formulas combined since the last time the data was cleared. This data can be viewed on the display or printed. The data includes: • Loads—The number of loads processed (if applicable). • Formula Number—(if applicable). • Run Time—Total time to process a load including drain, distribution, coast and any error time (see below). • Wait Time—The time span between when one formula ends and when the next one begins (with machine power on). Wait time is always applied to the formula that follows it. If the machine remains on and idle overnight, this entire time is applied to the wait time for the first load processed the following day. Turn power off then back on before starting the first load to exclude idle time outside of normal operating hours. • Error Time—The time during which normal operation is suspended due to an error condition. This time is included in run time (see above). NOTE: The accumulators will store data for formulas 00 through 99, whether these are internal or downloaded from Mildata®. They do not store data on Mildata® formulas higher than 99. However, Mildata® itself provides this capability. 78 MANUAL MODE MENU FUNCTIONS ON MARK II, III, IV, AND V WASHER-EXTRACTORS MSOP0254BE/9514DV (6 of 8) Selections (Modes) on the Data Accumulation Sub-Menu Ë 0=Display Data—Display accumulated data on the microprocessor display. 1=Print—Print out hard copy of accumulated data on a serial printer. 2=Clear—Erase all accumulated data. To Access the Data Accumulation Menu Ë DATA ACCUMULATION 2 When selection 2, Data Accumulation, on the manual menu is displayed as shown at left, Accesses Data Accumulation and displays the choices. 0 0=DISPLAY DATA 1=PRINT 2=CLEAR When the Data Accumulation choices are displayed as shown at left, / or <x> Scrolls the choices. Selects one of the displayed choices, where <x> is a number from 0 to 2. or Returns to the Run Formula menu (run mode). 0=Display Data—Accumulated data may be displayed in three ways, as shown in the “Table of Displayed Ë Data” below. 0 0=DISPLAY DATA 1=PRINT 2=CLEAR When 0=Display Data is chosen from the Data Accumulation choices, as shown at left, Accesses Display Data and displays the choices. 0 0=LAST LOAD 1=FORMS 2=TOTAL When the Display Data choices are displayed as shown at left, <x> Selects a type of data to display, where <x> is a number from 0 to 2. Displays the selected data, as explained in the “Table of Displayed Data,” below. If 1=Forms is accessed, / or <xx> Scrolls the formulas, Selects a formula, where <xx> is the two-digit formula number. Returns to the Data Accumulation choices. ÏTable of Displayed Data Data Type: 0=LAST LOAD Data Displayed: Formula number of last load run hours 1/10 minute minutes 1/10 hour 1=FORMS (formulas) Formula 15 2=TOTAL Total number of loads run 1/10 hours hour hours 79 1/10 hour MANUAL MODE MENU FUNCTIONS ON MARK II, III, IV, AND V WASHER-EXTRACTORS MSOP0254BE/9514DV (7 of 8) 1=Print—Accumulated data may be printed on a serial printer that conforms to the “REQUIREMENTS AND Ë SETTINGS FOR THE EPSON LX300 PRINTER” (see Table of Contents). FIGURE 1 is an example printout. 1 0=DISPLAY DATA When 1=Print, is chosen from the Data Accumulation choices, as shown at left, 1=PRINT 2=CLEAR Accesses the print function and prompts for the date. DATE:MM-DD-YYYY DATE: DD-MM-YYYY 00 When one of the date entry displays is displayed as shown at left, <xx>, Enters the first value, where <xx> is the two-digit number for the month or day (depending on the format configured) and advances the cursor to the second field. Month-day-year or daymonth-year format, depending on the format configured. <xx>, Enters the second value and advances the cursor to the third value. <yyyy>, Enters the year, where <yyyy> is the four digit number for the year and sends the data to the printer. When all data has been sent, the Data Accumulation menu reappears. PELLERIN MILNOR CORPORATION W/E: 48036QHP WASHER 06 VERSION 91000/S DATE: 11/09/1993 PAGE: 01 DATA ACCUMULATION 0 = LAST FORMULA RUN FORMULA # 05 RUN TIME HHT 003 WAIT TIME HHT ERROR TIME MMT 001 000 1 = DATA PER FORMULA FORMULA # 05 09 11 #OF LOADS # RUN TIME HHHT WAIT TIME HHHT 042 027 008 0372 0183 0041 0038 0014 0026 ERROR TIME HHT 002 000 000 2 = TOTAL ACCUMULATION DATA TOTAL # OF LOADS # RUN TIME HHHHT WAIT TIME HHHHT ERROR TIME HHT 0077 00596 00078 002 NOTES: = Number # = Hours-Hours-Tenth of hour HHT HHHT = Hours-Hours-Hours-Tenth of hour HHHHT = Hours-Hours-Hours-Hours-Tenth of hour MMT = Minutes-Minutes-Tenth of minute = Data has reached maximum stored value. * ÎFIGURE 1 (MSOP0254BE) ÎExample Data Accumulation Printout 80 MANUAL MODE MENU FUNCTIONS ON MARK II, III, IV, AND V WASHER-EXTRACTORS MSOP0254BE/9514DV (8 of 8) 2=Clear—Accumulated data may be cleared whenever the machine is idle. All data is cleared simultaneously. Ë 2 0=DISPLAY DATA 1=PRINT 2=CLEAR When 2=Clear is chosen from the Data Accumulation choices as shown at left, NEXT TO CLEAR DATA CANCEL=ESCAPE When the display shown at left appears, Accesses the clear function and prompts the user to continue or cancel. Clears all accumulated data from memory and returns to the Data Accumulation choices. or Exits the clear function without clearing the accumulators and returns to the Data Accumulation choices. 81 82 Section Supplemental Information 83 5 NOTICE As this manual was being printed, Pellerin Milnor Corporation began a manufacturing change which may affect how this manual applies to your machine. The six-position DIP switch on each printed circuit board is being replaced with two sixteen-position rotary switches. The switches (DIP and rotary) are used to set the logical address for each board that communicates with the microprocessor in the machine, or with a higher-level control system (e.g., a Mildata network). Because the change to rotary switches corresponds so closely to the release of this manual, we are supplying you with documentation on how to set both types of switches. If your machine uses printed circuit boards containing one DIP switch, refer to MSFDA401DE to set the address on replacement boards. If your machine uses printed circuit boards containing rotary switches, refer to MSFDA401EE. BMP970004/97071 84 MSFDA401DE/9020JV (1 of 5) THE HARDWARE IN SERIAL-TYPE MICROPROCESSORS General ® Milnor serial microprocessor controls are designed specifically for Milnor® machines and systems. Along with certain external electromechanical relay logic and sensing devices, they control all machine and system functions. Not every microprocessor includes all the components described in this section. The Microprocessor Components This is a list of all components for Milnor® microprocessor controllers. Not every Milnor® microprocessor controller includes all the following components. 1. Keypad or Keyboard—Depending upon the model/type, the keypad may have 12, 30, or 58 buttons. The different keypads are not interchangeable. 2. Keyswitch—Selects run/program modes. The key may be removed only in run. Never leave the key accessible to unauthorized personnel. 3. Display—Depending upon the model/type, the display may be either liquid crystal, fluorescent, or CRT. The different displays are not interchangeable. 4a. Power Supply (NOT for CBW® System)—Converts control circuit AC voltage to +12VDC, -12VDC, and +5VDC for the CPU board. On dryers and some other machines, a second, identical power supply performs the same function for all the peripheral boards, which are mounted in an enclosure separate from the CPU. A minimum 14AWG ground wire must be connected between the grounds on the CPU and the peripheral board(s). This ground is installed at the factory when both enclosures are mounted on the same machine, as in washer-extractors. The ground wire must be provided during installation when the CPU enclosure and its associated peripheral board enclosures are remote from one another as in dryers. Although the +12VDC and -12VDC are not adjustable, the +5VDC for the CPU is very sensitive. The power supply must be adjusted most accurately, so the actual voltage at the CPU board is between 4.95VDC and 5.1VDC as measured by an accurate digital voltmeter. 4b. Power Supply (CBW® System Only)—The Milnor CBW System utilizes two discrete power supplies to convert control circuit AC voltage to +12 VDC, -12 VDC, and +5VDC for the CPU board and peripheral boards. One power supply (ESPS) is a 40-watt power supply located in the Miltron cabinet. It powers the peripheral boards in the Miltron cabinet, including the optional load cell interface board and A/D board for a weighing conveyor, the CPU board and the memory expansion board, and the monitor interface board. Although the +12VDC and -12VDC are not adjustable, the +5VDC for the CPU is very sensitive. The power supply must be adjusted accurately, so the actual voltage at the CPU board is between 4.95VDC and 5.1VDC as measured by an accurate digital voltmeter. The second power supply (PSO) is a 120-watt power supply which provides +12VDC, -12VDC, and +5VDC to the peripheral boards located on the tunnel. This power supply provides for the adjustment of the +12VDC voltage, the -12VDC voltage, and the +5VDC voltage. If these voltages require adjustment, set the +5VDC to provide no less than +4.8VDC at the module electric box farthest from the power supply, as measured by an accurate digital voltmeter. If necessary, adjust the +12VDC to 12.00VDC and the -12VDC to -12.00VDC as measured by an accurate digital voltmeter. 85 F J D J THE HARDWARE IN SERIAL-TYPE MICROPROCESSORS G MSFDA401DE/9020JV (2 of 5) If the +5VDC at the peripheral board nearest PSO is at least +5.25VDC when the voltage at the peripheral board farthest from PSO is +4.8VDC or less, suspect loose MTA connections or inadequate wiring somewhere between the nearest and farthest peripheral boards. 5. CPU (Processor) Board—The Central Processing Unit (CPU) processes data received from the various inputs, stores information, and responds to each keypad entry with the appropriate action. It may be mounted in an enclosure separate from its peripheral boards. The CPU contains E-PROMs programmed by the Milnor factory with fixed instructions (software) that determine how the machine functions. Depending upon machine model/type, the CPU chip can be either an Intel 8085 or an Intel 8088. Although the E-PROMs do not require battery backup, the CPU board utilizes a battery which normally assures that the user-programmable memory will be retained for two to three months without external power. See below and “IMPORTANT OWNER/USER INFORMATION . . .” (see Table of Contents). 6. Memory Expansion Board—Increases memory space available to the processor. This board is used with 8088 CPU board in some applications. D G 7. Battery—Provides memory retention backup when power is off. The battery is mounted directly on 8085 CPU boards, and mounted separately for 8088 CPU boards. A capacitor on the 8088 CPU board provides enough power to retain memory for several hours after the battery has been disconnected. Once fully charged (see “IMPORTANT OWNER/USER INFORMATION . . .”), the battery backup is reliable for 90 days with no power applied. 8. Opto-Isolator Board—Optically isolates inputs to the CPU for electronic noise immunity. Opto-Isolators are incorporated into the 8088 CPU board; thus this separate board is only required for 8085 CPUs. 9. I/O Board—16/8 input-output contains 16 solid-state signal input devices and eight output relays. The input devices are capable of faithfully conducting a low VA 12VDC ground signal to the CPU. The output relays are socketmounted SPDT, 12VDC electromechanical relays with contacts capable of faithfully conducting a maximum of 25VA at 110/120VAC (0.2 ampere or 200 milliamperes at 110/120VAC) or 12.5 VA at 24VAC (0.5 ampere or 500 milliamperes at 24VAC). The output will be either 24VAC or 110/120VAC depending on the machine model/type. These outputs and their power source are intended only to drive another relay with higher contact ratings, that in turn may drive a pump, valve, solenoid, etc., from a separate power source. Never use these outputs to directly drive a pump, valve, or solenoid unless the maximum current required never exceeds the above values. Higher ampere or VA loads will burn out traces on the printed circuit board or possibly overload and damage the control circuit transformer. H Standard I/O board—Used in all devices requiring I/O boards except those listed below. High-speed I/O board—Used only in the following devices and configurations: E6N, J6N, and T6N washer-extractors equipped and configured for both variable basket speed and electronic balancing; Milrail configured for high-speed boards; and all configurations of the M7E centrifugal extractor. 10. Output Board—A 16-output board contains 16 output relays, the same type as those described above. D G D 11. A/D Board (Analog to Digital Convertor)—Converts analog voltage signals, such as temperature, to a digital signal that can be utilized by the CPU. Up to a maximum of eight A/D channels may be provided on a single board. Although seemingly identical, the A/D boards used to sense air temperature in the dryer, water temperature in washer-extractors and dye machines, water temperature in the tunnel, and weight for a weighing conveyor are all different. The different types are clearly marked with different part numbers, which are mentioned in the wiring diagram set and are not interchangeable. 12. D/A Board (Digital to Analog Convertor)—Converts digital signals from the processor to an analog voltage between 0 and 5VDC (e.g., provides the analog signal to the dryer gas valve position actuator and dye machine steam position actuator). 86 THE HARDWARE IN SERIAL-TYPE MICROPROCESSORS MSFDA401DE/9020JV (3 of 5) 13. CRT Board—Receives display instructions from the processor and generates the signals to the CRT to create the desired displays; used in controllers such as the Miltron and Miltrac controllers and Device Master systems. G The CRT board can be plugged in backwards, even though the cabinet/bracketry makes this difficult to do and labeling on the parent board states the proper orientation. Use care to orient the board properly, otherwise microprocessor components may burn out. 14. Resistor Boards—Although seemingly identical, resistor boards are quite different. The different types are clearly marked with different part numbers, which are mentioned in the wiring diagram set and are not interchangeable. a. For Temperature-Sensing System—Used with A/D board in washer-extractors and Dye-Extractors® as part of temperature-sensing system; not required on continuous batch washers because necessary circuitry is included on other (standard) CBW printed circuit boards. b. For Gas Valve—Used with D/A board in temperature control circuit of gas dryers; converts 0-5VDC to 4-20 milliamperes for modulating gas valve. c. For Steam Valve—Used with D/A board in temperature control circuit of older steam dryer models; converts 0-5VDC to 4-20 milliamperes for modulating steam valve. See “4-20MA Output Board” in this section. D 15. Signal Conditioner for Thermocouple—Amplifies the output from a thermocouple so an A/D board can use the signal. 16. Rotation Safety Board—Used in dryers. Reads rotational safety proximity switch to confirm that the basket is turning. 17. Temperature Probes—Two types of temperature probes are used, depending on equipment type: Thermistor temperature probes—A temperature-sensitive resistor whose resistance changes with respect to temperature; uses include washer-extractors, textile machines, and continuous batch washers. Thermocouple temperature probes—A connection of dissimilar metals which produces a voltage with respect to its temperature; uses include dryers. 18. Weigh Scale Interface Board—Regarding machine logic, this is located between the load cell of the weighing conveyor (CONWA) and the weighing conveyor A/D board. It interprets data from the conveyor load cell to the A/D board. 19. 4-20MA Output Board—Used on newer dye machines and steam dryers with temperature control. See “Resistor Boards/c. For Steam Valve” in this section. D The Serial Communications Port All Milnor serial microprocessors have a serial port with a nine-pin receptacle and plug to pass data to other devices via one of several special serial cables to Download or to Print data when their software supports these functions (e.g., see programming information). For more information on the various separate serial cables required for these functions, see external serial link cable information in this manual (see Table of Contents), if applicable. 87 F THE HARDWARE IN SERIAL-TYPE MICROPROCESSORS MSFDA401DE/9020JV (4 of 5) Which Boards Are Used in Various Devices C D H B I E B D G C Board 8088 I/O OUTPUT CPU 1 21 — 1 21 —1 Device COSHA COBUC DEVICE MASTER 1 DRYER 1 DYE 1 LINEAR COSTA 1 LINK MASTER 1 MILTRAC 1 PRESS 1 EXTRACTO 1 R VERTSTO 1 W/E NOTE (MARK I) 7 W/E (MARK II) 1 CBW 1 System A/D D/A CRT — — — — — — Temp Gas Steam Opto- Sensing Valve Valve Isolator Resistor Resistor 4-20MA — — — — — — — — Signal Conditioner — — Weigh Rotation Scale Safety Interface — — — — 21 11 2 —1 1 2 — 14 14 — 12 1 1 — — — — — — — 1 — 12 — — —2 1 — 1 — — 1 — — — — 11 — — — — — — — — — — — — — 21 11 — — 11 11 — — 1 — — — — — — 1 — — — — — — — — — — — — — — — — — — — — — — — — — — — — — — 2 — — — 1 — — — — — — — 11 11 13,4 —1 — 1 1 — — — — — 11 2+1 per module 11 —1 13,4 —1 1 per 84 — modules 1,5,6 — 1 — — 1 — — — — — — — — — — 15 1. 2. 3. 4. Boards can be added for options For gas dryers and steam dryers with temperature control For washer-extractors with temperature option Although seemingly identical, the A/D boards for sensing air temperature in dryers, water temperature in washer-extractors and dye machines, water temperature in tunnels and weight for weighing conveyors are all different.The different types have different part numbers, are clearly marked, and are not interchangeable. 5. Required for CBW system with weighing conveyor 6. Required for Reuse/Cooldown and/or Overhead Fill tanks 7. The Mark I washer-extractor control used an 8085 CPU NOTE: Additional boards may be required for certain other options. 88 THE HARDWARE IN SERIAL-TYPE MICROPROCESSORS MSFDA401DE/9020JV (5 of 5) DIP Switches and How To Set Them Every peripheral board has eight DIP switches which establish the address of each board so it may communicate serially with its own CPU, as though on a “party line,” while sending and receiving only its own messages. In a battery of machines, the DIP switch settings are identical for each identical peripheral board in each identical machine (e.g., each first I/O board (I/O-1) in each washer-extractor has the identical DIP switch setting). When a CPU must communicate with a higher level control (e.g., when all dryers communicate In this example, with the Milnet® system), the higher level control must know switches 1 thru 4 the address of each CPU. For 8085 CPUs, a board-mounted are OFF,ON,ON, DIP switch performs this function; however, for the 8088 CPU, OFF, respectively. the higher level control knows the address of each CPU because that information was established during configuration FIGURE 1 (MSFDA401DE) (e.g., see Miltrac Address configure decision in the programDIP Switch ON/OFF Positions ming manual for any device that communicates with Miltrac). B C F DIP Switch Settings Board Device COSHA A/D D/A — — I/O–1 2–8 ON 1 OFF — — 2–8 ON COBUC 1 OFF — — 2–8 ON DEVICE 1 OFF MASTER 2–5, 7, 8, ON 2–4,7,8 ON 2–8 ON DRYER 1,6, OFF 1,5,6 OFF 1 OFF 2–5,7,8 ON 2–4,7,8 ON 2–8 ON DYE1,5,6 OFF 1 OFF EXTRACTOR 1,6 OFF ® LINEAR COSTA PRESS CENTRIFUGAL EXTRACTOR — — 2–5,7,8 ON 1,6 OFF — — — — — I/O–2 I/O–3 1, 3–8 ON 2 OFF 1, 3–8 ON 2 OFF 1, 3–8 ON 2 OFF 1, 3–8 ON 2 OFF 1, 3–8 ON 2 OFF 3–8 ON 1,2 OFF 3–8 ON 1,2 OFF 3–8 ON 1,2 OFF — 2–8 ON 1,3–8 ON 1 OFF 2 OFF 2–8 1,3–8 ON 1 OFF 2 OFF 2-8 ON 1, 3-8 ON 1 OFF 2 OFF — — 3–8 ON 1,2 OFF 3-8 ON 1,2 OFF 2–8 ON 1,3–8 ON 1 OFF 2 OFF 2–5,7,8 ON 2–4,7–8 ON 2–8 ON 1,3–8 ON WASHER1,5,6 OFF 1 OFF 2 OFF EXTRACTOR 1,6 OFF VERTSTO CBW® System I/O–4 Output–1 Output–2 1,2,4–8 ON — — — 3 OFF 1,2,4–8 ON 2–4, 6–8 ON 1,3,4,6–8 ON 3,4,6–8 ON H 3 OFF 1,5 OFF 2,5 OFF 1,2,5 OFF — 2–4, 6–8 ON 1,3,4, 6–8 ON 3,4, 6–8 ON 1,5 OFF 2,5 OFF 1,2,5 OFF — 2–4, 6–8 ON — — 1,5 OFF — 2–4,6–8 ON 1,3,4,6–8 ON 3,4,6–8 ON 1,5 OFF 2,5 OFF 1,2,5 OFF — — — 1,2,4–8 ON 2–4,6–8 ON 1,3,4,6–8 ON 3 OFF 1,5 OFF 2,5 OFF 2-4,6-8 ON 1,3,4, 6-8 ON — 1,5 OFF 2,5 OFF — — — — — — 2–4,6–8 ON 1,3,4,6–8 ON 1,5 OFF 2,5 OFF See schematics for DIP switch positions on Continuous Batch Washer and the MILTRON controller. Shaded cells denote options. 89 Output–3 — — — — — E I MSFDA401EE/9533CV (1 of 6) THE HARDWARE IN SERIAL-TYPE MICROPROCESSORS FOR MARK IV AND V MACHINES C General ® Milnor serial microprocessor controls are designed specifically for Milnor® machines and systems. Along with certain external electromechanical relay logic and sensing devices, they control all machine and system functions. Not every microprocessor includes all the components described in this section. The Microprocessor Components This is a list of all components for Milnor® microprocessor controllers. Not every Milnor® microprocessor controller includes all the following components. 1. Keypad or Keyboard—Depending upon the model/type, the keypad may have 12, 30, or 58 buttons. The different keypads are not interchangeable. 2. Keyswitch—Selects run/program modes. The key may be removed only in run. Never leave the key accessible to unauthorized personnel. 3. Display—Depending upon the model/type, the display may be either liquid crystal, fluorescent, or CRT. The different displays are not interchangeable. 4a. Power Supply (NOT for CBW® System)—Converts control circuit AC voltage to +12VDC, -12VDC, and +5VDC for the CPU board. On dryers and some other machines, a second, identical power supply performs the same function for all the peripheral boards, which are mounted in an enclosure separate from the CPU. A minimum 14AWG ground wire must be connected between the grounds on the CPU and the peripheral board(s). This ground is installed at the factory when both enclosures are mounted on the same machine, as in washer-extractors. The ground wire must be provided during installation when the CPU enclosure and its associated peripheral board enclosures are remote from one another as in dryers. Although the +12VDC and -12VDC are not adjustable, the +5VDC for the CPU is very sensitive. The power supply must be adjusted most accurately, so the actual voltage at the CPU board is between 4.95VDC and 5.1VDC as measured by an accurate digital voltmeter. B 4b. Power Supply (CBW® System Only)—The Milnor CBW System utilizes two discrete power supplies to convert control circuit AC voltage to +12 VDC, -12 VDC, and +5VDC for the CPU board and peripheral boards. One power supply (ESPS) is a 40-watt power supply located in the Miltron cabinet. It powers the peripheral boards in the Miltron cabinet, including the optional load cell interface board and A/D board for a weighing conveyor, the CPU board and the memory expansion board, and the monitor interface board. Although the +12VDC and -12VDC are not adjustable, the +5VDC for the CPU is very sensitive. The power supply must be adjusted accurately, so the actual voltage at the CPU board is between 4.95VDC and 5.1VDC as measured by an accurate digital voltmeter. 90 B THE HARDWARE IN SERIAL-TYPE MICROPROCESSORS FOR MARK IV AND V MACHINES MSFDA401EE/9533CV (2 of 6) The second power supply (PSO) is a 120-watt power supply which provides +12VDC, -12VDC, and +5VDC to the peripheral boards located on the tunnel. This power supply provides for the adjustment of the +12VDC voltage, the -12VDC voltage, and the +5VDC voltage. If these voltages require adjustment, set the +5VDC to provide no less than +4.8VDC at the module electric box farthest from the power supply, as measured by an accurate digital voltmeter. If necessary, adjust the +12VDC to 12.00VDC and the -12VDC to -12.00VDC as measured by an accurate digital voltmeter. If the +5VDC at the peripheral board nearest PSO is at least +5.25VDC when the voltage at the peripheral board farthest from PSO is +4.8VDC or less, suspect loose MTA connections or inadequate wiring somewhere between the nearest and farthest peripheral boards. 5. CPU (Processor) Board—The Central Processing Unit (CPU) processes data received from the various inputs, stores information, and responds to each keypad entry with the appropriate action. It may be mounted in an enclosure separate from its peripheral boards. The CPU contains EPROMs programmed by the Milnor factory with fixed instructions (software) that determine how the machine functions. Depending upon machine model/type, the CPU chip can be an Intel 8085, an Intel 8088, or an Intel 80186. Although the EPROMs do not require battery backup, the CPU board utilizes a battery which normally assures that the user-programmable memory will be retained for two to three months without external power. See below and “IMPORTANT OWNER/USER INFORMATION . . .” (see Table of Contents). 6. Memory Expansion Board—Increases memory space available to the processor. This board is used with 8088 CPU board in some applications. 7. Battery—Provides memory retention backup when power is off. The battery is mounted directly on 8085 CPU boards, and mounted separately for 8088 and 80186 CPU boards. A capacitor on the 8088 and 80186 CPU board provides enough power to retain memory for several hours after the battery has been disconnected. Once fully charged (see “IMPORTANT OWNER/USER INFORMATION . . .”), the battery backup is reliable for 90 days with no power applied. 8. Opto-Isolator Board—Optically isolates inputs to the CPU for electronic noise immunity. Opto-Isolators are incorporated into the 8088 and 80186 CPU board; thus this separate board is only required for 8085 CPUs. 9. I/O Board—16/8 input-output contains 16 solid-state signal input devices and eight output relays. The input devices are capable of faithfully conducting a low VA 12VDC ground signal to the CPU. The output relays are socketmounted SPDT, 12VDC electromechanical relays with contacts capable of faithfully conducting a maximum of 25VA at 110/120VAC (0.2 ampere or 200 milliamperes at 110/120VAC) or 12.5 VA at 24VAC (0.5 ampere or 500 milliamperes at 24VAC). The output will be either 24VAC or 110/120VAC depending on the machine model/type. These outputs and their power source are intended only to drive another relay with higher contact ratings, that in turn may drive a pump, valve, solenoid, etc., from a separate power source. Never use these outputs to directly drive a pump, valve, or solenoid unless the maximum current required never exceeds the above values. Higher ampere or VA loads will burn out traces on the printed circuit board or possibly overload and damage the control circuit transformer. This board has 25 status lights. One light blinks when the board is sending signals. Each of the 24 remaining lights represent an input (green lights) or output (red lights) on that board, and illuminates when the corresponding input or oututs is made. This board has two rotary dials which must be adjusted to set the board’s address (see “Rotary Switches and How to Set Them” in this section). This board also has convenient test points that can be used to test voltage to the board. 91 THE HARDWARE IN SERIAL-TYPE MICROPROCESSORS FOR MARK IV AND V MACHINES MSFDA401EE/9533CV (3 of 6) Standard I/O board—Used in all devices requiring I/O boards except those listed below. High-speed I/O board—Used only in the following devices and configurations: E6N, J6N, and T6N washer-extractors equipped and configured for both variable basket speed and electronic balancing; Milrail configured for high-speed boards; and all configurations of the M7E centrifugal extractor. 10. Output Board—A 24-output board contains 24 output relays, the same board and relays as described above. 11. A/D Board (Analog to Digital Convertor)—Converts analog voltage signals, such as temperature, to a digital signal that can be utilized by the CPU. Up to a maximum of eight A/D channels may be provided on a single board. Although seemingly identical, the A/D boards used to sense air temperature in the dryer, water temperature in washer-extractors and textile machines, water temperature in the tunnel, and weight for a weighing conveyor are all different. The different types are clearly marked with different part numbers, which are mentioned in the wiring diagram set and are not interchangeable. This board has one status light. This light blinks when the board is communicating. This board has two rotary dials which must be adjusted to set the board’s address (see “Rotary Switches and How to Set Them”). This board also has convenient test points that can be used to test voltage to the board. 12. D/A Board (Digital to Analog Convertor)—Converts digital signals from the processor to an analog voltage between 0 and 5VDC (e.g., provides the analog signal to the dryer gas valve position actuator and dye machine steam position actuator). This board has one status light. This light blinks when the board is communicating. This board has two rotary dials which must be adjusted to set the board’s address (see “Rotary Switches and How to Set Them”). This board also has convenient test points that can be used to test voltage to the board. 13. CRT Board—Receives display instructions from the processor and generates the signals to the CRT to create the desired displays; used in controllers such as the Miltron and Miltrac controllers and Device Master systems. The CRT board can be plugged in backwards, even though the cabinet/bracketry makes this difficult to do and labeling on the parent board states the proper orientation. Use care to orient the board properly, otherwise microprocessor components may burn out. 14. Resistor Boards—Although seemingly identical, resistor boards are quite different. The different types are clearly marked with different part numbers, which are mentioned in the wiring diagram set and are not interchangeable. a. For Temperature-Sensing System—Used with A/D board in washer-extractors and Dye-Extractors® as part of temperature-sensing system; not required on continuous batch washers because necessary circuitry is included on other (standard) CBW printed circuit boards. b. For Gas Valve—Used with D/A board in temperature control circuit of gas dryers; converts 0-5VDC to 4-20 milliamperes for modulating gas valve. c. For Steam Valve—Used with D/A board in temperature control circuit of older steam dryer models; converts 0-5VDC to 4-20 milliamperes for modulating steam valve. See “4-20MA Output Board” in this section. 92 THE HARDWARE IN SERIAL-TYPE MICROPROCESSORS FOR MARK IV AND V MACHINES MSFDA401EE/9533CV (4 of 6) 15. Signal Conditioner for Thermocouple—Amplifies the output from a thermocouple so an A/D board can use the signal. 16. Rotation Safety Board—Used in dryers. Reads rotational safety proximity switch to confirm that the basket is turning. 17. Temperature Probes—Two types of temperature probes are used, depending on equipment type: Thermistor temperature probes—A temperature-sensitive resistor whose resistance changes with respect to temperature; uses include washer-extractors, textile machines, and continuous batch washers. Thermocouple temperature probes—A connection of dissimilar metals which produces a voltage with respect to its temperature; uses include dryers. 18. Weigh Scale Interface Board—Regarding machine logic, this is located between the load cell of the weighing conveyor (CONWA) and the weighing conveyor A/D board. It interprets data from the conveyor load cell to the A/D board. 19. 4-20MA Output Board—Used on newer textile machines and steam dryers with temperature control. See “Resistor Boards/c. For Steam Valve” in this section. 20. 8 Out/16 In Chemical Flow Meter Board—This board is used with the metered chemical injection option on textile machines. Eight outputs and eight counters are respectively assigned to chemical valves and chemical flow meters. Two of the counters are non-isolated direct inputs to the microprocessor on this board and are capable of of counting pulses of 0 to 5 VDC at a frequency of up to 10kHz. the remaining six counters are optically isolated from the peripheral board microprocessor and are capable of counting pulses from 0 to 12 VDC at a frequency up to 150 Hz. The Serial Communications Port All Milnor serial microprocessors have a serial port with a nine-pin receptacle and plug to pass data to other devices via one of several special serial cables to Download or to Print data when their software supports these functions (e.g., see programming information). For more information on the various separate serial cables required for these functions, see external serial link cable information in this manual (see Table of Contents), if applicable. 93 THE HARDWARE IN SERIAL-TYPE MICROPROCESSORS FOR MARK IV AND V MACHINES MSFDA401EE/9533CV (5 of 6) Which Boards Are Used in Various Devices Board CPU I/O Output A/D D/A CRT Device COSHA 1 COBUC 1 DEVICE MASTER* 1 DRYER 1 TEXTILE* 1 LINEAR COSTA 1 LINK MASTER 1 MILTRAC* 1 PRESS 1 EXTRACTO 1 R VERTSTO 1 W/E NOTE (MARK I) 7 W/E (MARK II) 1 1 CBW System* Temp Gas Steam Opto- Sensing Valve Valve Isolator Resistor Resistor 4-20MA Signal Conditioner Chem Rotation Weigh Flow Safety Scale Meter Interfac e — — — — — — — — — — 1 — 01 — — 21 21 — —1 — — — — — — — — — — — — — — — — 21 2 1 —1 1 2 — 14 14 — 12 1 1 — — — — — — — 1 — 12 — — —2 1 — 1 — 11 — — — — — — — — — — — — — — 21 2 — — 11 11 — — 1 — — — — — — 1 — — — — — — — — — — — — — — — — — — — — — — — — — — — — — — — — — — 2 — — — 1 — — — — — — — — 11 11 13,4 —1 — 1 1 — — — — — — 11 2+1 per module 11 —1 13,4 —1 4 1 per 8 — modules 1,5,6 — 1 — — 1 — — — — — — — — — — — 15 — *80186 CPU 1. Boards can be added for options 2. For gas dryers and steam dryers with temperature control 3. For washer-extractors with temperature option 4. Although seemingly identical, the A/D boards for sensing air temperature in dryers, water temperature in washer-extractors and dye machines, water temperature in tunnels and weight for weighing conveyors are all different.The different types have different part numbers, are clearly marked, and are not interchangeable. 5. Required for CBW system with weighing conveyor 6. Required for Reuse/Cooldown and/or Overhead Fill tanks 7. The Mark I washer-extractor control used an 8085 CPU NOTE: Additional boards may be required for certain other options. 94 THE HARDWARE IN SERIAL-TYPE MICROPROCESSORS FOR MARK IV AND V MACHINES MSFDA401EE/9533CV (6 of 6) Rotary Switches and How To Set Them The Input/Output board, the Output board, the A/D board, and the D/A board each have two rotary switches which establish the address for each board. This allows the boards to communicate serially with its own CPU, as though on a “party line,” while sending and receiving its own messages. In a battery of machines, the rotary switches are identical for each identical peripheral board in each identical machine (e.g., each first I/O board (I/O-1) in each washer-extractor has the identical rotary switch setting). When a CPU must communicate with a higher level control (e.g., when all dryers communicate with the Milnet® system), the higher level control must know the address of each CPU. For 8088 CPUs, the high level control knows the address of each CPU because that information was established during configuration (e.g., see Miltrac Address configure decision in the programming manual for any device that communicates with Miltrac). Rotary Switch Settings Board Device A/D D/A I/O-1 I/O-2 I/O-3 I/O-4 Output-1 Output-2 Output-3 SW2 SW1 SW2 SW1 SW2 SW1 SW2 SW1 SW2 SW1 SW2 SW1 SW2 SW1 SW2 SW1 SW2 SW1 COSHA 0 1 0 2 0 3 0 4 COBUC 0 1 0 2 0 3 0 4 Device Master 0 1 0 2 0 5 1 1 1 2 1 3 1 2 1 3 1 3 Dryer 2 1 3 1 0 1 0 2 1 1 Textile 2 1 3 1 0 1 0 2 1 1 0 1 0 2 0 1 0 2 0 3 1 1 0 1 0 2 0 3 0 4 1 1 1 2 Extractor 0 1 0 2 0 3 0 4 1 1 1 2 Versto 0 1 0 2 0 1 0 2 1 1 1 2 Linear Costo One-stage Press Two-stage Press WasherExtractor CBW system 3 2 2 1 1 1 3 1 See schematics for rotary switch positions on Continuous Batch Washers and the MILTRON controller. Shaded cells represent optional boards. 95 MSSM0217AE/9020IV (1 of 5) È OW TO CHANGE EPROMS IN MICROPROCESSORS H AND WHERE TO CHECK THE DC VOLTAGES D Occasionally, software enhancements become available. Depending upon the software change, the new software EPROMs (Erasable, Programmable, Read-Only Memory) may be offered for sale or for no charge to the customer. When a set of EPROMs is changed in the field, ensure that the software version being installed matches the machine hardware and that EPROMs are installed in the proper socket positions and orientation. How To Change EPROMs Ê G SHOCK HAZARD—Electrical components on the machine conduct high voltage that will kill or seriously injure you on contact. ☞ Lock OFF and tag out electrical power at the main (wall) disconnect before beginning this procedure. B E 1. Make sure all power to the machine is off. 2. Locate the EPROMs as described in “Location of EPROMs on Processor Board” in this section. Note the orientation of the EPROMs as shown in FIGURES 3, 5, 7, and 9. 3. Slip a small flat tool underneath the EPROM, and carefully remove each old EPROM from its base, taking note of their numerical order (see FIGURES 3 and 7) and orientation to the key notch on the socket. 4. Install new EPROMs, making sure the key notch on the EPROM is properly oriented and that all pins enter the proper holes in the socket (FIGURE 1). If necessary, slightly bend the pins on the EPROMs to align them in the socket. After inserting each EPROM, verify that all pins are seated in the socket. F ÎFIGURE 1 (MSSM0217AE) ÎProperly Seating the EPROM F COMPONENT DAMAGE HAZARD—Incorrectly installing any EPROM may cause EPROM burn out, machine failure, or display error. ☞ Match each EPROM with its corresponding socket. Each EPROM will work in only one socket, although it may physically fit in others. ☞ Align EPROM so every pin mates with the correct hole in the socket. Verifying Proper EPROM Installation—After installing new EPROMs, apply power to the machine Ë and turn the machine on. If the EPROMs are properly installed, the display will continue with the normal display sequence when powering up. If the display is blank or appears unusual, turn the machine off at once and check the orientation of the EPROMs. 96 HOW TO CHANGE EPROMS IN MICROPROCESSORS AND WHERE TO CHECK THE DC VOLTAGES B C MSSM0217AE/9020IV (2 of 5) Location of EPROMs on Processor Board Ê Depending on machine model and type, the CPU chip can be an Intel 8085 or an Intel 8088. Each microprocessor board requires at least one EPROM for proper operation, but the EPROMs are located differently, depending upon the type of board. This information describes the location and arrangement of the EPROM chips on each type of board. It also describes where to check the voltages required by the processor board. 8085 Processor Boards, NOT Coin Machine—See FIGURE 3. Install EPROM #1 at the end of the Ë row, then #2, #3, and #4. Chip #4 goes next to the two soldered chips on the board. See FIGURE 2 for where to check voltages. ÎFIGURE 2 (MSSM0217AE) ÎMTA-31 on 8085 Processor Board (wires not shown for clarity) ÎFIGURE 3 (MSSM0217AE) Î8085 Processor Board (NOT Coin Machine) 97 HOW TO CHANGE EPROMS IN MICROPROCESSORS AND WHERE TO CHECK THE DC VOLTAGES MSSM0217AE/9020IV (3 of 5) 8085 Coin Machine Processor Boards—See FIGURE 5. Install the single Ë EPROM in socket IC7 below connector W34. These boards have no battery. 8085 chip DIP switch EPROM in socket IC-7 MTA connectors Chassis ground Capacitor ÎFIGURE 4 (MSSM0217AE) ÎMTA-1 in 8085 Coin Machine (wires not shown for clarity) ÎFIGURE 5 (MSSM0217AE) Î8085 Coin Machine Processor Board 98 H HOW TO CHANGE EPROMS IN MICROPROCESSORS AND WHERE TO CHECK THE DC VOLTAGES B C MSSM0217AE/9020IV (4 of 5) 8088 Processor Boards Without Memory Expansion Board—See the table of EPROM locaË tions (below) and FIGURE 7. If the set consists of only one EPROM, install it in socket A of FIGURE 7. If two EPROMs comprise the set, install EPROM #2 in socket A and EPROM #1 in socket B. Always install highest numbered EPROM in socket A. If the set consists of more than two EPROMs, a Memory Expansion Board must be present in the machine along with the processor board. 8088 Processor Boards With Memory Expansion Board—See the table of EPROM locations Ë below and FIGURE 7. If the EPROM set consists of three or more EPROMs, install the two highest numbered EPROMs (e.g., EPROMs #3 and #4 of a four-chip set) on the processor board, with the highest numbered E-PROM (EPROM #4 of a four-chip set) in socket A, and the EPROM with the second highest number (EPROM #3 of a four-chip set) in socket B. Install the remaining EPROM(s) on the Memory Expansion Board with the highest numbered of the remaining EPROMs (e.g., EPROM #2 of a four-chip set) in socket IC-1 on the Memory Expansion Board and EPROM #1 in socket IC-2. EPROM Locations on 8088 Processor Board and Memory Expansion Board E-PROM Location by Socket (see FIGURE 4) EPROMS in Set A B IC-1 IC-2 4-chip set 4 3 2 1 3-chip set 3 2 1 — 2-chip set 2 1 — — 1-chip set 1 — — — ÎFIGURE 6 (MSSM0217AE) Î1MTA-31 on 8088 Board (wires not shown for clarity) ÎFIGURE 7 (MSSM0217AE) Î8088 Processor Board and Optional Memory Expansion Board 99 HOW TO CHANGE EPROMS IN MICROPROCESSORS AND WHERE TO CHECK THE DC VOLTAGES MSSM0217AE/9020IV (5 of 5) I 80186 Processor Boards—This processor board Ë is used on all Milnor system controllers (Miltron, Mildata, etc.) equipped with a color monitor, and on textile processing machines with software versions 95000 and later. The single EPROM on this board is located in socket IC-2. A30 29 MT TA 1M 34 TA TA 1M 1M 33 32 TA TA 1M Chassis Ground 2M 1M TA 31 31 ÎFIGURE 8 (MSSM0217AE) Î1MTA-31 on 80186 Board (wires not shown for clarity) Capacitor IM TA 28 80186 Processor R ÎFIGURE 9 (MSSM0217AE) Î80186 Processor Board 100 A39 MT A38 MT A36 MT A37 MT MT A35 MT A40 EPROM in socket IC-2 ROM socket (empty except for Japan) MSSM0227AE/9525AV (1 of 4) ÈHE EXTERNAL SERIAL LINK CABLES AND T HOW TO CONSTRUCT THEM General Ê Only three wires (two signal wires plus a ground, referred to in this section as a serial link) are required to transfer data from one Milnor® device to another. However, because the two optional serial communicating functions (Download and Print Data, but not interconnected networks such as Milnet®/Miltrac or Mildata® systems) are conducted through a single external DIN-type, 9-pin connector, different serial links will be required for the two functions; it may be necessary to temporarily disconnect one plug from the connector and insert another to access the other optional function. Non-optional serial communications (as between Mildata® networks and a bank of washer-extractors, or as between Milnet®/Miltrac systems and the press, shuttle, and dryers in a CBW® system) are hard-wired internally either at the factory or during system installation. Thus, except for some field retrofit situations, these network systems generally do not use the external connector mentioned above. In Mildata® systems, the functions of Download and Print Data are usually performed at the Mildata® PC itself, but each washer-extractor (and certain other machines if their software supports it) can also Download or Print Data via its external connector. If Download or Print Data is performed from serial downloader-to-machine or machine-tomachine with machines in a Milnet® /Miltrac or Mildata® network system, ALL energized machines on the network will receive the downloaded data. Turn off power to any machines to which you do not wish to Download. 101 THE EXTERNAL SERIAL LINK CABLES AND HOW TO CONSTRUCT THEM MSSM0227AE/9525AV (2 of 4) Pin Identification Ê Pin locations looking at the wire entry side of the female RECEPTACLE (i.e., from inside the enclosure). The female RECEPTACLE always has male pins. Ordinarily, all wires entering this RECEPTACLE are inserted at the factory. Pins 1+2, 3+4, and 6+9 on the RECEPTACLE have been connected together at the factory as shown. Pin locations looking at the wire entry side of the male PLUG. The male PLUG always has female pins. The wires entering this PLUG are inserted by others when the Serial Link cables are fabricated in the field, and by the factory if for a SERIAL DOWNLOADER interface. ÎFIGURE 1 (MSSM0227AE) ÎPin Locations in the External Serial Link Connector ÏPin Assignments in the External Connector PIN NUMBER WIRES ON RECEPTACLE INSIDE ELECTRICAL ENCLOSURE Number Color FUNCTION 1+2 SERIAL LOW DLL BLUE and BLACK 3+4 SERIAL HIGH DLH BLUE and RED 5 CLEAR TO SEND CTS BLUE and ORANGE 6+9 ELECTRONIC GROUND 2G BLUE and WHITE 7 TRANSMIT DATA TXD BLUE and ORANGE 8 +5DC V1 BLUE AVOID EQUIPMENT DAMAGE—Never connect pin 8 between any machines or to the printer. This pin conducts +5VDC from the machine’s power supply. Pin 8 is used only to power the SERIAL DOWNLOADER INTERFACE. If pin 8 is connected to any pin in the connector or the printer or any other machine, the two volt sources will clash and burn up expensive electronic components in both machines. 102 THE EXTERNAL SERIAL LINK CABLES AND HOW TO CONSTRUCT THEM MSSM0227AE/9525AV (3 of 4) How To Construct (Wire) the Serial Link Cables Ê The Type of Cable Wire To Use—Use 18AWG four-conductor shielded cable. Connect the shield to Ë the ground at one end only. See the various drawings below. AVOID EQUIPMENT DAMAGE—Never connect pin 8 between any machines or to the printer. This pin conducts +5VDC from the machine’s power supply. Pin 8 is used only to power the SERIAL DOWNLOADER INTERFACE. If pin 8 is connected to any pin in the connector or the printer or any other machine, the two volt sources will clash and burn up expensive electronic components in both machines. To Download From Machine-to (from)-Serial Downloader Ë ÎFIGURE 2 (MSSM0227AE) ÎConnections for Downloading Machine-to (from)-Serial Downloader 103 THE EXTERNAL SERIAL LINK CABLES AND HOW TO CONSTRUCT THEM MSSM0227AE/9525AV (4 of 4) To Download From Machine-to-Machine(s)—FIGURE 3 illustrates how to construct a daisy chain Ë serial link cable to download data from one machine to several others simultaneously. It is best to program one (MASTER) machine (or to DOWNLOAD using SERIAL DOWNLOADER-TO-MACHINE if the data is already stored in the downloader) and then to use a serial link to program the remainder from that MASTER. Any machine on the serial link can be the MASTER. ÎFIGURE 3 (MSSM0227AE) ÎConnections for Downloading From Machine-to-Machine(s) For Print Data—The connections shown in FIGURE 4 are made at the factory if the factory furnishes the Ë printer, or by whomever provides the printer. Where applicable, see the appropriate programming section in this manual for an explanation of the Print Data feature (see Table of Contents). ÎFIGURE 4 (MSSM0227AE) ÎMachine-to-Printer Connections 104 MSSM0251BE/9525AV (1 of 1) È EQUIREMENTS AND SETTINGS R FOR THE EPSON LX300 PRINTER As of this writing, the Epson model LX300 printer is available from Milnor for printing data from microprocessor controllers with printing functions. (This printer replaces the Epson LX810, which replaced the Epson LX800. Refer to Milnor® document MSSM0251AE for information on these older printer models.) This document supplements the Epson LX300 User’s Guide for printers used with Milnor controllers. NOTICE: Because of the many differences among printer makes and models, Milnor® cannot ensure suitability or troubleshoot printers other than the Epson LX300 (or older approved models), with the required interface cable. Cable Requirements—The Epson LX300 must be connected to the printer port on the machine using one of Ë the following Milnor interface cables: Part Number Description 10YMK2PNTR 100-formula washer-extractor, dryer, extractor, and Miltron (CBW®) controllers 10YCBWPNTR Non-serial Miltron (CBW®) controller Required Settings—All printers shipped from Milnor® are pre-configured to operate correctly with Milnor® Ë equipment. If the printer is replaced or loses its configuration, refer to the user’s guide and re-configure the printer with the following values: Setting Character spacing Shape of zero Skip-over-perforation Character table Auto line feed Page length Auto tear off Tractor Interface Bit rate Parity Data length ETX/ACT Value 10 cpi 0 Off PC 437 Off 11 inches Off Single Serial 9600 bps Even 8 bit On 105 MSSM0248AE/9526BV (1 of 1) È OW “CHEMWAIT” WORKS IN H MILNOR MARK I, II, III, IV, AND V MICROPROCESSOR WASHER-EXTRACTOR CONTROLLERS B “CHEMWAIT” is a feature in the Milnor washer-extractor controller whereby a central chemical injection system can service several washer-extractors. When the chemical injection system is serving another machine, each washer-extractor controller can accept a command from the injection system to “stop the timer and do not start the injection signal.” An independent output from Milnor to the chemical system declares: “THIS MACHINE DESIRES TO INJECT ONE OR MORE UNNAMED CHEMICAL(S).” (The same independent output is used regardless of the chemical(s) that will be subsequently requested.) To cause the Milnor timer to stop and delay the “COMMENCE CHEMICAL INJECTION” signals, an independent input from the chemical system to Milnor must respond, “WAIT” (within two seconds). In the absence of a “WAIT” response, the Milnor signal(s) start two seconds after the inject request, or two seconds after the “WAIT” response is extinguished. The duration of the inject signals will be whatever is commanded in the washing program. “WAIT” commands will be ignored unless the machine has desired to inject less than two seconds before. When several washer-extractors desire chemicals simultaneously, it is the central chemical injection systems’ responsibility to decide which machine will receive chemicals first. It is also the central chemical injection systems’ responsibility to cope with the situation when one or more washer-extractors simultaneously desire more than one chemical, although the latter case may be avoided by only commanding one chemical injection at a time—using Milnor’s exclusive “do not drain” feature to subsequently inject more than one chemical in the same bath. The “DESIRES TO INJECT” and “WAIT” signals must be via potential-free contacts capable of faithfully handling 10 MA (.01 amperes) at 5 VDC. The specific “COMMENCE CHEMICAL INJECTON” signals will be either 120 VAC or 240 VAC, depending on the specific MILNOR model, and via relay contacts capable of conducting a maximum of 9 VA (i.e., a maximum of either 80 MA (.08 amperes) at 120 VAC or 40 MA (.04 amperes) at 240 VAC). “CHEMWAIT” is presently available in all Mark I, II, III, IV, and V controllers, but does require the optional #2 output board. Ask factory for more information. 106 B MSSM0238BE/9527BV (1 of 6) È DJUSTING LEVEL SENSING APPARATUSES A AND SETTING LEVELS ON 100-FORMULA WASHER-EXTRACTORS AND TEXTILE MACHINES How Level Control Works Ê Types of Level Sensing Apparatuses—Three types of apparatuses are used on these machines: float Ë chamber assemblies, pressure switches, and pressure transducers. A float chamber assembly (FIGURE 1) is an open-top, metal tube connected to the shell below the water line. The height of water in the tube is the same as in the cylinder. Changes in the level cause a float, rod, and actuating arm to move, which in turn, actuate either of two switches. Each switch actuates at one pre-set level. A pressure switch (FIGURE 2) actuates when the air inside an airtight chamber connected to the washer shell below the water line reaches a certain pressure. As the liquor level changes, the air pressure in the chamber changes. Each pressure switch actuates at one pre-set level. A pressure transducer (electronic level control) works similar to a pressure switch, except that it produces a voltage which varies with changes in pressure. The varying voltage is converted into digital data which the microprocessor controller can interpret and display as inches or centimeters of water. Which Apparatuses and Methods of Level Control Are Used—Table A, below, shows which Ë apparatuses are used on various machine types. These apparatuses permit controlling the liquor level using the methods listed in the table, unless the machine is equipped and configured for metered water (specifying a quantity of water). In the latter case, the level sensing apparatuses are not used to control levels, but they are used by the microprocessor controller for certain internal lockouts (e.g., permit steaming only after low level is achieved). ÏTable A: Apparatuses and Methods for Each Machine Type How level is specified in wash Machine Type Level Level Sensing Apparatus formula (no metered water) Divided cylinLevel 3=high (rinse) pressure switch SPLL3 Select one of the four pre-set der models levels Level 2=low (wash) pressure switch SPLL1 Level 1=below low (starch) pressure switch SPLLL Level 0=no water (shake out) N. A. 36021xxx and Level 3=high (rinse) float chamber/switch SLLL3 Select one of the four pre-set 36026xxx open Level 2=low (wash) float chamber/switch SLLLL levels pocket models Level 1=below low (starch) pressure switch SPLL1 Level 0=no water (shake out) N. A. OK to open door pressure switch SPLLS N. A. 42026xxx and Processing levels Specify inches or centimeters larger open pressure transducer within a pre-set range pocket models OK to open door N. A. Fill while tilted N. A. NOTE: There is no separate cooldown level. Cooldown occurs at the commanded level in the bath in which cooldown is commenced. 107 ADJUSTING LEVEL SENSING APPARATUSES AND SETTING LEVELS ON 100-FORMULA WASHER-EXTRACTORS AND TEXTILE MACHINES MSSM0238BE/9527BV (2 of 6) Determining Levels Ê Washer-Extractors—Ultimately, the local situation dictates the best processing levels to use. However, the Ë factory levels shown in Table B, below, reflect “typical” processing conditions, and the user should carefully consider the consequences before changing these settings. For example, given normal load size and common fabric type, the factory settings for level 2 and medium shown in the table below are the minimum required for a first bath. At lower levels the goods may not be fully wetted, resulting in poor washing and unbalanced extractions. Textile Machines—Because textile processes vary greatly, the configure lockouts for textile machines are set Ë initially to provide the widest range for commanding levels in the formula. ÏTable B: Factory Levels (in inches and ( ) centimeters) B Actual levels set on apparatus (machines with a float chamber assembly and/or pressure switches) Cylinder Level 1 Level 2 Level 3 Designation (starch) (wash) (rinse) Divided Cylinder Washer-Extractors 42044 4 (10) 7 (19) 12 (31) 60036 4 (10) 9 (23) 14 (36) 60044 4 (10) 9 (23) 14 (36) 72044 4 (10) 9 (23) 14 (36) 36021xxx and 36026xxx Washer-Extractors 36021 3 (8) 8 (20) 13 (33) 36026 3 (8) 8 (20) 13 (33) NOTE: Ok to open door level = 7 (18) This setting must not be changed. Configure values entered in microprocessor (machines with a pressure transducer) High Cylinder Low Medium Designation (minium) (min. prior (maximum) Tilt to extract) F8W Outerwear Washer-Extractor 30022 4 (10) 7 (19) 10 (25) — Open Pocket Washer Extractors—42026 and Larger 42026 8 (20) 10 (25) 16 (41) — 42032 8 (20) 10 (25) 16 (41) — 48032 9 (23) 11 (28) 16 (41) * 48036 9 (23) 11 (28) 16 (41) * 52038 8 (20) 10 (25) 16 (41) * 64046 10 (25) 12 (31) 16 (41) 16 (41)* 72046 10 (25) 14 (36) 18 (46) 18 (46)* 72058 10 (25) 14 (36) 18 (46) 18 (46)* * On non-tilting models, the tilt level must be set to 00. On tilting models, the factory settingis the same as high level. Textile Machines 64046 4 (10) 15 (38) 38 (97) 6 (15) 72058 4 (10) 15 (38) 38 (97) 6 (15) Precautions When Changing Factory Levels Ë 1. Pressure switch SPLLS, used on 36021xxx and 36026xxx models to unlock the door at a safe level, must remain at the factory setting. (In other models, this level is specified in the software and cannot be changed.) 2. Never set the level for a first bath lower than needed to thoroughly wet the goods. Normally this will be the factory setting shown in the table for level 2 or medium . 3. Never change float or pressure switch hierarchy. All lower level switches must make (i.e., L1 and L2 must both make for level 2; L1, L2, and L3 must all make for level 3.) 4. Pressure switch settings that vary more than one inch (2.5 cm) from the factory settings are not recommended. 108 ADJUSTING LEVEL SENSING APPARATUSES AND SETTING LEVELS ON 100-FORMULA WASHER-EXTRACTORS AND TEXTILE MACHINES MSSM0238BE/9527BV (3 of 6) About Level Adjustments Ê INJURY AND MACHINE DAMAGE HAZARDS—A knowledge of machine programming, operating, and mechanical/electrical servicing is needed when making level adjustments. These adjustments must be performed only by qualified personnel, in strict compliance with published safety precautions. When Adjustments Are Needed—If the mounted position of a float chamber assembly or part of it Ë changes (which can occur when components are replaced), the switches will no longer actuate at the same levels. Similarly, a pressure switch may not actuate at the original level setting as a result of prolonged wear or replacement. In these situations, the pre-set levels must be re-established. On machines with pressure transducers, the microprocessor may not properly interpret the transducer output as a result of prolonged wear or replacement of the transducer. In this situation, the transducer must be re-calibrated. Apparatuses Used To Make Level Adjustments—Level float-controlled levels are adjusted by Ë moving the clips on the float rod. Pressure switch-controlled levels are adjusted with the trip point adjusting screw on the switch. On machines with pressure transducers, actual processing levels are not pre-set (levels are specified in the formula), but ranges and tilt level are pre-set with the low, medium, high, and tilt level configure decisions. The transducer is calibrated with the tap offset counts configure decision. Measuring Levels Accurately—The adjustment procedures require filling the machine to a level mark of Ë known height. The amount of water needed to achieve a level will vary unpredictably if goods (which both absorb water and occupy space) are present or if the cylinder is rotating. Always set levels/calibrate with the cylinder at rest and without goods. On divided cylinder machines (which hang level, front to back), use the graduated sight glass on the shell front to measure levels. The graduations are in inches or centimeters, depending on the machine’s destination country. The levels in open pocket cylinders (which slope down to the rear) are measured at the rear (deepest part) of the cylinder. Temporary marks must be placed on the cylinder rear wall, as explained below. Marking Levels on an Open Pocket Machine Ë CONFINED SPACE HAZARDS—Confinement in the cylinder can kill or injure you. Hazards include, but are not limited to panic, burns, poisioning, suffocation, heat prostration, biological contamination, and crushing. ☞ Do not enter the cylinder until it has been thoroughly purged, flushed, drained, cooled, and immobilized. 1. Prepare the machine for safe entry and in accordance with all applicable codes (e.g., OSHA permit-required confined space entry requirements). Lock power off at the external disconnect switch. 2. On the inside of the cylinder, measure from the bottom rear and place clearly visible marks on the rear wall. If the machine has a level float and/or pressure switches, mark a line at each level to be set. If the machine has a pressure transducer, mark a line at high level. The cylinder will be stationary while filling, so the marks will not move. 3. When all personnel are clear, restore machine power. 109 ADJUSTING LEVEL SENSING APPARATUSES AND SETTING LEVELS ON 100-FORMULA WASHER-EXTRACTORS AND TEXTILE MACHINES MSSM0238BE/9527BV (4 of 6) Level Setting Procedures Ê (Machines With a Float Chamber Assembly and/or Pressure Switches) General Procedure—Perform the following for each level to be set: Ë 1. Close the door and run Formula 99. (The cylinder will be stationary and without water.) 2. Use the procedures described in “MODIFYING FORMULAS IN PROGRESS,” “Method B . . .” (see Table of Contents) to fill with cold water just to the mark for the level to be set. 3. Adjust the appropriate apparatus (float chamber assembly or pressure switch) as explained below, just enough to actuate (as indicated by the proper level number appearing on the display). Accessing and Adjusting the Float Chamber Assembly Ë ENTANGLE AND SEVER HAZARDS—Contact with moving components normally isolated by guards, covers, and panels can entangle you and crush your limbs. These components move automatically. ☞ Do not service machine unless qualified and authorized. The machine must remain powered on while adjusting the float rod clips. Use extreme caution not to reach into the path of any apparatuses which could move, such as pulleys or belts. On rigid models, the float chamber assembly (FIGURE 1) is located behind the shell. The float rod clips are accessible from the top of the machine. On suspended models, the level float is located within the frame. Remove the appropriate panel(s) for access. Move clips as shown in FIGURE 1. Note that top and bottom clips must not be placed closer together than one ÎFIGURE 1 (MSSM0238BE) inch (25 mm), otherwise the float rod F Î loat Chamber Assembly—Clip Adjustment can bind in the actuator arm. Accessing, Identifying, and Adjusting Pressure Switches Ë ELECTROCUTION AND ELECTRICAL BURN HAZARDS—Contact with high voltage will electrocute or burn you. Power switches on the machine and the control box do not eliminate these hazards. High voltage is present at the machine unless the main machine power disconnect is off. ☞ Do not service machine unless qualified and authorized. 110 ADJUSTING LEVEL SENSING APPARATUSES AND SETTING LEVELS ON 100-FORMULA WASHER-EXTRACTORS AND TEXTILE MACHINES MSSM0238BE/9527BV (5 of 6) The machine must remain powered on when adjustTrip Point Adjusting Screw ing pressure switches. Use extreme caution not to touch any electrical conductors on the switch or in the electric box. The trip point adjusting screw may become electrically energized when power is on. Use only an Normally Open (3) insulated screwdriver to make adjustments. Air tube Pressure switches (FIGURE 2) are located in the low connection Normally below voltage control box. A sticker on the switch and/or a tag in Closed (2) the control box identify the switches by the functional Common (1) names given in Table A (e.g., SPLL3). The switch manufacturer calibrates these switches to ÎFIGURE 2 (MSSM0240AE) actuate at a set pressure. When proper levels are verified at ÎPressure Switch the Milnor factory, the trip point adjusting screw i s painted with wax to hold its adjustment. With an insulated screwdriver, turn the trip point adjusting screw slowly. Turning clockwise causes the switch to actuate at a higher level; turning counter-clockwise actuates it at a lower level. NOTE: A crimp, cut, or loose connection in the plastic air tube will prevent the pressure switch from functioning, causing the machine to overflow. Inspect air tubes periodically. Range Setting, Calibrating, and Testing Procedures Ê (Machines With a Pressure Transducer) Disabling Metered Water if the Machine Also Has a Flow Meter—If the machine has a flow Ë meter and is configured for metered water (configure decision N), then the pressure transducer is only used for internal lockouts. Never-the-less, the transducer must be properly calibrated. The procedures described herein for range setting and calibrating may be used in this instance provided metered water is disabled, as follows: 1. Write down (or print out) all configure decisions. This is necessary because the next step will cause certain configure values to be lost. These must be re-entered later. 2. Set configure decision N (metered water)=0. Now a calibration formula can be programmed, specifying levels in inches (or centimeters) of water, as explained elsewhere herein. DATA LOSS AND MALFUNCTION HAZARDS—Existing formulas contain water quantity data which only applies to metered water. While metered water is disabled: ☞ Do not access existing formulas. The microprocessor will delete the water data. ☞ Do not run existing formulas. The water data will cause the machine to malfunction. Setting the Level Ranges and Tilt Level—The low, medium, and high level configure decisions deterË mine the ranges within which levels may be specified in the wash formula. See “PROGRAMMING . . . ,” “5=CONFIGURE . . .” for how these values affect the ranges. Set these values as desired. The tilt level configure decision specifies the level a tilting machine will fill to while tilted. On non-tilting machines this level must be set to 00. Creating a Calibration Formula—A one-step calibration formula is needed for calibrating and testing. Ë Command a soak wash (cylinder does not turn), no temperature, cold water only, a level height (inches or centimeters) equal to high level (the height of the level mark), no steam, and no chemicals. 111 ADJUSTING LEVEL SENSING APPARATUSES AND SETTING LEVELS ON 100-FORMULA WASHER-EXTRACTORS AND TEXTILE MACHINES MSSM0238BE/9527BV (6 of 6) Calibrating Tap Offset Counts—Set the tap offset counts configure decision to 0000. Run the calibration Ë formula and observe the water level. If the machine does not fill precisely to high level, adjust the tap offset counts configure value and run the formula again, repeating as required. Initially, change this value in fifty unit increments. If the level is too low—enter 0050. Increasing the value in the range 0000 to 4095 increases the level achieved. If the level is too high—enter 5050. Increasing the value in the range 5000 to 9095 decreases the level achieved. Enabling Metered Water if the Machine Also Has a Flow Meter—If metered water was preË viously disabled, re-enable it as follows (if the transducer must be tested, do this after testing): 1. Set configure decision N (metered water)=1 2. Step through all configure decisions, comparing them with the recorded values. Do not change the low level, medium level, high level, tilt level, and tap offset counts values, which were just established. Verify that all other values are as previously recorded. The counts per 100 and offset valve time values for metered water will probably need to be re-entered. Testing the Transducer—If problems with the transducer are encountered (e.g., eratic levels), a qualified Ë service technician can troubleshoot this condition as follows: 1. Test for a faulty transducer: a. Disconnect the pressure transducer output wire (2MTA3-4). b. Measure the voltages on the transducer. There should be +12VDC on the input pin and approx. 1 VDC on the output pin with no water in the cylinder. 2. Test for an air leak: The following step requires injecting water with the transducer output disconnected. The water supply must be shut off manually otherwise the machine will overflow. a. With the output wire still disconnected, have an assistant run the calibration formula and manually shut off the cold water supply externally when high level is achieved. b. While the machine is filling, measure the voltage on the output pin of the transducer. It should rise from 1.0VDC to some voltage less then 6.0VDC. It rises approximately 1VDC per 11inches (28 cm) of water. c. With the machine at high level, monitor the transducer output voltage. It should remain stable. 3. Test for effective shielding of the transducer box-to-low voltage control box cable. The shield on this four conductor cable must be grounded to the copper bus bar in the low voltage control box and disconnected in the transducer box. Verify proper shielding as follows: a. Re-connect the wire to the output pin on the transducer. b. Change the calibration formula type of step to a two-way bath and run this formula. c. While the machine is filling with the cylinder rotating, hold 05:38 STEP 01 2461/056/056 05:00 on the keypad. The display will appear similar to the example at left. Monitor the middle numeric value on the bottom line of the display which is the actual level in centimeters. If this value goes to zero while the basket is turning and returns to the correct level during dwell, then the shield is not properly grounded. 112 MSSM0269AE/9525CV (1 of 4) ÈETTING THE UNIT OF MEASURE AND CALIBRATING S ELECTRONIC WATER FLOWMETERS USED ON WASHER-EXTRACTORS AND TEXTILE MACHINES Metered water (formerly called liquor ratio) is a feature which permits the formula developer to specify a quantity of water (as opposed to a liquor level) for each wash step. On washer-extractors, the quantity injected when the formula is run is the quantity specified in the formula. On textile machines, the quantity of water injected is proportional to the ratio of actual load weight entered by the operator and nominal weight specified in the formula. Washer-extractors and textile machines furnished with metered water are equipped with a flowmeter to measure the quantity of incoming water. The flowmeter is calibrated at the Milnor factory. NOTE: Ensure that reuse water is free of lint and other solid contaminants which can become entangled in the flowmeter, causing it to malfunction. About These Procedures Ê Why the Flowmeter Must be Calibrated—Flowmeters have a paddle wheel that rotates at a speed proË portional to the speed of the passing water, sending pulses to an electronic counter. The number of pulses for a given speed of water will vary slightly from one flowmeter to another. The number of pulses for a given quantity of water depends on the size of the pipe the flowmeter is in. A 2" (51 mm) diameter pipe will have a much lower pulse count than a 1" (25 mm) diameter pipe, for the same quantity. Calibration determines the ratio of pulses to quantity of water for the specific flowmeter and pipe. Initially, some unit of measure (e.g., pounds, gallons, kilograms, liters) must be chosen for calibrating. The Milnor factory uses pounds. What Calibration Values are Required—The calibration values required by the microprocessor conË troller are counts per 100 and offset valve time. These values are entered in mode 5, Configure (see “PROGRAMMING . . .” see Table of Contents). Counts per 100 is the number of flowmeter counts resulting from injecting 100 units of water (pounds, gallons, kilograms, liters). Once the counts per 100 is established for a given unit of measure it may be converted to any other unit. The unit of measure that counts per 100 is based on must also be used when programming formulas. Offset Valve Time is the reduction in time that the water valve will remain open to admit the metered quantity commanded in the formula. This adjustment compensates for the tendancy to overshoot the commanded quantity because of the time taken for the valve to close. The value is in tenths of seconds. NOTE: The counts per 100 must be finalized before determining the offset valve time. Setting the Unit of Measure Ê When Setting the Unit of Measure is Required—Every machine equipped with electronic flowmeË ters is calibrated at the Milnor factory and the flowmeter calibration label is marked with the counts per 100 and offset valve time values. This label is located on the inside of the processor control board. A laundry desiring to program formulas in any unit other than pounds (the unit used by Milnor) must first convert the counts per 100 shown on the calibration label to their preferred unit of measure and enter this value in the counts per 100 configure decision. 113 B SETTING THE UNIT OF MEASURE AND CALIBRATING ELECTRONIC WATER FLOWMETERS USED ON WASHER-EXTRACTORS AND TEXTILE MACHINES MSSM0269AE/9525CV (2 of 4) Conversion Procedure—Use the following formula to convert from pounds to another unit of measure: Ë Factory counts per 100 pounds x Multiplier listed below = New counts per 100 Desired Unit Gallons Kilograms Liters Multiplier 8.33 2.2 2.2 Example: Factory counts per 100 pounds = 0532 Desired units = Liters New counts per 100 liters = 0532 x 2.2 = 1170 NOTE: Contact the Milnor factory for any unit not listed if the conversion factor cannot be determined. Calibrating Ê When Calibration is Required—If configuration label is lost, merely re-enter the values listed on the Ë configuration plate (or convert to the desired units). Recalibration is only required for replacement flowmeters or if it is suspected that a flowmeter has lost its calibration as may eventually occur with use. Preparations for Calibrating Ë INJURY AND MACHINE DAMAGE HAZARDS—Calibrating requires temporarily removing the cylinder water inlet hose. This procedure must be performed only by qualified maintenance personnel, in strict compliance with published safety precautions. Obtain a container large enough to hold 460 pounds (208 kilograms, 55 gallons, 208 liters). Establish a means of accurately measuring the contents of the container (by weighing or determining volume). Lock off machine power at the external disconnect switch, then remove the appropriate panels to gain access to the machine’s water inlet piping. An internal hose connects the water inlet piping to the wash cylinder. Obtain eight feet (2.5 meters) of hose of the same diameter as the internal hose. Disconnect the internal hose and install the temporary ÏTable A: Initial Counts per 100 hose such that incoming water will be injected into the measurCylinder Initial Value of Counts per 100 Size ing container. Make sure the hose is secured so it cannot jump Pounds Kilograms Gallons Liters out of the container. 36021/36026 Taking care to keep bystanders away from the machine, Consult Milnor factory 42026 restore machine power. In mode 5, Configure, enter the initial counts per 100 value from Table A and enter 000 for the offset 42031/42044 48032/48036 0540 1189 4498 1189 valve time. Create a calibration formula consisting of one bath step. 52038 0540 1189 4498 1189 For this step, command no steam, cold water only, no chemicals, 60044 0225 0496 1874 0496 and whichever of the following water quantities is in the same 64046 0225 0496 1874 0496 units as the counts per 100 configure decision: 416 pounds, 189 72044/72058 0225 0496 1874 0496 kilograms, 50 gallons, or 189 liters. 114 SETTING THE UNIT OF MEASURE AND CALIBRATING ELECTRONIC WATER FLOWMETERS USED ON WASHER-EXTRACTORS AND TEXTILE MACHINES MSSM0269AE/9525CV (3 of 4) Summary of Calibration Procedure—The calibration procedure is in two parts: Ë Part A. Determine the actual counts per 100 value. This is done by running the calibration formula, measuring the actual quantity injected (disregarding commanded quantity), reading the total counts, calculating the actual counts per 100 units, entering this value in configure, and repeating the procedure until consistent results are achieved. Part B. Determine the offset valve time. This is done by running the calibration formula, measuring the actual quantity injected, determining any difference between actual and commanded quantity (because the water valves do not close instantaneously when commanded quantity is achieved) then adjusting the offset valve time to eliminate discrepancies. This procedure is repeated until actual and commanded quantities are equal. Part A: Determining Counts per 100 Ë When first running the calibration formula, the measuring container may overflow. ☞ Increase the number of counts per 100 to reduce the quantity of water injected. 1. Run the calibration formula. When the water valve closes, hold on the keypad and read the display. 04:38 F0001S01 04:00 The number on the lower left of the display (01784 in this example) is the total counts for this injection. Record this number. 01784 01350 2. Accurately measure the quantity of water injected. Record this value then drain the container. 3. Calculate the counts per 100 using the following formula: Total counts x 100 = Counts per 100 Actual quantity Example: Let’s say the actual quantity is 395 pounds. Then, 1784 395 x 100 = 452 counts per 100 pounds 4. Enter the result in the counts per 100 configure decision. 5. Repeat steps 1 through 4. The quantity injected should be slightly more than the commanded quantity and the new counts per 100 should be close to the previously calculated value. Repeat, if necessary, until the counts per 100 value is consistent. 115 SETTING THE UNIT OF MEASURE AND CALIBRATING ELECTRONIC WATER FLOWMETERS USED ON WASHER-EXTRACTORS AND TEXTILE MACHINES MSSM0269AE/9525CV (4 of 4) Part B: Determining Offset Valve Time Ë 1. Run the calibration formula. 2. Accurately measure the quantity of water injected, and compare this to the commanded quantity. Assuming actual is more than commanded, enter 010 (one second) into the offset valve time configure decision. (If actual is less than commanded, repeat Part A). Drain the container. 3. Repeat steps 1 and 2 as required, adjusting the offset valve time until actual and commanded quantities are equal. This is a trial and error process. 4. Once testing is completed, lock power off at the machine’s external disconnect switch and restore the machine to its correct operational condition. 116 Pellerin Milnor has begun a manufacturing change which may affect how this manual applies to your machine. European-style wiring is replacing conventional wiring methods in electrical boxes. Because this change is being implemented one machine model at a time, not all models currently use European-style wiring. Because this wirirng change affects the chemical connections made in the field, it is important to refer to the correct manual section when making these connections. If your machine uses conventional wiring methods, refer to MSSM0262BE. If your machine uses European-style wiring, refer to MSSM0262CE. The following list includes all washer-extractor models currently being shipped with Europeanstyle wiring and the date code of the day the change was implemented on that machine. 36021BWP 36030F8P 36030F8S 36030F8W 36026Q6P 36021Q6P 42026Q6P 42032F7W 42032F7P 36030F8J 42032F8J 36030Q6J BMP980025/98141 117 --97146 --97173 --97362 --97113 --97073 --97073 --97146 --98107 --98107 --98107 --98107 --97146 MSSM0262BE/9808AV (1 of 7) È ONNECTING CHEMICAL SYSTEMS TO 100-FORMULA C WASHER-EXTRACTORS AND TEXTILE MACHINES Various methods, some standard and some optional, are available on all 100-formula washer-extractors and textile machines, to accommodate any of the commonly used allied (non-Milnor) chemical systems. Use this section to help determine the best method of chemical injection and how to connect the chemical system. Always consult the schematic manual before connecting chemical systems to the machine. ELECTRIC SHOCK HAZARD—Contact with high voltage electricity will kill or seriously injure you. Even with the Master Switch off and/or any emergency stop switches off, three-phase power and control circuit power are still present at several locations within electric boxes and electrical components. INJURY AND DAMAGE HAZARDS—Improper wiring can cause machine to malfunction, risking injury to personnel, damage to machine components, and damage to goods. ☞ Electrical and piping connections described in this section must be made only by qualified, ☞ ☞ ☞ ☞ authorized maintenance personnel. Lock off and tag out power at the external disconnect switches for the washer-extractor and for any chemical devices that provide power to the interpreter relay box (if furnished) before proceeding. DO NOT rely merely on the information in this section when wiring. Consult all applicable electrical schematics. DO NOT reroute or rearrange any wires not specifically permitted by this instruction. DO NOT connect a common wire to ground. Use the common terminal furnished. 118 CONNECTING CHEMICAL SYSTEMS TO 100-FORMULA WASHER-EXTRACTORS AND TEXTILE MACHINES MSSM0262BE/9808AV (2 of 7) Chemical Injection Methods Available Ê (Item numbers correspond to those in FIGURE 1) 1. Inject Signals—An inject signal is an electric potential that occurs in response to a programmed chemical Ë injection. Five discrete signals (chemicals 1 through 5) are always furnished. If only these signals are furnished, they are available at terminal strip TBS on BWP, QxP, and FxP models, and at Molex connector WCS on larger models. Ten additional signals (chemicals 6 through 15) are optionally available. If these signals are furnished, then on BWP and QxP models, all 15 signals are available at terminal strips TBS and TBT. On BWP and QxP models furnished with interpret relays and on all other models (whether or not interpret relays are furnished) all 15 signals are available at terminal strip TBA. Items 2 through 5 below operate off of inject signals. Disconnect the factory wired apparatus to use the inject signal for any other low current apparatus that meets the electrical specifications provided elsewhere herein. 2. Supply Injector—If a supply injector is furnished, the five electrically operated flush valves are wired to Ë terminal strip TBS, WCS, or TBA (depending on model and options). 3. Optional Interpret Relays—Interpret relay contacts have a higher current carrying capacity than inject Ë signals. The interpret relay coils are wired to TBA (see FIGURE 3). One set of contacts on each relay is wired to terminal strip TBB and connected to an internal power source. This power source may be replaced by an external, separately fused source, or merely disconnected, to provide potential-free (“dry”) contacts. Use interpret relays to actuate electrically operated apparatuses (e.g., pumps, valves) or provide potential-free signals for other controllers. 4. Optional Pilot Air Valves—If these electrically operated valves are furnished, they are wired to terminal Ë strip TBS, WCS, or TBA, (depending on model and options) at the factory. Use pilot air valves to actuate air-operated apparatuses (e.g., chemical valves). 5. Optional Liquid Supply Valves—If these air-operated valves are furnished, they are tubed to the pilot Ë air valves. Use these valves with pressurized liquid chemical delivery systems (e.g., ring main). 6. Pumped Chemical Inlets—A five-port inlet is standard on rigid models and a 15 port inlet is optional Ë on all models. Use these valveless inlets only with systems that are not continuously pressurized and that deliver chemicals only when an injection is commanded (e.g., peristaltic pumps). Sequenced Chemical Injection (Chemwait)—When coupled with an allied chemical controller of Ë appropriate capability, the Chemwait feature permits a single chemical source to supply a bank of washer-extractors by delaying chemical injection into one machine whenever that chemical source is currently supplying another machine. See “HOW CHEMWAIT WORKS . . .” (see Table of Contents). Connecting Apparatuses to Inject Signals Ê Electrical Specifications—Inject signals provide a 110VAC, 50Hz or 120VAC, 60Hz potential. Each sigË nal can accommodate one apparatus not exceeding 37 milliamperes. Inject signals cannot be made potential-free. COMPONENT DAMAGE HAZARD—Board components will burn out, requiring board replacement if devices driven by inject signals do not meet the electrical specifications. (Pumps generally draw a higher current and will burn out board components.) 119 CONNECTING CHEMICAL SYSTEMS TO 100-FORMULA WASHER-EXTRACTORS AND TEXTILE MACHINES MSSM0262BE/9808AV (3 of 7) ÎFIGURE 1 (MSSM0262BE) ÎSchematic Illustration of Available Chemical Injection Methods 120 CONNECTING CHEMICAL SYSTEMS TO 100-FORMULA WASHER-EXTRACTORS AND TEXTILE MACHINES MSSM0262BE/9808AV (4 of 7) BWP, QxP and FxP Models With Five Signals Only—Acquire signals at terminal strip TBS, loË cated in the high voltage control box on BWP and QxP models and in the rear control box on FxP models. Terminals 1 through 5 are chemicals 1 through 5, respectively and terminal 8 is common. The specified voltage is enabled between the appropriate terminal and common whenever an injection is called for. Other Models With Five Signals Only—AcË quire signals at Molex connector WCS in the high voltage control box (see FIGURE 2). Pins 1 through 5 are chemicals 1 through 5 respectively and pin 7 is common. The specified voltage is enabled between the appropriate pin and common whenever an injection is called for. Ë WP and QxP Models With 15 Signals and No B Interpret Relays—Acquire all 15 signals at TBS and TBT in the high voltage control box. Terminals 1 through 7 on TBS and 1 through 8 on TBT are chemicals 1 through 15 respectively. Terminal 8 on TBS is common. The specified voltage is enabled between the appropriate terminal of TBS or TBT and common, whenever a chemical injection is called for. Ë ther Models With 15 Signals and No Interpret O Relays—Acquire all 15 chemical signals and a manifold flush sig- ÎFIGURE 2 (MSSM0262BE) ÎLocating WCS in High Voltage nal at TBA (see FIGURE 3). Terminals A through Q on this terminal strip are chemicals 1 through 15 respectively and Terminal R is the flush. Terminal TB1 provides a multi-pin common. The specified voltage is enabled between the appropriate terminal of TBA and common whenever a chemical injection or flush is called for. Connecting Apparatuses to Interpret Relays Ê Electrical Specifications—The internal power source provides a 110VAC, 50Hz or 120VAC, 60Hz potenË tial. Each interpret relay can accommodate one apparatus, not exceeding 0.6 amperes. The total current drawn by all apparatuses must not exceed 10 amperes. When apparatuses are driven by external power, do not exceed 1 ampere at 250VAC per relay contact. COMPONENT DAMAGE HAZARD—Interpret relay contacts will fail, requiring relay replacement if devices exceed the specified current load. Using Internal Power—When interpret relays (up to 15) are furnished, chemical signals are available at TBB Ë in the interpret relay box. Terminals A through Q are chemicals 1 through 15 respectively. Terminal TB1 provides a multi-pin common. The specified voltage is enabled between the appropriate terminal of TBB and common whenever a chemical injection is called for. As shown in FIGURE 3, terminal R of TBB is used to supply power internally to one contact on each interpret relay. 121 CONNECTING CHEMICAL SYSTEMS TO 100-FORMULA WASHER-EXTRACTORS AND TEXTILE MACHINES MSSM0262BE/9808AV (5 of 7) Using External Power or Potential-Free Contacts—As shown in FIGURE 3, TBB, terminal R, Ë which receives power via WCL, not only supplies power to the interpret relay contacts but also to the pumped chemical inlet manifold flush valve and/or supply injector flush valves, if furnished. To disconnect the internal power source, remove all of the wires from the left side of terminal R, but maintain the connections between the removed wires. Make certain that any external power source connected to terminal R is separately fused. Consider carefully the potential hazards of having more than one power source in a single enclosure. If an external power source is wired to TBB, terminal R, then the voltage provided by this source is enabled between the appropriate terminal of TBB and the user-supplied common (not TB1) whenever a chemical injection is called for. If no power source is connected to TBB, terminal R, then a potential-free signal (contact closure) is enabled between the appropriate terminal (A through Q) of TBB and TBB, Terminal R, whenever an injection is called for. ÎFIGURE 3 (MSSM0262BE) ÎConnections Inside the Interpret Relay Box 122 CONNECTING CHEMICAL SYSTEMS TO 100-FORMULA WASHER-EXTRACTORS AND TEXTILE MACHINES MSSM0262BE/9808AV (6 of 7) Pressurized Chemical Systems Ê These systems use chemical valves on the machine to admit chemicals from pressurized lines (e.g., ring main systems). The machine may be furnished with pilot air valves only, to which the customer may attach air-operated chemical valves, or with pilot valves and chemical valves. Connecting Air-Operated Chemical Valves to Pilot Air Valves—When chemical injection piË lot valves are furnished, they are located in an air valve box dedicated to this function. Connect incoming compressed air where indicated in FIGURE 4. See the installation Venttubes manual for compressed air specifications. Pilot valves are arranged from left to right, beginning with chemical 1, when facing the connections, as shown in FIGURE 4 (however spacing varies with the number of valves furnished). Pilot valve connecCompressed airin tions accept 1/4" (6.3 mm) OD, 0.17" (4.3 mm) ID tubing. Tubing used by Milnor is rated for 310 psi (2.137 MPa) working 5 3 4 1 2 pressure at 72°F (22°C) and 1250 psi (8.618 MPa) minimum Chemical Connect alliedair-operated burst pressure at 73°F (23°C). If air-operated, liquid chemical devices here valves are also furnished, these will be pre-connected to the piÎFIGURE 4 (MSSM0262BE) lot valves; however, these may be disconnected and the pilot A Î rrangement of Pilot Air Valves valves used to drive other devices, if desired. Connecting Pressurized Liquid Chemical Lines to Air-Operated Valves Ë If air-operated chemical valves are furnished, between seven valves (two standard flow plus five high flow) and 15 valves will be supplied. Although each valve can be devoted to a separate chemical, the high flow valves are usually used to speed up injection when an extra large quantity of a chemical also injected via a standard flow valve is required (e.g., large doses of alkali in early heavy soil baths followed by smaller doses in later baths). Thus, the basic seven-valve set normally accommodates five chemicals as shown in FIGURE 5. When air-operated chemical valves are furnished by Milnor, corresponding Valves:1 1L 2 2L 3 4 5 Connect pressurized pilot air valves and associated air connections chemical lineshere between pilot and chemical valves are also furnished. All chemicals are injected into a manifold which is automatically flushed with water 3/8"Standard after every injection. Flow Valve Standard flow valve connections (1, 2, 3, 4, 5, etc.) are 3/8" NPT. High flow valve connections from Pilot (1L, 2L, etc.) are 1/2" NPT. Chemical piping Air Valve should adhere to chemical system manufacturer 1/2"High Flushing specifications. The water inlet for flushing is interFlow waterin Valve nally connected to the main cold water inlet on some machines. An external, 1/2" NPT connection is required on other machines. Because the Chemicals output relay-to-pilot valve wiring and the pilot valve to chemical valve air connections vary with the number and combination of valves furnished, its best to test each chemical output to determine Towasher-extractor which output (chemical 1, 2, 3, etc.) operates ÎFIGURE 5 (MSSM0262BE) which valve (1, 1L, 2, 2L, etc.). See “MANUAL A Î rrangement of Liquid Chemical Valves MODE MENU FUNCTIONS . . .” 123 CONNECTING CHEMICAL SYSTEMS TO 100-FORMULA WASHER-EXTRACTORS AND TEXTILE MACHINES MSSM0262BE/9808AV (7 of 7) Pumped Chemical Systems Ê These systems deliver chemicals to the machine intermittantly usually via peristaltic pumps. Inlets on the machine must be unrestricted at all times (valveless). The 5 and 15 port pumped chemical inlets meet this requirement. Risk Associated With Pumped Chemical Systems—An inherent risk of this method of chemical Ë injection is that concentrated chemicals can dribble into the machine after hours, when the machine is not in operation, causing machine and/or linen damage. Because Milnor has no control over the design or installation of pumped chemical systems, Pellerin Milnor Corporation accepts absolutely no responsibility for damage to its equipment or textiles therein, caused in this way. Much more information on this subject is provided in document B2TAG86033, “Pumped Chemical Installation and Precautions.” Consult this document before connecting a pumped chemical system. Ë onnecting Flushing Water to 15-Port C Inlets—Flushing water is required for 15-port inlets. It is internally piped to the incoming cold water inlet on some machines. When not internally piped, a 1/2" NPT external water line must be connected where indicated in FIGURE 6. ÎFIGURE 6 (MSSM0262BE) Î15-Port Pumped Chemical Inlet 124 MSSM0262CE/9814AV (1 of 6) È ONNECTING CHEMICAL SYSTEMS TO 100-FORMULA C WASHER-EXTRACTORS AND TEXTILE MACHINES WITH EUROPEAN WIRING Various standard and optional methods are available on all 100-formula washer-extractors and textile machines, to accommodate any of the commonly used allied (non-Milnor) chemical systems. Use this section to help determine the best method of chemical injection for your laundry and how to connect the chemical system. Always consult the machine schematic manuals before connecting chemical systems. ELECTRIC SHOCK HAZARD—Contact with high voltage electricity will kill or seriously injure you. Even with the Master Switch off and/or any emergency stop switches off, three-phase power and control circuit power are still present at several locations within electric boxes and electrical components. INJURY AND DAMAGE HAZARDS—Improper wiring can cause the machine to malfunction, risking injury to personnel, damage to machine components, and damage to goods. ☞ Electrical and piping connections described in this section must be made only by qualified, ☞ ☞ ☞ ☞ authorized maintenance personnel. Lock off and tag out power at the external disconnect switches for the washer-extractor and for any chemical devices that provide power to the interpret relay box (if furnished) before proceeding. DO NOT rely merely on the information in this section when wiring. Consult all applicable electrical schematics. DO NOT reroute or rearrange any wires not specifically described by this instruction. DO NOT connect a common wire to ground. Use the common terminal furnished. 125 CONNECTING CHEMICAL SYSTEMS TO 100-FORMULA WASHER-EXTRACTORS AND TEXTILE MACHINES WITH EUROPEAN WIRING MSSM0262CE/9814AV (2 of 6) Chemical Injection Connection Methods Available Ê Chemical Injection Output Signals Ë Five discrete signals, released in response to programmed chemical injections for chemicals 1 through 5, are furnished standard on all washer-extractors. Ten additional signals (chemicals 6 through 15) are optionally available on most machines. Often these start signals are used to operate other electrically-operated, low-voltage chemical injection devices like interpreter relays and pilot valves. These devices, in turn, are used to operate a higher voltage chemical injection device. These signals, each capable of a maximum electrical load of 9VA at 120VAC, can be accessed at terminal strip TBA. Disconnect the factory wired apparatus to use these start signals for any other low current apparatuses. Liquid Chemical Tube Barbed Connectors Ë Barbed fittings, furnished standard on F-style machines, provide for the connection of tubes from remote chemical supply injection systems. The F8P and F7P are furnished with six barbed connectors, while outerwear machines are furnished with ten connectors. One chemical injection output signal is required for each connector, and at least five are provided standard. Five Compartment Flushing Chemical Injector Ë A five-compartment dry supply injector mounted externally on the washer-extractor is furnished standard on most washer-extractors in lieu of a pumped chemical style system. The flushing chemical injector is offered optionally on the Q style microprocessor machines and outerwear machines. Each electrically operated flush valve located in a supply compartment is wired to terminal strip TBA and uses a chemical injection output signal. Optional Interpret Relays Ë One or more interpreter relays (up to 15) mounted in a control box are optionally available and connected to the standard chemical injection outputs on washer-extractors. These relays can be used to operate other electricallyoperated, high voltage chemical injection devices like pumps and valves. These relays, each capable of a maximum electrical load of 1 ampere at 250VAC, have one set of contacts on each relay wired to terminal strip TBA and connected to an internal power source. The internal power source may be replaced by an external, separately fused source, or merely disconnected, to provide potential-free (“dry”) contacts. Optional Pilot Air Valves Ë Pilot air valves are optionally available to actuate air-operated chemical injection valves or other similar air-operated devices supplied by others. A maximum of 15 of these normally-closed air valves are available and are connected to corresponding chemical injection output signals. Each air-operated valve is wired to terminal strip TBA and uses a chemical injection output signal. Optional Central Liquid Chemical Supply System/Valves Ë Seven air-operated chemical injection valves are optionally available for use with up to seven different chemicals on most models. The system includes two 1/2" high flow and five 3/8" standard flow air-operated valves. Individual standard flow central liquid chemical valves are also optionally available up to a maximum of 8 additional standard flow valves in the system for a maximum of 15 valves. Each individual valve includes the necessary interpreter relay and pilot valve. Chemical injection valves are wired to terminal strip TBA and use a output signal, interpreter relay, and pilot valve for each optional chemical valve. These valves are used with pressurized liquid chemical delivery systems like a ring main. 126 CONNECTING CHEMICAL SYSTEMS TO 100-FORMULA WASHER-EXTRACTORS AND TEXTILE MACHINES WITH EUROPEAN WIRING MSSM0262CE/9814AV (3 of 6) Optional Peristaltic Pump Connections Ë Up to fifteen 1/2" barbed fittings for separate peristaltic hose connections are optionally available. Automatic flush can be added optionally with peristaltic pump connections. The connections are provided standard with five chemical output signals, and additional signals must be added to operate more than five peristaltic hose connections. These valveless inlets are used only with systems that are not continuously pressurized and that deliver chemicals only when an injection is commanded. Sequenced Chemical Injection (Chemwait) Ë A chemical injection sequencer supplied by others interfaces with the machines to supply each machine with chemicals one at a time. See “HOW CHEMWAIT WORKS . . .” (see Table of Contents). Connecting Apparatuses to Chemical Injection Signals Ê Electrical Specifications—Inject signals provide a 110VAC, 50Hz or 120VAC, 60Hz potential. Each sigË nal can accommodate one apparatus not exceeding 37 milliamperes. Inject signals cannot be made potential-free. COMPONENT DAMAGE HAZARD—Devices driven by injection output signals which exceed electrical specifications will burn out board components, requiring board replacement. (Pumps generally draw a higher current and will burn out board components.) BWP and QxP Models With Five Signals Only—Acquire signals at terminal strip TBA, located in Ë the high voltage control box . Points 86 through 90 are chemicals 1 through 5, respectively, point 109 is flush, and point 6 is common. The specified voltage is enabled between the appropriate terminal and common whenever an injection is called for. FxP, FxS, and FxW Models With Five Signals Only—Acquire signals at terminal strip TBA in the Ë rear control box. Points 47 through 51 are chemicals 1 through 5, point 62 is flush, point 6 is common. In FxS models, point 63 is the soap chute. The specified voltage is enabled between the appropriate terminal and common whenever an injection is called for. BWP and QxP Models With 15 Signals and No Interpret Relays—Acquire all 15 signals at Ë TBA in the high voltage control box. Points 86 through 90 are 1 through 5 respectively and points 94 through 102 are 6 through 14 respectively. Point 108 is chemical 15. Point 109 is flush. The specified voltage is enabled between the appropriate terminal of TBA and common, whenever a chemical injection is called for. FxP and FxW Models With 15 Signals and No Interpret Relays—Acquire all 15 signals at Ë TBA in the high voltage control box. Points 52 through 61 are chemicals 6 through 15 respectively. The specified voltage is enabled between the appropriate terminal of TBA, whenever a chemical injection is called for. FxW Models With 15 Signals and Interpret Relays—Acquire all 15 signals at TBA in the high Ë voltage control box. Points 68 through 82 are 1 through 15 respectively. The specified voltage is enabled between the appropriate terminal of TBA and common, whenever a chemical injection is called for. 127 CONNECTING CHEMICAL SYSTEMS TO 100-FORMULA WASHER-EXTRACTORS AND TEXTILE MACHINES WITH EUROPEAN WIRING MSSM0262CE/9814AV (4 of 6) Connecting Apparatuses to Interpret Relays Ê Electrical Specifications—The internal power source provides a 110VAC, 50Hz or 120VAC, 60Hz potenË tial. Each interpret relay can accomodate one apparatus, not exceeding 0.6 amperes. The total current drawn by all apparatuses must not exceed 10 amperes. When apparatuses are driven by external power, do not exceed 1 ampere at 250VAC per relay contact. COMPONENT DAMAGE HAZARD—Connecting devices which exceed the electrical specifications can cause interpret relay contacts to fail, requiring relay replacement. Using Internal Power Ë When interpret relays (up to 15) are furnished, chemical signals are available at TBB in the interpret relay box. Terminals A through Q are chemicals 1 through 15 respectively. Terminal TB1 provides a multi-pin common. The specified voltage is enabled between the appropriate terminal of TBB and common whenever a chemical injection is called for. As shown in Figure 1, terminal R of TBB is used to supply power internally to one contact on each interpret relay. ÎFIGURE 1 (MSSM0262CE) ÎConnections Inside the Interpret Relay Box 128 CONNECTING CHEMICAL SYSTEMS TO 100-FORMULA WASHER-EXTRACTORS AND TEXTILE MACHINES WITH EUROPEAN WIRING MSSM0262CE/9814AV (5 of 6) Using External Power or Potential-Free Contacts Ë As shown in Figure 1, TBB, terminal R, which receives power via WCL, not only supplies power to the interpret relay contacts but also to the pumped chemical inlet manifold flush valve and/or supply injector flush valves, if furnished. To disconnect the internal power source, remove all wires from the left side of terminal R, but maintain the connections between the removed wires. Make certain that any external power source connected to terminal R is separately fused. Consider carefully the potential hazards of having more than one power source in a single enclosure. If an external power source is wired to TBB, terminal R, then the voltage provided by this source is enabled between the appropriate terminal of TBB and the user-supplied common (not TB1) whenever a chemical injection is called for. If no power source is connected to TBB, terminal R, then a potential-free signal (contact closure) is enabled between the appropriate terminal (A through Q) of TBB and TBB, Terminal R, whenever an injection is called for. Pressurized Chemical Systems Ê These systems use chemical valves on the machine to admit chemicals from pressurized lines (e.g., ring main systems). The machine may be furnished with pilot air valves only, to which the customer may attach air-operated chemical valves, or with pilot valves and chemical valves. Venttubes Ë onnecting Air-Operated Chemical Valves to C Pilot Air Valves—When chemical injection pilot valves are Compressed furnished, they are located in an air valve box dedicated to this airin function. Connect incoming compressed air where indicated in Figure 2. See the installation manual for compressed air specifi3 5 1 4 2 Chemical cations. Pilot valves are arranged from left to right, beginning Connect alliedair-operated devices here with chemical 1, when facing the connections, as shown in Figure 4 (however spacing varies with the number of valves furnished). ÎFIGURE 2 (MSSM0262CE) Pilot valve connections accept 1/4" (6.3 mm) OD, 0.17" (4.3 mm) ÎArrangement of Pilot Air Valves ID tubing. Tubing used by Milnor is rated for 310 psi (2.137 MPa) working pressure at 72°F (22°C) and 1250 psi (8.618 MPa) minimum burst pressure at 73°F (23°C). If air-operated, liquid chemical valves are also furnished, these will be pre-connected to the pilot valves; however, these may be disconnected and the pilot valves used to drive other devices, if desired. 129 CONNECTING CHEMICAL SYSTEMS TO 100-FORMULA WASHER-EXTRACTORS AND TEXTILE MACHINES WITH EUROPEAN WIRING MSSM0262CE/9814AV (6 of 6) Connecting Pressurized Liquid Chemical Lines to Air-Operated Valves—If air-operated Ë chemical valves are furnished, between seven valves (two standard flow plus five high flow) and 15 valves will be supplied. Although each valve can be devoted to a separate chemical, the high flow valves are usually used to speed up injection when an extra large quantity of a chemical also injected via a standard flow valve is required (e.g., large doses of alkali in early heavy soil baths followed by smaller doses in later baths). Thus, the basic seven-valve set normally accommodates five chemicals as shown in Valves:1 1L 2 2L 3 4 5 Connect pressurized chemical Figure 3. When air-operated chemical valves are furlineshere nished by Milnor, corresponding pilot air valves and associated air connections between pilot and chemical valves are also furnished. All chemicals are injected 3/8"Standard Flow into a manifold which is automatically flushed with Valve water after every injection. from Standard flow valve connections (1, 2, 3, 4, 5, Pilot Air etc.) are 3/8" NPT. High flow valve connections (1L, Valve 2L, etc.) are 1/2" NPT. Chemical piping should adhere 1/2"High Flushing Flow waterin Valve to chemical system manufacturer specifications. The water inlet for flushing is internally connected to the main cold water inlet on some machines. An external, Chemicals 1/2" NPT connection is required on other machines. Because the output relay-to-pilot valve wiring and the pilot valve to chemical valve air connections vary with the number and combination of valves furnished, it is Towasher-extractor best to test each chemical output to determine which ÎFIGURE 3 (MSSM0262CE) output (chemical 1, 2, 3, etc.) operates which valve (1, ÎArrangement of Liquid Chemical Valves 1L, 2, 2L, etc.). See “MANUAL MODE MENU FUNCTIONS . . .” Pumped Chemical Systems Ê These systems deliver chemicals to the machine intermittently usually via peristaltic pumps. Inlets on the machine must be unrestricted at all times (valveless). The 5 and 15 port pumped chemical inlets meet this requirement. Ë onnecting Flushing Water to 15-Port C Inlets—Flushing water is required for 15-port inlets. It is internally piped to the incoming cold water inlet on some machines. When not internally piped, a 1/2" NPT external water line must be connected where indicated in FIGURE 6. Ë isk Associated With Pumped Chemical R Systems—An inherent risk of this method of chemical injection is that concentrated chemicals can dribble into the machine after hours, when the machine is not in operation, causing machine and/or linen damage. Because Milnor has ÎFIGURE 4 (MSSM0262CE) no control over the design or installation of pumped chemiÎ15-Port Pumped Chemical Inlet cal systems, Pellerin Milnor Corporation accepts absolutely no responsibility for damage to its equipment or textiles therein, caused in this way. Much more information on this subject is provided in document B2TAG86033, “Pumped Chemical Installation and Precautions.” Consult this document before connecting a pumped chemical system. 130 MSFDD412CE/9905CV (1 of 13) DEFINITIONS OF TERMS AND ABBREVIATIONS È The following terms and abbreviations are used in documents relating to Milnor® equipment. Because this text is used in several manuals, some of the terms may not apply to this manual. In the following list, a “CBW® system” may include, but is not limited to, the following equipment: CBW® washers, loading conveyors or rail system, extraction system, and receiving conveyors. Term Applies to these machines Definition Allied Device CBW® system; Dryer any device not manufactured by Milnor®, but associated with or connected to Milnor® equipment. Allied Discharge CBW® system; Dryer situation where an allied device is used to unload a Milnor® machine; see also Allied Device. Allied Loading CBW® system; Dryer situation where using an allied device to load a Milnor® machine; see also Allied Device. Auto Pass Empty CBW® system method, via compatibility C-Bits, of automatically sending through one or several “empty pockets” so as to clear incompatible liquors through normal counterflow. Auto-Purge CBW® washer procedure by which the shell, shell sumps, and weir boxes of tunnels with drain valves and rapid refill valves (standard on WorkWear tunnels) are flushed of heavy insoluble particles, refilled, reheated, and redosed with chemicals based on a commandable number of transfers since the last purge. AutoSpot washer-extractors a control mechanism with which the operator can automatically align one cylinder pocket of a divided cylinder machine with the loading doors. Batch CBW® system; Dryer group of goods that are to be processed together. Batch Code CBW® system; Dryer information for the Miltron controller about how to process the goods in the batch. Bath CBW® washer, washer-extractor a general term for any step of a wash formula during which the goods are exposed to water and/or chemicals. Bath Exchange CBW® washer system whereby formulas can be classified as being “good” or “bad” relative to each other; includes software and hardware to prevent the transfer of good goods into a bad bath and to prevent the flow of bad water and/or chemicals into a good load of goods. 131 DEFINITIONS OF TERMS AND ABBREVIATIONS Term MSFDD412CE/9905CV (2 of 13) Applies to these machines CPU (Central all microprocessorProcessing Unit) controlled models Definition integrated circuit component—usually an Intel 8088 and its ancillary devices—that interprets programming instructions and inputs to the microprocessor and provides outputs to other devices. C-Bit (Control Bit) CBW® washer programmable Miltron controller output used to control various discretionary functions in the tunnel, including temperatures, chemical injection, etc.; C-Bits are assigned to specific locations in the load system, tunnel, extraction system, etc., and can be commanded to turn on according to a washing formula. C-Bit Attributes CBW® washer values assigned to a C-Bit which define or control its functions. C-Bit, Compatibility CBW® washer scheme whereby a C-Bit may be actuated based on a comparison of goods now in a module with goods that previously occupied that module (called “Forward Compatibility”), or with goods that will next occupy that module (called “Backward Compatibility”). C-Bit, Compatibility, Backward CBW® washer see C-Bit, Compatibility C-Bit, Compatibility, Forward CBW® washer see C-Bit, Compatibility C-Bit, Compatibility, Direct CBW® washer Compatibility C-Bit in which each C-Bit value is commanded directly on its appropriate Display P. C-Bit, Compatibility, Indirect CBW® washer Compatibility C-Bit in which each C-Bit value is commanded on its appropriate Display L, and the instruction to actuate commanded on its appropriate Display P. C-Bit, Dedicated CBW® washer C-Bit for which discrete values may be commanded for each of the 256 goods classes instead of for each of the 16 basic formulas. See also C-Bit, Standard. C-Bit Hold Code CBW® washer C-Bit attribute that answers the question, “If the CBW® washer goes into Hold while this C-Bit is ON, should the C-Bit turn OFF even if its C-Bit time value has not expired, or its commanded temperature has not been achieved?” C-Bit Init Code CBW® washer C-Bit attribute that specifies when, during the time between transfers, a C-Bit controlled action starts. 132 DEFINITIONS OF TERMS AND ABBREVIATIONS Term MSFDD412CE/9905CV (3 of 13) Applies to these machines Definition C-Bit Op Codes CBW® washer C-Bit attribute that modifies C-Bit behavior to suit a specific function. For example, when a C-Bit is assigned Op Code 04 (Drain), all other C-Bits in the module turn off whenever the C-Bit opens the drain valve. C-Bit, Standard CBW® washer C-Bit for which discrete values may be commanded for each of the 16 basic formulas, but not for each of the 256 possible goods classes. See also C-Bit, Dedicated. C-Bit Steam Code CBW® washer C-Bit attribute to specify when the Steam C-Bit will turn on to satisfy the commanded temperature. C-Bit Value, On-time CBW® washer C-Bit Value in seconds for time-based functions. C-Bit Value, Temperature CBW® washer C-Bit Value for temperature-based functions; in degrees: Fahrenheit or Celsius. Cake CBW® system batch of goods after discharge from the Press. CBW® CBW® washer registered trademark to describe the Milnor® Continuous Batch Washer. CCW all models counterclockwise cylinder rotation, as viewed from the load end (looking toward the discharge end); see also CW. CCWLS CBW® washer counterclockwise limit switch to determine the limit of CCW rotation during reversals; see also CWLS, TDCLS, SAFETY. Central liquid supply system washer-extractor chemicals are constantly supplied to the machine under pressure; valves on the machine open and close to regulate the flow of chemicals into the machine. Centrifugal Extractor CBW® system extraction device to which tunnel may pass batches; extraction is by spinning goods in a cylinder. Checksum all microprocessorcontrolled models one of several numbers generated by the control that represents the amount of data in a specific memory area; any change in a checksum indicates that data has changed. Clean side washer-extractor the side of a pass-through machine from which clean goods are unloaded after processing. COBUC CBW® system Milnor® shuttle for transporting loose wet goods from the CBW® washer to an extraction device (may traverse and/or extend to load). Code, Customer CBW® system; Dryer code that identifies the 1 of 1000 possible “owners” of a batch. 133 DEFINITIONS OF TERMS AND ABBREVIATIONS Term MSFDD412CE/9905CV (4 of 13) Applies to these machines Definition Code, Destination CBW® system; Dryer code that identifies the 1 of 64 (if the Miltrac controller) or 1 of 8 (if Allied Data Pass) desired post-dry or no-dry destination of a batch. Code, Dry CBW® system; Dryer code that identifies the 1 of 16 × 2 desired dry cycles for a batch. Code, Formula CBW® washer code that identifies the 1 of 16 basic wash formulas used to process a batch. Code, Goods CBW® washer; Dryer code that identifies the 1 of 256 goods classifications that describe a batch and invoke any variations to the basic formula used. Code, Init CBW® washer see C-Bit Init Code ® Code, Single Cake CBW system code that specifies that receiving device (shuttle, dryer, etc.) should handle only a single cake instead of its maximum capacity of cakes. COELF CBW® system Milnor® non-traversing, elevating shuttle conveyor for pressed cakes. COHORFP CBW® system Milnor® horizontal conveyor that pivots and elevates a single pressed cake for transfer to the next receiving device, or holds a cake when next receiving device is full. COINC CBW® system Milnor® inclined conveyor that pivots and elevates a single pressed cake for transfer to the next receiving device, or holds a cake when next receiving device is full. COLOOS CBW® system Milnor® traversing, elevating, and extending conveyor for loose or pressed extracted goods. Compatibility, Direct Compatibility, Indirect CBW® washer see C-Bit, Compatibility, Direct CBW® washer see C-Bit, Compatibility, Indirect Conditioning Dryer dryer program in which only a portion of the moisture in the goods is removed. Configure CBW® system; Dryer microprocessor programming for various software and hardware options on machine. CONLO CBW® system Milnor® loading conveyor with partitioned belt which loads loose goods into CBW® washer; each partition holds one batch. Control all microprocessorcontrolled models control box, usually housing a keypad, at which the user commands action and programs the machine; also includes all electromechanical devices on the machine involved with its operation. 134 DEFINITIONS OF TERMS AND ABBREVIATIONS Term MSFDD412CE/9905CV (5 of 13) Applies to these machines Definition Controller all microprocessorcontrolled models control box, usually housing a keypad, at which the user commands action and programs the machine. CONWA CBW® system conveyor similar to CONLO, but includes built-in goods weighing and “authorized” load weights indicator. See CONLO. Cooldown, Dryer Dryer gradual temperature reduction after the drying cycle to ensure goods are not discharged too hot. Always program sufficient cooldown time to cool goods. Goods that are discharged too hot can catch fire by spontaneous combustion—sometimes many hours after the laundry has stopped working. Cooldown, Reuse (Flush) Tank CBW® washer methods of reducing the temperature in the Reuse (Flush) tank. Cooldown, Washer CBW® washer method of reducing a bath temperature in a tunnel washer. COSAT CBW® system Milnor® traversing, non-elevating shuttle conveyor for transporting pressed cakes. COSHA CBW® system Milnor® elevating and traversing shuttle conveyor for transporting pressed cakes. Count CBW® washer number of sets of CW and CCW cylinder reversals commanded for each formula. Count-up CBW® washer process in which the tunnel counts the number of reversal sets remaining between transfers; in Miltron software prior to Mark VIII, this process was called “count-down,” because the counter displayed the number of reversal sets already completed. Counterflow CBW® washer tunnel water flow, opposite the flow of goods, from the clean (discharge) end of tunnel toward the dirty (load) end. CPU all microprocessorcontrolled models Central Processing Unit—the main computer chip in a microprocessor control that processes data as well as the board on which the CPU chip is mounted. CRT CBW® system cathode-ray tube (also called Video Display Unit); the screen on the various controls on which information is displayed. Customer Code CBW® system; Dryer see Code, Customer CW clockwise cylinder rotation direction as viewed from the load end (looking toward the discharge end); see also CCW. all models 135 DEFINITIONS OF TERMS AND ABBREVIATIONS Term MSFDD412CE/9905CV (6 of 13) Applies to these machines Definition CWLS CBW® washer clockwise limit switch to determine the limit of CW rotation during reversals; see also CCWLS, TDCLS, SAFETY. Cycle all models operations undertaken in a specific order to process goods; a cycle normally ends with the device ready to accept another load. Cylinder washer-extractor the perforated basket inside the machine shell which contains the goods and is rotated by the motors. Cylinder Pocket washer-extractor one of the two or three divisions of a divided cylinder washer-extractor into which goods are loaded for processing. Daisy Chain all serial micromethod of linking two or more serial type microprocessor conprocessor controlled trols with one four-conductor shielded cable. All data passes via this cable, regardless of which machines are communicating. models Data, Operational CBW® washer information regarding tunnel operating efficiency that is collected and held by the Miltron controller. Default Password CBW® system; Dryer See Password, Default Default Value CBW® system value used by the microprocessor control if no other value is commanded by the programmer. Destination CBW® system; Dryer area or zone of laundry facility to which goods will be routed after drying or after pressing if “no-dry.” Destination Code CBW® system; Dryer see Code, Destination DIP Switches all microprocessorcontrolled models Dual In-line Package switches; a row of (usually eight) miniature switches in a single housing used to permanently select (or configure) certain options on microprocessor boards; on Milnor® microprocessor controls, these switches are used most often to specify the communications “address” for each machine in a Miltrac system. Discretionary Data Field CBW® system any field in the Miltron microprocessor control system that can be updated through the keyboard. Display all models data appearing on the Miltron or Miltrac CRT screen; also refers to the two line by 20 character display used on some Milnor® controls. Door, Manual all models machine door is opened/closed by hand. Door, Power Operated all models machine door is normally operated through electro-mechanical controls rather than manually; usually machine must be energized for door operation. 136 DEFINITIONS OF TERMS AND ABBREVIATIONS Term MSFDD412CE/9905CV (7 of 13) Applies to these machines Definition Dosing, First CBW® washer chemical injection needed to achieve the correct working concentration at start up and whenever the goods type now in the module differs from the previous batch. Dosing, Maintenance CBW® washer chemical injection needed to maintain the correct working concentration whenever the goods type now in the module is the same as the previous batch. Download serial microprocessor controlled models process of transferring data—usually configuration and programming instructions—from a machine to another machine or a memory storage device. Drain Speed washer-extractor one of several ways to end a wash formula; goods are kept in motion at drain speed until the operator is ready to discharge them. Dry Code CBW® system; Dryer see Code, Dry Dry Cycle, Full Dryer dry cycle used when a dryer is loaded to its full capacity (e.g., a two-cake dryer with two cakes); refers to the amount of goods loaded into the dryer, not the degree of moisture removal; see also Conditioning and Full Dry. Dry Cycle, Partial Dryer dry cycle used when a multicake dryer is loaded to less than its full capacity (e.g., a two-cake dryer with one cake); refers to the amount of goods loaded into the dryer, not the degree of moisture removal; see also Conditioning and Full Dry. EPROM all microprocessorcontrolled models Erasable, programmable Read-Only Memory; the portion of the Milnor® microprocessor control used to store the fixed instructions (software) that determine how the machine functions. Extraction CBW® system removal of excess water from goods discharged from the tunnel. ® Extractor, Centrifugal CBW system see Centrifugal Extractor Extractor, Press CBW® system see Press Fast Fill CBW® washer see C-Bit, Fast Fill Fire Control Unit Dryer electronic device used in gas-fired dryers to ensure that a pilot flame is present before allowing the main gas valve(s) to open. First Dosing CBW® washer see Dosing, First Flow Lifter ® CBW washer tunnel ancillary component that accepts bath liquor from one wash zone, removes lint, and pumps liquor to a higher level in another wash zone. 137 DEFINITIONS OF TERMS AND ABBREVIATIONS Term C MSFDD412CE/9905CV (8 of 13) Applies to these machines Definition Flow-not CBW® washer valve to divert “bad” liquor to sewer instead of allowing normal counterflow into the next water-receiving module. Flow of Goods all models direction goods flow through a machine that accepts goods at one end and discharges them out the opposite end. Flow Splitter CBW® washer tunnel ancillary component that accepts bath liquor from the rinse zone, removes lint, and pumps part of liquor to Reuse tank and part to wash zone; permits higher level in wash zone. Formula all models instructions used by the machine control to operate motors, valves, and other components during a standard cycle. Formula Code CBW® washer; Dryer see Code, Formula Full Dry Dryer dryer formula that removes virtually all moisture from the goods. Gains, PID Modulating Dryer; DyExtractor® proportional-integral-differential gains, a set of constants used by the software in Milnor® dryers to determine the temperature and its rate of change at the inlet and outlet temperature probes. Goods all models articles processed or conveyed by a machine. Hard Start Dryer process by which dryer basket motors momentarily provide additional torque to start into motion a loaded stationary basket. Hardware all models electronic boards that control the machine. Hold CBW® washer condition where count-up or transfer is suspended because prerequisites are not met; if caused by a loading error, flow is disabled Home Shuttle Conveyors specific position along the shuttle path to which the shuttle returns upon power up; or after discharge, load, or error correction; belt is at receive level 0. Inching washer-extractor a control mechanism with which an operator can manually align one pocket of a divided cylinder machine with the loading doors. Init Code CBW® washer see C-Bit Init Code Input, Direct all microprocessorcontrolled models signals that enter the processor board directly; direct inputs are provided by switches on the machine, including limit switches, the Signal Cancel button, and the Run/Program keyswitch. Input, Module CBW® washer signals that enter the Miltron processor board through the first I/O board of each tunnel module; module inputs are provided by level switches, module-specific circuit breakers and motor overloads, etc. 138 DEFINITIONS OF TERMS AND ABBREVIATIONS Term MSFDD412CE/9905CV (9 of 13) Applies to these machines Definition Input, Standard all microprocessorcontrolled models signals to the microprocessor controller that certain standard conditions exist; these inputs enter the processor board through the standard I/O board(s); include Bag Ready, Load Conveyor Ready, and Remote Customer and Goods Codes, etc. Jogging Centrifugal Extractor; Dryer intermittent rotation of the cylinder on certain Milnor® machines can be used to dislodge goods from the cylinder wall after extraction, or to assist in discharging goods from the tilted cylinder, etc. Level Switch CBW® washer device that signals the control when water has reached a preset level. LINEAR COSTA CBW® system Milnor® controller to store multiple cakes on a belt conveyor. Liquor washer-extractor CBW® washer bath solution usually composed of water and chemicals. Load all models the amount of goods, measured by weight or pieces, that a machine normally handles during a cycle. Load Chute CBW® system stainless steel chute that directs goods into the machine. Loading Device all models in a system, this is the device which loads another device; example: a shuttle may be the loading device for a dryer. Loading Direction all models direction goods are loaded into/onto a device. Maintenance Dosing CBW® washer see Dosing, Maintenance MILDATA® CBW® system software that connects Milnor® Serial Microprocessor machines to a centrally located personal computer for data capture, report creation, and formula generation. MILTRAC CBW® system control unit that passes batch codes between the various system components and controls the routing of goods based on machine availability and the batch codes. MILTRON CBW® washer microprocessor control unit for the tunnel washer. Minipass CBW® washer second character of the password used to access screens that require some security, but less than that afforded by the full password. For further explanation, see Password. MMQ CBW® system minutes, minutes, and quarter minutes (e.g., 043=4 minutes, 45 seconds); see also SS and SSS. 139 B DEFINITIONS OF TERMS AND ABBREVIATIONS Term C MSFDD412CE/9905CV (10 of 13) Applies to these machines Definition Model all models designation of machine without regard to options; for most devices, the model includes some dimensional representation of the effective machine size. Motor Contactor Box all models enclosure containing the high voltage motor contactors. Module CBW® washer portion of a CBW used to process one batch of goods during one “time between transfers.” Monitor CBW® system video display screen; see also CRT. No-Dry CBW® system station where clean, extracted, but undried goods are discharged. Non-Dedicated C-Bit CBW® washer see C-Bit, Standard Op Code CBW® washer see C-Bit Op Code Output, Assignable CBW® washer see C-Bit Output, Standard CBW® washer see Standard Output Overhead Fast Fill Tank CBW® washer tank that quickly supplies water to a single, specific module when commanded. Pass Empty CBW® washer see Auto Pass Empty Password CBW® washer; Dryer three-character code entered to access or change values in certain display pages; prevents unauthorized programming; the instructions for changing the password are contained in a separate document sent only to the owner; see also Minipass. Password, Default CBW® washer password (ABC) in the Miltron control when shipped from the Milnor® factory that automatically replaces any field-programmed password after a failed Program Memory check. Password, Mini CBW® washer see Minipass Permanent Press all models a fabric or finish which is heat-set after the article is manufactured to minimize wrinkling and retain creases. Press CBW® system extraction device to which the tunnel may pass batches. Extraction is by squeezing goods under pneumatic (pre-press) pressure, then hydraulic (main bell) pressure. Press Pressure CBW® system force used by a press during the extraction process; also, a code that identifies the one of up to four optional pressures that the Milnor® press should apply to a batch. 140 DEFINITIONS OF TERMS AND ABBREVIATIONS Term Program Constants MSFDD412CE/9905CV (11 of 13) Applies to these machines CBW® system; Dryer Definition values that specify characteristics of the CBW® system not normally changed after first commissioning; program constants specify line frequency (50 or 60 Hz), minimum and maximum cooldown temperature, Mildata® address, etc. Program Mode all microprocessorcontrolled models mode which allows programming of wash formulas, dry cycles, and other discretionary data; see also Run Mode. Pumped Chemical Supply System washer-extractor chemicals flow into the machine when the machine control or operator commands the pump to operate. Rail Sequencer CBW® washer Miltron feature that permits programming the sequence with which bags are released from feeder rails to the main rail for delivery to the tunnel in an automated rail system. Relay Box CBW® washer enclosure containing the plug-in relays external to the microprocessor; some external relays provide control logic, and some are merely slaves to microprocessor outputs. Reversal (Set of Reversals) CBW® washer one clockwise plus one counterclockwise rotation of the baskets during the normal wash cycle; see also Count and Count-up. Reversing washer-extractor one of several ways to end a wash formula; goods are kept in motion at wash speed by the rotating cylinder until the operator is ready to discharge them. Rinse Zone Flow Splitter CBW® washer see Flow Splitter Run Mode all microprocessorcontrolled models mode of operation that allows devices to run automatically; see also Program Mode. SAFETY CBW® washer safety limit switch; see also CCWLS, CWLS, and TDCLS. Software all microprocessorcontrolled models fixed information contained in EPROMs (programming by Milnor®) that determines how the machine functions. Soil Side washer-extractor the side of a pass-through machine into which soiled goods are loaded for processing. Spray-down washer-extractor a feature which allows the operator to facilitate loading the machine by spraying the goods with water as they are loaded. SS (SSS) all microprocessorcontrolled models seconds, i.e., “SS” means two digits (00-99 seconds), “SSS” means three digits (000-255 seconds); see also MMQ. Standard C-Bit CBW® washer see C-Bit, Standard 141 DEFINITIONS OF TERMS AND ABBREVIATIONS Term MSFDD412CE/9905CV (12 of 13) Applies to these machines Standard Input CBW® washer ® Definition see Input, Standard Standard Output CBW washer signal from the microprocessor control to perform a certain standard function—such as “Start Motors on Odd Modules First.” Standing Bath CBW® washer condition where there is no counterflow in a module. Steam Code Step Timer ® see C-Bit Steam Code ® counts time for each individual step in a formula or dry code. CBW washer CBW washer; Dryer Supply Injector washer-extractor compartmented hopper into which chemicals are loaded before beginning a wash cycle; these chemicals are flushed into the machine automatically when commanded by the control. Synchronism CBW® system condition where the movement of batches of goods through some part of the overall processing operation exactly corresponds with the tunnel transfers; batches discharged from the tunnel may remain synchronous only at the very moment of transfer. TDC CBW® washer top dead center; the approximate position of the junction of the transfer scoops and the perforated cylinder side sheets after transfer has occurred. TDCLS CBW® washer top dead center limit switch; see also CCWLS, CWLS, and SAFETY. Thermistor CBW® system temperature-sensing device that varies its resistance to an electrical current with regard to temperature; used most frequently in CBW® washers, washer-extractors, and dye machines. Thermocouple Dryer temperature-sensing device that provides a millivolt range current which varies proportionally according to its temperature; used most frequently in dryers. Three Wire Circuit all models circuit that provides control power for all machine functions; any of several safety devices in the three-wire circuit will open the circuit and stop machine operation if a malfunction is detected; once open, the three-wire circuit can only be closed by manual intervention and then only if the condition that opened the circuit is rectified. Thermo-Water all models so equipped method of controlling incoming water temperature by modulating (alternately and oppositely opening and closing) the hot and cold water valves. Timer, Output CBW® washer software process that controls or monitors the duration of a function. See also C-Bit Value, On-time. 142 DEFINITIONS OF TERMS AND ABBREVIATIONS Term MSFDD412CE/9905CV (13 of 13) Applies to these machines Definition Toggle Switch all models one of several types of hand-operated switches with a single operating lever that can be moved to two or more positions (e.g., the Master switch). Transfer Time (Formula Transfer Rate) CBW® washer commanded time between transfers. TrickleCharged all microprocessorcontrolled models process of slowly and continuously charging a microprocessor backup battery during machine operation to maintain a full charge. Tumbling Dryer, washer-extractor goods are kept moving after the cycle is complete until the operator is ready to discharge them. Tunnel CBW® washer see Tunnel Washer Tunnel Washer CBW® washer ® industry term referring to a continuous batch washer. VERTSTO CBW system Milnor® multi-tiered, non-translating, elevating or non-elevating intermediate cake storage conveyor for storing pressed cakes between other cake-moving devices in the CBW® system. Wash Zone Flow Lifter CBW® washer see Flow Lifter Washerextractor CBW® system machine that both washes and extracts (spins the goods) to remove a large percentage of the absorbed water. Watchdog Timer CBW® washer one of a number of program timers which causes the Miltron control to initiate a hold if certain portions of the cylinder reversal or transfer sequences exceed programmed limits. Weir CBW® washer device in each tunnel module that controls the level of the liquor as it discharges from the module. Zone CBW® washer group of independent tunnel modules with separate baths in each module, connected together (usually in counterflow) via their overflow weirs, and dedicated to performing specific functions including washing, rinsing, etc. 143