1
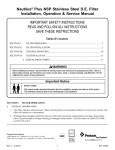
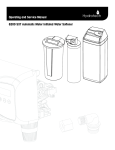
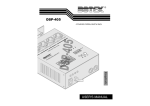
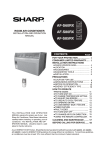
DE FILTER
INSTALLATION, OPERATION & SERVICE MANUAL
FILTER IS DESIGNED AND INTENDED FOR USE TO FILTER WATER
IN SWlMNllNG POOLS AND SPAS
* PATENT PENDING
STARBRIGHT SYSTEMS
P.O. BOX 1205 SANFORD, NORTH CAROLINA 27330
spaced far apart and no horizontal surfaces in the bottom
portion of the grid assembly assures complete cake removal during the "swish and bump" action.
INSTALLATION INSTRUCTIONS
WARNING
FILTERS SHOULD NEVER BE TESTED OR
SUBJECTED TO AIR OR GAS UNDER PRESSURE. ALL GASES ARE COMPRESSIBLE AND
U N D E R PRESSURE CREATE A DANGER.
SEVERE BODILY INJURY OR PROPERTY
DAMAGE COULD OCCUR IF THE FILTER IS
SUBJECTED TO AIR OR GAS PRESSURE.
1.
Remove all components from the carton and inspect
for damage that may have occured in shipment.
2.
Place the filter in its permanent location on a level
slab. DO NOT use sand to level the filter as it may
wash away, leaving the filter out of level. This condition will cause poor filter performance.
3.
~e certain the piping is asfollows: A) From the pool to
the
Of the pump; B, From the
the pump
to the inletof the filter; C) From the outletof the filter to
the pool.
INTRODUCTION
The Star filter is very simple to operate and yet is very
positive in it's operation. The flow entering the filter is at
the bottom through a series of holes 360 degrees around
giving a very even flow pattern with the filter and assuring
even flow pattern within the filter and assuring even flow
to all parts of the grid both top and bottom. Perhaps the
real key to the filter is it's mechanical meansof dislodging
the cake. Patents have been applied for this type of
and bump" system, -rhe entire grid assembly is
moved using a small handle on top of the filter. This
handle can easily be moved even when the pump is on
the filter mode. However, the cake will not fall because of
the differential pressure between the outer surface and
the inner surface ofthe
or septum, w h e n the pump is
shut down, and all pressures are balanced, moving the
handle and the grid assembly bumping against the stops
(approximately 90 degrees apart) dislodges the cake in a
very dramatic and explosive manner. The type of "swish
and bump" action can easily be understood by comparing it to a conventional agitator type of washing machine.
The swishing action of the water within the washing
machine necessarily cleans the clothes in a positive
fashion. The same swishing action takes place in the Star
filter. The only difference being that it's a manual lever
causing the "swishing" motion. Having vertical grids
PROCEDURES
This filter operates under pressure. When closed properly and operated without air in the water system, this
filter will operate in a safe manner.
WARNING
AIR ENTERING FILTER AND THE UlVlT NOT CLOSED
CORRECTLY CAN CAUSE THE TANKTOP TO BLOW
OFF AND COULD CAUSE SEVER BODILY INJURY
AND/OR PROPERTY DAMAGE.
GENERAL - Check all piping valves SO that the water
can flow from the pool tothe pump through the filter and
back to the pool. Open the air bleeder valve on top of the
filter. (Turn counter-clockwise to open.) Check the hand
knob 0, thev-clamp to be certain it is fully tightened. See
Re-assembly of filter items 4, 5 & 6 for the procedure for
tightening up the hand knobs, startpump; do not operate
for more than 1 minute without the diatomaceous earth
(D.E.) precoat. When a solid stream of water leaves the
pet cock close it. A steady flow of water is now returning
to the pool.
PRECOAT - Add 4 pounds of diatomaceous (D.E.) into
the skimmer. (This is approximately 7 quarts.) After 2 or 3
,inUtes note the pressure gauge reading, p,lso note the
flow by holding your hand over the pool return fitting in
the pool.
FILTERING -Asdirt is collected in the filterthe pressure
gauge will gradually rise and the flow to the pool will be
lowered. When the flow has been reduced by about 1/ 3
note the pressure gauge reading. In the future the higher
gauge reading can be used as a guide
tell when
regenerati0n is needed. The increase in pressure will be
in thegeneral area of 10 pounds, but will vary depending
On the pump being used with the filter.
REGENERATION -SWISH AND BUMP -When the flow
has been reduced and the pressure gauge has increased
as mentioned above, regeneration in necessary. Stop the
pump and move the handle back and forth 4 times. This
will "swish and bump" the filter allowing the D.E. to intermix with the water within the filter chamber. Restart the
pump and the flow will be back to normal and the pressure gauge will be at the low reading.
CAUTION:
When performing the manual cleaning operation you may wish to disassemble the filter which is easily done by
loosening the handle knob on theV-band assembly. However, be certain the pump is shut off and the pressuregauge
reads 0 before attempting to disassemble the filter.
CLEANING - After a number of weeks it will be noted
that the flow is reduced in about 1 day, which means that
the ratio of dirt to D.E. is such that full cleaning is needed.
To clean the filter, shut off the pump. Open the air relief
valve and the drain valve. Quickly "swish and bump"
using the handle provided 6 to 8 times. Wait approximately 3 minutes or until the filter is completely empty.
Turn the pump on and completely fill the filter again with
water. "Swish and bump" another 6 to 8 times and again
allow the filter to drain. Close the drain valve and follow
the instructions above to begin a new filter cycle by
adding 4 Ibs. D.E.
CLEANING OF GRID ASSEMBLY
Due to pool water chemistry, a build up of minerals and
oil may form deposits on the fabric of the grids. This will
eventually result in shortened filter cycles. To clean the
fabric proceed as follows.
Never attempt to open clamp while there is pressure in
the filter. Beforeopening, turn pump off and open air relief
valve.
Remove the entire grid assembly from the filter and
hose off using a nozzle directing the water stream at
about a 45O angle. If the fabric is coated with body oils,
suntan lotions, calcium or rust, washing will not remove
these materials. It is recommended that one of thefollowing cleaners be used:
FILTER-CLEANSE - Great Lakes Biochemical
FILTER-FREE - Hydrotech Chemical Corporation
KLEEN-IT - Bio Lab, Inc.
Mix a solution following the manufacturer's instructions on the label. Place the entire grid assembly in a
plastic container and add the solution so the entire grid
assembly is submerged. Allow to stand overnight (12
hours).
The following day wash with a hose and remove all of
the solution from the grids so it does not return to the
pool.
This will remove oils, scale and rust in one cleaning
operation. This procedure should be done at the end of
the swimming season and before the filter is stored for
the winter.
WARNING
IMPROPER TANK ASSEMBLY COULD CAUSE THE
TANK TOP TO BLOW OFF AND COULD CAUSE
SEVERE BODILY INJURY AND/OR PROPERTY
DAMAGE.
RE-ASSEMBLY OF FILTER
1.
Be certain the grid assembly is inserted into the
bottom fitting. Clean the two tank half flanges and the
tank o-ring.
2. Be sure o-ring is in proper position.
3. After installing the o-ring, replace the top cover and
guide it carefully so the handle shaft assembly engages
the grid assembly. DO NOT FORCE THE COVER TO
CLOSE.
4. Locate the filter clamp over both flanges, tank top and
tank bottom.
5. While tightening hand knob you must tap clamp all
around the diameter with a mallet or similar tool to insure
uniform loading.
6. Be certain the hand knob is firmly tightened as much as
possible using full hand power to tighten.
7. The bleeder valve on filter tank must be open before
starting pump.
8. Start pump.
9. Close air bleeder valve when a steady stream of water
flows from the valve -- this indicates that all air is bled
from tank.
WINTERIZING THE FILTER
In areas where sub-freezing temperatures can be
expected, the filter should be removed from its operating
location and stored indoors. Prior to removal, cycle the
filter as described under CLEANING. If filter is left outdoors, be certain it is clean and completely drained of all
water.
/"SWISH
Manual Air Bleeder
Automatic Air Bleeder
Charge with 4
pounds of
diatomaceous
earth for 6 to
8 weeks of
normal
operation.
Diffuser for 360" flow fo
even coating of D.E. on a
grids.
Drain
1%" NPT openings
I N & O U T 90°
-
& B U M P Handle
Pressure Gauge
--&
Redesigned vertical grids
(more than 1" spacing)
- Hand Knob
Built in STOPS
for dislodging of
D.E. cake when
top handle is
moved back and
forth (Positive
"Swish & Bump"
DE FILTER
1 'DIM B
D I M A' 1
MODEL
DE-35
DE-50
REPLACEMENT PARTS
DESCRIPTION
1
31
1
23
1
1
I
NOTE 1
I T E M 31, G R l D ASSEMBLY-COMPLETE
C O N S I S T S O F I T E M S 11. 13. 14, 21, 22, 27, 32, 33
NOTE 2
I T E M 30, P/N 19-4880 B A N D ASSEMBLY-COMPLETE
C O N S I S T S O F I T E M S 23. 24. 25. 26. 34
NOTE 3
APPLY S I L I C O N E S E A L A N T T O A C M E T H R E A D S
O N I T E M 16. P / N 19-1483
1
I
71-3001
S T A R B R I G H T SYSTEMS
P O B O X 1205 SANFORD, N C 27330
GRID ASSEMBLY-COMPLETE DE35
1 1
1
17-4879
CLAMP BAND
1
1
19-1948
R O D x I ~ " S SDEs5
1
1
19-1430
ROD-'14'' X 21'h" SS DE50
27-2408
NUT-HEX %-20 SERRATED SS
20
19-1437
CHECK VALVE ASSEMBLY
19
19-1423
FOOTTANK
18
19-1424
O-RING 3'12" X 3 'Is" X 3/16"
17
19-1474
O-RING 1%" X 2 X 'Is"
16
19-1942
16
1
19-1483
PIPE-CENTER WIDIFFUSER DE 35
1
PIPE-CENTER WIDIFFUSER DE 50
( 1 1
15
75-0009
BOTTOM-TANK
I
14
19-1467
RETAINER-GRID BOTTOM
1
13
19-1321
GRID - DE 35
4
13
19-1322
GRID - DE 50
4
12
17-4704
0-RING-TANK
1
11
19-1950
MANIFOLD ASSEMBLY DE 35
1
11
19-1481
MANIFOLD ASSEMBLY DE 50
1
10
19-1955
SHAFT-ENGAGEMENT DE 35
10
19-1480
SHAFT-ENGAGEMENT D E ~ O
9
19-1479
O-RING 718" X l'h" X 'la"
8
19-1478
NUT-1 '18''
7
75-0010
TOP-TANK DE 35
7
1
75-0011
'
1
1
i l l
- 8" - BUTTRESS
TOP-TANK DE 50
1
15-5054
5
15-5050
GAUGE-BACK MOUNT PRESSURE
4
19-1475
ADAPTOR-TANK TOP DE 50
19-2515
SCREW-AIR BLEEDER WIO-RING
19-1472
KNOB-ENGAGEMENTSHAFT
1
55-2472
SCREW-FLATHEAD #12 x 1-
( 1 1
2
1
1
1
O-RING 1'1~"X 2'1s" X 'h"
1
6
3
1
19-1953
1
-
1
1
1
1