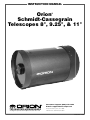
1
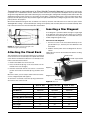
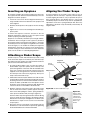
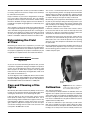
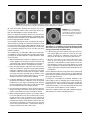
INSTRUCTION MANUAL
Orion
Schmidt-Cassegrain
Telescopes 8", 9.25", & 11"
®
Customer Support (800)-676-1343
E-mail: [email protected]
Corporate Offices (831)-763-7000
Providing Exceptional Consumer Optical Products Since 1975
P.O. Box 1815, Santa Cruz, CA 95061
IN 265 Rev. A 8/05
Congratulations on your purchase of an Orion Schmidt-Cassegrain telescope! The Schmidt-Cassegrain optical system uses a combination of mirrors and lenses and is referred to as a compound or catadioptric telescope. This unique
design offers large-diameter optics while maintaining very short tube lengths, making them extremely portable and versatile. The
Schmidt-Cassegrain system consists of a zero-power corrector plate, a spherical primary mirror, and a secondary mirror. Once
light rays enter the optical system, they travel the length of the optical tube three times, exiting through a hole in the center of the
primary mirror to the eyepiece.
Orion-brand Schmidt-Cassegrain tube assemblies are made by Celestron International in the U.S.A. The optics feature
Starbright® XLT coatings -- enhanced multi-layer coatings on the primary and secondary mirrors for increased reflectivity and a
fully coated corrector for the finest anti-reflection characteristics.
Unpacking Your Scope
Inserting a Star Diagonal
Use case when unpacking the shipping carton. We recommend keeping the boxes and all original packaging materials. In the event that the telescope needs to be shipped to
another location, or returned for warranty repair, having the
proper packaging will ensure that your telescope will survive
the journey intact. Returns for refund or exchange will not be
accepted without the original packaging.
A star diagonal is a prism that diverts the light at a right angle
to the light path of the telescope. This allows you to observe
in positions that are physically more comfortable than if you
looked straight through the scope.
Figure 1. Cutaway view of the light path of the
Schmidt-Cassegrain optical design.
To insert a star diagonal:
1. Turn the set screw on the visual back until its tip no longer extends into (i.e., obstructs) the inner diameter of the
visual back.
2. Slide the chrome portion of the star diagonal into the visual back.
Attaching the Visual Back
The visual back is the accessory that allows you to attach all
visual accessories to the telescope. The optical tube should
come with the visual back installed. If it is not already on the
tube it can be attached as follows:
Tighten the set screw on the visual back to hold the star diagonal in place.
Finder scope
Finder scope bracket
2. Place the knurled slip ring on the visual back over the
threads on the rear cell (Fig 2).
3. Hold the visual back with the set screw in a convenient
position and rotate the knurled slip ring clockwise until
tight.
Once this is done, you are ready to attach other accessories,
such as a diagonal prism and eyepiece.
To remove the visual back, rotate the slip ring counterclockwise until it is free of the rear cell.
Focal Length, Ratio
Tube Material
Coatings
2
Dovetail finder-scope base
Visual back
1. Remove the rubber cover on the rear cell.
Eyepiece
Diagonal
Focus knob
Figure 2. Rear cell
Orion 8" SCT
Orion 9.25" SCT
Orion 11" SCT
2032mm, f/10
2350mm, f/10
2800mm, f/10
Aluminum
Aluminum
Aluminum
StarBright XLT
StarBright XLT
StarBright™ XLT
™
™
Highest Useful Magnification
480x
555x
660x
Secondary Mirror Obstruction
2.7"
3.35"
3.75"
-- By Area
11%
13%
12%
-- By Diameter
34%
36%
34%
Tube Length
17"
22"
24"
Tube Weight
12 lbs.
20 lbs.
27 lbs.
Inserting an Eyepiece
Aligning the Finder Scope
An eyepiece magnifies the image focused by the telescope.
The eyepiece fits into either the visual back directly or the star
diagonal. To install an eyepiece:
Accurate alignment of the finder scope makes it easy to
find objects with the telescope, especially celestial objects.
To make aligning the finder as easy as possible, this procedure should be done in the daytime when it is easy to find
and identify objects. The finder scope has two perpendicular
adjustment screws and a spring-loaded pin that allow easy
adjustment of the finder scope horizontally and vertically. To
align the finder:
1. Loosen the set screw on the star diagonal until the tip no
longer extends into the inner diameter of the eyepiece end
of the diagonal.
2. Slide the chrome portion of the eyepiece into the star diagonal.
3. Tighten the set screw on the star diagonal to hold the eyepiece in place.
To remove the eyepiece, loosen the setscrew on the star
diagonal and slide the eyepiece out. You can replace it with
another eyepiece (purchased separately).
Eyepieces are commonly referred to by focal length and barrel diameter. The focal length of each eyepiece is printed on
the eyepiece barrel. The longer the focal length (i.e., the larger
the number) the lower the eyepiece magnification, the shorter
the focal length (i.e., the smaller the number) the higher the
magnification. Generally, you will use low to moderate powers when viewing. For more information on how to determine
power, see the section on “Calculating Magnification.”
Attaching a Finder Scope
A finder scope is a small, wide-field telescope used to help
locate and center objects in the field of your main telescope.
The finder scope has a built-in crosshair reticle that shows the
optical center of the finder’s field of view.
1. To install an Orion finder scope, you must first attach a
dovetail finder scope base (#7215) to the telescope. Line
up the through-holes in the base with the threaded holes
in the rear cell of the telescope tube. Then insert the two
supplied screws through the base and thread them into
the telescope holes until secure (Figure 3a). Now you’re
ready to attach the finder scope.
Figure 3a. Attaching the optional dovetail finder scope base.
Focus
lock ring
Alignment
thumbscrews
Objective lens
Tensioner
2. Unthread the two black nylon thumbscrews until the ends
are flush with the inside of the bracket (Figure 3b). Remove
the O-ring from the foot of the bracket and slide it over the
back of the finder (it will NOT fit over the objective end of
the finder). It may need to be stretched a little. Slide it until
it seats into the slot in the middle of the finder tube.
3. Slide the eyepiece end (narrow end) of the finder scope
into the end of the bracket’s cylinder opposite the alignment screws while pulling the chrome, spring-loaded tensioner pin on the bracket with your fingers (Figure 3c).
Push the finder scope through the bracket until the O-ring
seats just inside the front opening of the bracket cylinder.
Release the tensioner pin and tighten the two black nylon
thumbscrews a couple of turns each to secure the finder
scope in place.
Eyepiece
Finder-scope
bracket
Dovetail
foot
Figure 3b. The Orion 6x30 finder scope.
Figure 3c.
Pull the springloaded tensioner
outward, then
insert the finder
scope into the
finder scope
bracket.
4. Now insert the foot of the finder scope bracket into the
dovetail base. Lock the bracket into position by tightening
the knurled thumbscrew on the dovetail holder.
3
1 Choose a target that is in excess of one mile away. This
eliminates any possible parallax effect between the telescope and finder.
2 Release the altitude and azimuth clamps of your telescope
mount and point the telescope at your target.
is sharp. Once an image is in focus, turn the knob clockwise
to focus on a closer object and counterclockwise for a more
distant object. A single turn of the focusing knob moves the
primary mirror only slightly. Therefore, it will take many turns
(about 30) to go from close focus to infinity.
5. With the image in the finder scope’s field of view, adjust the
alignment thumbscrews one at a time to center the object
on the intersection of the crosshairs.
For astronomical viewing, out-of-focus star images are very
diffuse, making them difficult to see. If you turn the focus knob
too quickly, you can go right through focus without seeing the
image. To avoid this problem, your first astronomical target
should be a bright object (like the Moon or a planet) so that
the image is visible even when out of focus. Critical focusing is best accomplished when the focusing knob is turned in
such a manner that the mirror moves against the pull of gravity. In doing so, any mirror shift is minimized. For astronomical
observing, both visually and photographically, this is done by
turning the focus knob counterclockwise.
Focusing the Finder Scope
Image Orientation
If, when you look through the finder scope, the images appear
somewhat out of focus, you will need to refocus the finder
scope for your eyes.
The image orientation changes depending on how the eyepiece is inserted into the telescope. When using a star diagonal, the image is right-side-up but reversed from left to right
(i.e., mirror image). If inserting an eyepiece directly into the
visual back (i.e., without a star diagonal), the image is upsidedown and reversed from left to right (i.e., inverted). This is normal for the Schmidt-Cassegrain design.
3 Center your target in the main optics of the telescope. You
may have to move the telescope slightly to center it.
4 Now look in the finder scope. Is the object visible? Ideally it
will be somewhere in the field of view. If not, some coarse
adjustment to the finder scope bracket’s alignment thumbscrews will be needed until the object comes into the finder
scope’s field of view.
1. Loosen the lock ring located behind the objective lens cell
on the body of the finder scope (see Figure 3b).
2. Back the lock ring off by a few turns, for now. Refocus the
finder scope on a distant object by threading the objective
lens cell in or out of the finder scope body. Precise focusing
will be achieved by focusing the finder scope on a bright
star.
3. Once the image appears sharp, retighten the locking ring
behind the objective lens cell. The finder scope’s focus
should not need to be adjusted again.
Image orientation through the finder scope is upside down. This
is normal for any finder that is used straight-through. Because
of this, it may take a few minutes to familiarize yourself with the
directional change each screw makes on the finder.
Focusing the Telescope
The Schmidt-Cassegrain
focusing mechanism controls the primary mirror,
which is mounted on a ring
that slides back and forth
on the primary baffle tube.
The focusing knob, which
moves the primary mirror,
is on the rear cell of the
telescope. To focus, turn
the focusing knob until the
image is sharp. If the knob
will not turn, it has reached
the end of its travel on the
focusing mechanism. Turn
the knob in the opposite
direction until the image
4
Normal image
orientation as seen
with unaided eye.
With star diagonal,
image in telescope
is reversed.
With an eyepiece
but no diagonal,
image in telescope
is inverted.
Figure 5. Image orientation in Schmidt-Cassegrains
Calculating Magnification
You can change the magnifying power of your telescope by
changing the eyepiece (ocular). To determine the magnification of your telescope, simply divide the focal length of the telescope by the focal length of the eyepiece used. In equation
format, the formula looks like this:
Telescope Focal Length (mm)
= Magnification
Eyepiece Focal Length (mm)
Figure 4. The emblem on the end
of the focus knob shows the correct
rotation direction for focusing your
telescope.
For example, if you are using a 26mm eyepiece in the 8"
Schmidt-Cassegrain, divide the focal length of the telescope
(2032mm) by the focal length of the eyepiece, 26mm. That
yields a magnification of 78.
Although the power is variable, each instrument has a limit to
how much it can practically achieve. The general rule is 60x
magnification per inch of aperture. So an 8"-aperture telescope
can achieve a maximum useful magnification of 480 power.
This level of magnification assumes you have ideal conditions
for viewing, however. The clearest, sharpest views will always
be achieved at lower powers.
Keep in mind that as you increase magnification, the brightness of the object viewed will decrease; this is an inherent
principle of the laws of physics and cannot be avoided. If magnification is doubled, an image appears four times dimmer. If
magnification is tripled, image brightness is reduced by a factor of nine!
The “F-number” of a telescope stands for the ratio between the
focal length and the diameter of the light-gathering element.
The 8" Schmidt-Cassegrain optical tube has a focal length of
80 inches and a diameter of 8 inches. This makes the system
an f/10 (focal length divided by diameter). An optional focal
reducer is available to reduce the effective focal ratio to f/6.3.
Determining the Field
of View
Determining the field of view is important if you want to get
an idea of the angular size of the object you are observing. To
calculate the actual field of view, divide the apparent field of
the eyepiece (supplied by the eyepiece manufacturer) by the
magnification. In equation format, the formula looks like this:
Apparent Field of Eyepiece
You can use a commercially made lens cleaner or mix your
own. A good cleaning solution is isopropyl alcohol mixed with
distilled water. The solution should be 60% isopropyl alcohol
and 40% distilled water. Or, liquid dish soap diluted with water
(a couple of drops per one quart of water) can be used.
Occasionally, you may experience dew build-up on the corrector plate of your telescope during an observing session. If you
want to continue observing, the dew must be removed, either
with a hair dryer (on low setting) or by pointing the telescope at
the ground until the dew has evaporated.
If moisture condenses on the inside of the corrector, remove
the accessories from the rear cell of the telescope. Place the
telescope in a dust-free environment and point it down. This
will remove the moisture from the telescope tube.
To minimize the need to clean your telescope, replace all lens
covers once you have finished using it. Since the rear cell is
NOT sealed, the cover should be placed over the opening
when not in use. This will prevent contaminants from entering
the optical tube.
Internal adjustments and cleaning should be done only by an
authorized repair department. If your telescope is in need of
internal cleaning, please call Orion for a return authorization
number and price quote.
= True Field
Magnification
As you can see, before determining the field of view, you must
calculate the magnification. Using the example in the previous
section, we can determine the field of view using the same
26mm eyepiece. A 26mm Plössl eyepiece has an apparent
field of view of 52°. Divide 52 by the magnification, which is 78.
This yields an actual field of 1.5°.
To convert degrees to feet at 1,000 yards, which is more useful for
terrestrial observing, simply multiply by 52.5. Continuing with our
example, multiply the angular field 1.5° by 52.5. This produces a
linear field width of 78.8 feet at a distance of 1,000 yards.
Care and Cleaning of the
Optics
Occasionally, dust and/or moisture may build up on the corrector plate of your telescope. Special care should be taken when
cleaning any instrument so as not to damage the optics.
If dust has built up on the corrector plate, remove it with a
brush (made of camel’s hair) or a blower bulb. Then, use an
optical cleaning solution and white tissue paper to remove any
remaining debris. Apply the solution to the tissue (not to the
glass) and then apply the tissue paper to the lens. Low-pressure strokes should go from the center of the corrector to the
outer portion. Do NOT rub in circles!
Collimation
screws
Collimation
Figure 6. The three collimation
screws are located on the front of
the secondary mirror housing.
The optical performance
of your telescope is directly related to its collimation, that is the
alignment of its optical system. Your telescope was collimated
at the factory after it was completely assembled. However, if the
telescope is dropped or jarred severely during transport, it may
have to be re-collimated. The only optical element that can be
adjusted is the secondary mirror.
To check the collimation of your telescope you will need a
light source. A bright star near the zenith is ideal since there
is a minimal amount of atmospheric distortion. Make sure that
tracking is on so that you won’t have to manually track the star.
5
Figure 7. Even though the star pattern appears the same on both sides of focus, it is asymmetric. The dark
obstruction is skewed off to the left side of the diffraction pattern indicating poor collimation.
Or, if you do not want to power up your telescope, you can use
Polaris. Its position relative to the celestial pole moves very
little, thus eliminating the need to manually track it.
Before you begin the collimation process, be sure that your
telescope is in thermal equilibrium with the surroundings. Allow
45 minutes for the telescope to reach equilibrium if you move it
between large temperature extremes.
Figure 8. In a well-collimated
telescope, a defocused star image
should appear symmetrical, with the
dark central obstruction centered in
the star’s ring pattern.
Use a medium to high power ocular, something in the range of
12mm to 6mm focal length. It is important to position a star in
the center of the field of view to judge collimation. Slowly cross
in and out of focus and judge the symmetry of the star. If you
see a systematic skewing of the star to one side, then recollimation is needed.
Warning: The secondary mirror should never be removed.
Adjustments to collimation can easily be made by turning
the screws on the secondary mirror mount without ever
having to remove the secondary mirror.
To accomplish this, you will need to adjust the secondary mirror collimation screw(s) located on the secondary mirror holder
(see Figure 6). To make collimation a simple procedure, follow
these easy steps:
6. If while turning you notice that the screws get very loose,
then simply tighten the other two screws by the same
amount. Conversely, if a collimation screw gets too tight,
then loosen the other two screws by the same amount.
1. While looking through a medium- to high-power eyepiece,
center a bright star in the field of view, then de-focus it until
a ring pattern with a dark shadow appears (see Figure 7).
Notice in which direction the central shadow is skewed.
7. Once the star image is in the center of the field of view,
check to see if the rings are concentric. If the central
obstruction is still skewed in the same direction, then continue turning the screw(s) in the same direction. If you find
that the ring pattern is skewed in a different direction, then
simply repeat steps 2 through 6 as described above for the
new direction.
2. Place your finger along the edge of the front cell of the telescope (be careful not to touch the corrector plate), pointing
toward the collimation screws. The shadow of your finger
should be visible when looking into the eyepiece. Rotate
your finger around the tube edge until its shadow is seen
closest to the narrowest portion of the rings (i.e., the same
direction in which the central shadow is skewed).
3. Locate the collimation screw closest to where your finger is
positioned. This will be the collimation screw you will need
to adjust first. If your finger is positioned exactly between
two of the collimation screws, then you will need to adjust
the screw opposite where your finger is located.
4. Use the hand control buttons to move the de-focused star
image to the edge of the field of view, in the same direction
that the central obstruction of the star image is skewed.
5. While looking through the eyepiece, use an Allen wrench
to turn the collimation screw you located in steps 2 and 3.
Usually a tenth of a turn is enough to notice a change in
collimation. If the star image moves out of the field of view
in the direction that the central shadow is skewed, then you
are turning the collimation screw the wrong way. Turn the
screw in the opposite direction, so that the star image is
moving toward the center of the field of view.
6
Perfect collimation will yield a ring pattern that’s symmetrical
just inside and outside of focus (Figure 8). Well-collimated
optics deliver the optimal performance specifications that your
telescope is built to achieve.
If “seeing” (i.e., air steadiness) is turbulent, collimation is difficult to judge. If stars are twinkling, that’s a tipoff that the seeing is bad. In that case you might want to wait for a night with
better seeing (i.e., when stars aren’t twinkling) to perform the
collimation procedure, or you could try pointing the telescope
to a part of the sky that appears to have steadier air.
Note: Laser collimators will not work with Schmidt-Cassegrains
and should not be used in collimating the optics.
7
Orion Two-Year Limited Warranty
Orion warrants this telescope to be free from defects in materials and workmanship for two years. Orion
will repair or replace such product or part thereof which, upon inspection by Orion, is found to be defective in materials or workmanship. As a condition to the obligation of Orion to repair or replace such product, the product must be returned to Orion together with proof-of-purchase satisfactory to Orion.
The Proper Return Authorization Number must be obtained from Orion in advance of return. Call 800676-1343 to receive the number to be displayed on the outside of your shipping container. Items should
be sent to Orion Warranty Repair, 89 Hangar Way, Watsonville, CA 95076.
This warranty is for the benefit of the original retail purchaser only. All returns must be accompanied by a
written statement setting forth the name, address, and daytime telephone number of the owner, together
with a brief description of any claimed defects. Parts or product for which replacement is made shall
become the property of Celestron.
The customer shall be responsible for all costs of transportation and insurance, both to and from Orion,
and shall be required to prepay such costs.
Orion shall use reasonable efforts to repair or replace any telescope covered by this warranty within thirty
days of receipt. In the event repair or replacement shall require more than thirty days, Orion shall notify
the customer accordingly. Orion reserves the right to replace any product which has been discontinued
from its product line with a new product of comparable value and function.
This warranty shall be void and of no force of effect in the event a covered product has been modified in
design or function, or subjected to abuse, misuse, mishandling or unauthorized repair. Further, product
malfunction or deterioration due to normal wear is not covered by this warranty.
ORION DISCLAIMS ANY WARRANTIES, EXPRESS OR IMPLIED, WHETHER OF MERCHANTABILITY
OR FITNESS FOR A PARTICULAR USE, EXCEPT AS EXPRESSLY SET FORTH HEREIN.
THE SOLE OBLIGATION OF ORION UNDER THIS LIMITED WARRANTY SHALL BE TO REPAIR
OR REPLACE THE COVERED PRODUCT, IN ACCORDANCE WITH THE TERMS SET FORTH
HEREIN. ORION EXPRESSLY DISCLAIMS ANY LOST PROFITS, GENERAL, SPECIAL, INDIRECT
OR CONSEQUENTIAL DAMAGES WHICH MAY RESULT FROM BREACH OF ANY WARRANTY, OR
ARISING OUT OF THE USE OR INABILITY TO USE ANY CELESTRON PRODUCT. ANY WARRANTIES
WHICH ARE IMPLIED AND WHICH CANNOT BE DISCLAIMED SHALL BE LIMITED IN DURATION TO
A TERM OF TWO YEARS FROM THE DATE OF ORIGINAL RETAIL PURCHASE.
Some states do not allow the exclusion or limitation of incidental or consequential damages or limitation
on how long an implied warranty lasts, so the above limitations and exclusions may not apply to you.
This warranty gives you specific legal rights, and you may also have other rights which vary from state
to state. Orion reserves the right to modify or discontinue, without prior notice to you, any model or style
of telescope. If warranty problems arise, or if you need assistance in using your telescope contact: Orion
Telescopes & Binoculars, Customer Service Department, 89 Hangar Way, Watsonville, CA 95076, (800)
676-1343. This warranty supersedes all other product warranties.
Orion Telescopes & Binoculars
Post Office Box 1815, Santa Cruz, CA 95061
Customer Support Help Line (800)-676-1343
8