1
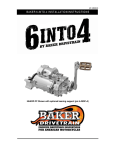
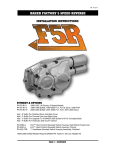
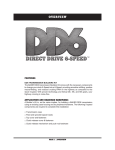
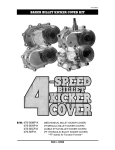
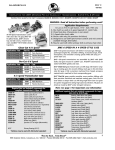
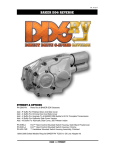
INSTALLATION INSTRUCTIONS
FOR
BIG TWIN SIX-SPEED
OVERDRIVE
BUILDER’S KITS
&
SERVICE GUIDE
FOR
BIG TWIN SIX-SPEED
OVERDRIVE
COMPLETE ASSEMBLIES
9804 E. Saginaw Haslett, MI. 48840 - Phone: (517) 339-3835 - Fax: (517) 339-4590 - Toll Free: 1-877-640-2004
baker od6 installation instructions
39
31
36
14
22
10
1
2
25
7
24
8
3
4
23
9
5
6
21
20
19
11
18
43
40
12
42
13
41
33
15
30
17
38
16
37
29
35
34
32
26
28
27
OD6 Exploded View - Complete Assembly
view 1
baker od6 installation instructions
The following parts are included as shown in:
OD6 Exploded View - Complete Assembly
view 1
Number
Part Number
QtyDescription
1
2
3
4
5
6
7
8
9
10
11
12
13
14
15
16
17
18
19
20
21
22
23
24
25
26
27
28
29
30
31
32
33
34
35
36
37
38
39
40
41
42
43
34468-56A
25C225KCSS/P
25C125KCSS/P
6099SS
33900-59
34904-86E
31F100KCSS/P
33715-85S
70183
152-56A
5-6QEN-A
23207
33001
609B
108-6EP
73753
66808
12067B
11165A
33344-94S
34091-85
*
35211-91B
40251-92A
23202
25C225KCSS/P
25C100KCSS/P
25C125KCSS/P
597-56C
130-56C2
66827
25452-87A
18052
987678
25453-87A
34920-86
68067
36801-87B
10705-01149
609B
TWC411
TC411
37089-84L
1
1
4
5
1
1
1
1
1
1
1
4
4
6
1
1
1
1
1
1
1
1
1
1
2
2
2
2
1
1
1
1
1
3
1
1
1
1
1
1
2
1
1
Top Cover
1/4-20 x 2.250” SHCS Bolt
1/4-20 x 1.250” SHCS Bolt
Washer, Top Cover
Neutral Switch
Gasket, Top Cover
5/16-24 x 1.000” SHCS Bolt
Shift Lever
7/16-14 Nut
Eccentric Screw
Shift Drum Assembly
1/4-20 x 1.250” SHCS Bolt
Washer, Shift Drum
Alignment Dowel
Plug, Speed Sensor
1/4-20 x .625” BHCS Bolt
O-Ring, Sensor Plug
Seal, Main Gear
Quad Seal
Spacer
Bearing Race
Pulley
Pulley Nut
Lock Plate
1/4-20 x .625” BHCS Bolt
1/4-20 x 2.250” SHCS Bolt
1/4-20 x 1.000” SHCS Bolt
1/4-20 x 1.250” SHCS Bolt
Side Cover
Dip Stick 2-Piece
O-Ring, Dip Stick
Inner Ramp
5/16-24 x .625” Hex Bolt
3/8” Ball
Outer Ramp
Coupler
Snap Ring, Ball and Ramp
Gasket, Side Cover
E-Clip, Actuator Rod
Alignment Dowel
Washer, Actuator Rod
Bearing, Actuator Rod
Actuator Rod
* = Customer Preference
baker od6 installation instructions
31
4
5
6
9
3
7
2
8
10
11
12
1
13
19
14
30
18
15
17
34
33
32
16
20
26
22
21
29
23
27
24
25
28
OD6 Exploded View - Complete Assembly
view 2
baker od6 installation instructions
The following parts are included as shown in
OD6 Exploded View - Complete Assembly
view 2
Number
Part Number
QtyDescription
1
1
1
1
1
1
1
1
1
1
1
1
1
1
1
1
1
1
5
1
1
1
2
2
1
2
2
4
1
1
1
1
1
Bearing, Main Gear
Snap Ring, Main Gear
Bearing, Countershaft
Snap Ring, Shifter Pawl
Washer, Shifter Pawl
Seal, Shifter Pawl
Bushing, Shifter Pawl
Plug, Fork Rod
Shifter Pawl assembly
Fork, 2M
Fork, 3C
Fork, 4C
Fork, 1M
Dowel, Door
Main Gear, 5M
Dowel, Door 5/16 X 1.000” Solid
Gasket, Door
Case
Stud, Case
Aux Fork Rod
Plug, Aux Fork Rod
Retaining Plate
3/4-16 Jam Nut
1/4-20 x .625” SHCS BOLT
Zero Leak Drain Plug
Bearing, Door
1/4-20 x 1.500” SHCS BOLT
5/16-18 x 1.500” SHCS BOLT
Door
Pecker, Support Bridge
Fork Rod
Magnet
1/4-20 x 1.000” SHCS BOLT
34
See View 3
1
Gear Set Assembly
1
2
3
4
5
6
7
8
9
10
11
12
13
14
15
16
17
18
19
20
21
22
23
24
25
26
27
28
29
30
31
32
33
6209
1302-334PP
BK2526
1400-43PP
6497HW
12045
33114-79
25702
555-56A
101-56
102-6F
102-6E
101-6E
64273
61005M
26770
35652-79B
204C-56P
11733A
112-6E
3784C
103-6
37141
23202
51740-001
6304
25C150KCSS/P
31C150KCSS/P
2-6B
115-6E
122-6
F1409
23205
baker od6 installation instructions
10
5
1
1
2
3
4
5
11
1
6
7
4
8
5
14
5
1
9
4
15
4
1
5
5
16
4
5
12
1
13
17
OD6 Exploded View - gearset
view 3
baker od6 installation instructions
the following parts are included as shown in
OD6 Exploded View - gearset
view 3
Number
1
2
3
4
5
6
7
8
9
10
11
12
13
14
15
16
17
Part Number
11067
61005C
603M2C
8876A
6003B
61573C
61234C
62941C
60866C
60000M
37088-90
60866M
AS2035
62212M
603M2C
61234M
62941M
QtyDescription
6
1
1
5
7
1
1
1
1
1
1
1
1
1
1
1
1
Retaining Ring
5th Gear Countershaft
2nd Gear Countershaft
Bearing
Thrust Washer
3rd Gear Countershaft
4th Gear Countershaft
1st Gear Countershaft
Countershaft with 6th Gear
Mainshaft
Clutch Release Rod
6th Gear Mainshaft
Shim, Mainshaft
2nd Gear Mainshaft
3rd Gear Mainshaft
4th Gear Mainshaft
1st Gear Mainshaft
baker od6 installation instructions
APPLICATION AND REQUIRED HARDWARE
A Builder’s Kit is, as the name implies, for building a BAKER Six-Speed Overdrive™ Transmission using
an existing case/housing and peripheral hardware. The following 5-speed components are required to
complete the task:
Transmission Housing*
Pawl and sprocket spacer seals
Shifter pawl assembly
Top cover and fasteners
Neutral switch
Clutch release cover and fasteners
Clutch release mechanism and push rod hardware
*1) H-D® Transmission housings come with the left side bearings installed and, in the case of the Softail®,
with transmission mounting plate studs installed. These items may have to be purchased separately when
using aftermarket cases.
2) Since the speed sensor provision for the BAKER™ Six Speed is in the side door, it is not necessary to
purchase a transmission case with speed sensor provisions.
CONTENTS
Figure 1 shows an illustration of the contents of the Builder’s Kit.
FORWARD
We highly recommend that the BAKER™ Builder’s Kit be installed only by trained and/or seasoned
mechanics with prior
H-D® 5-speed experience. If you have never serviced an H-D® 5-speed, do not attempt this
installation project.
REQUIRED READING
Regardless of the skill level or experience of the individual installing the Builder’s Kit, it is highly
recommended that a genuine H-D® Motor Company Parts Catalog and Factory Service Manual be
available for reference for the installation. The installation instructions for the BAKER Six-Speed will make
frequent reference to the Factory Service Manual. Any Factory Service Manual from 1990 on will be
sufficient.
SPECIAL TOOLS
The only special tools required are tools that would also be required for any 5-speed installation.
For installing/ removing the main drive gear and main drive gear bearing, HD-35316A is available
through your local Harley Davidson® Dealer. The equivalent tool TOOLA-56 is available through BAKER
DRIVETRAIN™.
For removing and installing the bearing inner race on the transmission mainshaft, H-D® 34902A is
required. The BAKER DRIVETRAIN™ equivalent part is TOOLB-56.
For removing and installing the 1-7/8” transmission sprocket nut, H-D® 9466--37A is required. The BAKER
DRIVETRAIN™ equivalent part is TOOLD-56.
baker od6 installation instructions
INSTALLATION INSTRUCTIONS
CASE PREPARATION/ GEARSET REMOVAL
If the Builder’s Kit is replacing/refreshing an existing 5-speed, refer to your Factory Service Manual
Section 7, MAINSHAFT/COUNTERSHAFT Removal. Follow REMOVAL procedure.
Next, refer to section 7, MAIN DRIVE GEAR removal, follow REMOVAL procedure.
If the Builder’s Kit is going into a new case, no preparation is required.
CASE CLEARANCE CHECKS
The BAKER Six-Speed Overdrive™ hardware is designed to fit in stock H-D® cases without modification to
the case to Six-Speed Components. Since most aftermarket cases are styled after the H-D® equivalent,
the hardware usually fits in most situations, but there are exceptions. The internal walls of cases ‘float
around’ occasionally in H-D® and aftermarket castings. This is not an indication of a quality problem, but
rather this is inherent in the casting process.
Check #1 - 6th gear Mainshaft Clearance
Place the side door gasket provided onto the dowel pins of the case. This gasket is your template
Figure 2 shows the area of concern that has to be checked with the ‘template’.
If the thickness of the boss around the 5/16-18 screw hole is above the profile of the gasket (from roughly the 10 o’clock to the 2 o’clock position), the material must be removed.
This is best accomplished by taking a permanent pen or paint marker and drawing around the gasket as shown in Figure 3. Remove the painted material roughly 1/2” back from the gasket surface of the case. A coarse flat file works well.
CHECK #2 - AUXILIARY FORK SHAFT BRIDGE CLEARANCE
The auxiliary fork shaft bridge comes installed on the inside of the side door as shown in Figure 4.
The fork shaft bridge functions as the support for the 4th C/S gear fork shaft.
Again, use the side door gasket provided as your template and place it on the dowels. Notice the blue paint dot in the upper right hand corner of the gasket.
If any aluminum is present below the blue paint dot, paint the area 3/8” on either side of the blue dot as shown in Figure 5 and remove the material inward (perpendicular to gasket surface) roughly 1-3/8” from the gasket surface. A large coarse round file works well.
CHECK #3 - RIGHT SIDE PILLOW BLOCK CLEARANCE
The right side pillow block/roller detent assembly needs to be checked for proper fit to the case. The right side of the right pillow block needs to be checked for case clearance - see Figure 6.
Any gap greater than zero is acceptable as long as the pillow block detent assembly fits down square over the dowels. If you are installing a Six-Speed Overdrive™ into a Delkron® Softail® case,
you will have to remove some material as shown in Figure 7.
Also check to make sure that some gap exists between the torsion spring and the side of the case is shown in Figure 9.
baker od6 installation instructions
CHECK #4 - PRIMARY FORK ROD BOSS CLEARANCE
The boss in which the fork rod slides through must be checked for clearance for the 6th mainshaft gear. Once again, use the side door gasket as a template for this check.
Figure 8 shows the area of concern. If the thickness of the boss is outside the profile of the gasket in the 6 to 8 o’clock position, it must be removed. A large, coarse flat file works best.
CHECK #5 - AFTERMARKET CLUTCH RELEASE AND TOP COVER FIT
If you are installing aftermarket clutch release and top covers, you should check the fit of these covers onto the side door and over the shift drum, respectively.
ADJUSTMENTS/SET-UP AND CHECKS
The BAKER Six-Speed Overdrive™ has only two adjustments, just like the 5-speed. The first adjustment
required is the shift drum end play which is different than the 5-Speed. The second adjustment is the
shifter pawl eccentric adjusting screw, which is identical to 5-Speed and is performed as one of the last
steps in the installation. On 2000 - up Softail and 2001 - up FLT/Dyna models (5 or 6 Speed), there is no
eccentric adjustment screw, so no adjustment is necessary.
The 5-speed end play is adjusted/set- up on the detent side (right side) pillow block. In the 5-Speed
design, axial thrust from the shift drum (during shifting) is controlled by the right side pillow block only.
Both pillow blocks (left and right side) control the axial thrust on the Six-Speed Overdrive™. The shim to
properly set up the end play is placed adjacent to the left side pillow block (Figure 10). Four shims are
provided (a .036”, .030”, .024”, and a .020” shim) to set up this clearance- end play spec is .005”/- .003”.
Start by putting the .020” thick shim on the end of the shift drum. Place the shift drum/pillow
block assembly onto the four dowels on top of the case. Put the four 1/4 - 20X1 1/4 cap screws
w/ washers into the pillow block holes and tighten down the shift drum/pillow block assembly
squarely. ‘Squarely’ means tighten down the four cap screws one turn each at a time to pull the pillow
blocks down over the dowels*. A circular pattern for tightening the four cap screws works best. NEVER
RUN ONE CAP SCREW ALL THE WAY DOWN WITHOUT SEQUENTIALLY TIGHTENING THE OTHER
THREE AS SPECIFIED ABOVE - IRREPARABLE DAMAGE WILL RESULT!
*Most aftermarket cases have oversized pillow block dowels. The right side pillow block
may be stubborn to make its way over the dowels. Tightening down the pillow block hex bolts in a
circular pattern, as specified above, is usually sufficient to overcome this.
Measure the end play next to the right side pillow block as shown in Figure 11. Place the feeler gage in
between the shim and the left side pillow block. If measured value is within spec., discard the other shims.
When the end play is set to spec., confirm that the drum rotates freely by lifting up the detent lever with
one hand and rotating the drum with the other. The drum should rotate freely. If the drum does not rotate
freely, even though the end play was measured in spec., you must increase the end play. This ‘potential’
situation can happen because the feeler gage only measures the end play at one radial point.
In the unlikely event the end play is less than the lower limit of .002 this could be due to variation in your
housing, tolerance stack up of the BAKER™ hardware or a combination of both.
Regardless of the cause, it needs to be corrected. Please call BAKER™ and have some vernier calipers
available to take measurements during your conversation to assist with diagnosis. If we determine that
the difficulty is with your case, we will advise you how to remedy the situation. If the difficulty is with our
hardware, we will ship replacement hardware overnight (domestic only) to remedy the situation.
WITH THE PRECEDING CHECKS AND SET UPS OUR OF THE WAY, YOU ARE NOW READY TO
BEGIN THE INSTALLATION.
baker od6 installation instructions
GEARSET INSTALLATION
New O.E. cases come with the P/N 8996 main drive gear bearing installed. For a new aftermarket case or
any ‘used’ case, install a new main drive gear bearing and retaining ring as indicated below.
Remove the main drive gear (5th M/S) from the BAKER Six Speed Overdrive™ gearset/ trap door
assembly by simply sliding it off the mainshaft. Install a new main drive gear bearing, O.E. P/N 8996 with
a tool as mentioned in the special tools section of this manual. NEVER install the bearing into the case
by applying pressure to the inner race - you will destroy the bearing. Install a new retaining ring with the
bevel facing out.
Special Note: 2000 - up 88B Softail® transmission cases have a noted defect to the landing that supports
the 8996A bearing. This landing comes straight from the factory with a very thin wall thickness and cracks
in the corner between the landing and the 8996A bearing bore. Inspect carefully for this situation. When
installing the new 8996A bearing, press it in carefully and don’t crack the landing off of the case.
Install the main drive gear into the main drive gear bearing using the same special tool.
Hang the side door gasket onto the case dowel pins and carefully push it down to the seat against the
case gasket surface.
Apply some WD-40 or equivalent to the main drive gear seal and to the mainshaft (on the portion adjacent
to the splines). Install the gearset by sliding the mainshaft through the main drive gear and slowly pushing
the whole trap door/gearset assembly until the case dowel pins contact the dowel holes in the side door. A
rubber hammer is helpful to tap the side door over the case dowel pins without risking any damage to the
chrome plated aluminum side door. You may also use a slide hammer with a 1/4-30 tip for this task.
Install the four 5/16” SHCS (socket head cap screws) in the lower 4 screw holes and torque them to 13-16
ft lbs. Install the two 1/4” SHCS in the screw holes above each dowel and torque them to 7-9 ft lbs. At this
time, check the fitment of the auxiliary fork shaft into the fork shaft bridge. If the fork shaft slides easily into
the fork shaft bridge, take no action at this time. If the fork shaft does not slide easily into the fork shaft
bridge, then put the auxiliary fork shaft in your freezer at this time. This will make the installation
of the shaft much easier when the time comes to install it.
SHIFT FORK INSTALLATION
Figure 1 details the names of the 2 shift forks that are provided with this kit. Figure 13 details where these
forks belong on the gearset. The 3rd C/S, 2nd M/S, and 1st M/S forks will ride on the primary fork rod (like
5-speed). The 4th C/S fork rides on the auxiliary shaft.
First, install the 1st M/S fork. You must slide the 1st gear away from the door and engage the dogs of the
adjacent gear (4th) to allow room for the fork to slide on (Figure 12). Next, install the 4th C/S fork.
Install the 3rd C/S and 2nd M/S forks in the positions specified. Slide the primary fork rod through the 1st
M/S fork, 3rd C/S fork, and 2nd M/S fork.
Remove the 1/2-20 set screw from the outside of the side door. Retrieve the auxiliary fork shaft from your
freezer and install it into the access hole from which the 1/2-20 set screw was removed. You will have to
drive it into the fork shaft bridge that is bolted to the opposite side of the door. While tapping the auxiliary
fork shaft through with a brass hammer, hold onto the 4th C/S gear fork and make sure the fork is positioned correctly to receive the auxiliary fork shaft that is simultaneously being driven through.
Once the head of the auxiliary fork shaft is flush with the outside of the side door, you will need to drive it
another 1/2” (carefully) into the door until you definitely feel it seat. A spare grade 2 (soft) bolt works well
as a ‘punch’ to drive the auxiliary fork shaft to seat.
Put some Loctite 242 on the 1/2-20 set screw and torque it to 2-4 ft-lbs (tightly torqued); you will feel it
seat against the head of the auxiliary fork shaft. Apply a generous amount of WD-40 or transmission oil to
the forks and fork rods.
baker od6 installation instructions
FUNCTION CHECK
With the 4 forks and the primary and secondary fork rods installed, check to make sure that the forks slide
freely on the fork rods by moving them back and forth with your fingers. In particular, if you experience any
binding of the 4th C/S fork, you most likely need to go back and perform clearance check #2 (in the Case
Clearance Checks section) again as outlined in the previous section.
SHIFT DRUM/DETENT SYSTEM/PILLOW BLOCK INSTALLATION
Install the shift drum assembly as detailed in the Adjustments/ Set-up and Checks section. This time,
however, you must be careful to make sure the fork pins are in the grooves in which they belong. As
mentioned before, it is recommended that you tighten down the four cap screws in a circular pattern.
Monitor closely the pins of the forks relative to the shift drum grooves. Application of Loctite 242 to the four
cap screws is recommended. Re-check the shift drum end play.
Set the adjustment on the shifter pawl adjustment screw per the Factory Service Manual Section 7,
SHIFTER LINKAGE adjustment.
CLUTCH ROD END - RIGHT SIDE
Transfer the thrust washers (2), thrust bearing, and retaining ring from your 5-speed right side rod end to
the new rod end that has been provided with the kit. Install this rod end on the right side, at the end of the
mainshaft, under the clutch cover.
CLUTCH RELEASE COVER INSTALLATION
Install your desired clutch release cover onto the side door. The only note is that two of the screw holes in
the side door that receive two clutch cover screws have a threaded depth of 1/2”. This means, if you are
using an O.E.M. style clutch cover, you must use the two 1/4-20 x 2” SHCS that are provided, or any other
SHCS with a 2” length. The positions of these two screw holes are shown in Figure 14.
SPEED SENSOR INSTALLATION
If you have a transmission case with speed sensor provisions, install the dummy plug and screw provided
with your Builder’s Kit in the case. Relocate the speed sensor to the provision in the side door. See Figure
14. You may require a speed sensor signal conversion box to correctly calibrate the speedo head. The
new S&S units are available through BAKER DRIVETRAIN™. The new S&S units are sent to you pre-set
so there is little or no ‘dial in’ required after installation.
FLUID FILL
Fluid capacity is 20-24 oz. of one of the following recommended oil.
If available at your local dealer, we highly recommend Red Line ‘Heavy Shockproof’ transmission oil. Red
Line oil can be purchased directly through Baker Drivetrain™.
If Red Line is not available, then one of the following oils can be used:
Bel Ray 85W140
Spectro 75W140
Torco 85W140
baker od6 installation instructions
ANCILLARY ITEMS
FLT Builder’s Kits come with a modified oil spout because the stock oil spout does not clear the thicker
side door. The modified oil spout is installed with the 5/16” adapter plate and the two gaskets provided
(one on each side of the adapter plate) for proper fit.
In addition, the FLT® style exhaust bracket that bolts to the lower part of the side door using the four 5/16
screw holes in the case may have to be modified. Since the surface in which this bracket mounts to is
.525” thicker than stock, experience shows that .400” should be laterally take out of the exhaust bracket to
keep the exhaust pipe in the O.E.M. position. Modified brackets are available through BAKER™ at a cost
of $25 if you do not have a hack saw and welder at your disposal.
DISASSEMBLY
In general, disassembly of your BAKER Six-Speed Overdrive™ is the reverse of content of the Installation
Instructions with only one note; to remove the auxiliary fork shaft, you will need a slide hammer with a
10-32 threaded tip. An alternate method is to use a 2” long 10-32 bolt/screw. Thread the screw into the
auxiliary fork shaft and grab the head of the screw with a set of vise grips. Give the vise grips a swift tug
to extract the fork rod.
CUSTOMER SUPPORT
For any installation or service questions, please contact our technical department at (517) 339-3835.
DISCLAIMER
The words Harley®, H-D®, and Delkron® are registered trademarks and are for reference only. Use of
the H-D® model designations and part numbers are for reference only. BAKER DRIVETRAIN™ has no
association with, and makes no claims against, these words, trademarks, or companies.
The installation of these parts may void or otherwise adversely affect your factory warranty. If is
the sole responsibility of the user to determine the suitability of this product for his or her use,
and the user shall assume all legal, personal injury risk and liability and all other obligations,
duties and risks associated therewith.
baker od6 installation instructions
baker od6 installation instructions
baker od6 installation instructions
baker od6 installation instructions
baker od6 installation instructions
baker od6 installation instructions
baker od6 installation instructions