1
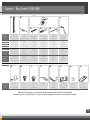
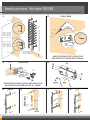
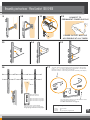
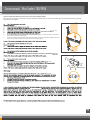
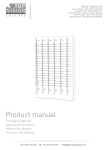
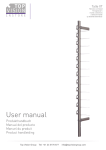
DE
P1
EN
P8
ES
P14
FR
P19
IT
P25
NL
P31
A S S E M B L Y
INSTRUCTIONS
Index of User Manual: Mino Comfort 100/240V
P 7 :
Safety instructions
P 8 :
Contents
P 9 :
Assembly instructions
P 11 :
Instruction manual
P 12 :
Service cheklist
Safety instructions: Mino Comfort 100/240V
IMPORTANT SAFETY INSTRUCTIONS
When using an electrical unit, basic precautions should always be followed, including the following:
Read all instructions before using the Secure Display System
DANGER - To reduce the risk of electric shock:
1.
This SECURE DISPLAY SYSTEM contains electronic components. Do not open these without
a qualified electrician or an official Top Vision dealer.
WARNING - To reduce the risk of burns, fire, electric shock, or injury to persons:
1.
Close supervision is necessary when this unit is used by, or near children, invalids, or disabled persons.
2.
Use this unit only for its intended use as described in this manual. Do not use attachments not
recommended by the manufacturer.
3.
Never operate this unit if it has a damaged cord or plug, if it is not working properly, if it has been dropped
or damaged, or dropped into water. Return the SECURE DISPLAY SYSTEM to a service center for examination
and repair.
4.
Never drop or insert any object into any opening other then the intended use of presenting sunglasses.
5.
Do not use outdoors / for indoor use only!
6.
Do not operate where aerosol (spray) products are being used or where oxygen is being administered.
PLEASE KEEP THESE INSTRUCTIONS FOR YOUR REFERENCE
MAINTENANCE INSTRUCTIONS
Instructions for cleaning and user maintenance operations:
1.
The exterior of a SECURE DISPLAY SYSTEM may only be cleaned with a non-static brush.
2.
The SECURE DISPLAY SYSTEM has no user serviceable parts. All malfunctional or
damaged components are to be replaced by a service representative duly authorized
by Top Vision Group BV or an official Top Vision dealer.
INTENDED USE
1.
The indented use of the Secure Display System is to display eyewear frames and sunglasses.
2.
This product is for commercial use only.
declaration of conformity
Top Vision Group herewith declares that this „SECURE DISPLAY SYSTEM” meets the following standards:
61000-6-3 (2001) +A11 / 61000-6-1 (2001) / EMC directive 89/336/EEC.
Art. 98001 - Version 2 - 22-09-2008
Contents: Mino Comfort 100/240V
A
B
F
75860
C
D
E
Set
Article code
10 / 12 frames
10403
95069
95092
92041
70091
Quantity
Max. 6 per box
12 pcs
4 per column
4 per column
1 per box
1 per column
Size
16 x 18 x 1170mm
168 x 50 x 10mm
3.9 x 38mm
6 x 35mm
2mm
1500 mm
Article code
15 frames
10405
95069
95092
92041
70091
Quantity
Max. 6 per box
15 pcs
4 per column
4 per column
1 per box
1 per column
Size
16 x 18 x 1380mm
168 x 50 x 10mm
3.9 x 38mm
6 x 35mm
2mm
1500 mm
Article code
18 frames
10406
95069
95092
92041
70091
Quantity
Max. 6 per box
18 pcs
4 per column
4 per column
1 per box
1 per column
Size
16 x 18 x 1590mm
168 x 50 x 10mm
3.9 x 38mm
6 x 35mm
2mm
1500 mm
Article code
17 / 21 frames
10407
95069
95092
92041
70091
Quantity
Max. 6 per box
21 pcs
4 per column
4 per column
1 per box
1 per column
Size
16 x 18 x 1800mm
168 x 50 x 10mm
3.9 x 38mm
6 x 35mm
2mm
1500 mm
50497
Article code
G
H
70078
J
I
95071
K
95081
70088
1x
Quantity
1x
2x
2x
Size
16 x 18 x1170mm
3,9 x 13mm
4,8 x 9,5mm
L
M
N
70089
11753
95171
50498
1x
1 per max. 6 columns
1x
1x
150cm
40x75x25mm
Ø 11,5mm
80x35x10mm
Check if all parts are present and operational, before installing!
Contact your local dealer in case of shortage and refer to the article code.
EN
P8
Assembly instructions: Mino Comfort 100/240V
1
2
FRONTVIEW
Ø 6 mm
35 mm
35 mm
Advises height top frame position: 1850 mm
Ref # B
Ø 6 mm
15 mm
XL hook columns:
10 pos: 1015 mm
12 pos: 1225 mm
15 pos: 1435 mm
17 pos: 1645 mm
Ø 11,5 mm
35 mm
Regular columns:
12 pos: 1015 mm
15 pos: 1225 mm
18 pos: 1435 mm
21 pos: 1645 mm
Advice distance
between two
columns: 190 mm
35 mm
Ø 11,5 mm
art. 95171
Ref # B
KEEP RECEIVER EYE CLEAR FOR
RECEPTION OF INFRA RED SIGNAL!
3
Ref # B
4
REARVIEW
I
X
H
RJ10
RECEIVER EYE MUST BE accessible for
maintance and service at al times!
5
E
X
X
X
X
6
Columns
7
Top
Bottom
X
RJ10
X
Y
X
Y
24V
Power
8
Assembly instructions: Mino Comfort 100/240V
9
10
11
12
Connect to
permanent power supply!
Click
TR
AF
O
power outlet MUST BE
accessible at all times!
13
14
15
Click
Click
16
17
The timer interval to automatically relock the system is 120 seconds.
Press “-” or “+” (1 beep) to adjust timer interval with +/- 30 seconds.
Maximum interval = 5 minutes (2 high beeps)
Minumum interval = 0 seconds (unit remains unlocked) (2 low beeps)
Ref # B
Open all columns
Close all columns
Open all columns in group 1
Open all columns in group 2
Open all columns in group 3
High short beep: code identified
Low short beep: code not recognized
For grouping instructions see page 5.
The mode button allows you to add additional codes
and/or change group settings.
For Mode instructions see page 11.
Factory settings:
Timer:
Sound:
Group:
120 seconds
On
No groups pre programmed
EN
P10
Instruction manual: Mino Comfort 100/240V
Opening and locking:
To open or lock the columns, aim your remote control at the receiver eye and press the button. The led lights on the columns will then light up and the
columns will produce a short sound signal.
TIMER BUTTON
MODE BUTTON
Timer function, locking automatically:
Upon delivery, the timer function is on and set at an
interval of 120 seconds (2 minutes). When the frame
security is unlocked the timer automatically locks
it again after the interval. The timer interval can be
changed using the “+” and the “-” buttons on the receiver unit (in stages of 30 seconds). The maximum
interval is 300 seconds (5 minutes). The minimum (0
seconds) switches the timer off. When pressing the
“+” or the “-” buttons a high (+) or low (-) sound signal
is produced. The maximum and minimum can be instantly reached by pressing pressing the “+” button or
“-” button for a longer period.
Adding or removing remote controls codes:
Each production order is given a unique remote control code to prevent misuse of the security system by
third parties. Upon delivery, the code is pre-programmed in the remote control and the receiving electronics. If desired, it is possible to add extra codes in a
later stage. It is also possible to erase programmed
codes, for example in case of loss or theft of one of
the remote controls.
Comfort timer function:
Just before the automatic closure, the green led on
the receiver will blink and a tripple sound signal will
be heard. If desired to continue your sales pitch and
keep the column(s) opened, one push of the button
of the remote control will extend the timer interval by
5 minutes. A second push of the button of the remote
control during this 5-minute extension will lock the
column(s) again. The sales progress will not be interferred but security of the frames remains guaranteed.
During the timer interval it will always be possible to
lock the frame security using the remote control.
1
1
1
2
MODE BUTTON and TIMER BUTTON
Reset instructions:
Press the “mode” and the “-” button simultaneously
for a 5 seconds, to erase all programmed remote controls. This is confirmed by 3 sound signals. The led
will stay on during erasure, followed by a long sound
signal to confrm that all the receiver has been reset.
Removing a code:
If you wish to remove all remote control codes, or
have a malfunction and desire a reset, follow these
instructions. Press the “mode” and the “-” button simultaneously for a 5 seconds, to erase all programmed remote controls. This is confirmed by 3 sound
signals. The led will stay on during erasure, followed
by a long sound signal to confrm that all remote control codes have been erased. You can add new codes
by following the Adding a code instructions.
2
2
3
3
3
1
1
1
2
Creating groups of columns:
If you would prefer the columns to open in pre selected groups you can do so by programming each
column to belong to group 1, 2 or 3.
To program a receiver into a specific group, press the
embedded “mode” button on the receiver for 3 seconds. This will be confirmed by a long sound signal
and the green led will light up. Then, aim the remote
control at the receiver eye, and press the desired
group number on the remote control. All columns that
are connected to that specific receiver are now in this
desired group. The receiver accepted the group if
you hear a short sound signal. A double signal will be
heard if it was an existing remote control.
Leave the programming mode by pressing the
“mode” button shortly. This is confirmed by three
short sound signals and the led turning off. When
no programming action is executed for more then 60
seconds, the programming mode is closed automatically.
Adding a code:
To add codes, press the embedded “mode” button
on the receiver for 3 seconds. This will be confirmed
by a long sound signal and the green led will light
up. Then, aim the new remote controls at the receiver
eye, one at a time and press the button on the remote
control. The remote control is accepted if you hear a
short sound signal. A double signal will be heard if it
was an existing remote control.
Leave the programming mode by pressing the
“mode” button shortly. This is confirmed by three
short sound signals and the led turning off. When
no programming action is executed for more then 60
seconds, the programming mode is closed automatically.
Open all columns
Close all columns
Switch sound on/off:
To turn the sound signals on or off, press “mode” button for 3 seconds. This will be confirmed by a long
sound signal and the green led will light up. Then,
presse the “-” button to switch the sound off. This
is confirmed by 3 light signals. Press the “+” button
to switch the sound back on. This is confirmed by 3
sound signals. Leave the programming mode as
mentioned above.
2
2
Deleting groups:
If you wish to remove a group, you will have to remove all codes. You can do so by following these instructions. Press the “mode” and the “-” button simultaneously for a 5 seconds, to erase all programmed
remote controls. This is confirmed by 3 sound signals.
The led will stay on during erasure, followed by a long
sound signal to confrm that all codes have been erased. You can add new codes with the adding code or
creating groups procedure.
Open all columns in group 1
Open all columns in group 2
Open all columns in group 3
Factory settings:
Timer:
Sound:
Group:
120 seconds
On
No groups pre programmed
Service manual: Mino Comfort 100/240V
SERVICE GUIDELINES BEFORE CONTACTNIG A TOP VISION SERVICE AGENT:
When you are encountering a malfunction with your Top Vision product, there are several basic points you can check yourself before contacting
a Top Vision service agent.
Sketch D
3 mtr)
7.
If you hear an alarm sound signal while using the remote, there is a short-circuiting in the system.
Check if the wires are not damaged!
If you hear a short low sound signal while using the remote, the column might have forgotten the code,
reset your receiver and add your remote control code (see page 11).
Sketch E
X
X
X
X
3 mtr)
X
Y
24V
X
Y
X
receiver eye
24 months
U
PL
G
GE
D IN
RL
PROPE
Y
6.
twenty four months
EN
P12
Head Office (NL)
Top Vision Group BV
T. +31 23 5176 677
F. +31 23 5310 241
E. [email protected]
W. www.topvisiongroup.com
Australia
Saata PTY LTD
T +61 892 997 100
F. +61 892 997 100
E. [email protected]
W. www.topvisiongroup.com
Austria
Fa. Franz Wallner GmbH
T. +43 7242 63375
F. +43 7242 63375-9
E. [email protected]
W. www.topvisiongroup.de
Belgium
Shop Concept
T. +32 387 756 86
F. +32 387 765 01
E. [email protected]
W. www.shop-concept.be
Canada
Cofidec
Tel: +1 514 457 6680
Fax: +1 514 457 7368
E: [email protected]
W. www.topvisiongroup.com / .fr
Denmark
Top Vision Denmark
T. +45 86 30 08 00
F. +45 86 32 57 79
E. [email protected]
W. www.topvisiongroup.dk
Germany
Top Vision Deutschland
Tel: +49 6502 93 999 26
Fax: +49 6502 93 999 36
E: [email protected]
W. www.topvisiongroup.de
Finland
Veli Kuusamo
T. +358 40 58 64951
F. +358 16 57 42 07
E. [email protected]
W. www.topvisiongroup.com
France
Top Vision Group France
T. +33 1 43 44 76 11
F. +33 1 43 45 81 40
E. [email protected]
W. www.topvisiongroup.fr
Italy
Top Solutions
T. +39 02 99 76 87 69
F. +39 02 99 76 87 70
E. [email protected]
W. www.topvisiongroup.it
Spain
Creaciones RTC
T. +34 93 23 77 476
F. +34 93 41 51 313
E. [email protected]
W. www.topvisiongroup.com
United Kingdom
Top Vision UK
T. +44 870 840 23 78
F. +44 870 840 23 79
E. [email protected]
W. www.topvisiongroup.com
Art. 98001 - Version 2 - 16-01-2009