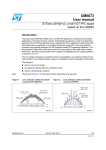
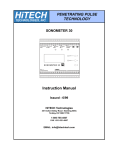
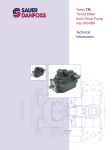
1
OIL-FIRED CENTRAL FURNACE
Installation, Operation, and Service Manual
With Users Information Section
Models:
THV1C072A948SA
THV1C072A9V4SA
c WARNING:
• Do NOT store or use gasoline or other flammable vapors and liquids
in the vicinity of this or any other appliance.
• Improper installation, adjustment, alteration, service, or
maintenance can cause a fire or explosion resulting in property
damage, personal injury, or loss of life. For assistance or additional
information consult a qualified installer or service agency.
These instructions should be:
• read prior to installing the furnace
• retained for reference by qualified service personnel
• reviewed before performing any service or maintenance
MO-513
ECN 5396-MA 141211
MADE IN USA
I. SAFETY SECTION
This page contains various warnings and cautions found throughout the Oil Furnace
Manual. Please read and comply with the statements below.
cWARNING AND CAUTIONS:
cWARNING: This furnace is not to be used as a construction heater. See Page 1.
c CAUTION MUST BE TAKEN NOT TO EXCEED 90° ROTATION (OF THE FLUE
ELBOW) COUNTERCLOCKWISE OR RIGHT FROM THE VERTICAL POSITION.
See Page 2.
cWARNING: The predetermined limit location on this oil fired furnace has been tested
and approved. Any attempt to relocate this safety control or replace this safety control with
a control that is not approved, or is incompatible, may result in personal injury, substantial
property damage or death. See Page 4.
cWARNING: Turn off the electrical power to the unit before attempting to change supply
air blower speed wiring. See Page 7
cWARNING: THE HEAT EXCHANGER MUST BE CLEANED BY A QUALIFIED
SERVICE PERSON. See Page 11.
cCAUTION: DO NOT ATTEMPT TO MAKE REPAIRS YOURSELF! See Page 12.
cWARNING: The area around the furnace should be kept free and clear of combustible
liquids and material, especially papers and rags. See Page 12.
cWARNING: NEVER burn garbage or refuse in your furnace. Never try to ignite oil by
tossing burning papers or other material into your furnace. See Page 12.
cWARNING: This oil furnace is designed to burn No. 1 or No. 2 distillate fuel oil. NEVER
USE GASOLINE OR A MIXTURE OF OIL AND GASOLINE. See Page 12.
cCAUTION: DO NOT ATTEMPT TO START THE BURNER WHEN:
1. Excess oil has accumulated,
2. The furnace is full of vapors
3. The combustion chamber is very hot.
IF ONE OR MORE OF THESE CONDITIONS EXIST, CONTACT A QUALIFIED
SERVICE PERSON. See Page 12.
cWARNING: To avoid injury from moving parts, hot surfaces, or electrical shock, shut
off the power to the furnace before removing any furnace access doors to service the air
filters. See Page 13.
i
All installations and services must be performed by qualified service personnel.
TABLE OF CONTENTS
SECTION
I. SAFETY SECTION
II. GENERAL INSTRUCTIONS
A. VENTING
B. DRAFT REGULATORS
C. DUCT WORK/AIR CONDITIONING/SUPPLY/RETURN
AIRFLOW AND AIR TEMPERATURE
D. FILTERS MOUNTED EXTERNAL TO FURNACE
E. LIMIT POSITION AND LOCATION
F. BURNER INSTALLATION
G. BURNER SPECIFICATIONS AND APPLICATIONS
H. ELECTRIC4AL CONNECTIONS
I. BLOWER MOTOR SPEED SELECTION
J. HEAT EXCHANGER CLEANING INSTRUCTIONS
BEGINNING PAGE
i
1
2
3
3
4
4
5
6
6
7
11
III. USERS INFORMATION SECTION
A. OIL SUPPLY
B. COMBUSTION AIR SUPPLY
C. INSPECTION AREAS
D. STARTING THE BURNER
E. FILTER CLEANING AND LOCATIONS
12
12
12
12
12
13
APPENDIX – A
REPLACEMENT PARTS LIST
15
APPENDIX – B
WIRING DIAGRAMS
18
ii
All installations and services must be performed by qualified service personnel.
II. GENERAL INSTRUCTIONS - READ BEFORE START OF INSTALLATION
1. The heating output capacity of the furnace proposed for installation should be based on a heat loss calculation
made according to the manuals provided by the Air Conditioning Contractors of America (ACCA) or the American
Society of Heating, Refrigeration and Air Conditioning Engineers, Inc. (ASHRAE).
2. All local codes and/or regulations take precedence over the instructions in this manual and should be followed
accordingly. In the absence of local codes, installation must conform with these instructions and regulations of the
National Fire Protection Association, and to the provisions of the National Electrical Code (ANSI/NFPA 70-1999 or
latest edition).
3. The installed furnace must be level and positioned in a central location with respect to outlet registers. It should be
located near the chimney to minimize any horizontal run of flue pipe, which may be required.
4. A furnace installed in a residential garage must be installed so the burner and ignition source are located higher
than 18 inches above the floor, unless the required combustion air is taken from the exterior of the garage. Also, the
furnace must be located or protected to avoid physical damage by vehicles.
cWARNING: This furnace is not to be used as a construction heater.
5. Listed below are definitions of "COMBUSTIBLE MATERIAL" and "NON-COMBUSTIBLE MATERIAL."
COMBUSTIBLE MATERIAL:
Material made of or surfaced with wood, compressed paper, plant fibers, plastics, or other material that will ignite
and burn, whether flame resistant or not.
NON-COMBUSTIBLE MATERIAL:
Material that is not capable of being ignited and burned. Such materials consist entirely of, or a combination of,
steel, iron, brick, tile, concrete, slate, or glass.
MINIMUM CLEARANCES TO COMBUSTIBLE MATERIALS
TYPE OF UNIT
MODEL NO.1
FROM
SIDES OF
FURNACE
FRONT
TOP &
SIDES OF
PLENUM
FROM THE
FLUE/VENT
REAR
HIGHBOY
THV1C*
0”
Note 1
1”
7”
0”
Notes:
1
THV1C* front clearance 6” for Closet, 24” for Alcove.
The minimum clearances listed in the preceding table are for fire protection. Clearance for servicing the front of the
furnace should be at least 24 inches. A clearance of 24 inches is recommended for passage to all points on the
furnace requiring service access.
NOTE: The THV1C* furnace may be installed on combustible flooring.
NOTE: The THV1C* furnace is approved for closet installation. If the furnace is installed in a closet, it requires two
openings in the closet door for combustion air, each having a minimum area of 162 sq. inches. This free area
intentionally exceeds the recommended minimum free area of 2 square inches per 1000 BTUH of input rate.
1
All installations and services must be performed by qualified service personnel.
A. VENTING:
NOTE: On the THV1C* it is possible to rotate the flue elbow (which is factory installed for vertical discharge) 90°
counterclockwise from the vertical position to adapt to various venting systems.
c CAUTION MUST BE TAKEN NOT TO EXCEED 90° ROTATION (OF THE FLUE
ELBOW) COUNTERCLOCKWISE OR RIGHT FROM THE VERTICAL POSITION.
ROTATION OF FRONT FLUE ELBOW
When an installation requires that the flue exit out the left hand side casing on a front flue unit, remove screw
securing the 90 deg. elbow and rotate it 90° counterclockwise. Then, remove knock-out in side casing and extend
vent through the opening.
A trim collar may be ordered from the manufacturer of this furnace to hide the gap around the flue pipe. This trim
collar, however, is not required for operation. Trim collar/gasket part numbers(s) R14121 / R330073.
NOTE: ROTATION OF FLUE PIPE IS ONLY ALLOWED FOR LEFT HAND SIDE VENTING
APPLICATIONS.
The THV1C* may be vented through a standard correctly sized chimney.
The THV1C* may also be horizontally vented through a side wall. The manufacturer of this furnace has available the
Field model RFDVS-45/RFVOP-415 side wall vent kit for such applications. When installing the RFDVS45/RFVOP-415 side wall vent kit, outside combustion air must also be applied to the burner. The following table
identifies application order information.
SIDE WALL VENTING APPLICATION ORDER INFORMATION
FIELD VENT TERMINATION
SIDE WALL VENT
KIT
ACCESSORIES KIT
BURNER
Beckett AFG
COMBUSTION AIR INTAKE
HOOD KIT
(FOR COMBUSTION AIR
APPLICATIONS ONLY)
(15’ application MAX)
(BURNER SPECIFIC)
PART NUMBER
PART NUMBER
PART NUMBER
RAOPS8393
RAOPS8394
RAOPS8397
The Field vent kit is set up with 4 inch diameter vent pipe with concentric through-the-wall vent termination/inlet air
vent hood. The combustion air inlet pipe diameter is also 4 inch diameter. For Beckett, the combustion air inlet pipe
will be reduced to 3” diameter with the Beckett side wall vent kit.
The side wall vent may be installed either through the upper knock-out on the left side casing of the unit or vertically
out the top opening of the vestibule. The 4” flexible vent pipe included w/ Field vent kit is able to be installed at 2”
clearance to combustibles.
The combustion air inlet can be installed through the either the lower left side casing knock-out or the lower right
side casing knock-out.
2
All installations and services must be performed by qualified service personnel.
B. DRAFT REGULATORS:
A draft regulator is supplied with the furnace and should be installed according to the regulator manufacturer’s
recommendations. With the burner operating, use a draft gauge to adjust the regulator to the proper setting. (refer to
the instructions enclosed with draft regulator to adjust to the proper setting). When the burner air supply and draft are
properly adjusted, the overfire draft should be a negative (-).01" to (-).02" WC 1, as measured at the 5/16" overfire
air tap (See Fig. 4). This tap is provided in the upper burner mounting plate. To measure the flue draft, punch a small
hole in the vent connector pipe as close to the furnace as possible and always before the draft regulator.
Note:
1. Draft overfire may be positive for high fire applications but not to exceed (+).02" WC.
C. DUCT WORK/AIR CONDITIONING/SUPPLY/RETURN AIRFLOW AND AIR TEMPERATURE:
If the furnace is used in connection with summer air conditioning (cooling), the furnace should be installed parallel
with or on the upstream side of the evaporator coil to avoid condensation in the furnace heat exchanger. If the
cooling unit is installed with a parallel flow arrangement, dampers or other means used to control flow of air should
be provided to prevent chilled air from entering the furnace. If such a damper is manually operated, it must be
equipped with a means to prevent operation of either unit, unless the damper is in the full heat or cool position.
The supply/return airflow shall be set to obtain an air temperature rise, across the furnace, in the range of 55º to
85ºF. Since the flow resistance of each duct system is slightly different, the airflow (fan speed) may have to be
changed in the field to achieve a satisfactory temperature rise.
One way to measure the temperature rise across the furnace is to insert temperature measuring devices (e.g.
thermometers) into the return air duct and into the supply air duct about 12 inches from the furnace. After the furnace
has been firing continually for over 20 minutes, read the temperature difference between the two (2) thermometers.
The temperature difference should not exceed 85ºF, nor be less than 55ºF. A temperature rise of 70ºF is considered
to be optimum for comfort.
The blower (fan) speed fan is adjusted by changing the fan motor winding energized by the control system. The
furnace is set on fan speed, “ML”, at the factory, refer to page 13 of this manual. To adjust the fan speed, change
corresponding wire from the appropriate fan speed to the “HEAT” tap on the control.
The duct system should again follow the current design standard of Air Conditioning Contractors of America
(ACCA) or ASHRAE Fundamentals volume. The most common location for the A-shaped coil (A style) is shown in
Fig. 1.
Fig 1: Acceptable locations for the air conditioner evaporator coil.
3
All installations and services must be performed by qualified service personnel.
NOTICE: The minimum coil pan clearance for a drum type heat exchanger is three inches unless specified
otherwise by the individual coil manufacturer.
D. FILTERS MOUNTED EXTERNAL TO FURNACE
On highboy furnaces, it is necessary to cut the return air opening in the side or rear casing, depending upon the
needs of the specific installation.
The filter rack is provided with the furnace, refer to Fig. 2. For your convenience, (4) locator knock-outs have been
placed at the proper locations for the cutout on both the left and right side casings. Cut opening between knockouts
and screw filter rack in place.
PLEASE NOTE: While scribing the return air opening, the filter rack can be held in position by tape or similar
temporary means.
Fig. 2: A typical filter rack and dimensions for the THV1C* furnace.
Connect the return air plenum to the filter rack and slide the filter into place. Dimensions for adapting the return air
plenum to the filter rack are provided (See Fig. 2).
E. LIMIT POSITION AND LOCATION
cWARNING: The predetermined limit location on this oil fired furnace has been tested and
approved. Any attempt to relocate this safety control or replace this safety control with a control
that is not approved, or is incompatible, may result in personal injury, substantial property
damage or death.
4
All installations and services must be performed by qualified service personnel.
F. BURNER INSTALLATION:
NOTE: The burner is factory installed on this furnace.
NOTICE: Remove all cardboard packing from around chamber before installing burner.
The oil burner will mount on three stud mounting bolts on the lower mounting plate covering the opening in the front
of the heat exchanger. The end of the burner tube should be inserted no further than 1/4 inch back from the inside
surface of the combustion chamber. A distance further than 1/4 inch back from the inside chamber wall may cause
impingement and sooting. This unit is equipped with a chamber retainer (refer to Fig.4). This retainer secures the
chamber during shipping and helps to maintain insertion depth. DO NOT remove this retainer when installing
burner.
Fig. 4: Typical location of the overfire air tap and components in burner mounting plate area
Fig. 5: Burner insertion illustration (Top view)
When mounting the burner, the mounting plate (Fig. 4) must be removed to provide access to the area in front of the
combustion chamber. A fiber insulating sleeve or amulet is provided on the burner tube of specific burners (see Fig.
5). See burner application chart for type of insulator. Do not allow the burner tube or end cone to physically touch
or protrude into the chamber, as excess heat transfer could result in destruction of the tube, end cone or both. The
burner tube/end cone is properly positioned, when the end is ¼ inch back from the inside surface of the combustion
chamber wall.
5
All installations and services must be performed by qualified service personnel.
G. BURNER SPECIFICATIONS AND APPLICATIONS
FURNACE MODEL
THV1C* SERIES
BURNER
SPEC
NO.
*
INS
BURNER
MODEL & TUBE
LENGTH
HEAD
EFL201
N
AFG-4.5”
F3
STATIC
PLATE
MAXIMUM
NOZZLE
SIZE**
3-5/8U
0.75X80° A
SHIPPED
NOZZLE
SIZE
BURNER
BECKETT (AFG)
0.60X80° A
OIL
PUMP
PRESSURE
(PSIG)
120
* INSULATOR S = SLEEVE OR N = NONE
THE NOZZLE SIZE GIVES THE NOMINAL FLOWRATE, IN GPH, FOLLOWED BY THE SPRAY
ANGLE, IN DEGREE’S, AND THE SPRAY PATTERN, EITHER “A” FOR HOLLOW CONE OR “B”
FOR SOLID CONE. FOR EXAMPLE, A NOZZLE RATED AT 0.65 GPH @ 100 PSIG THAT PROVIDES
AN 80° SPRAY ANGLE AND A HOLLOW SPRAY PATTERN WOULD BE ABBREVIATED IN THE
TABLE AS “0.65 X 80°A”.
INPUT CAPACITY SELECTION CHART
UNITS
THV1C*
THV1C*
THV1C*
EQUIVALENT
HEAT INPUT
RATE*
(BTU/HR)
70,000
85,000
106,250
EFFECTIVE
HEATING
CAPACITY**
(BTU/HR)
60,000
69,000
90,000
NOZZLE SIZE (GPH x TYPE)
Beckett AFG
0.50 x 80° A
0.60 x 80° A
0.75 x 80° A
All rates shown achieved with 120 PSIG pump pressure for Beckett AFG.
* Based on #2 domestic heating fuel oil having heating value of 140,000 BTU per gallon.
** Based on thermal efficiency of 84%-85%.
H. ELECTRICAL CONNECTIONS
NOTICE: All field wiring must conform to local, state and national codes.
A disconnect switch equipped with overcurrent protection (e.g. a time delay-type fuse or inverse time, circuit
breaker) should be installed in the service line for shutting down and protecting the furnace and electrical system.
Since the furnace is entirely pre-wired at the factory, it is only necessary to connect the building electrical service
lines to the two (2) pigtail wires extending from the fan center junction box. The fan center is mounted inside the
furnace burner compartment. The service lines to the furnace should be no smaller than 14 Ga., insulated copper wire
with a temperature rating of 60ºC, or greater.
Connect an equipment ground wire to the furnace at the fan center junction box. If wiring is run through metal
electrical conduit, it may not be necessary to run a separate equipment ground wire. Consult local codes and
authorities for specific minimum requirements.
6
All installations and services must be performed by qualified service personnel.
I. BLOWER MOTOR SPEED SELECTION:
cWARNING: Turn off the electrical power to the unit before attempting to change supply
air blower speed wiring.
The furnace comes from the factory with the proper cooling speed selected and the heat rise set to approximately
70°F on mid-fire.
The heat rise is determined by the nozzle size and the switch selection on the control board located in the blower
compartment for ECM models or blower speed taps for PSC models.
For ECM unit, switches 7 & 8 are used to select the proper blower speed for heating, refer to figure 5A and page 8.
For PSC unit, refer to figure 5B and page 10 for blower speed tap selections.
Fig-5A ECM unit
7
All installations and services must be performed by qualified service personnel.
ECM air flow DIP switch settings:
outdoor
unit size
(tons)
COOLING
3.5
3
2.5
AIRFLOW
SETTING
LOW
HEATING
sw1
LOW
(350 CFM/TON)
NORMAL
(400 CFM/TON)
HIGH
(450 CFM/TON)
LOW
(350 CFM/TON)
NORMAL
(400 CFM/TON)
HIGH
(450 CFM/TON)
LOW
(350 CFM/TON)
NORMAL
(400 CFM/TON)
HIGH
(450 CFM/TON)
LOW
(350 CFM/TON)
NORMAL
(400 CFM/TON)
HIGH
(450 CFM/TON)
4
MEDIUM
LOW
MEDIUM
HIGH
HIGH
dip switch setting
external static pressure
airflow setting
sw2
sw3
sw4
OFF
OFF
OFF
ON
OFF
OFF
OFF
OFF
OFF
OFF
ON
OFF
ON
OFF
OFF
ON
ON
OFF
OFF
OFF
ON
OFF
ON
OFF
OFF
ON
OFF
ON
OFF
ON
OFF
OFF
OFF
ON
ON
OFF
ON
ON
OFF
ON
ON
ON
OFF
OFF
ON
ON
ON
OFF
CFM
WATTS
CFM
WATTS
CFM
WATTS
CFM
WATTS
0.1
791
103
938
141
1124
210
1420
325
DIP SWITCH SETTING
SW7
SW8
ON
ON
OFF
ON
ON
OFF
OFF
OFF
CFM
WATTS
CFM
WATTS
CFM
WATTS
0.1
1401
315
1581
435
1803
605
0.3
1415
386
1597
517
1789
711
0.5
1424
467
1613
588
1810
800
0.7
1420
534
1617
680
1728
799
0.9
1392
601
1601
741
1644
795
CFM
WATTS
CFM
WATTS
CFM
WATTS
1216
232
1374
319
1577
431
1258
286
1411
382
1585
512
1273
348
1406
460
1605
582
1222
425
1401
530
1589
655
1179
504
1365
626
1593
724
CFM
WATTS
CFM
WATTS
CFM
WATTS
1071
173
1176
223
1341
300
1071
223
1208
284
1355
366
1053
284
1213
339
1355
432
1004
355
1197
396
1355
196
965
400
1144
487
1317
602
CFM
WATTS
CFM
WATTS
CFM
WATTS
847
118
951
170
1121
197
854
163
971
200
1127
254
861
227
984
282
1149
302
824
271
955
333
1076
396
785
298
925
365
1070
440
EXTERNAL STATIC PRESSURE
0.3
0.5
0.7
822
749
732
148
209
245
958
971
875
189
237
302
1152
1163
1152
267
330
383
1424
1446
1428
447
476
536
0.9
723
281
882
337
1101
463
1397
613
HEATING
ECM Blower delay settings:
DIP SWITCH SETTING
SW5
SW6
OFF
OFF
ON
OFF
OFF
ON
ON
ON
HEATING ON & OFF DELAY OPTIONS
DELAY ON
DELAY OFF
1 MIN
3 MIN
1 MIN
4 MIN
1 MIN
6 MIN
1 MIN
8 MIN
NOTE: The fan off delay for cooling is fixed at 60 seconds. This is preset and non-adjustable.
FACTORY SETTING
8
All installations and services must be performed by qualified service personnel.
Fig-5B PSC unit
PSC Blower delay settings:
9
All installations and services must be performed by qualified service personnel.
PSC air flow Speed Tap settings:
ALTERATIONS REQ’D FOR A/C @ DESIGN EXTERNAL STATIC PRESSURE
COOLING UNIT
Recommended CLG Speed
HTG Speed by Input
Low
Fire
Mid
Fire
High
Fire
24,000
Low
ML
MH
Low
30,000
Low
ML
MH
Med Low
36,000
Low
ML
MH
Med High
42,000
Low
ML
MH
Med High
48,000
Low
ML
MH
High
Speed Tap\ Static
Pressure
Furnace Airflow (CFM) vs. External Static pressure (in. WC.)
0.1
0.2
0.3
0.4
0.5
0.6
0.7
Low
930
915
912
910
822
774
730
ML
1155
1152
1130
1126
1085
1042
920
MH
1442
1432
1418
1382
1334
1293
1230
High
1802
1762
1705
1635
1569
1493
1428
Low
3.28
3.1
3.02
2.91
2.64
2.49
2.36
Furnace Motor Current Draw (Amps) vs. External Static pressure (in. WC.)
ML
4.18
4.02
3.91
3.74
3.59
3.34
2.95
MH
5.44
5.17
4.95
4.72
4.43
4.21
3.95
High
6.61
6.36
6.04
5.73
5.46
5.17
4.9
Speed Tap\ Static
Pressure
0.1
High Fire Temperature Rise vs. External Static pressure (in. WC.)
0.2
0.3
0.4
0.5
0.6
0.7
Low
90
91
91
92
101
108
114
ML
72
72
74
74
77
80
91
MH
58
58
59
60
62
64
68
High
46
47
49
51
53
56
58
Speed Tap\ Static
Pressure
0.1
0.2
0.3
0.4
0.5
0.6
Low
72
73
73
73
81
86
91
ML
58
58
59
59
61
64
72
MH
46
47
47
48
50
52
54
High
37
38
39
41
42
45
47
Mid Fire Temperature Rise vs. External Static pressure (in. WC.)
0.7
Low Fire Temperature Rise vs. External Static pressure (in. WC.)
Speed Tap\ Static
Pressure
0.1
0.2
0.3
0.4
0.5
0.6
0.7
Low
60
61
61
61
68
72
76
ML
48
48
49
49
51
53
60
MH
39
39
39
40
42
43
45
High
31
32
33
34
35
37
39
10
All installations and services must be performed by qualified service personnel.
J. HEAT EXCHANGER CLEANING INSTRUCTIONS:
cWARNING: THE HEAT EXCHANGER MUST BE CLEANED BY A QUALIFIED
SERVICE PERSON.
It is important to inspect and clean the heat exchanger once a year, or as necessary, to remove any build-up of soot.
A layer of soot on the inside of the heat exchanger will act as an insulator and reduce heat transfer, resulting in less
efficiency.
To clean the heat exchanger, first turn off all power to the unit. Remove clean-out plugs, the vent connector pipe to
the chimney, the burner, and the burner mounting plates. When removing the clean-out plugs, remove the screw at
the 12 o’clock position. Then, pull clean-out plug straight back.
Fig. 6: Clean-out plug removal
With access to the inside of the heat exchanger through the burner area, clean-out openings, and vent pipe
connection, it is possible to use a long, flexible wire brush and an industrial type vacuum cleaner to remove any soot
build-up. NOTE: A one inch (outside diameter) vacuum cleaner hose will fit into the radiator.
To vacuum and brush the outer radiator of the heat exchanger, go through the clean-out openings in both directions,
as shown in figure 7, below.
Fig. 7: Recommended method and device for cleaning inside of heat exchanger.
Reassemble the furnace to its original construction*. Remount the burner being certain that the air tube is properly
inserted into the chamber opening (see section F). If heavy soot deposits were found in the heat exchanger, this may
indicate the burner is out of adjustment.
*When returning clean-out plugs to their original position, insert plug and replace screw at the 12 o’clock position.
This is sufficient for sealing the access tube.
11
All installations and services must be performed by qualified service personnel.
III. USERS INFORMATION SECTION
A. OIL SUPPLY: Do not allow the fuel tank to run completely empty. During the summer, keep the tank full to
prevent condensation of moisture on the inside surface of the tank. If the fuel tank runs completely dry, it may be
necessary to purge the lines of trapped air. Contact a qualified technician to bleed the lines and restart the burner.
OIL SUPPLY VALVE: Turn the oil supply valve off if the burner is shut down for an extended period of time.
B. COMBUSTION AIR SUPPLY: The burner requires a generous amount of clean combustion air to operate
safely. Lack of adequate combustion air can result in erratic operation of the burner, noisy combustion, or fuel odors
in the air. NEVER BLOCK THE FURNACE FROM THE SUPPLY OF COMBUSTION AIR. If there is an exhaust
fan, dryer or return air grill in the furnace room, there should be increased concern and additional efforts may be
required to provide adequate combustion air to the furnace at all times.
C. INSPECTION AREAS
VESTIBULE: The furnace vestibule area or burner compartment should be inspected by removing the front door of
the furnace and looking for signs of excessive heat such as discoloration of components materials damage, from rust
or corrosion, soot or carbon build-up.
EXTERIOR OF FURNACE: The furnace exterior should be inspected for signs of excessive heat such as
discoloration of materials and damage from rust or corrosion.
FLUE PIPE, VENT PIPE OR CONNECTOR: The furnace vent pipe should be inspected for signs of rust,
corrosion pitting or holes in pipe, and leakage around seams in pipe, indicated by soot or condensate streaks.
CHIMNEY OR VENTING SYSTEM: The furnace venting system should be inspected for signs of rust, corrosion
pitting or holes, and signs of condensation or moisture leakage from the venting system.
If any of the above symptoms are evident, call a qualified heating contractor for assistance.
cCAUTION: DO NOT ATTEMPT TO MAKE REPAIRS YOURSELF!
cWARNING: The area around the furnace should be kept free and clear of combustible
liquids and material, especially papers and rags.
cWARNING: NEVER burn garbage or refuse in your furnace. Never try to ignite oil by
tossing burning papers or other material into your furnace.
cWARNING: This oil furnace is designed to burn No. 1 or No. 2 distillate fuel oil. NEVER
USE GASOLINE OR A MIXTURE OF OIL AND GASOLINE.
cCAUTION: DO NOT ATTEMPT TO START THE BURNER WHEN:
1. Excess oil has accumulated,
2. The furnace is full of vapors
3. The combustion chamber is very hot.
IF ONE OR MORE OF THESE CONDITIONS EXIST, CONTACT A QUALIFIED
SERVICE PERSON.
D. STARTING THE BURNER:
1. Turn the main service switch to "OFF" position.
2. Set thermostat substantially above room temperature.
3. Open shut-off valves in oil supply line to burner.
4. Turn service switch to furnace "ON". If burner starts and runs, but stops again on lockout, it may be necessary to
bleed the lines or make burner combustion air adjustments. Contact a qualified service person to adjust and start
burner.
12
All installations and services must be performed by qualified service personnel.
E. FILTER CLEANING AND LOCATION:
The air filters should be inspected each month and cleaned when dirty. Cleaning the air filters frequently may reduce
airborne contaminants from entering the furnace and depositing in the furnace, duct system and home.
cWARNING: To avoid injury from moving parts, hot surfaces, or electrical shock, shut
off the power to the furnace before removing any furnace access doors to service the air
filters.
The filter rack will be located between the return air plenum and the return air opening on the side of the furnace,
refer to figure 8. Slide the dirty filter out, clean it with a mild soap and water solution. Make sure filter is thoroughly
dry before replacing.
Fig. 8: Location of the air filter on the typical highboy furnace.
13
All installations and services must be performed by qualified service personnel.
COMBUSTION AND EFFICIENCY TESTING FOR
OIL FIRED CENTRAL FURNACES.
Complete this form for each furnace installed. Read instruction
manual carefully before making tests. Retain this form with furnace.
furnace.
CUSTOMER
NAME
ADDRESS
CITY, STATE
AIR SHUTTER OPENING
BURNER MODEL NO. BLAST TUBE LGTH.
HEATING
INS.
SYSTEM
COMBUSTION CHAMBER
CONDITION
% OF MAX. (EST)
MATERIAL
FURNACE MODEL
TYPE OF VENTING SYSTEM
MASONRY
CHIMNEY
METAL
CHIMNEY
SIDEWALL
POWER VENTER
METAL
CHIMNEY
MASONRY CHIMNEY
W/METAL LINER
MASONRY
CHIMNEY
W/INDUCER
W/INDUCER
FUEL LINE FILTER
DRAFT CONTROL
INITIAL
INSTALLATION
COMBUSTION
TESTS
(Operate burner
CO2 in stack pipe
Draft Over-fire
at least 10
minutes before
Draft in stack pipe
Smoke number
starting tests.)
Gross stack temp.
Furnace room temp.
Net stack temp.
(Gross stack minus
furnace room temp.)
Efficiency
Nozzle size and spray
Oil pump pressure
Operation of Controls
Burner Safety Controls
Check for oil leaks
Tests taken by
Date
NOTES:
INSTALLER NAME & ADDRESS
14
FURNACE SERIAL NUMBER
SERVICE
SERVICE
SERVICE
All installations and services must be performed by qualified service personnel.
APPENDIX-A Replacement Parts List
15
All installations and services must be performed by qualified service personnel.
16
All installations and services must be performed by qualified service personnel.
17
All installations and services must be performed by qualified service personnel.
APPENDIX-B Wiring Diagrams
THV1C072A948SA
BLOWER SPEED TAPS
COOL = A/C Tap
HEAT = Heating Tap
LOW = Constant air or
Dehumidifier
18
All installations and services must be performed by qualified service personnel.
THV1C072A9V4SA
19
Notes:
1. Using wirenuts, connect power supply wire L1 to pigtail marked "1" and wire L2
to pigtail marked "2" in fan center. Connect an earth grounding wire to ground wire
terminal in J-box.
2. If any electrical wiring must be replaced, new wiring must have an insulation
type rated for 105°C or greater.
3. Use only copper conductors for all field and replacement wiring.
4. For adequate overcurrent protection, maximum acceptable size time delay type
fuse or inverse time circuit breaker refer to name plate.
5. Typical room thermostat anticipator setting is 0.1 A.
6. Use Class I type electrical wiring to make thermostat connections to fan center
and oil primary safety control.
7. Electrical schematic shown with heating system, cooling system (if equipped),
and fan off.