1
Service Manual
HP DesignJet 430
HP DesignJet 450C
HP DesignJet 455CA
Printers
-$(" .#$- (/&
#$- '(/& )(.$(- $(!),'.$)( ( --,2 .) . -. &$,. ( - ,0$ -$"( . *,$(. ,- ') &- ( -$"( . *,$(. ,- ') &- ( -$"( . *,$(. ,- ') &- ( ), $(!),'.$)( )/. /-$(" .# - *,$(. ,- , ! , .) .# ),, -*)($(" /- ,
( +/$%3, ! , ( "/$ -
# *,) /, - -,$ $( .#$- '(/& , .) * ,!),' 2 3 ,.$!$ - ,0$ * ,-)(( & )(&2
,. (/' ,- !), *&).. , )*.$)(- --),$ - ( - ,0$ *,.- , &). $(
#*. , #$- '(/& )(.$(- $(!),'.$)( !), .# )&), -$"( . (
*,$(. ,-
-'&& ,,)1 $- /- .) $($. ).# , *,.- )! .# ,0$ (/& ),
- ,- /$ 1# , 2)/ ( !$( $(!),'.$)( , &. .) .# .)*$ 2)/ ,
)(-/&.$("
$$
-$(".#$-(/&
HP DesignJet 430, 450C and 455CA Printers
/.3%.32
2).' 3()2 !.4!, ))
!&%38 8-"/,2 7
2 3(% 1).3%1 2).' 3(% !3%23 )1-6!1% %5)2)/. -0/13!.3 .&/1-!3)/. (!3 !. $/ 6(%. ! 823%- 11/1 /$% 00%!12 /. 3(%
1/.39!.%, )20,!8 !5% 8/4 0%1&/1-%$ ! %15)#% %23 /. 3(% !),%$ /-0/.%.322%-",8 !5% 8/4 %1&/1-%$ 3(% ##41!#8 !,)"1!3)/. (!3 #!. $/ 3/ /,5% 1).394!,)38 1/",%-2 (!3 #!. $/ )& 3(% ).% %.2/1 (!2 1/",%-2 %3%#3).' %$)! (!3 #!. $/ )& 3(% !11)!'% )2 /)28 (!3 #!. $/ )& 3(% /5%1 %.2/1 )2.3 /1+).' (!3 #!. $/ )& 3(% !11)!'% 22%-",8 (!2 01/",%-2 0!1+).' ).
3(% %15)#% 3!3)/. (!3 #!. $/ )& 3(% 1).3%1 #/.3).4/42,8 1%*%#32 !131)$'%2 (!3 #!. $/ )& 3(% %$)! #/.3).4/42,8 #1!2(%2 (!3 #!. $/ )& 3(% 1).3%1 $/%2 ./3 /6%1 (!3 #!. $/ )& 3(% 1).3%1 (!2 01/",%-2 6)3( %$)! /!$).' (!3 #!. $/ )& 3(% 1).3%1 (!2 01/",%-2 6)3( 3(% 433%1 (!3 #!. $/ )& 3(% !), %#(!.)2- !),2 (!3 )2 !. %11/1 9
9
9
9
9
9
9
9
9
9
9
9
9
9
9
9
9
-0/13!.3 .&/1-!3)/. /. 1/4",%2(//3).' 11/1 /$%2 9
823%- 11/1 #/$%2 9
2%1 %22!'%2 9
HP DesignJet 430, 450C and 455CA Printers
/.3%.32 )))
0531&6%5+10 18'3<0 '.( '45 #0& 13/#. 0+5+#.+;#5+10 '37+%' '454 *+%* '37+%' '45 51 '3(13/ '37+%' '454 +#)0145+%4 '37+%' 1&' 5122+0) # '45 05'3+0) '37+%' 1&' +'8+0) '45 65265 7+# 5*' '3+#. 135 #+. :%.' '45 3105 #0'. '45 #33+#)' 9+4 "<#9+4 '45 #33+#)' '45 '04134 '45 '&+#<9+4 !<9+4 '45 '0%* 60 1&6.#3 '45 .'%5310+%4 '45 '37+%' 1&' 5122+0) # '45 05'3+0) '37+%' 1&' #+. '45 .'%53+%#. '45 '3710%1&'3 '45 '37+%' 10+513 #5# +42.#: 1&'. 10(+)63#5+10 31%'&63' '37+%' 10(+)63#5+10 .15 3+05+0) 5*' '37+%' 10(+)63#5+10 .15 05'323'5+0) 5*' '37+%' 10(+)63#5+10 .15 .'#3+0) 5*' <
<
<
<
<
<
<
<
<
<
<
<
<
<
<
<
<
<
<
<
<
<
<
<
<
<
<
<
<
<
<
%%63#%: #.+$3#5+10 63214' *#5 +4 5*' 0&<1+05 %%63#%: 2'%+(+%#5+10 *#5 %#0 (('%5 5*' 0&<1+05 %%63#%: '(13' '3(13/+0) 5*' %%63#%: #.+$3#5+10 '3(13/+0) 5*' %%63#%: #.+$3#5+10 &,645+0) 5*' #33+#)'<51<'&+# +45#0%' 1 %*'%- 5*' %#33+#)'<51</'&+# &+45#0%' 1 #&,645 5*' %#33+#)'<51</'&+# &+45#0%' +7
105'054
<
<
<
<
<
<
<
<
<
HP DesignJet 430, 450C and 455CA Printers
Print Quality Troubleshooting Checklist . . . . . . . . . . . . . . . . . . . . . . . . . . . . . . . . .
PrintĆQuality Plot . . . . . . . . . . . . . . . . . . . . . . . . . . . . . . . . . . . . . . . . . . . . . . . . . . . . .
Introduction . . . . . . . . . . . . . . . . . . . . . . . . . . . . . . . . . . . . . . . . . . . . . . . . . . . . . . .
Using the PrintĆQuality Plot . . . . . . . . . . . . . . . . . . . . . . . . . . . . . . . . . . . . . . . . .
Printing the PrintĆQuality Plot . . . . . . . . . . . . . . . . . . . . . . . . . . . . . . . . . . . . . .
Analyzing the PrintĆQuality Plot . . . . . . . . . . . . . . . . . . . . . . . . . . . . . . . . . . . . .
Test Pattern 1: Cartridge WarmĆup . . . . . . . . . . . . . . . . . . . . . . . . . . . . . . . . . . .
Test Pattern 2: Nozzle Print Test . . . . . . . . . . . . . . . . . . . . . . . . . . . . . . . . . . . .
Test Pattern 3: Vertical Line Straightness Test . . . . . . . . . . . . . . . . . . . . . . . .
Test Pattern 4: Color Alignment Quality Test . . . . . . . . . . . . . . . . . . . . . . . . . .
Test Pattern 5: Color Variation Test . . . . . . . . . . . . . . . . . . . . . . . . . . . . . . . . . .
Test Pattern 6: Banding Test . . . . . . . . . . . . . . . . . . . . . . . . . . . . . . . . . . . . . . . .
No Printing Defects Found in the PrintĆQuality Plot . . . . . . . . . . . . . . . . . . .
Media . . . . . . . . . . . . . . . . . . . . . . . . . . . . . . . . . . . . . . . . . . . . . . . . . . . . . . . . . . . . .
PrintĆQuality Defects Troubleshooting . . . . . . . . . . . . . . . . . . . . . . . . . . . . . . . . . . .
Starwheel Marks . . . . . . . . . . . . . . . . . . . . . . . . . . . . . . . . . . . . . . . . . . . . . . . . . . .
Uneven Fill Density . . . . . . . . . . . . . . . . . . . . . . . . . . . . . . . . . . . . . . . . . . . . . . . .
Spray . . . . . . . . . . . . . . . . . . . . . . . . . . . . . . . . . . . . . . . . . . . . . . . . . . . . . . . . . . . . .
Bleeding, Blooming and Wicking . . . . . . . . . . . . . . . . . . . . . . . . . . . . . . . . . . . . .
Ink Smearing . . . . . . . . . . . . . . . . . . . . . . . . . . . . . . . . . . . . . . . . . . . . . . . . . . . . . .
Hue Changes . . . . . . . . . . . . . . . . . . . . . . . . . . . . . . . . . . . . . . . . . . . . . . . . . . . . . . .
6Ć2
6Ć3
6Ć3
6Ć3
6Ć3
6Ć5
6Ć5
6Ć5
6Ć7
6Ć9
6Ć11
6Ć12
6Ć15
6Ć15
6Ć16
6Ć16
6Ć16
6Ć16
6Ć17
6Ć17
6Ć18
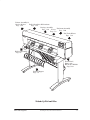
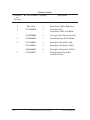
Exchange Assemblies . . . . . . . . . . . . . . . . . . . . . . . . . . . . . . . . . . . . . . . . . . . . . . . . . .
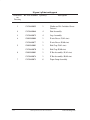
Replacement Parts . . . . . . . . . . . . . . . . . . . . . . . . . . . . . . . . . . . . . . . . . . . . . . . . . . . . .
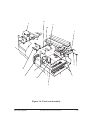
Figure 1 Ć General View . . . . . . . . . . . . . . . . . . . . . . . . . . . . . . . . . . . . . . . . . . . . .
Figure 2 Ć Printer Support . . . . . . . . . . . . . . . . . . . . . . . . . . . . . . . . . . . . . . . . . . .
Figure 3 Ć Rollfeed Assembly . . . . . . . . . . . . . . . . . . . . . . . . . . . . . . . . . . . . . . . . .
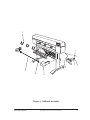
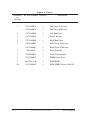
Figure 4 Ć Covers . . . . . . . . . . . . . . . . . . . . . . . . . . . . . . . . . . . . . . . . . . . . . . . . . . .
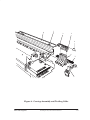
Figure 5 Ć Front Panel, Spittoon and Electronics Module . . . . . . . . . . . . . . . .
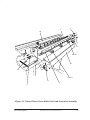
Figure 6 Ć X and Y axis Motors and Encoder Strip . . . . . . . . . . . . . . . . . . . . . .
Figure 7 Ć Primer Assembly and Service Station Assembly . . . . . . . . . . . . . .
Figure 8 Ć Carriage Assembly and Trailing Cable . . . . . . . . . . . . . . . . . . . . . . .
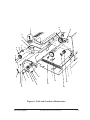
Figure 9 Ć Bail and Overdrive Mechanisms . . . . . . . . . . . . . . . . . . . . . . . . . . . .
Figure 10 Ć Pincharm Assembly . . . . . . . . . . . . . . . . . . . . . . . . . . . . . . . . . . . . . .
Figure 11 Ć Entry Platen, Drive Roller, Bail and Overdrive Assembly . . . . .
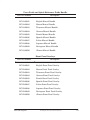
Printer Labels . . . . . . . . . . . . . . . . . . . . . . . . . . . . . . . . . . . . . . . . . . . . . . . . . . . . . .
Users Guide and Quick Reference Guide Bundle . . . . . . . . . . . . . . . . . . . . . . .
Front Panel Overlays . . . . . . . . . . . . . . . . . . . . . . . . . . . . . . . . . . . . . . . . . . . . . . .
Compatible Documentation . . . . . . . . . . . . . . . . . . . . . . . . . . . . . . . . . . . . . . . . . .
PlugĆin memory (RAM SIMM) . . . . . . . . . . . . . . . . . . . . . . . . . . . . . . . . . . . . . . .
Cartridges . . . . . . . . . . . . . . . . . . . . . . . . . . . . . . . . . . . . . . . . . . . . . . . . . . . . . . . . .
External Print Servers . . . . . . . . . . . . . . . . . . . . . . . . . . . . . . . . . . . . . . . . . . . . . .
HP DesignJet 430, 450C and 455CA Printers
7Ć2
7Ć2
7Ć3
7Ć4
7Ć6
7Ć8
7Ć10
7Ć12
7Ć14
7Ć16
7Ć18
7Ć20
7Ć22
7Ć24
7Ć25
7Ć25
7Ć26
7Ć26
7Ć26
7Ć27
Contents
v
.42/%5$4*/. &"33&-#,8 "'&48 2&$"54*/.3 ,&$42/34"4*$ *3$)"2(& 2&$"54*/.3 &15*2&% //,3 .34",,*.( " /2 &-/6*.( 4)& "*, 33&-#,8 &-/6*.( 4)& /0 /6&2 &-/6*.( 4)& /,,'&&% 33&-#,8 &-/6*.( 4)& &'4 .%9/6&2 &-/6*.( 4)& *()4 .%9/6&2 &-/6*.( 4)& 2/.49".&, 33&-#,8 &-/6*.( 4)& ,&$42/.*$3 /%5,& &-/6*.( 4)& .$/%&2 42*0 &-/6*.( 4)& *()4 2"$+&4 &-/6*.( 4)& "22*"(& /4/2 &-/6*.( 4)& 0*44//. &-/6*.( 4)& 544&2 33&-#,8 &-/6*.( 4)& 2*6&9/,,&2 &"2 &-/6*.( 4)& &%*" /4/2 33&-#,8 &-/6*.( 4)& *.$)92- &$)".*3- &-/6*.( 4)& 2*-&2 33&-#,8 &-/6*.( 4)& &26*$& 4"4*/. &-/6*.( 4)& "*,9*'4 &$)".*3- &-/6*.( 4)& .("(*.(9&6&2 500/24 &-/6*.( 4)& 2"*,*.( "#,& &-/6*.( 4)& 2"*,*.(9"#,& 5*%& &-/6*.( 4)& "22*"(& 33&-#,8 &-/6*.( 4)& 2*6& &,4 &-/6*.( 4)& 2*6&9&,4 5,,&8 &-/6*.( 4)& 2*6& /,,&2 &*.34",,*.( 4)& 2*6& /,,&2 &-/6*.( 4)& *.$)92- *'4 &$)".*3- &-/6*.( 4)& 6&2%2*6& 33&-#,8 *.$,5%*.( 4)& 6&2%2*6& /,,&2
&%*" &0"2"4/2 &%*" &',&$4/23 ".% &%*" &.3/2 &-/6*.( 4)& .428 ,"4&. 9
9
9
9
9
9
9
9
9
9
9
9
9
9
9
9
9
9
9
9
9
9
9
9
9
9
9
9
9
9
9
9
9
9
9
/*3452& /. 2*.4&2 &6&, /' 2*.4&2 3"(& 2*$4*/. /. ,*%&2 /% /*38 "22*"(& !)&&, .+ 0*,,*.( &,4 7&,,*.( ,&".*.( 4)& 2*.4&2 &.&2", ,&".*.( ,&".*.( 4)& 2*6& /,,&2 6*
/.4&.43
9
9
9
9
9
9
9
9
9
HP DesignJet 430, 450C and 455CA Printers
,1/-#2"1(-, -** $#( $+-3(,& 1 1(" ' /&$ %/-+ 1'$ $#( /(..(,& 1'$ $#( (,"'6/+ $,0-/ /-3(#(,& -/"$ -, -. -% 1'$ $#( (* (*6(%1 $"' ,(0+ $1$"1(,& 1'$ (,$0 ,# $#( #&$0 (,$ $,0-/ -3(,& 1'$ //( &$ //( &$6/(3$ $"' ,("0 -1-/ $*1 ,# 2**$5 //( &$ 2(# ,"$ -0(1(-, * $$#! ") //( &$ /-3(#(,& ,) /(,1 /1/(#&$0 (01 ,"$ !$14$$, //( &$ ,# $#( /-#2"(,& , + &$ /(,16-#$ ' / "1$/(01("0 $/3("(,& 1'$ /1/(#&$0 $/3("$ 1 1(-, .(11--, /(+$/ *$"1/-,("0 -#2*$ $,0-/0 ,.2121.21 ,1$/% "$0 (6/-,("0 66 -4$/ 2..*5 1$/ -,#$,0 1(-, $+-/5 0 &$ *-1 /($,1 1(-, 01$/ + &$ /-"$00-/ HP DesignJet 430, 450C and 455CA Printers
6
6
6
6
6
6
6
6
6
6
6
6
6
6
6
6
6
6
6
6
6
6
6
6
6
6
6
6
6
6
6
6
6
6
6
6
6
6
-,1$,10 3((
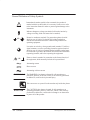
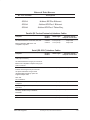
General Definition of Safety Symbols
International caution symbol (refer to manual): the product is
marked with this symbol when it is necessary for the user to refer
to the instruction manual in order to protect against damage to the
instrument.
Indicates dangerous voltage (terminals fed from the interior by
voltage exceeding 1000 volts must also be marked).
Protective conductor terminal. For protection against electrical
shock in case of a fault. Used with field wiring terminals to
indicate the terminal that must be connected to ground before
operating equipment.
Low-noise or noiseless, clean ground (earth) terminal. Used for a
signal common, as well as providing protection against electrical
shock in case of a fault. A terminal marked with this symbol must
be connected to ground in the manner described in the installation
(operating) manual, and before operating the equipment.
Frame or chassis terminal. A connection to the frame (chassis) of
the equipment, which normally includes all exposed metal.
Alternating current
Direct current
Alternating or direct current
The WARNING sign denotes a hazard. It calls attention to a
procedure, practice, or the like, which, if not correctly performed
or adhered to, could result in personal injury.
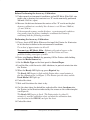
Take care not to cut yourself on the encoder strip inside the plotter.
The CAUTION sign denotes a hazard. It calls attention to an
operating procedure, practice, or the like, which, if not correctly
performed or adhered to, could result in damage to or destruction
of part or all of the product.
HP DesignJet 430, 450C and 455CA Printers
HP DesignJet 430, 450C and 455CA Printers
1-1
Introduction
This chapter will guide you through the relevant steps to take when
troubleshooting the printer.
Before spending time troubleshooting the problem by doing the various tests
or replacing parts (which may not need replacing), check which firmware
revision the printer is using. To check which firmware revision the printer is
using, page 4Ć29. Some problems
which occurred in earlier firmware releases may have been solved in later
revisions. So if there is a new firmware revision then replace the Firmware
SIMM before replacing any parts.
The Printer firmware is contained either on a flash ROM SIMM at the back
of the Printer or on a masked ROM inside the electronics module. The
firmwareĆrevision level, for example A.01.03, is printed by the Printer on the
setup sheet and on the service configuration plot. The revision level is also
printed on a label on any flash ROM SIMM. Do not open the electronics
module.
: When replacing the electronics module, always remember to
check the firmware revision level of the electronics
module. The revision level will be printed on the top surface of
the module. Also, check the firmware revision level of the ROM
SIMM installed in the electronics module. With this
information you must do the following:
1. If the firmware revision level of the ROM SIMM in the old
electronics module is than the firmware revision level of
the new electronics module, then you install the
ROM SIMM into the module.
2. If the firmware revision level of the ROM SIMM in the old
electronics module is than the firmware revision level
of the new electronics module, then you install the ROM
SIMM into the module.
Example 1: The ROM SIMM firmware revision level is A.01.03
and the firmware revision level of the electronics module is
A.01.04. You would use the electronics module the
ROM SIMM installed.
Example 2: The ROM SIMM firmware revision level is A.01.05
and the firmware revision level of the electronics module is
A.01.04. You would use the electronics module the ROM
SIMM installed.
1-2
HP DesignJet 430, 450C and 455CA Printers
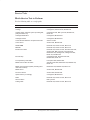
Troubleshooting
What Can I do when a System Error Code Appears on the
FrontĆPanel Display?
Chapter 2 contains a list of system error codes and their respective
descriptions and recommended corrective actions. Only try one recommended
action at a time and check if the error code has disappeared.
If you have an error code which is not documented in this Service Manual or
you have an error which you cannot resolve, then report the error to the HP
Response Center or the nearest HP Support Office. When reporting the error,
have the following information ready:
D
D
D
D
D
D
D
D
Model and Serial Number of the printer.
Which firmware revision the printer is using.
The complete error code.
The Service Configuration Plot.
The Current configuration sheet.
Which software application the customer is using (name, version, etc.).
Is the problem reproducible by you?
Additional comments about the usage, the setting, etc..
Have you performed a Service Test on the Failed
Component/Assembly?
If possible, always perform a Service Test on the component/assembly that
you are about to replace, just to make sure that is the component/assembly
that has failed. If the test on that component/assembly passes, you
should NOT replace it. For information on the Service Tests and how to
use them ' Chapter 4.
Have you Performed the Accuracy Calibration?
Is the printer calibrated correctly after replacing a component? Refer to
Chapter 5 to check when the Accuracy Calibration is required.
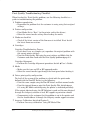
What can I do to Solve PrintĆQuality Problems?
Whenever an PrintĆQuality problem appears, it is advisable to print the
PrintĆQuality Plot to help diagnose the problem. The PrintĆQuality Print will
help you differentiate between possible Cartridge errors and other problems
such as incorrect frontĆpanel selection, driver or RIP configuration or
mechanical problems. For information on solving PrintĆQuality problems '
Chapter 6.
Troubleshooting
HP DesignJet 430, 450C and 455CA Printers
1-3
What can I do if the Line Sensor has Problems Detecting Media?
1 Excessive ink deposits on the driveĆroller surface can fool the sensor by
reflecting the light. Clean the driveĆroller Chapter 9.
2 Line sensor incorrectly calibrated: The accuracy calibration includes
calibration of the line sensor on the carriage. You must use HP Matte film
when performing the accuracy calibration (Details Chapter 5).
Otherwise the line sensor will have problems loading some types of media.
3 The Line Sensor is faulty. Replace the Carriage Assembly page 8Ć37.
What can I do if the Carriage is Noisy?
1 Dirty Carriage bushings. Remove dust particles from the Carriage
bushings and from the slider rod along which the Carriage moves. If
necessary, apply lubricant to the slider rod.
2 Make sure that the belt is correctly positioned on the YĆaxis motor.
3 Remove dust particles from the Back Beam and, if necessary, apply grease.
4 Check for a faulty Carriage. Perform the Carriage Axis Test page 4Ć10.
What can I do if the Cover Sensor isn't Working?
1 Before troubleshooting, make sure that you are not in Service Mode 1
because the Cover sensor is disabled and Printer will think that the cover
is always closed. Power OFF the Printer and switch it back ON again and
check if the Cover sensor works.
2 Check if the cable for the frontĆpanel assembly is connected correctly to
the electronics module.
3 Replace the frontĆpanel assembly page 8Ć12.
What can I do if the Carriage Assembly has problems parking in the
Service Station?
1 Mispositioned trailing cable: The trailing cable may be preventing the
carriage from reaching the leftĆhand stop. Make sure that the trailing
cable is positioned under the plastic tabs at the back of the carriage cover,
and not above them.
2 The Carriage is not at the correct height. Check and, if necessary, adjust
the Carriage height (Details chapter 5).
3 The Belt is not correctly positioned over the idler pulley.
4 Check for a faulty bail lever mechanism because the Carriage may have
trouble passing over it.
1-4
HP DesignJet 430, 450C and 455CA Printers
Troubleshooting
What can I do if the Printer continuously rejects Cartridges?
If you are in Service Mode 1, the cover sensor is disabled. In order to test a
new Cartridge set, the Printer must be powered OF and and ON again.
1 Remove tape and align cartridges: One frequent cause of cartridge
problems is that the user has forgotten to remove the tape from new
cartridges. Remove the tape.
2 Dirty pads: The connection between the carriage PCA and the cartridge
flex connector is made by means of a gold bubble on the flex connector
that touches a gold pad on the PCA. The Carriage Test (details page
4Ć12) includes a test of this connection. When nozzle failures occur, clean
the flex contacts on the cartridge and in the Carriage.
3 Continuity Problem: Remove all the cartridges from the Carriage and
try installing just the rejected cartridge. If the cartridge is still rejected
then replace the cartridge with a new one. If the new cartridge is not
rejected then check, one by one, if the other cartridges are rejected or not.
4 Faulty cartridge: Some black cartridges (51640A) with USE BEFORE
dates of April '96 and earlier may have thinĆfilm damage. This means
that the material used for channeling ink behind the nozzles can crack
with aging. When this happens, ink seepage may cause many nozzles to
fail (eight or more). Replace the black cartridge with one with USE
BEFORE date of May '96 or later.
5 If the Cartridges are not inserted correctly into the Carriage, the
Cartridges will be rejected. Make sure that the springs that hold the
Cartridges in the Carriage are not broken or misplaced.
6 Perform the Carriage Test page 4Ć12.
7 Replace the Trailing Cable page 8Ć8.
8 Replace the Carriage Assembly page 8Ć37.
Troubleshooting
HP DesignJet 430, 450C and 455CA Printers
1-5
What can I do if the Media continuously crashes?
1 Check if the media loaded is HP approved. If the media is not HP
approved, advise the customer to use HP media and check to see if the
problem is now solved.
2 AntiĆstatic brush: If this brush (located under the entry platen) is
damaged or removed, static charge can build up on the media. A charge
can cause the media to stick to itself and jam the Printer.
3 The Carriage is at the incorrect height in relation to the Drive Roller.
Check and if necessary adjust the carriageĆtoĆmedia distance page 5Ć5
and try to load the media again.
4 The Drive Roller is installed incorrectly. Remove the Drive Roller and install
in the correct position page 8Ć44 and try to load the media again.
5 The overdrive wheels turn free in both directions, creating bubbles in the
media. Make sure that the Clutch assembly is installed correctly and is
not faulty.
6 Missing or damaged starwheels. Make sure that all the starwheels on
the bail assembly are correctly installed and turn properly.
7 Missing Media Deflectors. Make sure that all the Media deflectors are
installed on the Printer, otherwise there could be media crashes.
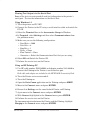
What can I do if the Printer does not Power ON?
1 Check that the power cord is connected correctly.
2 Check that the ROM SIMM (firmware) is installed correctly in the correct
slot (the slot furthest from you) at the back of the Printer.
3 Try to disconnect all the cables, apart from the Front Panel Cable, from the
Electronics Module and then try to power ON the Printer again. If nothing
appears on the frontĆpanel display, then replace the Electronics Module page 8Ć13. If the Printer does Power On with the cables disconnected, then
the problem must be with another component of the Printer. To find the
faulty component, power OFF the Printer and connect one of the cables and
power ON again. Once the faulty component is connected, it will not allow
the Printer to power ON. This component should then be replaced.
1-6
HP DesignJet 430, 450C and 455CA Printers
Troubleshooting
What can I do if the Printer has problems with Media Loading?
1 Check that the Media Sensor is installed correctly.
2 Check if the cable for the Media Sensor is connected correctly.
3 Check if the Pincharms are down (the Pincharm lever should be up).
4 If the media is continuously rejected during the media edge check, then
make sure that the Line Sensor is installed correctly. If necessary, perform
the Carriage Test ' page 4Ć12.
5 Make sure the line sensor is calibrated. Perform the Accuracy Calibration
' page 5Ć2.
6 Replace the Media Sensor (part of the overdrive assembly) ' page 8Ć50.
7 Replace the Carriage Assembly ' page 8Ć37.
Only replace one component at a time and check if the problem
has been solved before replacing another component. Using
this procedure you will be able to determine exactly which
component failed.
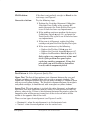
What can I do if the Printer has problems with the Cutter?
1 If the Carriage Assembly has problems picking up the Cutter:
D
D
Check that the cable for the FrontĆPanel Assembly is is not loose and is
routed correctly in the cover clips. A loose cable can be trapped by the
Cutter, preventing the Cutter from moving.
Make sure that the Spittoon Assembly is correctly installed and is
aligned with the Overdrive Assembly. If the Spittoon is loose or
mispositioned, the cutter will have problems parking in the right cover.
2 If the media crashes when moving the Cutter:
D
D
D
Make sure that there is no media trapped inside the Cutter
mechanism. Remove the Cutter to inspect it correctly.
Remove the Cutter and make sure that both rotary blades are touching
each other by the flat sides and not the sloping sides. If the rotary blades
are touching each other by the sloping sides, you must reseat them.
If the Printer is placed on a table, it must be placed as close to the edge
as possible to make sure that the media that is coming out falls
correctly. If the Printer is in the middle of the table, the media that is
coming out will be lifted up causing the cutter to crash into it.
Troubleshooting
HP DesignJet 430, 450C and 455CA Printers
1-7
What can I do if the Bail Mechanism Fails?
1 Obstructions: Check that there are no obstructions in the way of the
Bail Assembly.
2 Wearing of parts: The cam gear and engaging gear may not make
correct contact with the left driveĆroller gear even though the carriage is
actuating the engaging lever. This can happen due to excessive wearing of
parts. Another problem may be that the bail cable has broken.
3 Carriage motor control: The carriage may not properly locate the
engagement lever, preventing the gears from engaging. Any problems
with the carriageĆmotor control system (for example, the encoder strip) or
associated mechanics could cause this problem. Also, if the carriage
cannot find the true left stop during initialization (caused by
interference), the engaging lever cannot be located.
4 Bail cam: The bail may fall from the up position. This can happen if the
cam is over or underĆrotated. The notch on the cam, used to engage the
left bail bracket, is not properly located for the bail up" condition, and
the bail falls abruptly. Perform a bail cycle test.
5 Adjust carriage: If the carriage moves over the engaging lever without
raising it, you may need to adjust the carriage angle on the slider rod.
(Details ' page 5Ć5.) However, be careful not to jeopardize the print
quality, which is very sensitive to the carriage angle.
EEROM Errors
What is an EEROM error?
An EEROM error means that some of the internal tests that the firmware
performs have detected that, when reĆreading information from the EEROM,
it doesn't correspond to the information that had previously been written
there, or that the checksum of all the information is incorrect. This failure
has five possible causes:
D
D
D
D
D
Faulty electronics module.
Contact problems with the trailingĆcable connections.
Faulty trailing cable.
Faulty carriage.
The Printer was turned off while a test was writing to the EEROM, thus
leaving corrupt information (or a communication cable was disconnected
while sending information to the EEROM using software diagnostic tools).
It is generally not easy to discover the cause, due to the intermittent character of
the failure modes.
1-8
HP DesignJet 430, 450C and 455CA Printers
Troubleshooting
If you are sure that the failure occurred just after an electricity powerĆcut, or
after turning off the Printer during the bench run or other service tests, then
the Printer is not faulty. You just need to reset the EEROM. In other cases,
you need to find the cause:
There is always an EEROM error when you switch on the Printer:
D If it is easy to reproduce a error, then try one or all of the
following steps for a possible solution:
Configure the EEROM with the correct model ID (instructions ' page 4Ć27).
D
If you cannot configure the EEROM with the correct model ID after
several attempts and you continue getting the same error code, replace
the electronics module ' page 8Ć13.
There is sometimes an EEROM error when you switch on the Printer
(normally shows up as a error):
Switch on the Printer, allow it to initialize until it has completed the
powerĆon LED sequence, and switch off the Printer. (You are now sure
that the EEROM has not been corrupted. If a error appeared,
it also corrects the EEROM contents, and the next time you switch the
Printer ON, the error should not occur in good units.)
D
Leave the unit off for 15 minutes to detect if the EEROM is losing its
information. Then turn it on again and allow it to initialize. If a error appears during the initialization sequence, and the carriage does
not begin to move, then the EEROM is probably faulty. Replace the
electronics module.
Troubleshooting
HP DesignJet 430, 450C and 455CA Printers
1-9
HP DesignJet 430, 450C and 455CA Printers
2-1
System Error Codes
If you have an error code which is not documented in this Service Manual or
you have an error which you cannot resolve, then report the error to the HP
Response Center or the nearest HP Support Office. When reporting the error,
have the following information ready:
Model and Serial Number of the printer.
Which firmware revision the printer is using.
The complete error number.
The Service Print ( ).
The Current configuration sheet.
Which software application the customer is using (name, version, etc.).
Is the problem reproducible by you?
Additional comments about the usage, the setting, etc..
Before spending time troubleshooting the problem by doing the various tests
or replacing parts (which may not need replacing), check which firmware
revision the printer is using or check if a service note deals with this
particular problem. Some problems which occurred in earlier firmware
releases may have been solved in later revisions. So if there is a new firmware
revision then update the ROM SIMM before replacing any parts. Refer to
Chapter 7 for the part number of the ROM SIMM.
2-2
HP DesignJet 430, 450C and 455CA Printers
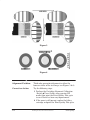
System Error Codes
1
2
SETUP
STATUS
GROUP
A
B
C
D
E
F
3
FORM FEED
REPRINT
ERROR
GROUP
READY
ALIGN MEDIA
LOAD MEDIA
G
H
I
J
FAST
NORMAL
BEST
LED Symbols:
FILM
Flashing
CARTRIDGES
DATA
MEDIA
ROLL
SHEET
GLOSSY
6
7
MEDIA TYPE
MEDIA SOURCE
LEDĆCode Examples:
Off
D
K
E
L
M
F
K
L
M
COATED
LED Letters:
On (Steady)
CANCEL
N
O
PAPER
5
PRINT QUALITY
4
A
G
N
B
H
O
C
I
Flashing KLM LEDs K, L and M are flashing.
Steady DEL
LEDs D, E and L are on.
J
System Error codes
The following pages contain the possible error codes and the instructions
necessary to solve the problem.
System Error Codes
HP DesignJet 430, 450C and 455CA Printers
2-3
Error Codes for the HP DesignJet 430, 450C and 455CA Printers
D
K
E
L
M
F
A
G
N
B
H
O
C
I
J
Steady KLM
D
K
E
L
M
F
A
G
N
B
H
O
C
I
J
Flashing KLM
An error which the customer could probably solve, like a
paper jam, minor cartridge problem etc. In order to get more
information on the error, the CANCEL key must be pressed
which will display a Subcode. Use the error codes below to
find information on the subcode.
Cartridges + Data + Media:
This error code indicates a severe problem which will require
a Service Engineer to troubleshoot. In order to get more
information on the error, the CANCEL key must be pressed
which will display a Subcode. Use the error codes below to
find information on the subcode.
D
K
Ready + Cartridges: The RAM SIMM test failed.
E
L
M
Possible causes:
F
A
G
N
B
H
O
C
I
J
Steady DK
RAM SIMM installed is not an original HP supported part.
RAM SIMM badly connected.
Faulty RAM SIMM.
Faulty electronics module.
D
K
Ready + Data: Cartridge Continuity Test Failure.
E
L
M
Possible causes:
F
A
G
N
B
H
O
C
I
J
Steady DL
2-4
Cartridges + Data + Media:
Cartridges faulty or badly seated.
Faulty or badly connected trailing cable.
Dirty carriage flex circuit.
Faulty carriage.
Faulty electronics module.
HP DesignJet 430, 450C and 455CA Printers
System Error Codes
D
K
Ready + Media: XĆaxis Shutdown.
E
L
M
Possible causes:
F
A
G
N
B
H
O
C
I
J
Steady DM
D
K
E
L
M
F
A
G
N
B
H
O
C
I
J
Steady DEFK
Obstacle or friction in XĆaxis.
Faulty or badly connected XĆaxis Encoder Cable.
Faulty media motor, or motor cable pinched.
Faulty electronics module.
Ready + Align Media + Load Media + Cartridges:
Memory or Accuracy Calibration Problems.
Possible causes:
Not enough memory for the current plot. Add extra
memory by installing a bigger RAM SIMM. Refer to
Chapter 7 for the correct part numbers of the RAM
SIMMs.
If this error code appeared while performing the Accuracy
Calibration:
Check that the quality of the Accuracy Calibration print
is good. If the quality is bad, try to clean the black
cartridge or replace it.
Make sure that you load the Accuracy Calibration print in
the correct position and orientation, and make sure that
you select the correct media type.
Make sure that the line sensor on the carriage is clean. If
the Line sensor is dirty or not functioning correctly, it will
have problems reading the accuracy calibration print.
Faulty Trailing Cable.
Faulty Carriage Assembly.
Faulty Electronics Module.
D
K
Ready + Load Media + Cartridges: Mechanical Problem.
E
L
M
Possible causes:
F
A
G
N
B
H
O
C
I
J
Check the Bail Assembly.
Check the Capping Position in the Service Station.
Steady DFK
System Error Codes
HP DesignJet 430, 450C and 455CA Printers
2-5
D
K
E
L
M
F
A
G
N
B
H
O
C
I
Error in
bailĆlift mechanism. The bailĆlift system is unable to raise or
lower the bail. (It is the carriage that tests to see whether the
bail is in the correct position by trying to knock against it.)
Possible causes:
J
D Check the bailĆlift system to see if it is working correctly.
D Use the bail cycle test to help troubleshoot.
D
K
Error in XĆaxis calibration.
E
L
M
Possible causes:
F
A
G
N
B
H
O
C
I
J
D
K
E
L
M
F
A
G
N
B
H
O
C
I
J
D
K
E
L
M
F
A
G
N
B
H
O
C
I
J
D Is XĆaxis calibration done? (details ' Chapter 5)
D Did you load media in correct orientation?
D Are the marks visible on the plot? If not, check cartridges.
D Are cartridges correctly aligned? If so, the problem may be
in the electronics module, media motor or driveĆroller gear; if
alignment is incorrect, the problem may be in the carriage.
Firmware has a problem interacting
with some of the characteristics of the print.
The Printer is using an old Firmware revision Ć Install the
latest firmware revision.
D If this error remains, report the problem to your HP
Response Center. Note conditions and actions before
error occurred. Include setup sheet and service
configuration plot in report.
This is a
generic System Error that covers about 600 error codes.
D Report the problem to your HP Response Center. Note
conditions and actions before error occurred. Include setup
sheet and service configuration plot in report.
2-6
HP DesignJet 430, 450C and 455CA Printers
System Error Codes
D
K
E
L
M
F
A
G
N
B
H
O
C
I
J
Steady DEL
D
K
E
L
M
F
A
G
N
B
H
O
C
I
Ready + Align Media + Data: Communication problem
with RSĆ232 (Serial Port).
Possible causes:
Incorrect configuration in communications speed/protocol.
Incorrect communications cable.
Error in host computer.
Ready + Load Media + Data: There is a communication
problem between the Main PCA and the internal
microprocessors.
The Main PCA is faulty Ć Replace the Electronics Module.
J
Steady DFL
D
K
Ready + Cartridges + Data: Mark Encoder not detected.
E
L
M
Possible causes:
F
A
G
N
B
H
O
C
I
J
Steady DKL
D
K
E
L
M
F
A
G
N
B
H
O
C
I
J
Steady EFL
System Error Codes
The line on the mark encoder is dirty or missing.
Faulty or badly connected trailing cable.
Faulty or badly connected carriage sensor.
Faulty or badly connected XĆaxis Encoder Cable.
The drive roller has shifted slightly from the expected
position (mechanics). Check that the carriage sensor lights
just over the white mark on the drive roller when starting.
Faulty carriage PCA.
Faulty XĆmotor.
Faulty YĆmotor.
Faulty electronics module.
Align Media + Load Media + Data: Error reading
Centronics I/O
Problems in the Centronics Communications. Probably due
to the bad contacts of the connector.
If this error remains, report the problem to your HP
Response Center. Note conditions and actions before
error occurred. Include setup sheet and service
configuration plot in report.
HP DesignJet 430, 450C and 455CA Printers
2-7
D
K
E
L
M
F
A
G
N
B
H
O
C
I
J
Steady FKL
D
K
E
L
M
F
A
G
N
B
H
O
C
I
J
Steady EKL
Load Media + Cartridges + Data: Problems when
initializing the carriage.
Possible causes:
D
D
D
D
Carriage assembly is not present.
Faulty or badly connected trailing cable.
Faulty carriage PCA.
Faulty electronics module.
Align Media + Cartridges + Data: Model ID not
configured.
D After replacing a new electronics module, it must be
configured either as a DesignJet 430, 450C or 455CA. If a
new module does not show this error, it means that it has
been installed previously and was probably calibrated with
other parameters. After configuring the module Error
code Steady DLM will appear which means the accuracy
calibration must be done. After the accuracy calibration is
done, all other calibrations must be done. If configuring
the module does not remove the error, even after
switching the Printer OFF and ON, then the EEROM in
the main PCA is probably defective. Before trying to
replace the electronics module try clearing the EEROM
and perform all the calibrations again and see if that
solves the problem.
Refer to page 4Ć27 in order to configure the correct model ID.
For more information ' page 1Ć8.
D
K
Align Media + Cartridges: EEROM test error.
E
L
M
Possible causes:
F
A
G
N
B
H
O
C
I
J
Steady EK
2-8
D Switch the Printer OFF and ON again and see if the error
remains. If the error appears continuously, replace the
Electronics Module.
D The Calibrations in the EEROM have been lost.
Perform the Accuracy Calibration (refer to Chapter 5).
HP DesignJet 430, 450C and 455CA Printers
System Error Codes
D
K
Load Media + Cartridges: Electronics Module Failure.
E
L
M
Possible causes:
F
A
G
N
B
H
O
C
I
J
Steady FK
D
D
D
D
Fan faulty or badly connected.
Faulty ROM SIMM.
Faulty RAM SIMM.
Faulty Electronics Module.
D
K
Align Media + Media: YĆaxis Shutdown.
E
L
M
Possible causes:
F
A
G
N
B
H
O
C
I
J
Steady EM
D Problems with the Cutter Assembly.
D Clear any binding due to a media jam.
D Turn the Printer off. Manually move the carriage along
the carriage axis. Check for any areas where the carriage
may be binding.
D Ensure that the belt and belt pulley are in correct
working order. Remove dirt from the pulley that could
cause the belt to slip.
D Perform the carriageĆaxis test and the servo/encoder test
to check for problems with the carriage motor, encoder
strip, and electronics module.
D Remove dirt from the slider rod and chassis beam. Apply
oil (Anderol 4068, HP part number: 6040Ć0858) to the
carriage bushings.
D At high temperatures, and if the fan is not working
correctly, the internal resistance of the motor driver may
increase, causing a decrease in the voltage between the
motor contacts, and a shutdown of the motor.
D Ensure that the encoder strip is not inverted, damaged or
absent.
D Reconnect or replace the trailing cable ' page 8Ć8.
D Replace the carriage assembly ' page 8Ć37.
D
K
Ready + Align Media + Media: YĆaxis Movement Error.
E
L
M
Possible causes:
F
A
G
N
B
H
O
C
I
J
Steady DEM
System Error Codes
D Something is causing excessive friction in the YĆaxis
(carriage axis).
D The carriage touches the bail as it moves.
HP DesignJet 430, 450C and 455CA Printers
2-9
D
K
E
L
M
F
A
G
N
B
H
O
C
I
J
D
K
E
L
M
F
A
G
N
B
H
O
C
I
J
Possible causes:
D
D
D
D
Incorrect routing of the motor cables.
Electrical noise in motors.
Faulty motor encoder.
Motor received an electrostatic discharge while operating.
Error in YĆaxis
encoder quadrature.
Possible causes:
D
D
D
D
D
D
Damaged or broken encoder strip.
Faulty or badly connected trailing cable.
Incorrect routing of the motor cables.
Electrical noise in motors.
Faulty motor encoder.
Trailing Cable received an electrostatic discharge while
the Printer was operating. Replace the Trailing Cable
' page 8Ć8.
D
K
Cartridge Alignment Error.
E
L
M
Possible causes:
F
A
G
N
B
H
O
C
I
J
2-10
Error in XĆaxis encoder
quadrature.
D
D
D
D
D
Faulty Cartridges.
Dirty or incorrect media.
Faulty Line Sensor.
Faulty Carriage Assembly.
Faulty Electronics Module.
HP DesignJet 430, 450C and 455CA Printers
System Error Codes
HP DesignJet 430, 450C and 455CA Printers
3-1
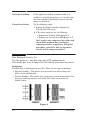
The lights on the front panel provide the means for your dayĆtoĆday
communication" with the printer. They tell you the printer's current status
and, if there is an error, the nature of the error. In order to understand the
meaning of each combination of lights, you should check the table in this
chapter to help you to understand the meaning. You will therefore find this
table useful in troubleshooting.
Key to table
starting below
This graphic ...
means ...
The fifteen lights on the printer’s front
panel. The sequence of explanations in
the table is:
1:
Status
group
3:
Print
quality
group
2:
Error
group
4:
Media
type
group
5:
Media
source
group
This light is ON and STEADY.
This light is ON and FLASHING.
This light is OFF or this is the relevant
light.
The state of this light is not relevant.
Explanation and Action
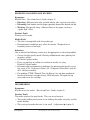
Lights
No lights
3-2
All lights off
If no lights are on, you may have a power
problem, or the printer may be switched
off.
HP DesignJet 430, 450C and 455CA Printers
User Messages
Explanation and Action
Lights
Status group
READY light off
The printer is not ready to print.
Check the state of the other lights and
look them up in this table.
The printer is ready to print.
READY
Send your print from your computer or,
for a special internal print, press the
appropriate key combination.
READY
PAPER
ALIGN MEDIA
The printer is busy with a task or is
receiving a file.
Wait.
If combined with one of the four media
type group lights flashing. The printer is
waiting for the media to dry. This can be
terminated by pressing Form Feed.
You are loading media and need to
realign it, even if it seems perfectly
aligned.
Lower the media lever, realign the media,
and raise the media lever.
The printer is ready, but you need to load
media.
LOAD MEDIA
When you are ready to print, load media.
The printer has a file in memory, which it
is waiting to print, but no media is loaded.
LOAD MEDIA
Load media.
User Messages
HP DesignJet 430, 450C and 455CA Printers
3-3
Explanation and Action
Lights
Either: one of the color or black print
cartridges is faulty, misplaced or missing.
CARTRIDGES
Error Group
Or: you have loaded a print cartridge of
the wrong type for this printer.
For the correct part numbers of the
cartridges supported by this printer, see
Chapter 7.
DATA
Either: the current print is too large for
the printer’s memory.
Look on your computer screen for any
error message: some drivers, for
example the Microsoft Windows driver
supplied with your printer, allow you to
choose a different printing mode and try
to send the file again. In the case of the
Microsoft Windows 95 driver shipped
with the printer, the relevant field is called
“Process document” in the Options dialog
box.
Otherwise, you may need to install more
memory to print this print. For
information on available memory
expansion modules, see Chapter 7.
Or: there is a problem with the serial
interface.
The printer’s settings for baud rate and
parity must be the same as those of the
computer sending the data.
MEDIA
Either: the sheet you loaded is
misaligned.
Realign it again. See the Users Guide
for a short tutorial on loading media.
Or: it is an invalid size.
For supported media sizes, refer to the
Users Guide.
Or: the media lever is lowered.
Raise the lever.
Or: the cover is open when the printer is
initializing.
Lower the cover.
3-4
HP DesignJet 430, 450C and 455CA Printers
User Messages
HP DesignJet 430, 450C and 455CA Printers
4-1
"(&#)(#"
' $(& ,$ "' #+ (# )' ( ) (/" &* '(' "#'(' "
+( (# # ( ('(' $#'' +-' $&#&! &* '( #" (
#!$#""( (( -#) & #)( (# &$ )'( (# ! ')& (( ' (
#!$#""( (( ' ( ('( #" (( #!$#""( $''' (& ' "#
" (# &$ (
#+&/"
&"(&' )(#!( - $&#&! '&' # "(&" ' ('(' " !"
"( .(#" '%)"' +"*& ( )'& '+(' ( &"(& #" )&
#)&' " &&#& ' "( #" ( &#"(/$" ' #) " $&#&! )&
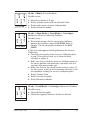
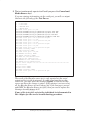
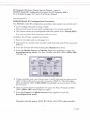
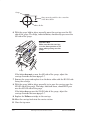
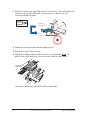
" -'' - "(&$&(" ( &&#& # ( ' $(& Self Test and Normal Initialization
$#+&/#" ' ('( " "( .(#" $&#)& #' ( # #+"
1 "( .' ( '&*# $&#''#&
2 "( .' ( !" $&#''#&
3 '(' #!!)"(#" (+" ( !" $&#''#& " ( '&*# $&#''#&
4 '(' ( ')!
5 '(' ( '&*#/$&#''#& (&"'& )& " "(&&)$( (&"
6 '(' ( ')!
7 )'' ( !" $&#''#& (# "( . &(" &!+& !#) '
8 &#&!' ')'( # ( (& '&* ('(
9 ' ( #*& '"'#&
If the cover is open, nothing further happens until you close it.
10 "( .' ( && ,' /,'
11 '' ( !& "#& (# ( '(&( # ( &* &# &
12 (' "- # '(
Does not eject roll media if loaded.
13 ' ( ! '"'#&
14 (' ( &"(& (# $( !
4-2
HP DesignJet 430, 450C and 455CA Printers
Service Tests
Assembly/Feature
Tested by ...
Bail system
Bail cycle test, Bench run, Modular Test
Carriage
Carriage test, Electrical test, Modular test
Carriage motor and drive system (including belt,
pulley and slider rod)
Carriage-axis test, Bail cycle test, Modular test,
Bench run
Cartridge identification
Carriage test, Modular test
Cartridge nozzles
Carriage test, Modular test
Communication between computer and Printer
Service monitor
Cover sensor
Sensors test, Modular test
DRAM SIMM
Electrical test, Power-on tests, Bench run
EEROM
Electrical test, Power-on tests, Bench run
Electronics module
Electrical test, Power-on tests, Servo/Encoder test,
Sensors test, Bail cycle test, Front-panel test,
Media-axis test, Carriage test, Carriage-axis test,
Bench run, Modular test
Encoder strip
Carriage-axis test, Servo/Encoder test,
Modular test, Bench run
Front-panel keys and LEDs
Front-panel test, Modular test
Media-axis encoder and cable
Servo/Encoder test, Media-axis test, Modular test,
Bench run
Media motor and drive system (including drive
roller and overdrive)
Media-axis test, Modular test, Bench run
Media sensor
Sensors test, Modular test
Pinch-arm sensor
Sensors test, Modular test
Optical sensor (on carriage)
Carriage test, Modular test
ROM
Electrical test, Power-on tests, Bench run
Service station
Bail cycle test
Trailing cable
Electrical test, Power-on tests, Bench run
Service Tests
HP DesignJet 430, 450C and 455CA Printers
4-3
#.2'!# #/0/ '%+,/0'!/
&# $,)),3'+% '/ )'/0 ,$ )) '+0#.+) /#.2'!# 0#/0/ 2') )# '+ 0&# .'+0#./
+/0.1!0',+/ $,. #+0#.'+% /#.2'!# *,"# .# %'2#+ ,+ -%# 6 +/0.1!0',+/
$,. #+0#.'+% /#.2'!# *,"# .# %'2#+ ,+ -%# 6
') 5!)# #/0 ' -%# 6
&'/ 0#/0/ 0&# ,-#.0',+ ,$ 0&# ') /5/0#* #.2'!# 00',+ +" 0&# 64'/
5 #+%%'+% +" "'/#+%%'+% 0&# ')6)'$0 *#!&+'/* +"
!--'+%1+!--'+% 0&# !.0.'"%#/ 0, #+/1.# !,..#!0 )'$0'+% !0',+
.,+0 +#) #/0 ' -%# 6
&# -1.-,/# ,$ 0&'/ 0#/0 '/ 0, 2#.'$5 0&# ,-#.0',+ ,$ 0&# $.,+06-+#) (#5/
+" /
..'%# 4'/ 64'/ #/0 ' -%# 6
&# -1.-,/# ,$ 0&'/ 0#/0 '/ 0, 2#.'$5 0&# ,-#.0',+ ,$ 0&# !,*-,+#+0/ ,$ 0&#
..'%# 4'/
..'%# #/0 ' -%# 6
&# -1.-,/# ,$ 0&'/ 0#/0 '/ 0, 2#.'$5 0&# ,-#.0',+ ,$ 0&# ..'%#
/1 /5/0#*/ )'(# 0&# '+# #+/,. +" +),% *1)0'-)#4#. &'/ 0#/0 )/,
!&#!(/ 0&# !,++#!0',+ #03##+ 0&# !..'%# $)#4 !'.!1'0 +" 0&# !.0.'"%#/
#+/,./ #/0 ' -%# 6
&'/ 0#/0/ 0&# ,-#.0',+ ,$ 0&# !,2#. /#+/,. -'+!&.* /#+/,. +" *#"'
/#+/,.
#"'64'/ 64'/ #/0 ' -%# 6
&# -1.-,/# ,$ 0&'/ 0#/0 '/ 0, 2#.'$5 0&# ,-#.0',+ ,$ 0&# !,*-,+#+0/ ,$ 0&#
#"' 4'/
#+!& 1+ ' -%# 6
&'/ 0#/0 &/ ##+ "#/'%+#" 0, # 1/#" "1.'+% 0&# *+1$!01.'+% /0%# +"
+,0 '+ 0&# $'#)" ", +,0 0 +50'*# #+0#. 0&'/ 0#/0 3&#+ 0.,1 )#/&,,0'+% 0&#
.'+0#.
,"1). #/0 ' -%# 6
&'/ 0#/0 &/ ##+ !.#0#" 0, !&#!( 0&# '+0#.!0',+ #03##+ 2.',1/
!,*-,+#+0/ ,$ 0&# .'+0#. 0 !,* '+#/ 0&# $,)),3'+% 0#/0/
D
D
D
D
D
4-4
..'%#64'/ 0#/0
..'%# 0#/0
#"'64'/ 0#/0
.,+06-+#) 0#/0
#+/,./ 0#/0
HP DesignJet 430, 450C and 455CA Printers
Service Tests
,&$31/.*$2 &23 ' 0"(& 9
)& 0410/2& /' 3)*2 3&23 *2 3/ 5&1*'8 3)& /0&1"3*/. /' 3)& /,4-.
"%%1&22 ".% 3)& 2)4'',&1
"*, &23 ' 0"(& 9
)*2 3&232 3)& /0&1"3*/. /' 3)& #"*, 2823&- &15*$& 3"3*/. ".% 3)& !9"7*2
#8 &.("(*.( ".% %*2&.("(*.( 3)& #"*,9,*'3 -&$)".*2- ".%
$"00*.(4.$"00*.( 3)& $"131*%(&2
,&$31*$", &23 ' 0"(& 9
)*2 3&232 3)& /0&1"3*/. /' 2/-& /' 3)& &,&$31*$", $/-0/.&.32 /' 3)&
&,&$31/.*$2 -/%4,&
&15/.$/%&1 &23 ' 0"(& 9
)& 2&15/&.$/%&1 3&23 0&1'/1-2 3)& '/,,/6*.(
D
D
D
&%*"9"7*2 &.$/%&1 3&23 &1*'*&2 3)& /0&1"3*/. /' 3)& 2&15/ ,//0
-&%*"9"7*2 '&&%#"$+
"11*"(&9"7*2 &.$/%&1 3&23 &1*'*&2 3)& /0&1"3*/. /' 3)& 2&15/ ,//0
$"11*"(&9"7*2 '&&%#"$+
&$/1%2 3)& -"7*-4- '1*$3*/. %&3&$3&% *. 3)& !/4 $". 5*&6
3)*2 *.'/1-"3*/. /. 3)& 2&15*$& $/.'*(41"3*/. 0,/3
&15*$& /.*3/1 ' 0"(& 9
)& 2&15*$& -/.*3/1 *2 42&'4, 3/ '*.% /43 6)8 3)& 1*.3&1 *2 ./3 0,/33*.(
6)"3 8/4 &70&$3 *3 3/ 0,/3 3 &."#,&2 8/4 3/ 1&"% 3)& (1"0)*$29,".(4"(&
*.2314$3*/.2 3)"3 3)& 1*.3&1 *2 1&$&*5*.( '1/- 3)& $/-043&1 .23&"% /'
0,/33*.( 3)& %1"6*.( 3)"3 8/4 2&.% 3)& 1*.3&1 01*.32 3)& #&(*..*.( ".%
&.% /' 3)& $/%& 3)"3 6/4,% /3)&16*2& )"5& #&&. 42&% 3/ 0,/3 3)& %1"6*.(
/%&, /.'*(41"3*/. 1/$&%41& ' 0"(& 9
)*2 01/$&%41& *2 .&$&22"18 *' 3)& 1*.3&1 .&&%2 3/ #& 1&$/.'*(41&% "2 "
&2*(.&3 /1 &15*$& /.'*(41"3*/. ,/3 ' 0"(& 9
*5&2 " 2&15*$& 1&0/13 /' 3)& 1*.3&1
,&"1*.( 3)& ' 0"(& 9
.2314$3*/.2 /. )/6 3/ $,&"1 3)& Service Tests
HP DesignJet 430, 450C and 455CA Printers
4-5
&* $ &* $ $#(#' ('(' (( do not # $"%!( #(!.($# $
( &#(& ' "#' (& ' '-'(" &&$& # #$&"! "$ ( ' '(!!
%$''! ($ #(& #($ &* $ !'$ ( #'$&' & '! #
&* $ + "#' ( +!! #$( %$''! ($ !$ " $#!(" (( ( '#'$&' +!! )#($#! ' )&# ( #'$&' '(
THE COVER SENSOR IS DISABLED WHEN IN SERVICE MODE 1. IF
THE CARRIAGE IS MOVING IT WILL NOT STOP IF THE COVER IS
OPENED. BE VERY CAREFUL NOT TO PUT YOUR HANDS INSIDE.
$" $ ( ('(' # '&* "$ 1 '# ('( #$&"($# ($ ( %&#(&'
'&! %$&( $ *+ ( #$&"($# %&$&" ( %&$)& $# % /
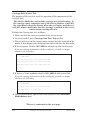
The Electronics Test is continuously done in the background during
Service Mode 1. If you are viewing information via the serial port, you
will see output similar to the following:
Test Mode EE test: 0
Test Mode EE test: 1
Stopping a Test
'&* ('(' & $#(#)$)'!- &%( )#(! -$) '($% (" $ ,( ('(
%&'' ( Cancel and Media Source -' '$" ('(' "- ( '$&( +!
$& ,(# $ ,( &* $ -$) ")'( %$+& ( &#(&
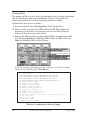
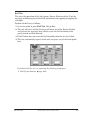
Entering Service Mode 1
1 ! $!# ( Reprint - $+# '+( ( &#(& 2 # ( ( ' # ($ !( )% $# - $# &!' ( Reprint -
The printer performs the electrical powerĆon tests and then the fan turns
on and remains on. All LEDs remain off for a few seconds. Then, all
LEDs begin to flash, waiting for you to perform a test.
If there are any system failures during Service Mode initialization,
the Sheet LED ( ) will be lit. This failure means that the
Electronics Module has failed and needs to be replaced.
%&#(
SERVICE MODE 1
4-6
+
HP DesignJet 430, 450C and 455CA Printers
Service Tests
Viewing Test Output via the Serial Port
-+$ -% 1'$ 1$010 (, 0$/3("$ +-#$ 1 0$,# 1$01 (,%-/+ 1(-, 1- 1'$ ./(,1$/0
0$/( * .-/1 - 3($4 1'$ (,%-/+ 1(-, 3( 1'$ $/( * -/1
Using Windows 3.1
1 2/, 1'$ ./(,1$/ ,# 2 -,,$"1 1'$ /(,1$/ 1- 1'$ 20(,&
0$/( * (,1$/% "$ " !*$ ,# 04(1"' 1'$
3 $*$"1 1'$ Terminal "-, (, 1'$ Accessories Group (, (,#-40
4 , Terminal 0$*$"1 Settings ,# 1'$, 0$*$"1 Communications %/-+
1'$ .2** #-4, +$,2
5 )$ 02/$ 5-2 20$ 1'$ %-**-4(,& "-,%(&2/ 1(-,
2# 1$ 1 (10 1-. (10 /(15 -,$
*-4 -,1/-* -,$
-,,$"1-/ $*$"1 1'$ -++2,(" 1(-,0 -/1 1' 1 5-2 /$ 20(,&
6 $*$"1 OK ,# 4(1"' 1'$ /(,1$/ 7 $/%-/+ 1'$ 0$/3("$ 1$010 -, 1'$ /(,1$/
Using an HP Palmtop PC
1 0$ " !*$ ,2+!$/ 6 ,# # .1$/ ,2+!$/ 6
1"-,,$"1 1'$ *+1-. 1- 1'$ /(,1$/0 0$/( * (,1$/% "$ .-/1
Both cable and adaptor are included in the HP F1021B Connectivity Pack.
2 2/, 1'$ /(,1$/ -, (, 0$/3("$ +-#$ 1
3 2/, 1'$ *+1-. -,
4 .$, 1'$ Data Comm ..*(" 1(-, -, 1'$ *+1-. ,# ./$00 MENU
5 -3$ 1- 1'$ Connect +$,2 ,# ./$00 ENTER
6 ,02/$ 1' 1 Settings /$ 1'$ 0 +$ %-/ !-1' /(,1$/ ,# *+1-.
7 & (, +-3$ 1- 1'$ Connect +$,2 ,# ./$00 ENTER.
8 (1' Connect '(&'*(&'1$# (, 1'$ Connect +$,2 ./$00 ENTER.
9 $/%-/+ 1'$ 0$/3("$ 1$010 -, 1'$ /(,1$/
- 01-. "-++2,(" 1(-, !$14$$, 1'$ /(,1$/ ,# 1'$ *+1-. '(&'*(&'1
Hangup (, 1'$ Connect +$,2 ,# ./$00 ENTER
Service Tests
HP DesignJet 430, 450C and 455CA Printers
4-7
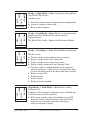
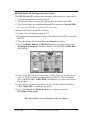
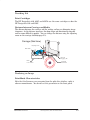
Bail Cycle Test
' ('(' ( $%&($# $ ( ! '-'(" &* (($# # ( .,' ## # '## ( !.!( "#'" # %%#)#%%# (
&(&'
('( +!! %&$&" ( #)"& $ -!' ' '% # ( )( ( ' !& (' ('( +!! #$( )#($#
This Test has been designed to be used during the manufacturing
stage and not in the field. If the Bail needs to be tested, please use
the Bail Test in Service Mode 2. If a system error prevents you from
entering into Service Mode 2, you may try this test instead.
&$&" ( ! -! ('( ' $!!$+'
1 # '&* "$ 1, %&'' Bail Cycle Test ()% -
2 ('( +!! '(&( # ( && +!! "$* $)( $ ( &* (($#
# (*( ( ## !*& + )'' ( ! ''"!- ($ #(!- &' # (# !$+&
3 ('( &%(' ( #)"& $ -!' ' # # ( )#!''
-$) %&'' ( Cancel and Media Source -'
4 ( ('( %''' ( '( LED C +!! !( )% (& ( &'( -!
5 (& ' ')($+# # ( .,' ( '( LED C +!! '(&( ($
!'
6 ( &#(& $' #$( &' ( ! ''"!- (# ( ('( ' !
If the bail fails the test, try replacing the following component:
BailĆlift mechanism page 8Ć28.
4-8
HP DesignJet 430, 450C and 455CA Printers
Service Tests
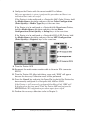
Front Panel Test
$! " #" #"# " # %!' # !# # !#( '" "
!! # !# #"# " &"
1 "!% 1 !"" Front Panel Test ! '
If you are viewing information via the serial port, you will see output
similar to the following:
1. - Front Panel Test
This message only informs you that the test has started, and a message
will appear if the test passes or fails.
2 #"# & "#!# # " & " ! "" #! &
#' & #$! ## " ! $# !!#'
& #' "
3 ## # !#( '" $# !!#' !"" # '
# ' " !"" # # LED I & #
4 ' " # $# # # LED I & ! 5 #"# #$$"' ! #" #" $# '$ !"" # Cancel and
Media Source '"
If the test fails, to resolve the problem, try one of the following:
Check that the cable for the Front Panel Assembly is connected to the
Electronics Module. Also make sure that the cable is NOT damaged or
twisted.
Replace the Front Panel Assembly page 8Ć12.
Replace the Electronics Module page 8Ć13.
Service Tests
HP DesignJet 430, 450C and 455CA Printers
4-9
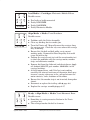
Carriage Axis (YĆaxis) Test
"&#"!$ ! %$ %$% $ %! '#* % !"#%! ! % !"! %$ ! %
## )$
This Service Mode does not include carriageĆaxis initialization. If
the carriage starts somewhere out of the Service Station, it will hit
the rightĆhand side of the Printer when the test begins, and the test
will fail. Always make sure that the carriage is parked in the service
station before starting this test.
#!# % ## )$ %$% $ !!($
1 $&# %% % ## $ "# % $#' $%%! 2 $#' ! 1 "#$$ CarriageĆAxis Test "# % *
3 %$% ( $%#% % ## !'$ %!(#$ % #%+ $ ! %
"# %# % % $ *$ ! !' #! $ %! $ !'# % #' #!#
4 % %$% "$$$ % $% LED A ( % &" %# % #$% *
2. - Y-AXIS TEST
Test Mode Y-axis cycle: 26.67 speed and 66 pwm
Test Mode Y-axis cycle 50.00 speed and 100 pwm
Test Mode Y-axis cycle: 26.67 speed and 68 pwm
5 %# $ +)$ $&%!( % $% LED A ( $%#% %! $
2. - Y-AXIS TEST
Test Mode Y-axis cycle: 26.67 speed and 0 pwm
Test Mode Error: 2 on y-axis test
6 %$% ! % &!&$* #"%$ %$ & % *!& "#$$ % Cancel and
Media Source *$
The test is continued on the next page.
4-10
HP DesignJet 430, 450C and 455CA Printers
Service Tests
!& #- ## ) ($ " "
)&# ( &#(& $ #)!!- "$* ( && !$# ( && ,'
$& #- &' +& ( && "- ##
#')& (( ( !( # !( %)!!- & # $&&( +$& # $&& "$*
&( &$" ( %)!!- (( $)! )' ( !( ($ '!%
"$* &( &$" ( '!& &$ # ''' " %%!- $! #&$!
%&( #)"& . ($ ( && )'#'
( ("%&()&' # ( # ' #$( +$& # $&&(!- ( #(&#!
&''(# $ ( "$($& &*& "- #&' )'# &' # (
*$!( (+# ( "$($& $#((' # ')($+# $ ( "$($&
#')& (( ( #$& '(&% ' #$( #*&( " $& '#(
$##( $& &%! ( (&!# ! % .
%! ( && ''"!- % .
Only replace one component at a time and perform the test
again before replacing another component. Using this procedure
you will be able to determine exactly which component failed.
Service Tests
HP DesignJet 430, 450C and 455CA Printers
4-11
"&#"!$ ! %$ %$% $ %! '#* % !"#%! ! % ## $&$*$%$
% $!# ! &%")# $ %$% $! $ %
! %! %( % ## ) #&% % #%#$
#!# % ## %$% $ !!($
$#' ! "#$$ # % &%* *
%$% ( $%#% % $ ( %&# # ( !
!' % % # %# *!& &$% (% !# % #! %+ %!
% % %$% $ "$$ !# # %! % !!( &# %! ( $ $$!% (% (
%$% % %$% % !!( $ ( % % %$%
% !!( $ ( $ 4. - Carriage Test
0x57c7c350 (carrPCBTest): Forcing use of R10X method for Calvin: 13643 1960
0x57c7c350 (carrPCBTest): Forcing use of R10X method for Yellow: 11361 1953
0x57c7c350 (carrPCBTest): Forcing use of R10X method for Cyan: 11361 1953
0x57c7c350 (carrPCBTest): Forcing use of R10X method for Magenta: 11361 1953
Pen BLACK continuity: WORKS
Pen CYAN continuity: WORKS
Pen MAGENTA continuity: WORKS
Pen YELLOW continuity: WORKS
Pen BLACK has 1cd4 identification.
Pen CYAN has 400 identification.
Pen MAGENTA has 1f00 identification.
Pen YELLOW has 1900 identification.
Optical sensor samples: 253 255 255 254 253 252 252 250 249 248 247
246 245 244 243 241
Optical Sensor: WORKS
Carriage MUX : WORKS
Pen BLACK continuity: WORKS ...........
4-12
HP DesignJet 430, 450C and 455CA Printers
Service Tests
If you are viewing information via the serial port, you will see output
similar to the following if the Test Fails:
4. - Carriage Test
0x57c7c350 (carrPCBTest): Forcing use of R10X method for Calvin: 13643 1960
0x57c7c350 (carrPCBTest): Forcing use of R10X method for Yellow: 12160 1899
0x57c7c350 (carrPCBTest): Forcing use of R10X method for Cyan: 12160 1899
0x57c7c350 (carrPCBTest): Forcing use of R10X method for Magenta: 12160 1899 Pen BLACK
continuity: FAILS
Pen CYAN continuity: FAILS
Pen MAGENTA continuity: FAILS
Pen YELLOW continuity: FAILS
Pen BLACK has 3ffe identification.
Pen CYAN has 3ffe identification.
Pen MAGENTA has 3ffe identification.
Pen YELLOW has 3ffe identification.
Optical sensor samples: 215 252 243 232 221 208 194 179 166 151 135
119 103 87 71 54
Optical Sensor: WORKS
Carriage MUX : FAILS
Pen BLACK continuity: FAILS ................
4 Cancel and
Media Source Cartridge Continuity Test Failure
If any cartridge Continuity test fails, to resolve the problem, try one of
the following:
1 Remove the failing Cartridge and clean the flex contacts on the
Carriage and the Cartridge. Reseat the Cartridge and try the test again.
2 Replace the Cartridge of the relevant failing color and perform this test
again.
3 Check and if necessary replace the Trailing Cable page 8Ć8.
4 Replace the Carriage Assembly page 8Ć37.
5 Replace the Electronics Module page 8Ć13.
Only replace one component at a time and perform the test
again before replacing another component. Using this procedure
you will be able to determine exactly which component failed.
The test is continued on the next page.
Service Tests
HP DesignJet 430, 450C and 455CA Printers
4-13
If the Line Sensor test fails, to resolve the problem, try one of the
following:
1 Line sensor incorrectly calibrated: The accuracy calibration
includes calibration of the line sensor on the carriage. You must use
HP Matte film when performing the accuracy calibration (Details Chapter 5). Otherwise the line sensor will have problems loading some
types of media.
2 Check and if necessary replace the Trailing Cable page 8Ć8.
3 Replace the Carriage Assembly page 8Ć37.
4 Replace the Electronics Module page 8Ć13.
Only replace one component at a time and perform the test
again before replacing another component. Using this procedure
you will be able to determine exactly which component failed.
If the Analog Multiplexer test fails, to resolve the problem, try one of the
following:
1 Check and if necessary replace the Trailing Cable page 8Ć8.
2 Replace the Carriage Assembly page 8Ć37.
3 Replace the Electronics Module page 8Ć13.
Only replace one component at a time and perform the test
again before replacing another component. Using this procedure
you will be able to determine exactly which component failed.
4-14
HP DesignJet 430, 450C and 455CA Printers
Service Tests
Sensors Test
% &%&% & "#$&"! " & "($ %!%"$ #!$
$"$
%!%"$ !
%!%"$
& !%"$% &%& % "")%
1 ! %$(
" 1 #$%% Sensors Test *# *
2 &(& & !%%$* %!%"$ ! && & $(!& %&&'%
!% $ &" & "")! '$ &" ) %
%%"& )& ) %!%"$
3 &%& "!&!'"'%* $#&% &% '!& *"' #$%% & Cancel and
Media Source *%
If you are viewing information via the serial port, you will see output
similar to the following:
5. - SENSORS TEST
This message only informs you that the test has started, and a message
will not appear if the test passes or fails.
If the test fails, to resolve the problem, try one of the following:
1 If the cover sensor fails, check that the frontĆpanel assembly is correctly
connected to the electronics module. Try replacing the frontĆpanel assembly.
2 If the Pincharm sensor fails, check that the sensor cable is correctly
connected to the electronics module. Try replacing the pincharm sensor.
3 If the Media sensor fails, check that the sensor cable is correctly
connected to the electronics module. Try replacing the overdrive assembly
(the media sensor is included as part of the overdrive assembly).
4 Replace the Electronics Module page 8Ć13.
Only replace one component at a time and perform the test
again before replacing another component. Using this procedure
you will be able to determine exactly which component failed.
Service Tests
HP DesignJet 430, 450C and 455CA Printers
4-15
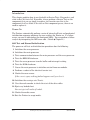
MediaĆAxis (XĆAxis) Test
# ! "! "!" ! " $ ' " " " "! "
&!
" (&! "!" ! %!
1 ! $ 1 !! MediaĆAxis Test #""
2 "!" % !" " " $ !%" $
""! !"! #$" "
3 " "!" !!! " !!' LED J % " # " " !" '
3. - X-AXIS TEST
Test Mode X-Axis Cycle: 92 pwm
Test Mode X-Axis Cycle: 65 pwm
Test Mode X-Axis Cycle: 66 pwm
4 " ! !#"% " !!' LED J % !" " " ! " "
!" '
3. - X-AXIS TEST
Test Mode X-Axis Cycle: 79 pwm
Test Mode X-Axis Cycle: 115 pwm
Test Mode X-Axis Cycle: 127 pwm
Test Mode Error: 1 on X-axis test
5 "!" "##!' "! "! #" '# !! " Cancel and
Media Source '!
4-16
HP DesignJet 430, 450C and 455CA Printers
Service Tests
If the test fails, to resolve the problem, try one of the following:
1 Switch OFF the Printer and manually moving the carriage along the
slider rod, check for obstacle or friction in the XĆaxis.
2 Check for a faulty or badly connected XĆaxis Encoder Cable.
3 Replace media motor page 8Ć23.
4 Replace electronics module page 8Ć13.
Only replace one component at a time and perform the test
again before replacing another component. Using this procedure
you will be able to determine exactly which component failed.
Service Tests
HP DesignJet 430, 450C and 455CA Printers
4-17
Bench Run
If the Printer is switched OFF during the Bench Run, the
Bench Run will be resumed at exactly the same point before the
Printer was switched OFF, until the Bench Run is completed.
THIS TEST HAS BEEN DESIGNED TO BE USED DURING
THE MANUFACTURING STAGE AND NOT IN THE FIELD.
DO NOT AT ANYTIME ENTER THIS TEST WHEN
TROUBLESHOOTING THE PRINTER.
1 Bench Run Media Source Form
Feed 1 you
must immediately EXIT the Bench Run by switching OFF the
Printer and powering ON again while pressing the Print Quality
and Media Source keys
4-18
HP DesignJet 430, 450C and 455CA Printers
Service Tests
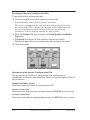
Modular Test
# $#$ # "$ $ $ $"$ $' &" %#
! $# $ "$" $ # $ ' $#$#
""*(# $#$
"" $#$
*(# $#$
" $*! $#$
# "# $#$
This Service Mode does not include carriageĆaxis initialization. If
the carriage starts somewhere out of the Service Station, it will hit
the rightĆhand side of the Printer when the test begins, and the test
will fail. Always make sure that the carriage is parked in the service
station before starting this test.
!"$ $ $#$ # $ $" !"$# $% ""##
" " $ %" $#$ # '#
1 #%" $$ $ "" # !" $ #"& #$$ 2 #"& 1 !"## Modular Test %" )
3 !"$" "#$ !" "# $ " $*! #$ $ # %)
!$ $ )# " !"## $ $%# '$ $ "#$ $ & $#$# !"
4 " $ $ ' %" $ ' # ## $ '$ '
$#$ $ $#$ passes $ ' # ' $ ON $ $#$
fails $ ' # ' #
The test is continued on the next page.
Service Tests
HP DesignJet 430, 450C and 455CA Printers
4-19
If you are viewing information via the serial port, you will see output
similar to the following if the Test Passes:
1. - FRONT PANEL TEST
2. - Y AXIS TEST
3. - X AXIS TEST
4. - CARRIAGE TEST
5. - SENSORS TEST
Test Mode X–axis cycle : 87 pwm.
0x57c7c350 (carrPCBTest): Forcing use of R10X method for Calvin: 13643 1960
0x57c7c350 (carrPCBTest): Forcing use of R10X method for Yellow: 11361 1953
0x57c7c350 (carrPCBTest): Forcing use of R10X method for Cyan: 11361 1953
0x57c7c350 (carrPCBTest): Forcing use of R10X method for Magenta: 11361 1953
Test Mode Y-axis cycle : 26.67 speed and 68 pwm.
Test Mode X-axis cycle : 67 pwm.
Test Mode Y-axis cycle : 50.00 speed and 100 pwm.
Test Mode X-axis cycle : 66 pwm.
Test Mode Y-axis cycle : 26.67 speed and 66 pwm.
Test Mode X-axis cycle : 65 pwm.
Test Mode Y-axis cycle : 50.00 speed and 98 pwm.
Pen BLACK continuity: WORKS
Pen CYAN continuity: WORKS
Test Mode X-axis cycle : 64 pwm.
Pen MAGENTA continuity: WORKS
Pen YELLOW continuity: WORKS
Pen BLACK has 1cd4 identification.
Pen CYAN has 400 identification.
Pen MAGENTA has 1f00 identification.
Pen YELLOW has 1900 identification.
Optical sensor samples: 255 255 255 255 255 254 254 253 253 252 252 251
251 250 250 249
Optical Sensor: WORKS
Encoder sensor: WORKS
Pen BLACK continuity: WORKS
Test Mode Y-axis cycle : 26.67 speed and 68 pwm
.............
The result of the Encoder sensor test is only reported via the serial
output and not via the frontĆpanel. In order to perform the encoder
sensor test, you must move the carriage slightly so that the encoder
sensor can detect the change in status. If the carriage is not moved at
all, the Encoder Sensor test will always fail. If the carriage is moved
and ONLY the Encoder Sensor test fails, then you need to replace the
Carriage Assembly page 8Ć37.
If any of the tests fail, refer to the individual test documented in
this chapter for the correct troubleshooting procedure.
4-20
HP DesignJet 430, 450C and 455CA Printers
Service Tests
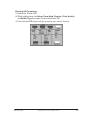
Electronics Test
#'$#"% " &% &%& % &" ($* & "#$&"! " & "' !
$%% ! & %'$
THIS TEST HAS BEEN FOUND TO BE VERY UNSTABLE DUE TO
SOME INTERACTIONS BETWEEN SOME OF THE COMPONENTS
OF THE ELECTRONICS MODULE. IT IS SOMETIMES IMPOSSIBLE
TO EXIT THIS TEST WITHOUT SWITCHING OFF THE PRINTER.
$"$
& &$"!% &%& % "")%
1 ! %$(
*%
" 1 #$%% Electronics Test "'$ ! #$!&
2 &%& ) %&$& ! & % ) &'$! $ ) !"
"( !& ! & $!&$ ! *"' '%& )& "$ & $"!&+! &"
!& & &%& % #%% "$ 3 & &%& #%%% & & LED O ) & '#
4 & &%& % & & LED O ) %&$& &" %
5 &%& "!&!'"'%* $#&% &% '!& *"' #$%% & Cancel and
Media Source *%
If the test fails, try replacing the following component:
Electronics Module page 8Ć13.
Service Tests
HP DesignJet 430, 450C and 455CA Printers
4-21
'+ % '+ % %$) $( )()( )) do $ %#&") $ ) " /) %$ % )
' $)' ( #$( )' ( (.()# ''%' $ $%'#" #% ) ( NOT
&%(( " )% $)' $)% '+ % &%(( " )'. $)' $ $)% '+ % $ &'%'# $ ) )()( )'
)()( $ ('+ #% 2 ($ )() $%'#) %$ )% ) &' $)'(
(' " &%') %' (%# % ) )()( .%* , "" $ )% &' $) ) '+ %$ *') %$ "%) ) "( & 0
$ %'' )% ! ) '(*")(
Stopping a Test
('+ )()( ' %$) $*%*(". '&) *$) " .%* ()%& )# % - ) )() &'(( $. % ) '%$)0&$" !.( % - ) '+ % .%* #*()
&%,' ) ' $)'
Entering Service Mode 2
1 " %" $ ) Media Source !. %,$ (, ) ) &' $)' 2 $ ) ) ( $ )% " ) *& %$ . %$ '"( ) Media
Source !.
The printer performs the electrical powerĆon tests and initializes the
mechanics as in normal user mode.
When you are in Service Mode 2, All the LEDs will go off except the ones
that have been selected. Once inside a test, all the LEDs, except for the
LEDs in the Error Group, will begin to flash.
+
%*'
SERVICE MODE 2
4-22
HP DesignJet 430, 450C and 455CA Printers
Service Tests
! "!"! " " " !'!" $ "" " (&! '
! " (" ! # "
" !
" "!" ! %!
! $ !! "# '
"!" % !" " " % $ #" " $ ""
"$" " $ % #!! " !!' " "' ! " % " " ! " ! " !!' " " "!" ! "!" "##!' "! "! #" '# !! ' " "(
'!
If the bail fails the test, try replacing the following component:
BailĆlift mechanism page 8Ć28.
Service Tests
HP DesignJet 430, 450C and 455CA Printers
4-23
Electrical Test
!
THIS TEST HAS BEEN FOUND TO BE VERY UNSTABLE DUE TO
SOME INTERACTIONS BETWEEN SOME OF THE COMPONENTS
OF THE ELECTRONICS MODULE. IT IS SOMETIMES IMPOSSIBLE
TO EXIT THIS TEST WITHOUT SWITCHING OFF THE PRINTER.
#
1 " 2 Electrical Test $
2 # # 3 # % $ ! !
4-24
HP DesignJet 430, 450C and 455CA Printers
Service Tests
! *)-'&') +*+ ()')%* +! '$$'."& "1/"* &') +*+ )""* +! '()+"'& ' +! *)-' $''(
%"1/"* #
))" 1/"* &') +*+ )""* +! '()+"'& ' +! *)-' $''(
))" 1/"* #
')* +! %/"%,% )"+"'& ++ "& +! ', & -". +!"*
"&')%+"'& '& +! *)-" '&" ,)+"'& ($'+
)')% +! )-'&') +*+ * '$$'.*
& *)-" %' ()** " 0( 0
! +*+ ."$$ *+)+ & +!) ."$$ *$" !+ %'-%&+* "& +! & 1/"*
+) -)0 %'-%&+* +! ")+"'& ' +! %'-%&+ ."$$ !& "&
'+! /"* ! %/"%,% ' '+! /"* ."$$ *- "& +! ' -". +! )*,$+* ' +! +*+ 0', %,*+ ()"&+ +! )-" '&" ,)+"'&
$'+ )"&+ ,$"+0 & " 0( #0*
+! +*+ "$* & ))') ' ."$$ (() '& +! )'&+1(&$ ) +'
!(+) "& ')) +' '))+$0 +)',$*!''+ +! "$,)
Service Tests
HP DesignJet 430, 450C and 455CA Printers
4-25
Service Monitor (Data Display)
%$( "!&"$ % '%' &" ! "'& )+ & $!&$ % !"& #"&&! )&
+"' *#& & &" #"& & !% +"' &" $ & $#%-!'
!%&$'&"!% && & $!&$ % $(! $" & " #'&$ !%& "
#"&&! & $)! && +"' %! & $!&$ #$!&% & !!! ! !
" & " && )"' "&$)% ( ! '% &" #"& & $)!
"' ! % !") " & $#%-!' !%&$'&"!% &" &" # "'& & #"$&!& !"$ &"! $" & #$!& "
$"$
& $( "!&"$ % "")%
1 ! %$( " 2 " %& "
! #"$&$& "$!&&"!
%, "$ %,
! ' 2 $%% Service Monitor +# ! "'$ +%
3 ! & $"
& " #'&$ &$"' & %$ "$ #$ #"$&%
The LED begins to flash.
4 & '!& & computer % !& && & % %!& & The LED continues to flash.
5 & Ready % %! #$%% Service Monitor +#
! "'$ +% !
The LED continues to flash. After a minute, the fan turns on,
and the carriage moves to the right side of the Printer.
Instead of printing the drawing that you sent, the Printer prints the first
and last Kbytes of the code for that drawing. The code is printed in
hexadecimal and ASCII format. (If the total size of the file(s) sent is not
bigger than one Kbyte, only the first buffer is printed.) The Printer exits the
service monitor mode if the file(s) sent contain PJL universal exit language.
4-26
HP DesignJet 430, 450C and 455CA Printers
Service Tests
EEROM Model ID Configuration Procedure
! %'$ '&" ,)+"'& ()',) '&$0 &* +' ))" ',+ "
()1'&" ,) ') "* "& ),*
D ! ,))&+ ') "* "&'))+$0 '&" ,) +' +! .)'& %'$ D ! )"&+) *!'.* & ,&'&" ,) %'$ *0*+% ))') Steady EKL
D
It is very rare that these situations will ever occur.
'&" ,) +! )"&+) %'$ * '$$'.*
1 %'- +! )" !+1& '-) ' ( 1
2 "*'&&+ +! %" %'+') &') $ )'% +! %"& '&&+')
3 ,)& +! )"&+) .!"$ !'$"& +! Reprint #0 '.&
4 )** +! Media Source & Media Type #0* +' +!) +' &+) +!
deconfiguration mode ! *+ ')%$ & *+ * LEDs ABC
."$$ $" !+ ,(
5 *"& *,"+$ +''$ *!')+1"),"+ ("&* & +! ")*+ +.' ("&* '& +!
)" !+ ' +! %" %'+') &') '&&+') ! )+)" *
+ & " * LEDs KLM *!',$ $" !+ ,( * 0', *!')+1"),"+
+! +.' ("&*
6 & 0', !- *!')+1"),"+ +! +.' ("&* +! *+ ')%$ & *+
* LEDs ABC *!',$ $" !+ ,( "&
7 )** +! Cancel & Media Source #0* +' +!) +' /"+ +!
deconfiguration mode
Service Tests
HP DesignJet 430, 450C and 455CA Printers
4-27
8 (' #!-* ," *#',* .#," ," (**, &(% + (%%(.+
Only one opportunity is given to perform this procedure and there is no
indication that it was successful.
," *#',* #+ ,( (' #!-* + +#!', (%(* *#',* "(%
," Media Source $/ (.' ' )*++ ," ,.( Color Configuration
(Print Quality + Media Type) $/+ , ," +& ,#&
," *#',* #+ ,( (' #!-* + +#!', ('("*(&*#',*
"(% ," Media Source $/ (.' ' )*++ ," ,.( Mono
Configuration (Print Quality + Setup) $/+ , ," +& ,#&
," *#',* #+ ,( (' #!-* + +#!', *#',* "(%
," Media Source $/ (.' ' )*++ ," ,.( LFP Configuration
(Print Quality + Reprint) $/+ , ," +& ,#&
9 -*' ," *#',* 10 ('', ," &# &(,(* '(* % ,( ," &#' ('',(*
11 -*' ," *#',* ,* #'#,#%#0#'! **(* ( 1 .#%% ))*
-+ ," -*/ %#*,#(' &-+, +,#%% )* (*&
12 *++ ," Cancel $/ ' )*#', ," &( %(, ,( "$ # ," *#',* "+
' (**,%/ (' #!-* + +#!', (* If the Printer is still incorrectly configured then Error Code EKL" will
be displayed on the front panel. Turn the Printer OFF and perform the
EEROM Model ID configuration procedure again from step .
13 * (*& ," -*/ %#*,#(' * * ,( "),* 4-28
HP DesignJet 430, 450C and 455CA Printers
Service Tests
DesignJet 4XX Service Configuration Plot
Firmware Release: X.XX.XX
SPROC release: X.X (Servo-Processor Code revision number.)
EEROM Contents
EEROM CONTENTS
(This is for the Printer design engineers to interpret.)
NOTE: All EEPROM Parameters are since last EEROM Reset.
Number of Power Cycles:
19
Number of Color Plots:
13
Number of Black Plots:
15
Number of Pens:
7666
Factory Spittoon:
0% used
Number of Bail Errors:
0
Number of System Errors:
2
Last System Error:
0x00000550 (errno = 0x3c0001)
Last System Error at file media_load.c line 2810
Bench Run:
Bench Run Maximum Y-Axis (Carriage-Axis) PWM:
127
Bench Run Maximum X-Axis (Media-Axis) PWM:
87
Encoder-Tests Maximum Y-Axis (Carriage-Axis) PWM:
62
Encoder-Tests Maximum X-Axis (Media-Axis) PWM:
62
X-axis Calibration:
Service Tests
Amp1 = 7.467, Phase1 = –0.450, Amp2 = 8.956, Phase2 = 2.325, Factor = –0.000500
HP DesignJet 430, 450C and 455CA Printers
4-29
Printing the Service Configuration Plot
$ %&#( ( '&* $#)&($# %!$(
1 # '&* "$ 2 !$ '( # %$&(&( $&#(($#
In normal mode, load a sheet in portrait orientation.
The service configuration plot can be plotted without the need to enter
the service mode. This is because the customer will be requested to plot
the service configuration plot and he will be given the following
instructions to plot it without entering the service mode.
2 # ( Ready !(' )% %&'' ( Print Quality and Media
Type ,'
3 Ready !( #' ($ !' # (# &"#' $# '(,
&#(& %!$(' ( '&* $#)&($# %!$( # (' ( "
4 #!$ ( "
Interpreting the Service Configuration Plot
%&"(&' $# ( &* $#)&($# !$( # !% ,$) ($
(&$)!'$$( ( &#(& "$& (*!, & ' '$&( '&%($# $ ( !!
( %&"(&'
Number of Power Cycles
$+ "#, ("' ( &#(& ' # %$+& Number of Color Plots
$+ "#, $!$& %!$(' * # %&$) '# ( +' !'( &'
Number of Black Plots
$+ "#, "$#$ %!$(' * # %&$) '# ( +' !'( &'
4-30
HP DesignJet 430, 450C and 455CA Printers
Service Tests
Number of Pens
# (.' + )! -$' , # +-+$" #, ( + *& # (.' +, + ! + -)
!+)' & !- -) +$"#- 2( " (- &&)0 &%
Factory Spittoon
# ,-$'- & / & )! $(% $( -# ,*$--))( #$, & / & 0$&& $()++ - $! -#
#, ( & + Number of Bail Errors
)0 '(2 ,#.-)0(, -# + #/ ( ., )! -# $&3&$! ' #($,'
Number of System Errors
)0 '(2 2,- ' ++)+, #/ ).++ Last System Error
# &,- 2,- ' ++)+ -#- ).++ Last System Error Data
(!)+'-$)( )( 1-&2 0#$# &$( )! -# !$+'0+ -#
++)+ ).++ $(
Bench Run
# -# + -# (# .( #, ( * +!)+' Bench Run Maximum YĆAxis (CarriageĆAxis) PWM
#$, &. ,#).& less -#( 2*$& &. 3 Bench Run Maximum XĆAxis (MediaĆAxis) PWM
#$, &. ,#).& less -#( 2*$& &. 3 Encoder ĆTests Maximum YĆAxis (CarriageĆAxis) PWM
#$, &. ,#).& less -#( 2*$& &. 3 Encoder ĆTests Maximum XĆAxis (MediaĆAxis) PWM
#$, &. ,#).& less -#( 2*$& &. 3 XĆaxis Calibration
#$, ,#)0, -# $(!)+'-$)( + &- -) -# .+2 &$+-$)(
Service Tests
HP DesignJet 430, 450C and 455CA Printers
4-31
Clearing the EEROM
,$) !& ( !&($# %&"(&' ,$) +!! (# #
($ %&$&" ( &#(& !&($#' (!' %(& !&# ( !'$ &'(' ( ($&, '%(($$# *!)
($ )' % # "# (( ( *!) %&#( $# (
'&* $#)&($# %!$( ", &(!, )#&'("( (
"$)#( $ # # ( '%(($$#
Clearing Just the Benchrun and Calibration Parameters
1 +( ( &#(& 2 ! $!# $+# ( Form Feed Cancel # Media Type ,'
$+# '+( ( &#(& 3 # ( ( ' # ($ !( )% $# , $# &!' ( ,'
Clearing Just the UserĆDefined Setup Parameters
1 +( ( &#(& 2 ! $!# $+# ( Reprint Cancel, Media Type # Media
Source ,' $+# '+( ( &#(& 3 # ( ( ' # ($ !( )% $# , $# &!' ( ,'
4-32
HP DesignJet 430, 450C and 455CA Printers
Service Tests
Clearing All Parameters
1 2 Setup, Form Feed, Reprint Print Quality
Media Type 3 Service Tests
HP DesignJet 430, 450C and 455CA Printers
4-33
HP DesignJet 430, 450C and 455CA Printers
5-1
Calibrations
The only Calibration that the Printer requires is the which must be performed under certain conditions.
The accuracy calibration (XĆaxis calibration) procedure is used to correct the
endĆpoint accuracy of the media axis. The carriage axis does not require
calibration and is used to calibrate the media axis. The accuracy calibration
also includes calibration of the optical line sensor on the carriage.
The accuracy calibration is also used to correct the error of the XĆaxis
movement to avoid banding.
Perform the accuracy calibration whenever the:
EEROM is erased.
Electronics module is replaced.
Drive roller is removed or replaced.
Media (XĆaxis) motor is removed or replaced.
DriveĆroller gear is removed or replaced.
Cartridge carriage is replaced.
Mark encoder is removed or replaced.
Optical sensor is removed or replaced.
The endĆpoint accuracy specifies how accurately a Printer can draw a given
length of line. The endĆpoint accuracy specification for the Printers is ± 0.38
mm (0.015 in) or ± 0.2% of the specified vector length, whichever is greater, at
23C (73F), at 50Ć60% relative humidity on HP matte film. Use the following
formula to calculate the Printer's accuracy:
Measured length – Desired length
Desired length
x 100 = %Error
Various part tolerances inside the Printer affect the accuracy (in particular
the drive roller). Other outside influences include:
Media thickness. Thicker media creates longer lines.
Media expansion. As the media grows, so do the lines.
The application software may be instructing the Printer to draw an
incorrect line length.
The EEROM has been cleared. The accuracy constants are stored in this
nonĆvolatile memory component.
5-2
HP DesignJet 430, 450C and 455CA Printers
Service Calibrations
Before Performing the Accuracy Calibration
1 Under normal environmental conditions and on HP Matte Film D/A1Ćsize
media, plot a drawing that contains two X" marks nominally positioned
500 mm (19.69 in.) apart.
2 Measure the distance between the centers of the X" marks on the plot.
-*1 %"*,"(' "+ ' " ,!"+ "+,' "+ '(, && "'
&& "'
,! &+-* -*1 &" ,!"$'++ (* '."*('&',% ('","('+
.*1 *,%1 *(& ,! ,(*1 +,'*+ *%"*, ,! *"',* 1
(',"'-"' /",! ,! (%%(/"' )*(-*
Performing the Accuracy Calibration
1 Place a sheet of HP Matte Film over the top of the Printer for 10 minutes
to let the sheet stabilize to the environmental conditions.
+ +!, ( ))*(0"&, +"2 (* ,!*/"+ ,! (),"% +'+(* (' ,!
**" /"%% %"*, "'(**,%1 ' ,! *"',* /"%% !.
)*(%&+ %("' +(& ,1)+ ( &"
2 Enter into Service Mode 2, by powering ON the Printer while holding
down the Media Source key.
3 Set the Media Type on the front panel to Coated Paper.
4 Load the film, with the matte (dull) side down, in portrait orientation into
the Printer.
5 When the Ready LED lights up, press Reprint key.
! "'+ ,( %+! ' ,! *"',* ,$+ +.*% &"'-,+ ,(
)%(, ,! %"*,"(' )%(, + " -* ! *"',* #,+ ,! +!, ' ,!
%" !,+ -)
6 Unload the sheet.
7 Wait until the ink on the sheet is dry.
8 Cut the sheet along the dotted line and reload the sheet facedown into
the Printer, in the direction indicated by the arrows on the calibration plot
(see Figure 2).
! "'+ ,( %+! ! *"',* ,$+ %++ ,!' &"'-,+ ,( * ,! %"*,"(' +!, %-%, ,! %"*,"(' ,
+. ,! , "' ,! ' #, ,! +!,
9 Unload the sheet.
Service Calibrations
HP DesignJet 430, 450C and 455CA Printers
5-3
5-4
HP DesignJet 430, 450C and 455CA Printers
Service Calibrations
Adjusting the CarriageĆtoĆMedia Distance
It is very important that the distance between the carriage and the media is
within certain limits. If the distance between the cartridge nozzles and the
media is , ink smears on the media. If the distance is ,
unwanted spray appears around the ink dots, and vertical lines are not straight.
(A big distance may also prevent the carriage from actuating the bail lever.)
Whenever you remove the Drive Roller or the Cartridge Carriage, take care
to reinstall them correctly. Incorrect installation may result in the carriage
being too close or too far from the media. For the correct installation
procedure Chapter 8.
A (included with the carriage assembly) has been produced to check
the carriageĆtoĆmedia distance to make sure it is within the tolerances
allowed. Use this gauge to check the carriageĆtoĆmedia distance as follows:
Open the top cover.
Move the carriage out of the service station.
Remove the cartridge from the carriage.
Check the gauge to determine the and sides:
NO
GO
GO
Place the gauge on the drive roller on the leftĆhand side of the carriage,
with the side facing the carriage, in the position shown below:
Service Calibrations
HP DesignJet 430, 450C and 455CA Printers
5-5
Gauge
Y
B
Gauge must be parallel to the centerĆline
of the Drive Roller
Drive Roller
6 With the gauge held in place, manually move the carriage over the side of the gauge. The ledge, indicated below, should easily pass over the
side of the gauge.
Make sure that the carriage
is in the down position at all
times when passing over the
gauge.
Ledge
If the ledge does not go over the side of the gauge, adjust the
carriageĆtoĆmedia distance ' page 5Ć7.
7 Remove the gauge and replace it on the drive roller with the NO GO side
facing the carriage.
8 With the gauge held in place, manually try to pass the carriage over the
side of the gauge. The ledge, indicated above, should NOT pass
over the side of the gauge.
If the ledge does go over the side of the gauge, adjust the
carriageĆtoĆmedia distance ' page 5Ć7.
9 Replace the Yellow cartridge in the carriage.
10 Move the carriage back into the service station.
11 Close the top cover.
5-6
HP DesignJet 430, 450C and 455CA Printers
Service Calibrations
You will need to adjust the carriageĆtoĆmedia distance if:
The ledge on the carriage pass over the side of the gauge.
This means that the carriage is positioned too close to the drive roller.
The ledge on the carriage pass over the side of the gauge. This
means that the carriage is positioned too far from the drive roller.
Adjust the carriageĆtoĆmedia distance as follows:
Release the two indicated clips on the top of the cartridge carriage by
pulling them slightly outwards.
Pull the top of the carriage up.
Service Calibrations
HP DesignJet 430, 450C and 455CA Printers
5-7
Tighten or loosen the indicated screw on the carriage. This will adjust the
carriage angle on the slider rod, thus increasing or decreasing the
carriageĆtoĆmedia distance.
Torx-8
Rotating
Clockwise
ÎÎ
ÎÎ
Gap
Increases
Î
Î
Check the carriageĆtoĆmedia distance page 5Ć5.
Reinstall the top of the carriage.
Check the trailing cable to make sure that it is positioned under the
plastic tabs at the back of the carriage cover, and not above them.
Trailing cable
under tabs !
Otherwise, the Printer will not be able to load media.
5-8
HP DesignJet 430, 450C and 455CA Printers
Service Calibrations
HP DesignJet 430, 450C and 455CA Printers
6-1
Print Quality Troubleshooting Checklist
When faced with a Print Quality problem, use the following checklist as a
guide in troubleshooting the problem:
Problem reproduction
Reproduce the problem that the customer is seeing using their original
settings.
Printer configuration:
Print Mode: Set to Best" (in the printer and in the drivers).
Select the correct media setting when loading the media.
Hardware check list
Check if the latest version of the firmware is installed. If not Install
the latest firmware revision.
Cartridges
Cartridge Troubleshooting Process:
If you don't have any samples yet, reproduce the original problem with
the correct printer settings.
Print the PrintĆQuality Plot using the exact settings and Media that the
Customer used when faced with the Print Quality problem page 6Ć3.
Cartridge Alignment:
Perform the Cartridge Alignment procedure (details User's Guide).
Media
Make sure that you use HP or HPĆapproved media.
Select the correct media type through the frontĆpanel when loading it.
Driver print quality configuration:
To clarify if the reason of the problem is related with the print mode
defined with the NonĆHP Driver try the following:
Print the same sample using the NonĆHP driver and their normal media.
Print the internal demo or print the Print Quality Plot (details page
6Ć3) using HP Media and configuring the printer as indicated previously.
If the output obtained using the HP Solution is good and the one obtained
through the 3rd party solution is bad, HP support organization should:
Communicate to the customer that the problem is not in the printer and
that he should address it through the 3rd party vendor support structure.
Accuracy Calibration (details Chapter 5)
Perform Accuracy calibration" using HP Matte Film.
6-2
HP DesignJet 430, 450C and 455CA Printers
Print Quality
PrintĆQuality Plot
Introduction
Whenever a Print Quality problem appears, it is advisable to print the
PrintĆQuality Plot to help diagnose the problem. The PrintĆQuality Plot will
help you differentiate between possible cartridge errors and other problems
such as incorrect frontĆpanel selection, driver or RIP configuration or
mechanical problems.
Using the PrintĆQuality Plot
1 The size of the PrintĆQuality Plot is A3 and B so you must use media (roll
or sheet) that is this size or larger.
2 Use the same type of media that the customer was using when the Print
quality problem was discovered.
3 Study each of the test patterns in the order listed to determine the type of
Print quality problem.
4 If the customer was reporting problems of Print Quality using nonĆHP
media and after the PrintĆQuality Plot test the same quality problems
appear, advise the customer to use genuine HP media. Repeat the
PrintĆQuality Plot test using genuine HP Media.
Printing the PrintĆQuality Plot
1 Before printing the plot, in Normal mode, set the Media Type and Print
Quality on the front panel to the settings that you want to test.
2 Load a sheet of media in portrait orientation.
3 When the Ready LED lights up, press the Form Feed and Media
Source keys together.
The light begins to flash, and the media moves slightly forward. The
carriage moves to the right side of the Printer, and the fan turns on. The Printer
plots the print-quality plot and ejects the media.
4 Unload the media.
Print Quality
HP DesignJet 430, 450C and 455CA Printers
6-3
PrintĆQuality Plot
The printĆquality plot for the HP DesignJet 430/450C/455CA is represented
below. Use a 10X magnifier to help identify plotĆquality problems.
Test 6
6-4
HP DesignJet 430, 450C and 455CA Printers
Print Quality
Analyzing the PrintĆQuality Plot
The PrintĆQuality Plot will contain six patterns as follows:
1 Cartridge Warm Up (See below).
2 Nozzle Print Test (See below).
3 Vertical Line Straightness Test page 6Ć7.
4 Color Alignment Quality Test page 6Ć9.
5 Color Variation Test page 6Ć11.
6 Banding Test page 6Ć12.
Test Pattern 1: This pattern warmsĆup the cartridges, leaving them in a perfect operating
condition. You can ignore this pattern and continue with Test Pattern 2.
Test Pattern 2: In this test all the 96 nozzles of each cartridge are tested. For each of the 4 colors
you will see the numbers 1 to 90 over the diagonally stepped lines in increments
of 5. These numbers correspond to the nozzle number that prints each step.
There are two cartridge nozzle errors (see Figure 1):
Nozzles not printing.
Nozzles misdirected.
Figure 1
Print Quality
HP DesignJet 430, 450C and 455CA Printers
6-5
Nozzles not printing (Nozzles Out)
1 If the diagonally stepped lines are broken in one or more steps it indicates
that this specific nozzle(s) may be blocked and are not printing.
Nozzles misdirected
If all the stepped lines are visible in the pattern, then all the cartridge nozzles
are printing. However the nozzles could still be misdirected, possibly due to
some dried ink around the nozzles.
1 In the top pattern, marked with numbers, if the diagonally stepped lines
are not equally positioned in every step it indicates that this specific
nozzle(s) may be misdirected.
Nozzles Problem 1:
Nozzles Problem 2:
Corrective Action:
Some cartridge nozzles, in any one color, are not
printing.
Cartridge nozzles are misdirected in any one color.
Try the following steps:
1 Prime the Cartridges and print the
PrintĆQuality Plot again to see if there has been
any improvement.
2 If the error is still present, replace the failing
cartridge and print the PrintĆQuality Plot again.
3 If the error continues try the following:
Replace the Trailing Cable page 8Ć8.
Replace the Carriage Assembly page 8Ć37.
Replace the Electronics Module page 8Ć13.
6-6
HP DesignJet 430, 450C and 455CA Printers
Print Quality
Test Pattern 3: VerticalĆline straightness is a measure of the horizontal distance between the
segments of a vertical line plotted in two consecutive swaths. If the Printer is
working correctly, this distance should be less than 2 mils (see Figure 2)
Swath Printing Direction
Swath (n–1)
Swath Printing Direction
Swath (n)
Swath Printing Direction
Swath (n+1)
Maximum allowable VLS Error = 2 mils.
Figure 2
Customer Expectations
Although the VLS specification satisfies the expectations of most customers,
some may complain even when the Printer is working within this specification.
If the VLS error is already less than 2 mils, do not try to improve it.
The VLS error is composed of two parts (see Figure 3):
ThetaĆZeta error
Bidirectional error
Figure 3
Print Quality
HP DesignJet 430, 450C and 455CA Printers
6-7
Bidirectional Error
You can see an example of a bidirectional error in Figure 3. If you print the
same plot using a unidirectional print mode, the error should not appear.
This error can occur for various reasons, including:
Incorrect distance between nozzles and media. (Adjustment chapter 5.)
EncoderĆstrip slots are damaged or dirty.
Dirt on the pulley is causing the belt to slip.
Friction between carriage bushings and slider rod:
ThetaĆZeta Error
You can see an example of a ThetaĆZeta error in Figure 3. They appear when the
rows of nozzles on a cartridge are not perpendicular to the carriage axis (YĆaxis).
This error can occur for various reasons, including:
Badly seated cartridge.
Faulty cartridge.
Faulty carriage.
Figure 4
6-8
HP DesignJet 430, 450C and 455CA Printers
Print Quality
VLS Problem:
Corrective Action:
If the line is not perfectly straight at Bias 0 in the
test image (see Figure 4).
Try the following steps:
1 Perform the Cartridge Alignment Calibration
(Details Users Guide) using genuine HP
media then print the PrintĆQuality Plot again
to see if there has been any improvement.
2 If the problem continues perform the Accuracy
Calibration (Details page 5Ć2) and print the
PrintĆQuality Plot again to see if there has been
any improvement.
3 If the error is still present, replace the failing
cartridge and print the PrintĆQuality Plot again.
4 If the error continues try the following:
Replace the Trailing Cable page 8Ć8.
Replace the Carriage Assembly page 8Ć37.
Replace the Electronics Module page 8Ć13.
Test Pattern 4: Upper Test: The first of these patterns tests alignment between the cyan and
magenta cartridges; it should be blue with no cyan or magenta shadows. The
second tests alignment between the cyan and yellow cartridges; it should be green
with no cyan or yellow shadows. The third tests alignment between the magenta
and yellow cartridges; it should be red, with no magenta or yellow shadows.
Lower Test: This test pattern is to check the color alignment, and produces
6 patterns each with 2 different primary colors. In each pattern you will see
primary color circles. If there is misalignment between the primary colors the
composite color will be present in one part of the circle and white will be
visible at the opposite side of the circle.
There are two types of misalignment (see Figures 5 and 6):
Horizontal Ć when the misalignment is in the horizontal axis.
Vertical Ć when the misalignment is in the vertical axis.
Print Quality
HP DesignJet 430, 450C and 455CA Printers
6-9
Figure 5
Figure 6
Alignment Problem:
Corrective Action:
Third color present/misalignment in either the
boxes or circles of the test image (see Figures 5 & 6).
Try the following steps:
1 Perform the Cartridge Alignment Calibration
(Details Users Guide) using genuine HP
media then print the PrintĆQuality Plot again
to see if there has been any improvement.
2 If the error is still present, replace the failing
cartridge and print the PrintĆQuality Plot again.
6-10
HP DesignJet 430, 450C and 455CA Printers
Print Quality
If the problem continues perform the Accuracy
Calibration (Details page 5Ć2) and print the
PrintĆQuality Plot again to see if there has been
any improvement.
If the error continues try the following:
Replace the Trailing Cable page 8Ć8.
Replace the Carriage Assembly page 8Ć37.
Replace the XĆaxis Assembly page 8Ć23.
This test produces four boxes; black, blue, cyan and yellow. In each box there
are two horizontal bands, the lower band is 100% shade, the upper band is
shaded from 100% scaling to 60%.
The purpose of this test is to determine at what percent the upper shading
becomes visible from the lower band. The best way to do this is to cover the
box with a piece of paper and slide the paper horizontally across the box. Stop
as soon as you see a different shade in the upper box. You can then determine
the percentage scaling from the figure at the top or bottom of the box.
Print Quality
HP DesignJet 430, 450C and 455CA Printers
6-11
Variation Problem:
Corrective Action:
If the upper box shading is never visible or is
visible at a very low percentage, it is an indication
that the cartridge is producing incorrect size ink
drops (see Figure 8).
Try the following steps:
1 Replace the failing cartridge and print the
PrintĆQuality Plot again.
2 If the error continues try the following:
Replace the Trailing Cable page 8Ć8.
Replace the Carriage Assembly page 8Ć37.
Test Pattern 6: This Test pattern is a long dark stripe and is NOT numbered on the
PrintĆQuality plot. It can be found on the left handĆside of the other test patterns.
Symptoms
Random dark or light bands in area fills. There are two types of banding:
Negative Banding Ć This means that consecutive swaths overlap each
other, creating dark bands.
Positive Banding Ć This means that consecutive swaths do not touch, thus
leaving a small gap between each other. This then causes white (or
lighter) bands.
Figure 9
6-12
HP DesignJet 430, 450C and 455CA Printers
Print Quality
Cartridge Fault
D A nozzle is blocked or faulty and is not firing inkĆdrops.
D The ink drops of one nozzle are of smaller volume than those of the other
nozzles.
D A nozzle's ink drop volume varies while plotting.
D A nozzle's ink drops are misdirected:
D Defect in manufacture of cartridge.
D Dirt or debris on the nozzle plate.
D Ink puddling on the nozzle plate.
D
An electrical contact is misaligned or damaged on the cartridge, so that it
doesn't make correct contact with the circuit on the carriage. (See ' page
4Ć12, w .)
Printer Fault
D Incorrect swathĆadvance angle of the drive roller. This could be caused by a:
D Faulty roller (irregular roller radius / defective bearings)
D MediaĆaxis inaccuracy (defective media motor or driver circuit /
calibration lost)
D
D
D
D
D
An electrical contact is faulty in one of the Printer cartridge chutes, so
that it doesn't make correct contact with the circuit on the cartridge. (See
' page 4Ć12, w .)
Nozzles touch the service station, thus causing puddling to occur on the
printĆhead.
Some of the small slots on the encoder strip are damaged. Therefore the
Printer cannot position the carriage correctly during cartridge servicing.
Cartridges are misaligned with respect to each other.
Calibration values lost or incorrect.
Media Fault
Some types of media have a coating that prevents them getting wet" from
the ink drop. The ink doesn't spread out sufficiently around the point where
the dot is placed.
Banding may not occur on some poorĆquality media, where it is counteracted
by another problem: large dot gain. This is where the ink spreads out
excessively on the media around the desired dot position. To accurately test
for banding, use HP polyester inkjet film.
Print Quality
HP DesignJet 430, 450C and 455CA Printers
6-13
Banding Problem:
Corrective Action:
If there is negative or positive banding in the test
image (see Figure 9).
Try the following steps:
1 Perform the Cartridge Alignment Calibration
(Details Users Guide) using genuine HP
media then print the PrintĆQuality Plot again
to see if there has been any improvement.
2 If the problem continues perform the Accuracy
Calibration (Details page 5Ć2) and print the
PrintĆQuality Plot again to see if there has been
any improvement.
3 Remove the all Cartridges and clean the flex
contacts on the Carriage and the Cartridges.
Reseat the Cartridges and try the test again.
4 If the error is still present, replace the cartridges
and print the PrintĆQuality Plot again.
5 If the error continues try the following:
Replace the Encoder Strip page 8Ć15.
Replace the Trailing Cable page 8Ć8.
Replace the Carriage Assembly page 8Ć37.
Replace the Electronics Module page 8Ć13.
6-14
HP DesignJet 430, 450C and 455CA Printers
Print Quality
No Printing Defects Found in the PrintĆQuality Plot
If all the test patterns from the PrintĆQuality Plot are correct and you still
experience print quality problems, here are some of the other causes to check:
The print mode used in your printer is incorrect (this is defined by the
printer's frontĆpanel menu selections).
NonĆHP driver.
The RIP (If you are using one).
The software applications you are using.
Refer to the User's Guide for further information on how to configure the
system with correct settings.
Media
Always make sure that the customer is using the appropriate media for the
required image and that it is consistent with the software application being
used. To ensure color accuracy and print quality performance of the printer,
only media types that have been certified for the printer should be used. Use
of nonĆHP media or HP media not certified for the the printer may
significantly reduce the color and print quality of the required images. For
details of HP media, refer to the User's Guide or the Media Guide.
To have accurate colors, the media settings must match the type of
media loaded in the printer.
If the customer is using nonĆHP media with HP drivers, the colors in
the required print may not be accurate. Advise the customer to use
HP media if they want to improve the accuracy of the colors.
Print Quality
HP DesignJet 430, 450C and 455CA Printers
6-15
PrintĆQuality Defects Troubleshooting
STARWHEEL MARKS
On some drawings (for example, CAD drawings having a thickĆlined frame
around them) on some types of media, you may notice some small marks
made by the starwheels. These cannot be avoided.
UNEVEN FILL DENSITY
Symptoms
Blotchy area fills.
Product Fault
An incorrect mediaĆtype setting has been selected on the front panel and
does not correspond to the media being used.
Media Fault
The ink is incompatible with the media and does not spread uniformly
through the area fill.
Solutions
One or both of the following actions may be appropriate to solve an
unevenĆfillĆdensity problem:
Change the mediaĆtype setting on the front panel.
Use a more suitable media type.
Replace the faulty cartridge(s).
If the problem is occurring in black area fills on color plots printed in
Normal printĆquality mode, then use Best printĆquality mode instead.
SPRAY
Symptoms
Smaller dots of sprayed ink located around the point at which the required
dot is placed.
Product Fault
The cartridges are positioned too far from the media.
Solution
Check the carriageĆtoĆmedia distance. (Details chapter 5.)
Replace the faulty cartridge(s).
6-16
HP DesignJet 430, 450C and 455CA Printers
Print Quality
BLEEDING, BLOOMING AND WICKING
Symptoms
Blurred lines. (See also User's Guide, chapter 9.)
Bleeding: Different color inks, printed side by side, run into each other.
Blooming: Ink absorbs into the paper, spreading beyond the desired ink dot.
Wicking: Ink spreads along a fiber or fibers in the paper, creating a
spider web" effect.
Product Fault
Printing in fast mode.
Media Fault
The ink is incompatible with the media type.
Environmental conditions may affect the media. (Temperature or
humidity levels are too high.)
Solutions
One or more of the following actions may be appropriate to solve the problem:
Change the plotĆquality mode: Plotting in Best mode slows plotting but
improves quality.
Use better quality media.
If you are plotting on vellum or translucent media, try using
HewlettĆPackard media.
Recommended environmental conditions for optimum plot quality are in
the range of 15 Ć 35 degrees Celsius (59 Ć 95 degrees Fahrenheit) with 20 Ć
80 % relative humidity.
Pen problem: TTOE (Thermal TurnĆOn Energy) has not been performed
because of incorrect cartridge change. With the power ON, open the top
cover and reseat the cartridge.
INK SMEARING
Symptoms
Ink smears on the media. (See also User's Guide, chapter 9.)
Product Fault
The media touches the print heads. This can occur because:
The mediaĆholding mechanism is not holding the media correctly, and the
media buckles.
The carriageĆtoĆmedia distance is too small. (Adjustment chapter 5.)
Print Quality
HP DesignJet 430, 450C and 455CA Printers
6-17
HUE CHANGES
Symptoms
Changes of hue are noticed when printing in color.
Cartridge Fault
One or more of the print cartridges is running out of ink. (Typically the inks
of the four cartridges are used at different rates.)
Solution
Replace the print cartridge with a new one.
6-18
HP DesignJet 430, 450C and 455CA Printers
Print Quality
HP DesignJet 430, 450C and 455CA Printers
7-1
Exchange Assemblies
Exchange assemblies are factoryĆrepaired and tested assemblies that you can
order; they are listed in the following table. Exchange assemblies are
available only on a tradeĆin basis; therefore, you must return the defective
assemblies for credit.
Exchange Assemblies
HP Part Number
Qty
Description
C4713Ć60037
1
Electronics Module
Replacement Parts
Parts shown in the drawings in this chapter are listed in the corresponding
part lists. Match the appropriate number on the drawing with the same
number in the parts list for information on that part. The total quantity for
each part on the drawing is given as well as the part number.
To obtain replacement parts, contact the nearest HP Support Office. You
must include the part number and part description in the order you send.
Also include the Printer model and serial number.
7-2
HP DesignJet 430, 450C and 455CA Printers
Parts and Diagrams
Primer Assembly &
Service Station
Bail & Overdrive Mechanisms
Page 7Ć14
Page 7Ć18
Carriage Assembly
Pincharm Assembly
Page 7Ć16
Covers
Page 7Ć20
Page 7Ć8
X & YĆaxis Motors
Page 7Ć12
Rollfeed Assembly
Page 7Ć6
FrontĆPanel,
Spittoon &
Electronics Module
Page 7Ć10
Printer Support
Page 7Ć4
Parts and Diagrams
HP DesignJet 430, 450C and 455CA Printers
7-3
Reference
on
Drawing
Description
1
C4704Ć60095
1
Hardware Kit (Includes Screw
Drivers)
2
C4704Ć60086
2
Foot Assembly
3
C4704Ć60075
2
Legs Assembly
4
C6069Ć60002
1
XĆaxis Brace (D/A1Ćsize)
C4704Ć60077
1
XĆaxis Brace (E/A0Ćsize)
C6069Ć40001
1
End Cap (D/A1Ćsize)
C4704Ć40070
1
End Cap (E/A0Ćsize)
C6069Ć60001
1
X Bar Assembly (D/A1Ćsize)
C4704Ć60074
1
X Bar Assembly (E/A0Ćsize)
C4704Ć60073
6
Paper Loop Assembly
5
6
7
7-4
HP Part Number Quantity
HP DesignJet 430, 450C and 455CA Printers
Parts and Diagrams
Parts and Diagrams
HP DesignJet 430, 450C and 455CA Printers
7-5
Figure 3 Ć Rollfeed Assembly
Reference
on
Drawing
Description
1
C4717Ć60004
1
Rollfeed Hardware Kit
2
C4717A
1
Rollfeed Assembly (D/A1Ćsize)
(Includes Spindle, Hardware kit
and Hubs)
C4719A
1
Rollfeed Assembly (E/A0Ćsize)
(Includes Spindle, Hardware kit
and Hubs)
C4717Ć60003
1
Spindle (D/A1Ćsize)
C4719Ć60003
1
Spindle (E/A0Ćsize)
C4717Ć40017
2
Spindle Hub
C4713Ć60120
1
Spindle Hub Kit (for Chinese
Spindles only)
C4713Ć60038
1
Extensions Kit Assembly
3
4
5
7-6
HP Part Number Quantity
HP DesignJet 430, 450C and 455CA Printers
Parts and Diagrams
Figure 3 Ć Rollfeed Assembly
Parts and Diagrams
HP DesignJet 430, 450C and 455CA Printers
7-7
Reference
on
Drawing
1
7-8
HP Part Number Quantity
Description
C4713Ć60014
1
Top Cover (D/A1Ćsize)
C4714Ć60014
1
Top Cover (E/A0Ćsize)
2
C4713Ć40029
1
Left End Cover
3
C4713Ć40046
1
Switch Button
4
C4713Ć60030
1
Right End Cover
5
C4713Ć60097
1
Back Cover (D/A1Ćsize)
C4714Ć60097
1
Back Cover (E/A0Ćsize)
6
0515Ć2246
2
Screw Torx M3
7
C4699Ć60072
1
Cable Cip Assembly
8
C4713Ć00011
1
SIMM Cover Plate
9
See Page 7Ć26
1
RAM SIMM
10
C4713Ć60125
1
ROM SIMM (Version A.01.03)
HP DesignJet 430, 450C and 455CA Printers
Parts and Diagrams
Parts and Diagrams
HP DesignJet 430, 450C and 455CA Printers
7-9
Figure 5 Ć Front Panel, Spittoon and Electronics Module
Reference
on
Drawing
7-10
HP Part Number Quantity
Description
1
C4713Ć60091
1
FrontĆPanel Assembly
2
0515Ć1743
1
Screw
3
Ć
1
Washer (Included with Item 2)
4
C4713Ć60017
1
Spittoon Assembly
5
0515Ć2282
2
Screw
6
Ć
2
Washer (Included with Item 5)
7
C4713Ć60037
1
Electronics Module
HP DesignJet 430, 450C and 455CA Printers
Parts and Diagrams
Figure 5 Ć Front Panel, Spittoon and Electronics Module
Parts and Diagrams
HP DesignJet 430, 450C and 455CA Printers
7-11
Figure 6 Ć X and Y axis Motors and Encoder Strip
Reference
on
Drawing
1
Description
0535Ć0031
2
Nut
3050Ć1267
2
Washer
C4713Ć60098
1
Encoder Strip (D/A1Ćsize)
C4714Ć60098
1
Encoder Strip (E/A0Ćsize)
3
C4699Ć00016
1
Encoder Spring
4
0515Ć2765
1
Screw M4.2 x 35 Pan Torx stl
5
C4713Ć40017
1
Right Bracket
6
C3190Ć00013
1
Right Strap (clip)
7
C4713Ć60092
1
CarriageĆMotor Assembly
8
0515Ć1349
2
Screw M3 x 30 Mach T10
9
0515Ć2248
3
Screw
10
Ć
3
Washer (Included with Item 9)
11
C4713Ć60094
1
MediaĆMotor Assembly (Includes
Helical Gear)
12
C3180Ć60012
1
MediaĆMotor Cable
Ć
6040Ć0858
AR
Lubricant
Ć
C3190Ć60155
AR
Lubricant Grease
2
7-12
HP Part Number Quantity
HP DesignJet 430, 450C and 455CA Printers
Parts and Diagrams
Fig 6 Ć X and Y axis Motors and Encoder Strip
Parts and Diagrams
HP DesignJet 430, 450C and 455CA Printers
7-13
Figure 7 Ć Primer Assembly and Service Station Assembly
Reference
on
Drawing
7-14
HP Part Number Quantity
Description
1
0515Ć1743
2
Screw M4 x 17 Tap 20
2
C3190Ć60142
1
Service Station Assembly
3
C4713Ć60023
1
Primer Assembly
4
0624Ć0704
1
Screw 6Ć19 .375 Plas T15
5
3050Ć1267
1
Washer
6
C4713Ć60098
1
Encoder Strip (D/A1Ćsize)
C4714Ć60098
1
Encoder Strip (E/A0Ćsize)
7
0515Ć2765
1
Screw M4.2 x 35 Pan Torx stl
8
C3190Ć40040
1
Left Bracket
9
C3190Ć00012
1
Left Strap (clip)
Ć
C4713Ć40042
1
Primer Cover (DesignJet 430)
HP DesignJet 430, 450C and 455CA Printers
Parts and Diagrams
Figure 7 Ć Primer Assembly and Service Station Assembly
Parts and Diagrams
HP DesignJet 430, 450C and 455CA Printers
7-15
Figure 8 Ć Carriage Assembly and Trailing Cable
Reference
on
Drawing
Description
1
C4713Ć40038
1
Carriage Top
2
C3190Ć00086
1
TrailingĆCable Metal Clip
3
C3190Ć60038
1
Trailing Cable Assembly
(D/A1Ćsize)
C3191Ć60038
1
Trailing Cable Assembly
(E/A0Ćsize)
4
C4713Ć60039
1
Carriage Assembly
5
C4705Ć60082
1
Carriage Belt (D/A1Ćsize)
C4706Ć60082
1
Carriage Belt (E/A0Ćsize)
C4699Ć60052
1
Trailing Cable Guide (D/A1Ćsize)
C4700Ć60052
1
Trailing Cable Guide (E/A0Ćsize)
7
1400Ć1021
4
Trailing Cable Plastic Clip
8
C4713Ć60040
1
Cutter Assembly
Ć
C4701Ć40001
1
Cartridge Cover (DesignJet 430)
6
7-16
HP Part Number Quantity
HP DesignJet 430, 450C and 455CA Printers
Parts and Diagrams
Figure 8 Ć Carriage Assembly and Trailing Cable
Parts and Diagrams
HP DesignJet 430, 450C and 455CA Printers
7-17
Figure 9 Ć Bail and Overdrive Mechanisms
Reference
on
Drawing
7-18
HP Part Number Quantity
Description
1
C3190Ć60132
1
Pulley Assembly
2
C3190Ć40022
1
Engaging Lever
3
0515Ć1743
2
Screw M4 x 10 Tap T20
4
Ć
2
Washer (Included with Item 3)
5
0515Ć2200
1
Screw M3 x 8 Tap T10
6
Ć
1
Washer (Included with Item 5)
7
07575Ć80012
1
GearĆSupport Spring
8
C4713Ć40016
1
EngagingĆLever Support
9
0624Ć0617
1
Screw 6Ć9 .937 Plast T15
10
C3190Ć40019
1
Cam Gear
11
0624Ć0745
1
Screw
12
3050Ć0026
1
Washer
13
C1633Ć40027
1
Engaging Gear
14
C3190Ć40020
1
BailĆLift Cam
15
C3190Ć60007
1
Bail Cable
16
C3190Ć80013
1
Cable Spring
17
C3190Ć40021
1
Gear Support
18
C2847Ć20017
1
Shoulder Screw
19
C1633Ć40019
1
Overdrive Gear
20
0515Ć0083
1
Ring Net .250 OD
21
C3190Ć60131
1
Clutch Assembly
22
C4713Ć40030
1
Sideplate Bushing
HP DesignJet 430, 450C and 455CA Printers
Parts and Diagrams
Figure 9 Ć Bail and Overdrive Mechanisms
Parts and Diagrams
HP DesignJet 430, 450C and 455CA Printers
7-19
Figure 10 Ć Pincharm Assembly
Reference
on
Drawing
Description
1
0624Ć0771
1
Screw M3 x 30 Mach T10
2
C4713Ć40025
1
Pincharm Lever
3
0515Ć2282
1
Screw
4
Ć
1
Washer (Included with Item 3)
5
C4713Ć60034
1
Pincharm Sensor Assembly
6
C4713Ć80003
1
Pincharm Mechanical Spring
7
C4713Ć60116
1
Right Cam Journal Assembly
8
C3190Ć60149
1
Left Cam Journal Assembly
9
C2847Ć20005
1
Pincharm Bar Cam (D/A1Ćsize)
C1633Ć20012
1
Pincharm Bar Cam (E/A0Ćsize)
C1633Ć40082
5
Pincharm Bar Bushing
(D/A1Ćsize)
C1633Ć40082
7
Pincharm Bar Bushing
(E/A0Ćsize)
C1633Ć80005
5
Pincharm Bar Spring (D/A1Ćsize)
C1633Ć80005
7
Pincharm Bar Spring (E/A0Ćsize)
C4699Ć60081
5
Pincharm Assembly (D/A1Ćsize)
C4699Ć60081
7
Pincharm Assembly (E/A0Ćsize)
10
11
12
7-20
HP Part Number Quantity
HP DesignJet 430, 450C and 455CA Printers
Parts and Diagrams
Figure 10 Ć Pincharm Assembly
Parts and Diagrams
HP DesignJet 430, 450C and 455CA Printers
7-21
Figure 11 Ć Entry Platen, Drive Roller, Bail and Overdrive Assembly
Reference
on
Drawing
1
Description
C4713Ć60093
1
Bail Assembly (D/A1Ćsize)
C4714Ć60093
1
Bail Assembly (E/A0Ćsize)
2
0515-2337
1
Screw Long Dogpoint
3
0515-2765
1
Screw
4
C3180Ć20001
2
Alignment Screw
5
C4713Ć60115
1
Overdrive Assembly (D/A1Ćsize)
C4714Ć60115
1
Overdrive Assembly (E/A0Ćsize)
6
0515Ć2250
2
Screw (Media Button Assy)
7
C4713Ć60117
1
Media Button Assembly
8
0515Ć2250
1
Screw (Media Deflector)
9
C4713Ć40011
1
Media Deflector
10
C4699Ć60042
1
Driver Roller Assy (D/A1Ćsize)
C4700Ć60042
1
Driver Roller Assy (E/A0Ćsize)
11
C4713Ć40023
1
Side Trim Left
12
0627Ć0769
1
Screw
13
C4713Ć40022
1
Side Trim Right
14
C3180Ć20001
1
Alignment Screw
15
C4713Ć60114
1
Entry Platen Assy (D/A1Ćsize)
C4714Ć60114
1
Entry Platen Assy (E/A0Ćsize)
0515Ć1743
1
Screw
16
7-22
HP Part Number Quantity
HP DesignJet 430, 450C and 455CA Printers
Parts and Diagrams
1
10
3
2
4
16
12
13
4
6 and 7
15
14
8 and 9
11
2
5
Figure 11 Ć Entry Platen, Drive Roller, Bail and Overdrive Assembly
Parts and Diagrams
HP DesignJet 430, 450C and 455CA Printers
7-23
Reference
on
Drawing
Description
1
5961Ć3524
1
Serial Label (Right End Cover)
2
C3178Ć00030
1
Carriage Label
(DesignJets 450C and 450CA)
C4701Ć00009
1
Carriage Label (DesignJets 430)
3
C3190Ć40052
1
Quick Reference Guide Holder
4
C4713Ć00013
1
Nameplate (DesignJets 430)
C4715Ć00013
1
Nameplate (DesignJets 450C)
C6080Ć00001
1
Nameplate (DesignJets 455CA)
C4705Ć00017
1
Cartridge Insertion Label
(Left End Cover)
5
7-24
HP Part Number Quantity
HP DesignJet 430, 450C and 455CA Printers
Parts and Diagrams
Users Puide and Quick Reference Puide Bundle
HP Part Number
Description
C4713Ć60041
English Manual Bundle
C4713Ć60042
Korean Manual Bundle
C4713Ć60043
Taiwanese Manual Bundle
C4713Ć60044
German Manual Bundle
C4713Ć60045
French Manual Bundle
C4713Ć60046
Spanish Manual Bundle
C4713Ć60047
Italian Manual Bundle
C4713Ć60048
Japanese Manual Bundle
C4713Ć60049
Portuguese Manual Bundle
C4713Ć60050
Chinese Manual Bundle
Nront Panel Overlays
HP Part Number
Description
C4715Ć60041
English Front Panel Overlay
C4715Ć60042
Korean Front Panel Overlay
C4715Ć60043
Taiwanese Front Panel Overlay
C4715Ć60044
German Front Panel Overlay
C4715Ć60045
French Front Panel Overlay
C4715Ć60046
Spanish Front Panel Overlay
C4715Ć60047
Italian Front Panel Overlay
C4715Ć60048
Japanese Front Panel Overlay
C4715Ć60049
Portuguese Front Panel Overlay
C4715Ć60050
Chinese Front Panel Overlay
Parts and Diagrams
HP DesignJet 430, 450C and 455CA Printers
7-25
Compatible Documentation
Description
HP Part Number
C4713Ć90009
Software Application Notes
5965Ć9424
Accessories Guide
5965Ć9477
Media Swatch Book
5959Ć9733
HPĆGL/2 and RTL Programmer's Reference
Guide (English)
5959Ć9734
The product Comparison Guide for HPĆGL/2
and HP RTL Peripherals (English)
5010Ć3997
PJL Technical Reference Manual (English)
PlugĆin memory (RAM SIMM)
HP Part Number
Description
C3132A
4MB RAM SIMM
C3133A
8MB RAM SIMM
C3146A
16MB RAM SIMM
D3578A
32MB RAM SIMM
Cartridges
7-26
HP Part Number
Description
51640A
Black
51644C
Cyan
51644M
Magenta
51644Y
Yellow
HP DesignJet 430, 450C and 455CA Printers
Parts and Diagrams
HP Part Number
Description
J2591A
Jetdirect EX Plus Ethernet
J2593A
Jetdirect EX Plus 3 Ethernet
J2594A
Jetdirect EX Plus 3 Token Ring
Parallel (Bi-Tronics/Centronics) Interface Cables
Computer
HP Part
Number
Cable length
Connector type at
computer end of cable
HP 9000 workstations, series 300, 400, 700.
C2950A
2.0 m (6.9 ft)
25-pin male
IBM AT, IBM PS/2, IBM PC/XT and
compatible computers.
C2951A
3.0 m (9.8 ft)
25-pin male
Serial (RS-232-C) Interface Cables
Computer
HP Part
Number
Cable length
Connector type at
computer end of cable
HP Vectra or HP 24541A/B serial interface
card (9-pin connector).
24542G
3.0 m (9.8 ft)
9-pin female
17255M
1.2 m (3.9 ft)
25-pin male
IBM PC, PC/XT, IBM PS/2 and compatible
computers
C2913A
1.2 m (3.9 ft)
25-pin female
DEC VAX using DEC BC22D, BC03M, or
equivalent
17355M
3.0 m (9.8 ft)
Apple Macintosh Plus, SE, II Series, Classic,
LC family, Quadra family, PowerBook,
PowerMac
17302A
1.5 m (4.9 ft)
8-pin male mini-DIN
Apple Macintosh 128K and 512K
92219M
1.5 m (4.9 ft)
9-pin male
Extension cable
31391A
5 m (16.4 ft)
25-pin female
HP 9000 workstations using 9-pin connectors.
IBM AT and compatible computers using 9-pin
serial connectors.
HP Vectra PC with HP 24541A/B dual serial
interface card using the 25-pin connector.
HP Apollo workstation using an SPE
(Serial/Parallel Expansion) option and
supplied adapter cable.
DEC VAX.
Sun workstation.
Parts and Diagrams
HP DesignJet 430, 450C and 455CA Printers
7-27
HP DesignJet 430, 450C and 455CA Printers
9-1
Moisture on Printer
Users should use the Printer in an environment between 5% and 95%
relative humidity. To recover from moisture condensation, turn the Printer
off, and, using the main roller as a reference, wait until the Printer is
completely dry before using it again.
Level of Printer Usage
To achieve good performance and long lifetime of the HP DesignJet
430/450C/455CA Printers, users should limit use to the following
recommendations (duty cycle):
Average number of plots per day
Maximum number of plots per day
10 E/A0 CAD plots
20 E/A0 CAD plots
The service configuration plot gives an indication of how much the Printer
has been used: number of plots, number of cartridges, number of times the
Printer has been turned on. (Details page 4Ć29.)
Friction on Slider Rod
The carriage bushings are made of a porous composite material. Oil stays
inside them by means of capillary action. Never place the bushings on an
absorbant material. To prevent friction of the bushings on the slider rod,
remove dirt from the slider rod and chassis beam. Apply oil (Anderol 4068,
HP part number: 6040Ć0858) to the slider rod ( 3 drops) and to the
bushings if they are running dry.
Noisy Carriage Wheel
To prevent noisy movement of the carriage, remove aluminum or dust
particles from the wheel at the back of the carriage, and from the slider path
along which the wheel moves.
9-2
HP DesignJet 430, 450C and 455CA Printers
Preventive Maintenance
Ink Spilling
The service configuration plot gives an estimation of the amount of ink in the
Printer's spittoon. (Details page 4Ć29.) To prevent ink spilling, replace
both the spittoon and the inkĆseparator when the spittoon is almost full.
About 880 primes are needed to fill up the inkĆseparator.
Note that if you clear the EEROM or replace the electronics module, the
factory spittoon value is reset to 0% used. Keep in mind that the value
printed on the service configuration plot may greatly underestimate the
amount of ink in the spittoon.
Belt Swelling
To prevent new belts from swelling incorrectly, keep them in their bags with
dissicant until you need to install them.
Preventive Maintenance
HP DesignJet 430, 450C and 455CA Printers
9-3
Cleaning the Printer
To maintain the Printer in good operating condition, keep it free of dust
accumulation, ink, and other contamination. Cleaning intervals are
determined by the Printer environment and by the types of Printer supplies
used.
WARNING
'#""( ( &"(& &#! ( $#+& '#)& $&#&
(# $&#&!" ", "" #+ %) (#
&)" #" (# (& #!$#""(' #& &)(' #&
(&#) #$""' " ( " #')& ' (' "
&( '# -& " (# ( #& ")&,
"& ""
Proper general cleaning should include the following:
Blow away dust accumulation with compressed air if available.
Clean the outer surface of the Printer with a damp sponge or cloth. Use a
mild soap and water solution if necessary. Do not use abrasive cleaners.
Wipe the Printer dry with a soft lintĆfree cloth.
"" ( &* # &
Due to the ink's reflectance, ink spilled on the roller can disrupt the Printer's
edgeĆsensing function. To remove any ink from the roller, perform the
following procedure:
Connect the Printer to the ac power source.
Switch the Printer ON, and wait for it to finish initialization.
Open the top cover.
Keep the cover switch pressed while pressing Form Feed repeatedly until the
stained area of the drive roller is positioned at the top where it can be
cleaned.
Turn the Printer OFF, and '#""( ( from the ac power source.
Apply IPA (alcohol) to a soft, lintĆfree rag.
Use the rag to clean the roller surface.
Allow the drive roller to dry.
If other areas of the roller have been stained by ink, repeat the above
steps.
Reconnect the Printer to the ac source, turn the Printer on, and load
paper to test that no ink reflections disrupt operation of media loading.
9-4
HP DesignJet 430, 450C and 455CA Printers
Preventive Maintenance
HP DesignJet 430, 450C and 455CA Printers
10-1
Introduction
The HP DesignJets 430, 450C and 455CA follow on from and replace the
DesignJet 330 and 350C. The HP DesignJets 430, 450C and 455CA (like the
DesignJets 230, 330, 250C and 350C) have inherited much of the system
architecture and features of the DesignJet 220. Their writing system,
however, is based on that of the DesignJet 650C.
This chapter describes some of the main features of the HP DesignJets 430,
450C and 455CA. Before reading it, read the functional overview of the
DesignJet 220 ! part number C3187Ć90000.
(Information on the DesignJet 650C ! part number C2858Ć90000 Rev B).
Roll Media
When a rollĆfeed assembly is installed on the Printer, roll media can be used.
The rollĆfeed assembly consists of:
Two rollĆfeed components.
A spindle.
Two media stops.
The rollĆfeed assembly is installed below the sheet media entry path, to allow
the ease of loading for sheet media. When roll media is loaded into the
Printer, it is passed around a diverter roll, which optimizes the infeed path to
the Printer. Once a plot/print is completed, a builtĆin cutter automatically
slides across the paper to cut the plot/print from the roll.
Removing Static Charge from the Media
An antiĆstatic brush located under the entry platen prevents static charge
from building up on the media. A charge can cause the media to stick to itself
and jam the Printer.
10-2
HP DesignJet 430, 450C and 455CA Printers
Functional Overview
Gripping the Media
When you load the media, it is gripped by the pinchĆarms.
The pinchĆarm sensor is a switch sensor that is attached to the Printer
Chassis. It detects the position of the pinchĆarm lever. Linkage, attaching the
lever to a cam, causes the cam to release the switch as the pinchĆarms are
raised. The pinchĆarm sensor is electrically connected to the main PCA.
Providing a Force on Top of the Media
The bail provides a normal force on top of the media. There is no bail sensor
on the Printer to detect if the bail is up or down.
The bail features an automatic lift mechanism driven by the media motor
using a series of gears and actuated by the cartridge carriage. The cableĆbased
design eliminates the torque on the axle of the bailĆlift cam and thus improves
reliability. This mechanism is also more accessible. (Removal page 8Ć28.)
Detecting the Lines and Media Edges
The line sensor on the cartridge carriage is used to:
Detect the left and right media edges.
Detect and measure lines drawn on media when performing accuracy
calibration.
Scan the setup and alignment sheets.
Find the platen roller reference mark.
Functional Overview
HP DesignJet 430, 450C and 455CA Printers
10-3
Moving the Carriage
CarriageĆDrive Mechanics
Motor, Belt and Pulley
The carriage (YĆaxis) drive consists of a DC motor directly driving a single
belt and the carriage.
The motor assembly itself provides the tension needed on the belt,
eliminating the need for a separate pulley tensioner.
The belt clamps itself to the carriage; there are no separate belt clamps.
The interface between the motor shaft and belt is friction based.
You can remove the belt without having to remove the pulley on the left
end of the belt.
Carriage Guidance
The carriage moves along on just one stainless steel slider rod. It is guided by
two integrated bronze bushings, which are selfĆlubricating, and a back wheel.
Positional Feedback
An encoder strip provides feedback on the position of the carriage. The strip
does not require adjustment.
Carriage PCA
The carriage PCA is based on that of the DesignJet 650C. It connects to the
main PCA through a long 60Ćconductor (2x30) trailing cable. The carriage
PCA contains:
Optical line sensor
Thermistor circuit
Linear encoder
Cartridge nozzle firing circuit
Some electronic components on the DesignJet 450C and 450CA carriage PCA
are not present on the DesignJet 430 carriage PCA. At powerĆon the Printer
firmware identifies whether the carriage is for a color or a monochrome
model, and behaves accordingly.
10-4
HP DesignJet 430, 450C and 455CA Printers
Functional Overview
Providing Ink
The HP DesignJets 430, 450C and 455CA use the same cartridges as does the
HP DesignJets 330 and 350C.
The distance between the carriage and the writing surface can determine image
sharpness. As the distance increases, the drop shape and directionality degrade
and are more difficult to predict. You can change the distance using the adjusting
screw on the carriage (details page 5Ć5).
Adjusting Screw
Back Slider
ÎÎ
ÎÎ
Bail-Lift
Engaging Tab
Beam
Cross–section
Integrated
Line Sensor
Producing an Image
Note that the firmware can recognize from the plot data whether a plot is
color or monochrome. You do not set this parameter on the front panel.
Functional Overview
HP DesignJet 430, 450C and 455CA Printers
10-5
Servicing the Cartridges
The service station is easy to access and remove, and is replaceable as one
unit.
The absence of a drop detector implies a different cartridgeĆmaintenance
algorithm to guarantee correct nozzle conditions. The Printer warms the
nozzles and spits ink:
Before each plot.
After each cartridge change.
While printing, depending on: cartridge, humidity, temperature, and
plot ink density.
The ventilation holes, which were located on the serviceĆstation sled on
the DesignJet 650C, are now located on the ink separator to prevent them
from becoming clogged.
A single, redesigned spittoon is located on the right side of the Printer.
The Printers feature a manual primer, based on that of the DeskJet 1200,
instead of the automatic one of the DesignJet 650C.
A bellows assembly provides a vacuum to suck ink from the nozzles. The
suction tubes have a wider diameter than those of the DesignJet 650C, to
help prevent clogging.
An ink separator isolates the bellows from the cartridges, preventing ink
contamination of the bellows.
Although the primers for the DesignJets 430, 450C and 455CA and
DesignJets 230 and 250C look identical, their characteristics are different.
Installing the incorrect primer can damage the cartridges or reduce the
servicing of the cartridges. For the correct part numbers for the primers chapter 7.
10-6
HP DesignJet 430, 450C and 455CA Printers
Functional Overview
Electronics Module
The electronics module includes the main PCA, power supply and fan. It is one
exchangeable part; you do not need to open it. If you replace the electronics
module, remember to swap any SIMMs from the old module to the new one.
There is no bail sensor for the HP DesignJets 430, 450C and 455CA. There is
a pinchĆarm sensor which is different to the one installed on the HP
DesignJets 330 and 350C. The following sensors connect to the main PCA:
The is a mechanical switch that detects if the Printer cover
has been raised. If you open the cover while the Printer is plotting, the
plot is cancelled!
The detects the presence of media. It is also used to
determine media length.
The sends signals to the carriage and is used to detect the
mark encoder and read alignment patterns. It is also used to determine
media width.
The detects whether the pinchĆarms have been raised.
The servo processor uses the sensor to determine the pinchĆarm position
during the initialization sequence.
The Printer firmware code is contained on either an inĆbuilt masked ROM
(soldered to the main PCA) or a flash ROM SIMM (installed in the innerĆmost
socket at the back of the Printer). If both are present, the Printer recognizes
the code on the ROM SIMM instead of that on the inĆbuilt ROM. The powerĆon
LED sequence tells you whether the Printer is using code from inĆbuilt ROM or
from a ROM SIMM. If the LEDs begin to light up from the right, then the
Printer is using the ROM SIMM. If the LEDs begin to light up from the left,
then the Printer is using the builtĆin ROM. To find out the firmwareĆcode
revision level that the Printer is using, print a user setup sheet or a service
configuration plot.
The Printers have a standard four megabytes of onĆboard RAM. They also
have one RAMĆexpansion socket, which can hold an optional 4Ć, 8Ć, 16Ć or 32Ć
megabyte DRAM SIMM. The socket is the outerĆmost one at the back of the
Printer.
Functional Overview
HP DesignJet 430, 450C and 455CA Printers
10-7
EEROM
EEROM is used as nonvolatile storage for calibration and configuration data.
Useful information from the EEROM is printed on the service configuration
plot. The EEROM is soldered to the Main PCA in both new and rebuilt
electronic modules.
If you clear the EEROM or replace the electronics module, perform all
calibrations. Also note that the factory spittoon value on the cleared or new
EEROM is 0%. Keep in mind that the value printed on the service
configuration plot may greatly underestimate the amount of ink in the spittoon.
Input/Output Interfaces
The Printers have both a parallel (BiĆTronics) and a serial (RSĆ232ĆC)
interface. Unlike the DesignJet 650C, they have no modular input/output
(MIO). You can connect the Printers to a network by means of an or external print server.
BiĆTronics
In addition to the operating modes of the DesignJet 220, the BiĆTronics
interfaces feature the extendedĆcapabilityĆport (ECP) forward and reverse
operating modes, providing for faster communication.
RSĆ232ĆC
The supported baudrates are 1200, 2400, 4800, 9600, 19200 and 38400, with
eight bits and no parity, or seven bits with either odd or even parity. Mark
parity is not supported. Both XON/XOFF and DTR handshaking are
supported. ENQ/ACK handshake is not supported.
Power Supply
An autoĆranging power supply is located in the electronics module.
The primary side of the power supply contains rectified line
voltage that can be lethal when touched even if the ON/OFF
switch is OFF.
In any case, you should not need to open the electronics
module. It is one exchangeable part.
Water Condensation
In humid environments, water may condense on the sideĆplates. A wick
attached to the underside of the right sideĆplate routes water drops away
from the mainĆPCA electronics.
10-8
HP DesignJet 430, 450C and 455CA Printers
Functional Overview
Memory Usage
It is difficult to calculate the amount of Printer memory needed to plot a
drawing of any given file size. Memory is used, not just to hold the input
data, but also for system overhead, processing workĆspace, and storage of the
internal representation of the plot. Some types of graphics require relatively
large amounts of memory. Examples are wide lines, raster fill patterns,
polygons, and userĆdefined lines.
Plot Orientation
The output orientation of the drawing also has an impact on memory usage.
Compare a plot of horizontal lines with one of vertical lines. Lines plotted
parallel to the carriage axis take up considerably less memory than those
plotted perpendicular to it. The Printer builds graphic display objects on a
swathĆbyĆswath basis. A horizontal line can be contained in one swath. A
vertical line spans many swaths and therefore requires more entries in the
Printer's internal display list.
Raster Image Processor
The raster transfer language (RTL) provides a solution to insufficient
memory on the Printer. When all the data is sent to the Printer in the order
leftĆtoĆright and topĆtoĆbottom, the Printer is able to plot the data as it
receives it. For this to happen, software (a rasterĆimage processor) in the
computer must first rasterize all the data. The software issues a command
(referred to in RTL as no negative motion) telling the Printer that it will
not receive data for any media location on which it has already plotted.
The use of no negative motion is called flow mode. Data flows through the
Printer without being stored in a display list, so the size of the file that you
can send is almost unlimited.
Functional Overview
HP DesignJet 430, 450C and 455CA Printers
10-9