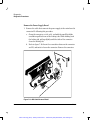
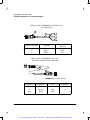
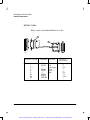
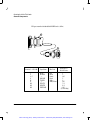
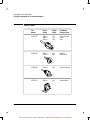
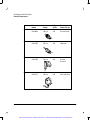
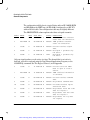
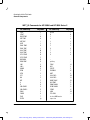
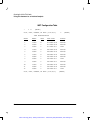
1
Artisan Technology Group is your source for quality new and certified-used/pre-owned equipment • FAST SHIPPING AND DELIVERY • TENS OF THOUSANDS OF IN-STOCK ITEMS • EQUIPMENT DEMOS • HUNDREDS OF MANUFACTURERS SUPPORTED • LEASING/MONTHLY RENTALS • ITAR CERTIFIED SECURE ASSET SOLUTIONS SERVICE CENTER REPAIRS Experienced engineers and technicians on staff at our full-service, in-house repair center WE BUY USED EQUIPMENT Sell your excess, underutilized, and idle used equipment We also offer credit for buy-backs and trade-ins www.artisantg.com/WeBuyEquipment InstraView REMOTE INSPECTION LOOKING FOR MORE INFORMATION? Visit us on the web at www.artisantg.com for more information on price quotations, drivers, technical specifications, manuals, and documentation SM Remotely inspect equipment before purchasing with our interactive website at www.instraview.com Contact us: (888) 88-SOURCE | [email protected] | www.artisantg.com Agilent 3396 Series III Integrator Reference Manual Agilent Technologies Artisan Technology Group - Quality Instrumentation ... Guaranteed | (888) 88-SOURCE | www.artisantg.com Manuals 3395_3396 Integrator.qxd 10/6/2003 9:59 AM Page 1 Agilent 3395/3396 Integrators Manuals These manuals may contain references to HP or Hewlett-Packard. Please note that Hewlett-Packard’s former test and measurement, semiconductor products and chemicals analysis businesses are now part of Agilent Technologies. The HP 3395/3396 Integrator referred to throughout this document is now the Agilent 3395/3396 Integrator. Artisan Technology Group - Quality Instrumentation ... Guaranteed | (888) 88-SOURCE | www.artisantg.com Printing History Printing History The information contained in this document may be revised without notice. HewlettĆPackard makes no warranty of any kind with regard to this material, including, but not limited to, the implied warranties of merchantability and fitness for a particular purpose. HewlettĆPackard shall not be liable for errors contained herein or for incidental or consequential damages in connection with the furnishing, performance, or use of this material. No part of this document may be photocopied, reproduced, or translated to another program language without the prior written consent of HewlettĆPackard Company. HP part number 03396-90550 First editionĊJanuary 1995 Second Edition ĊAugust 1997 Printed in USA ©Copyright 1990Ċ1997 by HewlettĆPackard Company All Rights Reserved. Reproduction, adaptation, or translation without prior written permission is prohibited, except as allowed under the copyright laws. ii Artisan Technology Group - Quality Instrumentation ... Guaranteed | (888) 88-SOURCE | www.artisantg.com Safety Symbols Safety Information The 3396 meets the following IEC (International Electrotechnical Commission) classifications: Safety Class 1, Transient Overvoltage Category II, and Pollution Degree 2. The unit has been designed and tested in accordance with recognized safety standards and designed for use indoors. If the instrument is used in a manner not specified by the manufacturer, the protection provided by the instrument may be impaired. Whenever the safety protection of the unit has been compromised, disconnect the unit from all power sources and secure the unit against unintended operation. Refer servicing to qualified service personnel. Substituting parts or performing any unauthorized modification to the instrument may result in a safety hazard. Disconnect the AC power cord before removing covers. iii Artisan Technology Group - Quality Instrumentation ... Guaranteed | (888) 88-SOURCE | www.artisantg.com Printing History Safety Symbols Warnings in the manual or on the instrument must be observed during all phases of operation, service, and repair of this instrument. Failure to comply with these precautions violates safety standards of design and the intended use of the instrument. HewlettĆPackard Company assumes no liability for the customer's failure to comply with these requirements. WARNING A WARNING CALLS ATTENTION TO A CONDITION OR POSSIBLE SITUATION THAT COULD CAUSE INJURY TO THE USER. Caution A Caution calls attention to a condition or possible situation that could damage or destroy the product or the user's work. Caution. Refer to accompanying documents. Indicates hazardous voltages. Indicates earth (ground) terminal. iv Artisan Technology Group - Quality Instrumentation ... Guaranteed | (888) 88-SOURCE | www.artisantg.com Safety Symbols Important User Information for In Vitro Diagnostic Applications This is a multipurpose product that may be used for qualitative or quantitative analyses in many applications. If used in conjunction with proven procedures (methodology) by a qualified operator, one of these applications may be in vitro diagnostic procedures. General instrument performance characteristics and instructions are included in this manual. Specific in vitro diagnostic procedures and methodology remain the choice and the responsibility of the user and are not included. v Artisan Technology Group - Quality Instrumentation ... Guaranteed | (888) 88-SOURCE | www.artisantg.com Printing History Sound Emission Certification for Federal Republic of Germany Manufacturer's Declaration Sound Emission: This information is provided to comply with the requirements of the German Sound Emission Directive dated January 18, 1991. D Sound Pressure Lp < 55 dB(A) D At Operator Position D Normal Operation D According to ISO 7779 (Type Test) Herstellerbescheinigung Der Deutschen Bundespost wurde das Inverkehrbringen dieses Gerätes/Systems angezeigt und die Berechtigung zur Überprüfung der Serie auf Einhaltung der Bestimmungen eingeräumt. Schallemission: Diese Information steht im Zusammenhang mit den Anforderungen der Maschinenlärminformationsverordnung vom 18 Januar 1991. D Schalldruckpegel Lp < 55 dB(A) D Am Arbeitsplatz D Normaler Betrieb D Nach DIN 45635 T. 19 (Typprüfung) vi Artisan Technology Group - Quality Instrumentation ... Guaranteed | (888) 88-SOURCE | www.artisantg.com Contents 1 Preinstallation Checklists Site Requirements 1-2 Unpacking and Inspecting Your Unit 1-3 Recording Important Numbers 1-4 2 Installing the Integrator Installing Paper Assemblies 2-4 Installing the Roll Paper Mechanism 2-4 Installing the ZĆFold Paper Mechanism 2-6 Installing the Paper Separator 2-7 Installing Print Cartridges 2-8 Installing the Blotter Pad 2-9 Priming the Print Cartridge 2-10 Inserting the Print Cartridge 2-11 Loading Paper 2-12 Applying Power and Running the SelfĆTest 2-13 Verifying the Voltage Setting 2-14 Initial Turn On 2-15 Setting Paper Parameters 2-17 Setting the Date and Time 2-19 Installing Expansion Cards 2-20 3 Cable Connections Connecting HPĆIL Devices 3-2 Installing HPĆIL and INET Devices 3-5 Installing the HP 19405B INTEG Event Control Module (IECM) 3-6 Installing an HPĆIB Disk Drive 3-7 Loop PowerĆUp 3-8 Installing Signal Cables 3-9 Connections to HewlettĆPackard Analytical Instruments 3-10 Connections to NonĆHewlettĆPackard Analytical Instruments 3-11 Installing Sample/Remote Devices 3-12 vii Artisan Technology Group - Quality Instrumentation ... Guaranteed | (888) 88-SOURCE | www.artisantg.com Contents Installing the Sample Number (BCD) Cable 3-13 Connecting a Remote Control Cable to HewlettĆPackard Equipment 3-14 Connecting a Remote Control Cable to NonĆHewlettĆPackard Units 3-14 Connecting RSĆ232ĆC Cables 3-17 4 Routine Maintenance Exterior Cleaning 4-2 Removing/Reloading Paper 4-3 Removing Paper from the Printer 4-3 Reloading Paper 4-3 Maintaining the Printer 4-5 Replacing the Blotter Pad 4-5 Checking the Print Cartridge 4-6 Cleaning the Carriage Contacts 4-7 5 Obtaining HP Service Filling out the Repair Information Form 5-2 Returning Your HP 3396 for Repair 5-5 Repacking Your Unit for Shipment 5-6 HP Service 5-7 6 Troubleshooting Power Problems 6-2 No Response at Initial Turn On (Unit does not function) 6-2 Checking the Fuse 6-3 Power failed" Messages Appear After Working 6-4 COMM Indicator Light Blinks After Initial Turn On Tests Are Complete 6-4 Signal Problems 6-5 Data Represents a Zero or Straight Baseline with INET Instruments 6-5 Data Represents a Zero or Straight Baseline, or is Pinned at Maximum Value with Analog Signal 6-6 viii Artisan Technology Group - Quality Instrumentation ... Guaranteed | (888) 88-SOURCE | www.artisantg.com Contents Excessive Noise or Drift on Chromatogram 6-7 Reported, Processed, or Raw Data Are Not What You Expected 6-8 System Problems 6-9 Integrater Cannot Be Started or Stopped from an External Device 6-9 HP 3396 Does Not Start or Stop an External Device 6-10 HP 3396 Does Not Communicate with RSĆ232ĆC Device 6-11 LOOP DOWN" Message Printed 6-12 External Sample Number is Missing or Inaccurate 6-13 Running the Automatic PowerĆOn Tests 6-14 7 Diagnostics Purpose of This Section 7-2 Safety Information 7-2 Running the SelfĆTest Diagnostics 7-3 Description of SelfĆTest Diagnostics 7-6 Running the Signal Tests 7-15 The SSET ANALOG Command 7-15 ZeroĆVolt Input Test 7-17 OneĆVolt Input Test 7-18 Diagnostic Procedures 7-19 Measuring dc Supply Voltages 7-19 Measuring Motor Windings 7-23 Partitioning Failures 7-25 Module Level Troubleshooting 7-25 Interpreting Diagnostic Test Failures 7-30 Remote and Sample Number Test 7-31 RSĆ232ĆC Cable Testing 7-32 Disassembly and Reassembly Instructions 7-34 Remove Power from the Unit 7-34 Remove the Paper 7-34 Remove the Paper Hangers (if Installed) 7-34 Remove the Printer Window 7-35 Remove the Paper Separator 7-35 ix Artisan Technology Group - Quality Instrumentation ... Guaranteed | (888) 88-SOURCE | www.artisantg.com Contents Remove the Keyboard 7-35 Remove the Top Cover 7-35 Remove the Print Mechanism 7-37 Remove the Power Supply Board 7-39 Remove the Line Module 7-40 Remove the Cooling Fan 7-40 Remove the Main Board 7-41 8 Parts and Cables Replacement Parts 8-2 Cables for Obsolete HP Instruments 8-4 Cable Diagrams 8-5 Analog Signal Cables 8-5 Remote Control Cables 8-8 Sample Number Cable 8-18 RSĆ232ĆC Cables 8-21 Power Cable 8-24 9 Communicating with Other Devices What Devices Communicate with the Integrator? 9-2 Using NonĆINET Analytical Instruments 9-3 Using the Remote Control Cable 9-3 Using the Sample Number Cable 9-4 10 Using the Instrument Network What is the Instrument Network? 10-2 Starting and Stopping INET 10-3 Checking for Instrument Readiness 10-5 Listing INET Devices 10-6 Controlling INET Instruments with the HP 3396 10-9 Controlling the HP 5890 through BASIC 10-13 Controlling the HP 7673 through BASIC 10-14 Controlling the HP 6890 10-16 Understanding INET 10-17 Controlling INET Devices 10-18 INET Operating States 10-20 x Artisan Technology Group - Quality Instrumentation ... Guaranteed | (888) 88-SOURCE | www.artisantg.com Contents Automatic Network Configuration 10-21 Establishing and Changing INET Data Paths 10-24 INET Data Types 10-24 Changing the INET Configuration Table 10-29 Run and Report Annotation Data (A0 AND R0) 10-32 B0 Data (B0) 10-33 Chromatographic Data (C1) 10-34 Immediate Data (I0 AND I1) 10-34 Device Dependent Commands (K0) 10-36 Sample Data (S0) 10-36 HP 3396 Background Tasks 10-38 11 Using Disk Drives Compatible Disk Drives 11-2 Listing Devices on the Loop 11-3 Autoconfiguration and Reconfiguration 11-4 Using Disk Drives 11-7 Accessing Disk Drives 11-7 File System Commands 11-9 Understanding HPĆIL and HPĆIB 11-12 How HPĆIL Operates 11-13 12 Using RSĆ232ĆC Devices What is the RSĆ232ĆC Interface? 12-2 Installing RSĆ232ĆC Devices 12-3 Choosing the Proper Cable 12-4 DTE or DCE? 12-5 Customizing Cables 12-7 Connecting the Cable 12-8 The RSĆ232 Configuration Settings 12-9 Changing the RSĆ232 settings with the SSET RS232 command 12-10 The RSĆ232 Configuration Switches 12-10 Changing the Default RSĆ232 Configuration Switches 12-10 Changing the RS232 settings with the SSET RS232 command 12-11 xi Artisan Technology Group - Quality Instrumentation ... Guaranteed | (888) 88-SOURCE | www.artisantg.com Contents Listing the Switch Settings 12-12 Data Rate Switches 1, 2, 3 12-12 Hardware Handshake Switch 4 12-13 Switches 5, 6, 7, and 8 are not used 12-14 Handshake Delay Switch 9 12-14 Timeout Duration Switch 10 12-14 Matching RSĆ232ĆC Protocol 12-15 Using External BASIC 12-17 Using RSĆ232ĆC in Remote Mode 12-18 Appendix A Standard Features A-1 Data Storage A-1 Calculations and Reporting A-2 Printer/Plotter Characteristics A-3 External Control and Data Communications A-4 EPROMĆBased Programs A-4 Specifications A-5 Data Acquisition A-5 Electrical: A-6 Physical Characteristics: A-6 Environmental Conditions: A-6 Appendix B Storing Your Integrator B-1 Appendix C Dual Channel INET_CONTROL Commands C-1 Buffer Signal Assignment C-3 Default Assignment Scheme C-3 Setting HP 3396 / HP GC Data Paths C-5 xii Artisan Technology Group - Quality Instrumentation ... Guaranteed | (888) 88-SOURCE | www.artisantg.com 1 Site Requirements 1-2 Unpacking and Inspecting Your Unit 1-3 Recording Important Numbers 1-4 Preinstallation Checklists Artisan Technology Group - Quality Instrumentation ... Guaranteed | (888) 88-SOURCE | www.artisantg.com Preinstallation Checklists Site Requirements The HP 3396 Series III Integrator is designed for laboratory use. Ensure that the intended operating environment for your integrator meets these requirements: D The atmosphere is free of corrosive chemicals. D The temperature remains between 5_ and 40_C (41_ to 104_F) while the unit is operating. D An altitude up to 2000 m. D The relative humidity is between 10 and 90% noncondensing. D A surface area about 46 cm wide by 46 cm deep (about 18 by 18 inches) exists for the unit, and about 46 cm (18 inches) exists above the unit. D The power line meets the following specifications: Line voltages: 115 or 230 V ac (+15 to Ć22%) Line frequency: 48 to 66 Hz (The HP 3396 Series III consumes a maximum of 50 VA.) Refer to Appendix A for complete HP 3396 Series III specifications. 1-2 Artisan Technology Group - Quality Instrumentation ... Guaranteed | (888) 88-SOURCE | www.artisantg.com Creating the Little Falls Look German Components Unpacking and Inspecting Your Unit D Verify that you have received all shipped containers by checking the carrier's papers. D Inspect the exterior of the shipping container(s) for physical damage and watermarks. If damage or water is indicated, immediately contact your carrier (retain the carton and all packing materials for the carrier's inspection). D Open the integrator box; remove the manual set and miscellaneous components from inside the container and set all of these aside. D Unpack the HP 3396 Series III Integrator and inspect it for damage. If you detect damage, contact your nearest HewlettĆPackard Sales and Service Office. D Unpack any other containers. 1-3 Artisan Technology Group - Quality Instrumentation ... Guaranteed | (888) 88-SOURCE | www.artisantg.com Creating the Little Falls Look Using this document as an Interleaf template Recording Important Numbers In any verbal or written correspondence with HewlettĆPackard concerning your integrator, you will need to know the following information: Instrument Model Number: Instrument Name: HP 3396C HP 3396 or Series III Integrator Instrument Serial Number: Take a few minutes now to fill in the empty box above. The instrument's serial number can be found on the rear of the integrator. 1-4 Artisan Technology Group - Quality Instrumentation ... Guaranteed | (888) 88-SOURCE | www.artisantg.com 2 Installing Paper Assemblies 2-4 Installing Print Cartridges 2-8 Loading Paper 2-12 Applying Power and Running the SelfĆTest Installing Expansion Cards 2-20 2-13 Installing the Integrator Artisan Technology Group - Quality Instrumentation ... Guaranteed | (888) 88-SOURCE | www.artisantg.com Installing the Integrator Before installing the paper assemblies, print cartridge, or loading paper, open the printer window. Printer Window Figure 2Ć1. The Printer Window The printer window is opened by lifting its rear edge upward and forward toward the front of the integrator. 2-2 Artisan Technology Group - Quality Instrumentation ... Guaranteed | (888) 88-SOURCE | www.artisantg.com Installing the Integrator Applying Power and Running the SelfĆTest Figure 2Ć2. The Window Open The window can, if necessary, be removed completely. Squeeze the two hinged ends, disengaging one end from its axis tab, and then lift the window away from the integrator. 2-3 Artisan Technology Group - Quality Instrumentation ... Guaranteed | (888) 88-SOURCE | www.artisantg.com Creating the Little Falls Look Using this document as an Interleaf template Installing Paper Assemblies Two forms of dispensing paper are available for the HP 3396 Integrator: the standard roll of paper, which has its assembly supplied in all units, and the zĆfold paper, which can be ordered as an option. To maintain the high reliability of the printer mechanism, use only the recommended paper and print cartridges listed in chapter 8 of this manual. Installing the Roll Paper Mechanism From the integrator package, remove: D 2 paperĆroll holder brackets D 1 paperĆroll rod D 1 roll of inkjet paper You may also want to remove the paper separator at this time, for installation later. 2-4 Artisan Technology Group - Quality Instrumentation ... Guaranteed | (888) 88-SOURCE | www.artisantg.com Installing the Integrator Applying Power and Running the SelfĆTest PaperĆRoll Rod Paper PaperĆRoll Holder Brackets Figure 2Ć3. Roll Paper Mechanism Snap the two paperĆroll holder brackets into the appropriate slots on the top rear of the integrator. Unwrap the roll of paper. Check that the edges of the roll are flat and even, and that no slack exists in the roll. Insert the paperĆroll rod through the paper roll. Position the roll of paper so that it unrolls from beneath the roll, towards the front of the unit (see Figure 2Ć3). Mount the rod and paper on the brackets. 2-5 Artisan Technology Group - Quality Instrumentation ... Guaranteed | (888) 88-SOURCE | www.artisantg.com Creating the Little Falls Look Using this document as an Interleaf template Installing the ZĆFold Paper Mechanism From the accessory package, remove: D 1 pack of zĆfold paper D 1 paper stand You may also want to remove the paper separator from the integrator package at this time, for installation later. Figure 2Ć4. ZĆFold Paper Stand Unwrap the pack of paper. Lay the top sheet of paper (with the PRINT THIS SIDE" facing down) on flat top surface of the integrator. Position the pack of paper inside the stand so that it unfolds from the top of the pack and around the rear of the integrator and stand. The pack of paper will have to temporarily be moved later when connecting cables. However, doing this now will assure proper paper loading. 2-6 Artisan Technology Group - Quality Instrumentation ... Guaranteed | (888) 88-SOURCE | www.artisantg.com Installing the Integrator Applying Power and Running the SelfĆTest Installing the Paper Separator The paper separator is used with both the roll paper and the zĆfold paper. Paper Separator Figure 2Ć5. Installing the Paper Separator Insert the tabs at the bottom of the separator into the slots in the printer mechanism. 2-7 Artisan Technology Group - Quality Instrumentation ... Guaranteed | (888) 88-SOURCE | www.artisantg.com Creating the Little Falls Look Using this document as an Interleaf template Installing Print Cartridges Check the expiration date stamped on the bottom of the print cartridge container. Be certain that the expiration date has not yet been reached. WARNING THE INK IN THE PRINTHEAD CARTRIDGE CONTAINS DIETHYLENE GLYCOL, WHICH IS HARMFUL IF SWALLOWED. KEEP NEW OR USED CARTRIDGES OUT OF REACH OF CHILDREN. If the printer window is not already open, open it now. Remove the print cartridge and the blotter from the container, taking care not to touch the face of the cartridge. (The blotter is stored under the clear plastic disk at the bottom of the container.) 2-8 Artisan Technology Group - Quality Instrumentation ... Guaranteed | (888) 88-SOURCE | www.artisantg.com Installing the Integrator Applying Power and Running the SelfĆTest Installing the Blotter Pad When you turn on the integrator, ink is sprayed on the blotter to clear the printhead. Blotters are provided with each print cartridge and should be replaced each time the cartridge is replaced. Bail Arms Star Wheels Figure 2Ć6. Inserting Blotter Pad Insert the blotter into the holder as shown below, making sure that the stiffĆcoated side of the blotter faces the back of the printer. 2-9 Artisan Technology Group - Quality Instrumentation ... Guaranteed | (888) 88-SOURCE | www.artisantg.com Creating the Little Falls Look Using this document as an Interleaf template Priming the Print Cartridge Prime the print cartridge by gently pushing the end of a straightened paper clip or similar object about 1/4Ćinches (6 mm) into the hole in the rear of the print cartridge. Caution Be careful. Excessive force will puncture the bladder! Gently push the ink bladder until a drop of ink appears on the face of the cartridge. Figure 2Ć7. Priming the Print Cartridge Wipe the print cartridge face with a soft cloth or lintĆfree tissue. 2-10 Artisan Technology Group - Quality Instrumentation ... Guaranteed | (888) 88-SOURCE | www.artisantg.com Installing the Integrator Applying Power and Running the SelfĆTest Inserting the Print Cartridge Pull the carriage cradle latch all the way down, as shown in circle 1 of the figure below. Set the print cartridge in the cradle (the action labelled 2 below). Carriage Latch Carriage Figure 2Ć8. Inserting the Print Cartridge Push the cradle latch up to lock the print cartridge in place (as shown in circle 3). 2-11 Artisan Technology Group - Quality Instrumentation ... Guaranteed | (888) 88-SOURCE | www.artisantg.com Creating the Little Falls Look Using this document as an Interleaf template Loading Paper The paper should be positioned on the top flat surface of the integrator with the PRINT THIS SIDE facing down against the surface. After rotating around the roller, the PRINT THIS SIDE will be correctly facing up. Pull both bail arms forward to their open positions. SlideĂtheĂpaperĂintoĂtheĂslot under the paper separator. (It may be helpful to pull the paper separator forward temporarily until the paper is inserted.) Push the paper under the roller until its edge passes above the bail arms. Align the holes in the left edge of the paper with the sprockets of the left pin wheel. If necessary, adust the right pin wheel to the width of the paper. It can move sideways to accommodate for minor differences in paper widths. Align the holes in the right side of the paper with the sprockets of the right pin wheel. Be certain that the paper is straight and that both sides are even. Push the bail arms back to their closed positions, locking the paper in position against the roller. Close the printer window. Verify that the paper's PRINT THIS SIDE is correctly positioned on the side of the paper toward the print cartridge. 2-12 Artisan Technology Group - Quality Instrumentation ... Guaranteed | (888) 88-SOURCE | www.artisantg.com Installing the Integrator Applying Power and Running the SelfĆTest Applying Power and Running the SelfĆTest If other instruments are to be connected to the HP 3396, see their installation instructions before attempting to apply power to the integrator. WARNING THE POWER CORD MUST BE CONNECTED ONLY TO A LINE POWER SOURCE WITH A PROTECTIVE EARTH CONTACT. DO NOT USE AN EXTENSION CORD, POWER CABLE, OR PLUG ADAPTER WITHOUT A PROTECTIVE EARTH (GROUNDING) CONDUCTOR. PROPER GROUNDING SHOULD BE VERIFIED. First, ensure that voltage shown on the line voltage selection switch at the rear of the instrument matches the intended power source. 2-13 Artisan Technology Group - Quality Instrumentation ... Guaranteed | (888) 88-SOURCE | www.artisantg.com Creating the Little Falls Look Using this document as an Interleaf template Verifying the Voltage Setting Locate the line voltage selection switch on the rear panel of the integrator above the power cord receptacle. Line Voltage Selection Switch Figure 2Ć9. Line Voltage Selection A voltage setting of 115 is compatible with sources from 90 to 132V. A voltage setting of 230 is compatible with sources from 180 to 264V. Make sure the selected operating voltage matches the voltage of the power source you're using. If it doesn't match, do not apply power! Set the proper voltage. If you cannot, contact your local HP office. 2-14 Artisan Technology Group - Quality Instrumentation ... Guaranteed | (888) 88-SOURCE | www.artisantg.com Installing the Integrator Applying Power and Running the SelfĆTest Initial Turn On Connect the power cable first to the integrator and second to a properly grounded power source of the same voltage. LINE Power Switch Figure 2Ć10. Line Voltage Selection Press the LINE power switch on the rear panel of the integrator. The symbol 0" indicates off. The symbol " indicates on. The integrator will perform a warmĆstart powerĆon when power is first applied. Operating parameters and the memory disk M: are preserved. A coldĆstart is invoked by simultaneously pressing the [CTRL] and [DEL] keys. The operating parameters are restored to their default values and the information stored on the memory disk M: are lost during a coldĆstart. The integrator also performs a series of selfĆtests during a coldĆstart. When the integrator has successfully passed the selfĆtests (after about 30 seconds), the firmware revision numbers (Z80/HOST/INET/PP) and the installed applications programs are printed. 2-15 Artisan Technology Group - Quality Instrumentation ... Guaranteed | (888) 88-SOURCE | www.artisantg.com Creating the Little Falls Look Using this document as an Interleaf template Figure 2Ć12. PowerĆOn Salutation When BASIC language programming capability is installed, the integrator prints a PLUS BASIC" message. When HPĆIL or INET devices are connected, the integrator prints a LOOP UP" message, if all the devices on the loop are poweredĆon and working. 2-16 Artisan Technology Group - Quality Instrumentation ... Guaranteed | (888) 88-SOURCE | www.artisantg.com Installing the Integrator Applying Power and Running the SelfĆTest Setting Paper Parameters Unless set differently, the initial physical position of the paper is assumed to be the correct the top of form (TOF). Moreover, it is also assumed that US letter size paper is being used. To set or reset the top of form (TOF) and specify either of the two size pages: the U.S. 8.5 x 11 inch letter size (66 lines) the ISO 297 mm A4 size (72 lines) Press [CTRL] [K] Defines top of form (TOF) and a 66Ćline, 11Ćinch page length. Press [CTRL] [V] Defines top of form (TOF) and a 72Ćline, A4Ćpage length. To simply advance the paper one full page: Press [CTRL] [L] Advances the paper to the next top of form location, using the page length defined by either of the two preceding commands. To advance the paper less than a full page: Press [ENTER] Advances the paper one line and prints out an * with each carriage return. Press [SHIFT] [ENTER] Advances the paper as long as you hold the keys down. Press [CTRL] [A] Advances the paper oneĆeighth of a line. This is useful when positioning the paper before setting top of form. 2-17 Artisan Technology Group - Quality Instrumentation ... Guaranteed | (888) 88-SOURCE | www.artisantg.com Creating the Little Falls Look Using this document as an Interleaf template To set form feed and perforation skipping options: Press [OP()] [5] [ENTER] Most of the items in this dialog concern the report and the information to be included in it. Such items are discussed fully in the Operating Manual. * OP # 5 PRINT & POST-RUN LIST OPTIONS Large font [Y*/N]: Store post-run report [Y/N*]: External post-run report [Y/N*]: List run parameters [Y/N*]: List timetable [Y/N*]: List calibration [Y/N*]: List remote method [Y/N*]: Form-feed before report [Y/N*]: Y [ENTER] Form-feed after report [Y/N*]: Y [ENTER] Skip perforations in report [Y/N*]: Y [ENTER] Skip perforations in plot [Y/N*]: Y [ENTER] The last four items control paper feed during the plot and report. The two form feed options cause an advance to the next topĆofĆpage before and/or after printing a report. Skipping perforations in the plot may only be selected when perforation skipping in the report is also selected. For more information about how to use this option, refer to the Operating Manual. 2-18 Artisan Technology Group - Quality Instrumentation ... Guaranteed | (888) 88-SOURCE | www.artisantg.com Installing the Integrator Applying Power and Running the SelfĆTest Setting the Date and Time The HP 3396 Integrator contains a calendar and clock, which can be used to label reports and to time stamp" files. To list time only: Type [T] [I] and press [ENTER] To list the date and time: Type [D] [A] and press [ENTER] The clock does not run when the integrator is off. Every time you start the integrator you need to reset the date and time. To set the calendar: Type [D] [A] mm/dd/yy [ENTER] where mm/dd/yy is the... month day year (mm = 01 to 12) (dd = 01 to 31) (yy = 00 to 99). For example, 07/04/95 represents July 4, 1995. To set the clock: Type [T] [I] hh:mm:ss [ENTER] Note: Use individual keys to spell time. Do NOT use the functional [TIME] key. where hh:mm:ss represents the 24 hour clock in... hours minutes seconds (hh = 00 to 23) (mm = 00 to 59) (ss = 00 to 59). The slash (/), colon (:), and comma (,) are all acceptable separators for both date and time. 2-19 Artisan Technology Group - Quality Instrumentation ... Guaranteed | (888) 88-SOURCE | www.artisantg.com Creating the Little Falls Look Using this document as an Interleaf template Installing Expansion Cards The HP 3396 Series III has two slots for expansion cards in the back panel. Expansion cards are explained in detail in the Operating Manual, chapter 5, Data Storage. WARNING Always turn the HP 3396 Series III OFF with the ON/OFF switch before inserting or removing expansion cards. To install the expansion card: 1. Turn the HP 3396 Series III OFF. 2. Remove the expansion card from the package. Avoid touching the card surface. 3. Insert the card into one of the two card slots, located on the back panel of the HP 3396 Series III. The end with the small holes to fit onto the connectors goes in first. Push the card firmly into the slot. The black button next to the card slot should extend outward when the card is fully inserted. 4. Turn the HP 3396 Series III ON. 5. Type SYSTEM [ENTER] to see the system configuration and be sure the card was recognized. To remove expansion cards from the card slots on the HP 3396 Series III: 1. Turn OFF the integrator; 2. Push the button next to the card you want to remove, until the card is fully disengaged from the slot; 3. Remove the card and turn on the integrator; 4. Type SYSTEM [ENTER] to see the new system configuration. 2-20 Artisan Technology Group - Quality Instrumentation ... Guaranteed | (888) 88-SOURCE | www.artisantg.com 3 Connecting HPĆIL Devices 3-2 Installing Signal Cables 3-9 Installing Sample/Remote Devices 3-12 Connecting RSĆ232ĆC Cables 3-17 Cable Connections Artisan Technology Group - Quality Instrumentation ... Guaranteed | (888) 88-SOURCE | www.artisantg.com Cable Connections Connecting HPĆIL Devices All of the interconnections between the HP 3396 Integrator and other devices are made at the integrator's rear panel. Line Select RSĆ232 Expansion Slot AC Line Input Sample Fuse Remote Analog Input On/Off Switch Instrument Network Figure 3Ć1. Integrator Rear Panel Cable Receptacles Generally using roll paper provides enough room to connect cables without removing the roll of paper. However, if the zĆfold paper and stand are used, the paper will conceal the rear panel's connections. The zĆfold paper pack must be removed temporarily from the lower part of the stand and placed on top of the integrator until the cables are connected. Cables should be connected and then routed inside the stand's back edge to either side of the stand. When done, return the paper pack into the lower part of the stand. It is best to have all of the instruments and devices turnedĆoff before you connect any cables. 3-2 Artisan Technology Group - Quality Instrumentation ... Guaranteed | (888) 88-SOURCE | www.artisantg.com Creating the Little Falls Look German Components Although there are many cables that can be used to connect various devices with the HP 3396 Integrator, they generally fall into one of five types: D HPĆIL Cables HewlettĆPackard interface loop cables connect various HPĆIL devices (e.g. flexible disk drives, printers, and specific analytical instruments) to an instrument network (INET) to communicate signal data, instrument setpoints, controls, and status signals, with the integrator. Moreover, certain HPĆIB devices can be added to this loop when an HPĆIL/HPĆIB interface is used. D Signal Input Cables Analog signal input cables connect the integrator to chromatographic signal voltages from various analytical instruments. D Sample Cables The sample number (BCD) cable is used to connect a nonĆINET automatic sampler or sequencer to the integrator so that it can obtain sample number data. D Remote Cables Remote control cables are used to communicate readiness to or from other (nonĆINET) instruments, start other devices, or start and stop the integrator under the control of other instruments. D RSĆ232ĆC Cables Data communications RSĆ232ĆC cables can be used (when properly configured) to transmit and receive data and commands to a computer and/or other RSĆ232ĆC external devices. Cable diagrams can be found in part 3 of this manual. 3-3 Artisan Technology Group - Quality Instrumentation ... Guaranteed | (888) 88-SOURCE | www.artisantg.com Cable Connections Connecting RSĆ232ĆC Cables Line Select RSĆ232 Expansion Slot AC Line Input Sample Fuse Remote Analog Input On/Off Switch Instrument Network Figure 3Ć2. Integrator HPĆIL Cable Receptacles The HewlettĆPackard Interface Loop (HPĆIL) is a twoĆwire loop for interfacing the HP 3396 Integrator to devices such as flexibleĆdisk drives and printers. The interface loop is connected with HPĆIL cables to the INSTRUMENT NETWORK receptacles on the rear panel of the HP 3396. Besides the HPĆIL devices mentioned above, the HPĆIL can also accommodate the HP analytical Instrument Network (INET). This network allows the exchange of analytical data, instrument setpoints, and remote control and status signals among HP analytical instruments and the integrator. 3-4 Artisan Technology Group - Quality Instrumentation ... Guaranteed | (888) 88-SOURCE | www.artisantg.com Creating the Little Falls Look German Components HP 3396 Cables: HP Part Number: HPĆIL Cable 0.5 m 82167Ć60001 HPĆIL Cable 1.0 m 82167Ć60002 HPĆIL Cable 5.0 m 82167Ć60003 Certain HewlettĆPackard Interface Bus (HPĆIB) devices can be connected via HPĆIL loop by using the HP 82169A HPĆIL/HPĆIB interface. It is best to have all of the instruments and devices turned off before connecting any cables. This is particularly true when dealing with HPĆIL cables. Caution In order for the integrator to properly configure the HPĆIL system, all HPĆIL cabling must be connected and all instruments/devices must be powered on before the integrator is energized. Installing HPĆIL and INET Devices Conveniently arrange the INET and HPĆIL devices so that the lengths of the HPĆIL cables to be used will reach appropriate devices. Starting with the HP 3396 Integrator, connect the output of one device to the input of another device with HPĆIL cables, ultimately forming a single complete loop connecting all of the devices. Ensure that the connectors are inserted fully into the receptacles. 3-5 Artisan Technology Group - Quality Instrumentation ... Guaranteed | (888) 88-SOURCE | www.artisantg.com Cable Connections Connecting RSĆ232ĆC Cables In Out HP 3396 Integrator In Out HP 19405B IECM Module Out In HP 7673 INET Sampler HP 5890 INET GC In Out Figure 3Ć3. Example of Instrument Network Cabling Installing the HP 19405B INTEG Event Control Module (IECM) Install an IN end of an HPĆIL cable into the rear panel of the HP 3396 integrator. Install an OUT connector of another HPĆIL cable into the appropriate connector on the integrator. Install the other ends of the cables in the INSTR NETWORK receptacles (J1) on the rear of the IECM in a loop configuration. Refer to the HP 19405B installation instructions for more details. Connect all other cabling (nonĆHPĆIL) between the HP 19405B IECM and external devices. 3-6 Artisan Technology Group - Quality Instrumentation ... Guaranteed | (888) 88-SOURCE | www.artisantg.com Creating the Little Falls Look German Components Installing an HPĆIB Disk Drive This disk drive is no longer availble; the HP 3396 is still compatible if you own one. Connect an HP 82169A HPĆIL/HPĆIB Interface into the loop with the provided HPĆIL cable. M Figure 3Ć4. Switches on HPĆIP/HPĆIB Interface Set the MAILBOX/TRANSLATE" (M) switch (the switch with the dot under it) on the HPĆIL/HPĆIB Interface to the TRANSLATE" position. The ADDRESS" switches on the Interface are not used; however, for the Interface to work properly, one of the switches (any one) must be set to 0, not all be set to 1. To be certain, all of the address switches could be set to 0. 3-7 Artisan Technology Group - Quality Instrumentation ... Guaranteed | (888) 88-SOURCE | www.artisantg.com Cable Connections Connecting RSĆ232ĆC Cables ADDRESS X 421 Figure 3Ć5. Switches on HPĆIB Drive set to 1 Set the HPĆIB disk drive address switches between 1 and 7. Refer to your disk drive manual for instructions of how to set the address. Caution Often the factory will set the address to zero. For the HPĆIB device to configure properly, it must be set to any address between 1 and 7 (not zero). During configuration, the HP 3396 integrator will assign each device's HPĆIB address as its loop address. Connect the HPĆIB device to the HPĆIL/HPĆIB interface with an HPĆIB cable. Loop PowerĆUp After all the devices are connected and appropriate hard addresses have been set on any HPĆIB devices, you are ready to powerĆup the loop. The loop must be continuous and complete. All HPĆIL and INET instruments must be powered ON. If disk drives are included on the loop, wait for them to finish their startĆup routines (often a minute or so). Turn on the integrator and observe the selfĆtest. 3-8 Artisan Technology Group - Quality Instrumentation ... Guaranteed | (888) 88-SOURCE | www.artisantg.com Creating the Little Falls Look German Components Installing Signal Cables Line Select RSĆ232 Expansion Slot AC Line Input Sample Fuse Remote Analog Input On/Off Switch Instrument Network Figure 3Ć6. Integrator Signal Cable Receptacle The analog signal input cable is used to connect chromatographic signal voltages from analytical instruments to the HP 3396 Integrator. Generally, the signal is supplied from the instrument's integrator output (rather than the attenuated recorder output). 3-9 Artisan Technology Group - Quality Instrumentation ... Guaranteed | (888) 88-SOURCE | www.artisantg.com Cable Connections Connecting RSĆ232ĆC Cables Connections to HewlettĆPackard Analytical Instruments Install the appropriate cable between the HP analytical instrument's INTEGRATOR output and the HP 3396 Integrator's INPUT receptacle. Connects the HP 3396 Series II to: HP Part Number HP 5710/30 GCs and HP 1081B UV Detector 35900Ć60620 HP 5880A GC 35900Ć60570 HP 5790A GC 35900Ć60590 HP 1040 Diode Detector and HP 1090A/L LC 35900Ć60600 HP 5890A and HP 5890 Series II GCs 35900Ć60610 HP 1046A Fluorescence Detector 35900Ć60750 HP 6890 GC G1530Ć60570 3-10 Artisan Technology Group - Quality Instrumentation ... Guaranteed | (888) 88-SOURCE | www.artisantg.com Creating the Little Falls Look German Components Connections to NonĆHewlettĆPackard Analytical Instruments The HP 3396 Integrator has floating (not earthĆground referenced) differential signal inputs. The maximum input signal should be limited to 1 volt. Verify the signal voltage compatibility of the nonĆHewlettĆPackard instrument. Caution The input signal range is Ć10 mV to +1000 mV. The HP 3396 is protected against signals not exceeding + 10 volts between the + and Ć signal leads. Between either signal input lead and earth ground, maximum permitted potential is + 100 volts. Use the general or special purpose signal cable to connect the integrator to your equipment. Connects the HP 3396 to: HP Part Number NonĆHP Equipment (general purpose, spade lug terminations) 35900Ć60630 NonĆHP Equipment (special purpose, square pin terminations) 35900Ć60640 3-11 Artisan Technology Group - Quality Instrumentation ... Guaranteed | (888) 88-SOURCE | www.artisantg.com Cable Connections Connecting RSĆ232ĆC Cables Installing Sample/Remote Devices Note: An HP 7673 Automatic Sampler connected to the HP 3396 Integrator via Instrument Network (INET) does NOT use either a remote control or sample number cable. Remote control signals and sample number data are transmitted over INET cable. When the HP 5890 is the GC used, the HP 7673 is part of the INET loop. When the HP 6890 is the GC in use, the HP 7673 connects to the HP 6890 with an RSS cable, and is not part of the INET loop. See the HP 6890 Reference manual for cable information. Line Select RSĆ232 Expansion Slot AC Line Input Sample Fuse Remote Analog Input On/Off Switch Instrument Network Figure 3Ć7. Integrator Control Cables Receptacles 3-12 Artisan Technology Group - Quality Instrumentation ... Guaranteed | (888) 88-SOURCE | www.artisantg.com Creating the Little Falls Look German Components Through the remote control cable, the HP 3396 Integrator can: D be started and stopped under the control of other instruments. D provide readiness status to other instruments. D sense the readiness of other instruments. D start other instruments. Through the Sample Number (BCD) cable, the HP 3396 Integrator can: D accept binary coded decimal sample number data from an automatic sampler or sequencer. Installing the Sample Number (BCD) Cable The sample number cable allows the HP 3396 to accept BCD (binaryĆcoded decimal) sample number data from an automatic sampler or sequencer. Plug one end of the BCD cable into the 15Ćpin SAMPLE receptacle on the rear panel of the HP 3396 Integrator. If the instrument that supplies the BCD information is one of the HewlettĆPackard units indicated below, simply plug in the other end of the cable. Connects the HP 3396 to: HP Part Number HP 7673 (NonĆINET) Automatic Sampler 03396Ć60560 HP 1090 LC Auto Sampler 03396Ć60580 General Purpose (spade lug terminations) 03396Ć60530 If the general purpose cable is to be used, refer to the cable diagram in the Service section (Part 3) of this manual. Connect the appropriate wires at the end of the cable to the BCD signal source on the sampler or sequencer. 3-13 Artisan Technology Group - Quality Instrumentation ... Guaranteed | (888) 88-SOURCE | www.artisantg.com Cable Connections Connecting RSĆ232ĆC Cables Connecting a Remote Control Cable to HewlettĆPackard Equipment Install the indicated cable between the REMOTE receptacle on the back of the HP 3396 Series II Integrator and the HewlettĆPackard instrument. Connects the HP 3396 to : HP 6890 GC HP 5890A or HP 5890 Series II (analog output) Second HP 3394 or 3396 Integrator HP 1040 Diode Detector and HP 1090A/L LC HP 1046A Fluorescence Detector HP Part Number 03396Ć61010 03394Ć60560 03394Ć60580 03396Ć60650 03394Ć60600 Connecting a Remote Control Cable to NonĆHewlettĆPackard Units Install the general purpose remote control cable for nonĆHP equipment between the REMOTE receptacle on the back of the integrator and the nonĆHP analytical instrument. Connects the HP 3396 to : NonĆHP equipment (spade lug terminations) HP Part Number 03396Ć61030 Determine which instrument will be the controller". If the HP 3396 Integrator is to supply the start," one example of how the cable may be installed is shown below. 3-14 Artisan Technology Group - Quality Instrumentation ... Guaranteed | (888) 88-SOURCE | www.artisantg.com Creating the Little Falls Look German Components BLK PLUGGED INTO REMOTE" RED General Purpose Remote Control Cable HP 3396 START READY BRN GC ORN DETECTOR SIGNAL Analog Signal Cable Figure 3Ć8. Remote Control Cabling When [START] is pressed on the integrator, a oneĆsecond contact closure will be provided to the GC between the black (BLK) to orange (ORN) leads. Note: NonĆHP chromatographs used in temperatureĆprogrammed applications MUST be capable of having their oven temperature programmers started remotely by a oneĆsecond contact closure for properly automated operation under control of the HP 3396. If you perform temperatureĆprogrammed analyses, the chromatograph also may be equipped with ovenĆready sensing. If the ovenĆready sensing function is not available, or is not used, the HP 3396 assumes the oven is always ready. If the GC (or sampler) is to supply the start" to the HP 3396 Integrator, one example of how the cable may be installed is shown below. 3-15 Artisan Technology Group - Quality Instrumentation ... Guaranteed | (888) 88-SOURCE | www.artisantg.com Cable Connections Connecting RSĆ232ĆC Cables SAMPLER & SEQUENCER Sample Number Cable BCD SAMPLE NUMBER START GRN HP 3396 SAMPLE REMOTE General Purpose Remote Control Cable RED START READY START SIGNAL LINE (NONĆHP) BRN GC Figure 3Ć9. A Simple Automated System Whenever the nonĆHP cable is to be used, refer to the cable diagram in the service section (Part 3) of this manual. Connect the appropriate wires at the end of the cable to the BCD signal source on the sampler or sequencer. 3-16 Artisan Technology Group - Quality Instrumentation ... Guaranteed | (888) 88-SOURCE | www.artisantg.com Creating the Little Falls Look German Components Connecting RSĆ232ĆC Cables Note: The HP 3396 Integrator cannot function as a general purpose terminal. Line Select RSĆ232 Expansion Slot AC Line Input Sample Fuse Remote Analog Input On/Off Switch Instrument Network Figure 3Ć10. Integrator RSĆ232ĆC Cable Receptacle The HP 3396 can be connected with a RSĆ232ĆC cable to a computer and other external devices to transmit and receive data and commands. The RSĆ232ĆC connection must conform to EIA (Electronic Industries Association) standards. RSĆ232ĆC Interface installation is quite a bit more involved than simply choosing the proper cable and setting the configuration switches. Communications between an HP 3396 and an external computing device require programs to be running on the host to operate the RSĆ232ĆC link. Information about programs, required protocol, operation, cable selection, and configuration switch settings can be found in Book II of this manual. 3-17 Artisan Technology Group - Quality Instrumentation ... Guaranteed | (888) 88-SOURCE | www.artisantg.com Cable Connections Connecting RSĆ232ĆC Cables 3-18 Artisan Technology Group - Quality Instrumentation ... Guaranteed | (888) 88-SOURCE | www.artisantg.com 4 Exterior Cleaning 4-2 Removing/Reloading Paper 4-3 Maintaining the Printer 4-5 Routine Maintenance Artisan Technology Group - Quality Instrumentation ... Guaranteed | (888) 88-SOURCE | www.artisantg.com Routine Maintenance Exterior Cleaning 1. Periodically wipe clean the exterior of the case and printer window with a slightly damp cloth. Avoid using chemical spray cleansers and organicĆbased detergent solutions and solvents when cleaning the integrator case. 2. At least once every six months inspect the ventilation grills along the right side of the HP 3396 Integrator and under the leftĆhand corner of the keyboard. Clean the grills as necessary with a vacuum cleaner to remove dust and other obstructions. 4-2 Artisan Technology Group - Quality Instrumentation ... Guaranteed | (888) 88-SOURCE | www.artisantg.com Creating the Little Falls Look German Components Removing/Reloading Paper Paper must be reloaded whenever the paper supply runs out or if the paper is intentionally removed for some other reason, e.g. if it is accidently torn. When the instrument runs out of paper, the HP 3396 will print OUT OF PAPER: FEED W/ENTER, RESUME W/ESC . Removing Paper from the Printer 1. Find a line of perforations between the roll and where it enters the printer mechanism. Tear along the perforations. 2. Open the printer window, lift the bail arms forward, and pull the remaining sheets of paper up and out of the mechanism. 3. If a low pressure air supply is readily available, it sometimes helps to blow air directly into the print mechanism to remove any small, loose particles of paper from the area. Removing the paper separator will provide improved access to the area. Replace the paper separator when completed. Reloading Paper The paper should be positioned on the rear of the top flat surface of the integrator with the PRINT THIS SIDE facing down against the surface. After rotating around the roller, the PRINT THIS SIDE will be correctly positioned facing up. 1. Remove the printer window by lifting it up and toward yourself. 2. Pull both bail arms forward to their open positions. 4-3 Artisan Technology Group - Quality Instrumentation ... Guaranteed | (888) 88-SOURCE | www.artisantg.com Routine Maintenance Maintaining the Printer 3. InsertĂtheĂpaperĂintoĂtheĂslot under the paper separator. (It may be helpful to pull the paper separator forward temporarily until the paper is inserted.) Ensure that the edges of the roll of paper are flat and even. 4. Push the paper under the roller until its edge passes above the bail arms. 5. Align the holes in the left edge of the paper with the sprockets of the left pin wheel. 6. If necessary, adust the right pin wheel to the width of the paper. It can move sideways to accommodate for minor differences in paper widths. Align the holes in the right side of the paper with the sprockets of the right pin wheel. Be certain that the paper is straight and that both sides are even. 7. Push the bail arms back to their closed positions, locking the paper in position against the roller. Verify that the paper's PRINT THIS SIDE is correctly positioned on the side of the paper toward the print cartridge. Replace the printer window. 8. Press [SHIFT] [ENTER] to feed the paper through the printer mechanism. AfterĂpaperĂhasĂbeenĂreloaded,ĂtheĂgreenĂKEYBDĂindicatorĂwill continueĂtoĂflashĂandĂtheĂkeyboardĂwillĂbeĂlocked. 9. Press [ESC] to resume normal operation. 4-4 Artisan Technology Group - Quality Instrumentation ... Guaranteed | (888) 88-SOURCE | www.artisantg.com Creating the Little Falls Look German Components Maintaining the Printer Caution Never move the print carriage while the power is on. Doing so may cause damage to your printer. If you need to move the carriage, turn off the power and then slowly move it to the desired position. Replacing the Blotter Pad Replacing the blotter pad is the same procedure as its installation except that the old blotter must be removed first. 1. Remove the printer window. 2. Open the bail arms. 3. Turn the power off, then move the carriage away from the blotter. 4. Insert the tip of a pencil into the hole at the top of the blotter. Pull the pad up and away from it holder. Discard the used blotter. 5. Follow the installation instructions in chapter 2 for inserting the new pad. 4-5 Artisan Technology Group - Quality Instrumentation ... Guaranteed | (888) 88-SOURCE | www.artisantg.com Routine Maintenance Maintaining the Printer Checking the Print Cartridge Checking the print cartridge involves checking that the cartridge contains enough ink and that the ink flows easily. Chapter 2 of this manual provides instructions describing how to prime the cartridge and how to install a new cartridge should this prove necessary. To check the ink level in a cartridge: 1. Remove the printer window. 2. Pull down the carriage cradle latch. 3. Remove the print cartridge. 4. Examine the print cartridge to determine the amount of ink in it. If the bladder looks deflated like the one in the illustration below, it is low on ink and should be replaced. Figure 4Ć1. Empty Print Cartridge 5. If the bladder is low on ink, you should install a new print cartridge; see chapter 2. If the bladder is not empty, the cartridge may need priming. When a print cartridge is new, clogged, or has been mechanically jarred, it often requires priming. Refer to chapter 2 for the priming procedure. 4-6 Artisan Technology Group - Quality Instrumentation ... Guaranteed | (888) 88-SOURCE | www.artisantg.com Creating the Little Falls Look German Components Cleaning the Carriage Contacts If ink has seeped out of the cartridge onto the carriage, clean the carriage contact points with a swab dampened with water. Figure 4Ć2. Cleaning the Nozzles and Carriage Contacts Wipe the print cartridge face (nozzles) with a soft cloth or lintĆfree tissue. 4-7 Artisan Technology Group - Quality Instrumentation ... Guaranteed | (888) 88-SOURCE | www.artisantg.com Routine Maintenance Maintaining the Printer 4-8 Artisan Technology Group - Quality Instrumentation ... Guaranteed | (888) 88-SOURCE | www.artisantg.com 5 Filling out the Repair Information Form 5-2 Returning Your HP 3396 for Repair 5-5 Repacking Your Unit for Shipment 5-6 HP Service 5-7 Obtaining HP Service Artisan Technology Group - Quality Instrumentation ... Guaranteed | (888) 88-SOURCE | www.artisantg.com Obtaining HP Service Filling out the Repair Information Form The Repair Information Form and shipping label are included in the Customer Information Envelope when the HP 3396 integrator is first shipped from the factory. Please fill out this form completely and include it with your HP 3396 when the unit is returned to HP for repair. If you can not locate the form, contact your nearest HP Sales and Service Office for more information. A new blank form will accompany your HP 3396 when it is returned to you repaired. 5-2 Artisan Technology Group - Quality Instrumentation ... Guaranteed | (888) 88-SOURCE | www.artisantg.com Creating the Little Falls Look German Components REPA I R I N F OR M A TION F OR M 5-3 Artisan Technology Group - Quality Instrumentation ... Guaranteed | (888) 88-SOURCE | www.artisantg.com Creating the Little Falls Look Using this document as an Interleaf template IN THE USA: NORTH AMERICAN FIELD REPAIR CENTER Little Falls Site (4300) 2850 Centerville Road Wilmington, DE 19808 IN WEST GERMANY: HEWLETTĆPACKARD GmbH Reparaturzentrum Analytische Messtechnik ErmlisĆAllee DĆ7517 Waldbronn 2 Phone: 7243Ć6021 ELSEWHERE: Contact your local HP Analytical Sales and Service Office for information. 35900Ć90200 5-4 Artisan Technology Group - Quality Instrumentation ... Guaranteed | (888) 88-SOURCE | www.artisantg.com Creating the Little Falls Look German Components Returning Your HP 3396 for Repair The standard HP warranty features returnĆtoĆbench repair, including postage and handling. D In the United States: 1. Fill out both sides of the Repair Information Form completely. 2. Attach a copy of the form to the HP 3396. 3. Pack the unit securely (see Repacking Your Unit for Shipment" on the next page). 4. Use the peelĆoff address label (also included in the customer information envelope) and affix it to the outside of the shipping carton. D Elsewhere: 1. Fill out both sides of the Repair Information Form completely. 2. Contact your nearest HP Sales and Service Office for instructions on getting your unit returned for repair. A complete list of offices is included in the back of this manual. 3. Attach a copy of the form to the HP 3396. 4. Pack the unit securely (see Repacking your Unit for Shipment"). a. Send the unit to an HPĆdesignated service facility. 5-5 Artisan Technology Group - Quality Instrumentation ... Guaranteed | (888) 88-SOURCE | www.artisantg.com Creating the Little Falls Look Using this document as an Interleaf template Repacking Your Unit for Shipment 1. To prepare the HP 3396 for shipment, remove paper from the printer mechanism and unsnap paper roll holders from the rear of the instrument. Remove the print cartridge from the print carriage. 2. To repack your HP 3396 for shipment, we recommend that you use the original shipping container. If the original packing materials are not available, be sure to use a carton of at least 250Ćpounds test. Pack the HP 3396 Integrator with at least two inches of padding on all sides. 3. Do not include any operating accessories (including cables) with the HP 3396 unless the problem relates to an accessory. 4. On the Repair Information Form, be sure you detail the following items when you return your HP 3396 for repair: D A description of the exact configuration at the time of the malfunction, including the interface cable, computer, peripherals, and software in use. D A brief description of symptoms for service personnel, including any printout that shows what happened. D The serial number of the HP 3396 (located on the lower left portion of the rear panel). D Include your name, address, and a phone number at which you may be reached during the day. 5. Attach the Return Shipping Label originally packed in the Customer Information Envelope to the outside of the shipping carton. 6. Since inĆtransit damage is not covered by the warranty, we suggest that you always insure shipments. 5-6 Artisan Technology Group - Quality Instrumentation ... Guaranteed | (888) 88-SOURCE | www.artisantg.com Creating the Little Falls Look German Components HP Service OnĆsite service of your HP 3396 is available on a timeĆandĆmaterial basis or under a maintenance agreement. To request onĆsite service: 1. Fill out the reverse side of the Repair Information Form. 2. Call your local HP Sales and Service Office. Have the following information available (look on the back panel of your integrator for this information): D Model number: HP 3396C, M, etc. D Instrument Name: HP 3396 Series III. D Serial number: From the rear of the instrument. D Information from the reverse side of the Repair Information Form. 5-7 Artisan Technology Group - Quality Instrumentation ... Guaranteed | (888) 88-SOURCE | www.artisantg.com Creating the Little Falls Look Using this document as an Interleaf template 5-8 Artisan Technology Group - Quality Instrumentation ... Guaranteed | (888) 88-SOURCE | www.artisantg.com 6 Power Problems 6-2 Signal Problems 6-5 System Problems 6-9 Running the Automatic PowerĆOn Tests 6-14 Troubleshooting Artisan Technology Group - Quality Instrumentation ... Guaranteed | (888) 88-SOURCE | www.artisantg.com Troubleshooting Power Problems No Response at Initial Turn On (Unit does not function) Probable Causes D Voltage selection switch set improperly. (Instrument set to 115 V and plugged in to a 230 V circuit.) D Power is not available to HP 3396 Integrator. D Fuse is blown. Suggested Actions 1. Check that the line voltage selection switch on the rear panel is set to the proper voltage value (either 115 V or 230 V). 2. Check that the power cord is connected between the integrator and a live ac power source. If the wall receptacle is dead", contact your local electrician. 3. Check that the rear panel power switch is ON. 4. Check that the integrator's fuse is of the proper 3Ćampere value and is not blown. 6-2 Artisan Technology Group - Quality Instrumentation ... Guaranteed | (888) 88-SOURCE | www.artisantg.com Creating the Little Falls Look German Components Checking the Fuse The fuse is located near the power switch on the rear panel of the HP 3396 Integrator. 1. Turn the power switch on the rear panel OFF. 2. Disconnect the line power cord from both the wall receptacle and the rear of the integrator. WARNING FAILURE TO REMOVE THE POWER CORD FROM THE INTEGRATOR COULD RESULT IN ELECTRIC SHOCK AND PERSONAL INJURY. 3. Locate the fuse cap below the AC LINE socket. 4. Insert a small flathead screwdriver into the fusecap. Pushing in slightly, turn the fuse cap counterclockwise to free it. 5. Remove the fuse and visually inspect it. The wire inside the fuse should be unbroken. If the wire is broken, the fuse is defective. 6. If the fuse looks okay, reinstall it and look elsewhere for the problem. If the fuse is defective, replace it with a new fuse (3A, 250VAC, IEC 127 Type F, quickĆacting, 3AG). Caution If fuse blows a second time, contact HP service. 6-3 Artisan Technology Group - Quality Instrumentation ... Guaranteed | (888) 88-SOURCE | www.artisantg.com Troubleshooting Running the Automatic PowerĆOn Tests Power failed" Messages Appear After Working Probable Causes D Incorrect ac line voltage selection. (Integrator is set to 230 V and connected to a 115 V circuit.) D Poor line power supplied. Suggested Actions 1. If the line voltage selection switch on the rear panel is set improperly, change it. 2. Have an electrician check the line power for noise and/or surges. COMM Indicator Light Blinks After Initial Turn On Tests Are Complete Probable Causes D DATACOMM switches set incorrectly. D Faulty cable connection. Suggested Actions 1. Are the DATACOMM switches set correctly? If a host computer is not connected to the integrator, set the timeout duration switch to short". This is about 15 seconds. * 2. Is the cable connector in the REMOTE port seated properly? *Note: If switches are changed, the integrator must either be power cycled or [CTRL] [BREAK] for the new settings to be read. 6-4 Artisan Technology Group - Quality Instrumentation ... Guaranteed | (888) 88-SOURCE | www.artisantg.com Creating the Little Falls Look German Components Signal Problems Data Represents a Zero or Straight Baseline with INET Instruments Probable Causes D Disconnected or faulty HPĆIL cables. D C1 data path is inactive. D Problem with chromatograph. Suggested Actions 1. Check that all INET cables are connected. 2. Check status of C1 Data path using INET_CONFIGURATION command or INET LIST command. C1 Pros and C1 Cons should say IDLE". 3. Check that the HP 5890 GC or HP 1090L LC has compatible firmware. (All HP 6890 firmware is compatible.) D A revision letter of C" or higher must appear on the HP 5890 GC at turn on. D The HP 1090L LC code must be B2616 or higher. 4. Check chromatograph; refer to the chromatograph's operating manual for details. 5. If the suggestions in steps 1Ć4 did not help, obtain HP service. 6-5 Artisan Technology Group - Quality Instrumentation ... Guaranteed | (888) 88-SOURCE | www.artisantg.com Troubleshooting Running the Automatic PowerĆOn Tests Data Represents a Zero or Straight Baseline, or is Pinned at Maximum Value with Analog Signal Probable Causes D Signal switch on rear panel is in wrong position. D Problem with chromatograph. D Cabling problems. Suggested Actions 1. Is the signal switch in the OPERATE (middle) position? 2. Is the instrument supplying the signal operating properly? 3. Is the signal within the range of Ć10 mV to +1 V? 4. If a generalĆpurpose signal cable is being used, are the connections to the signal source correct? 5. Disconnect the HP 3396 from other equipment, then turn to Running the SelfĆTest Diagnostics" in section 7 of this manual. 6. Run test L, the Print/Plot test. D If the test passes, run A/D test. D If the test fails, obtain HP service. 7. Run test B, the A/D Test. D If test passes, run 0V and 1V tests. D If test fails, obtain HP service. 8. Turn to Running the Signal Tests" and run the 0V and 1V Tests. D If tests pass, there is a chromatographic or cabling problem. D If tests fail, obtain HP service. 9. Is INET cable connected? If INET is connected, C1 Pros and C1 Cons should say IDLE". Check configuration. 6-6 Artisan Technology Group - Quality Instrumentation ... Guaranteed | (888) 88-SOURCE | www.artisantg.com Creating the Little Falls Look German Components Excessive Noise or Drift on Chromatogram Probable Causes D Signal source malfunction or improper control settings. D Signal itself drifts or is noisy (problem with chromatograph). D Cabling problem. Suggested Actions 1. Is the instrument supplying the signal operating properly? Are the signal output controls set appropriately? 2. Is the signal from the analytical instrument drifting or noisy? 3. If a generalĆpurpose signal cable is being used, are the connections to the signal source secure? 4. Disconnect the HP 3396 from other equipment. 5. Turn to Running the SelfĆTest Diagnostics" in section 7 of this manual. Run Test B, the A/D test. D If the test passes, the cable or a connection is defective. D If the test fails, go to next step. 6. Turn to Running the Signal Tests". Run the 0V and 1V Tests. D If all tests pass, there is a chromatographic or cabling problem. D If tests fail, obtain HP service. 6-7 Artisan Technology Group - Quality Instrumentation ... Guaranteed | (888) 88-SOURCE | www.artisantg.com Troubleshooting Running the Automatic PowerĆOn Tests Reported, Processed, or Raw Data Are Not What You Expected Probable Causes D Signal source malfunction or improper controls settings. D Signal itself is at fault. D Cabling problem. D Inactive INET data path. D Calculation or calibration problem. Suggested Actions 1. Is the instrument supplying the signal operating properly? 2. Is the signal being applied within the range of Ć10 mV to +1 V (analog only)? 3. If a generalĆpurpose signal cable is being used, are the connections to the signal source correct? 4. If INET is being used, verify that the C1 data path is active. 5. Was the proper calculation chosen? Check if PKWD and THRSH were properly set. 6. Turn to Running SelfĆTest Diagnostics" in this chapter and run Test T, Demo Chromatogram. If demo chromatogram is okay, continue with step 7. 7. Disconnect the HP 3396 from other equipment, then run Test B, the A/D test. D If test passes, run 0V and 1V tests. D If test fails, obtain HP service. 8. Turn to Running the Signal Tests" and run the 0V and 1V tests. D If the tests pass, the cable is defective or signal is at fault. 6-8 Artisan Technology Group - Quality Instrumentation ... Guaranteed | (888) 88-SOURCE | www.artisantg.com Creating the Little Falls Look German Components System Problems Integrater Cannot Be Started or Stopped from an External Device Probable Causes D Problem with external device. D Capability not provided by cable or external device. D Disconnected or faulty cable. D Signal incompatibility. Suggested Actions 1. Is the external device working? 2. Do the instrument and cable both have the capability of starting or stopping the HP 3396? Requires a oneĆsecond contact closure. 3. Is the remote control cable securely and properly connected? 4. Turn to Running SelfĆTest Diagnostics". Run Test 9, the remote control and sample input test. If test fails, obtain HP service. 5. For custom cable connections, verify compatibility of signals between the remote instrument and the HP 3396. 6. If the suggestions in steps 1Ć5 did not help, obtain HP service. 6-9 Artisan Technology Group - Quality Instrumentation ... Guaranteed | (888) 88-SOURCE | www.artisantg.com Troubleshooting Running the Automatic PowerĆOn Tests HP 3396 Does Not Start or Stop an External Device Probable Causes D Problem with external device. D Capability not provided by cable or recognized by remote unit. D Disconnected or faulty cable. D Signal incompatibility. Suggested Actions 1. Have any error messages been printed? 2. Is the external device working? 3. Do the external device and the cable both have the capability of being activated by the HP 3396? Integrator provides a oneĆsecond contact closure between SO1 and SO2 output pins on the remote cable. 4. Is the remote control cable securely and properly connected? 5. For custom cable connections, verify compatibility of signals between the HP 3396 Series II and the external device. 6. If the suggestions in steps 1Ć5 did not help, obtain HP service. 6-10 Artisan Technology Group - Quality Instrumentation ... Guaranteed | (888) 88-SOURCE | www.artisantg.com Creating the Little Falls Look German Components HP 3396 Does Not Communicate with RSĆ232ĆC Device Probable causes D Host computer not properly programmed. D HP 3396 HP 5890 GC with an HP 19395A (YĆcable) 03394Ć60610 configuration switches set incorrectly. D Improper or faulty cables. Suggested Actions 1. Check compatibility and programming of host computer. 2. Check configuration switch settings using the system command. Are they correct? You can override the default settings with the SSET RS232 command; see RS232 connections section of this manual. 3. Are all cables in question securely connected and operative? 6-11 Artisan Technology Group - Quality Instrumentation ... Guaranteed | (888) 88-SOURCE | www.artisantg.com Troubleshooting Running the Automatic PowerĆOn Tests LOOP DOWN" Message Printed Probable Causes D HPĆIL or INET instrument is not functioning. D Disconnected or faulty HPĆIL cable. D Environmental problem (site requirements not met). Suggested Actions 1. Has HPĆIL been installed properly? 2. Go Turn to Running the SelfĆTest Diagnostics". With the all INET instruments connected in the loop and powered on, perform test 8 (HPĆIL bus test). D If the test passes, HPĆIL is working. D If the test fails, subtract one instrument at a time from the loop until the test passes in order to identify the defective instrument or cable. 3. Verify an individual HPĆIL or INET device by running its selfĆtest. 4. If all instruments are working, check HPĆIL cables. Connect all cables together in a loop and then connect them to the HP 3396 Series II. Turn to Running SelfĆTest Diagnostics" and run test 7, the HPĆIL port test. D If the test passes, all cables are okay. D If the HPĆIL port test fails, remove one cable at a time until the test passes in order to identify the defective cable. 5. Check power mains for line faults. 6. If the suggestions in steps 1Ć5 did not help, obtain HP service. 6-12 Artisan Technology Group - Quality Instrumentation ... Guaranteed | (888) 88-SOURCE | www.artisantg.com Creating the Little Falls Look German Components External Sample Number is Missing or Inaccurate Probable Causes D Cabling problem. Suggested Actions 1. Is the sample number cable connected properly? 2. Is the BCD sense wire in the correct position for the application? 3. Verify the integrity of sample number cable. 4. Turn to Running SelfĆTest Diagnostics" and run Test 9, remote control and sample number input test. D If test passes, cable is at fault. D If test fails, call HP service. 6-13 Artisan Technology Group - Quality Instrumentation ... Guaranteed | (888) 88-SOURCE | www.artisantg.com Troubleshooting Running the Automatic PowerĆOn Tests Running the Automatic PowerĆOn Tests The automatic powerĆon tests help you isolate problems quickly when the HP 3396 is suspected of being at fault. 1. Invoke a coldĆstart by simultaneously pressing the [CTRL] and [DEL] keys. The operating parameters are restored to their default values and the information stored on the memory disk M: are lost during a coldĆstart. The integrator also performs a series of selfĆtests during a coldĆstart. 2. Keyboard indicators monitor the progress of the tests and freeze in a particular pattern if a failure occurs. 3. If the instrument prints firmware revision numbers (Z80/HOST/INET/PP) and the printer/plotter confidence test properly appears, the green KEYBOARD indicator is ON and an asterisk prompt prints out, the unit has passed the tests. Figure 6Ć1. Printer/Plotter Confidence Test. 6-14 Artisan Technology Group - Quality Instrumentation ... Guaranteed | (888) 88-SOURCE | www.artisantg.com Creating the Little Falls Look German Components 4. If two rows of a number (1, 2, 3, 4, 5, 6, or 7) occur instead of the normal alphanumeric printout before the chromatogram, an internal error has been sensed as is illustrated in Figure 6Ć2. Figure 6Ć2. Printer/Plotter Error Condition. Refer to the service section of this manual or call your local HewlettĆPackard office. 6-15 Artisan Technology Group - Quality Instrumentation ... Guaranteed | (888) 88-SOURCE | www.artisantg.com Troubleshooting Running the Automatic PowerĆOn Tests 6-16 Artisan Technology Group - Quality Instrumentation ... Guaranteed | (888) 88-SOURCE | www.artisantg.com 7 Purpose of This Section 7-2 Safety Information 7-2 Running the SelfĆTest Diagnostics 7-3 Description of SelfĆTest Diagnostics 7-6 Running the Signal Tests 7-15 ZeroĆVolt Input Test 7-17 OneĆVolt Input Test 7-18 Diagnostic Procedures 7-19 Disassembly and Reassembly Instructions 7-34 Diagnostics Artisan Technology Group - Quality Instrumentation ... Guaranteed | (888) 88-SOURCE | www.artisantg.com Diagnostics Purpose of This Section The purpose of this section is to provide additional information about servicing your HP 3396. This information is important for qualified service technicians or for reference by HewlettĆPackard customer engineers servicing your instrument at your location. The information presented here does not mean that these servicing procedures can be performed by you. Only qualified service engineers should attempt any of the test or disassembly procedures described here. Safety Information Caution Circuit cards contain staticĆsensitive devices. Do not remove the instrument cover or keyboard except at an approved electrostaticĆfree workstation. WARNING THE POWER SUPPLY MODULE IS A DIRECT LINEĆPOWERED SWITCHĆMODE SUPPLY. ELECTRICAL NODES ON THIS MODULE CAN BE AT POTENTIALS UP TO 370 V DC. USE EXTREME CARE WHEN MEASURING LOWĆVOLTAGE DC OUTPUTS. 7-2 Artisan Technology Group - Quality Instrumentation ... Guaranteed | (888) 88-SOURCE | www.artisantg.com Diagnostics Diagnostic Procedures Running the SelfĆTest Diagnostics If the HP 3396 fails to operate as expected, an instrument connected to the HP 3396 may be at fault. The HP 3396 Integrator has builtĆin selfĆtest procedures that are useful in determining which instrument, if any, in the system" is at fault. Document any information that you receive from these tests to report to your HewlettĆPackard service representative. Caution Save all BASIC programs, methods, and other files, if possible, on an external disk drive or expansion card before starting the selfĆtest diagnostics. 1. To start the selfĆtest diagnostics, simultaneously press the following keys: [CTRL] [SHIFT] [BREAK] Hold them down until the instrument starts printing. If you release any of these keys too soon, the diagnostics will not start. 2. If you pressed the above three keys correctly, you'll see this printout: SELF TEST (Press (M) key for more help) => 3. Type [M] to list the tests available. Figure 7Ć1 is a printout of this list. 7-3 Artisan Technology Group - Quality Instrumentation ... Guaranteed | (888) 88-SOURCE | www.artisantg.com Diagnostics Diagnostic Procedures => M Press the keys for the tests no tests, you will return to selected the tests you want, continuously unless an error you want to perform. If you select the system software. After you have press ENTER. The tests will run halts them. (0) (1) (2) (3) (4) (5) (6) (7) (8) (9) (B) (L) (K) (N) (O) (A) (T) Clear all tests and demo chromatogram ROM crc and bank select test Quick RAM test Extended RAM test (20 min per 128K) 8051 ROM and RAM test 8051 interface test RS232 port test HP-IL port & bus test PCMCIA socket test (requires loop–back connector) Remote control and sample # input test A/D noise test P/P test Keyboard test High speed printer test P/P ROM and RAM test Run all tests Enable demo chromatogram (P) (S) (C) (H) Print error messages Suppress error messages Continue testing if error occurs Halt testing if error occurs (press SPACE to continue) => Figure 7Ć1. SelfĆTest Diagnostic Menu 4. Type the number or letter for the desired tests after the prompt, =>. If you strike an incorrect test number, press [0] (zero) immediately afterward to clear all previous test selections. 5. Press [P] to print all selfĆtest error messages, or press [S] to suppress all error messages. 7-4 Artisan Technology Group - Quality Instrumentation ... Guaranteed | (888) 88-SOURCE | www.artisantg.com Diagnostics Diagnostic Procedures 6. Press [H] after the appropriate test numbers to halt testing when an error occurs. Press the space bar after an error prints out to resume testing. Press [C] after the appropriate test numbers to resume testing after an error occurs. Note: If [S] is not pressed, [P] is assumed, and if [H] is not pressed, [C] is assumed. 7. Press [ENTER] to start the test(s). The set of selfĆtest diagnostics run continuously unless you press [H] to halt testing after the first error. The keyboard indicators (LEDs) display which diagnostic tests are being run. Information codes for an error are printed if you do not press [S]. See the section titled Interpreting Diagnostic Test Failures" in this chapter for additional information on how to interpret diagnostic messages. Tests from this dialog can confirm a fault discovered during the powerĆon selfĆtests or determine if the HP 3396 Series II is the instrument in a system" that is at fault. 8. To halt all testing, turn the integrator off. When you want to halt the demo chromatogram without turning the instrument off, press [CTRL] [SHIFT] [BREAK] to reinitiate the diagnostic menu, then press [0] to exit this menu and return to the system prompt. This method preserves internal memory. 7-5 Artisan Technology Group - Quality Instrumentation ... Guaranteed | (888) 88-SOURCE | www.artisantg.com Diagnostics Diagnostic Procedures Description of SelfĆTest Diagnostics (1) ROM CRC and Bank Select TestĊThe data contents of ROM are manipulated mathematically by a special algorithm (a cyclic redundancy checkĆ16 routine). The resultant value after all ROM locations are operated on will be zero. If the value is not zero, the ROM is declared defective and an error message will be printed. A bank select test is also performed that checks switching between the operating system ROM and the diagnostic ROM. (2) Quick RAM TestĊThis test performs a walkingĆ1s and a walkingĆ0s test throughout RAM. An arbitrary pattern is then written into RAM by the CPU and is read back for accuracy. Any incorrect data will cause the test to fail. (3) Extended RAM TestĊPermutated data is written into every location of RAM and then read back for verification. (4) 8051 ROM and RAM TestsĊThe HOST CPU performs a CRCĆ16 routine to test its internal ROM. If the resultant checksum is incorrect, this test fails and a corresponding error message will be printed. The HPĆIL/INET CPU also does a CRCĆ16 routine on the applications EPROM if installed. The Z80A main CPU then requests each I/O CPU (HOST and INET) to test its internal RAM. Each I/O CPU will write permutated data into the internal RAM and reads the data back for verification. (5) 8051 Interface TestsĊData is written into RAM by the Z80A CPU then permutated by the HOST CPU. The Z80A then checks the modification and permutates the data again. The HPĆIL/INET CPU modifies the data pattern that is again checked by the Z80A. After this test has been performed for every third location in RAM, the Z80A will reread these locations to verify the correct data. (6) RSĆ232ĆC Port TestĊThis test requires the connection of the DataComm loopback test connector (HP part number 03396Ć60540) to 7-6 Artisan Technology Group - Quality Instrumentation ... Guaranteed | (888) 88-SOURCE | www.artisantg.com Diagnostics Diagnostic Procedures the connector on the back panel. This connector loops back the TXD (transmit) output to the RXD (receive) input. Data is then written to the port, looped back to the input by the connector, and then read by the CPU for accuracy. (7) HPĆIL/INET Bus TestĊThis test requires the connection of an HPĆIL cable to the rear panel INET IN and OUT jacks. The interpreter will transmit all possible INET data patterns onto the loop and read them back to verify correct reception of the data. During this test, the HP 3396 may remain connected to other instruments on INET. This test is particularly useful for identifying which instrument on the loop is causing the fault. If the test fails, one instrument at a time can be removed until the test passes, verifying the faulty instrument. (8) PCMCIA Socket TestĊThis test requires the connection of two PCMCIA loopback test connectors to the PCMCIA sockets on the back panel. It is used by the factory to verify the manufacturing process. To test the sockets at a customer site, exercise PCMCIA functionality with an expansion card known to be in good working order. (9) Remote Control and Sample Number Input TestĊThis test verifies the remote and sample connectors by connecting a jumper wire between the pins of the connectors. The HP 3396 will print out a response which can be compared to the INFO values in tables 7Ć9 and 7Ć10 for accuracy. (B) A/D Noise TestĊThis test checks the HP 3396 analogĆtoĆdigital subsystem for internal noise. All operating parameters are set internally for plotting the noise signal. Be sure the HP 3396 has been powered ON for at least 30 minutes before running this test. An example of an A/D test is shown in figure 7Ć2. If the number for peakĆtoĆpeak noise on your printout is 3.0 or less, the test passes. 7-7 Artisan Technology Group - Quality Instrumentation ... Guaranteed | (888) 88-SOURCE | www.artisantg.com Diagnostics Diagnostic Procedures A/D Test PeakĆtoĆPeak Noise = 1.008 Figure 7Ć2. A/D Test Results (L) P/P Test (Print/Plot Test)ĊThis test will print out four lines of the entire HP 3396 character set. The first two lines will be in large font, and the second two lines will be in small font; then, a diagonal line and a horizontal line will be plotted across the full width of the paper. The printout can be checked visually for any irregularities. (See example in figure 7Ć3.) 7-8 Artisan Technology Group - Quality Instrumentation ... Guaranteed | (888) 88-SOURCE | www.artisantg.com Diagnostics Diagnostic Procedures Figure 7Ć3. Example of Test L (K) Keyboard TestĊThe keyboard test will verify that the keyboard is functional by printing the key presses. (N) HighĆSpeed PrinterĊOne possible problem in the printer/plotter subsystem is slippage of the printhead motor. This would appear as a baseline offset in a real chromatogram. The test provides an excellent means for evaluating potential motor slippage because of the rigorous test plot with annotation. The test generates 10 seconds of square wave plot followed by 110 seconds of random noise, with annotation. The noise is followed by another 10 seconds of square wave. If slippage were to occur, it would probably occur during the noise plot because of the high torque requirements on the motor. Any motor slippage would be detected by observing the square waves. The distance from the left and right edges of the paper to the edges of the plot would vary depending on whether the motor slipped. (See figure 7Ć4.) 7-9 Artisan Technology Group - Quality Instrumentation ... Guaranteed | (888) 88-SOURCE | www.artisantg.com Diagnostics Diagnostic Procedures A B A should equal B. If it does not, there has been some motor slippage. Figure 7Ć4. Example of Test N After running at least one pass of the test, observe the distance from the edge of the plot to the edge of the first set of square waves. Compare this distance to the distance in the second set of square waves. If they are the same, the motor did not slip. In most cases, slippage indicates a defective motor. (O) P/P ROM and RAM TestĊThis test checks the internal ROM of the print/plot processor using a CRC test similar to test 1. Both the print/plot internal RAM and external RAM are tested similar to test 2, the quick RAM test. Data is written into the RAM and then read back from the RAM for verification. Any errors would result in a test failure and an appropriate error message will be printed. Failure of this test at powerĆon will result in numbers (1 to 7) being printed instead of the internal character set (see figure 7Ć5). 7-10 Artisan Technology Group - Quality Instrumentation ... Guaranteed | (888) 88-SOURCE | www.artisantg.com Diagnostics Diagnostic Procedures Figure 7Ć5. Example of Test O Failure at PowerĆOn (A) Run All TestsĊSelecting test A will cause all the above tests to run consecutively. (T) Enable Demo ChromatogramĊSelecting this test enables the demo chromatogram. The demo chromatogram is internally stored signal data that can be used to verify performance and as a training tool in conjunction with the cookbook" section of the operating manual. Running the demo chromatogram and obtaining positive results verifies every subsystem in the unit, except the A/D. Figure 7Ć6 is an example of a demo chromatogram on a good unit. 7-11 Artisan Technology Group - Quality Instrumentation ... Guaranteed | (888) 88-SOURCE | www.artisantg.com Diagnostics Diagnostic Procedures Figure 7Ć6. Example of Demo Chromatogram Test T 7-12 Artisan Technology Group - Quality Instrumentation ... Guaranteed | (888) 88-SOURCE | www.artisantg.com Diagnostics Diagnostic Procedures Performing Test T 1. Disconnect any HPĆIL cables from rear of instrument. 2. After selecting test T, set [ATT 2^] to 4 and [CHT SP] to 4. 3. Press the [START] key to begin the chromatogram. 4. Press the [STOP] key to end the chromatogram after the peak marked with a retention time of 1.150 has been plotted. The demo chromatogram should resemble figure 7Ć6. Keyboard status indicator sequenceĊWhenever a selfĆtest is selected, it will run continuously until the unit is turned off. The keyboard status indicators (LEDs) will indicate which test is running, according to table 7Ć1. At the conclusion of the test, all indicators will blink, indicating a successful completion of the test. If a test fails, an appropriate error message will be printed. (See Interpreting Diagnostic Test Failures" in this chapter.) At powerĆon the integrator runs tests 1, 2, 4, 5, and 0 as part of the powerĆon selfĆtest. Table 1-1. Keyboard Status Indicators Sequence Test No. KYBD COMM READY RUN 1 2 3 4 5 6 7 8 9 B L K N O Off Off Off Off Off Off Off On On On On On On On Off Off Off On On On On Off Off Off Off On On On Off On On Off Off On On Off Off On On Off On Off On Off On Off On Off On Off On Off On Off On On 7-13 Artisan Technology Group - Quality Instrumentation ... Guaranteed | (888) 88-SOURCE | www.artisantg.com Diagnostics Diagnostic Procedures Table 1-2. Equipment Needed for SelfĆTest Diagnostics Test Number Equipment Needed Installation Jack 6 Test connector HP part number 03396Ć60540 COMPUTER 7 HPĆIL cable(s) INSTRUMENT NETWORK 8 HPĆIL cable(s) and device(s) INSTRUMENT NETWORK A Test connector HPĆIL cable(s) COMPUTER INSTRUMENT NETWORK T None Before selecting tests 6, 7, 8, 9, B, and T, follow the appropriate instructions below. Test 6 Connect the test connector (HP part number 03396Ć60540) to the rear panel RS232" jack. Test 7 Connect one or more HPĆIL cables to the INSTRUMENT NETWORK" jacks on the rear of the HP 3396. Test 8 Leave any HPĆIL or INET devices connected to the HP 3396 via HPĆIL cables. Test 9 Disconnect any remote control or sample number cables connected to the integrator before running the test. Test B Before selecting this test: 1. Set the analog input switch to the 0ĆV (down) position with a small, straightĆblade screwdriver. 2. Make sure the unit has been poweredĆon for at least 30 minutes. 7-14 Artisan Technology Group - Quality Instrumentation ... Guaranteed | (888) 88-SOURCE | www.artisantg.com Diagnostics Diagnostic Procedures Running the Signal Tests In addition to the selfĆtest diagnostics, A/D signal problems can be detected using the 0ĆV and 1ĆV tests described in this section. Caution Save all BASIC programs, methods, and other files, if possible, on an external disc drive or expansion card before starting the 0ĆV and 1ĆV input tests. The SSET ANALOG Command The SSET ANALOG command is used to change the A/D reference voltage for the following tests: ONE-VOLT INPUT TEST; ONE-VOLT PLOT TEST; ZERO-VOLT INPUT TEST; ZERO-VOLT PLOT TEST. The current analog input setting is shown with every SYSTEM command. The last line printed by the HP 3396 after a SYSTEM command is: ANALOG INPUT IS NORMAL AND IS ACTIVE If the reference voltage has been changed, the reponse to the SYSTEM command will reflect the change. The reference voltage can be changed either from the system prompt (*) or from the BASIC prompt (<). It can be set for 0 or 1 volts. To set the reference voltage to 1V, type: SSET ANALOG R1 [ENTER] The HP 3396's response to a SYSTEM command now ends: ANALOG INPUT IS 1V REF AND IS ACTIVE 7-15 Artisan Technology Group - Quality Instrumentation ... Guaranteed | (888) 88-SOURCE | www.artisantg.com Diagnostics Diagnostic Procedures To change to a 0 volt reference, type: SSET ANALOG R0 The last line of the SYSTEM command response is now: ANALOG INPUT IS 0V REF AND IS ACTIVE After conducting the test you must return the system to NORMAL operating mode using the SSET ANALOG command again. Type: SSET ANALOG RN If the SSET ANALOG command is used improperly, the HP 3396 prints the following error message: SSET ANALOG WANTS VALUE R0", R1", OR RN" If you start a run with the analog input set to 0 or 1 with the SSET ANALOG command, the run header is appended to as a warning that the reference input was plotted. The following message appears. * RUN # 1 JAN 1, 1901 00:01:02 ANALOG INPUT R0 You should set the analog input to NORMAL, and then repeat the run. 7-16 Artisan Technology Group - Quality Instrumentation ... Guaranteed | (888) 88-SOURCE | www.artisantg.com Diagnostics Diagnostic Procedures ZeroĆVolt Input Test The zeroĆvolt input test reports the value of a 0ĆV input signal as measured by the HP 3396. The reported value can be inspected to ensure that it is within acceptable limits. 1. Use the SSET ANALOG command to set the analog voltage to zero. Allow the input to stabilize for several minutes. Then press [LIST] [ZERO] The HP 3396 prints LIST: ZERO = xx, yyyy.yyy where xx is the plot position of the printhead as a percentage of fullĆscale deflection, and yyyy.yyy is the value (in millivolts) of the 0ĆV input signal as measured by the HP 3396. The yyyy.yyy value must be 0 +4 mV. 7-17 Artisan Technology Group - Quality Instrumentation ... Guaranteed | (888) 88-SOURCE | www.artisantg.com Diagnostics Diagnostic Procedures OneĆVolt Input Test The oneĆvolt input test reports the value of a 1ĆV input test signal measured by the HP 3396. 1. Use the SSET ANALOG command to set the analog voltage to one. Allow the input to stabilize for several minutes. Then press [LIST] [ZERO] The HP 3396 prints LIST: ZERO = xx, yyyy.yyy where xx is the plot position of the printhead as a percentage of fullĆscale deflection, and yyyy.yyy is the value (in millivolts) of the zero input signal as measured by the HP 3396. The yyyy.yyy value should be between 800 and 1084. 2. Repeat [LIST] [ZERO] several times. The voltage measured should be consistently between 800 and 1084. 7-18 Artisan Technology Group - Quality Instrumentation ... Guaranteed | (888) 88-SOURCE | www.artisantg.com Diagnostics Diagnostic Procedures Diagnostic Procedures Measuring dc Supply Voltages The power supply module, HP part number 0950Ć1884, provides three regulated voltages to the main PC board. These voltages are used either directly by circuits on the board or are converted to other voltages for special purposes. The 5ĆV supply is used for CPUs, memory, general logic circuits, and paper motor drive. The +12ĆV supply is used for the print carriage motor drive, ink dot firing, and A/D converter. The -12ĆV supply is used for RSĆ232ĆC communication and printer analog circuits. The dc supply voltages can be measured under three conditions: isolated, idle load, and full load. When checking these voltages, be sure that you match the test limits on the supply with the conditions of the test. Refer to table 7Ć4 for the test limits for each voltage under each of these conditions. The supply test points can be located at the left rear corner of the main PC board. See tables 7Ć3 and 7Ć5 and figure 7Ć9 for detail identifying the test points. Equipment required: D Voltmeter, at least 3Ć1/2 digits resolution D 15Ćohm 2Ćwatt resistor (HP part number 0698Ć3605) Follow the instructions in this chapter and disassemble the unit through Remove the Print Mechanism." WARNING IT IS DANGEROUS AND UNNECESSARY TO PROBE THE POWER SUPPLY VOLTAGES AT THE POWER SUPPLY END OF THE DC CABLE. HIGH VOLTAGES EXIST ON THE HEAT SINKS AND OTHER COMPONENTS OF THE POWER SUPPLY MODULE. 7-19 Artisan Technology Group - Quality Instrumentation ... Guaranteed | (888) 88-SOURCE | www.artisantg.com Diagnostics Diagnostic Procedures Idle Load Measurement To measure the voltages at idle load conditions, do the following: 1. Disconnect motor cables from P8 and P3. 2. Apply power to the unit. 3. Measure dc voltages at the P2 test points. 4. Turn off power. FullĆload Voltage Drop Measurement The fullĆload test is performed differently when looking at the 5ĆV supply or the +12ĆV supply. To test the 5ĆV supply at full load, do the following: 1. Connect the paper motor at P8. 2. Disconnect the print carrier motor P3. 3. Disconnect paper sensor cable at P7. 4. Connect voltmeter leads to test pins at P2. 5. Apply power to the unit. The initial reading should be near the idle measurement, but as the confidence test proceeds (after about 9 seconds), the voltage should drop. The lowest reading obtained before the keyboard LEDs go out should be used to verify the fullĆload drop. 6. Turn off power. To test the +12ĆV supply at full load, do the following: 1. Disconnect the paper sensor cable from P7. 2. Disconnect the paper motor from P8. 3. Connect the print carriage motor to P3. 7-20 Artisan Technology Group - Quality Instrumentation ... Guaranteed | (888) 88-SOURCE | www.artisantg.com Diagnostics Diagnostic Procedures 4. Remove the print cartridge. 5. Apply power and observe the power supply voltages during the highĆspeed motions of the print carriage during the confidence test interval. Use the lowest reading to calculate observed fullĆload voltage drop. 6. Turn off power. Isolated Measurement This measurement must be made with an approximately 15Ćohm load on the +5ĆV supply. If a load resistor is not available, either print mechanism motor can be used as a load for the +5ĆV supply. Use two 24ĆAWG solid or tinned stranded jumper wires to connect pins 3 and 9 of the dc cable to pins 1 (red) and 2 (brown) of either motor. This will provide a 14Ćohm load for this test. 1. Find the dc supply cable that passes through the main sheet metal bracket and remove it from main board connector P1. (See figure 7Ć11 for detail on removing this connector). 2. Obtain a 15Ćohm 2Ćwatt resistor (HP part number 0698Ć3605) with at least 3/4Ćin.Ćlong leads. Bend the leads at right angles to the body to form a U shape. 3. Insert the resistor leads directly into the dc cable between pins 3 and 9. 4. Apply power to the unit. The voltages should then be checked by probing the exposed contacts on the top of the connector body. 5. Turn off power. 7-21 Artisan Technology Group - Quality Instrumentation ... Guaranteed | (888) 88-SOURCE | www.artisantg.com Diagnostics Diagnostic Procedures Table 1-3. Test and Interconnect Points Shown in Figure Description Test Point 1 7Ć9 DC Secondary Connection P1 2 7Ć9 DC Test Points P2 3 7Ć9 Optical Sensor Connection P4 4 7Ć9 Paper Drive Connection P8 5 7Ć9 Print Carriage Connection P3 6 7Ć9 OutĆofĆPaper Sense Connection P7 21 8Ć1 AC Primary Connection J1 8 7Ć9 Print Cartridge Connection J3 Item Table 1-4. The dc Voltage Measurement Limits Isolated Idle Load Voltage Drop Full Load 5.16 to 5.26 5.10 to 5.19 40 to 100 mV +12 V 10.75 to 13.75 11.30 to 13.62 50 to 200 mV -12 V -10.5 to -14.5 -10.98 to -14.1 Not Applicable Supply +5 V 7-22 Artisan Technology Group - Quality Instrumentation ... Guaranteed | (888) 88-SOURCE | www.artisantg.com Diagnostics Diagnostic Procedures Table 1-5. The dc Voltage Test Points Supply Isolated Idle, Full Load Common DC Cable pin 3 or 8 P2 pin 5 +5 V DC Cable pin 4 or 9 P2 pin 7 +12 V DC Cable pin 7 or 2 P2 pin 3 -12 V DC Cable pin 6 or 1 P2 pin 1 Measuring Motor Windings This procedure is used to test for internal shorts in either the print carrier or the paper drive motor. The same procedure is used for both motors. The equipment required is an ohmmeter with sensitive low ohms range (200 ohms or less). Turn off power. Follow the disassembly instructions up to and including Remove the Top Cover." Do the following for each motor: 1. Disconnect the motor from the main PC board from P8 or P3. 2. Probe the exposed crimp contacts on the top of the connector. 3. Compare the readings obtained to the limits in tables 7Ć6 and 7Ć7 for that motor. 7-23 Artisan Technology Group - Quality Instrumentation ... Guaranteed | (888) 88-SOURCE | www.artisantg.com Diagnostics Diagnostic Procedures Table 1-6. Print Carriage Motor Winding Resistances Red to Brown Blue to Yellow 12.6 to 15.4 ohms 12.6 to 15.4 ohms Note: The motor has two white wires. The following measurements will show an OPEN CIRCUIT to one white wire and show indicated valĆ ue to the other white wire. Red or Brown to White Blue or Yellow to White or Black 6.3 to 7.7 ohms 6.3 to 7.7 ohms Table 1-7. Paper Drive Motor Winding Resistances Red to Brown Blue to Yellow 13 to 15.8 ohms 13 to 15.8 ohms Note: The motor has two white wires. The following measurements will show an OPEN CIRCUIT to one white wire and show indicated value to the other white wire. Red or Brown to White Blue or Yellow to White 6.5 to 7.9 ohms 6.5 to 7.9 ohms 7-24 Artisan Technology Group - Quality Instrumentation ... Guaranteed | (888) 88-SOURCE | www.artisantg.com Diagnostics Diagnostic Procedures Partitioning Failures All diagnostic tests are for circuitry on the main PC board as described in chapter 5. A failure of any of these tests (resulting in an `ERROR=' message) strongly indicates an electronic failure on this circuit card. If the PowerĆOn Confidence Tests do not run at all, then the problem can be on the main PC board or the power supply module. Paper or pen motion failures in the confidence test or any diagnostic might indicate a printer problem but more likely a main PC board problem. Before performing any of the troubleshooting procedures detailed below, do the following: 1. Remove any cables from the rear panel. 2. Disassemble the unit through Remove the Top Cover." 3. Remove the print cartridge. Module Level Troubleshooting The following troubleshooting tree is based on symptoms that are observed during the powerĆon confidence tests. Each observable symptom is followed by several potential causes. For each cause there is an action listed that will confirm the cause and indicate the recommended repair. If the cause is not confirmed, continue with the next potential cause. When you reach the last cause for the symptom, no confirmation is required. Please refer to chapter 5 for a description of the proper behavior of the powerĆon confidence tests. If the instrument fails to execute these tests, find the appropriate symptom from the following charts. Follow the recommended actions in the order indicated. 7-25 Artisan Technology Group - Quality Instrumentation ... Guaranteed | (888) 88-SOURCE | www.artisantg.com Diagnostics Diagnostic Procedures SYMPTOM: LEDs do not light at powerĆon. Cause Action Improper ac Connection 1. Check fuse and line power connections. Correct if necessary. 2. Check for ac line voltage at ac module J1, pins 5 and 7. If line voltage is absent, doubleĆcheck the fuse and line connecĆ tions; replace ac module if connections are good. ZĆ80 CPU Kernel Problem 3. Check dc voltages at main PC board test DC Voltage Problem 4. Carefully check main PC board and both Overload on Main PC Board 5. If both print mechanism motors do not Overload on Print Mechanism 6. Disconnect the overheated motor. Refer to Internal Main PC Board Failure 7. Replace the main PC board. points, P2. If voltages are good, replace main PC board. printer motors for overheating. The power supply is capable of providing enough excess power to make an overloaded circuit heat obviously. If there are no signs of an overload, the power supply is probably defective. Replace the power supply. overheat (they dissipate about 7 watts during print and plot modes) and there is an overheated circuit on the main PC board, replace the main PC board. table 7Ć6 or 7Ć7 and measure the winding resistances. If the motor is beyond this range, replace the motor or the print mechanism. If both windings of the motor are within the specified resistance range, proceed. 7-26 Artisan Technology Group - Quality Instrumentation ... Guaranteed | (888) 88-SOURCE | www.artisantg.com Diagnostics Diagnostic Procedures SYMPTOM: LEDs remain on continuously after powerĆon. Print carriage motion may be erratic. Cause Action Power Supply Problem 1. See table 7Ć5 and measure the +5Ć and +12ĆV supplies under isolated conditions. Replace the power supply module if out of range, as per test limits in table 7Ć4. 2. Measure +5Ć and +12ĆV supply at idle and full load. If voltage drop is greater than the specified amount in the table, replace the power supply. Defective Paper Drive Motor 3. Disconnect paper drive motor from P8 ZĆ80 Kernel Problem 4. Replace the main PC board. and reapply power. If LEDs go out after several seconds and indicate confidence test activity, the paper drive motor is shorted internally. Replace the motor or the print mechanism. 7-27 Artisan Technology Group - Quality Instrumentation ... Guaranteed | (888) 88-SOURCE | www.artisantg.com Diagnostics Diagnostic Procedures SYMPTOM: Print carriage does not move or it chatters and moves erratically. Paper feed may or may not be normal. LEDs indicate proper confidence test activity. Cause Action Power Supply Problem 1. See table 7Ć5 and measure the +12 and -12ĆV supplies under isolated and idle conditions. Check the test limits from table 7Ć4 and replace supply module if out of range. 2. Measure +12ĆV supply at full load. If voltage drop is greater than the specified amount, replace the power supply. Print Carriage Motor Is Defective 3. Turn off power. Remove paper drive motor from P8. Remove print carriage motor from P3. Slowly move print carriage to center of mechanism. Reconnect print carriage motor to P8. Leave paper sensor connected to P7. Apply power to unit. After several seconds, the print carriage should make three or four motions to the left for a total of about 1.35 inches. If it does not move, moves erratically, or makes excessive noise, the motor is probably defective. Replace the motor or print mechanism. Alternatively refer to table 7Ć6 and measĆ ure the print carriage motor winding resisĆ tance. Replace the motor or the print mechanism if out of range. Drive Electronics Are Defective 4. Replace the main PC board. 7-28 Artisan Technology Group - Quality Instrumentation ... Guaranteed | (888) 88-SOURCE | www.artisantg.com Diagnostics Diagnostic Procedures SYMPTOM: Paper does not feed or feeds slowly or erratically. Print carriage motion appears normal. Cause Action Blocked Paper Path 1. Check paper path for obstructions. 2. Check that the paper separator is installed properly. 3. If ZĆfold paper was in use, switch to roll paper unless a HewlettĆPackard paper stand was used. Paper Drive Motor Defective 4. Disconnect power from unit. Remove print mechanism. Set the print mechanism down on the board and rotate it so that the paper drive motor is to the rear and its shield is resting on the instrument's rear panel. ConĆ nect paper motor to P3. Connect outĆofĆ paper sense cable to P7. Connect the optical sensor cable to P4. Apply power to unit. The paper feed grit wheels should immediately rotate backward" for a fracĆ tion of a second and then reverse and feed smoothly for about two seconds. It will then hesitate slightly as the motor slips. Switch the power off and on again and observe the initial motion again. The initial two seconds of motion in both directions should be quiet and smooth. If the paper feed wheels do not move, move erratically, or make excessive noise, the motor is probably defective. Replace the motor or print mechanism. Alternatively refer to table 7Ć7 and measure the paper motor winding resisĆ tance. Replace motor or print mechanism if out of range. Paper Drive Electronics Defective 5. Replace main PC board. 7-29 Artisan Technology Group - Quality Instrumentation ... Guaranteed | (888) 88-SOURCE | www.artisantg.com Diagnostics Diagnostic Procedures Interpreting Diagnostic Test Failures This section will help you to understand the results of some of the selfĆtest diagnostics. Several diagnostic tests can identify specific defective socketed components for replacement. Table 7Ć8 lists these tests, the ERROR and INFO data that are printed for a failure of the test, and the action to correct the problem. For any other diagnostic test failure, replace the main PC board. Table 1-8. Diagnostic Error Messages for Socketed Components Test ERROR = INFO= Action (1) ERROR = 01H INFO = xxyyH If xx = FF or 00 through 08, replace U68. ERROR = 03H ROM version error. Check U62 for compatibility. ERROR = 22H or 23H Replace U27. ERROR = 42H or 43H Replace U17. ERROR = 44H Replace U68. (Application EPROM) ERROR = 0DH INFO = 003xH If x = 1, 2, or 3, replace the print/plot processor U50. (4) (O) Two of the diagnostic tests can be performed with accessory hardware to verify the unit with a greater confidence level. These tests are the remote and sample number test and the RSĆ232ĆC port test. Both tests should be performed with the instrument fully assembled. 7-30 Artisan Technology Group - Quality Instrumentation ... Guaranteed | (888) 88-SOURCE | www.artisantg.com Diagnostics Diagnostic Procedures Remote and Sample Number Test Equipment Required D ThreeĆinch length of 20ĆAWG solid or tinned stranded jumper wire Test Procedure 1. Remove any connecting cables from the remote and sample receptacles on the rear panel. 2. Enter the selfĆtest dialog and select test 9 and press [ENTER] to begin repetitive testing. 3. Connect the jumper wire to pin 9 on the sample number connector. Connect the other end of the wire as per table 7Ć9, and observe the printed error message. The ERROR part of the message should be ignored. Compare the INFO = value to those in the table. Only connect the jumper long enough to cause the error message to print. 4. Similarly, connect the jumper wire from pin 9 on the remote connector to other pins on the remote connector and check for INFO = values from table 7Ć10. If no error message is printed for any pin combination listed, it may indicate a failure in U22 or U23. Replace the main PC board. 7-31 Artisan Technology Group - Quality Instrumentation ... Guaranteed | (888) 88-SOURCE | www.artisantg.com Diagnostics Diagnostic Procedures Table 1-9. Sample Connector Test Sample No. Pin INFO = 1 2 3 4 5 6 7 8 10 8002H 8008H 8004H 8001H 8100H 8800H 8400H 8200H 8040H Table 1-10. Remote Connector Test Remote Pin No. INFO = 3 5 6 7 8 1080H 8010H C000H 8020H A000H RSĆ232ĆC Cable Testing The RSĆ232ĆC loopback test can be used to test the integrator alone or with a communications cable attached. By testing the instrument in both configurations, you can identify which element of the system is faulty and avoid unnecessary service charges. Testing the instrument alone is described in chapter 2 of this manual under the heading Running the SelfĆTest Diagnostics." Connect jumper wires between the pins in table 7-11 depending on which connector you are using. If you are testing without a connector, jumper the 15Ćpin female on the instrument as per table 7-11. 7-32 Artisan Technology Group - Quality Instrumentation ... Guaranteed | (888) 88-SOURCE | www.artisantg.com Diagnostics Diagnostic Procedures Be sure to test it while the instrument is in good working order! To test the instrument and its RSĆ232ĆC cable, first you have to locate a compatible loopback connector for the opposite end of the cable. This may be a 25Ćpin or a 9Ćpin connector, with male or female contacts. Obtain a proper mating connector and wire it for loopback as shown in table 7Ć11. Test the loopback connector on a known good cable before relying on it when a failure occurs. Loopback connectors for standard connector sizes are available from computer supply and accessory distributors. If the advertised wiring includes the connections shown in table 7Ć11, then it should be suitable for the diagnostic test. Additional connections, such as pins 6 to 20 in the 25Ćpin connector, will not affect the test. Run Diagnostic Test 6 with the RSĆ232ĆC cable connected to the integrator and the 25Ć or 9Ćpin loopback connector on the other end. If this test fails after passing with the 15Ćpin alone, the cable is defective. Note: The hardware handshake signals CA and CB are not wired in the DCE cables (HP part numbers 03396Ć50520 and 03396Ć60530); thus, the test cannot pass without an error message. When testing either one of these cables with a loopback connector, an ERROR = 24H indicates that the cable passes the continuity test of the transmitted data and received data lines. If ERROR = 25H is printed, it indicates a failure of these lines. Table 1-11. Loopback Connector Wiring Connector Size Connect Pins 9Ćpin Male 2 to 3 15Ćpin Male 1 to 13 and 2 to 14 25Ćpin M/F 2 to 3 and 4 to 5 7-33 Artisan Technology Group - Quality Instrumentation ... Guaranteed | (888) 88-SOURCE | www.artisantg.com Diagnostics Diagnostic Procedures Disassembly and Reassembly Instructions Equipment Required WARNING D Small size 1 pt Pozidriv screwdriver D Large size 2 pt Pozidriv screwdriver D Pry tool (HP part number 8710Ć1347) D Small 1/8Ćin. flatĆblade screwdriver D Replacement selfĆtapping screws (HP part number 0624Ć0427) DISCONNECT AC POWER SOURCE BEFORE OPENING THE CASE. Remove Power from the Unit 1. Turn the unit off by depressing the line switch located in the left rear of the instrument. 2. Remove the power cord. Remove the Paper 1. Tear the paper at a serration before the point where it enters the print mechanism, open the printer window, lift the bail arms forward, and pull the remaining paper up and out of the mechanism. 2. Remove the roll from the paper hangers (if installed). Remove the Paper Hangers (if Installed) 1. Apply slight pressure to the locking tabs on the bottom of the hangers and pull up. 7-34 Artisan Technology Group - Quality Instrumentation ... Guaranteed | (888) 88-SOURCE | www.artisantg.com Diagnostics Diagnostic Procedures Remove the Printer Window 1. Lift the window up. 2. With the thumb and forefinger, apply slight pressure to the leftĆhand side of the window to release the window from the locking tab and lift the window up. Notice that the tab on the leftĆhand side is slotted. Remove the Paper Separator 1. Pull forward and lift up. Remove the Keyboard 1. Insert the pry tool between the top of the keyboard and the case on the rightĆhand side, and apply slight downward pressure until the locking tab releases. Repeat the process in the middle and on the left side, and lift the keyboard up. 2. While holding the keyboard with one hand, grasp the ribbon cable with the other hand and carefully pull the cable out of the keyboard. Remove the Top Cover 1. With the large Pozidriv, remove the two selfĆtapping screws in the front of the unit under the keyboard. The middle hole is not used. 2. With the large Pozidriv, remove the two selfĆtapping screws located under the printer window. 3. With the large Pozidriv, remove the two selfĆtapping screws in the square openings in the rear of the unit. 4. Lift the top cover off. 7-35 Artisan Technology Group - Quality Instrumentation ... Guaranteed | (888) 88-SOURCE | www.artisantg.com Diagnostics Diagnostic Procedures Keyboard Cabinet Top Printer Mechanism Fan AC Line Module Power Supply Module Cabinet Base Main PC Board Figure 7Ć8. Instrument View with Printer Removed 7-36 Artisan Technology Group - Quality Instrumentation ... Guaranteed | (888) 88-SOURCE | www.artisantg.com Diagnostics Diagnostic Procedures Remove the Print Mechanism 1. Remove the aluminum shield from the two posts in front of the print mechanism. 2. With the large Pozidriv, remove the two selfĆtapping screws in the front of the mechanism that secure the mechanism to the case. Be careful not to lose the cupped washers. 3. Turn the unit around so that you are facing the rear panel. 4. See figure 7Ć9 and tables 7Ć3 and 8Ć1 to identify and remove the following printer cables. Remove the print carriage motor cable from connector P3. Remove the optical sensor cable from connector P4. Remove the flexible print cartridge cable from J3, noting that it only makes contact on one side. Remove the outĆofĆpaper sensor cable from connector P7. Remove the paper drive motor cable from connector P8. 7-37 Artisan Technology Group - Quality Instrumentation ... Guaranteed | (888) 88-SOURCE | www.artisantg.com Diagnostics Diagnostic Procedures 17 19 16 ËËË ËËË 4 8 6 3 7 1 ÍÍÍ ÍÍÍ ÍÍÍ ÍÍÍ ÍÍÍ ÍÍÍ ÍÍÍ 2 5 Figure 7Ć9. Print Mechanism Cable Connections and Test Points (See tables 7Ć3 and 8Ć2 for parts identification.) 5. Lift the mechanism out of the unit. 7-38 Artisan Technology Group - Quality Instrumentation ... Guaranteed | (888) 88-SOURCE | www.artisantg.com Diagnostics Diagnostic Procedures Remove the Power Supply Board 1. Remove the cable that connects the power supply to the main board at connector P1 following this procedure. a. Grasp the connector, not the cable, and with the small flatĆblade screwdriver pull back one of the locking tabs. While holding back the locking tab, pull up slightly until that side of the connector clears the locking tab. b. Refer to figure 7Ć10. Insert the screwdriver between the connector and P1, and twist to loosen the connector. Remove the connector. ËË ËË Figure 7Ć10. DC Cable Removal Detail 7-39 Artisan Technology Group - Quality Instrumentation ... Guaranteed | (888) 88-SOURCE | www.artisantg.com Diagnostics Diagnostic Procedures 2. Remove the ac primary cable that connects the power supply to the line module at connector J1 by releasing the locking tab and pulling out the cable. 3. With the small Pozidriv, remove the two screws that secure the power supply to the metal shield. They are located at the top of the board. 4. Lift the power supply board out of the unit, carefully feeding the cable through the hole in the shield. Remove the Line Module 1. With the small Pozidriv, remove the two screws that secure the line module to the metal shield. They are located on each side of the power cord socket. 2. With the small Pozidriv, remove the screw attaching the green safety ground wire to the rear panel. 3. Lift the line module out of the unit. Remove the Cooling Fan 1. Remove the fan cable from the connector on the main PC board by applying slight pressure to the top of the connector to release the locking tab and pull out. 2. Grasp the fan and apply pressure toward the front of the unit and up until the fan clears the locking tabs. 3. Lift the fan out of the unit. 7-40 Artisan Technology Group - Quality Instrumentation ... Guaranteed | (888) 88-SOURCE | www.artisantg.com Diagnostics Diagnostic Procedures Remove the Main Board 1. Remove the six screws that secure the main PC board to the case and the metal shield. There are three panĆhead screws in the rear and four selfĆtapping screws, two in the front on either side, and two in the middle on either side. Use the small Pozidriv to remove the panĆhead screws in the rear and the large Pozidriv to remove the selfĆtapping screws. 2. Lift the board up from the front and lift it out of the unit being sure to clear the connectors in the rear from the shield. LIFT THE METAL SHIELD OUT OF THE UNIT. 7-41 Artisan Technology Group - Quality Instrumentation ... Guaranteed | (888) 88-SOURCE | www.artisantg.com Diagnostics Diagnostic Procedures 15 14 15 Figure 7Ć11. Instrument View with Main PC Board Removed (See table 8Ć2 for parts identification.) 7-42 Artisan Technology Group - Quality Instrumentation ... Guaranteed | (888) 88-SOURCE | www.artisantg.com Diagnostics Diagnostic Procedures The unit is now completely disassembled. To reassemble the instrument, follow this procedure in reverse. Refer to figures 7Ć9, 7Ć11, and 8Ć1 for parts and cable placement details. All selfĆtapping screws should be replaced with new screws. 7-43 Artisan Technology Group - Quality Instrumentation ... Guaranteed | (888) 88-SOURCE | www.artisantg.com Diagnostics Diagnostic Procedures 7-44 Artisan Technology Group - Quality Instrumentation ... Guaranteed | (888) 88-SOURCE | www.artisantg.com 8 Replacement Parts 8-2 Cables for Obsolete HP Instruments 8-4 Cable Diagrams 8-5 Power Cable 8-23 Parts and Cables Artisan Technology Group - Quality Instrumentation ... Guaranteed | (888) 88-SOURCE | www.artisantg.com Parts and Cables Replacement Parts Table 1-12. Socketed Components Item No. 1 2 Shown in Figure No. Description Reference Description Part Number 8Ć1 8Ć1 ZĆ80 ROM INET ROM U68 U17 03396Ć80401 03396Ć80311 Table 1-13. Other Replacement Parts Item Shown in No. Figure No. Description Part No. Quantity 8 9 10 11 8Ć1 8Ć1 8Ć1 8Ć1 8Ć1 Main PC Board Power Supply Module AC Module Assembly Printer Mechanism Keyboard for HP 3396B Keyboard for HP 3396C Keyboard for HP 3397 03396Ć60116 0950Ć1884 03394Ć60030 03394Ć61040 03396-60635 03396-60636 03396-60637 1 1 1 1 1 1 1 12 13 14 15 16 17 8Ć1 8Ć1 7Ć11, 8Ć1 7Ć11 7Ć9, 8Ć1 7Ć9, 8Ć1 Fan Cup Washer Screw, SelfĆTapping Screw, Machine Paper Drive Motor Print Carriage Motor 35900Ć60520 02225Ć00017 0624Ć0427 0515Ć0912 3140Ć0787 3140Ć1076 1 2 12 8 1 1 - Not shown Window 03394Ć40100 1 8-2 Artisan Technology Group - Quality Instrumentation ... Guaranteed | (888) 88-SOURCE | www.artisantg.com Creating the Little Falls Look German Components 11 14 13 16 10 12 17 9 2 8 1 Figure 8Ć1. Instrument View with Printer Removed (See tables 8Ć1 and 8Ć2 for parts identification.) 8-3 Artisan Technology Group - Quality Instrumentation ... Guaranteed | (888) 88-SOURCE | www.artisantg.com Creating the Little Falls Look Using this document as an Interleaf template Cables for Obsolete HP Instruments ÁÁÁÁÁÁÁÁÁÁÁÁÁÁÁÁÁÁÁÁÁÁÁÁÁÁÁ ÁÁÁÁÁÁÁÁÁÁÁÁÁÁÁÁÁÁÁÁÁÁÁÁÁÁÁ ÁÁÁÁÁÁÁÁÁÁÁÁÁÁÁÁÁÁÁÁÁÁÁÁÁÁÁ ÁÁÁÁÁÁÁÁÁÁÁÁÁ ÁÁÁÁÁÁÁ ÁÁÁÁÁÁÁ ÁÁÁÁÁÁÁÁÁÁÁÁÁ ÁÁÁÁÁÁÁ ÁÁÁÁÁÁÁ ÁÁÁÁÁÁÁÁÁÁÁÁÁÁÁÁÁÁÁÁÁÁÁÁÁÁÁ ÁÁÁÁÁÁÁÁÁÁÁÁÁÁÁÁÁÁÁÁÁÁÁÁÁÁÁ Description Signal Cable Remote Cable HP 5710/5730 GC and HP 1081 UV 35900-60620 03396-60620 HP 5880A GC 35900-60570 03394-60540 HP 5790A GC 35900-60590 03396-60620 HP 1040M diode array detector 35900-60600 03396-60650 Reference the HP 3396 Series II Integrator Reference Manual, Chapter 8, for the diagrams and pin outs for the cables listed above. 8-4 Artisan Technology Group - Quality Instrumentation ... Guaranteed | (888) 88-SOURCE | www.artisantg.com Creating the Little Falls Look German Components Cable Diagrams Analog Signal Cables HP part number 35900Ć60600 HP 1090A/L LC and HP 1040A Diode Array Detector 1 1 2 3 2 35900-60600 8 Connector 1ĊHP 3396 Signal Name Wire Color 1 2 3 Shield Signal Signal + Jumper Orange Black Red Connector 2ĊHP 1090 and HP 1040 1 5 3 4,6 HP part number 35900Ć60610 HP 5890A Gas Chromatograph 1 2 1 2 3 5 3 1 35900-60610 6 4 2 No Connection Connector 1ĊHP 3396 Signal Name Wire Color 1 2 3 Shield Signal Signal + Orange Black Red Connector 2ĊHP 5890 5 1 3 8-5 Artisan Technology Group - Quality Instrumentation ... Guaranteed | (888) 88-SOURCE | www.artisantg.com Creating the Little Falls Look Using this document as an Interleaf template HP part number 35900Ć60630 for General Purpose UseĊSpade Lugs 1 2 1 2 3 35900-60630 Connector 1ĊHP 3396 Connector 2ĊHP 5880 Wire Color Signal Name Orange Black Red Shield Signal Signal + 1 2 3 HP part number G1530Ć60570 for use with HP 3395B, 3396C/M, 3397A to HP 6890 5 6 3 1 4 1 2 2 G1530Ć60570 3 2 1* *1 next to triangle etched on connector Connector 1 Signal name Color Connector 2 4 1V black 3 2 Common white 2 Shell Ground orange 1 8-6 Artisan Technology Group - Quality Instrumentation ... Guaranteed | (888) 88-SOURCE | www.artisantg.com Creating the Little Falls Look German Components HP part number 35900Ć60640 for Special Purpose Use Square Pins 2 1 1 2 3 35900-60640 Connector 1ĊHP 3396 Signal Name Orange Black Red Shield Signal Signal + 1 2 3 Connector 2 Wire Color HP part number 35900Ć60750 HP 1050 Series LC and HP 1046A Fluorescence Detector 1 1 2 3 2 35900-60750 Connector 1ĊHP 3396 Signal Name 2 3 Signal Signal + Wire Color Black Red Connector 2ĊHP 1046 Shield Center 8-7 Artisan Technology Group - Quality Instrumentation ... Guaranteed | (888) 88-SOURCE | www.artisantg.com Creating the Little Falls Look Using this document as an Interleaf template Remote Control Cables HP part number 03394Ć60540 HP 3396A/B and HP 3395A for General Purpose UseĊSpade Lugs 1 2 03394-60540 Pin 1 ÁÁÁÁÁÁÁÁÁÁÁÁÁÁÁÁÁÁÁÁÁÁÁÁÁ ÁÁÁÁÁÁÁÁÁÁÁÁÁÁÁÁÁÁÁÁÁÁÁÁÁ ÁÁÁÁÁÁÁÁÁÁÁÁÁÁÁÁÁÁÁÁÁÁÁÁÁ ÁÁÁÁÁÁÁÁÁÁÁÁÁÁÁÁÁÁÁÁÁÁÁÁÁ ÁÁÁÁÁÁÁÁÁÁÁÁÁÁÁÁÁÁÁÁÁÁÁÁÁ ÁÁÁÁÁÁÁÁÁÁÁÁÁÁÁÁÁÁÁÁÁÁÁÁÁ ÁÁÁÁÁÁÁÁÁÁÁÁÁÁÁÁÁÁÁÁÁÁÁÁÁ ÁÁÁÁÁÁÁÁÁÁÁÁÁÁÁÁÁÁÁÁÁÁÁÁÁ ÁÁÁÁÁÁÁÁÁ ÁÁÁÁÁÁÁÁÁÁÁÁÁÁÁÁÁ ÁÁÁÁÁÁÁÁÁÁÁÁÁÁÁÁ ÁÁÁÁÁÁÁÁ Connector 1-HP 3396 Signal Name Connector 2 1 S01 Black 3 START Green 5 RDY IN Red 6 STOP White 13 S02 Orange 14 RDY OUT Blue 15 GND Brown N.C. DRAIN Clear 8-8 Artisan Technology Group - Quality Instrumentation ... Guaranteed | (888) 88-SOURCE | www.artisantg.com Creating the Little Falls Look German Components HP part number 03396Ć61030 for HP 3396 Series III (3396C/M, 3397A, 3395A) for General Purpose UseĊSpade Lugs 1 2 Pin 1 ÁÁÁÁÁÁÁÁÁÁÁÁÁÁÁÁÁÁÁÁÁÁÁÁÁ ÁÁÁÁÁÁÁÁÁÁÁÁÁÁÁÁÁÁÁÁÁÁÁÁÁ ÁÁÁÁÁÁÁÁÁÁÁÁÁÁÁÁÁÁÁÁÁÁÁÁÁ ÁÁÁÁÁÁÁÁÁÁÁÁÁÁÁÁÁÁÁÁÁÁÁÁÁ ÁÁÁÁÁÁÁÁÁÁÁÁÁÁÁÁÁÁÁÁÁÁÁÁÁ ÁÁÁÁÁÁÁÁÁ ÁÁÁÁÁÁÁÁ ÁÁÁÁÁÁÁÁ ÁÁÁÁÁÁÁÁÁÁÁÁÁÁÁÁÁÁÁÁÁÁÁÁÁ ÁÁÁÁÁÁÁÁÁÁÁÁÁÁÁÁÁÁÁÁÁÁÁÁÁ ÁÁÁÁÁÁÁÁÁÁÁÁÁÁÁÁÁÁÁÁÁÁÁÁÁ ÁÁÁÁÁÁÁÁÁÁÁÁÁÁÁÁÁÁÁÁÁÁÁÁÁ ÁÁÁÁÁÁÁÁÁÁÁÁÁÁÁÁÁÁÁÁÁÁÁÁÁ ÁÁÁÁÁÁÁÁÁ ÁÁÁÁÁÁÁÁ ÁÁÁÁÁÁÁÁ ÁÁÁÁÁÁÁÁÁÁÁÁÁÁÁÁÁÁÁÁÁÁÁÁÁ Connector 1-HP 3396 Signal Name Connector 2 1 S01 Black 3 START INPUT Green 4 STOP2 Yellow 5 RDY IN Red 6 STOP White 9 GND Violet 13 S02 Orange 14 RDY OUT Blue 15 GND Brown N.C. DRAIN Clear 8-9 Artisan Technology Group - Quality Instrumentation ... Guaranteed | (888) 88-SOURCE | www.artisantg.com Creating the Little Falls Look Using this document as an Interleaf template Signal Name Signal Description Input/Output SO1 Start Oven 1 Output START Start HP 3396 Input RDY IN Indicates readiness of system to HP 3396 Input STOP Stop HP 3396 Input SO2 Start Oven 2 Output RDY OUT Indicates readiness of HP 3396 to system Output SO1 and SO2 are normally open relay contacts that provide a oneĆsecond contact closure to start external devices when START is pressed on the HP 3396 Series III. The proper configuration to start an external device is: SO1 Normally Open Contact SO2 External Device Start External Device GND 8-10 Artisan Technology Group - Quality Instrumentation ... Guaranteed | (888) 88-SOURCE | www.artisantg.com Creating the Little Falls Look German Components HP part number 03396Ć61020 Cable PinĆOuts, HP 6890A to HP 3396A/B/L Integrator 6 9 1 03396Ć61020 5 2 1 8 1 15 9 HP 3395A/HP 3396B APG RSS Connector 1Ċ9 pin (male) Signal Name Connector 2Ċ15 pin (male) 1 GND 9ĊGround 2 Prepare *NC 3 Start 3ĊStart in 4 Shut down *NC 5 Reserved *NC 6 Power on *NC 7 Ready 14ĊReady out 8 Stop *NC 9 Start request *NC *NC = no connect 8-11 Artisan Technology Group - Quality Instrumentation ... Guaranteed | (888) 88-SOURCE | www.artisantg.com Creating the Little Falls Look Using this document as an Interleaf template HP part number 03396Ć61010 Cable PinĆOuts, HP 6890A to HP 3395B, 3396C/M, and 3397A Integrator 6 9 1 03396Ć61010 5 2 1 1 8 9 15 HP 3395B/HP 3396C APG RRS Connector 1Ċ9 pin male Signal Name Connector 2Ċ15 pin male 1 GND 9ĊGround 2 Prepare *NC 3 Start 3ĊStart in 4 Shut down *NC 5 Reserved *NC 6 Power on *NC 7 Ready 14ĊReady out 8 Stop 4ĊSTOP2 in 9 Start request *NC *NC = no connect 8-12 Artisan Technology Group - Quality Instrumentation ... Guaranteed | (888) 88-SOURCE | www.artisantg.com Creating the Little Falls Look German Components HP part number 03396Ć60650 HP 1090A/L LC and HP 1040A Diode Array Detector 1 2 1 03396Ć60650 8 Pin 1 Connector 1ĊHP 3396 3 6 15 14 Signal Name START STOP GND READY Wire Color Red Green Black/Orange White Connector 2ĊHP 1090 4 6 1, 8 3 8-13 Artisan Technology Group - Quality Instrumentation ... Guaranteed | (888) 88-SOURCE | www.artisantg.com Creating the Little Falls Look Using this document as an Interleaf template HP part number 03394Ć60560 HP 5890A Gas Chromatograph 1 2 1 3 5 7 9 11 03394-60560 2 4 6 8 10 12 Pin 1 Connector 1ĊHP 3396 Wire Color 1 3 5 9 13 15 Black Green Red Brown Orange Clear Signal Name SO1 START RDY IN GND SO2 GND Connector 2ĊHP 5890 2 7 5 8 1 N.C. 8-14 Artisan Technology Group - Quality Instrumentation ... Guaranteed | (888) 88-SOURCE | www.artisantg.com Creating the Little Falls Look German Components HP part number 03394Ć60600 HP 1046A Fluorescence Detector (APG) 1 03394-60600 2 Pin 1 1 5 Connector 1ĊHP 3396 N.C. 1, 3 5, 14 6 9 13, 15 N.C. Wire Color Black Green Red White Brown Brown/Jumper Signal Name START REQ START/SO1 RDY STOP SIG GND SO2, GND DRAIN 6 9 Connector 2ĊHP 1046 N.C. 3 7 8 1 N.C. (To Shell Only) 8-15 Artisan Technology Group - Quality Instrumentation ... Guaranteed | (888) 88-SOURCE | www.artisantg.com Creating the Little Falls Look Using this document as an Interleaf template HP part number 03396Ć60550 HP 7673A/B Remote Start/Stop 1 2 2 4 6 8 10 12 03396Ć60550 1 3 5 7 9 11 Pin 1 Connector 1ĊHP 3396 Pin Signal Name 1 3 5 9 13 14 15 SO1 START IN RDY IN GND SO2 RDY OUT GND Connector 2ĊHP 7673 Wire Color Black Green Red Brown Orange White Drain Blue Blue Brown Brown Pin Signal Name 2 7 5 8 1 12 3 4 6 10 GND START OUT 1 RDY OUT GND START IN RDY IN JMPR TO NO. 4 JMPR TO NO. 3 JMPR TO NO. 10 JMPR TO NO. 6 8-16 Artisan Technology Group - Quality Instrumentation ... Guaranteed | (888) 88-SOURCE | www.artisantg.com Creating the Little Falls Look German Components HP part number 3396Ć60580 Synchronous Start 2 1 MASTER Pin 1 03396Ć60580 Pin 1 Connector 1ĊHP 3394/96 Master 1 3 5 9 13 14 15 Signal Name SO1 START RDY/IN DRAIN SO2 RDY/OUT GND Wire Color Black Green Red Clear Orange Blue Brown Connector 2ĊHP 3394/96 Slave 3 1 14 9 15 5 13 8-17 Artisan Technology Group - Quality Instrumentation ... Guaranteed | (888) 88-SOURCE | www.artisantg.com Creating the Little Falls Look Using this document as an Interleaf template Sample Number Cable HP part number 03396Ć60500 General Purpose 1 2 03396Ć60500 Pin 1 Connector 1ĆHP 3396 1 2 3 4 5 6 7 8 9 10 N.C. Signal Name BCD 20 BCD 80 BCD 40 BCD 10 BCD 1 BCD 8 BCD 4 BCD 2 GND HITR (High True) SHIELD Connector 2ĊWire Color Yellow Purple White Orange Brown Green Gray Red Black Blue Clear Connecting pin 10, HITR (high true), to pin 9 (GND) will change the BCD signal from high true to low true. 8-18 Artisan Technology Group - Quality Instrumentation ... Guaranteed | (888) 88-SOURCE | www.artisantg.com Creating the Little Falls Look German Components HP part number 03396Ć60560 HP 7673 BCD Sample Cable HP 3396A END 1 2 HP 7673A END 03396Ć60560 Pin 1 Pin 1 Connector 1ĊHP 3396 1 2 3 4 5 6 7 8 9 Signal Name BCD 20 BCD 80 BCD 40 BCD 10 BCD 1 BCD 8 BCD 4 BCD 2 GND Wire Color Green Violet Blue Yellow Black Orange Red Brown Gray Connector 2ĊHP 7673 1 2 3 4 5 6 7 8 9 8-19 Artisan Technology Group - Quality Instrumentation ... Guaranteed | (888) 88-SOURCE | www.artisantg.com Creating the Little Falls Look Using this document as an Interleaf template HP part number 03396Ć60580 HP 1090 BCD Sample Cable 2 03396Ć60580 1 A BC D E F H J K L Pin 1 Connector 1ĊHP 1090 Signal Name Wire Color Connector 2ĊHP 3396 A B C D E F H J K L Ċ GND BCD 80 BCD 40 BCD 20 BCD 10 KEY BCD 8 BCD 4 BCD 2 BCD 1 HITR (High True) Black/Drain Violet White Yellow Orange Ċ Green Gray Red Brown Blue 9 2 3 1 4 Ċ 6 7 8 5 10 Connecting pin 10, HITR (high true), to pin 9 (GND) will change the BCD signal from high true to low true. 8-20 Artisan Technology Group - Quality Instrumentation ... Guaranteed | (888) 88-SOURCE | www.artisantg.com Creating the Little Falls Look German Components RSĆ232ĆC Cables HP part number 03396Ć60520 DCE Female (25ĆPin) 1 2 03396-60520 Pin 1 Connector 1ĊHP 3396 Signal Name Wire Color 1 2 4, 5 9 14 15 N.C. N.C. N.C. RLSD RX DATA Ċ SIG. GND TX DATA Ċ RTS/CTS DSR/DTR PROT. GND Blue Red Brown Jumper Brown Green White Connector 2Ċ RSĆ232 Device 8 2 N.C. 7 3 N.C. 4, 5 6, 20 1 8-21 Artisan Technology Group - Quality Instrumentation ... Guaranteed | (888) 88-SOURCE | www.artisantg.com Creating the Little Falls Look Using this document as an Interleaf template HP part number 03396Ć60510 DTE Male (25ĆPin) 1 2 03396-60510 Pin 1 Pin 1 Connector 1ĊHP 3396 Signal Name Wire Color Connector 2Ċ RSĆ232 Device 1 2 4, 5 9 13 14 15 N.C. RTS RX DATA Ċ SIG. GND CTS TX DATA Ċ PROT. GND Blue Red Brown Jumper Brown Orange Green White 4 3 N.C. 7 5 2 N.C. 1 8-22 Artisan Technology Group - Quality Instrumentation ... Guaranteed | (888) 88-SOURCE | www.artisantg.com Creating the Little Falls Look German Components HP part number 03396Ć60530 DCE Female (9ĆPin) 1 03396-60530 2 Pin 1 1 5 Connector 1ĊHP 3396 Signal Name Wire Color 1 2 4, 5 9 14 15 N.C. N.C. N.C. RLSD RX DATA Ċ SIG. GND TX DATA Ċ RTS/CTS DSR/DTR PROT. GND Red Green Brown Black White White/Yellow 6 9 Connector 2Ċ RSĆ232 Device 1 3 N.C. 5 2 N.C. 7, 8 6, 4 N.C. (To Shell Only) 8-23 Artisan Technology Group - Quality Instrumentation ... Guaranteed | (888) 88-SOURCE | www.artisantg.com Creating the Little Falls Look Using this document as an Interleaf template Power Cable Part Number Source Voltage Voltage Setting Predominant Country of Usage 8120Ć1378 120 V ac 100 V ac 220 V ac 115 115 230 USA and Canada Japan Israel E N 8120Ć1369 240 V ac 220 V ac L 230 230 Australia New Zealand E L 8120Ć1689 220 V ac N 230 European Continent E N 8120Ć1351 240 V ac L 230 United Kingdom E L N 8-24 Artisan Technology Group - Quality Instrumentation ... Guaranteed | (888) 88-SOURCE | www.artisantg.com Creating the Little Falls Look German Components Part Number Source Voltage Voltage Setting Predominant Country of Usage 8120Ć0698 240 V ac 230 USA and Canada 230 Switzerland L L E 8120Ć2104 220 V ac L E N 8120Ć2956 220 V ac 230 Denmark, Greenland 8120Ć4211 240 V ac 230 India, South Africa 8-25 Artisan Technology Group - Quality Instrumentation ... Guaranteed | (888) 88-SOURCE | www.artisantg.com Creating the Little Falls Look Using this document as an Interleaf template 8-26 Artisan Technology Group - Quality Instrumentation ... Guaranteed | (888) 88-SOURCE | www.artisantg.com 9 What Devices Communicate with the Integrator? 9-2 Using NonĆINET Analytical Instruments 9-3 Communicating with Other Devices Artisan Technology Group - Quality Instrumentation ... Guaranteed | (888) 88-SOURCE | www.artisantg.com Introduction What Devices Communicate with the Integrator? The HP 3396 integrator communicates with a variety of devices through its back panel receptacles. Line Select Expansion Slot RSĆ232 AC Line Input Sample Fuse Remote Analog Input On/Off Switch Instrument Network Device Type HP networking analytical instruments Non-INET analytical instruments Disk drives HPĆIL/HPĆIB Interface (HP 82169A) Host computer Modem Interface Type Back Panel Receptacle See Chp INET INSTRUMENT NETWORK 10 Analog TTL BCD ANALOG INPUT REMOTE SAMPLE 9 9 9 HPĆIL and HPĆIB* HPĆIL INSTRUMENT NETWORK INSTRUMENT NETWORK 10,11 10 RSĆ232ĆC RSĆ232ĆC RSĆ232ĆC RSĆ232ĆC 12 12 *Requires HP 82169A HPĆIL/HPĆIB Interface 9-2 Artisan Technology Group - Quality Instrumentation ... Guaranteed | (888) 88-SOURCE | www.artisantg.com Creating the Little Falls Look German Components Using NonĆINET Analytical Instruments The HP 3396 integrates analog input between -10 mV and +1000 mV. Use the appropriate Analog Signal cable to connect an analytical instrument not part of HewlettĆPackard's instrument network to the analog input receptacle of the HP 3396. See the Reference Manual for installation information. NonINET analytical instruments must be started and stopped manually unless the Remote Control cable is used. Sample numbers are transmitted from nonINET instruments through the Sample Number cable. Using the Remote Control Cable A Remote Control cable allows the integrator D to start other instruments D to be started and stopped by other instruments D to provide readiness status to other instruments. Since remote control signals are exchanged over the Instrument Network (INET), a Remote Control cable is not usually needed when INET is installed. Note: Since both INET and the Remote Control cable supply readiness status, any instrument connected to the HP 3396 via INET should not directly or indirectly connect its READY output to the HP 3396's READY input via the Remote Control cable. 9-3 Artisan Technology Group - Quality Instrumentation ... Guaranteed | (888) 88-SOURCE | www.artisantg.com Creating the Little Falls Look Using this document as an Interleaf template The Remote Control cable start output is connected to the start input of an analytical instrument such as a gas chromatograph (GC). The READY line in the cable may be connected to a signal from the GC that indicates oven readiness. In this case, when you press [START] on the HP 3396, the integrator is started, and so is the oven program on the GC. If the oven or the integrator is not ready, the message not ready" is printed at the start of the run. The integrator processes the signal anyway; the message serves only to caution you that something is not ready. See the HP 3396 Reference Manual for related information. Using the Sample Number Cable The Sample Number cable allows the HP 3396 to accept binary coded decimal (BCD) sample (bottle) number data from an automatic sampler or sequencer. Since sample number data are exchanged over INET, a sample number cable is usually not needed when INET is installed. See chapter 10, Using the Instrument Network for a more detailed explanation. Further information about how to automate a series of analyses using the Sample Number cable can be found in the Automating Analyses chapter of the HP 3396 Operating Manual. See the Installation and Service sections of this manual for related information. 9-4 Artisan Technology Group - Quality Instrumentation ... Guaranteed | (888) 88-SOURCE | www.artisantg.com 10 What is the Instrument Network? 10-2 Starting and Stopping INET 10-3 Checking for Instrument Readiness 10-5 Listing INET Devices 10-6 Controlling INET Instruments with the HP 3396 Controlling the HP 6890 10-16 Understanding INET 10-17 10-9 Using the Instrument Network Artisan Technology Group - Quality Instrumentation ... Guaranteed | (888) 88-SOURCE | www.artisantg.com Using the Instrument Network What is the Instrument Network? HewlettĆPackard's analytical Instrument Network (INET) provides a data, parameter, and command path for analytical instruments to communicate with each other. The HewlettĆPackard Interface Loop (HPĆIL) provides a path for this communication. The following table lists the INET instruments that are compatible with the HP 3396 at the time of this printing. INET Instruments Compatible with the HP 3396 Device Type Model Number Comments INET GC HP 5890A HP 6890A HP 5890 Series II Rev C or later software. INET LC HP 1090L HP 1050 Rev B2616 or later software is compatible with the HP 3396. INET Sampler HP 7673 Automatic sampler. INET Sampler/Event HP 19405A Control Module (S/ECM) Used with nonINET Samplers, HP 7670/71/72A and to control automated GC valving. INET INTEG Event Control Module (IECM) Used with INET instruments to control external events. HP 19405B 10-2 Artisan Technology Group - Quality Instrumentation ... Guaranteed | (888) 88-SOURCE | www.artisantg.com Creating the Little Falls Look German Components Starting and Stopping INET When INET is enabled, runs may be started from any INET instrument by pressing [START]. All INET instruments will start at the same time, coordinated by communication over the network. When starting sequences on INET, the HP 7673 will begin its preĆrun activity before starting the HP 5890 or HP 6890 and the associated integrator. Pressing [STOP] on any INET instrument stops the current run, and aborts a sequence if one is running. When the HP 6890 GC is part of the instrument configuration, the HP 6890 and HP 3396 communicate over INET, but the HP 6890 and the HP 7673 Sampler communicate over RSĆ232. The HP 3396 does not communicate with the HP 7673 Sampler; the sampler is controlled by the HP 6890. When the HP 5890, HP 7673, and HP 3396 are configured, they all communicate over INET and the HP 3396 controls the sampler. See Automating Analysis, in Chapter 9 of the HP 3396 Operating Manual for related information. 10-3 Artisan Technology Group - Quality Instrumentation ... Guaranteed | (888) 88-SOURCE | www.artisantg.com Creating the Little Falls Look Using this document as an Interleaf template HewlettĆPackard's Instrument Network (INET) HPĆIL Cables 12345678910 HP 3396 HP 7673 HP 5890 HP 3396 12345678910 HPĆIL Cables HP 7673 RSS Cable RS–232 Cable HP 6890 10-4 Artisan Technology Group - Quality Instrumentation ... Guaranteed | (888) 88-SOURCE | www.artisantg.com Creating the Little Falls Look German Components Checking for Instrument Readiness All INET instruments, the HPĆIL disk drives, and instruments that use the READY line in the Remote Control cable can be checked for readiness by the HP 3396. The green READY indicator on the keyboard indicates readiness for the HP 3396 and all INET instruments that are connected and turned on. 1. Type [R] [E] [A] and press [ENTER] to check system readiness. If the HPĆIL loop is UP" (all cables connected, all instruments switched on), and if all INET instruments and HPĆIL disk drives are ready, the HP 3396 prints SYSTEM IS READY. (The HP 3396 checks the readiness of the disk drives only when file storage is enabled via option 2 or option 5.) The Remote Control cable ready line is also checked for a ready state if it is being used. If the HPĆIL loop is DOWN" (a broken connection, or instruments powered OFF), the HP 3396 assumes you are not using it, and reports that all is ready as above. To avoid being misled if you don't know whether the loop is down, use the SYSTEM command [S] [Y] [ENTER]. The HP 3396 will print Loop is down instead of the LOOP CONFIGURATION TABLE if the loop is not active. During sequence operation the readiness check is performed automatically, and the HP 3396 waits for system readiness before starting each run in the sequence. However, when you start a run manually, the HP 3396 will not automatically check readiness. When the system is not ready and a run is started manually, the run will proceed after warning you that the system is not ready by printing START; not ready. 10-5 Artisan Technology Group - Quality Instrumentation ... Guaranteed | (888) 88-SOURCE | www.artisantg.com Creating the Little Falls Look Using this document as an Interleaf template Listing INET Devices With the HP 3396 in system command mode, a user can get a listing of the INET Configuration Table. This command can be abbreviated by its first two characters. 1. Type [I] [N] and press [ENTER] to get a listing of the INET Configuration Table. The routing of INET data from producers to consumer is referred to as a data path in the table. Data paths are automatically configured when the instrument is switched on, but may also be changed manually from the HP 3396 keyboard. Example * I N [ENTER] LIST, EXIT, CHANGE, OR HELP [L/E*/C/H]: L [ENTER] INET CONFIGURATION ENTRY MODEL ADDR DATA PATH STATUS 1 2 3 3396C 6890A 6890A 0 8 8 C1 CONS CH 0 C1 PROD CH 0 C1 PROD CH 1 ACTIVE ACTIVE IDLE 4 5 3396C 6890A 0 8 K0 PROD CH 0 K0 CONS CH 0 ACTIVE ACTIVE 6 7 8 9 3396C 6890A 6890A 6890A 0 8 8 8 R0 R0 R0 R0 0 0 1 2 ACTIVE ACTIVE IDLE ACTIVE 10 11 12 3396C 6890A 6890A 0 8 8 S0 CONS CH 0 S0 PROD CH 0 S0 PROD CH 1 ACTIVE ACTIVE IDLE CONS PROD PROD PROD CH CH CH CH LIST, EXIT, CHANGE, OR HELP [L/E*/C/H]: [ENTER] 10-6 Artisan Technology Group - Quality Instrumentation ... Guaranteed | (888) 88-SOURCE | www.artisantg.com Creating the Little Falls Look German Components The configuration table below is a typical listing with an HP 19405B IECM and HP 6890 on the INET loop; the HP 6890 is configured to an HP 7673 with an RSĆ232 cable. Your configuration table may be slightly different. The DESCRIPTION column explains what data each path transmits. ENTRY 1 MODEL 3396B ADDR 0 DATA PATH A0 CONS CH 0 STATUS ACTIVE 2 D3C-IECM 10 A0 PROD CH 0 ACTIVE 3 3369C 0 C1 CONS CH 0 ACTIVE 4 6890A 8 C1 PROD CH 0 ACTIVE 5 6890A 8 C1 PROD CH 1 IDLE DESCRIPTION HP 3396 receives external event data run annotation. IECM produces external event run annotation. HP 3396 receives signal data. GC signal 1 produces signal data.* GC signal 2 produces signal data.* Only one signal producer can be active at a time. The channel that is not active is buffered, and can be analyzed using the Dual Channel Applications Program, or the ANALYZE Q: command. See The Buffered Channel, in the Appendix. 6 3396C 0 I1 PROD CH 0 ACTIVE 7 D3C-IECM 10 I1 CONS CH 0 ACTIVE 8 3396C 0 K0 PROD CH 0 ACTIVE 9 6890A 8 K0 CONS CH 0 ACTIVE 10 3396C 0 R0 CONS CH 0 ACTIVE 11 6890A 8 R0 PROD CH 0 ACTIVE 12 6890A 8 R0 PROD CH 1 IDLE 13 6890A 8 R0 PROD CH 2 ACTIVE HP 3396 tells the IECM when to open or close a switch. IECM receives information on switches. HP 3396 receives command data. GC produces command data. HP 3396C receives report annotation data. GC produces front bar code data for reports.* GC produces rear bar code data for reports.* GC produces run log data for reports. 10-7 Artisan Technology Group - Quality Instrumentation ... Guaranteed | (888) 88-SOURCE | www.artisantg.com Creating the Little Falls Look Using this document as an Interleaf template 14 3396C 0 S0 CONS CH 0 ACTIVE 15 6890A 8 S0 PROD CH 0 ACTIVE 16 6890A 8 S0 PROD CH 1 IDLE 17 D3C-IECM 10 S0 PROD CH 0 IDLE HP 3396 receives sample number data. GC produces front injector sample number data.* GC produces rear injector sample number data.* IECM produces sample number external event data. *The front and rear assignments for bar code information and sample number data, and signal 1 and signal 2 positions for signal data, are shown in this table in their default positions. The default positions can be changed by the user; see the Appendix. 10-8 Artisan Technology Group - Quality Instrumentation ... Guaranteed | (888) 88-SOURCE | www.artisantg.com Creating the Little Falls Look German Components Controlling INET Instruments with the HP 3396 The HP 5890, HP6890, and HP 7673 series samplers can execute commands sent from the HP 3396 using K0 data path transactions. Each of these instruments has a set of response messages that are returned to the HP 3396 as a result of executing a command. The HP 5890 has a keycode corresponding to each key on its keypad. By combining keystrokes on the keypad of the HP 3396, command strings can be sent as if the commands were entered on the keypad of the HP 5890. The HP 7673 series samplers use abbreviations to control each parameter. The abbreviated words are entered with the alphanumeric keys on the HP 3396. Some commands are common to all HP 7673 samplers. There is an expanded command set for the HP 7673C to accommodate its greater functionality. The tables on the following two pages show the abbreviations and keycodes for these instruments. Because it is a much more sophisticated instrument, the HP 6890 has a more elaborate command set and uses a different logic to implement it. See the HP 6890 Programmers Manual for complete information. 10-9 Artisan Technology Group - Quality Instrumentation ... Guaranteed | (888) 88-SOURCE | www.artisantg.com Creating the Little Falls Look Using this document as an Interleaf template Example To enter an oven temperature of 250_C at the HP 5890's keypad, you would press [OVEN] [TEMP] 250 [ENTER] The command string for this set of key sequences is KEY:G250@ where KEY: is the command for keypad entries. 1. Press [OP( )] [6] [ENTER] to send a K0 command string. This dialog may also be accessed through section 8 of the [EDIT] [METH] dialog. Whichever way the dialog is accessed, the syntax for entering commands remains the same and the HP 3396 responds with DEVICE ADDRESS: 2. Press [10] [ENTER] to enter the loop address of the HP 5890. This address is printed in the INET Configuration Table which is accessed by pressing [I] [N] [ENTER]. After entering the address of the intended consumer, the HP 3396 will prompt for a command string with COMMAND STRING: 3. Type KEY:G250@ to set the oven temperature on the HP 5890 to 250_C. The command string entered at this point depends on the instrument receiving the command and your purpose. A partial list of commands, which represent set points for the HP 7673, can be found on the next two pages. See Understanding INET later in this chapter for related information. 10-10 Artisan Technology Group - Quality Instrumentation ... Guaranteed | (888) 88-SOURCE | www.artisantg.com Creating the Little Falls Look German Components INET_I/0 Commands for HP 5890A and HP 5890 Series II HP 5890 Key STOP START OVEN TEMP INIT TEMP INIT TIME RATE FINAL TEMP FINAL TIME INJ A TEMP INJ B TEMP DET A TEMP DET B TEMP OVEN MAX EQUIB TIME SIG 1 SIG 2 RANGE ZERO ATTN DET ON OFF A B COL COMP 1 COL COMP 2 FLOW PURGE TIME ENTER Keycode = ^ G H I J K L M N O P Q R V W X Z Y > E F A B C D S U T @ HP 5890 Key CLEAR 0 1 2 3 4 5 6 7 8 9 . gold key TABLE ADD DELETE PREVIOUS NEXT INJ A PRES INJ B PRES OVEN TRACK AUX TEMP FLOW PARAM CRYO PARAM STORE LOAD TCD SENS to check ROM version super clear Keycode ? 0 1 2 3 4 5 6 7 8 9 . / /H /I /J /K /L /M /N /O /P /S /S /V /W /> ; : 10-11 Artisan Technology Group - Quality Instrumentation ... Guaranteed | (888) 88-SOURCE | www.artisantg.com Creating the Little Falls Look Using this document as an Interleaf template HP 7673 INET_I/0 Commands HP 7673 Command INJECTIONS/BOTTLE FIRST BOTTLE LAST BOTTLE SAMPLE WASHES PUMPS VISCOSITY INJECTION VOLUME A WASHES B WASHES PRIORITY SAMPLE ONĆCOLUMN BOTTLE POSITION MOVE MANUAL SEQUENCE AUTO SEQUENCE RETURN BOTTLES TURRET RESET VERSION ERROR TRAY BAR CODE READER Command Abbreviation INJ FIRST LAST WASH PUMP VIS VOL AWASH BWASH PRI ONCOL BOT POS MOV MAN AUTO RET TUR RES VER ERR TRY BCR 10-12 Artisan Technology Group - Quality Instrumentation ... Guaranteed | (888) 88-SOURCE | www.artisantg.com Creating the Little Falls Look German Components Controlling the HP 5890 through BASIC The following BASIC program uses the INET_I0 command and the command string listed above to set the oven temperature to 250_C at the HP 5890 located at INET address 8. For this program to execute properly, the HP 3396 must be configured as a K0 producer and the HP 5890 as a K0 consumer. See Understanding INET later in this chapter for instructions on how to change the INET Configuration Table. 10 !This program sets HP 5890 GC OVEN TEMP to 250 20 !First dimension a command string (GCOP$) for the appropriate 30 !keystrokes and a response string (GCRESP$) for the GC’s response 40 DIM GCOP$(22), GCRESP$(80) 50 !Enter the command string 60 GCOP$ = “KEY:G250@” 70 !Transmit the command to device address via INET 80 INET_IO 8, GCOP$, GCRESP$ 90 PRINT GCRESP$ 100 END This program directs the HP 3396 to print the instrument's response to the command sent to it. The response printed by the HP 3396 might look like this: AOVEN TEMP 50 250 In this case, the A" indicates that the HP 5890 has acknowledged the new oven temperature set point. The current value of the oven temperature is listed next, followed by the new set point. Attempting to set the oven temperature to 500_ C, however, elicits the following response: 10-13 Artisan Technology Group - Quality Instrumentation ... Guaranteed | (888) 88-SOURCE | www.artisantg.com Creating the Little Falls Look Using this document as an Interleaf template OVEN LIMIT = 400 Any combination of keys that is valid on the keyboard can be replicated using the INET_I0 command. When an invalid key sequence is entered, the CLEAR keycode must be sent to clear the error and go on, just as it is done at the instrument keypad. Refer to the Operator's Quick Reference Card and the HP 5890 Reference Manual for a list of valid key sequences for the HP 5890. Controlling the HP 7673 through BASIC When the HP 7673 is part of the INET configuration, commands are sent via INET to control in the same way they are sent to the HP 5890. However, since the HP 7673 does not have a keypad, the sampler commands duplicate all the set points accessible through the HP 3396 sequence dialog. Unlike the HP 5890, the HP 7673's message strings are composed of a set point keyword and a value for either or both the front and rear injectors. A complete list of keycodes for the HP 7673's sampler parameters are located earlier in this section. The syntax for each sampler command is the same. The table below uses the INJECTIONS/BOTTLE command to illustrate the sampler command syntax. 10-14 Artisan Technology Group - Quality Instrumentation ... Guaranteed | (888) 88-SOURCE | www.artisantg.com Creating the Little Falls Look German Components Command String Syntax for the HP 7673 Command String Syntax INJ INJ2,3 INJ,1 INJ3 Action Taken by HP 7673 Returns current set points Injector 1 will do 2 injections per bottle. Injector 2 will do 3 injections per bottle. Injector 1 will use its current setting. Injector 2 will do 1 injection per bottle. Injector 1 will do 3 injections per bottle. Injector 2 will use its current setting. When the HP 7673 acknowledges a set point, the HP 3396 prints the current set point values separated by a comma, for the front and rear injectors. If only one injector is installed, the set point will be repeated twice. If only one injector's set point is changed, the previous set point value for the other injector is retained and printed. When the sampler command string causes an error, then the sampler will print N" and an error message. If a keycode is sent to a different instrument at the wrong address, the HP 3396 may print: ADDRESS IS NOT ON LOOP OR DOES NOT SUPPORT K0 DATA PATH 10-15 Artisan Technology Group - Quality Instrumentation ... Guaranteed | (888) 88-SOURCE | www.artisantg.com Creating the Little Falls Look Using this document as an Interleaf template Example The BASIC program below illustrates how to send commands to a dual injector HP 7673 to control the number of pumps done by the front and rear injectors. The HP 3396 must be configured as a K0 producer and the HP 7673 as a K0 consumer. See Understanding INET later in this chapter for instructions on how to change the INET Configuration table. The HP 7673 in this example is at INET address 9. 10 20 30 40 50 60 70 80 90 100 !Set HP 7673A front injector to do 5 pumps per sample and !the rear injector to do 2 pumps per sample !SAMPOP$ = command string !SAMPRESP$ = response string DIM SAMPOP$(22), SAMPRESP$(80) !Enter the command string SAMPOP$ = “PUMPS5,2” INET_IO 9, SAMPOP$, SAMPRESP$ PRINT SAMPRESP$ END This program directs the HP 3396 to print the INET sampler's response to the PUMP command string. If the sampler accepts the new set point, it might respond with: A 5, 2 If, however, the command is rejected by the sampler, it responds with: N error message Controlling the HP 6890 The HP 6890 can be controlled using the K0 data path, and through BASIC, in the same manner as the HP 5890. The command structure is different. For further information, see the HP 6890 Programmers Manual. 10-16 Artisan Technology Group - Quality Instrumentation ... Guaranteed | (888) 88-SOURCE | www.artisantg.com Creating the Little Falls Look German Components Understanding INET HPĆIL, the HewlettĆPackard Interface Loop, is a serial twoĆwire connection and a software protocol that allows printers, storage devices, and analytical instruments to communicate with each other. INET instruments are HewlettĆPackard samplers and gas chromatographs that operate with the HP 3396 on the HPĆIL. INET devices use HPĆIL protocol to exchange information. INET is a communications application of HPĆIL that controls analytical instrumentation. Where HPĆIL protocol allows printers and disk drives to communicate with the HP 3396A, INET provides a data and command path for analytical instruments to operate effectively together. Implicit in the network are protocol and data structures that allow a group of instruments comprising a controller, data producers, and data consumers to function as a single system. Each INET device is an HPĆIL device with an extra layer of software for more sophisticated operation. INET is controlled locally by the HP 3396 or remotely controlled by a host computer when an integrator is not used. Since INET instruments use the HPĆIL interface, much of the physical operation is also the same as HPĆIL. The HPĆILĆbased network has one controller and a number of talkers and listeners. The HP 3396 is the HPĆIL controller. Producers send messages over the loop and consumers receive messages. INET's producers and consumers are divided further into objects" (or instrument functions) that produce and consume different types of chromatographically meaningful data. Each INET instrument stores its own set points and parameters and also makes them available to the HP 3396, for listing and remote storage. The collection of these storage areas is the active workspace of the HP 3396 system. The active workspace will expand and contract as instruments are added or removed from the network. However, while the HP 3396 is being operated, the active workspace always appears to be a single, contiguous, yet distributed piece of information. 10-17 Artisan Technology Group - Quality Instrumentation ... Guaranteed | (888) 88-SOURCE | www.artisantg.com Creating the Little Falls Look Using this document as an Interleaf template A typical INET system is illustrated below. INET System In Out HP 3396 Controller In Out Out HP 7673 Automatic SamĆ pler In HP 9114B Disk Drive Out In HP 5890 INET GC As stated before, INET adds another layer of software protocol to HPĆIL so that analytical instruments can communicate with each other as well as with other HPĆIL devices. Since INET devices must conform to HPĆIL standards, both types of instruments are compatible on the same loop with one HP 3396 acting as controller for both analytical and HPĆIL devices. Controlling INET Devices The HPĆIL interface and INET protocol allow the HP 3396 to receive and control INET instrument set points. The set points are encoded ASCII character strings and are grouped in blocks in the active workspace with the INET (loop) address of the instrument to which they belong. These strings are transmitted to the HP 3396 over the HPĆIL/INET link during configuration. The HP 3396 can also pass set points between INET instruments (including itself) and local or computer storage. For example, the [STORE] [METH] key sequence initiates the passing of set point blocks from the network instruments to the HP 3396. Once these keys are pressed at the HP 3396 keyboard, all set point traffic is automatic. 10-18 Artisan Technology Group - Quality Instrumentation ... Guaranteed | (888) 88-SOURCE | www.artisantg.com Creating the Little Falls Look German Components If the network is broken and then reconnected in a different order, the address of a particular instrument may change. However, since the HP 3396 tries to load set points to the loop using model numbers as addresses, each instrument will still get the correct set point block as long as there are no other instruments with the same model number on the loop. The HP 3396 only discriminates between instruments with the same model number by their physical location. Set points from a method saved prior to the break may be sent to the wrong instrument. If two instruments with identical model numbers are on the same loop and their positions are switched after a method has been stored, each will receive the set points intended for the other when the method is reloaded into the active workspace. However, INET instruments will not accept set points with parameter value errors (e.g. an HP 19405B will reject HP 5890 parameters). In addition to accepting keyboard entry for its own set points, in certain cases the HP 3396 provides keyboard entry of set points for other INET devices. The [PREP] [SEQ] dialog allows set points to be chosen for the HP 7673 sampler when an HP 5890 is configured, or the HP 19405B IECM (INTEG Event Control Module). The HP 7673 sampler and HP 5890 GC set points may be entered via option 6, the [PREP] [METH] dialog, or through INET_I0 statements in a BASIC program. The HP 3396 may alter set points before or after a run but not while a run is in progress. Specific instructions for how to enter set points for INET instruments from the HP 3396 are described in earlier in this chapter. 10-19 Artisan Technology Group - Quality Instrumentation ... Guaranteed | (888) 88-SOURCE | www.artisantg.com Creating the Little Falls Look Using this document as an Interleaf template INET Operating States As the instruments exchange commands under the direction of the HP 3396, INET moves through its five distinct operating states. INET Operating States Network State Inactive Prerun Run Postrun Run may not begin" Typical HP 3396 Mode or Activity Waiting for commands Waiting for sampler to find bottle, doing pumps, washes, etc. Integration mode Calculation and report generation Plot mode, BASIC mode, during an ANALYZE, an open dialog, or threshold measurement. Also if the host computer explicitly requests the run may not begin" state, or during a column compensation run on the HP GC. INET states are characterized by the type of HP 3396 activity as well as the kinds of data transmissions that are taking place. The steps outlined below illustrate how an HP 3396 and an active sampler would typically proceed through different network states as they carry out a sequence of runs. 1. Inactive state: The network instruments are ready; the user then presses [SEQ] [START] on the HP 3396 keyboard. The HP 3396 issues a command to change the network state to the Prerun state. 2. Prerun state: The sampler begins searching in its sample tray for the bottle specified in its sequence. When it finds the bottle, it makes an injection and issues a command for INET to enter the Run state. 10-20 Artisan Technology Group - Quality Instrumentation ... Guaranteed | (888) 88-SOURCE | www.artisantg.com Creating the Little Falls Look German Components 3. Run state: The HP 3396 enters INTEGRATION mode. When the run ends (for example, when a Timetable STOP command occurs), the HP 3396 sends a message on the network to change the network to the Postrun state. 4. Postrun state: During this state, the HP 3396 calculates the result of the previous run and prints its report. It calls for any report annotations other instruments wish to add, and it appends them to the end of the report. (The report may be printed or written to a file.) The HP 3396 also stays in the postrun state while the HP 6890 is executing any postrun programs. 5. The next state change depends on the sampler. If the sampler is finished, it directs the network to the Inactive state (1). If it is not finished with its sequence, it directs the network to the Prerun state (2). The sampler advances to the next sample to be injected and INET operation continues from there. Automatic Network Configuration Data paths connect data producers to data consumers of matching type and format. INET automatically configures data paths among all of the instruments on the loop. Certain objects allow only one consumer or producer, while other data types may allow multiple consumers and producers. When an active data producer puts data out on the loop, the active consumers of that type of data accept it automatically. For example, an active INET sampler (e.g. HP 7673 when configured to an HP 5890 GC) produces sample numbers on the loop. The HP 3396 is an active consumer of sample numbers. It prints the sample number from the sampler in the upper right hand corner of the report for that run and also searches its sample table for a match to the sample number. 10-21 Artisan Technology Group - Quality Instrumentation ... Guaranteed | (888) 88-SOURCE | www.artisantg.com Creating the Little Falls Look Using this document as an Interleaf template Before the configuration process is begun, the HP 3396 determines whether to initiate a coldĆ or warmĆstart configuration. The HP 3396 initiates a coldĆstart configuration when: D the [CTRL] [DEL] keys are pressed simultaneously; D a RECONFIGURE command is executed from system command mode; D a power failure occurs for a length of time greater than the battery life or memory backup time of any INET instrument on the loop; D INET instruments are added to the HP 3396 after it has been operating in a standĆalone condition only since coldĆstart. The HP 3396 initiates a warmĆstart configuration, reverting back to its last active state, when : D the loop is broken and reconnected in the same place; D an HPĆIB instrument is added or removed; D an HPĆIL instrument is added to the INET loop in such a way that no INET instrument addresses are changed; D INET or HPĆIL instruments are added to or removed from a working INET loop in a way that changes the address of one or more INET instruments; D a RECONFIGURE statement is executed from a BASIC program; D power failure occurs for a length of time shorter than the battery life or memory backup time of any one of the INET instruments; D the power fails on the HP 19405B; D a method or sequence file is loaded into the active workspace. 10-22 Artisan Technology Group - Quality Instrumentation ... Guaranteed | (888) 88-SOURCE | www.artisantg.com Creating the Little Falls Look German Components The last case does not occur as part of the HPĆIL reconfiguration, as do the other cases. The Configuring, Wait ..." message does not appear and INET addresses on the loop do not change. The HP 3396 reconciles the INET data path information in the INET Configuration Table with the current hardware and configuration, linking producers and consumers as required by the method or sequence. If the file contains set points for instruments that are not on the network, those set points will not be used, and an error message will be printed. However, the loop will generally still function for devices that do have a set point match; missing devices will be ignored. The configuration process proceeds as follows: 1. The HP 3396 first determines if the configuration is a coldĆstart or warmĆstart. When the configuration is a coldĆstart, the HP 3396 instructs INET instruments to set their configuration parameters to the cold (powerĆup) status. Otherwise, under warmĆstart conditions, configuration parameters remain active and unchanged. 2. The HP 3396 uploads configuration parameters from the INET devices in loopĆaddress order to determine the current state of the devices and data paths. 3. The HP 3396 then modifies the configuration parameters it has received based on whether the configuration is a coldĆ or warmĆstart and on the configuration constraints listed earlier in this chapter. 4. The HP 3396 then downloads the modified parameters back to the INET devices and checks to see that the modified parameters are accepted by each device on the loop. 10-23 Artisan Technology Group - Quality Instrumentation ... Guaranteed | (888) 88-SOURCE | www.artisantg.com Creating the Little Falls Look Using this document as an Interleaf template Establishing and Changing INET Data Paths INET protocol allows INET instruments to exchange a number of different types of data. Because each instrument on INET is actually a collection of functions housed together, INET addresses these functions separately as objects". Objects are instrument functions that act as producers or consumers of particular data types. Producers generate one data type and transmit it onto the loop for a corresponding consumer or consumers to use. The HP 3396, acting as an INET controller, routes data from producers to matching consumers. The data route from producer to consumer is defined as a data path". The HP 3396 controller keeps track of D the model numbers of all producers and consumers, D the types of data being exchanged, D the number of dataĆproducing sources, or channels, in use with each data path, D the status of each data path. All of this information is listed in the INET Configuration Table; see Listing INET Devices earlier in this chapter. INET Data Types Various types of data are transmitted between INET instruments. The data types are qualified by a format #, a digit from 0 to 9. Format numbers allow instruments to choose among formats for expressing the standard data types, preventing erroneous automatic configuration with instruments using different formats. 10-24 Artisan Technology Group - Quality Instrumentation ... Guaranteed | (888) 88-SOURCE | www.artisantg.com Creating the Little Falls Look German Components Common data types in use with the HP 3396 are listed in the table below. INET Data Types Data Type Name Description A0 Run Annotation (Format 0) DataĂrecordsĂofĂprintableĂASCIIĂstrings with a maximum of 42 characters for annotating the plot during a run. B0 B0 (Format 0) Reserved. C1 Chromatographic Signal (Format 1) 20 Hz signal points are represented by a 32Ćbit binary signed number. The HP 6890 has a 37Ćbit range. The 32Ćbit range that the HP 3396 accepts can be selected from any 32 contiguous bits out of the 37 produced by the HP 6890. See Using Methods in the HP 3396 Operating Manual for details on selecting the range. Since the HP 5890 FID dynamic range is 32Ćbits, it is completely covered I0 Immediate Data (Format 0) Sampler parameter data. I1 Immediate Data (Format 1) External events timetable data. K0 Device Dependent Commands (Format 0) Analytical instrument set point data or keyboard dialogs. R0 Report Annotation (Format 0) Printable ASCII data appended to reports. This may include bar code information, run logs, and external event notations. S0 Sample Number (Format 0) Three digit ASCII sample numbers ranging from 0 to 999 used in postrun report calculations. 10-25 Artisan Technology Group - Quality Instrumentation ... Guaranteed | (888) 88-SOURCE | www.artisantg.com Creating the Little Falls Look Using this document as an Interleaf template INET DataĆType Configuration Constraints Data Type Constraints INET State(s) During Data Transmission A0 Multiple active producers and active consumers allowed. Run or Plot B0 Reserved; status cannot be changed. Not applicable C1 Multiple active consumers, one active producer allowed. All I0 One active producer and one active consumer allowed. HP 3396 activates the I0 consumer in the instrument that is the active S0 producer. All I1 One active producer and one active consumer allowed. All K0 One active producer and multiple active consumers allowed. All, except for Run R0 Multiple active consumers and active producers allowed. Postrun, Idle, and Run may not begin" S0 One active S0 producer, multiple active S0 consumers allowed. Immediately after Postrun 10-26 Artisan Technology Group - Quality Instrumentation ... Guaranteed | (888) 88-SOURCE | www.artisantg.com Creating the Little Falls Look German Components In general during INET configurations, instruments with lower addresses have priority in getting their objects activated. This is not true, however, when the HP 19405A and another INET sampler (e.g., the HP 7673) coexist on the same INET loop. In this case the HP 7673 will take priority as the active sampler (S0 producer) irrespective of its address. The configuration process generates an INET Configuration Table, which has at least one entry for each INET device on the network. For simple devices, that entry may contain only the address and model number of the device. For more complex instruments, the table has an entry for each object or separate dataĆconsuming function within the instrument. With the HP 3396 in system command mode, a user can get a listing of the INET Configuration Table. This command can be abbreviated by its first two characters [I] [N] [ENTER] The routing of INET data from producers to consumer is referred to as a data path in the table. Data paths are automatically configured at powerĆon, but may also be changed manually from the HP 3396 keyboard. A typical INET Configuration Table is illustrated below. 10-27 Artisan Technology Group - Quality Instrumentation ... Guaranteed | (888) 88-SOURCE | www.artisantg.com Creating the Little Falls Look Using this document as an Interleaf template INET Configuration Table * I N [ENTER] LIST, EXIT, CHANGE, OR HELP [L/E*/C/H]: L [ENTER] INET CONFIGURATION ENTRY MODEL ADDR DATA PATH STATUS 1 2 3 3396C 6890A 6890A 0 8 8 C1 CONS CH 0 C1 PROD CH 0 C1 PROD CH 1 ACTIVE ACTIVE IDLE 4 5 3396C 6890A 0 8 K0 PROD CH 0 K0 CONS CH 0 ACTIVE ACTIVE 6 7 8 9 3396C 6890A 6890A 6890A 0 8 8 8 R0 R0 R0 R0 0 0 1 2 ACTIVE ACTIVE IDLE ACTIVE 10 11 12 3396C 6890A 6890A 0 8 8 S0 CONS CH 0 S0 PROD CH 0 S0 PROD CH 1 ACTIVE ACTIVE IDLE CONS PROD PROD PROD CH CH CH CH LIST, EXIT, CHANGE, OR HELP [L/E*/C/H]: [ENTER] 10-28 Artisan Technology Group - Quality Instrumentation ... Guaranteed | (888) 88-SOURCE | www.artisantg.com Creating the Little Falls Look German Components Changing the INET Configuration Table INET Configuration Table setpoints are stored in a method or sequence file when the [STORE] [METH] or [STORE] [SEQ] functions are executed. All HP 5890 and HP 6890 Gas Chromatograph data paths are stored in the method file. All HP 7673 Automatic Sampler data paths are stored in the sequence file. When an HP 6890 and HP 7673 are configured, the sampler data paths are also stored as part of the method. Other instruments on the network have their paths divided between the method and sequence files. When method and sequence files are loaded, the system automatically tries to implement the INET configuration implied by these files. For typical INET systems comprising an HP 3396, an HP 7673, and an HP 6890, the automatic configuration will be acceptable in most cases. However, it is possible to make configuration changes manually using the INET_CONFIGURATION command. This command provides a way to alter the loop configuration through an interactive dialog at the HP 3396 keyboard. To enter this dialog, press [I] [N] [ENTER] After the INET configuration is listed (see previous page), the HP 3396 prompts EXIT, CHANGE, OR HELP [E*/C/H]: Press [ENTER] to exit the dialog and return to the system command mode. [H] [ENTER] will explain the abbreviations used in the INET Configuration Table and list some precautions to take when changing the status of an entry manually. Entering [C] [ENTER] allows one to alter the configuration of the loop manually. When [C] [ENTER] is pressed, the HP 3396 responds 10-29 Artisan Technology Group - Quality Instrumentation ... Guaranteed | (888) 88-SOURCE | www.artisantg.com Creating the Little Falls Look Using this document as an Interleaf template CHANGE ENTRY NUMBER: The only information listed in the INET Configuration Table that may be changed through this dialog is the status of a data path. Active producers and consumers can be deactivated, and inactive ones can be activated. The configuration of a particular data type is subject to the constraints listed earlier in this chapter. If an INET data path is listed as IDLE and you wish to activate it, enter the number of the entry to be activated. To deactivate an entry number, enter its number with a [-] key before it. For example, to use the analog input for the HP 5890 instead of INET data, the C1 data path in the listing above must be deactivated. Entering [-][4] and [-][5] accomplishes this. When the INET configuration is listed again, this path is shown as IDLE. See the figure below. When making Configuration Table changes, be sure that each data path has at least one active producer and one active consumer. The HP 3396 will deactivate data paths configured incorrectly, e.g., where there are too many or too few producers or consumers. Some INET instruments may also reject a configuration change themselves, e.g., if an option is not installed. After making changes, it is a good idea to list the INET Configuration Table again to verify them. The table on the next page lists all the INET data types used in the HP 3396 and the INET instruments that produce and consume these data types. 10-30 Artisan Technology Group - Quality Instrumentation ... Guaranteed | (888) 88-SOURCE | www.artisantg.com Creating the Little Falls Look German Components INET Instruments as DataĆType Producers and Consumers Data Types INET Instruments A0 B0** C1 I0*** I1 K0 R0 S0 HP 3396 C C C P P P C C HP 6890 - - P - - C P P HP 5890 - - P - - C - - HP 7673* - P - C - C - P HP 19405A P - - C C - - P HP 19405B P - - - C - - - HP 1050L - - - - - - P P HP 1090L - - - - - - P P C = CONSUMER P =PRODUCER * When in an INET configuration with the HP 5890 GC. When configured with the HP 6890 GC, the HP 7376 is not on INET. B0 data path is not in use. ** BO data path is not in use. *** IO data is coupled to SO data and is not listed separately in the INET Configuration Table. 10-31 Artisan Technology Group - Quality Instrumentation ... Guaranteed | (888) 88-SOURCE | www.artisantg.com Creating the Little Falls Look Using this document as an Interleaf template Run and Report Annotation Data (A0 AND R0) Run annotation is performed by the HP 3396 in response to its internal demands, such as retention time printing and to demands from Run annotation producers on the Instrument Network. The HP 3396 consumes Format 0 Run Annotation data which consists of printable ASCII characters sent by a producer during the Run or Plot states. The HP 19405B is a Format 0 Run Annotation Data Producer. This instrument sends the characters EX" to the HP 3396 whenever any of their relays switch due to an External Events Timetable entry. Because multiple A0Ćproducers are permitted, the HP 3396 may overprint simultaneous annotations. Normally active, the A0Ćproducer may be deactivated to prevent cluttering of the plot with annotations. For example, an annotation might overprint an important retention time, making it unreadable. To deactivate an A0Ćproducer, first list the INET Configuration Table. Find the HP 3396 A0Ćconsumer and deactivate it (the last consumer of a particular data type must be deactivated before the last producer may be deactivated). Then deactivate the A0 producer. As an A0Ćproducer, the HP 19405B IECM prints EX" on the chromatogram each time an external event is executed. After the A0Ćproducer is deactivated, the External Events Timetable entries will still be executed by the sampler during runs, but EX" is no longer printed on the plot. When all consumers on one data path are deactivated, the HP 3396 automatically deactivates the resulting unmatched producers, printing the message 10-32 Artisan Technology Group - Quality Instrumentation ... Guaranteed | (888) 88-SOURCE | www.artisantg.com Creating the Little Falls Look German Components UNMATCHED PRODUCERS DEACTIVATED In the example above, the A0Ćproducer is explicitly deleted. The HP 3396 finds no unmatched producers, and so no automatic deactivation is necessary. Either deactivation method is acceptable, but the former saves a few keystrokes in cases when all objects of a particular data path are to be deactivated. Of course, if you want to deactivate just some but not all of the producers on a data path, each must be deleted explicitly. If there are multiple active producers of a particular data type and format #, you need not deactivate the consumers before deactivating a producer. However, before deactivating the last active producer on a data path, you must deactivate all the consumers on that data path. Report annotation is similar to run annotation in that, once the data path is activated, the printing occurs automatically. R0Ćproducers, however, send their ASCII strings during the Postrun state to be printed on the HP 3396 and/or stored with the result file as part of the report for each run. R0Ćproducers are polled in order of descending INET/HPĆIL address, starting with the highest device address. An R0Ćproducer may also request permission from the the HP 3396 to use its printer to print set points, for example, during the Idle" and Run may not begin" states. The HP 6890 is an R0 producer of run log information. A barcoder uses an R0 data path to produce sample information. Producers and consumers of the report annotation data are activated and deactivated as described above for run annotation data consumers and producers. B0 Data (B0) When an HP 7673 is part of INET, the INET Configuration Table will list the sampler as a producer of B0 data and the HP 3396 as its consumer. However, this data path is not in use and cannot be activated from the HP 3396 keyboard. 10-33 Artisan Technology Group - Quality Instrumentation ... Guaranteed | (888) 88-SOURCE | www.artisantg.com Creating the Little Falls Look Using this document as an Interleaf template Chromatographic Data (C1) The HP 3396 is a consumer of Format 1 chromatographic data. Instruments such as the HP 6890 Gas Chromatograph, with INET compatibility, may send their digitized output signals to the HP 3396 using INET rather than the analog signal lines. The active CĆproducer continuously sends data to the active consumer, so one can list the signal level ([LIST] [ZERO] [ENTER]) or do an automatic threshold determination ([THRESH] [ENTER]) at any time. The HP 3396 can either plot the data ([PLOT]) or integrate the data and produce a report ([START]), just as with the analog voltage signal from the rear panel input. If it is an active C1 consumer, the HP 3396 plot of C1 data will automatically start when an HP 5890 GC column compensation run begins. The HP 6890 can perform compensation runs during the postĆrun state. The HP 3396 accepts the postrun state, and will not plot runs that occur during that time. Only one Format 1 chromatographic data producer may be active at any time. When more than one HP GC is on the INET system, C1Ćproducers can be deactivated as shown in Changing the INET Configuration Table above. Just deactivating the C1 consumer will shut off the Format 1 Chromatographic data producer. The HP 3396 will then use the signal applied to its analog voltage input as the signal to integrate. To activate a desired C1Ćproducer, enter its entry number, and then reactivate the C1Ćconsumer. Immediate Data (I0 AND I1) The immediate data formats supported by the HP 3396 are Format 0 for a portion of the [PREP] [SEQ] entries and Format 1 for [EXT()] key entries which may be entered directly via the SET EXT statements in BASIC, the external events timetable dialog, or through the [PREP] [METH] dialog. 10-34 Artisan Technology Group - Quality Instrumentation ... Guaranteed | (888) 88-SOURCE | www.artisantg.com Creating the Little Falls Look German Components When part of the INET loop (that is, when configured to an HP 5890 GC), the HP 7673 sampler or HP 19405A sampler controller uses the I0 data path to send prompts to the HP 3396 printer and to get response messages from the HP 3396 keyboard. When the HP 19405A or HP 19405B are used as external event controllers, they use the I1 data path to send prompts and get responses in the same way. In any network with only an INET sampler, and either an HP 19405A or an HP 19405B, it will be automatically configured at powerĆon as a consumer of one or both formats of Immediate data. The HP 3396 configures itself as the producer of the two data formats, thus establishing control over the sampler or sampler controller. Note that the sample data type (S0, described below) and the immediate data format, I0, are coupled in the HP 3396. The I0 data path is automatically activated when the S0 data type is activated, but the I0 data path is not listed separately in the INET Configuration Table. Immediate data formats may be transmitted during any INET state. To depart from the powerĆon network configuration for I1 data, use the [I][N] [ENTER] key sequence. The constraints for immediate data are given in the table above. Even in a single sampler system there may be reasons to deactivate the I1 data path. For example, deactivating the path prevents casual users from inadvertantly changing the External Event Timetable, perhaps causing an undesired external event. The HP 19405B IECM can control eight external events. If you need more than eight external events, another HP 19405B can be added to the system. In this case the [I][N] dialog selects which HP 19405B is online to the EXT() commands via the I1 path. 10-35 Artisan Technology Group - Quality Instrumentation ... Guaranteed | (888) 88-SOURCE | www.artisantg.com Creating the Little Falls Look Using this document as an Interleaf template Device Dependent Commands (K0) The HP 6890, the HP 5890, and the HP 7673 (when part of the INET loop) are consumers of K0 commands. The K0 data path allows the HP 3396 as a K0 producer to send command strings changing the set points of these instruments, or cause certain other actions to be taken, as long as a run is not in progress. Fundamentally, a single K0 transaction consists of the HP 3396 sending a message to an INET device and the INET device sending a response back to the HP 3396. To enter these commands from the HP 3396 keyboard, Option 6, the [PREP] [METH] dialog, or the INET_I0 command in BASIC, may be used. Entering commands is explained in the section called Controlling INET Instruments Through BASIC earlier in this chapter. The K0 data path producer (the HP 3396) and all consumers are automatically configured as ACTIVE when power is switched on. Although K0 consumers can be deactivated, there is no reason to deactivate them since the indicated device address determines which instrument is the active consumer of a particular command string. Sample Data (S0) At powerĆon configuration, the HP 3396 is configured as an active S0Ćconsumer and the INET sampler is the active producer of sample data. S0 data describes the sample most recently analyzed and may represent bottle numbers or an ID code. Typically the S0 data is the bottle number of the most recently injected vial. Since I0 data is coupled to S0 data, the HP 3396 is configured as an active I0Ćproducer and the INET sampler is the active consumer of I0Ćdata at powerĆon. As an S0 consumer, the HP 3396 uses the sample number (bottle number) as an index into the sample table for calibrated reports (ESTD, ISTD, and NORM). The HP 3396 also prints the sample number in the upper right hand corner of the report. If the Sample Number cable is used as the source of this information, the HP 3396 S0 consumer object should be IDLE. 10-36 Artisan Technology Group - Quality Instrumentation ... Guaranteed | (888) 88-SOURCE | www.artisantg.com Creating the Little Falls Look German Components To deactivate the active S0Ćproducer, you must first deactivate all active S0Ćconsumers (typically only the HP 3396). When the S0Ćconsumers are deactivated, the HP 3396 automatically deactivates the matching S0Ćproducers. At this point, no sample data will be transmitted to the HP 3396. To switch from one active producer to another (if several of one type are connected to INET), enter C" for the change dialog after listing the INET Configuration Table. Deactivate all the matching consumers, then deactivate the current producer and activate the desired one. Finally, reactivate the desired consumer(s). See the configuration constraints listed above. 10-37 Artisan Technology Group - Quality Instrumentation ... Guaranteed | (888) 88-SOURCE | www.artisantg.com Creating the Little Falls Look Using this document as an Interleaf template HP 3396 Background Tasks As the INET controller, the HP 3396 manages the interactions of analytical equipment as described in the preceding subsections. In addition to the operation and data structures described, INET performs several functions that are apparent only by their indirect effects on the instruments. Among these functions are readiness, status polling, and error detection. The HP 3396 continuously polls each of the following: D HPĆIL addresses (INET only) in address order for readiness and status. D HP 3396 keyboard. After each status poll cycle the INET controller conducts an INET readiness to begin a run" poll if in the Idle or Postrun state. In addition, pressing [R] [E] [A] [ENTER] causes an immediate poll of INET devices, including the most recent host computer readiness return, and prints the results on the printer/plotter. The network state determines the response to [START] key presses from INET instruments and the host computer. The status indicators (LEDs) on the HP 3396 keyboard are set to reflect the state of the network (READY, RUN, KEYBD) and the host computer (COMM), if one is connected. Unless a sequence of runs is being started, any start message or keystroke starts a run immediately, with the HP 3396 printing START; not ready if it is not ready to start a run. If a sequence of runs is being started from a program or if the [SEQ] [START] keys were pressed, the network will wait for all instruments to become ready before starting any run. The HP 3396 will print the message 10-38 Artisan Technology Group - Quality Instrumentation ... Guaranteed | (888) 88-SOURCE | www.artisantg.com Creating the Little Falls Look German Components Waiting for System Readiness and hold off the actual start of the run. During the Prerun, Run, and Run may not begin" INET states, the ready polling is suspended. If the Instrument Network is in any of these states, it has already accepted a start signal or intentionally ignored a start signal, so by definition, it is not ready. No polling is necessary until the network proceeds to the Postrun state. The HPĆIL status polling also allows instruments on INET to print warning and error messages on the HP 3396 printer/plotter. 10-39 Artisan Technology Group - Quality Instrumentation ... Guaranteed | (888) 88-SOURCE | www.artisantg.com Creating the Little Falls Look Using this document as an Interleaf template 10-40 Artisan Technology Group - Quality Instrumentation ... Guaranteed | (888) 88-SOURCE | www.artisantg.com 11 Compatible Disk Drives 11-2 Using Disk Drives 11-7 Understanding HPĆIL and HPĆIB 11-12 Using Disk Drives Artisan Technology Group - Quality Instrumentation ... Guaranteed | (888) 88-SOURCE | www.artisantg.com Using Disk Drives Compatible Disk Drives You can elect to save HP 3396 files, data, and BASIC programs externally on disk drives or in a host computer system. You can also save them on the data storage extension cards of an HP 3396 Series III. For more information about extension cards, see Saving Integrator Data in the HP 3396 Operating Manual. The HP 9153 Disk Drive contains a hard or fixed disk. The other drives listed use flexible, or floppy", disks. Disk Drives Compatible with the HP 3396 Disk Drive Model Number Notes HP 9114A or B HPĆIL, batteryĆoperated, floppy drive HP 9122C or D HPĆIB device2 HP 9153A or C1 10 Megabyte Winchester, HPĆIB device2 Note: The HP 3396 is only compatible with doubleĆsided subset 80 command set disk drives. 1When used with the HP 3396 Series II, the HP 9153C 10 megabyte disk drive should be divided into the maximum number of volumes. This will keep disk directory listings on the HP 3396 to a reasonable length. See the HP 9153C Getting Started manual for instruction on setting the configuration switch to determine the number and size of volumes. 2Requires use of an HP 82169A HPĆIL/HPĆIB Interface. HewlettĆPackard's PeakĆ96 Information Manager allows easy storage of integrator files at a host computer. 11-2 Artisan Technology Group - Quality Instrumentation ... Guaranteed | (888) 88-SOURCE | www.artisantg.com Creating the Little Falls Look German Components Listing Devices on the Loop Compatible disk drives use the HewlettĆPackard Interface Loop or HewlettĆPackard Interface Bus. 1. Press [S] [Y ] [ENTER]to list all the devices currently active on the loop. This is a typical listing for the system with an HP 9122 HPĆIB disk drive and two SRAM extension cards. ÁÁÁÁÁ ÁÁÁÁÁÁÁÁÁÁÁÁ ÁÁÁÁÁÁÁÁÁÁ ÁÁÁÁÁ ÁÁÁÁÁÁÁÁÁÁÁÁ ÁÁÁÁÁÁÁÁÁÁ ÁÁÁÁÁ ÁÁÁÁÁÁÁÁÁÁÁÁÁÁÁÁÁÁÁÁÁÁ ÁÁÁÁÁÁÁÁÁÁÁÁÁÁÁÁÁÁÁÁÁÁÁÁÁÁÁ ÁÁÁÁÁÁÁÁÁÁÁÁÁÁÁÁÁÁÁÁÁÁÁÁÁÁÁ ÁÁÁÁÁ ÁÁÁÁÁÁÁÁÁÁÁÁ ÁÁÁÁÁÁÁÁÁÁ ÁÁÁÁÁÁÁÁÁÁÁÁÁÁÁÁÁÁÁÁÁÁÁÁÁÁÁ ÁÁÁÁÁÁÁÁÁÁÁÁÁÁÁÁÁÁÁÁÁÁÁÁÁÁÁÁÁ ÁÁÁÁÁÁÁÁÁÁÁÁÁÁÁÁÁÁÁÁÁÁÁÁÁÁÁÁÁ ÁÁÁÁÁÁ ÁÁÁÁÁÁ ÁÁÁÁÁ ÁÁÁÁÁÁ ÁÁÁÁÁÁ ÁÁÁÁÁÁ ÁÁÁÁÁÁ ÁÁÁÁÁ ÁÁÁÁÁÁ ÁÁÁÁÁÁ ÁÁÁÁÁÁÁÁÁÁÁÁÁÁÁÁÁÁÁÁÁÁÁÁÁÁÁÁÁ ÁÁÁÁÁÁÁÁÁÁÁÁÁÁÁÁÁÁÁÁÁÁÁÁÁÁÁÁÁ ÁÁÁÁÁÁÁÁÁÁÁÁÁÁÁÁÁÁÁÁÁÁÁÁÁÁÁÁÁ ÁÁÁÁÁÁÁÁÁÁÁÁÁÁÁÁÁÁÁÁÁÁÁÁÁÁÁÁÁ ÁÁÁÁÁÁ ÁÁÁÁÁÁ ÁÁÁÁÁ ÁÁÁÁÁÁ ÁÁÁÁÁÁ ÁÁÁÁÁÁ ÁÁÁÁÁÁ ÁÁÁÁÁ ÁÁÁÁÁÁ ÁÁÁÁÁÁ ÁÁÁÁÁÁÁÁÁÁÁÁÁÁÁÁÁÁÁÁÁÁÁÁÁÁÁÁÁ ÁÁÁÁÁÁÁÁÁÁÁÁÁÁÁÁÁÁÁÁÁÁÁÁÁÁÁÁÁ ADDRESS DEVICE ID ACCESSORY ID & CLASS 8 HP82169A 43H INTERFACE 1–7 RESERVED FOR HPIB DEVICES SLOT1 2MB–SRAM SLOT2 512KB–FLASH DISC NAME ADDRESS DRIVE# VOLUME ID MEDIA A 7 EPA1 B 7 WATER C SLOT1 CLWAT SRAM D SLOT1 METHOD SRAM F SLOT1 AUG SRAM G SLOT1 SAVE SRAM I SLOT2 TEMP SRAM J SLOT2 TEMP2 SRAM RS-232-C SWITCH SETTINGS Baud 4800 Timeout 15 sec Handshake Delay Disabled Hardware Handshake Enabled 11-3 Artisan Technology Group - Quality Instrumentation ... Guaranteed | (888) 88-SOURCE | www.artisantg.com Creating the Little Falls Look Using this document as an Interleaf template Example 2. Press [R] [E ] [A] [ENTER] to check system readiness. Autoconfiguration and Reconfiguration After the cables are connected and all instruments are switched on, the HP 3396, as controller, configures the loop. Configuring includes D recognizing the types and internal functions of the devices in the network, D assigning addresses. When assigning addresses, the HP 3396 always assigns address 0 to itself. Addresses 1 to 7 are reserved for HPĆIB devices and are set by switches on the HPĆIB devices themselves. Addresses 8 to 31 are assigned in order around the loop starting with the device connnected to the controller's HPĆIL output receptacle. Data or commands destined for a device on the loop often include the address of that instrument. When the order of instruments in the loop is changed, the system must be reconfigured so that the HP 3396 is aware of the new address for each device. The HP 3396 cannot detect the removal of an HPĆIB device unless the system is reconfigured by D breaking the loop, D resetting the HPĆIB interface (by pressing the reset button), D executing a RECONFIGURE command in BASIC or system command mode. 11-4 Artisan Technology Group - Quality Instrumentation ... Guaranteed | (888) 88-SOURCE | www.artisantg.com Creating the Little Falls Look German Components At the direction of the controller, the loop automatically reconfigures under the following circumstances: D recovery from a power failure, D recovery from a break in the loop (e.g., breaking the loop to add a device, or a power failure at a remote device), D executing a RECONFIGURE command from BASIC or system command mode. 1. Press [R] [E ] [C ] [ENTER] to reconfigure the system when instruments are added or moved on the loop. If there are more than 31 devices on the loop, the HP 3396 prints TOO MANY HP-IL OR HP-IB DEVICES. When the loop is broken, the HP 3396 prints LOOP DOWN: TIMEOUT When the loop is restored, the HP 3396 will configure again as described above. Once the configuration is done, the SYSTEM command may be used to list the addresses of the devices on the loop. For example, it is necessary to know a printer's address when using option 5 (postrun report option) or when sending a listing of a Method file to an external printer via the XADDRESS command. [S] [Y] [ENTER] will list HPĆIL and INET devices on the loop and their addresses. The current settings for the RSĆ232ĆC switches are also printed below the device listings. HPĆIB printers are not identified in this table. On HPĆIL, after devices have transmitted data to the HP 3396 as the system controller, the integrator sends the data it received back around the loop. When there is a discrepancy between data sent out by the transmitting device and the data sent back by the HP 3396, the device will send the controller an End of Transmission Error message. When this message is received, the integrator prints 11-5 Artisan Technology Group - Quality Instrumentation ... Guaranteed | (888) 88-SOURCE | www.artisantg.com Creating the Little Falls Look Using this document as an Interleaf template “ETE” ERROR This error could be due to faulty electronics in one or more devices on the HPĆIL loop or heavy electrical/radio interference preventing data from successfully traveling the HPĆIL loop. 11-6 Artisan Technology Group - Quality Instrumentation ... Guaranteed | (888) 88-SOURCE | www.artisantg.com Creating the Little Falls Look German Components Using Disk Drives See the HP 3396 Reference Manual for instruction about how to install disk drives with the HP 3396. Accessing Disk Drives Commands and key sequences that access disk drives are listed below. All commands listed below are discussed in the HP 3396 Operating Manual unless otherwise indicated. Listing files on disk: [LIST] [CALIB] filespec [ENTER] [LIST] [METH] filespec [ENTER] [LIST] [SEQ] filespec [ENTER] Listing files on disk to an external printer: Operating Manual chapter... 6 8 9 this chapter Note: The XADDRESS (external address) must be set to successfully list files to an external printer. [CTRL][LIST]Ă[CALIB]ĂfilespecĂ[ENTER] [CTRL][LIST]Ă[METH] filespec [ENTER] [CTRL][LIST] [SEQ] filespec [ENTER] Storing files on disk: [STORE] [CALIB] filespec [ENTER] [STORE] [METH] filespec [ENTER] [STORE] [SEQ] filespec [ENTER] Operating Manual chapter... 6 8 9 11-7 Artisan Technology Group - Quality Instrumentation ... Guaranteed | (888) 88-SOURCE | www.artisantg.com Creating the Little Falls Look Using this document as an Interleaf template Loading files from disk: [LOAD] [CALIB] filespec [ENTER] [LOAD] [METH] filespec [ENTER] [LOAD] [SEQ] filespec [ENTER] 6 8 9 Deleting files from disk: [DEL] [CALIB] filespec [ENTER] [DEL] [METH] filespec [ENTER] [DEL] [SEQ] filespec [ENTER] System commands: 6 8 9 this chapter READY RECONFIGURE SYSTEM File and disk commands: COPY filespec, filespec CREATE filespec, size DIRECTORY diskspec or filespec FORMAT diskspec, volume, max files PACK diskspec PURGE filespec Option 2: Storing data from runs Option 5: Listing postĆrun data Operating Manual chapter... 7 BASIC User's Manual 7 7 7 7 7 10 Refer to the HP 3396 BASIC Language User's Manual for information about file storage and retrieval from BASIC. 11-8 Artisan Technology Group - Quality Instrumentation ... Guaranteed | (888) 88-SOURCE | www.artisantg.com Creating the Little Falls Look German Components File System Commands The table below lists the commands that control disk drives. More detailed descriptions of the system commands may be found in the HP 3396 Operating Manual. BASIC commands and statements are described in more detail in the BASIC Language User's and BASIC Language Reference Manuals. For more information on using extension cards with the HP 3396 Series III, see Saving Integrator Data in the HP 3396 Operating Manual. 11-9 Artisan Technology Group - Quality Instrumentation ... Guaranteed | (888) 88-SOURCE | www.artisantg.com Creating the Little Falls Look Using this document as an Interleaf template File System Commands (M:disk or external disk drives) System Command Abbr Syntax ANALYZE,I ASSIGN -AS ANALYZE filespec, I ASSIGN keynumber, filespec .RAW, .BNC, .BNA .BAS COPY CREATE CO CR COPY filespec1, filespec2 CREATE filespec, size all all ^[LIST] [CTRL] [LIST]ă[CALIB] filespec [METH] [SEQ] .CAL,Ă.MET,Ă.SEQ [CTRL] [LIST] Valid File Extensions [DELETE] -- [DEL] [CALIB] filespec [METH] [SEQ] .CAL, .MET, .SEQ DIRECTORY DI DIRECTORY diskspec or filespec all FORMAT -- FORMAT diskspec,volume, numberfiles n/a [LIST] -- [LIST] [CALIB] filespec [METH] [SEQ] CAL, .MET, .SEQ [LOAD] -- [LOAD] [CALIB] filespec [METH] [SEQ] .CAL, .MET, .SEQ PACK PURGE PA PU PACK diskspec PURGE filespec n/a all READY RECONFIGURE RENAME REA REC REN READY RECONFIGURE RENAME filespec1, filespec2 n/a n/a all [STORE] -- [STORE] [CALIB] filespec [METH] [SEQ] .CAL, .MET, .SEQ SYSTEM SY SYSTEM n/a n/a = not applicable continued on next page 11-10 Artisan Technology Group - Quality Instrumentation ... Guaranteed | (888) 88-SOURCE | www.artisantg.com Creating the Little Falls Look German Components File System Commands (cont'd) BASIC Command or Statement Abbr ASK # DATUM ASK # LENGTH ASK # LIFTYPE ASK # RECORD ----- ASK # channel:DATUM string variable ASK # channel:LENGTH numeric variable ASK # channel:LIFTYPE numeric variable ASK # channel:RECORD numeric variable all all all all COPY CREATE DEVICE$ DIRECTORY CO CR -DI COPY filespec1, filespec2 CREATE filespec, filesize DEVICE$ (HPĆIL device address) DIRECTORY diskspec or filespec all all n/a n/a FORMAT -- FORMAT diskspec, volume, numberfiles n/a GET G GET filespec GETCALIB GETMETH GETSEQ JOIN LOAD PACK PURGE READ # RELEASE REST ---JO LO PA PU --- GETCALIB filespec" GETMETH filespec" GETSEQ filespec" JOIN filespec LOAD filespec PACK diskspec PURGE filespec READ # channel:variable list RELEASE REST # channel .BAA or .BAS .CAL .MET .SEQ .BAA .BAA n/a all all n/a RENAME RUN REN RENAME filespec1, filespec2 R RUN filespec SAVE SA SAVE filespec SET # MARGIN SET # RECORD SSET VOL SYSTEM ---SY SET # channel:MARGIN column number SET # channel:RECORD numeric expression SSET VOL SLOT#,#volumes SYSTEM Syntax Valid File Extensions all .BAA and .BAS .BAA and .BAS all all n/a n/a 1BASIC is installed with Option 100. n/a = not applicable 11-11 Artisan Technology Group - Quality Instrumentation ... Guaranteed | (888) 88-SOURCE | www.artisantg.com Creating the Little Falls Look Using this document as an Interleaf template Understanding HPĆIL and HPĆIB The HP 3396 is compatible with various types of HewlettĆPackard Interface Loop, HewlettĆPackard Interface Bus, and Instrument Network devices. HPĆIL is a serial twoĆwire connection and a software protocol that allows printers, storage devices, and analytical instruments to communicate with each other. All INET devices are HPĆILĆcompatible. HPĆIB is a parallel bus link with its own protocol, equivalent to IEEEĆ488. HPĆIL supports up to 31 devices on the loop", reserving seven of these for HPĆIB devices such as printers and disk drives. HPĆIB is an entirely different type of instrument interface that connects devices in parallel and uses a different message protocol. HPĆIB devices are integrated into the HPĆIL through the HP 82169A HPĆIL/HPĆIB Interface. More inĆdepth information about HPĆIL may be found in the book The HPĆIL System: An Introductory Guide to the HewlettĆPackard Interface Loop written by Kane, Harper, and Ushijima and published by OSBORNE/McGraw Hill. 11-12 Artisan Technology Group - Quality Instrumentation ... Guaranteed | (888) 88-SOURCE | www.artisantg.com Creating the Little Falls Look German Components How HPĆIL Operates HPĆIL devices play one of three different roles: controller, talker, or listener. Each loop has one device that acts as a controller and devices that talk and listen. As the HPĆIL controller, the HP 3396 D assigns addresses and talking and listening roles to each device, D services device requests, and D initiates the transfer of data from talkers to listeners. The HP 3396 is capable of initiating actions at a remote device on the loop. On the loop talkers are message senders and listeners are message receivers. Some devices, such as disk drives, function as both talkers and listeners, while printers are primarily listeners. An illustration of a loop with HPĆIL and an HPĆIB device is shown below. HPĆIL System In HP 3396 Controller HP-IL Cable Out HP 2225B Printer Out In HP-IL Cable Out HP-IL Cable In HP 82169A HPĆIB/HPĆIL InĆ HP-IB terface Cable HP 9122D Disk Drive 11-13 Artisan Technology Group - Quality Instrumentation ... Guaranteed | (888) 88-SOURCE | www.artisantg.com Creating the Little Falls Look Using this document as an Interleaf template 11-14 Artisan Technology Group - Quality Instrumentation ... Guaranteed | (888) 88-SOURCE | www.artisantg.com 12 What is the RSĆ232ĆC Interface? 12-2 Installing RSĆ232ĆC Devices 12-3 Choosing the Proper Cable 12-4 Connecting the Cable 12-8 The RSĆ232 Configuration Settings 12-9 Changing the RSĆ232 settings with the SSET RS232 command 12-10 Matching RSĆ232ĆC Protocol 12-15 Using External BASIC 12-17 Using RSĆ232ĆC in Remote Mode 12-18 Using RSĆ232ĆC Devices Artisan Technology Group - Quality Instrumentation ... Guaranteed | (888) 88-SOURCE | www.artisantg.com Using RSĆ232ĆC Devices What is the RSĆ232ĆC Interface? The RSĆ232ĆC link is a singleĆcable, bidirectional interface that conforms to Electronic Industries Association (EIA) standards. The HP 3396 can be connected via RSĆ232ĆC link to a computer and other external devices to send and receive data and commands. An external terminal may be connected to the HP 3396 via RSĆ232ĆC for the purpose of writing and executing BASIC programs. Instructions on how to use the external BASIC capability are included in this chapter. Communications between an HP 3396 and an external computing device require programs to be running on the host computer to operate the RSĆ232ĆC link. HP PeakĆ96 is the HewlettĆPackard product that allows an IBMĆcompatible personal computer to control the HP 3396. This chapter does not provide detailed operating and programming instructions for the range of other possible host computers. This information is contained in the RSĆ232ĆC Programmer's Guide (03396-90335). 12-2 Artisan Technology Group - Quality Instrumentation ... Guaranteed | (888) 88-SOURCE | www.artisantg.com Using RSĆ232ĆC Devices Matching RSĆ232ĆC Protocol Installing RSĆ232ĆC Devices The RSĆ232ĆC hardware includes the RSĆ232" connector on the rear panel, the configuration switches under the keyboard, and the choice of the DTE (male) cable, or the DCE (female) cable. The HP 3396 can be configured to be Data Terminal Equipment (DTE), the terminal end of the RSĆ232ĆC interface, or Data Communication Equipment (DCE), the modem end of the interface, whichever is appropriate. The cable determines the mode of operation. Caution The HP 3396 cannot function as a general purpose terminal. RSĆ232ĆC Interface installation involves 2. Choosing the proper cable. 3. Connecting the cable. 4. Setting RS 232 parameters using the SET_SYS dialog. 5. Matching RSĆ232ĆC protocol. 12-3 Artisan Technology Group - Quality Instrumentation ... Guaranteed | (888) 88-SOURCE | www.artisantg.com Using RSĆ232ĆC Devices Changing the RSĆ232 settings with the SSET RS232 command Choosing the Proper Cable The physical connection for the RSĆ232ĆC link is made by a cable with a 15Ćpin male connector to the RSĆ232 receptacle on the rear panel of the HP 3396. Since the HP 3396 can be configured as either Data Terminal Equipment (DTE) or Data Communications Equipment (DCE), two different cables may be used. RSĆ232ĆC Cables Cable Option # (Part Number) Description HP 3396 Mode 301 (03396-60520) 15Ćpin connector to 25Ćpin female D" RSĆ232ĆC connector DCE 302 (03396-60510) 15Ćpin connector to 25Ćpin male D" RSĆ232ĆC connector DTE 303 (03396-60530) 15Ćpin connector to 9Ćpin female D" RSĆ232ĆC connector DCE 304 (03396-60520) (HP 92224M) 15Ćpin connector to 25Ćpin female D" RSĆ232ĆC maleĆtoĆmale converter DCE The most straightforward way to connect two devices is to determine which device transmits its data on which connector pin. Then make sure the other device receives data on that pin. (In most cases only pins 2, 3, and 7 are used.) The HP 3396 implements the RSĆ232ĆC functions shown below. 12-4 Artisan Technology Group - Quality Instrumentation ... Guaranteed | (888) 88-SOURCE | www.artisantg.com Using RSĆ232ĆC Devices Matching RSĆ232ĆC Protocol RSĆ232ĆC Functions Implemented on the HP 3396 Connector 25Ćpin 25ĆPin 9ĆPin (DTE) (DCE) (DCE) 1 1 - AA Protective Ground (Shield) 2 3 2 BA Transmitted Data DTE DCE 3 2 3 BB Received Data DCE DTE 4 4 7 CA Request to Send DTE DCE 5 5 8 CB Clear to Send DCE DTE - 6 6 CC Data Set Ready DCE DTE 7 7 5 AB Signal Common - 8 1 CF Received Line Signal Detector DCE DTE - 20 4 CD Data Terminal Ready DTE DCE Caution Mnemonic Description Direction -- -- Voltages applied to any RSĆ232ĆC connection must not exceed 25V peak with respect to signal common, or damage to the HP 3396 may result. DTE or DCE? The needs of the RSĆ232ĆC device being connected to the HP 3396 determine which cable and configuration are used. When a DCE device, such as a modem, is being connected, the HP 3396 is configured as DTE and uses the DTE cable. When the DCE cable is used, the HP 3396 looks like a modem to DTE devices. The HP 3396 DTE cable has a male 25Ćpin D" connector. When the HP 3396 has the DTE cable connected, it behaves as a DTE device. The 12-5 Artisan Technology Group - Quality Instrumentation ... Guaranteed | (888) 88-SOURCE | www.artisantg.com Using RSĆ232ĆC Devices Changing the RSĆ232 settings with the SSET RS232 command connected device must be a DCE device, transmitting on pin 3 (BA) and receiving on pin 2 (BB). There are two DCE cables for the HP 3396. One (03396-60520) has a female 25Ćpin D" connector. Use this cable to connect the HP 3396 to a DTE device, transmitting data on pin 2 (BB) and receiving on pin 3 (BA). The other DCE cable (03396-60530) has a female 9Ćpin D" connector. Use this cable to connect the HP 3396 to a DTE device, transmitting data on pin 3 (BA) and receiving on pin 2 (BB). By RSĆ232ĆC convention, all DCE devices should have a FEMALE 25Ćpin D" connector associated with them, and all DTE devices should have a MALE 25Ćpin D" connector associated with them. However, many manufacturers use custom connectors or, to avoid male bulkhead fittings, use female connectors on their DTE devices and provide a maleĆtoĆmale cable. Therefore, just looking at the connector on the RSĆ232ĆC device is not a reliable way to determine which cable you should use. In addition not all RSĆ232ĆC devices clearly show whether they are DTE or DCE. Some may be switchable as well (such as the HP 3396). Consult the reference material provided with your RSĆ232ĆC device to be sure that the HP 3396 cable you received is the appropriate one. The signals shown in the table on the previous page should match so that an output from the HP 3396 is connected to the appropriate input on the RSĆ232ĆC device and vice versa. The connectors should be of opposite gender. The HP 3396 and the RSĆ232ĆC device should operate properly if these two conditions are met. If these conditions are not met and the output and input signals do not match or the connectors are not opposite in gender, customized cables, or adapters are required. 12-6 Artisan Technology Group - Quality Instrumentation ... Guaranteed | (888) 88-SOURCE | www.artisantg.com Using RSĆ232ĆC Devices Matching RSĆ232ĆC Protocol Customizing Cables You may find that the signals with the same mnemonics in both instruments are matched input to output, but the connector gender is the same in both instruments (both male or both female); then you need a genderĆchanging adapter. GenderĆchanging adapters are either maleĆtoĆmale or femaleĆtoĆfemale adapters with the pins connected straight through (#1 to #1, etc.). On the other hand, you may find that the signals with the same mnemonic in both devices are the same, i.e., both inputs or both outputs. You will need an adapter to crossĆconnect the devices. Such adapters for DTE devices (both devices transmitting data on Pin 2, both with male connectors) are called modemĆeliminator or nullĆmodem adapters. They crossĆconnect the commonly used DTE signals so that the needs of two DTE devices may be satisfied. With the following set of adapters, you should be able to conquer almost any RSĆ232ĆC situation: D maleĆtoĆmale straight through (HP 92224M), to change gender, D femaleĆtoĆfemale straight through (HP 92224F), also to change gender, D modemĆeliminator or nullĆmodem, usually femaleĆtoĆfemale, to allow two DTE devices to be connected together. It is also possible that you may need a combination of crossĆconnecting and genderĆchanging adapters. Similar adapters can be constructed or purchased for other combinations of connectors and device types. 12-7 Artisan Technology Group - Quality Instrumentation ... Guaranteed | (888) 88-SOURCE | www.artisantg.com Using RSĆ232ĆC Devices Changing the RSĆ232 settings with the SSET RS232 command Connecting the Cable Caution Connecting the HP 3396 RSĆ232ĆC cable to incompatible instruments may damage either the HP 3396, the external device, or both. Be sure that your computer or peripheral conforms to EIA Standard RSĆ232ĆC. After you have determined that your external device meets EIA Standards for RSĆ232ĆC, follow the steps below to connect your cable. 1. Choose the appropriate DCE or DTE RSĆ232ĆC interface cable. 2. Plug the DTE or DCE cable into the connector labeled RSĆ232" on the rear panel of the HP 3396. 3. Plug the opposite end of the cable which has a 9Ć or 25Ćpin D" connector into the RSĆ232ĆC input jack on the external device. 12-8 Artisan Technology Group - Quality Instrumentation ... Guaranteed | (888) 88-SOURCE | www.artisantg.com Using RSĆ232ĆC Devices Matching RSĆ232ĆC Protocol The RSĆ232 Configuration Settings The RSĆ232 default configuration switch settings are set at the factory. The eight switches are located under the keyboard of the HP 3396. The configuration parameters are: D data rate (from 150 to 19,200 baud), D hardware handshaking CA/CB (Request to Send, Clear to Send), and D duration of handshake timeouts (shortĊ15 seconds, or longĊ3 minutes). The default settings can be changed by removing the keyboard and physically changing the settings. The instructions for changing the switch settings are on the next page. The operating parameters can be changed with the SSET RS232 dialog without opening the cabinet (see below), and will remain in effect until a cold start occurs. CONFIGURATION UP 1 1 2 3 4 5 6 7 8 8 DOWN RSĆ232ĆC Switch Settings Switch 1. 2. 3. 4 5. 6. 7. 8. UP Disable Off 15 sec DOWN Enable (CA/CB) 30 msec 3 m in Function Data Rate (see table) Data Rate (see table) Data Rate (see table) HardwareĂHandshake Handshake Delay Timeout Not Used Not Used Data Rate Table Rates Switch (BAUD) 1 19200 9600 4800 2400 1200 600 300 150 UP DOWN UP DOWN UP DOWN UP DOWN 2 UP UP DOWN DOWN UP UP DOWN DOWN 3 UP UP UP UP DOWN DOWN DOWN DOWN 12-9 Artisan Technology Group - Quality Instrumentation ... Guaranteed | (888) 88-SOURCE | www.artisantg.com Using RSĆ232ĆC Devices Changing the RSĆ232 settings with the SSET RS232 command Changing the RSĆ232 settings with the SSET RS232 command The RSĆ232 Configuration Switches The RSĆ232 default configuration switch settings are set at the factory. The eight switches are located under the keyboard of the HP 3396. The configuration parameters are: D data rate (from 150 to 19,2000 baud), D hardware handshaking CA/CB (Request to Send, Clear to Send), D duration of handshake timeĆouts (shortĊ15 seconds, or longĊ3 minutes). The default settings can be changed by removing the keyboard and physically changing the settings. The operating parameters can be changed with the SSET RS232 dialog without opening the cabinet (see below), and will remain in effect until a cold start occurs. Changing the Default RSĆ232 Configuration Switches 1. Turn off and unplug the HP 3396. 2. Remove the keyboard by prying it off from the bottom. Be gentle with the keyboard. You can move it aside to locate the switches without unplugging the keyboard cable. 3. Locate the RSĆ232 switches. They are in a red panel at the lower right hand corner. 4. Set the switches to the desired configuration. 5. Replace the keyboard. 12-10 Artisan Technology Group - Quality Instrumentation ... Guaranteed | (888) 88-SOURCE | www.artisantg.com Using RSĆ232ĆC Devices Matching RSĆ232ĆC Protocol 6. Plug in and turn on the integrator. 7. Check to be sure you have the settings you want by typing [S][Y] [ENTER]. Changing the RS232 settings with the SSET RS232 command The SSET RS232 keyboard dialog overĆrides the RSĆ232 switch settings. To change the settings in the SSET RS232 dialog, type SSET RS232 in system command mode. (You are in system command mode whenever the * prompt is present.) An example dialog is shown below. * SSET RS232 [ENTER] RS 232 PARAMETERS BAUD [150/300/600/1200/2400/4800/9600*/19200]:19200 [ENTER] 1. Press ENTER to retain the current setting of 9600; type in the numerals for any other setting and then press ENTER. TIMEOUT....Long (180 sec), Short (15 sec) [L/S*]: L [ENTER] 2. Press ENTER to retain the current Short setting; type L and press ENTER to change the setting to Long. HANDSHAKE DELAY. Enabled (30mS), OFF [E/O*]: [ENTER] 3. Press ENTER to retain the current setting of OFF; type E and press ENTER to change the setting to Enabled. HARDWARE HANDSHAKE. Enabled, Disabled [E*/D]: D [ENTER] 4. Press ENTER to retain the current setting of Enabled; type D and press ENTER to change the setting to Disabled. 12-11 Artisan Technology Group - Quality Instrumentation ... Guaranteed | (888) 88-SOURCE | www.artisantg.com Using RSĆ232ĆC Devices Changing the RSĆ232 settings with the SSET RS232 command Remember that the settings will return to the default settings whenever a cold start occurs unless you change the physical settings of the switches (see instructions, above). BASIC can be used to change the parameters using PEEK and POKE. See the HP 3396 BASIC Language Manual for more information. Listing the Switch Settings You may list the current setting of the RSĆ232ĆC configuration switches by pressing [S] [Y] [ENTER] After printing the status of the INET loop, the HP 3396 will print the current values of these switches. Shown below is the HP 3396 listing of factoryĆset values for the RSĆ232ĆC switches. RS-232-C SWITCH SETTINGS Baud 9600 Timeout 15 sec Handshake Delay Off Hardware Handshake Disabled Use the descriptions below and the manual for your RSĆ232ĆC device to decide if any configuration settings need to be changed. Data Rate Switches 1, 2, 3 The data rate is the number of bits per second (or baud) transmitted by the link. Switches 1 to 3 allow you to select the rate your equipment can handle. For RSĆ232ĆC, the available rates are 150, 300, 600, 1200, 2400, 4800, 9600, and 19200 baud. The HP 3396 rate must be set equal to the rate that the external device is using. For applications in which only reports, processed peak data, setpoints, methods, sequences, and calibrations are to be transmitted, any transmission rate from 150 to 19200 baud is acceptable. 12-12 Artisan Technology Group - Quality Instrumentation ... Guaranteed | (888) 88-SOURCE | www.artisantg.com Using RSĆ232ĆC Devices Matching RSĆ232ĆC Protocol If you plan to transmit raw (unbunched) data directly from the HP 3396 to the external device, you must select a rate greater than or equal to 2400 baud. Hardware Handshake Switch 4 Switch 4 enables or disables the hardware handshakeĊRequest to Send/Clear to Send (CA/CB) for DTE operation of the HP 3396. Handshaking is a timing feature provided to allow external devices to hold off HP 3396 transmissions in conversation mode with signals on the CB line. Handshaking does not apply to BX (external BASIC) mode, DCE mode, or to I/0 commands initiated from a BASIC program via the READ # and PRINT # statements. If hardware handshaking is enabled, the HP 3396 turns CA ON before each buffer of data is to be transmitted. It then checks CB. If CB is ON, the HP 3396 transmits the data; otherwise it waits for the external device to turn CB ON before transmitting the data. The HP 3396 will wait only until the end of the timeout period, which is determined by switch 10, for the external device to turn CB ON. If the external device does not turn CB ON, the HP 3396 will timeout and revert to default protocol. However, the HP 3396 cannot itself disable hardware handshaking, so if the remote device continues to be unresponsive, the HP 3396 will timeout repeatedly. If the external device responds to the hardware handshake before the end of the timeout period, the HP 3396 turns off CA at the end of a data transmission and the process starts again. If you wish to use this feature, you MUST use the DTE cable regardless of the device type of the external instrument. You may have to make an adapter to use the DTE cable and connect the correct RSĆ232ĆC signals together. (See Customizing Cables above.) Whenever the DTE cable is used, either the external device must implement the CA/CB handshake or you must disable the handshake or, again, the HP 3396 will timeout repeatedly when host communication is attempted. 12-13 Artisan Technology Group - Quality Instrumentation ... Guaranteed | (888) 88-SOURCE | www.artisantg.com Using RSĆ232ĆC Devices Changing the RSĆ232 settings with the SSET RS232 command Handshake Delay Switch 5 Switch 5 may be set to force the HP 3396 to wait 30 milliseconds after receiving each handshake response before actually transmitting. This provides for host computers which may acknowledge a handshake quickly but are not immediately ready to receive. This delay applies to all handshakes. Timeout Duration Switch 6 Switch 6 may be set for short (15Ćsecond) or long (3Ćminute) timeouts, depending upon the response time of the computer to be connected. The HP 3396 aborts unfinished communications and returns to the default protocol if it receives no handshake response from the computer before the timeout period ends. One or more of the handshake optionsĊ hardware RSĆ232ĆC CA/CB (Request to Send/Clear to Send), Remote (ENQ/ACK), or Read SequenceĊmust be active for the timeout to be in effect. The timeout only applies if a handshake response is expected in conversation mode and does not arrive within the timeout window. The HP 3396 will wait indefinitely for the host computer to send messages if the pause occurs when no handshake response is expected. Timeouts do not apply to BX (External BASIC) mode or to I/0 commands initiated from a BASIC program via the READ # and PRINT # statements. Switches 7 and 8 are not used 12-14 Artisan Technology Group - Quality Instrumentation ... Guaranteed | (888) 88-SOURCE | www.artisantg.com Using RSĆ232ĆC Devices Matching RSĆ232ĆC Protocol Matching RSĆ232ĆC Protocol For RSĆ232ĆC communications to be completed successfully, the protocol for the remote device must match the HP 3396 protocol. Protocol is the set of conventions that determines the format and relative timing of the message exchange between the remote device and the HP 3396. When using the DTE cable, set up your remote RSĆ232ĆC device to match the HP 3396 default protocol. The default protocol is listed below: 12-15 Artisan Technology Group - Quality Instrumentation ... Guaranteed | (888) 88-SOURCE | www.artisantg.com Using RSĆ232ĆC Devices Changing the RSĆ232 settings with the SSET RS232 command Default RSĆ232ĆC Protocol Default Parameter Setting Meaning Parity OFF The parity bit in the character frame is set to zero for transĆ mitted characters, and is not checked for received characters. Echo OFF Characters received by the HP 3396 are not returned (echoed) back to the sender. Local Handshake ON When the HP 3396 receives an Enquire ( EQĂ) character, it transmits an Acknowledge ( AĂK) character. Remote Handshake OFF The HP 3396 sends no Enquire and expects no Acknowledge character. Data are sent with no handshake, one line at a time. Maximum Buffer Size 80 The maximum number of characters the HP 3396 can send or receive in a single transmission, excluding the conversation and stage mnemonics, checksum, handshake characters, and termination sequence. Remote Device Capabilities MUTE The HP 3396 does not expect the remote device to respond to messages. The remote device may send configuration commands if it is able. Local Termination Sequence Messages from the HP 3396 will be terminated by a Carriage Return character followed by a Line Feed character. (CR LF) Remote Termination Sequence The HP 3396 expects messages from the host to be terminated by a Carriage Return character followed by a Line Feed character. (CR LF) Read Sequence NONE The HP 3396 does not wait for a special character sequence during a read operation before transmitting. Checksum NONE The HP 3396 will not include a checksum between the text and the termination sequence. 12-16 Artisan Technology Group - Quality Instrumentation ... Guaranteed | (888) 88-SOURCE | www.artisantg.com Using RSĆ232ĆC Devices Matching RSĆ232ĆC Protocol Using External BASIC External BASIC allows the BASIC capabilities of the HP 3396 to be accessed from a remote terminal via RSĆ232ĆC. To use external BASIC: 1. Choose the appropriate DCE cable and connect your terminal to the HP 3396 using the instructions earlier in this chapter. 2. Type BX" on the HP 3396 keyboard. 3. Enter programs from the remote terminal. These programs may be listed on the HP 3396 printer via the XLIST command while the XADDRESS is set to -2. 4. Enter EX" from remote terminal to return to HP 3396 keyboard entry. In BX" mode any characters normally printed on the HP 3396 will be directed to the terminal display. For more information about external BASIC see the HP 3396 BASIC Language User's Manual. 12-17 Artisan Technology Group - Quality Instrumentation ... Guaranteed | (888) 88-SOURCE | www.artisantg.com Using RSĆ232ĆC Devices Changing the RSĆ232 settings with the SSET RS232 command Using RSĆ232ĆC in Remote Mode In REMOTE mode control of communications and of the HP 3396 have been acquired by a host computer. While in REMOTE mode, the prompt changes to a # and the computer has access to all key sequences available to the user in LOCAL mode. Operation in REMOTE mode gives the host potentially full control of the HP 3396. A host device may acquire control of the HP 3396 any time except when the HP 3396 is D executing a command D in the midst of a run D printing D in BASIC or external BASIC. Once the HP 3396 is in REMOTE mode, the HP 3396 keyboard is locked except for the [START], [STOP], [SEQ], [CTRL], and [BREAK] keys. The amber COMM indicator will turn on and stay on to let you know the communication link is established. The operation and programming requirements of remote RSĆ232ĆC devices vary. Because of the range of possible host computers, it is beyond the scope of this networking guide to give detailed operating or programming instructions for REMOTE mode. See the HP 3396 RSĆ232ĆC Programmer's Guide (03396-90335). 12-18 Artisan Technology Group - Quality Instrumentation ... Guaranteed | (888) 88-SOURCE | www.artisantg.com Appendix A Standard Features Data Storage BuiltĆin Electronic Disk: ÁÁÁÁÁÁÁÁÁÁÁ ÁÁÁÁÁÁÁÁÁÁÁÁÁÁÁ ÁÁÁÁÁÁÁÁÁÁÁ ÁÁÁÁÁÁÁÁÁÁÁÁÁÁÁ ÁÁÁÁÁÁÁÁÁÁÁ ÁÁÁÁÁÁÁÁÁÁÁÁÁÁÁ ÁÁÁÁÁÁÁÁÁÁÁÁÁÁÁÁÁÁÁÁÁÁÁÁÁÁ ÁÁÁÁÁÁÁÁÁÁÁ ÁÁÁÁÁÁÁÁÁÁÁÁÁÁÁ ÁÁÁÁÁÁÁÁÁÁÁ ÁÁÁÁÁÁÁÁÁÁÁÁÁÁÁ ÁÁÁÁÁÁÁÁÁÁÁÁÁÁÁÁÁÁÁÁÁÁÁÁÁÁ Size: 220 K; dynamically allocated; available for method, report, calibration, sequence, signal data, and BASIC program storage Backup Method: 0.47 F Super Capacitor Sustaining Time: Minimum: 5.8 hrs at +25 C; Typical: 150 hrs at +25 C ÁÁÁÁÁÁÁÁÁÁÁÁÁÁÁÁÁÁÁÁÁÁÁÁÁÁ ÁÁÁÁÁÁÁÁÁÁÁÁÁÁÁÁÁÁÁÁÁÁÁÁÁÁ ÁÁÁÁÁÁÁÁÁÁÁ ÁÁÁÁÁÁÁÁÁÁÁÁÁÁÁ ÁÁÁÁÁÁÁÁÁÁÁ ÁÁÁÁÁÁÁÁÁÁÁÁÁÁÁ ÁÁÁÁÁÁÁÁÁÁÁ ÁÁÁÁÁÁÁÁÁÁÁÁÁÁÁ ÁÁÁÁÁÁÁÁÁÁÁ ÁÁÁÁÁÁÁÁÁÁÁÁÁÁÁ ÁÁÁÁÁÁÁÁÁÁÁ ÁÁÁÁÁÁÁÁÁÁÁÁÁÁÁ ÁÁÁÁÁÁÁÁÁÁÁÁÁÁÁÁÁÁÁÁÁÁÁÁÁÁ ÁÁÁÁÁÁÁÁÁÁÁ ÁÁÁÁÁÁÁÁÁÁÁÁÁÁÁ ÁÁÁÁÁÁÁÁÁÁÁ ÁÁÁÁÁÁÁÁÁÁÁÁÁÁÁ ÁÁÁÁÁÁÁÁÁÁÁÁÁÁÁÁÁÁÁÁÁÁÁÁÁÁ ÁÁÁÁÁÁÁÁÁÁÁÁÁÁÁÁÁÁÁÁÁÁÁÁÁÁ Expansion Card Electronic Disks: Slot Type: PCMCIA version 2.0 Number of Slots: 2 (1 Type I/II/III, 1 Type I/II) Cards supported: SRAM ROM Flash (ATA standard only, 5V programĆ ming) Magnetic Disk (ATA standard only) Size: Capacity of media, up to 400MB File System: LIF (Logical Interchange Format) Volume Partitions: 16 maximum per card Barcode characters two, three, and four determine the injection volume, calibration level, and number of injections. Because they must be coded and printed beforehand for the samples being analyzed, an onĆdemand barcode printer is highly recommended. Barcode characters five, six, seven, and eight have no effect on the analysis. A-1 Artisan Technology Group - Quality Instrumentation ... Guaranteed | (888) 88-SOURCE | www.artisantg.com Appendix A title:1 Calculations and Reporting Maximum Retention Time 6900 minutes Retention Time Resolution 0.001 min (0.06 sec) Maximum Peak Storage Capacity Approximately 1240 peaks Detectable Peak Approximately 0.3 sec to 10.0 min width Width Range at half height (typical depending on [PK WD] parameter) Methods Area%, Height%, Normalization, External Standard, External Standard%, Internal Standard, and Internal Standard%. All calculations can be based on areas or heights. Multilevel Calibration Up to 63 levels possible Curve Fits Available SingleĆpoint, pointĆtoĆpoint, linear regression (least squares), nonlinear (quadratic) Reference Peaks Multiple reference peaks possible Retention Time Windows Percent or absolute time A-2 Artisan Technology Group - Quality Instrumentation ... Guaranteed | (888) 88-SOURCE | www.artisantg.com Appendix A title:1 Printer/Plotter Characteristics Printer Paper 8.5Ăin.ĂxĂ11Ăin.ĂsheetsĂonĂrollĂor zĆfold with 0.5Ăin.ĂtractorĂmargins. Print Character Format 96 ASCII Characters (upperĆ and lowercase) Printing Speed 150 characters/sec avg; bidirectional Character Density 12 characters/in. Plotting Sensitivity Approx 63.7 mV/cm at ATT 2^= 0 (analog) Valid Plotting Range Attenuation: ATT 2^ = -8 to +36 With an Analog Input 1 mV full scale at ATT 2^ = 0 1 V full scale at ATT 2^ = 10 Maximum Selectable Chart Speed 30 cm/min Maximum Plotting Velocity 31.7 cm/sec Plotting Acceleration 845 cm/sec@ A-3 Artisan Technology Group - Quality Instrumentation ... Guaranteed | (888) 88-SOURCE | www.artisantg.com Appendix A title:1 External Control and Data Communications Rear Panel Connections 3, labelled: REMOTE, SAMPLE, and COMPUTER. REMOTE (Remote Control) Inputs: H START (TTL) H STOP (TTL) H READY (TTL) Outputs: H STARTĊ1Ćsecond relay contact closure between SO1 and SO2 (start oven 1 and start oven 2) H READY (TTL)Ċopen collector SAMPLE Accepts TTL BCD (binary coded decimal) (Bottle Number Sense) signals; selectableĂhighĂorĂlowĂinput levels;ĂbottleĂnumbersĂfrom 0 to 99. RSĆ232 (Data Communications) RSĆ232ĆC protocol with baud rates: 150, 300, 600, 1200, 2400, 4800, 9600, 19200. EPROMĆBased Programs Postrun Baseline Drawing Unlimited File Size Automatic File Naming FiveĆdigit prefix, appended run number Sequence Chaining Unlimited number of methods Postrun Program Scheduling Up to 30 programs for realtime and buffered channels Batch Reprocessing Unlimited number of files A-4 Artisan Technology Group - Quality Instrumentation ... Guaranteed | (888) 88-SOURCE | www.artisantg.com Appendix A title:1 Specifications Data Acquisition Analog Input Circuitry: Input signal voltage range Ć10 mV to +1 V (for specified accuracy) Maximum differential input Ć10 V to + 10 V (with no damage to integrator) Maximum commonĆmode ąvoltage ±100 V (relative to integrator chassis) DC input impedance Differential: 33 Mohms, typical 8 Mohms, minimum Common mode: 500 Mohms, minimum Input noise 40 nV rms, typical (with input shorted) 150 nV rms, maximum (with input shorted) Analog dynamic range >140 dB, typical Common mode rejection 140 dB minimum, dc to 100 Hz Thermal drift (input shorted) 1 mV per _C, typical (0 to 35_C) 2 mV per _C, typical (35 to 55_C) 4 mV per _C, maximum (0 to 35_C) 8 mV per _C, maximum (35 to 55_C) Analog/Digital Conversion: Converter type Continuously integrating dual slope, 100% area recovery Area resolution 120 nVĆsec per count (±3%) Resolution >24 bits @ 1 Hz typical Conversion Rates 0.08 to 20 readings per second Bandwidth 3 Hz Differential nonlinearity Monotonicity guaranteed Integral nonlinearity ±0.02% of Full Scale, maximum* *Maximum deviation from a straight line connecting the 0.0V and 1.0V response values. Note: Specifications apply after a 1 hour warmĆup period at an ambient temperature of 20°C to 30°C. A-5 Artisan Technology Group - Quality Instrumentation ... Guaranteed | (888) 88-SOURCE | www.artisantg.com Appendix A title:1 Electrical: Line Voltage Selections Provided 115 and 230 V ac Line Voltage Tolerance For either voltage: +15, -22% Frequency Range 48 to 66 Hz Power Consumption 50 VA maximum Power Supply Fuse (not replaceable) 2A, 250VAC IEC 127 Type F (quickĆacting) 5 20 mm Physical Characteristics: Height, Top to Bottom 4.92 in. (12.5 cm) Width, Left to Right 13.8 in. (35.1 cm) Depth, Front to Back (without paper) 14.7 in. (37.3 cm) Weight 9.5 lb (4.31 kg) without paper loaded. Mechanical Mounting Benchtop installation on a hard, flat surface with 6Ćin. (14.7 cm) clearance in front, in back, and along both sides to allow for ample ample ventilation. Environmental Conditions: Average Heat Dissipation less than 120 Btu/hr Temperature Range (operating) 5_C to +40_C Temperature Range (storage) Ć20_C to +60_C Humidity Range (operating) 10% to 90% (noncondensing) A-6 Artisan Technology Group - Quality Instrumentation ... Guaranteed | (888) 88-SOURCE | www.artisantg.com Appendix B Storing Your Integrator Choose a clean environment not exceeding: D 95% relative humidity. D 25,000 feet above sea level in altitude. D +60_C or below Ć20_C (Ć4_ to +140_F), If the printhead is not in front of the blotter, D Make sure that the power is OFF. D Manually move the carriage to this position. When storage temperature will exceed +50_C, remove the print cartridge and store it in a normal room temperature environment (+25_C). When removing the unit from storage after D Less than 6 months, prime and clean the printhead. (See chapter 4 for printhead maintenance procedures.) D 6 months or more, replace the printhead. B-1 Artisan Technology Group - Quality Instrumentation ... Guaranteed | (888) 88-SOURCE | www.artisantg.com Appendix A title:1 B-2 Artisan Technology Group - Quality Instrumentation ... Guaranteed | (888) 88-SOURCE | www.artisantg.com Appendix C Dual Channel INET_CONTROL Commands You can use the dual channel INET control commands to interrogate and control the Buffered INET board of the HP 5890 and HP 6890, even if you do not have the Dual Channel Applications Program. You access the command set with the OP() 6 dialog. Press [OP()] [6] [ENTER]. Enter the INET GC address at the prompt, then enter the command string. Command String Function ! Bnnn Define buffered signal bunch size on input to main buffer, where n"= ascii decimal digit for the HP 5890, and n"= 1, 2, 4, 10, 20, 40, 100, or 200 for the HP 6890. The actual size is 10 -2 of the selected number. Response A" if OK; N" if rejected !I Initialize buffer for store or read by integrator. Set buffer read and write pointers to the start of the buffer. !F Begin/resume buffer filling (HP 5890 only). A" if OK; N" if rejected Halt/suspend buffer filling (HP 5890 only). A" if OK; N" if rejected !H !Sn For the HP 5890, define signal source for buffer to be SIGn (n=1,2). Overrides default choice. See Note. For the HP 6890, the buffered signal is the signal that is not live. If no live signal is selected, the buffered signal defaults to A" if OK; N" if rejected C-1 Artisan Technology Group - Quality Instrumentation ... Guaranteed | (888) 88-SOURCE | www.artisantg.com Appendix A title:1 signal 1. The !S command can change the buffered signal to signal 2. !R Read a signal block; returns compressed signal block (< or = 118 bytes) (HP 5890 only) A{binary block}" sent in Hex Ascii. N" = rejected. !O Returns buffer status A CCCCCC B ppp s PPP S" where: CCCCCC=#pts in bfr, B=C1 path blk'd status= 0/1, ppp=pkwd of data in buffer s=buffer data source=1 or 2, PPP=pkwd of next buffer, S=next buffer data source, N=rejected !V Returns model#, and dual channel firmware version. A 19242.00.03" N" = rejected !Cn Disable/Enable active C1 production A" if OK; N" if rejected where: n=0/1 to enable (if C1Px+)/disable C1 data MVER Returns MIO version number (HP 6890 only). SIG1 RANGE nn SIG2 RANGE nn n=0-16; selects range (HP 6890 only). A" if accepted; N" if rejected. Note: !Sn is overwritten by the default buffer selection scheme. C-2 Artisan Technology Group - Quality Instrumentation ... Guaranteed | (888) 88-SOURCE | www.artisantg.com Appendix A title:1 Buffer Signal Assignment The buffered analysis signal source selection (S1A) is updated either by: D The default assignment scheme. D The !Sn INET_CONTROL command (see pg. CĆ2) . Default Assignment Scheme The HP GC software selects the buffer signal source in the following way: D If S1B is 2 (OFF), then S1A is 0 (CH0 -> Buffer). D If S1B is 1 (CH1 -> Realtime), then S1A is 0 (CH0 -> Buffer). D If S1B is 0 (CH0 -> Realtime), then S1A is 1 (CH1 ->Buffer). C-3 Artisan Technology Group - Quality Instrumentation ... Guaranteed | (888) 88-SOURCE | www.artisantg.com Appendix A title:1 OFF CH 0 DET (C0P0) DET (C0P1) See Note 0 2 S1B 1 CH 1 1 Realtime Analysis HP 3396 Integrator Buffered Analysis HP 5890 GC or HP 6890 GC S1A 0 S1B can be operator defined using the 3396 INET_CONFIGURATION dialog. S1B is completely backed up. The default buffer selection will be invoked by any of the operations listed below: D A method is loaded. D After a power fail recovery. D After a loop break recovery. D After an INET_CONFIGURATION command. Each of these operations overrides the !Sn buffer signal selection. Note: When S1B is set to OFF, the 3396 realtime signal source is the A/D converter. C-4 Artisan Technology Group - Quality Instrumentation ... Guaranteed | (888) 88-SOURCE | www.artisantg.com Appendix A title:1 Setting HP 3396 / HP GC Data Paths The diagram on pages CĆ8 and CĆ9 represents a dual channel system consisting of the following components: HP 18587 Barcode Reader HP 7673 Automatic Sampler HP 6890 or HP 5890 Gas Chromatograph (with INET buffered interface) HP 3396 Integrator This diagram illustrates how the data paths of a Dual Channel system can be controlled by various user inputs. C-5 Artisan Technology Group - Quality Instrumentation ... Guaranteed | (888) 88-SOURCE | www.artisantg.com Appendix A title:1 This page intentionally blank C-6 Artisan Technology Group - Quality Instrumentation ... Guaranteed | (888) 88-SOURCE | www.artisantg.com Appendix A title:1 S2 A S3 A S3 B 2 S3 A R0P0 S5 1 Barcode Reader 2 S3 B S2 B R0P1 S6 1 1858 7 2 S3 A Barcodes S0P0 1 Bottle (Vial) Numbers S4 2 S3 B S0P1 1 Front Injector Rear Injector Off Oven Sample Sample DET.A DET.B 7673 S2 A SIG 1 SIG 2 S2 B 5890 C-7 Artisan Technology Group - Quality Instrumentation ... Guaranteed | (888) 88-SOURCE | www.artisantg.com Appendix A title:1 S1 B S1 A See default buffer signal assignment" on page CĆ4. S5 S6 S4 Barcodes R0C0 Bottle (Vial) Numbers S0C0 Live Run Print Plot S1 B SIG 1 SIG 2 C1P0 C1P1 S1 A Off C1C0 Digital Signals Buffer 5890 AN Q: 3396 C-8 Artisan Technology Group - Quality Instrumentation ... Guaranteed | (888) 88-SOURCE | www.artisantg.com Index A Addressing, HPĆIL, 11-4 Analog test, 7-15 Applying power and running the selfĆtest, 2-13 Initial turn on, 2-15 Setting paper parameters, 2-17 Setting the date and time, 2-19 Verifying the voltage setting, 2-14 B Buffer signal assignment, C-3 Default assignment scheme, C-3 C Cable diagrams, 8-5 Analog signal cables, 8-5 Remote control cables, 8-8 RSĆ232ĆC cables, 8-21 Sample number cable, 8-18 Cables for obsolete HP instruments, 8-4 Calculations and reporting, A-2 Changing the RSĆ232 settings with the SSET RS232 command, 12-10 Changing the default RSĆ232 configuration switches, 12-10 Data rate switches 1, 2, 3, 12-12 Handshake delay switch 9, 12-14 Hardware handshake switch 4, 12-13 Listing the switch settings, 12-12 Switches 5, 6, 7, and 8 are not used, 12-14 The RSĆ232 configuration switches, 12-10 Timeout duration switch 10, 12-14 Checking for instrument readiness, 10-5 Choosing the proper cable, 12-4 Customizing cables, 12-7 DTE or DCE?, 12-5 Compatible disk drives, 11-2 Autoconfiguration and reconfiguration, 11-4 Listing devices on the loop, 11-3 Connecting HPĆIL devices, 3-2 Installing an HPĆIB disk drive, 3-7 Installing HPĆIL and INET devices, 3-5 Installing the HP 19405B INTEG event control module (IECM), 3-6 Loop powerĆup, 3-8 Connecting RSĆ232ĆC cables, 3-17 Connecting the cable, 12-8 Controlling INET instruments with the HP 3396, 10-9 Controlling the HP 5890 through BASIC, 10-13 Controlling the HP 7673 through BASIC, 10-14 Controlling the HP 6890, 10-16 D Data acquisition, A-5 Electrical, A-6 Environmental conditions, A-6 Physical characteristics, A-6 Data storage, A-1 Description of selfĆtest diagnostics, 7-6 8051 interface tests, 7-6 8051 ROM and RAM Tests, 7-6 A/D noise test, 7-7 Enable demo chromatogram, 7-11 Extended RAM test, 7-6 HighĆspeed printer, 7-9 HPĆIL/INET port & bus test, 7-7 Keyboard test, 7-9 Index-1 Artisan Technology Group - Quality Instrumentation ... Guaranteed | (888) 88-SOURCE | www.artisantg.com Index P/P ROM and RAM test, 7-10 P/P test, 7-8 PCMCIA socket test, 7-7 Quick RAM test, 7-6 Remote control and sample number input, 7-7 ROM CRC and bank select test, 7-6 RSĆ232ĆC port test, 7-6 Run all tests, 7-11 Diagnostic procedures, 7-19 Interpreting diagnostic test failures, 7-30 Measuring dc supply voltages, 7-19 Measuring motor windings, 7-23 Module level troubleshooting, 7-25 Partitioning failures, 7-25 Remote and sample number test, 7-31 RSĆ232ĆC cable testing, 7-32 Disassembly and reassembly instructions, 7-34 Remove power from the unit, 7-34 Remove the cooling fan, 7-40 Remove the keyboard, 7-35 Remove the line module, 7-40 Remove the main board, 7-41 Remove the paper, 7-34 Remove the paper hangers, 7-34 Remove the paper separator, 7-35 Remove the power supply board, 7-39 Remove the print mechanism, 7-37 Remove the printer window, 7-35 Remove the top cover, 7-35 Dual channel INET_CONTROL commands, C-1 E EPROMĆbased programs, A-4 expansion cards, 2-20 Exterior cleaning, 4-2 External control and data communications, A-4 F Filling out the repair information form, 5-2 H HP service, 5-7 I Installing expansion cards, 2-20 Installing paper assemblies, 2-4 Installing the paper separator, 2-7 Installing the roll paper mechanism, 2-4 Installing the ZĆfold paper mechanism, 2-6 Installing print cartridges, 2-8 Inserting the print cartridge, 2-11 Installing RSĆ232ĆC devices, 12-3 Installing sample/remote devices, 3-12 Connecting a remote control cable to HewlettĆPackard equipment, 3-14 Connecting a remote control cable to nonĆHewlettĆPackard units, 3-14 Installing the sample number (BCD) cable, 3-13 Installing signal cables, 3-9 Connections to HewlettĆPackard analytical instruments, 3-10 Connections to nonĆHewlettĆPackard analytical instruments, 3-11 Index-2 Artisan Technology Group - Quality Instrumentation ... Guaranteed | (888) 88-SOURCE | www.artisantg.com Index Signal problems, 6-5 Data represents a zero or signal baseline, or is pinned at maximum value with analog signal, 6-6 Data represents a zero or straight baseline with L R INET instruments, 6-5 Listing INET devices, 10-6 RECONFIGURE command, Excessive noise or drift on Loading paper, 2-12 how used. See System chromatogram, 6-7 reconfiguration Reported, processed, or raw Recording important numbers, M data are not what you 1-4 expected, 6-8 Maintaining the printer, 4-5 Removing/reloading paper, 4-3 Checking the print cartridge, Site requirements, 1-2 Reloading paper, 4-3 4-6 SSET ANALOG, 7-15 Removing paper from the Cleaning the carriage SSET RS232, 12-11 printer, 4-3 contacts, 4-7 Starting and stopping INET, Repacking your unit for Replacing the blotter pad, 10-3 shipment, 5-6 4-5 Storing your integrator, B-1 Replacement parts, 8-2 Matching RSĆ232ĆC protocol, Symptom, 7-26 Returning your HP 3396 for 12-15 LEDs do not light at repair, 5-5 powerĆon, 7-26 Running the automatic LEDs remain on O powerĆon tests, 6-14 continuously after OneĆvolt input test, 7-18 Running the selfĆtest powerĆon, 7-27 diagnostics, 7-3 Paper does not feed or feeds P Running the signal tests, 7-15 slowly, 7-29 Power cable, 8-24 Print carriage does not move Power Problems, COMM S or it chatters, 7-28 Indicator Light Blinks System problems, 6-9 Safety information, 7-2 After Initial Turn On Tests Setting HP 3396/HP GC data LOOP DOWN" message Are Complete, 6-4 printed, 6-12 paths, C-5 Power problems, 6-2 Power failed" messages appear after working, 6-4 Installing the pring cartridges, Priming the print cartridge, 2-10 Installing the print cartridges, Installing the blotter pad, 2-9 Checking the fuse, 6-3 No response at initial turn on, 6-2 Printer/plotter characteristics, A-3 Purpose of this section, 7-2 Index-3 Artisan Technology Group - Quality Instrumentation ... Guaranteed | (888) 88-SOURCE | www.artisantg.com Index External sample number is missing or inaccurate, 6-13 HP 3396 does not communicate with RSĆ232ĆC device, 6-11 HP 3396 does not start or stop an external device, 6-10 Integrater cannot be started or stopped from an external device, 6-9 System reconfiguration, automatic, 11-5 T The RSĆ232 configuration settings, 12-9 U Understanding HPĆIL and HPĆIB, 11-12 How HPĆIL operates, 11-13 Understanding INET, 10-17 Automatic network configuration, 10-21 B0 data, 10-33 Changing the INET configuration table, 10-29 Chromatographic data, 10-34 Controlling INET devices, 10-18 Device dependent commands, 10-36 Establishing and changing INET data paths, 10-24 HP 3396 background tasks, 10-38 Immediate data, 10-34 INET data types, 10-24 INET Operating States Inactive, 10-20 Postrun, 10-21 Prerun, 10-20 Run, 10-21 INET operating states, 10-20 Run and report annotation data, 10-32 Sample data, 10-36 Unpacking and inspecting your unit, 1-3 Using disk drives, 11-7 Accessing disk drives, 11-7 File system commands, 11-9 Using external BASIC, 12-17 Using nonĆINET analytical instruments, 9-3 Using the remote control cable, 9-3 Using the sample number cable, 9-4 Using RSĆ232ĆC in remote mode, 12-18 V Voltage test, 7-15 W What devices communicate with the integrator?, 9-2 What is the instrument network?, 10-2 What is the RSĆ232ĆC interface?, 12-2 Z ZeroĆvolt input test, 7-17 Index-4 Artisan Technology Group - Quality Instrumentation ... Guaranteed | (888) 88-SOURCE | www.artisantg.com Artisan Technology Group - Quality Instrumentation ... Guaranteed | (888) 88-SOURCE | www.artisantg.com Agilent Technologies © Agilent Technologies, Inc. 08/97 Part Number 03396-90550 Artisan Technology Group - Quality Instrumentation ... Guaranteed | (888) 88-SOURCE | www.artisantg.com Artisan Technology Group is your source for quality new and certified-used/pre-owned equipment • FAST SHIPPING AND DELIVERY • TENS OF THOUSANDS OF IN-STOCK ITEMS • EQUIPMENT DEMOS • HUNDREDS OF MANUFACTURERS SUPPORTED • LEASING/MONTHLY RENTALS • ITAR CERTIFIED SECURE ASSET SOLUTIONS SERVICE CENTER REPAIRS Experienced engineers and technicians on staff at our full-service, in-house repair center WE BUY USED EQUIPMENT Sell your excess, underutilized, and idle used equipment We also offer credit for buy-backs and trade-ins www.artisantg.com/WeBuyEquipment InstraView REMOTE INSPECTION LOOKING FOR MORE INFORMATION? Visit us on the web at www.artisantg.com for more information on price quotations, drivers, technical specifications, manuals, and documentation SM Remotely inspect equipment before purchasing with our interactive website at www.instraview.com Contact us: (888) 88-SOURCE | [email protected] | www.artisantg.com