1
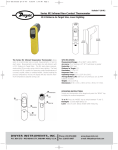
T-10-IR6-IR7:TEMPLATE
6/12/08
9:25 AM
Page 1
Bulletin T-10-IR6-IR7
Series IR6/IR7 Dual Laser Infrared Thermometer
Specifications - Installation and Operating Instructions
1-13/16
[46.04]
9-1/8
[231.78]
5-59/64
[150.42]
The Series IR6/IR7 Dual Laser Extended Range Infrared Thermometer is ideal for accurately measuring surface temperatures from long
distances. This feature packed handheld device allows the user to read the
maximum, minimum, average, and differential readings. The high and low
alarms give audible and visual indication of the process temperature. When
taking measurements in dark areas, a built-in white light can be used to illuminate the measurement area. For long term measurements, the unit includes a dual magnetic base attachment that allows hands-free
measurements.
Operating Instructions
Aim the thermometer at the target and pull the trigger to initiate the laser
sighting. Align the two laser points on the target to be measured. The surface temperature between the two laser point will appear on the screen.
SPECIFICATIONS
Measurement Range: IR6: -76 to 1600°F (-60 to 900°C); IR7: -76 to
1832°F (-60 to 1000°C).
Operating Range: 32 to 122°F (0 to 50°C).
Accuracy: ±2% of readings or 4°F (2°C) whichever is greater.
Resolution: 0.1°F (0.1°C).
Response Time: 1 second.
Distance to Target: IR6: 30:1, IR7: 50:1.
Emissivity: 0.95 Default – adjustable 0.10 to 1.00 in 0.01 steps.
Battery: 2 AAA, 180 hours continuous use.
Units: User selectable F or C.
Weight: 13.62 oz (386.1 g).
Agency Approvals: CE.
Upon releasing the trigger, the “Hold” icon will appear in the top left of the
screen and the last measurement will appear for 60 seconds (followed by
an automatic shut off to conserve battery life).
Engineering Units
The thermometer can measure °F or °C. To change the units, pull the trigger once to turn on the unit. Press the °F/°C key to switch the units.
Minimum, Maximum, Average, or Difference Readings
The thermometer will display the minimum, maximum, average, or differential (difference between the min and max) readings for the period in which
the measurements were taken. Press the “Mode” key, during or after scanning, to display these values.
Emissivity
The emissivity is preset at the factory at 0.95. It can be adjusted from 0.10
to 1.00. Changes should only be carried out by experienced personnel.
High or Low Alarm
The thermometer allows the user to set a high and low alarm. When the
temperature reading is above the high or below the low alarm, and audible
alarm will sound.
To adjust the high and low alarm functions, pull the trigger once to turn on
the unit. Press the “Mode” key until “HAL” or “LAL” appear on the lower
section of the screen. Press the up or down key to adjust the alarms in 1.00
increments.
Continuous Monitoring
The lock mode is used for continuously measuring temperatures for up to
60 minutes or until the “Lock” key is pressed.
To change the emissivity, pull the trigger once to turn on the unit. Press
“EMIS” key once. Press the up key or down key to adjust emissivity in 0.01
increments. Press the “EMIS” key to accept the new emissivity reading.
Laser and Light Functions
The built-in white light and back-lit LCD screen are present for low-light
conditions and the DUAL lasers are utilized to accurately define the measurement area.
To turn on or off the backlight function, hold the trigger down and press the
“Lock” key.
The Dual laser (and flashlight) can be turned on or off simultaneously by
holding down the trigger and pushing the °F/°C key.
To enter lock mode, pull the trigger once to turn on the unit. Press the
“Lock” key once so that lock appears on the screen (not in High alarm or
Low alarm mode).
DWYER INSTRUMENTS, INC.
P.O. BOX 373 • MICHIGAN CITY, INDIANA 46361, U.S.A.
Phone: 219/879-8000
Fax: 219/872-9057
www.dwyer-inst.com
e-mail: [email protected]
T-10-IR6-IR7:TEMPLATE
6/12/08
9:25 AM
Page 2
LCD Error Messages
The thermometer incorporates visual diagnostic messages as follows.
1.
2.
3.
4.
HiLo: Hi or Lo is displayed when the temperature being measured is
outside of the settings of HAL and LAL.
Er2: Displays when the thermometer is exposed to rapid changes in the
ambient temperature.
Er3: Displays when the ambient temperature exceeds 32°F (0°C) or
122°F (50°C). The thermometer should be allowed plenty of time
(minimum 30 minutes) to stabilized to the working/room temperature.
For all other error messages it is necessary to reset the thermometer.
To reset it, wait for the instrument to turn off, remove the battery and wait
for a minimum of one minute, reinsert the battery and turn it on. If the error
message remains please contact the Dwyer Customer Service
department for further assistance.
When device is in use, do not look directly into the laser
beam - Permanent eye damage may result.
Use extreme caution when operating the laser.
Never point the device towards anyone’s eyes.
Keep out of reach of all children.
NOTICE
The readings may be affected if the unit is operated within radio frequency
electromagnetic field strengths of approximately 3 volts per meter, but the
performance of the instrument will not be permanently affected.
Storage and Cleaning
The sensor lens is the most delicate part of the thermometer. The lens
should be kept clean at all times, care should be taken when cleaning the
lens using only a soft cloth or cotton swab with water or medical alcohol.
Allowing the lens to fully dry before using the thermometer. Do not
submerge any part of the thermometer. The thermometer should be
stored at room temperature between -4 and 149°F (-20 to 65°C).
Batteries
The thermometer incorporates visual low battery indication as follows.
Battery OK: Measurements are possible.
MAINTENANCE
A periodic check of the system calibration is recommended. The Series
IR6/IR7 is not field serviceable and should be returned if repair is needed
(field repair should not be attempted and may void warranty). Be sure to
include a brief description of the problem plus any relevant application
notes. Contact customer service to receive a return goods authorization
number before shipping.
Battery Low: Battery needs to be replaced, measurements are still
possible.
Battery Exhausted: measurements are not possible. When the low battery
icon indicates the battery is low, the batteries should be replaced
immediately with AAA, 1.5V batteries using the below steps.
To Replace Batteries
Fold down the front rubber grip on the handle of the device and remove
the old batteries.
Insert 2 AAA batteries according to the diagram located below the trigger.
NOTICE
It is important to turn the thermometer off before replacing the battery
otherwise the thermometer may malfunction. Dispose of used battery
promptly and keep away from children.
Installing Magnetic Base
Align the bolt hole in the base to the bolt hold on the handles of the
thermometer with the magnets facing down. Insert the included bolt from
under the base and tighten to the handle.
©Copyright 2008 Dwyer Instruments, Inc.
Printed in U.S.A. 6/08
DWYER INSTRUMENTS, INC.
P.O. BOX 373 • MICHIGAN CITY, INDIANA 46361, U.S.A.
Phone: 219/879-8000
Fax: 219/872-9057
FR# R5-443521-02
www.dwyer-inst.com
e-mail: [email protected]