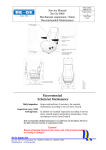
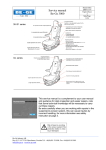
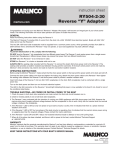
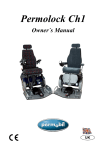
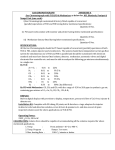
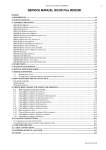
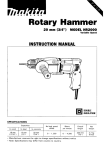
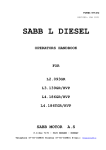
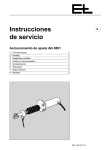
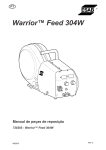
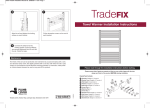
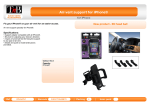
1
Illustrerad stol
Be-Ge 9100
Service Manual
Be-Ge 9000 airsuspended
Recommended Maintenance
Datum/Date
2005-08-19
Utgåva/Issue
1
Sida/Page
1(12)
Recommended
Scheduled Maintenance
Daily Inspection:
Inspections every 1,000
working hours:
Inspect and perform, if necessary, the required
maintenance according to service items 1 and 2.
In addition to extended inspections according to service
items 1 and 2, inspect and perform maintenance, if any,
according to service items 3 and 4.
If the recommended scheduled maintenance is not adhered to, Be-Ge Industri AB
reserve the right to limit any warranty or compensation claims.
Caution!
Beware of jamming injuries in the scissors unit, if the protective
bellows are lacking or damaged.
Be-Ge Industri AB
Box 912 SE-572 29 Oskarshamn, Sweden Tel. +46(0)491-761800.
Fax +46(0)491-81900.
[email protected] www.be-ge.com
Datum/Date
2005-08-19
Utgåva/Issue
1
Sida/Page
2(12)
Service Manual
Be-Ge 9000 airsuspended
Recommended Maintenance
Contents
Instruction
Foreign Objects
Suspension System
Lengthways Adjustment
Frame Fastening
Seatback adjuster
Seat Cushion, Trim, Foam
Shock Absorber
Air Suspension System
Headrest, Replacement
Seatback, Replacement
Safety Belt, Replacement
Appendix 1
Change of trim
Page
3
3
4
4
5
6
6
7
8
9
9
10
Appendix 2;
Torque and Loctite® Chart Be-Ge 9000 11
Appendix 3;
Troubleshooting Chart Be-Ge 91**
Be-Ge Industri AB
Box 912 SE-572 29 Oskarshamn, Sweden Tel. +46(0)491-761800.
Fax +46(0)491-81900.
[email protected] www.be-ge.com
12
Service Manual
Be-Ge 9000 airsuspended
Recommended Maintenance
Inspection
1.
Service Instruction
Check that the seat adjustment
controls work normally and
that foreign objects do not jam
them.
Remove objects, if any.
If any adjustment control does not
work normally – See service items
3-9.
If the seat is fitted with an integrated restraint system (safety
belt), check that all belt elements are undamaged.
If any belt element is damaged, replace the entire belt kit. (See service
item 12)
2.
Check that the seat retains its
adjusted height and that its
spring action is satisfactory.
If the controls do not work normally,
that is, if you cannot raise or lower the
seat, or if the seat has no spring action
– check for availability of intake air
and for leakage in the air connection.
Check that the height limiter is
released.
(See also service item 9).
Be-Ge Industri AB
Box 912 SE-572 29 Oskarshamn, Sweden Tel. +46(0)491-761800.
Fax +46(0)491-81900.
[email protected] www.be-ge.com
Illustration
Datum/Date
2005-08-19
Utgåva/Issue
1
Sida/Page
3(12)
Datum/Date
2005-08-19
Utgåva/Issue
1
Sida/Page
4(12)
Service Manual
Be-Ge 9000 airsuspended
Recommended Maintenance
Inspection
3.
Check lengthways adjustment.
Service Instruction
Illustration
Lubricate the slide rails of the seat
runner thinly with grease (Texando 20
or the equivalent).
Move the seat to its end positions to
paint the rails in between.
Before lubricating, clean the slide rails
with a lint-free cloth.
Replace the slide rails, if the play
(sideways or lengthways) of the slide
rails exceeds 1 mm.
Appliances:
Lint-free cloth
Grease (Texando 20 or the equivalent)
Brush
Box wrench 13 mm
Allen wrench 6 mm
The slide rails are replaced by unfastening the seat from its frame fastening (1).
Move the seat to its front position to
reach the rear bolts and to its rear
position to reach the front bolts.
Put the seat on its back, ease off the
bolts (2) attaching the slide rails to the
seat.
To reach, move the slide rails to their
end positions.
1
2
Fit the new slide rails.
4.
Check the bolts and frame
fastening of the seat.
Check for loose bolts.
Check the seat fastening to the floor
pan or the frame (1).
See the appendix for torque and Loctite instructions.
Appliances:
Box wrenches
Allen wrenches
Appendix
“Torque and Loctite Table”
Be-Ge Industri AB
Box 912 SE-572 29 Oskarshamn, Sweden Tel. +46(0)491-761800.
Fax +46(0)491-81900.
[email protected] www.be-ge.com
1
Datum/Date
2005-08-19
Utgåva/Issue
1
Sida/Page
5(12)
Service Manual
Be-Ge 9000 airsuspended
Recommended Maintenance
Inspection
5.
Check that the seatback retains
its adjusted angle.
Service Instruction g
Illustration
If the seatback does not keep position
and does not keep the positioned
angle, then the friction washer in the
backrest switch needs to be adjusted.
Loosen the wheel (1) and tighten the
locking nut (2) against the plastic
friction washer (3). Recommended
dynamometric is 5 – 10 Nm.
3
The wheel is then tightened towards
the locking nut. Hold the locking nut
with a wrench in order to keep the
dynamometric towards the friction
washer.
In order to avoid that the shaft rotates,
tighten the wheel on the opposite side
in the same way as above.
2
1
If the backrest has too much play
between the backrest and seat an
excenter washer (4) will prevent this.
Appliances:
Slotted chisel
Box wrench 17 mm
Allen wrench5 mm
U-wrench 22 mm
Loosen the protective bellow by
taking away the plastic rivets on the
backside of the seat, then fold down
the protective bellow (see service
item 6).
Loosen the backrest both socket head
cap bolts on the seats left side. Mount
the ecxenter washer on the front bolt
and adjust the excenter washer to the
required adjustment according to
sketch.
In order to lock the excenter washer
use the U-wrench on the front socket
head cap bolt then the rear bolt.
If further adjustment is required, then
one more excenter washer can be
mounted according to the above but
with opposite direction of rotation in
relation to the one on the left side. At
extreme needs, the excenter washer
can be mounted on the rear bolts.
Be-Ge Industri AB
Box 912 SE-572 29 Oskarshamn, Sweden Tel. +46(0)491-761800.
Fax +46(0)491-81900.
[email protected] www.be-ge.com
4
Datum/Date
2005-08-19
Utgåva/Issue
1
Sida/Page
6(12)
Service Manual
Be-Ge 9000 airsuspended
Recommended Maintenance
Inspection
6.
Dismantling of trim and foam
on seat cushion
Service Instruction
Illustration
The protective bellow is loosened by
removing the plastic rivets (1).
Unhook the trims fastening strap (2)
from the seat frame (3) and remove
the trimming and foam (4).
2
5
4
If the seat is equipped with electrical
heating (5), this must be disconnected
before dismantling.
Appliances:
Slotted chisel
Please note that the heating element is
glued onto the seat foam. Caution
should be taken if the seat foam is to
be exchanged but the heating elements
are re-used or the other way.
3
1
For other tapestry, please see “Change
of trim”
7.
Check the seat cushions tilt
function.
If the seat cushions tilt function does
not keep positioned angle or have to
much play, then the seat base needs to
be exchanged.
This is a qualified measure of service
and should be performed by
experienced service personnel in a
workshop.
8.
Check of the shock absorber.
If the shock absorber does not work in
a satisfied way, make noise or leak,
then it should be exchanged.
In order to reach the shock absorber
(1) the driver seat has removed out of
the vehicle, back, trim and foam
should be dismantled. (See service
item 6, 11).
Appliances:
Slotted chisel
Box wrench 13 mm
Allen wrench 5 mm
Loosen the shock absorbers fastening
bolts and nuts (2,3) and change the
shock absorber.
If the shock absorber does not fulfill
the required absorption then there is a
possibility to mount one more shock
absorber on the opposite scissors side
on the prepared fastening points.(4).
Be-Ge Industri AB
Box 912 SE-572 29 Oskarshamn, Sweden Tel. +46(0)491-761800.
Fax +46(0)491-81900.
[email protected] www.be-ge.com
2
4
1
3
Service Manual
Be-Ge 9000 airsuspended
Recommended Maintenance
Inspection
9.
Check the air suspension
system.
Service Instruction
Illustration
Check the air connections (1). Replace
the part, if you notice visual damage
or leakage.
If the air valve (2) is defect then this
needs to be replaced. Firstly,
disconnect the air connection.
2
In order to reach the valve, fold down
the front of the protective bellow and
remove the trim in the front of the seat
and lift up the foam cushion. (See
service item 6).
7
Check the air spring (5).
If the air spring is defect or worn it
should be replaced.
Disconnect the air connections (1) and
tilt the seat cushion to its max.
Dismantle the seat from its
frame/vehicle. Lay the seat down on
its back, and take apart the scissors leg
(6).
Remove the connection tube and angle
nipple (7) on the top of the air spring.
Loosen the air springs lower fastening
bolt and remove the air spring.
.
1
3
4
Loosen the valves screws (3) and pull
the valve forward (4). Disconnect the
tubes and wheel. Change the valve and
reconnect. Note that the tube
connections are right and then
reassemble the parts.
Appliances:
Star chisel
Allen wrench 6 mm,
Box wrench 27 mm
Loctite 243
Datum/Date
2005-08-19
Utgåva/Issue
1
Sida/Page
7(12)
5
6
Cont.
Be-Ge Industri AB
Box 912 SE-572 29 Oskarshamn, Sweden Tel. +46(0)491-761800.
Fax +46(0)491-81900.
[email protected] www.be-ge.com
Service Manual
Be-Ge 9000 airsuspended
Recommended Maintenance
Cont.
Inspection
9.
Check the air suspension
system.
Appliances:
Allen wrench 6 mm
Crow bar/special appliances
10.
Replacing the headrest.
Service Instruction
Mount the new air spring with the BeGe logo forward. Note! Do NOT
retighten the lower bolt completely.
Apply Loctite and screw on the angle
nipple and reconnect the air
connection.
Place a crow bar or other special
appliance from Be-Ge according to
sketch (1).
Connect compressed air and apply
pressure on the air spring. Hold on to
the air spring in order for it to clutch
around the piston. Wrinkles or similar
are not allowed, see sketch (2).
If the mounting does not work then try
with higher-pressure alternative
loosening the air spring, turning it
180° and reconnecting the air spring.
Tighten the lower bolt during
pressure. Disconnect the air tube and
lock the seat with the height limiter (3)
before reassembling to the
frame/vehicle.
Reconnect the airsuspension tubes and
loosen the height limiter.
The headrest is removed by depressing
the locking clamp to the headrest, located in the seatback.
Do this by applying pressure on the
right side of the seatback, about 100
mm under the upper edge of the seatback, and about 50 mm from its
outside.
At the same time pull the headrest upward.
This is applicable on all the seats with
3-point belt.
Appliances:
Blunt tool or object, such as a
hammer shaft or the equivalent
Seat models without belt are not
equipped with locking clamp; the
headrest is easily pulled off.
Be-Ge Industri AB
Box 912 SE-572 29 Oskarshamn, Sweden Tel. +46(0)491-761800.
Fax +46(0)491-81900.
[email protected] www.be-ge.com
Datum/Date
2005-08-19
Utgåva/Issue
1
Sida/Page
8(12)
Illustration
1
2
Right
Wrong
3
Datum/Date
2005-08-19
Utgåva/Issue
1
Sida/Page
9(12)
Service Manual
Be-Ge 9000 airsuspended
Recommended Maintenance
Inspection
11.
Replacing the seatback.
Service Instruction
Illustration
Loosen the protective bellow by
removing the plastic rivets on the seats
back and fold down the protective
bellow (service item 6).
3
Dismantle the seatback by loosing the
socket head cap bolts (1) on the right
and left hand side then the rear safety
belt bolts (2) on the right and left hand
side.
Appliances:
Box wrench 17 mm
Allen wrench 5 mm
Scissor, knife or similar
12.
Replacing the safety belt.
4
5
To reassemble the new seatback, enter
the front socket head cap bolts (1) and
then the rear bolts (2). Use the
dynamometric 42Nm on the rear bolts
and 33Nm on the front bolts.
6
If the seat is equipped with 3-point
safety belt, the belt deflection unit (3)
is removed to the new seatback by
removing the lid and loosening the
bolt (4).
If the seat is equipped with armrest
(5), these are removed to the new seat
by loosening the 3 bolts at the
fastening point of the armrest (6).
Before assembling the belt deflection
unit or/and armrest on the new
seatback, new wholes are done like the
previous seatback by scissors, knife or
similar
1
Loosen the protective bellow by
removing the plastic rivets on the seats
back and fold down the protective
bellow (service item 6).
Unfasten the retractor (3) from the
seat. Unfasten the belt anchorage (1)
and the buckle unit (2) on each side of
the seat, and unfasten the belt
deflection unit (4).
Appliances:
Box wrench 17 mm
2
Reassemble by first fixing the belt
deflection unit to obtain the correct
angle of the belt, and then the other
points of attachment.
4
2
3
Tighten all belt bolts at torque 42 Nm.
(Tolerance +/- 15%)
1
Be-Ge Industri AB
Box 912 SE-572 29 Oskarshamn, Sweden Tel. +46(0)491-761800.
Fax +46(0)491-81900.
[email protected] www.be-ge.com
Service Manual
Be-Ge 9000 airsuspended
Recommended Maintenance
1
2
Art.Nr 673150
Appendix 1
Change of trim Be-Ge 9000
Datum/Date
2005-08-19
Utgåva/Issue
1
Sida/Page
10(12)
Be-Ge Industri AB
Box 912 SE-572 29 Oskarshamn, Sweden Tel. +46(0)491-761800.
Fax +46(0)491-81900.
[email protected] www.be-ge.com
Datum/Date
2005-08-19
Utgåva/Issue
1
Sida/Page
11(12)
Service Manual
Be-Ge 9000 airsuspended
Recommended Maintenance
FILNAMN: 627611
050620 / URBAN
ERSÄTTER 050408
GODKÄND………
Appendix 2
Torque and Loctite® Chart Be-Ge 9000
Item
Art no
Qty
Belonging to
Loctite
**
-
Remarks
Bottom frame
Moment
Nm
(1)*
Screw RXS ST3.5x19 SV.KR POZ
650018
2-4
Bearing bolt
500330
2
Scissors system
47
2
Airsuspended seat
Bearing bolt
Bearing bolt
500393
4
Scissors system
47
2
620874
4
Scissors system
47
2
Bearing bolt
Nut M10 Triloc FZB K8
500396
2
Scissors system
47
2
500413
10
Scissors, seat frame
47
2
Screw MF6S M8x40 FZB 8.8
650054
1
Shock absorber
24
2
Airsuspended seat
Screw M6S M8x40 FZB 8.8
650015
1
24
2
Airsuspended seat
Nut M8 Triloc FZB K8
210401
2-4
24
2
Screw MC6S M5x10 FZB 8.8
650062
2
Shock absorber
Shock absorber,
compressor
Air valve, cover Airvent
5
-
Screw MC6S M8x20 FZB 8.8
500302
2-4
Sliding rails
24
-
Screw MC6LS M8x25 FZB 8.8
650017
2
Sliding rails
24
-
Nut M6M M8 FZB K8
210400
4
Sliding rails
24
-
Screw MF6S M8x20 SV.KR 10.9
310930
4
Back frame
33
1
Nut M6M M8 SV.KR K8
651011
1
Wheel, lumbar support
24
-
Nut ML6M M10 FZB K5
210403
4-6
Wheels
24
-
Screw UNF 7/16
-
2
Tether strap
42
3
Seat with belt
Screw UNF 7/16
-
2-4
2P 3P Belt
42
3
Seat with belt
Nut M6M M4 FZB K8
501391
1
Summer
(2)*
-
Screw MRX M4x16 FZB
501390
1
Summer
(1)*
-
Screw K6S M8x16 SV.KR 10.9
650021
2
Built-in compressor
24
2
Hose clip
628680
1
Built-in compressor
(10)*
-
GT-Valve
621080
1
Built-in compressor
(5)*
-
Screw RXS ST2.9x38 FZB POZ
650063
3
Fan, seat, Airvent
(1)*
-
Screw ECS M3x25 FZB 4.8
650061
3
Fan, back, Airvent
(1)*
-
Screw MRX-TT M4x6 SV.KR POS
650037
2
Cover, Airvent
(1)*
-
Seat with 3-point
belt
Nut M6M M5 FZB K8
500496
1
Cover, Airvent
(2)*
-
Screw RXS ST3.5x19 SV.KR POZ
650018
4
Grill Airvent
(1)*
-
Screw MF6S M10x16 obeh. 10.9
500231
1
Air spring
10
-
9000
Angled nippel 1500-6/4-1/8
500228
1
Air spring
(3)*
1
9000
Airsuspended seat
Airsuspended seat
Nut for air spring
*
** 1)
** 2)
500331
No moment tightening tolerance
Blue Loctite 243 (Soft)
Green Loctite 270 (Hard)
1
Air spring
(10)*
Moment Tolerance ± 15 %
Be-Ge Industri AB
Box 912 SE-572 29 Oskarshamn, Sweden Tel. +46(0)491-761800.
Fax +46(0)491-81900.
[email protected] www.be-ge.com
-
Max thread
8,2 mm
9000
Airsuspended seat
Service Manual
Be-Ge 9000 airsuspended
Recommended Maintenance
Datum/Date
2005-08-19
Utgåva/Issue
1
Sida/Page
12(12)
Appendix 3
Troubleshooting Chart Be-Ge 91**
Problem
Possible reason
Airsuspended Be-Ge 9000 (91**)
Remedy
Impossible to mount the headrest Burnt-in weld in the headrest grommet,
Drill the grommet with 10 mm boring
2-way headrest is not fixed in
Placed in the backrest
approx. 200 mm
The headrest grommet has wrong angles.
Bent the grommets slightly outwards.
required position
4- way headrest is not fixed in
The headrest grommet has wrong dimension Change the headrest grommets.
required position
The backrest seems to have to
Too much play in the backrest switch
much play
washers.
The bearing bolt in the outer spring scissors Retain the right position and tighten bolt with
is loose.
loctite
The seat seems slanting
Decrease the play by mounting excenter
The seats control wheels are loose The inner locking nut is loose.
Lock the wheel by tightening the locking nut.
The driver feels strokes from the
Defect shock absorber
Replace the shock absorber
riding.
The damping is insufficient
Mount 2 shock absorbers
The sliding rails seem to have to
Defect bearing balls in the rails.
Replace the sliding rails.
much play.
The sliding rails seem stiff
The rails do not run freely from the basement Check that the spacers are mounted between
seat and the basement.
The air riding out of function or
does not work properly
Dirty rails
Clean and re-lubricate the rails.
Air valve leakage
The air connection hose is not properly
mounted.
Replace the valve
Check that the air connection hose is mounted
and correctly connected to the seat.
The air connection hose is squeezed
The air supply is out of function
Replace the air connection hose
Check the air supply in the vehicle.
Defect air spring
Replace the air spring
The transport locking is connected
Disconnect the transport locking
Be-Ge Industri AB
Box 912 SE-572 29 Oskarshamn, Sweden Tel. +46(0)491-761800.
Fax +46(0)491-81900.
[email protected] www.be-ge.com