1
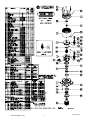
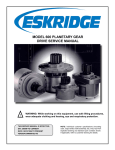
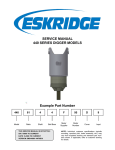
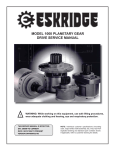
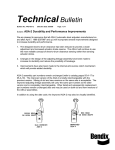
MODEL 120H PLANETARY GEAR
DRIVE SERVICE MANUAL
!
WARNING: While working on this equipment, use safe lifting procedures,
wear adequate clothing and wear hearing, eye and respiratory protection.
THIS SERVICE MANUAL IS EFFECTIVE:
S/N: 17802 TO CURRENT
DATE: 2/15/94 TO CURRENT
VERSION: SM120H_0307
NOTE: Individual customer specifications (mounting
case, output shaft, brake assembly, etc.) may vary from
exploded drawing and standard part numbers shown.
If applicable, refer to customer drawing for details.
www.eskridgeinc.com
2
SM120H_0307
MODEL 120H SERVICE MANUAL
SINGLE & DOUBLE PLANETARY
This manual will assist in disassembly and assembly procedures of major components for all Model 120H Planetary Gearboxes including single and double planetary models. Item numbers, indicated in parentheses throughout this manual, refer to the Eskridge Model 120H exploded parts breakdown drawings. Individual customer specifications (mounting case,
output shaft, brake assemby, etc.) may vary from exploded drawing and standard part numbers shown. If applicable, refer
to individual customer drawing for details.
LUBRICATION AND MAINTENANCE
The manufacturer recommends changing oil after the first 50 hours of operation. Oil should be changed at 500 hour intervals
thereafter. All gear boxes require GL-5 grade EP 80/90 gear oil for lubrication. Manufacturer also recommends that unit be
partially disassembled to inspect gears and bearings at 1000 hour intervals. The standard Model 120H gearbox is equipped
with a grease fitting (35) for lubrication of the output shaft bearings. The bearings should be greased sparingly with lithium
or general purpose grease every 50 operating hours or at regular maintenance intervals.
OIL CAPACITIES:
Vertical shaft operating position: 4.25 pints
Horizontal shaft operating position: 2.5 pints
*7) Remove sun gear (10).
WARNING: While working on this equipment, wear adequate protective clothing,
hearing, eye, and respiratory protection.
Use safe lifting procedures.
8) Remove planet shafts (6) and gears (8) by following
the procedure on the facing page SECONDARY PLANET
CARRIER SUBASSEMBLY.
9) Loosen locking screw in locknut (21) using 3/16 inch hex
(Allen) wrench. Unscrew and remove locknut (21).
BEFORE DISASSEMBLY
There are two types of units: Single planetary without
a primary planet carrier and double planetary with a
primary planet carrier. Steps with an asterisk (*) apply
only to the double planetary models.
CAUTION: The locknut is no longer retaining output shaft.
Care should be taken if moving base because output shaft
can fall out. Care also should be taken not to injure feet
or damage output shaft when shaft is pressed through
case.
UNIT DISASSEMBLY
PROCEDURE
10) Output shaft removal. Base (1) should be set on a plate
or table with output shaft (12) protruding through a hole in
table. Press output shaft out bottom of base by applying a
load to top end (internal end) of shaft until it passes through
inner shaft bearing cone (17). Set aside spacer (13) and
shims (14) until needed in UNIT ASSEMBLY.
1) Scribe a diagonal line across the outside of the unit from
the cover (4) to the base (1) before disassembly to aid in
the proper positioning of pieces during reassembly.
11) The unit is now disassembled into groups of parts. The
area(s) requiring repair should be identified by thorough
inspection of the parts after they have been cleaned and
dried. Then refer to the appropriate group repair section
below.
2) Remove magnetic drain plugs (33 & 34) and drain oil
from unit. Maximum drainage occurs when oil is warm
3) Remove 8 cover bolts (27) and lockwashers (31).
1. Output Shaft subassembly
*2. Primary Planet Carrier subassembly
3. Secondary Planet Carrier subassembly
4. Base subassembly
4) Lift off cover (4). Remove input thrust washer (26) and
input gear (11).
*5) Slide primary planet carrier assembly (items
3,7,9,15,23,24 & 30) out of unit by lifting up on planet
carrier (3).
6) Remove 12-point flange screws (28), flat washers (32),
and ring gear (5).
www.eskridgeinc.com
1
SM120H_0307
OUTPUT SHAFT
SUBASSEMBLY
SECONDARY
PLANET CARRIER
SUBASSEMBLY
(ITEMS 12,18 & 37)
DISASSEMBLY AND REPAIR
(ITEMS 2,6,8,15,21,22 & 29)
DISASSEMBLY AND REPAIR
1) Tapered bearing cone (18) may be removed using a
gear puller. If reusing old bearing cone, do not pull on or
damage roller cage.
NOTE: Do not rebuild planet carrier assembly until step
number 14 of unit assembly. The clamp nut (21) cannot
be installed when planet gears are already in place.
2) Remove old seal (37) and discard. Lubricate inner lip
of new seal (37) and turn so open side is upward. Slide
seal down output shaft (12) all the way to gear teeth or
until it fits snug over shaft seal diameter.
1) Drive roll pins (29) completely into planet shafts (6).
2) Pry shafts upwards out of carrier (2) using a screwdriver or similar tool between bottom of carrier and top
of base (1).
NOTE: Press bearing cone onto output shaft by pressing
on inner race only. DO NOT press on roller cage or it may
damage bearing.
3) Press bearing cone (18)(large end down) onto output
shaft (12). Be sure bearing cone is seated tightly against
shoulder of output shaft. If old bearing cone (18) was
removed only to replace seal, it may be reused.
3) Slide planet gears (8) and planet washers (15) out of
carrier (2).
4) Use a 1/8 inch pin punch to remove roll pins (29) from
the planet shafts (6).
5) If planet bearings (22) must be replaced, they may now
be pressed out of planet gears (8).
*PRIMARY
PLANET CARRIER
SUBASSEMBLY
(ITEMS 3,7,9,15,23,24 & 30)
DISASSEMBLY AND REPAIR
* applies only to the double planetary models.
*1) Drive roll pins (30) completely into planet shafts (7).
*2) Press or drive shafts out of carrier (3).
*3) Before sliding planet gears (9) and planet thrust washers (15) out of primary carrier (3), hold hand under planet
gear to catch inner bearing race (24) as it drops out of
planet bearing (23).
*4) If planet bearings (23) must be replaced, they may now
be pressed out of primary planet gears (9).
*5) Use a 1/8 inch pin punch to remove roll pins (30) from
primary planet shafts (7).
*6) Rebuild primary planet carrier assembly in reverse
order using any needed new parts.
*7) Planet shafts (7) should be installed with chamfered
end of 1/8” hole toward outside diameter of the carrier
(3). This will aid in alignment of holes while inserting roll
pins (30).
www.eskridgeinc.com
2
SM120H_0307
11) Install secondary carrier (2) as follows: Move carrier by
hand until you are certain carrier spline has started cleanly
and squarely onto shaft spline. Note that this is a press
fit. Press carrier slowly onto shaft spline.
BASE SUBASSEMBLY
(ITEMS 1,13,14,17,19,20,35,36 & 38)
DISASSEMBLY AND REPAIR
NOTE 1: Torque at proper bearing preload will vary according to the application. At output speeds of greater than
25 RPM, preload torque (including seal drag) should be in
the range of 20 to 50 in-lbs. At less than 25 RPM, preload
torque of 50 to 80 in-lbs should be adequate, but may be
as high as 150 in-lbs for extreme loading conditions.
1) Inspect inner and outer bearing cups (19,20). Bearing
cups are not removable. If cups are damaged, cups and
base (1) may need replacement. Contact Eskridge, inc.
if you have questions.
2) Remove and inspect o-ring (36), inner shaft seal (38),inner bearing cone (17), spacer (13), and shim(s) (14).
NOTE 2: Bearing preload is achieved by tightening clamp
nut (21) against the secondary planet carrier (2) and by
adjusting the number of shims (14). The shims prevent the
bearings from recieving too much preload which can cause
over-heating for operating speeds of over 25 RPM.
UNIT ASSEMBLY
REASSEMBLING
NOTE 3: Bearing preload will be determined by measuring
bearing rolling resistance which is the torque required to
turn shaft (or to turn base with shaft stationary). Torque can
be measured with a spring scale attached to the base. For
example, with shaft stationary,if a scale is attached to the
base, measuring 5 inches from the center of the gearbox
and it takes 10 lb. force to rotate base, then preload torque
is 5 inch x 10 lb = 50 in-lbs.
1) When all the subassemblies are complete, unit is ready
to be assembled. Start with base (1) with internal end down
(end with 16 holes) on the press table. Apply a thick layer
of lithium or general purpose bearing lubricant to surface
of bearing cup (20).
2) Invert output shaft assembly (threaded end down) and
carefully lower it into base (1) until bearing cone (18) is
seated.
12) While carrier (2) is being pressed onto shaft, measure
preload torque between base (1) and shaft (12). If torque
is not correct, add or remove 1 shim (14) as required and
try again. Once preload torque is correct, install locknut
(21) (with locking screw loose) until hand tight. Then tighten
locking screw till snug. Release clamping pressure against
carrier and recheck preload torque.
3) Press outer shaft seal (37) into base until it is flush
using a press fixture or a hammer and a large flat-ended
bar or rod.
CAUTION: Output shaft is not retained at this point.
13) Lubricate a new o-ring (36) and place over pilot on
base (1).
4) Invert unit and stand it on end of output shaft (12) (pinion
down, so that shaft is supporting unit).
14) To assemble secondary carrier: Install planet gears
(8) into carrier (2). With a planet washer (15) on both
sides of the planet gear and with bearings (22) installed,
slide gear into carrier (2). Insert planet shaft (6) through
carrier, planet gear, and washers. Planet shafts (6) should
be installed with chamfered end of 1/8 inch hole toward
outside diameter of carrier (2). This will aid in alignment
of holes while inserting roll pins (29).
5) While holding gear of output shaft (12) with one hand,
rotate base (1) to be sure it moves freely. The slight resistance you feel is due to seal load on output shaft.
6) Install bearing spacer (13) and shim(s) (14).
7) Grease inner bearing cup (19) using lithium or general
purpose grease.
CAUTION: Hold ring gear by outside diameter to avoid
injuring fingers.
NOTE: Press bearing cone onto output shaft by pressing
on inner race only. DO NOT press on roller cage or it may
damage bearing.
15) Place ring gear (5) over secondary carrier assembly.
Rotate until bolt holes line up with holes in base and one
of the two drain holes in ring gear as near as possible to
grease fitting (35) in base, or to customer specifications.
8) Slide bearing cone (17) (small end down) over internal
end of output shaft. Press bearing on slowly until it is just
seated.
16) Apply thread locking compound and install 16 flange
screws (28) and washers (32) and torque to 110 ft-lbs.
9) Install inner shaft seal (38).
17) Put pipe sealant on magnetic pipe plugs (33) and install
10) Insert the clamp nut (21) into the center of secondary
planet carrier (2). If the carrier is pressed onto the shaft
first, there will not be enough clearance to fit the clamp
nut into the carrier.
* applies only to the double planetary models.
4
www.eskridgeinc.com
3
SM120H_0307
into drain holes on ring gear (5).
18) Place thrust washer (16) onto center of secondary
planet carrier assembly.
*19) Install sun gear (10) into center of secondary planet
carrier.
*20) Install primary planet carrier assembly by rotating it
until planet gears line up with ring gear teeth and sun gear
spline. Assembly should drop into place.
NOTE: This model does not require a gear timing procedure.
21) Install input gear (11).
22) Single planetary models only: Install thrust washer
(40) and retaining ring (25) onto input gear.
*23) Double planetary models only: Place input thrust
washer (26) over input gear.
24) Add gear oil as specified on page 2. For vertical shaft
operating positions, correct oil level will measure to middle
of primary planet gears.
25) Install new o-ring (36) over pilot of cover (4).
26) Place cover (4) on top of unit and refer to scribed line
for proper orientaion. Install and torque eight capscrews
(27) with lockwashers (31) to 32 ft-lbs.
27) Put pipe sealant on magnetic plug (34) and install into
oil fill hole in cover.
28) Insert a shaft, such as an output shaft from a hydraulic
motor, into input gear (11) and rotate by hand to be sure
unit turns smoothly and easily.
THE GEARBOX IS NOW READY TO USE.
* applies only to the double planetary models.
www.eskridgeinc.com
4
SM120H_0307