1
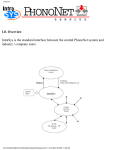
Basic Troubleshooting for CJ gauges
Basic Troubleshooting for CJ gauges
By John Strenk
Click on Speedometer for a quick troubleshooting guide
The Speedometer gauges
Were to start.
Read me first.
You need some tools. Go out and buy yourself a 12-volt test light for testing circuits. A DVM (Digital Volt
Meter) would also be helpful. It's really kind of hard to check anything without these instruments. These
instruments will go a long way in keeping your jeep running in the future.
•
In this part of the test the clip lead from the test light is connected to the (-) side of the battery or a good known
ground. How ca you tell if it•s a good ground point? Attach the clip lead of the test light to the (+) side of the
battery and touch the tip of the probe to were ever you want to use as a ground point. If it lights up then the
ground is good. Now connect the test clip to this point.
Check the fuse!! It•s labeled •IGN LPS• and is either a 3 amp or 15 amp fuse depending if you have an EEC
(Electronic Engine Control) computer or not. It might be blown. Use your test light and touch both ends of the
fuse. If there is power on both ends of the fuse then it is OK. Make sure the ignition is in the •ON• position.
http://home.roadrunner.com/~john.strenk/Gauge%20web%20page/basic_troubleshooting_for_cj_gau.htm (1 of 10)1/2/2009 5:27:51 PM
Basic Troubleshooting for CJ gauges
Now pull the red wire off the •I• terminal on the Fuel Gauge and touch inside the plug with the test light and
see if you are getting power to the connector. If you have power then replace the connector on the "I" terminal.
Now,, If you don't want to take the speedometer out yet, your going have to lay on your back to do the
following test.
Connect your Test light to a good ground. Then touch the probe of the test light to the "I" terminal on the back
of the Fuel gauge. If the light come on steady then your OK so far. If the light doesn't come on steady then I
would squeeze the plug together a little. It may not be tight enough on the stud.
Then Touch the probe to the "A" terminal of the fuel gauge. It should flash at full brightness about 1 a second.
If it stays bright continuously then you have a problem with the current regulator. It could be as simple as a
bad ground or a stuck contact point on the regulator. If it doesn't light at all then you probably have a problem
with the points on the current regulator or a broken connection.
http://home.roadrunner.com/~john.strenk/Gauge%20web%20page/basic_troubleshooting_for_cj_gau.htm (2 of 10)1/2/2009 5:27:51 PM
Basic Troubleshooting for CJ gauges
Finally touch the probe to the "S" terminal. If the Fuel level sending unit is connected and grounded properly
the light will flash but be considerably dimmer. The more full the tank is then the dimmer the light. If the test
light is fully bright as in testing the "A" terminal then there is something wrong with the Fuel Level sensor and/
or wiring/ground.
Still not working? Then let•s continue.
Good Grief, Grounds
The major complaint that our gauges don't work is no surprise in a 20 year or so vehicle. If you haven't gone
through a major overhaul lately you probably have a grounding problem. Maybe your gauges are working OK
for now but maybe you ought to inspect your jeep anyway.
The first thing you should check if you are having electrical problems in a CJ is the ground connection. There
are 3 major ground parts in a CJ. The tub or body, the engine and the frame. These should all be grounded
together in some fashion. Usually the (-) post on the battery grounds to the block and the block is grounded to
the frame with a jumper wire between the frame and the block on the driver side engine mount. The tub can be
conveniently grounded if you have a auxiliary wire running off the battery terminal. Just connect it to the body
nearby.
http://home.roadrunner.com/~john.strenk/Gauge%20web%20page/basic_troubleshooting_for_cj_gau.htm (3 of 10)1/2/2009 5:27:51 PM
Basic Troubleshooting for CJ gauges
This is our simple schematic of the basic wiring for our gauges. The Fuel and Temperature gauges are inside
the speedometer housing and has it's ground, The volt meter and the oil pressure gauge have there own
ground . The fuel level sensor is grounded at the frame with a wire. The oil pressure sensor and temperature
sensor ground to the engine block. You might want to keep the numbers of Teflon thread sealer to a minimum
to make sure the sensors are grounded to the block properly.
If you have had a leak in your window for a little while you could of started to rust your speedometer. Rust is a
good way to ruin a good ground. It will grow right under what is normally a good ground connection and
separate the two surfaces. Rust as it turns out is a poor conductor. It's bad enough for low current situations like
with the gauges but even worse with high current applications like a starter or winch.
Well, lets get to testing the grounds before we begin anything else. Take your test lights and connect the clip
lead to the (+) side on your battery. Touch the probe to the (-) side of the battery to be sure the light is working
in the test light. Don't laugh; I've had this problem before. Now go have fun and touch the probe to such things
as the engine block and frame and tub, light housings. You may have to scrape away some paint or rust to get a
good connection. If the light doesn't light then you have a bad ground. For the gauges I would check the dash
to see if it's grounded and then the housing of the speedometer. If this is not grounded then you are going to
have problems with your gauges.
http://home.roadrunner.com/~john.strenk/Gauge%20web%20page/basic_troubleshooting_for_cj_gau.htm (4 of 10)1/2/2009 5:27:51 PM
Basic Troubleshooting for CJ gauges
Let's see what happens when you loose a ground for your gauges. You may have been driving your jeep for a
few years now and you have had intermittent problems with the lights not working and stuff but you don't
really think about what can be happening with your gauges. Normally if you loose a ground with a radio or a
light it just stops working but this is not so with the gauges. The fuel and temperature gauges are run off a
current limiter located inside the fuel gauge. When you loose your ground to the dash or speedometer housing
there is no longer any current regulation in the circuit. Now the gauges can pull as much current as it can until
it burns up. This will over heat the windings on the bimetallic strips on the gauges and windings in the fuel
level sensor. Here are some pictures of the damage I found from over heating.
•
•
The first picture is of the windings on the gauge. You can see were the protective varnish over the wire is
burning and flaking off. The other two pictures is of the fuel level sensors and they had burnt the wire mount
apart. One has the windings completely missing and the last has the mount burnt away but still connected. So if
you have a poor ground on your dash and a full tank, the sensor will get hot enough to burn away the sensor.
How long will it take? I found out about 2 seconds! Let us not forget this is inside your fuel tank. You don't see
his effect so much on the temperature side as the resistance is still plenty high at normal operating temperature.
If you don•t have a good ground on the speedometer housing then check the dash for a good ground. If the
dash doesn•t have a good ground then check the tub. If you find a bad ground, fix the problem first. Be sure to
scrape away any paint and rust before you correct the bad ground. Don•t depend upon the thread of the fastener
to provide a good ground. Use a file or a grinding wheel to get a good contact. After you have secured the
http://home.roadrunner.com/~john.strenk/Gauge%20web%20page/basic_troubleshooting_for_cj_gau.htm (5 of 10)1/2/2009 5:27:51 PM
Basic Troubleshooting for CJ gauges
ground, paint over it to protect the metal from corrosion.
A lot of electrical parts in the jeep have a nickel plating. This protects the metal from corrosion by developing
a thin oxide layer over the surface. This oxide layer is easily broken with minimal pressure allowing a good
electrical connection such as when you slip a lug over a terminal. Trouble is a deep scratch can break through
the coating allowing the metal to rust and it will spread out under the coating. If you have to clean a surface of
a nickel plated device like the speedometer housing, try cleaning the area with a brass brush first so you don•t
scrape away the plating. A place like Radio Shack sells a product called •Liquid Electrical Tape• that you can
spray over the area to protect the ground connection after you are done.
•Some fasteners, like a star washer, take advantage of the nickel plating. The sharp points will break through
the oxide layer as the fastener tightened. Using a flat washer might not break thru the oxide layer. I like to use
•Kep nuts• that have the star washer permanently attached to the nut. This makes it easy to install all the right
fasteners at one time. I•ll use these nuts to attach the speedometer housing and any terminal connections. All
the gauges I have tested have a 10-32 thread.••
DON'T INSTALL ANY NEW PARTS UNTIL YOU ARE VERY SURE YOU HAVE A GOOD
GROUND FOR THE SPEEDOMETER.
Testing the Gauges.
OK, you have tested all the grounds. Every thing now looks good. It's time to test the gauges to see if they are
burned out. You are going to have to put down your Test Light and break out the DVM for these tests. If your a
contortionist you might be able to still test the gauges in the dash but it is a lot easier to pull the speedometer
out now.
The first thing we are going to do is test the windings of the wires inside the fuel gauge and the ground
connection of the gauge to the speedometer housing. Label all the wires on the gauges so you will know were
to put them back again. .
First we will check From the "A" terminal to the "I" terminal. The reading should be less than 0 ohms. If this is
reading "over range" or around 50 ohms then you have a contact problem. The Contact points on the regulator
may be pitted and not making good contact. You will then have to fix this problem or buy a new gauge. This
will call for some open gauge surgery.
Next we will check from "A" to "S". We are measuring the resistance of the heater coil for the gauge itself. It
should read between 19-21 ohms. In some after market gauges I have seen these values a little lower. If it is 0
ohms of "over range" then again you have a problem.
Now we will check from "S" to "I". Again this is checking the resistance of the heater coil for the gauge. It
should be in the range of 19-21 ohms. In some after market gauges I have seen these values a little lower. If it
is 0 ohms of "over range" then again you have a problem.
This test we start looking at the ground connection from the gauge too the speedometer housing. We are going
to measure from the "A" terminal to the speedometer housing. The resistance should read around 49 to 51
http://home.roadrunner.com/~john.strenk/Gauge%20web%20page/basic_troubleshooting_for_cj_gau.htm (6 of 10)1/2/2009 5:27:51 PM
Basic Troubleshooting for CJ gauges
ohms. We are reading the resistance of the heater wire on the regulator this time. If it reads "over range" then
we have a broken wire and the regulator is not working. If it reads 0 ohms then you have a short but you would
have blown a fuse if this was the case. If you show no resistance then your regulator wasn't working and you
have been supplying full current to your sensors. Plan on inspecting the fuel level sensor later.
Lastly, we are looking at the ground connection from the gauge too the speedometer housing. We are going to
measure from the "I" terminal to the speedometer housing. The resistance should read around 49 to 51 ohms.
We are reading the resistance of the heater wire on the regulator this time. If it reads "over range" then we have
a broken wire and the regulator is not working. If it reads 0 ohms then you have a short but you would have
blown a fuse if this was the case. If you show no resistance then your regulator wasn't working and you have
been supplying full current to your sensors. Plan on inspecting the fuel level sensor later.
Some of the after market fuel gauges read as low as 36 ohms for this test and still work properly.
In summery:
S to ground=68 to 72
S to I = 19 - 21
S to A = 19 - 21
I to A = 0
I to ground = 49 - 51
A to ground = 49 - 51
As long as we are under there you can check the Temp gauge. Only one test. From "A" to "S" on the Temp
meter. It should read 12-21 ohms. Same as the Fuel meter from "S" to "A" .
Checking Gauges with resistor load.
The factory service manual recommends checking the gauges with various resistors to insure the accuracy of
the meter movements. I would recommend getting a couple of test leads with clips to attach the resistors. Pull
the plug Off the "S" terminal of whatever gauge you are testing and connect on clip lead to this point. Connect
the other end of the clip lead to one side of the resistor. Connect another clip lead to the other side of the
resistor and connect that lead to ground. Turn the ignition ON and watch and see were the needle comes to a
rest. It may take 30 seconds to settle down.
The various resistors the Factory Service Manual recommends are as follows.:
Temp. gauge calibration:
C (cold)........................ 130 degrees--73 ohms
Beginning of band.......... 171 degrees--36 ohms
Top of band.................. 242 degrees--13 ohms
H (hot).......................... 270 degrees---9 ohms
http://home.roadrunner.com/~john.strenk/Gauge%20web%20page/basic_troubleshooting_for_cj_gau.htm (7 of 10)1/2/2009 5:27:51 PM
Basic Troubleshooting for CJ gauges
Fuel gauge calibration:
Empty--73 ohms
Half-- 23 ohms
Full--10 ohms
If you have any problem with the Fuel or Temperature gauges, go to my Speedometer repair article.
Testing the Sending Units
Temperature Sensor
OK grab your test light again. Connect your clip lead to a good ground. Turn your ignition switch to ON.
Might be a good idea to remove the plug from the ignition coil so you don't burn something up. Make sure you
have all the wires connected to the gauges correctly.
Pull the wire off the temp sensor and touch the tip of the test light to the inside of the plug. The light should
flash brightly just like it was doing before. If the light is not flashing or ON then you have a problem with your
wiring. Check the fire wall connector plug to see if the contacts are corroded or loose.
Now put the plug back on and touch the probe to the contact were the plug connects. The light should still flash
but a little dimmer now depending upon the temperature of the engine. The colder the engine the brighter the
test light.. If it flashes as brightly when it was not connected then you have a problem with the temp sensor or
the ground on the engine. Touch the probe to the side of the temp sensor to be sure it is grounded. If it lights up
and flashes then it is not grounded. Some times people put Teflon tape to seal the threads. to much can insulate
the temp sender from the block.
If you have the plug on the sensor and it flashes very bright and you have a good ground then you have a
problem with the temperature sensor. Now you will need to pull the sensor out and inspect it and test the
resistance at various temperatures. Connect a DVM to the sensor and using the Ohms scale measure the
resistance.
I put mine in a pot of water and heated it. There was a temperature meter to check the temperature of the water.
This is very crude but here is a sample of what I read with mine.:
Temp *F
70
80
90
100
110
120
130
140
150
160
Old
413
302
266
246
200
153
134
113
92
75
New
206
190
175
163
155
120
98
80
65
58
http://home.roadrunner.com/~john.strenk/Gauge%20web%20page/basic_troubleshooting_for_cj_gau.htm (8 of 10)1/2/2009 5:27:51 PM
Basic Troubleshooting for CJ gauges
170
180
190
200
210
65
56
49
43
36
48
40
33
28
20
Its going to be hard to accurately duplicate these temperatures and values so if you close and there are no "over
range" meaning "open connection" then the sensor is probably OK. My temperature meter heated up faster
than the CJ's temperature sensor so there is a kind of lag in the readings. About a 100:1 difference in mass. The
actual resistance vs. Gauge display is as follows:
Temp. gauge calibration:
C (cold)........................ 130 degrees--73 ohms
beginning of band.......... 171 degrees--36 ohms
Top of band.................. 242 degrees--13 ohms
H (hot).......................... 270 degrees---9 ohms
Fuel Level Sensor
Yep, you can still use your test light again. Same test as with the temp sensor. Finding a good ground back here
may be a little tricky so you may want to run a wire from the (-) post of the battery to the test light clip.
Pull the wire off the fuel level sensor and touch the probe of the test light inside the plug. The light should flash
brightly as with the temp sensor. If it doesn't then you have a problem with your wiring harness. Connect the
plug back on the fuel level sensor contact. Now touch the test light probe to the contact post. The light should
continue to flash but depending upon how much gas you have in the tank it could be very dim. The more gas in
the tank the dimmer the flashing light.
If the light is still flashing as brightly as you got when just touching inside the probe then you have a problem
with the sensor or a ground or just be almost out of gas. Touch the test light probe to the top of the fuel level
sensor and see if it flashes. If it does flash, then you have a bad ground. Usually these are very rusty so to
double check the ground, connect the probe to the (+) side of the battery and touch the probe to the top of the
fuel level sensor. It it lights then you have a good ground.
If you have the plug on the sensor and it flashes very bright and you have a good ground then you have a
problem with the fuel level sensor. Now you will need to pull the sensor out and inspect it and test the
resistance at various positions. Connect a DVM to the sensor and using the Ohm•s scale measure the resistance.
Empty = 73 ohms
1/2 Tank = 23 ohms
Full tank = 10 ohms
Its going to be hard to accurately duplicate these position and values so if your close and there are no "over
range" or "OR" meaning "open connection" then the sensor is OK.
http://home.roadrunner.com/~john.strenk/Gauge%20web%20page/basic_troubleshooting_for_cj_gau.htm (9 of 10)1/2/2009 5:27:51 PM
Basic Troubleshooting for CJ gauges
A little WARNING!
How long does it take to burn up a fuel level sender with a bad regulator or a bad ground?•••••• About 2
seconds! L
Now this sensor only reads about 20 ohms at full so it will only register a little over 1/2 a tank. L
Check your Grounds First!!
I hope this article has been of some help to you. If you have any comments or suggestions please contact me at:
[email protected]
Many thanks to Jason (a.k.a. CJSIXER) at 4 Wheel drive Hardware for assistance and equipment to allow me
to create this article and to my many friends at Jeeps Unlimited CJ Forum who ran to their Jeeps and Factory
Service Manuals to help me get information on CJ•s
http://home.roadrunner.com/~john.strenk/Gauge%20web%20page/basic_troubleshooting_for_cj_gau.htm (10 of 10)1/2/2009 5:27:51 PM