1
SERVICE MANUAL
AMERICAN “PERC-RITE®”
25 GPM WASTEWATER DRIP SYSTEMS
4 ZONE Up To 16 ZONE
SIMPLEX or DUPLEX
PATENT NO. 5,200,065
PATENTNO 5,766,475
_____________________________________________________
Dealer
MANUFACTURED BY:
AMERICAN MANUFACTURING COMPANY INC.
5517 WELLINGTON ROAD, GAINESVILLE, VA. 20155
1-800-345-3132
Copyright 2001
1
www.americanonsite.com
Table of Contents
Cover
1
Table of Contents
2
IMPORTANT NOTICE
3
Dealer Responsibility
3
Pump Chamber & Hydraulic Unit Details
8
Control Panel Installation Schematics
Installation Procedure Summary
10
12
Startup Procedures
13
Data Registers & Component Specifications & Details
16
Operational Checklist
24
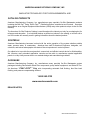
Order Information & Sales PR Page
26
IMPORTANT NOTICE
This Dealer Manual is intended to give general information and guidance to authorized dealers and other qualified
installers. The installer must determine the suitability of an American Manufacturing Company Septic Drip
Disposal System for sewage disposal regarding basic design and layout and how the system functions in a
specific site. The designer must make the final decision as to the suitability of a system. Suitability should be
based on consideration of the general standards and information contained herein as well as other applicable
waste disposal reference materials, specific topography, soil characteristics, space limitations, and other factors
associated with a particular project. Consequently, American Manufacturing Company, Inc., a Virginia
corporation, shall not be held liable in any manner to design engineers and other designers or installers of
sewage disposal systems for claims arising from the use of the information contained herein nor actions arising
from the reliance upon the accuracy of such information.
Additionally, unless American Manufacturing Company, Inc. or its employees are primarily responsible for a
particular project, American Manufacturing Company, Inc. assumes no responsibility regarding, and shall not be
liable to, any purchaser of a System in any manner for any of the following:
a. any decision regarding the suitability of a Drip Disposal System
b. the design and/or installation of a Drip Disposal System for any particular project, nor
c. the utility or functioning of a Drip Disposal System for the project.
Purchaser's rights are set forth in the limited warranty and the Equipment Purchase Contract (invoice) in the event
that the equipment itself is defective.
By acceptance of this Manual, every recipient acknowledges that the material contained herein is copyrighted.
The distribution and dissemination of this Manual in any form, including without limitation, printed or electronic
media, is reserved solely to the discretion of American Manufacturing Company, Inc. and it’s authorized agents.
Unauthorized reproduction and distribution of the information contained herein is strictly prohibited. The
information contained herein may be modified periodically by American Manufacturing Company, Inc. without any
prior or subsequent notification being given or obligated to be given to any recipient of this Manual. The recipient
of this Manual is responsible for ascertaining whether his or her manual is the most recent version available.
2
www.americanonsite.com
DEALER RESPONSIBILITY
PURPOSE
The purpose of this section is to outline the responsibilities of the Dealer regarding the installation, monitoring,
maintenance and warranty of the drip dispersal system as part of an on-site sewage treatment system.
INSTALLERS SCHEDULE OF DUTIES
1. The Dealer shall be responsible for the entire installation and shall only sell and install systems according
to approved plans and permits.
2. The Dealer shall be responsible for insuring proper electrical installation and startup including recording
startup date and initial meter readings.
3. The Dealer will meet standards for operation and maintenance per the jurisdictional health department.
4. The Dealer shall assure that all employees who work on the American Drip System are trained,
understand and can perform operation and maintenance per the Drip System manufacturer manuals.
5. The Dealer is responsible for informing the owner within the first month of operation of the type of system
installed and the owner’s responsibilities.
6. The Dealer is responsible for the first annual inspection after the 3rd month of operation.
7. The Dealer is responsible for one visit after first year of operation. The visit to include the following;
•
•
•
•
•
Sludge Judge the septic tank blanket
Inspect the drip system hardware for operation
Inspect system with operational checklist
Check landscaping for interference with system
Check water usage and evaluate usage compared to design
The inspection frequency should be set based on the first year’s evaluation. Future inspections
should be at a minimum once per year. If high strength waste is suspect, take sample for BOD,
SS, and FOG.
8. Removal, replacement or alteration to this system must be in compliance with all applicable current
county health department requirements, governing sewage treatment regulations and the manufacturer.
OWNER’S RESPONSIBILITIES
1. Acknowledge receipt and comply with instructions of the owner’s manual provided. Reference
owner’s responsibilities in manual.
2. Notifying the Dealer or the designated agent immediately of any problems with the sewage
treatment system.
3. Keeping the monitoring / access covers free of obstructions at all times.
4. Granting Installer / Operator and health department personnel access to the owner’s property to
service or inspect the sewage treatment system at any time during warranty period.
5. If system fails, owner will notify operator, manufacturer, and local health department.
6. Pumping the septic tank or other costs associated with the treatment system is not covered under
any warranty. Pumping is required from time to time (frequency) varies by jurisdiction just like in
conventional systems due to the production of solids during the treatment process.
7. Failure to make any payments when due shall be considered a breach of warranty and the operator may
terminate warranty work without notice.
3
www.americanonsite.com
When and How to use manual
This owner's manual should be read cover to cover initially, and then as needed to answer any questions or assist the owner
in fulfilling their maintenance and inspection responsibilities.
When and Where to call for assistance or get additional information
If at any time you have a question about the AMERICAN PERC-RITE® SYSTEM or observe any alarm or unusual condition,
you should call your qualified service representative or installing contractor as soon as possible. The owner should record in
the back of this manual, the contact name and telephone number of the qualified service representative and installing
contractor. If further assistance is needed, call American Manufacturing Company, Inc. at 800-345-3132, or visit us at
www.americanonsite.com.
Overview of Manual
The manual is organized to cover safety precautions and warnings, an overview of the AMERICAN PERC-RITE® SYSTEM
components, and the owner’s responsibility. A startup log and limited warranty are in the back of this manual.
Safety Precautions and Warnings
The owner or operator of the AMERICAN PERC-RITE® SYSTEM should take precautions consistent with operators working
with sewage and electricity when working with, or around any of the system components.
Electrical Hazards
The AMERICAN DRIP SYSTEM incorporates pump(s), float switches, relays and many electrical components that use 230
volts, 120 volts or 24 volts AC. Improper use of equipment can cause an electrical shock and may lead to serious injury or
death.
Sewage Hazards
Proper attention should be given to cleanup when working in and around the septic and pump tanks and wastewater handling
equipment to insure that disease causing bacteria are not transmitted to persons or contact surfaces. The septic and pump
tanks can allow for a toxic buildup of poisonous gasses that can lead to serious injury or death if inhaled.
Heavy Lifting Hazards
The owner and/or operator should exercise proper caution when lifting heavy system components, such as pump tank lids.
Improper lifting of heavy components can lead to loss of limb and/or mobility.
Overview of PERC-RITE DRIP SYSTEM
The Perc-Rite® Drip System is a unique fluid handling system for dispersal of effluent wastewater in soil systems.
The system incorporates filtration, time and level controlled application and ultra low rate drip distribution. In
conditions where aerobic dispersal, such as "Low Pressure Distribution", of septic effluent is required or where land
application with the use of conventional soil absorption fields are not acceptable, this system offers a unique method
for subsurface distribution of the waste water effluent.
The Perc-Rite ® Drip System will accommodate virtually any type of pretreatment process, whether septic tank
(anaerobic), aerobic, lagoon, or any type of treatment facility. Only primary treatment (the removal of large settleable
solids) of sewage is necessary for the operation of the system. Local soil and site conditions may require additional
treatment for excessive organics, oil and grease or other contaminants.
Since the installation of the field distribution lines causes very little soil disturbance and effluent discharge volume
from each emitter hole is insignificant, the installation of the system has very little site impact even in established
lawns or park areas. After installation there are virtually no visible indications that the installation site is being used for
disposal purposes. This system is especially suited for landscaped or wooded areas near buildings, trailer parks,
apartment complexes or residential subdivisions.
The Perc-Rite ® Drip System is operated via a "state of the art" controller, which is activated by level sensing devices
(standard mechanical differential float switches) located in a dosing tank downstream from the pretreatment process or
processes (typically a septic tank). When activated by the rising level of effluent in the dosing tank, the controller will enable
the disposal cycle, and as dictated by the time clock, pump the effluent through a 115-micron disc filter and then to final drip
dispersal.
4
www.americanonsite.com
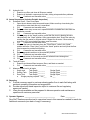
The pump control panel is equipped with four float switches to control the timed doses to be discharged. The four
float switches, "Redundant Off", "Standard Dose Enable", Peak Dose Enable", and "High Level" function as follows:
w Redundant Off - The water level must be high enough to overcome the "Redundant Off" (first & bottom) float in order for
the pump to be permitted to run.
w Standard Dose Enable - When the water level rises high enough to overcome the "Standard Dose Enable" (second) float
and the time clock has timed out the preset time delay (rest between dosing cycles for two zone designs) the pump will
activate and the lead zone is dosed. The pump will continue to run for the length of time as adjusted on the pump run
timer and then shut off. The pump will remain off until the internal time clock again times out the preset time delay after
which the pump will activate (as long as the "Standard Dose Enable" float is still up) and will run until the pump run timer
finishes timing out. This process will repeat until the water level drops below the "Standard Dose Enable" float and the
pump run timer has timed out.
w Peak Dose Enable - The control system will be equipped with a "Peak Dose Enable" circuit to manage peak flows and
excess water use. If the rising water level activates the "Peak Dose Enable" (third) float, the "Pump - Off - Pump & Alarm"
switch is set to "Pump", and the preset time delay has been exceeded ("Peak Dose Enable" rest between cycles), the
lead zone will be dosed. When the “Peak Dose Enable” circuit has been deactivated the normal pumping cycle will
resume. If the rising water level activates the "Peak Dose Enable" (third) float, the "Pump - Off - Pump & Alarm" switch is
set to "Pump & Alarm", and the preset time delay has been exceed ("Peak Dose Enable" rest between cycles), the lead
zone will be dosed and the "Peak Dose Enable" alarm will be activated. The audio portion of the alarm may be silenced
by pressing the Test-Normal-Silence switch to the silence position. When the "Peak Dose Enable" float has returned to
the down position the alarm will be deactivated and the normal pumping cycle will resume.
w High Level - If the water level rises enough to overcome the "High Level" (fourth) float, the audio/visual alarm will activate. The
audio portion of the alarm may be silenced by pressing the Test-Normal-Silence switch (located on the outside of the control panel) to
the silence position. The alarm circuit will latch until manually reset after the "High Level" float returns to its normal (down) position.
The alarm circuit is manually reset by switching the High Level Reset/Off-Normal switch (located inside the control panel on the
inner door) to the Reset position then back to normal.
Drip Tubing
The drip field supply line conveys the effluent to the drip absorption zone that is being dosed where it is discharged
below the soil surface through a patented chemical-resisting pressure compensating self cleaning "drip" poly-tubing
emitter. The emitters or "drippers" are located every two feet in the tubing and emit 0.65 gallons per hour per emitter.
The dripper lines are automatically scoured (forward flushed) every 50 dosing cycles. This function is activated by
the controller, which opens the field flush valve, thus allowing the flushed effluent to be returned to the pretreatment
tank.
The duration of this cycle is approximately three minutes. The flushing cycle produces a high velocity
cleansing/scouring action by the effluent along the inside walls of the dripper tubing, P.V.C. manifolds and emitters.
The construction of the "RAM" drip tubing is unique in that the internal diaphragm and labyrinth provide for an exact
amount of effluent to be discharged from each of its emitters which are spaced at two foot intervals along the entire
length of the RAM drip tubing. Each emitter maintains a constant flow over pressure ranges of 7 up to 70 psi.
Because the effluent is distributed at an ultra low rate, large quantities of effluent may be economically distributed
over large areas during controlled periods of time without saturating the surrounding soil.
Air Release Valves
The drip field return line conveys the effluent from the drip absorption zone (used to “flush” or clean the tubing) back
to the pretreatment device. Each zone will have an air release valve housed in a small valve box at the highest point
of the return manifold pipe in each zone. The valve will close when the water pressure arrives at the valve during
each dose. The air release valve allows air to reenter the tubing after each dose to allow the tubing to drain. This
also prevents the uphill tubing from draining water into the downhill tubing and overloading downhill tubing.
In the event of damage to the air release valve, effluent may leak from the system. This condition should be fixed
immediately by replacing damaged parts. Air release valves should not be covered with soil or other material and
should always be accessible to the service personnel.
5
www.americanonsite.com
Specifications
DISC FILTERS - Disc Filters shall be an oblique filter, entirely of plastic, with two 3/4” male end connections to
NPT schedule 40 pressure PVC. The filter elements shall consist of grooved rings, mounted on a spine, forming
a cylindrical filter body. The rings are to be kept together by a spring seated at the bottom of the filter cover. The
out-in filter shall be of the screw in type with nitrilic rubber o-ring seal. The body materials shall be polyester, the
spine and rings shall be polypropylene, and the spring shall be stainless steel. The nominal filtration capacity of
the filter shall be 115 microns.
DRIPPER TUBING - The dripper tubing shall be Netafim Bioline pressure compensating dripperline for
wastewater. The tubing shall be nominal 0.61 gallons per hour (+/- 5% flow rate from 7 to 60 psi). The tubing
shall function as a turbulent flow emitter between 0 and 7 psi, ensuring that the nominal design flow is not
exceeded at system start-up. The tubing shall be polyethylene 120 psi rating. Tubing end connections and splice
connections shall be manufactured specifically for the tubing and for connection to standard schedule 40 NPT
adapters.
AUTOMATIC CONTROL VALVES - The automatic control valves shall be solenoid activated diaphragm valves
by Bermad. The body and cover shall be reinforced nylon. The metal parts shall be stainless steel, the
diaphragm shall be nylon-fabric reinforced poly isoprene. The seals shall be Buna-N. These valves shall operate
electrically using hydraulic pressure to open and to close.
RETURN PRESSURE ASSEMBLY FOR ZONE RETURN CONTROL VALVE - The automatic zone return valve
shall, in the event the drip zones are over 8 feet in vertical elevation above the hydraulic unit, have installed a
“return pressure assembly”. The assembly is to be used to prevent the line from draining after or during each
dose. See standard detail.
GRAVITY PIPING - All gravity piping shall be schedule 40 PVC DWV as a minimum. Fittings shall be Schedule
40 PVC suitable for underground installation. All joints shall be solvent welded with the use of primer and PVC
Glue.
NON-DRIPPER LINE PRESSURE PIPING - All non-dripper line pressure piping shall be PVC schedule 40
pressure rated. Rigid piping shall be standard ASTM 1120 for use with solvent welded Schedule 40 fittings. Flex
piping shall be schedule 40 PVC flex pipe for use with pressure fittings.
FLOAT SWITCHES - Float switches for level indication and control shall be encapsulated mercury or mechanical
differential switches. The switches shall be provided by American Manufacturing, or equal.
GENERAL VALVES - All gate, ball, globe and check valves shall be Schedule 40. Check valves shall be of the
swing check design of metallic bronze with corrosion resistant metal hinge pin for use in wastewater.
PIPING DISCONNECTS - Piping disconnects shall be PVC schedule 80 unions.
AIR RELEASE VALVES - Air release valves shall be resilient seat “pop-up” type air release valves for use with
filtered effluent (nominal filtration size of 115 microns.)
WIRE SPLICES - Field wire splices shall be installed in suitable wire splice pull boxes with waterproof
connections for access to splice connections. The boxes shall have structural capacity for in ground installation
and light vehicle yard care traffic.
SPECIAL DRIP EQUIPMENT - All non-specified drip equipment shall be as supplied by American Manufacturing
Company, Inc., including the controls, drip hydraulic unit, pumps, and specialty fittings.
PIPE BEDDING - In ground piping shall be installed according to local codes. Piping shall be installed on original
soil or suitably compacted fill or gravel bedded excavations on original soil. Freestanding piping shall be schedule
40 PVC and assembled with restrained joints.
6
www.americanonsite.com
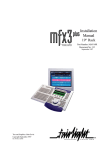
STANDARD DETAILS
REMOTE ZONE VALVE
The remote zone valves are typically
used on larger systems with more
than four zones or when the zones are
below the elevation of the pump
chamber. On slopes greater than 5%
a bentonite clay plug should be
installed three feet up contour from
the valve box to prevent effluent
from piping down the manifold and
filling the valve box.
7
www.americanonsite.com
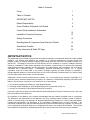
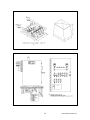
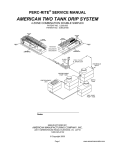
PUMP CHAMBER AND HYDRAULIC UNIT REQUIREMENTS
The hydraulic unit (HU) must be close to the pump chamber as shown. The limiting
factor is the back flushing sequence for the disc filters. The (HU) must be within 30 feet
horizontal and 8 feet vertical distance for the pump to have enough TDH to complete
back flushing.
The return line to the septic tank must have gravity flow back to the septic tank. The 11/2” line must have a 2% slope to drain back or a check valve should be placed at the
(HU) to prevent backpressure on the back flush valves. If longer distances are used,
the line size should be increased to 2”.
The pump should be placed as shown, secured on the floor of the pump. The pump
discharge pipe must have NO WEEP HOLE . The pump is to be hard wired into a
junction box.
1. Recommend half to full day storage between drip enable and high level alarm.
2. Recommend al least one-quarter day storage between alarm and inlet of tank.
3. Peak selector switch is located on circuit card and should initially be left in “Pump & Alarm”
to educate owner on water management.
8
www.americanonsite.com
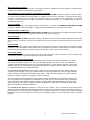
HYDRAULIC UNIT INSTALLATION STEPS
1. Remove the Hydraulic Unit from the shipping box and inventory contents. Make sure there
is no shipping damage prior to installation.
2. Dig a side trench to set the hydraulic unit. The area must be free from debris or rainwater
infiltration. (If the Hydraulic Unit is set below grade more than 4” the unit enclosure must
have a positive drain.) Center the unit on a gravel bed with the pipes slightly over the edge.
Connect the supply and return piping.
3. Install the control panel on two 4”x4” (minimum) pressure treated post with at least 3 feet of
clearance from the bottom of the control panel to the ground. The electrician shall provide
the sources of power to the control panel per the schematic enclosed in the control
enclosure. The control wire shall be run through conduit to the control with no splices and
connected to the terminal strip provided. Connect the heater, the pump control interface to
the control panel.
4. Install the insulated enclosure and backfill the area making sure not to damage any piping
or electrical components. Provide positive drainage from around the central unit to insure
no excessive rainwater will enter and rainwater, which does enter, will drain out. Provide a
minimum of 4” of backfill above the bottom edge of the enclosure to help enclosure heater
maintain temperatures above freezing. Additional mounding is preferred for freeze
protection and aesthetics.
9
www.americanonsite.com
10
www.americanonsite.com
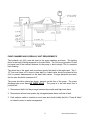
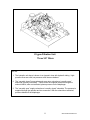
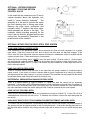
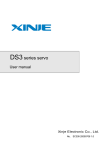
25 gpm Filtration Unit
Three 3/4” filters
NOTES:
1. The hydraulic unit above is shown in an isometric view with hydraulic tubing. Highpressure lines are solid, low-pressure relief lines are dashed.
2. The “normally closed” zone valves and zone return valve have “normally open”
solenoids (typically unmarked). These valves are supplied pressure through the
solenoid which, when not activated, places pressure on the diaphragm.
3. The “normally open” supply valves have “normally closed” solenoids. The pressure is
supplied through the operator and tee connection. With the solenoid not activated,
pressure bleeds off the diaphragm.
11
www.americanonsite.com
Installation Procedure Summary
1.
2.
3.
4.
5.
6.
7.
8.
9.
10.
11.
12.
13.
14.
15.
16.
17.
18.
19.
20.
Prepare field location for installation.
Set septic and pump tanks.
Dig header ditch for field manifold.
Install dripper tubing.
Install loops (flex tubing).
Dig ditches for conveyance lines (supply & return).
Place Central Unit and mount control panel.
Dry fit pressure lines and field manifolds.
Set switch tree in pump tank.
Glue all fittings and place valve boxes.
Install electrical (and phone line if applicable).
Check power supply and power up unit.
Provide one-day volume of clean water for startup.
Pressure check all fittings and lines.
Inspection of field and loops.
Flush all fields through the air release valves.
Set run time for Central Unit.
Check setup values against calculated values.
Find leaks and repair.
Backfill once lines and fields are determined to have no
leaks. Back filling is to be controlled to prevent the
damaging of pipes or fittings.
21. Grade and seed site.
22. Log data registers and startup values.
DUAL ZONE DOSE OPTION
In normal operation, the Perc-Rite® control panel will dose one zone at a time. The
American Perc-Rite® controller may be set for dosing two zones at a time while
maintaining single zone flush operations. All other operations are the same. The
control will automatically log in dual zone dosing registers inside microprocessor when
set up to do dual zone dosing.
12
www.americanonsite.com
Startup Procedures - AMERICAN SEPTIC DRIP
This procedure outlines the startup procedures for the drip dispersal field tubing system. The
process includes flushing dirt, pipe shavings and other possible construction debris out of the
tubing and checking dosing rates in a three-step process. First, flush through air release
valves, second flush through normal flushing process (while checking flow rate), and finally
checking final dose flow rate.
I. System Flushing Air Release Valves Off
a. Be sure pump chamber is full of clean water. Check lights on controller for float
activation. The “Off” float and “Standard Enable” float should be in the up position
before starting field flush. Continue to fill tank to “alarm” float. It should take one
days’ flow of clean water to flush tubing.
b. Place all toggle switches, on the inner door, in the “Off” position and place filter
back flush switch in the “Auto” position.
c. Remove air release valves, attach piece of 1/2” black flex PVC (5’ maximum) to
1/2” white PVC with dry coupling (do not glue) and place end to direct discharge
away from excavation.
d. Switch pump to “Hand” position. Pump should deadhead with no flow meter
movement.
e. Place filter back flush to filter #1 position. Note blue valve opening. Back flush
for 15 seconds, Place filter back flush switch to the “Auto” position.
f. Place disc filter back flush to filter #2 position. Note blue valve opening. Back
flush for 15 seconds, Place filter back flush switch to the “Auto” position.
g. Turn zone #1 to hand position to allow a manual field flush. After water starts
discharging from flex PVC, continue to flush for at least three (3) minutes or until
no debris (dirt, PVC shavings, etc.) is noted, whichever is greater.
h. Repeat item “e” & “f”.
i. Repeat “g” & “h” for each additional zone.
j. Place all toggle switches, on the inner door, in the “Off” position and place filter
back flush switch in the “Auto” position.
k. Remove black PVC hose, dry, and glue coupling with air release valves.
l. Remove disk filters and remove any pipe shavings or debris then replace filters.
II. Field Flush Flow Test
a. Determine each zone flushing GPM by multiplying the number of lateral
connections by 1.6 and adding to the dosing GPM. (See “a” in step III) Resultant
should not exceed 15 GPM for the two-disc filter rack.
b. Switch pump to “Hand” position. Pump should deadhead with no flow meter
movement.
c. Place filter back flush switch to filter #1 position. Note blue valve opening. Back
flush for 15 seconds. Place filter back flush switch to the “Auto” position.
d. Place filter back flush switch to filter #2 position. Note blue valve opening. Back
flush for 15 seconds. Place filter back flush switch to the “Auto” position.
e. Turn switch for “Zone #1” and the “Zone Return Valve” to “Hand” position to allow
a manual flush. After water starts flowing through zone return valve, flush for
three (3) minutes, check flow rate and compare with design flushing flow rate.
f. Place all toggle switches, on the inner door, in the “Off” position and place filter
back flush switch in the “Auto” position.
g. Repeat item “b”, “c”, “d” & “e” for each additional zone.
13
www.americanonsite.com
h. After flushing the last zone leave the pump and zone valve in the “Hand” position and
close the zone return valve “Off”. After the flow rate stabilizes and compares to design
flow rate, see next section.
III. Field Dose Flow Test
a. Determine each design zone dosing Gallons Per Minute (GPM) by the following
formula: (If installed as designed refer to calculation sheet.)
b. Determine dosing flow rate in the last zone flush tested. The rate should be
close to value calculated in “a” above. Check for leaks and repair as necessary.
c. With all toggle switches in the “off” position, back flush filters as described above
instep II’s ”b”, ”c”, & “d”.
d. Move the next zone switch to the “Hand” position and make sure the Zone
Return switch is in the “off” position, watch flow meter slow as system fills. When
pressurized, measure flow rate with watch. The rate should be close to value
calculated in “a” above. Check for leaks and repair as necessary.
e. Repeat for each additional zone.
f. Place all switches in the “Auto” position.
IV. Zone Return Pressure Assembly Flow Test
a. In some cases when the drip field is around 10’ in elevation above the hydraulic
unit or when it is significantly above the unit the valve will not close properly and
continue to recycle wastewater back to the septic tank. If this condition occurs,
follow the following steps.
b. Remove the zone return connection and reinstall a short 1” nipple in the return
valve.
c. Place the “return pressure assembly” in the return line as per standard detail on page
19.
V. Timer Adjustment / Automatic Mode
(Note: Timer Enable float must be up for automatic operation)
a. Write down gallons from flow meter and target total gallons dose for all Zones.
b. Place pump and Zone #1 in auto position, with all other zones “off”. Adjust timer
screw setting to the approximate calculated value for total gallons per zone.
Press “reset” button and hold for 5 seconds. System will automatically backflush
filters and dose next zone. Start stopwatch when meter begins flow. Record the
time it takes to deliver calculated volume. Adjust timer to that actual time (not
the calculated time).
c. Repeat for each additional zone, no adjustment should be necessary even if
zone is of a different size. High or Low volume values indicate a possible leak or
obstruction.
d. Leave all zones in use switched to automatic.
14
www.americanonsite.com
The "pump run time dial" will adjust the pump run time from zero minutes to 17 minutes.
This run time, when two 900 linear feet zones are in use, will dispose of 270 gpd when
dosed with the “Standard Dose Enable” float switch up and 450 gpd when dosed with
the “Peak Enable Float” switch up.
Use a small phillips screw driver to adjust the "pump run time dial". After adjustment,
press and hold the reset button until a pump event is initiated (approx. 5 seconds).
Time the pump run time after backflush to determine if the setting is adjusted where
wanted. Readjust if necessary. The gallons per day can be set by first determining the
gallons per minute in each zone, then the rest time between doses and then adjusting
the pump run time as necessary.
NOTE: THE OWNER ASSUMES FULL RESPONSIBILITY FOR CONDITIONS OR
MALFUNCTIONS DUE TO CHANGES IN PUMP RUN TIME BY ANYONE OTHER THAN A
QUALIFIED SERVICE REPRESENTATIVE.
TIMER SETTING
The timer may be easily set with the use of a hand held control adapter. Customers
that purchase an optional hand held unit will have the ability to view exact run timer
settings as the dial is manually turned. See page 9 of this manual for instructions. The
only other way to set the timer is by trial and error. Start an automatic cycle, time the
field dose, and then adjust up or down to get close to desired time.
DEALER NOTES;
15
www.americanonsite.com
DATA REGISTERS AND THE HAND HELD PROGRAMMING & MONITORING UNIT
Dealers may purchase the optional hand held programming & monitoring unit (hand
held unit) in order to see the timer settings and counter values as listed on the Data
Monitoring Table on the next page. The device is the size of a hand held calculator and
will easily fit into the standard installers service kit. The table may be copied to log in
data from a specific site for a specific date and time.
The hand held unit may be plugged into or removed from the microprocessor at any
time. Even in the middle of and operation the control will only divert back to automatic
operation. The use of the hand held is not necessary to operate the unit. It only makes
setting of the run time easier and proportioning of the run time possible. In most cases
however the proportioning is not necessary and the timer settings can be tested with a
stopwatch.
Data Registers - AMERICAN PERC-RITE® DRIP
Counters are used to provide delay time for doses and flushing sequences. Counters
may be adjusted to start cycles. Different dose times for each zone may be set.
Registers are field adjustable with a hand held unit only. The following table, which
registers, can be viewed and adjusted.
Data Registers - AMERICAN SINGLE TANK SANDFILTER DRIP
There are registers available for use with a SINGLE TANK SANDFILTER DRIP system.
Detailed information for this system is available from American at our web site.
TO START HAND HELD
Plug hand held unit with matching plug shape to socket
Press “F1” for first menu (main menu may already be on screen)
Note: If you press “esc” another menu may be seen, do not operate from this
menu. Press “esc” again to return to the main menu.
“Main Menu”
MAIN DATA VIEW EDIT
F1
F2
F3
F4
TO CHECK TIMER AND COUNTER REGISTERS
Press “F1” to view data - Pump and Zone Counters & ETM’s
Press “F2” to view timers and counters - Run & Rest times during operation
Press “F3” to edit timers and counters - Operational setup values
Press “F4” to view data - Pump and Zone Counters & ETM’s for Pre treatment tank
TO EDIT (CHANGE) REGISTER VALUES
Press edit timers and counters
Use small phillips screwdriver (on field pump run time screw) to adjust pump run times
Use arrows to move left flashing cursor on register that you want to change
Press “ENTER”, cursor will highlight the number of that register you want to change
Use arrows to change value to desired number, and then press “ENTER”. For
screens with multiple values, press “ENTER” repeatedly until screen changes.
Note: After thirty seconds of inactive viewing of a register, the hand held will return to the
top of the function register in use. After four minutes of inactivity, the hand held will return
to the main menu.
16
www.americanonsite.com
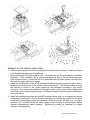
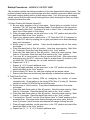
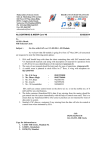
Loading a Program in a S7-200 series PLC 224/226/*
1.
Place Run/Term/Stop switch shown in Figure A
in the stop position.
2.
Remove all power from the system.
3.
Remove the cover or battery from the Eprom
(memory chip) housing noted in Figure A.
4.
Look at the underside of the Eprom () and align
it with the socket connector noted in Figure C
before inserting.
5.
After assuring alignment place the chip in the
slot and restore power to the system (with switch
still in stop position).
6.
Wait 10 seconds.
7.
Power the system down.
8.
Remove the Eprom.
9.
Replace cover or battery.
10. Restore system power.
11. Place switch in the run position.
Figure A
Figure B
17
www.americanonsite.com
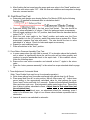
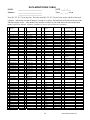
DATA MONITORING TABLE
NAME:
Address:
________________________
________________________
________________________
DATE: ___/___/___
Time: ___ : ___ AM PM
Press (F1, F2, F3, F4) at any time. Press the noted (F1, F2, F3, F4) to review and to edit the referenced
registers. After thirty seconds of inactive viewing of a register, the hand held will return to the top of the
function register in use. After another four minutes of inactivity, the hand held will return to the main
menu. Legend: (m) minutes, (h) hours, (t) tenths of a second. All rest times are in minutes.
Scr (F1) Drip Data
No. Record
1
Flow Meter
2
9
Z01 Counter
Z01 ETM (m)
Z02 Counter
Z02 ETM (m)
Z03 Counter
Z03 ETM (m)
Z04 Counter
Z04 ETM (m)
Z05 Counter
Z05 ETM (m)
Z06 Counter
Z06 ETM (m)
Z07 Counter
Z07 ETM (m)
Z08 Counter
10
Z08 ETM (m)
Z09 Counter
3
4
5
6
7
8
11
12
13
14
15
16
17
18
19
20
21
22
23
24
Z09 ETM (m)
Z10 Counter
Z10 ETM (m)
Z11 Counter
Z11 ETM (m)
Z12 Counter
Z12 ETM (m)
Z13 Counter
Z13 ETM (m)
Z14 Counter
Z14 ETM (m)
Z15 Counter
Z15 ETM (m)
Z16 Counter
Z16 ETM (m)
P1 Counter
P1 ETM (m)
P2 Counter
P2 ETM (m)
PK Dose CTR
PK ETM (m)
HL Counter
HL ETM (m)
Peak Zone
SF
ZO1 TTL Flow
ZO2 TTL Flow
ZO3 TTL Flow
ZO4 TTL Flow
Value
Scr (F2) Drip Status
No.
Value
Scr (F3) Drip Edit
No. Record
1
1-16
1
2
3
4
5
6
7
8
9
10
Zone Dose
Timer
TRGT (t)
Elapsed (t)
Zone Rest Time
TRGT (t)
Elapsed (t)
SF Rest Time
TRGT (t)
Elapsed (t)
Z1FF (Ctr)
Z2FF (Ctr)
Z3FF (Ctr)
Z4FF (Ctr)
Z5FF (Ctr)
Z6FF (Ctr)
Z7FF (Ctr)
2
3
4
Z8FF (Ctr)
Z9FF (Ctr)
Z10FF (Ctr)
Z11FF (Ctr)
Z12FF (Ctr)
Z13FF (Ctr)
Z14FF (Ctr)
Z15FF (Ctr)
Z16FF (Ctr)
Nxt Zone to
Dose
Backflush Timer
Flowmeter
Design Flow
gpm
Filter
Dose
SF
Peak
0=Off 1=On
5
6
7
8
3
1
0
0
9
10
11
12
Value
Scr (F4) Edit & Record
No. Pt = Pretreat Tank
SD = Simplex Dose
1
Pt Dose Time (t)
Z1RT
1,500-11,700
Z1 %
Flow
FF
Z2 RT
Z2 %
Flow
FF
Z3 RT
Z3 %
Flow
FF
Z4 RT
Z4 %
Flow
FF
100
12
25
1,500-11,700
100
12
25
1,500-11,700
100
12
25
1,500-11,700
100
12
25
7
Z5 RT
Z5 %
1,500-11,700
100
8
Flow
FF
Z6 RT
Z6 %
Flow
FF
Z7 RT
Z7 %
12
25
1,500-11,700
100
12
25
1,500-11,700
100
Flow
FF
Z8 RT
12
25
1,500-11,700
Z8 %
Flow
FF
Z9 RT
Z9 %
Flow
FF
Z10
Z10 %
Flow
FF
Z11 RT
Z11 %
Flow
FF
Z12 RT
Z12 %
Flow
100
12
25
1,500-11,700
100
12
25
1,500-11,700
100
12
25
1,500-11,700
100
12
25
1,500-11,700
100
12
18
2
3
4
5
6
9
10
TRGT (t)
Elapsed (t)
Rest Std (m)
Peak (m)
Trgt (m)
Elapsed (m)
P1 Counter
P1 ETM (m)
P2 Counter
P2 ETM (m)
PK Counter
PK ETM (m)
HL Counter
HL ETM (m)
SD Dose Time
TRGT (t)
Elapsed (t)
SD Rest Time TRGT
(m)
Elapsed (m)
SD Counter
SD ETM (m)
Main Menu
Value
1500-11700
45
30
1,500
1,440
www.americanonsite.com
25
26
27
28
29
30
31
32
33
34
35
36
37
38
39
ZO5 TTL Flow
ZO6 TTL Flow
ZO7 TTL Flow
ZO8 TTL Flow
ZO9 TTL Flow
ZO10 TTL
Flow
ZO11 TLL
Flow
ZO12 TTL
Flow
ZO13 TTL
Flow
ZO14 TTL
Flow
ZO15 TTL
Flow
ZO16 TTL
Flow
ZO1&ZO2
Flow
ZO3 & ZO4
Flow
ZO5 & ZO6
Flow
ZO7 & ZO8
Flow
ZO9 & Z10
Flow
Z11&Z12 Flow
Z13&Z14 Flow
Z15&Z16 Flow
ZO 1 FF (Ctr)
13
14
15
16
17
18
ZO 2 FF (Ctr)
19
ZO 3 FF (Ctr)
ZO 4 FF (Ctr)
20
ZO 5 FF (Ctr)
ZO 6 FF (Ctr)
ZO 7 FF (Ctr)
21
ZO 8 FF (Ctr)
22
ZO 9 FF (Ctr)
ZO 10 FF (Ctr)
ZO 11 FF (Ctr)
ZO 12 FF (Ctr)
ZO 13 FF (Ctr)
ZO 14 FF (Ctr)
ZO 15 FF (Ctr)
ZO 16 FF (Ctr)
Main Menu
23
FF
Z13 RT
Z13 %
Flow
FF
Z14 RT
25
1,500-11,700
100
12
25
1,500-11,700
Z14 %
100
Flow
12
FF
25
Z15 RT
1,500-11,700
Z15 %
100
Flow
12
FF
25
Z16 RT
1,500-11,700
Z16 %
100
Flow
12
FF
25
Std Enable Rest
Pk Enable Rest
SF Std off Rest
SF Std Enbl
Rest
SF Pk Enbl
Rest
BW Frequency
Peak Dose
Allow
Auto FF Time
Int
Filter Delay
Press. Delay
(sec)
Flow Meter
Mult.
Flow Varience
%
Catasrophic %
Main Menu
60
45
45
30
19
30
3,000
72
336
450
180
1
20
50
www.americanonsite.com
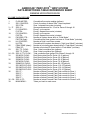
AMERICAN “PERC RITE®” DRIP SYSTEM
DATA MONITORING TABLE REFERENCE SHEET
SIEMENS MICROPROCESSOR
(F1) DRIP DATA RECORD
1.
2.
FLOW METER ZO1 COUNTER ZO1 ETM 3 – 17. ZO2-16 18.
P1 COUNTER P1 ETM 19.
P2 COUNTER P2 ETM 20.
PK DOSE CTR PK ETM (float) 21.
HL COUNTER HL ETM 22.
PEAK ZONE (dose) PEAK SF 23.
ZO1 TTL FLOW ZO2 TTL FLOW 24 – 30. ZO3-16 TTL FLOW 31.
ZO1&ZO2 FLOW ZO3&ZO4 FLOW 32.
ZO5&ZO6 FLOW ZO7&ZO8 FLOW 33.
ZO9&ZO10 FLOW ZO11&ZO12 FLOW 34.
ZO13&ZO14 FLOW ZO15&ZO16 FLOW 35.
ZO1 FF ZO2 FF ZO3 FF ZO4 FF 36 – 38. ZO5-16 FF 39.
MAIN MENU -
Cumulative flow meter reading (gallons).
Count of number of doses Zone 1 has completed.
Zone 1 elapsed time meter (minutes).
Same parameters as No. 2, but for Zones 2 through 16.
Pump 1 cycle counter.
Pump 1 elapsed time meter (minutes).
Pump 2 cycle counter.
Pump 2 elapsed time meter (minutes).
Number of system doses while in “Peak Mode”.
Cumulative total time system has been in “Peak Mode” (minutes).
Number of High Level Alarm events.
Cumulative time system has been in “High Level Mode” (minutes).
Number of minutes system dosed while in “Peak Mode” (minutes).
Number of minutes SF dosed while in “Peak Mode” (minutes).
Zone 1 total cumulative flow (gallons).
Zone 2 total cumulative flow (gallons).
Total cumulative flow (gallons) for Zones 3 through 16.
Dual Dosing total flow for Zones 1 & 2 (gallons).
Dual Dosing total flow for Zones 3 & 4 (gallons).
Dual Dosing total flow for Zones 5 & 6 (gallons).
Dual Dosing total flow for Zones 7 & 8 (gallons).
Dual Dosing total flow for Zones 9 & 10 (gallons).
Dual Dosing total flow for Zones 11 & 12 (gallons).
Dual Dosing total flow for Zones 13 & 14 (gallons).
Dual Dosing total flow for Zones 15 & 16 (gallons).
Number of actual Forward Field Flush counts for Zone 1.
Number of actual Forward Field Flush counts for Zone 2.
Number of actual Forward Field Flush counts for Zone 3.
Number of actual Forward Field Flush counts for Zone 4.
Number of actual Forward Field Flush counts for Zones 5 to16.
Takes you back to main menu.
20
www.americanonsite.com
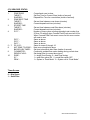
(F2) VIEW DRIP STATUS
1.
2.
3.
4.
5 – 7.
8.
9.
10.
ZONE DOSE
TARGET ELAPSED ZONE REST TIME
TARGET ELAPSED SF REST TIME
TARGET ELAPSED Z1 FF -
Z2 FF Z3 FF Z4 FF Z5-16 55 NXT ZONE TO DOSE BACKFLUSH TIMER FLOWMETER DESIGN FLOW DOSE S.F. PEAK -
Current/next zone to dose
Set Run Time for Current Zone (tenths of second)
Elapsed Run Time for current dose (tenths of second).
Set rest time between zone doses (minutes).
Current elapsed rest time (minutes).
Set rest time between sand filter doses (minutes).
Current elapsed rest time (minutes).
Number of zone cycles counting upwards to set number (typ.
25 from F3 setting) when Forward Field Flush event will occur.
When Forward Field Flush event occurs for this zone counter
will reset to zero.
Same as above.
Same as above.
Same as above.
Same for zones 5 through 16.
Next zone scheduled to dose.
Set time to backflush disc filters (tenths of second).
Continually updated flow meter reading during current dose.
Set design flow for current dose (gpm).
1 = single Zone Dosing. 2 = dual zone dosing.
1 = sand filter option ON . 0 = sand filter option OFF.
1 = System in “Peak Mode”. 2 = System not in “Peak Mode”.
Timer Screws
0 – Drip Zones
1 – Sand Filter
21
www.americanonsite.com
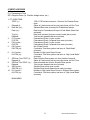
(F3) DRIP EDIT RECORD (edit settings)
1.
Z1 RT Z1 % FLOW FF -
2 –16.
17.
Z2-16 STD ENABLE REST PK ENABLE REST -
18.
SF STD OFF REST SF STD ENBL REST -
19.
SF PK ENBL REST BW FREQUENCY -
20.
PEAK DOSE ALLOW AUTO FF TIME INT -
21.
FM MULTIPLIER PRESSURE DELAY -
22.
FLOW VARIANCE% CATASTROPHIC% MAIN MENU -
23.
Zone 1 run time (1,500 - 11,700 tenths of second)
Percent of run time set by manual dial timer.
Set flow reading (gpm)
Number of zone doses before a Forward Field Flush event will
occur.
Same parameters as above for zones 2 through 16.
Standard rest time between zone dose events when in Dose
Enable mode (minutes).
Rest time between zone dose events when in “Peak” mode
(minutes).
Rest time between sand filter dose events when only “Off” float
is activated (minutes).
Rest time between sf dose events when in “Peak” mode
(minutes).
Rest time between sf dose events when in “Peak” mode
(minutes).
Amount of time between mid dose auto back flushes (tenths of
second).
72 hours is the maximum consecutive length of time system
will dose using the “Peak” dosing frequency.
336 hours (14 days). Zones will Forward Field Flush once
every 14 days or 25 cycles which ever is the lesser number.
1 (preset).
1800 tenths of second (3 minutes) before taking flow reading
(gpm) if Flow Monitoring is activated (“On” position).
Preset at 20% if Flow Monitoring is turned on.
Preset at 50% if Flow Monitoring is turned on.
Returns back to Main Menu.
Timer Screws
0 – Drip Zones
1 – Sand Filter
22
www.americanonsite.com
(F4)EDIT & RECORD
Pt = Pretreatment Tank
SD = Simplex Dose (i.e. Clarifier sludge return, etc.)
1. PT. DOSE TIME TRGT (t) -
2.
3.
4.
5.
6.
Elapsed (t) Rest Std. (m) Peak (m) Trgt (m) Elapsed P1 Counter P1 ETM P2 Counter P2 ETM PK Counter PK ETM (m) HL Counter HL ETM (m) -
7.
SD Dose Time TRGT (t) Elapsed (t) 8.
SD Rest Time TRGT (m) Elapsed 9.
SD Counter SD ETM (m) 10. HL Counter HL ETM (m) -
1500-11700 tenths of second -- Run time for Pretreat Pump
dose
Starts at 0 and counts out time as pump times out Run Time
Standard Rest time (minutes) for Pretreatment pumps
Rest time for Pretreatment Pumps in Peak Mode (Peak float
activated)
Rest time (minutes) for given current mode (std or peak)
Total current elapsed rest time (minutes)
Pretreatment Pump 1 cycle counter
Pretreatment Pump 1 elapsed time meter (minutes)
Pretreatment Pump 1 cycle counter
Pretreatment Pump 1 elapsed time meter (minutes)
No of Peak Events
Cumulative Total time system has been in “Peak Mode”
(minutes)
Number of High Level Alarm Events
Cumulative Total time system has been in “High Level Mode”
(minutes)
Enter Simplex Dose system run time (tenths of second)
Starts at 0 and counts out time as pump times out Run Time
Enter standard rest time for Simplex Dose system
Total current elapsed rest time (minutes)
Simplex Dose pump cycle counter
Simplex Dose pump elapsed time meter (minutes)
Number of High Level Alarm Events in Simplex Dose system
Cumulative Total time system has been in “High Level Mode”
(minutes)
MAIN MENU
23
www.americanonsite.com
INSPECTION AND OPERATION PROCEDURE
ONSITE DRIP DISPERSAL SYSTEM
NAME:
Address:
_____________________________
_____________________________
_____________________________
I. Monitoring Schedule Frequency
A.
Periodic Inspection
B.
Compile and review (submit) data
DATE:
Time:
___/___/___
___ : ___ AM PM
__________________________
__________________________
II. Periodic Inspection
A.
Field Conditions
1.
Walk the field and record any visible wet spots from the drip system.
2.
O.K.
Repair
Comments and remedial action ____________________
B.
Controller
1.
Lights and manual switch positions.
a.
Open the control panel and open the lid to the hydraulic unit and pump tank. Make
sure all manual switches are in the automatic position. With Microprocessor on,
verify power light and run lights are on.
b.
O.K.
Comments and remedial action ______________________
2.
Microprocessor input: See table in owner’s manual.
a.
O.K.
Comments and remedial action ______________________
3.
Microprocessor output: Verify there is output only when in automatic operation.
You may start automatic cycle with “Reset/Stop” button.
a.
O.K.
Comments and remedial action _______________________
C.
Pump Tank Liquid Level Float Switches
1.
Check liquid level in the pump tank to confirm switch operation.
a.
If a float is down, its light should be off. Note; High level alarm float requires
optional relay installed in control.
2.
O.K.
Comments and remedial action _____________________________
D.
Pump and Valve Operation
1.
Place pump "Hand-Off-Auto" switch in the "Hand" position to deadhead pump against
valves. Then open (optional) master valve. Flow meter should not turn indicating there are
no leaks.
2.
O.K.
Comments and remedial action _____________________________
3.
With the pump running, place each zone valve in the "Hand" (open) position one at a time
to check operation. With one zone valve open, flow should register on the flow meter.
When the zone valve closes (off position), the flow should stop.
4.
O.K.
Comments and remedial action _____________________________
5.
With one zone valve open and flowing, close and reopen (optional) master valve to check
operation.
6.
O.K.
Comments and remedial action _____________________________
7.
With the pump in the "Hand" position open the filter backwash valve for filter one and two
for ten seconds then close. There should be no flow registering in the flow meter and you
should hear the valves open and close. The backwash return valve diaphragm will rise
then lower during backflush.
8.
O.K.
Comments and remedial action _____________________________
9.
Return all switches to the automatic position.
24
www.americanonsite.com
E..
Hydraulic Unit
1.
Examine one filter and clean all filters as needed.
2.
Examine all hydraulic components for leaks, tubing crimps and other problems.
3.
O.K.
Comments and remedial action _____________________________
III. Annual Inspections (Includes Periodic Inspection)
A.
Extended Check - Zone Dose Rates
1.
Open the air release valve boxes and inspect. Make sure they close during the
dose with no water leak after air is evacuated.
2.
O.K.
Comments and remedial action _____________________________
3.
Determine how many zones are in operation and the installed flow rates from the
installation records.
4.
O.K.
Comments and remedial action _____________________________
5.
With the pump in the "Hand" position, select the first zone by placing the zone
valve switch in the "Hand" position. After pressurization time, check flow rates by
reading the flow meter for a timed minute. Repeat for all zones. If flow varies by
more than 10% from original flow rates, reset flow rates.
6.
O.K.
Comments and remedial action _____________________________
7.
After the final zone is checked, place the "Zone Return" valve in the “Hand”
position while the “Zone Valve” is still in the “Hand” position and verify that the flow
rate increased to provide field flushing.
8.
O.K.
Comments and remedial action _____________________________
9.
Return appropriate switches to the automatic position.
10. O.K.
Comments and remedial action _____________________________
11. Press reset button for 5 seconds and check automatic zone dosing time.
12. O.K.
Comments and remedial action _____________________________
B.
Tanks & Pumps
1.
Examine and clean effluent screens, filters, and floats as needed.
2.
O.K.
Comments and remedial action _____________________________
C.
Measure solids level in all tanks
1.
Septic tank
Tank Depth ________
2.
Settling Tank
Tank Depth ________
3.
Dose Tank
Tank Depth ________
a.
Sludge pumping required Yes ___
Sludge Depth _______
Sludge Depth _______
Sludge Depth _______
No ___
IV. Reporting
A.
B.
C.
Provide summary report to customer showing gallon flow to each field along with
pertinent operating information and suggestions.
Provide signed and dated inspection report to customer file and regulatory
agency as needed.
Have records available and be prepared to discuss operation and maintenance
specifics with customer personnel.
V. Operator Signature _________________________________
Date: __________
®
Perc Rite Dealers are authorized to reproduce forms in this manual as needed for each site.
Additional comments (use back of copy if necessary):
25
www.americanonsite.com
Order Information
AMERICAN MANUFACTURING COMPANY INC.
5517 WELLINGTON ROAD, GAINESVILLE, VA. 20155
1-800-345-3132
Fax: 1-703-754-0058
e-mail: [email protected]
web: www.americanonsite.com
US MAIL:
P.O. BOX 549
MANASSAS, VA. 20108-0549
FREIGHT TERMS
All materials shipped f.o.b. Gainesville, Virginia, via UPS or common carrier. Please consult factory for freight
allowances.
TERMS OF PAYMENT
With an approved credit account, terms are 2% 10 days, net 30 days from date of invoice. A 2% service charge
will be applied to all past due invoices. Customer agrees to pay all reasonable collection fees incurred by
American Manufacturing. All other orders will be shipped C.O.D. Deposits on some special orders may be
required.
PRODUCT CHANGES
American reserves the right to change prices and modify or redesign any product without notice.
ERRORS AND CLAIMS
All shipping errors must reported within 10 days. American Manufacturing will not be responsible for damages,
shortages or delays caused by shipping delays. Claims which are the responsibility of American will be expedited
immediately, but are limited to credit on or replacement of merchandise involved.
AMERICAN MANUFACTURING LIMITED WARRANTY
For one year (12 months) after date of purchase, American Manufacturing will repair or replace any product or
portion thereof which proves to be defective due to materials or workmanship of American Manufacturing. We
reserve the right to repair or replace defective materials at our discretion.
This warranty does not cover the following conditions:
1.
2.
3.
4.
5.
6.
Defects or problems caused by improper installation or maintenance of materials.
Abuse, neglect or accidental damage of products.
Normal maintenance or upkeep of products.
Lightning, war, floods, or other acts beyond our control.
Misapplication of our products for their designed purpose, or misapplication according to local, state or
national codes when in effect.
American Manufacturing Company or its representatives are not responsible for labor for replacement of
defective parts.
Defective or warranted items must be returned to American or a location designated by AMC. All returns must be
accompanied by a return goods authorization number (RGA) supplied by American.
Manufacturing will in no way be responsible for any losses or damages incurred by failure of equipment, parts or
service. NOTE: Some states do not allow exclusion of damages, so this may not apply to you.
There are no other warranties written or implied.
26
www.americanonsite.com
OPTIONAL - RETURN PRESSURE
ASSEMBLY FOR ZONE RETURN
CONTROL VALVE
In the event the drip zones are over 10 feet in
vertical elevation above the hydraulic unit,
install a “return pressure assembly”. The
assembly is to be used to prevent the return
line from draining after or during each dose.
Remove the zone return connection and
reinstall a short 1” nipple in the return valve.
Install assembly as shown to the right. The
hydraulic tubing providing pressure for the
rest of the unit must be plugged and the new
tubing from the assembly connected to the
pressure side of the solenoid.
OPTIONAL SETUPS FOR THE PERC-RITE® DRIP SYSTEM
FLOW MONITORING FOR PERC-RITE®
Flow monitoring is an operational option, which measures the flow rate and compares it to a preset
input value. If the flow is more than 20% plus or minus from this value, an alarm will engage. If the
flow is over 50% from the preset value the system will assume a catastrophic failure is sensed and the
system will shut down. Press reset button to reset system.
When the Flow monitoring option is NOT in use, the input number 1.5 must not be lit. Some controls
are provided with a selector switch, which may be turned to the off position to take out this input. Also,
the pressurization delay in the “F3” menu, 21st screen may be increased to a value larger than the run
time to eliminate alarms.
PUMP FAILURE FOR PERC-RITE®
There is a current sensor relay that one of the leads from the pump contactor is routed through to
sense current. In the event no current is sensed when a pump is supposed to be running, the pumps
will alternate and then stop running if no current is sensed. The terminals may be jumped on this switch
to eliminate alarms when using the control for pilot duty only.
DIFFERENTIAL PRESSURE BACKWASH FOR PERC-RITE®
There is a function based on input to number 1.7, which will send the control into an automatic
backwash. A filter battery with a differential pressure switch connected to terminal block 2 numbers 13
and 14 will do an automatic back flush of the filters when the pressure between the inlet manifold and
the outlet manifold exceeds the switch setting and the condition is sensed by the control panel.
DOSE CUTOUT FOR PERC-RITE®
Some controls are provided with a dose cut out based on an input to number 0.0. If input 0.0 is lit for a
selected period of time the unit will not run. To eliminate the condition, remove the input and press the
rest button.
HIGH LEVEL DOSE CUTOUT FOR COMBINATION PRETREATEMENT AND PERC-RITE®
The control may be provided with a pretreatment time dose function with duplex time dosed pumps to
any primary process and duplex pumps for the final drip dose tank. In the event the drip dose tank is in
the high-level alarm condition, the primary process pumps will be locked out to not overfill the drip dose
tank.
27
www.americanonsite.com
AMERICAN MANUFACTURING COMPANY, INC.
INNOVATIVE TECHNOLOGY FOR THE ENVIRONMENTAL AGE
CATALOG PRODUCTS
American Manufacturing Company, Inc. manufactures many specialty On-Site Wastewater products
including the Bull RunR Valve, Dial-A-FlowTM, Distribution Boxes, accessories and Controls. American
also supplies as an Original Equipment Manufacturer (OEM) many other products unique to the On-Site
Industry.
The American On-Site Products Catalog is used throughout the industry not only for purchasing but for
reference and education. If an individual desires a product not shown in the catalog, a toll free call to
our 800 number will normally result in getting information about the desired product.
CONTROLS
American Manufacturing becomes involved with the entire operation of the system whether potable
water, process water, or wastewater. American has staff Professional Engineers, designers, soil
scientists, and trained sales people with state-of-the-art experience in control systems.
Our objective is to provide the most practical, economical, and efficient control device for fluid handling.
We inventory many standard application controls and are able to manufacture special application
panels in a very timely manner due to our modular design and manufacturing methods.
PACKAGES
American Manufacturing Company, Inc. manufactures many specialty On-Site Wastewater system
packages including Recirculation Sand Filter components, pump station equipment, and State-Of-The®
Art American “PERC-RITE ” Drip units incorporating automatic field flushing, disc filter back
flushing, and pressure compensating emitters.
1-800-345-3132
www.americanonsite.com
DEALER NOTES;
28
www.americanonsite.com