1
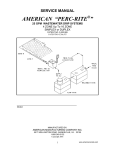
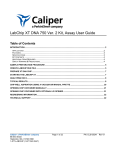
Template Preparation
and Sequencing Guide
For Research Use Only. Not for use in diagnostic procedures.
P/N 000-710-821-07 (06122013)
© Copyright 2010 - 2013, Pacific Biosciences of California, Inc. All rights reserved.
Information in this document is subject to change without notice. Pacific Biosciences assumes no responsibility for any errors or
omissions in this document.
PACIFIC BIOSCIENCES DISCLAIMS ALL WARRANTIES WITH RESPECT TO THIS DOCUMENT, EXPRESS, STATUTORY,
IMPLIED OR OTHERWISE, INCLUDING, BUT NOT LIMITED TO, ANY WARRANTIES OF MERCHANTABILITY,
SATISFACTORY QUALITY, NONINFRINGEMENT OR FITNESS FOR A PARTICULAR PURPOSE. IN NO EVENT SHALL
PACIFIC BIOSCIENCES BE LIABLE, WHETHER IN CONTRACT, TORT, WARRANTY, PURSUANT TO ANY STATUTE, OR ON
ANY OTHER BASIS FOR SPECIAL, CONSEQUENTIAL, INCIDENTAL, EXEMPLARY OR INDIRECT DAMAGES IN
CONNECTION WITH (OR ARISING FROM) THIS DOCUMENT, WHETHER OR NOT FORESEEABLE AND WHETHER OR NOT
PACIFIC BIOSCIENCES IS ADVISED OF THE POSSIBILITY OF SUCH DAMAGES.
Certain notices, terms, conditions and/or use restrictions may pertain to your use of Pacific Biosciences products and/or third party
products. Please refer to the applicable Pacific Biosciences Terms and Conditions of Sale and to the applicable license terms at
http://www.pacificbiosciences.com/licenses.html.
Trademarks:
Pacific Biosciences, the Pacific Biosciences logo, PacB io, SMRT and SMRTbell are trademarks of Pacific Biosciences in the
United States and/or certain other countries. All other trademarks are the sole property of their respective owners.
Pacific Biosciences of California, Inc.
1380 Willow Road
Menlo Park, CA 94025
www.pacificbiosciences.com
Notice of Equipment Class (Korea)
For Class A
For Class B
B EFORE Y OU B EGIN
Page 1
Overview
Trained Personnel
The PacBio® System includes the Instrument, the accompanying kits
needed for DNA template preparation and sequencing on the instrument, and the software used to set up runs and analyze data.
Any personnel carrying out the procedures described herein must be
trained in proper and safe laboratory practices. Throughout Pacific Biosciences® documentation, the words “you” or “user” refer to and
assume properly trained individuals.
Throughout this guide, user attention words and symbols appear that
may require a particular level of awareness or action.
User Attention
Words and
Symbols
Note: Calls attention to an item that may be of interest but
is not critical to the process.
Important: Calls attention to an item that is necessary for
proper operation of a step.
WARNING! Indicates you should proceed with appropriate caution.
Template
Preparation
Protocols
This guide describes an optimized procedure for preparing your DNA
template for sequencing on the PacBio System. This Blunt-End Ligation protocol, is suitable for all libraries (greater than 250 bp amplicons)
and offers a total preparation time of approximately four hours.
An A/T Ligation protocol can be used for preparing approximately 250
bp amplicon libraries. See Pacific Biosciences Procedure & Checklist 250 bp Amplicon Library Preparation and Sequencing available on our
Customer Portal and our website at www.smrtcommunity.com/SampleNet.
SMRTbell™
Templates
A SMRTbell™ template is a double-stranded DNA template capped by
hairpin loops at both ends. The SMRTbell template is structurally linear
and topologically circular. Some advantages of the SMRTbell structure
include the generation of both sense and antisense sequence from a
single molecule and the ability to achieve high single-molecule accuracy through circular consensus sequencing approaches.
By avoiding the use of intramolecular ligation, this method of forming
circular templates is similarly efficient across a wide range of insert
sizes. This allows a single methodology to support all applications.
Page 2
In addition to generating circular templates, the hairpin adapters provide two additional benefits. First, they provide a universal primer binding site and initiation sequence. Second, they protect the ends of the
DNA fragments. Exonucleases can therefore be used to degrade failed
ligation products and templates containing internal nicks, leaving
behind only those templates that are suitable for single molecule
sequencing.
Template
Preparation
Process
The SMRTbell template preparation method creates a circularized
template for use with multiple sequencing protocols. A single streamlined protocol is used to create different insert size libraries by altering
the fragmentation conditions. Amplicons can also be used (in the same
size ranges as input DNA).
This template preparation protocol can be used for all modes of oninstrument sequencing. Template preparation can be complete in 3-6
hours with minimal hands on time. Note that the time requirements
scale with the number of samples.
The first step in the generation of a SMRTbell library is production of
appropriately-sized double-stranded DNA fragments. These fragments
can be generated by random shearing of DNA, or by amplification of
target regions of interest. The SMRTbell library itself is produced by
ligating universal hairpin adapters onto double-stranded DNA fragments.
The hairpin dimers formed during this process are removed at the end
of the protocol using a magnetic bead purification step with size-selective conditions. The final step of the protocol is to remove failed ligation
products through the use of exonucleases.
Short-insert libraries are created with a combination of an A-tailing step
and ligation to an adapter with a single T nucleotide overhang. See
Pacific Biosciences Procedure & Checklist - 250 bp Amplicon Library
Preparation and Sequencing available on our Customer Portal and our
website at www.smrtcommunity.com/SampleNet.
Figure 1
Double-stranded DNA
Page 3
Figure 2
Fragmented DNA
Figure 3
Repaired Ends of Fragmented DNA
Figure 4
SMRTbell Adapters
5’ – pTCTCTCTCTTTTCCTCCTCCTCCGTTGTTGTTGTTGAGAGAGAT – 3’
Figure 5
Overhang Adapter
5’ – pATCTCTCTCTTTTCCTCCTCCTCCGTTGTTGTTGTTGAGAGAGAT – 3’
Figure 6
Blunt Adapter
5’-AAAAAAAAAAAAAAAAAATTAACGGAGGAGGAGGA-3’
Figure 7 C2 Primer (underlined sequence hybridizes to the hairpin loop and
red portion contains 2’-methoxy modifications to increase stability)
After the exonuclease step, SMRTbell templates are annealed to primers, and annealed templates are bound to DNA polymerase. Lastly, the
sample plate is set up for sequencing.
Page 4
DNA Quality
Pacific Biosciences’ template preparation process does not use amplification techniques. As a result, input DNA quality will be directly
reflected in sequencing results. Any DNA damage (e.g., abasic sites,
nicks, interstrand crosslinks) or contaminants (e.g., single-stranded
DNA, RNA, proteins, dyes, or salts) present in the input material will
impair performance of the system.
Therefore, ensure that your DNA sample:
• Is double-stranded. Single-stranded DNA will not be made into a
SMRTbell template in this template preparation process and can
interfere with quantitation and polymerase binding
• Has undergone a minimum of freeze-thaw cycles
• Has not been exposed to high temperatures (> 65ºC for 1 hour can
cause a detectable decrease in sequence quality)
• Has not been exposed to pH extremes (< 6 or > 9)
• Has an OD260/280 ratio of approximately 1.8 to 2.0
• Does not contain insoluble material
• Does not contain RNA
• Has not been exposed to intercalating fluorescent dyes or
ultraviolet radiation
• Does not contain chelating agents (e.g., EDTA), divalent metal
cations (e.g., Mg2+), denaturants (e.g., guanidinium salts, phenol),
or detergents (e.g., SDS, Triton-X100, CTAB)
• Does not contain carryover contamination from the starting
organism/tissue (e.g., heme, humic acid, polyphenols)
Assaying the
Quality of your
Sample
Prior to fragmentation, we recommend one or more of the following
quality assessments to ensure that the DNA is pure and of high molecular weight.
Quantitative Assessment
• Spectrophotometry (NanoDrop® Spectrophotometer): For samples
of concentration > 10-20ng/µL. We recommend an OD260/280 ratio
of approximately 1.8 to 2.0
• Fluorimetry: PicoGreen® or Qubit® Fluorimeter
Qualitative Assessment
• Gel electrophoresis and densitometry compared to the appropriate
size standards
• Sample DNA should be of high molecular weight and comparable
in intensity to a similar mass of control DNA.
Page 5
Gel Smear
• A Field-Inversion Gel Electrophoresis system can be used to
evaluate the quality of gDNA and determine the sizes of sheared
DNA and SMRTbell templates (see figure below). On a fieldinversion gel, high-quality gDNA should migrate as a single band of
approximately 50 kb (Lane 1).
DNA Input
Requirements
The 10 kb procedure described in this guide has been optimized to
produce SMRTbell template sizes with an input amount of 5 µg. For all
other insert sizes, download the Procedures from the Customer Portal
or www.smrtcommunity.com/SampleNet.
Note that depending upon the quality of your sample, approximately
20% sample loss is to be expected as a result of the shearing and concentration process. Therefore, be sure to have sufficient amounts of
starting DNA in order to have the required amount of starting material
for the End-Repair reaction.
Page 6
Scaling Up Reactions
Please note that all reaction volumes are concentration-dependent,
and each can be scaled with the input amount of sheared DNA. If preparing larger amounts of DNA, scale all the reaction volumes proportionally. For example, if the input amount is double the amount of DNA,
we recommend carrying out the reaction with double of every component and double the total volume.
PacBio® Kits and
SMRT® Cells
Required
PacBio Kits and SMRT Cell 8Pacs For Sequencing Experiments on
the PacBio System
Item
Specific Lab
Equipment and
Related
Consumables
Required
Source
DNA Template Prep Kit 2.0
Pacific Biosciences
DNA/Polymerase Binding Kit P4
Pacific Biosciences
DNA Sequencing Kit 2.0
Pacific Biosciences
DNA Sequencing Kit XL 1.0
Pacific Biosciences
Plasmidbell Complex P4
Pacific Biosciences
DNA Control Complex P4
Pacific Biosciences
MagBead Kit
Pacific Biosciences
MagBead Buffer Kit
Pacific Biosciences
AMPure® PB Kit
Pacific Biosciences
SMRT Cell 8Pac
Pacific Biosciences
SMRT Cell Oil
Pacific Biosciences
Required Equipment for Successful Template Preparation
Item
Vendor
Shearing Device:
• g-TUBE® microcentrifuge tubes
Covaris
• Covaris® S2 System (1 sample) or Covaris
E-Series (96 samples). For Covaris
devices: miniTube holders, and clear miniTubes will also be needed
and/or
• Hydroshear® Shearing Device
Hydroshear
Bioanalyzer® Instrument
Agilent Technologies PN 2100
Agilent® 2100 Bioanalyzer DNA 1000, DNA
7500, DNA 12000 DNA Kits, and/or High
Sensitivity DNA Kit
Agilent Technologies
Page 7
Item
NanoDrop® Series (2000, 2000c, 3300, 8000)
Vendor
Thermo Scientific
or
Qubit® Quantitation Platform - Fluorometer (and
Quant-iT™)
Invitrogen PN Q32857
96-well plates, semi-skirted
Fisher Scientific E951020303
Plate Septa
Pacific Biosciences
Tube Septa
Pacific Biosciences
AMPure® PB Beads
Pacific Biosciences
General Lab
Supplies
Item
Axygen® Sealing Film Roller
Vendor
Axygen PCR-SP-Roller
or
Septa Roller (Speedball® Roller)
Any Major Laboratory Supplier
Allegra® 6KR Centrifuge
Allegra
Microcentrifuge (1000-16000 RCF)
Eppendorf PN 5415D
Strip-tube Centrifuge
VWR PN 37000-700
Magnetic Particle Concentrator
Invitrogen 123-21D
0.2 mL PCR tubes (can be used for all
reactions)
Bio-Rad 0.2 mL flat cap PCR tube
(cat# TFI0201)
VWR® tube strip with individually
attached bubble caps (cat#
82006-634)
Molecular BioProducts 0.2 mL
PCR tube, flat cap (cat# 3412)
Molecular BioProducts 0.2 mL
PCR strip tube (cat# 3418)
0.5 mL VWR®/Eppendorf® DNA LoBind tubes
(used for all reactions)
Eppendorf PN 80077-236
1.5 mL VWR/Eppendorf DNA LoBind tubes
(used for all reactions)
Eppendorf PN 80077-230
Ethanol (absolute)
Sigma-Aldrich
Vortex-Genie® (with plate shaking
attachment)
VWR Catalog No. 14005-824
Plate centrifuge
Any Major Laboratory Supplier
Minifuge
Any Major Laboratory Supplier
Aerosol-resistant filter tips
Any Major Laboratory Supplier
Page 8
Molecular Biology Grade H20
Any Major Laboratory Supplier
Recommended
DNA Isolation Kits
Item
Sample Isolation kits:
• Blood and Cell Culture DNA Maxi Kit
• Blood and Cell Culture DNA Midi Kit
• Qiagen® Large-Construct Kit
• QIAquick® PCR Purification Kit
Page 9
Source
Qiagen
•
•
•
•
PN 13362
PN 13343
PN 12462
PN 28104
F RAGMENT DNA
Page 10
Shearing DNA
Our large insert size protocols have been validated using DNA fragmented with the Covaris® g-TUBE®. With any system, there will be
some variation in the distribution of the sheared fragments. In addition,
some DNA will be lost during the shearing process itself.
Depending on the quality of your starting material and the selected
method of shearing, you may expect to lose 20% of the starting mass
of your DNA sample.
Shearing DNA
Using a Covaris®
g-TUBE® Shearing
Device (> 5 kb
Insert Sizes)
The most up-to-date guidance on how to use the g-TUBE, along with
recommended centrifuges and centrifugation speeds, can be found in
the g-TUBE user manual available for download from the Covaris web
site.
• After the first centrifuge spin, check the upper chamber for residual
liquid. Re-spin if necessary.
• If there is still liquid in the chamber after 2 spins, use a 20 µL
pipettor and pipette up and down several times. Then spin the tube
down again.
After shearing, determine the approximate size range by loading 30 ng
of DNA on to the Bioanalyzer® 12000 chip or by running a low percent
(%) agarose gel. Check quantitation on a Nanodrop system. Note that
fragments sheared using the g-TUBE are greatly dependent on gDNA
quality and size and may range from 6 kb to 20 kb.
(Optional)
Shearing DNA
Using a
Hydroshear®
Shearing Device
(10 kb Insert Sizes)
Use a Covaris® g-TUBE® to shear your DNA sample. The most up-todate guidance on how to use the g- TUBE, along with recommended
centrifuges and centrifugation speeds, can be found in the g-TUBE
user manual available for download from the Covaris website.
Depending upon the quality of your sample, approximately 20% to
50% sample loss is to be expected as a result of the shearing and concentration process. Therefore, be sure to have sufficient amounts of
starting DNA in order to have at least 5 µg of sheared and concentrated DNA (140 ng/µL) for the Damage Repair reaction.
Note that a Hydroshear® Shearing Device can also be used to shear
DNA samples. However, because Hydrodynamic shearing performance can vary with each shearing assembly, we recommend optimizing the shearing whenever a new shearing assembly is used.
The sheared DNA can be stored for up to 24 hours at 4ºC or 2 months
at -20ºC.
Page 11
Sheared 10 kb
DNA Distribution
on a Bioanalyzer®
Instrument
The graph below shows an example of fragment size distribution.
Figure 1
Fragment Size Distribution for 10 kb
AMPure® PB
Purification Steps
Throughout this
Guide
For all 10 kb purification and concentration steps, you must use 0.45X
AMPure PB beads. For your convenience, the guide details these
requirements in each section.
Concentrate DNA
Perform the following steps, at room temperature, to concentrate your
DNA sample. Note that you must use low-adhesion (LoBind)
microcentrifuge tubes during the entire template preparation process.
1. Add 0.45X volume of AMPure PB magnetic beads to the sheared
DNA.
Before using, mix the bead reagent well until the solution appears
homogenous. Pipette the reagent slowly since the bead mixture is
viscous and precise volumes are critical to the purification process.
Consistent and efficient recovery of your sample is critical to
successful SMRTbell library preparation. If using this protocol for
the first time, we strongly recommend that you process a control
sample first. Using the DNA shearing methods and subsequent
AMPure PB bead purification steps described below, you should
recover approximately 50% - 80% of your input DNA (by mass).
Typical yields from pre-purified DNA (where smaller fragments are
already eliminated) are between 80-100%.
Page 12
2. Mix the bead/DNA solution thoroughly. Mix the beads with the DNA
by pipetting up and down or inverting the tube until the solution is
homogenous.
3. Quickly spin down the tube (for 1 second) to collect the beads.
4. Allow the DNA to bind to beads by shaking in a VWR® vortex mixer
at 2000 rpm for 10 minutes at room temperature. Note that the
bead/DNA mixing is critical to yield. After vortexing, the bead/DNA
mixture should appear homogenous.
We recommend using a VWR vortex mixer with a foam microtube
attachment (see Overview section for part number). If using other
instrumentation, ensure that the mixing is equally vigorous. Failure
to thoroughly mix the DNA with the bead reagent will result in
inefficient DNA binding and reduced sample recoveries.
5. Spin down the tube (for 1 second) to collect beads.
6. Place the tube in a magnetic bead rack until the beads collect to
the side of the tube and the solution appears clear. The actual time
required to collect the beads to the side depends on the volume of
beads added.
7. With the tube still on the magnetic bead rack, slowly pipette off
cleared supernatant and save in another tube. Avoid disturbing the
bead pellet.
If the DNA is not recovered at the end of this procedure, you can
add equal volumes of AMPure PB beads to the saved supernatant
and repeat the AMPure PB bead purification steps to recover the
DNA.
8. Wash beads with freshly prepared 70% ethanol.
Note that 70% ethanol is hygroscopic and should be prepared
FRESH to achieve optimal results. Also, 70% ethanol should be
stored in a tightly capped polypropylene tube for no more than 3
days.
a. Do not remove the tube from the magnetic bead rack.
b. Use a sufficient volume of 70% ethanol to fill the tube (1.5 mL
for 1.5 mL tube or 2 mL for 2 mL tube). Slowly dispense the
70% ethanol against the side of the tube opposite the beads.
Let the tube sit for 30 seconds.
c. Do not disturb the bead pellet.
d. After 30 seconds, pipette and discard the 70% ethanol.
Page 13
9. Repeat step 8 above.
10. Remove residual 70% ethanol and dry the bead pellet.
a. Remove tube from magnetic bead rack and spin to pellet
beads. Both the beads and any residual 70% ethanol will be
at the bottom of the tube.
b. Place the tube back on magnetic bead rack.
c. Pipette off any remaining 70% ethanol.
11. Check for any remaining droplets in the tube. If droplets are
present, repeat step 10.
12. Remove the tube from the magnetic bead rack and allow beads to
air-dry (with the tube caps open) for 30 to 60 seconds.
13. Calculate appropriate volume of Elution Buffer.
a. For 10 kb libraries:
__ ng X 0.5 / (__ng/µL) = __µL of Elution Buffer needed
The minimum DNA concentration required to proceed to the
next step (End-Repair) is 140 ng/µL with preferred mass of at
least 5 µg.
14. Add Pacific Biosciences® Elution Buffer volume (calculated in step
13 above) to your beads.
a. Thoroughly resuspend beads by vortexing for 1 minute at
2000 rpm. If the beads appear over-dried or cracked, let the
Elution Buffer sit on the beads for 2 to 3 minutes then vortex
again.
b. Spin the tube down to pellet beads, then place the tube back
on the magnetic bead rack.
c. Perform concentration measurements. Verify your DNA
concentration using a Nanodrop or Qubit® quantitation
platform. If the DNA concentration is estimated to be equal to
or below 12 ng/µL, a Qubit system reading is required. When
performing a Qubit system reading, ensure that your sample
is within the range of the Qubit kit you are using. For proper
concentration calculations, incorporate the dilution factor
(used when diluting your sample) to be within range of the
Qubit kit and the dilution factor when diluting your sample with
the working solution. The latter part of this dilution factor can
be calculated automatically by the Qubit system.
d. Discard the beads.
Page 14
15. Perform qualitative and quantitative analysis using a Bioanalyzer
instrument. Note that the Bioanalyzer instrument has different kits
in its offering and the appropriate kit, based on insert size, should
be used.
Dilute the samples appropriately before loading on the Bioanalyzer
chip so that the DNA concentration loaded falls well within the
detectable minimum and maximum range of the assay. Refer to
Agilent Technologies’ guides for specific information on the range
of the specific kit you might be using.
Note that typical yield, at this point of the process (i.e. postshearing and after one AMPure PB bead purification step), is
approximately 50%- 80%.
16. The sheared DNA can be stored for up to 24 hours at 4ºC or at 20ºC for longer duration.
Page 15
R EPAIR DNA D AMAGE
AND DNA E NDS
Page 16
Repair DNA
Damage
For sheared DNA libraries and PCR products greater than 2 kb, any
DNA damage (generated during DNA extraction and PCR amplifications) must be repaired using the DNA Damage Repair reagents provided by Pacific Biosciences. Common types of damage may include
abasic sites, cytosine deamination, and oxidation. Note that DNA damage repair is optional for insert sizes less than 2 kb.
1. Thaw the kit components on ice.
2. In a LoBind® microcentrifuge tube, add the following reagents:
Tube
Cap
Color
Stock
Conc.
Volume
Final Conc.
-
-
5 µg
-
10X
0.5 µL
1X
NAD+
100 X
0.5 µL
1X
ATP Hi
10 mM
5.0 µL
1mM
dNTP
10 mM
0.5 µL
0.1 mM for 10 kb
Reagent
Sheared DNA
DNA Damage Repair
Buffer
2.0 µL
DNA Damage Repair
Mix
H2O
-
Total Volume
to 50 µL
-
50.0 µL
-
If your input amount deviates from the inputs shown in this table, adjust
all reagent volumes proportionately. Note that the DNA final concentration cannot exceed 100 ng/µL.
3. Mix the reaction well by pipetting or flicking the tube.
4. Spin down tube contents with a quick spin in a microfuge.
5. Incubate at 25ºC for 15 minutes, then return reaction to 4ºC until
ready for purification.
Page 17
Repair Ends
The PacBio DNA Template Prep Kit is used to repair the ends of fragmented DNA (or non-phosphorylated 5’ ends of PCR products) in
preparation for ligation with hairpin adapters. Note that the tube caps
are color-coded for your convenience.
Use the following table to prepare your reaction then purify the DNA.
Tube Cap
Color
Reagent
DNA (Damage Repaired)
End Repair Mix
Stock
Conc.
−
20 X
Total Volume
Volume
Final Conc.
50 µL
−
2.5 µL
1X
52.5 µL
−
1. Mix the reaction well by pipetting or flicking the tube.
2. Spin down contents of tube with a quick spin in a microfuge.
3. Incubate at 25ºC for 5 minutes, return the reaction to 4ºC.
Purify the DNA
Perform the following steps at room temperature. Note that you must
use low-adhesion (LoBind) microcentrifuge tubes during the entire
template preparation process.
1. Add 0.45X volume of AMPure PB beads to the End-Repair
reaction.
Before using, mix the bead reagent well until the solution appears
homogenous. Pipette the reagent slowly since the bead mixture is
viscous and precise volumes are critical to the purification process.
2. Mix the bead/DNA solution thoroughly. Mix the beads with the EndRepair reaction by pipetting up and down or inverting the tube until
the solution is homogenous.
3. Quickly spin down the tube (for 1 second) to collect the beads.
4. Allow the DNA to bind to beads by shaking in a VWR® vortex mixer
at 2000 rpm for 10 minutes at room temperature. Note that the
bead/DNA mixing is critical to yield. After vortexing, the bead/DNA
mixture should appear homogenous.
We recommend using a VWR vortex mixer with a foam microtube
attachment (see Overview section with part number). If using other
instrumentation, ensure that the mixing is equally vigorous. Failure
to thoroughly mix the DNA with the bead reagent will result in
inefficient DNA binding and reduced sample recoveries.
Page 18
5. Spin down the tube (1 second) to collect beads.
6. Place the tube in a magnetic bead rack until the beads collect to
the side of the tube and the solution appears clear. The actual time
required to collect the beads to the side depends on the volume of
beads added. Slowly pipette off cleared supernatant and discard.
Avoid disturbing the bead pellet.
7. With the tube still on the magnetic bead rack, slowly pipette off
cleared supernatant and save in another tube. Avoid disturbing the
bead pellet.
If the DNA is not recovered at the end of this Procedure, you can
add equal volumes of AMPure PB beads to the saved supernatant
and repeat the AMPure PB bead purification steps to recover the
DNA.
8. Wash beads with freshly prepared 70% ethanol.
Note that 70% ethanol is hygroscopic and should be prepared
FRESH to achieve optimal results. Also, 70% ethanol should be
stored in a tightly capped polypropylene tube for no more than 3
days.
a. Do not remove the tube from the magnetic bead rack.
b. Use a sufficient volume of 70% ethanol to fill the tube (1.5 mL
for 1.5 mL tube or 2 mL for 2 mL tube). Slowly dispense the
70% ethanol against the side of the tube opposite the beads.
Let the tube sit for 30 seconds.
c. Do not disturb the bead pellet.
d. After 30 seconds, pipette and discard the 70% ethanol.
9. Repeat step 8 above.
10. Remove residual 70% ethanol and dry the bead pellet.
a. Remove tube from magnetic bead rack and spin to pellet
beads. Both the beads and any residual 70% ethanol will be
at the bottom of the tube.
b. Place the tube back on magnetic bead rack.
c. Pipette off any remaining 70% ethanol.
11. Check for any remaining droplets in the tube. If droplets are
present, repeat step 10.
12. Remove the tube from the magnetic bead rack and allow beads to
air-dry (with the tube caps open) for 30 to 60 seconds.
13. Elute the DNA off the beads.
a. Elute the DNA in 30 µL Elution Buffer.
Page 19
b. Thoroughly resuspend beads by vortexing for 1 minute at
2000 rpm. If the beads appear over-dried or cracked, let the
Elution Buffer sit on the beads for 2 to 3 minutes then vortex
again.
c. Spin the tube down to pellet beads, then place the tube back
on the magnetic bead rack
d. Discard beads.
14. Optional: Verify your DNA amount and concentration using Qubit®
Nanodrop® or Qubit® quantitation platform, as appropriate.
15. Perform qualitative and quantitative analysis using a Bioanalyzer
instrument. Note that the Bioanalyzer instrument has different kits
in its offering and the appropriate kit, based on insert size, should
be used.
Dilute the samples appropriately before loading on the Bioanalyzer
chip so that the DNA concentration loaded falls well within the
detectable minimum and maximum range of the assay. Refer to
Agilent’s users’ guides for specific information on the range of the
specific kit you might be using.
Note that typical yield at this point of the process (following EndRepair and one AMPure PB bead purification step) is
approximately between 80-100% of the total starting material.
16. The end repaired DNA can be stored overnight at 4ºC or at -20ºC
for longer duration.
Page 20
L IGATE A DAPTERS
Page 21
Blunt-End Ligation
of SMRTbell™
Templates
During this step, blunt hairpins are ligated to repaired fragment ends.
Figure 1
Repaired Fragment Ends
Figure 2
Blunt Hairpin Adapters and Insert DNA Ready for Ligation
To ligate the hairpins (SMRTbell™ templates) to the DNA fragments,
you will need BLUNT hairpin adapters. These are shipped as 20 µM
oligonucleotide stock and are pre-annealed. This reaction can be
scaled for the number of library samples being prepared.
Blunt-End Ligation
Reaction
In a LoBind microcentrifuge tube (on ice), add the following reagents in
the order shown (note that you can add water to achieve the desired
DNA volume). If preparing a Master Mix, ensure that the adapter is
NOT mixed with the ligase prior to introduction of the inserts. Add the
adapter to the well with the DNA. All other components, including the
ligase, should be added to the Master Mix.
Tube Cap
Color
Reagent
DNA (End Repaired)
Stock
Conc.
-
Blunt Adapter (20uM)
Volume
Final
Conc.
29µL to 30 µL
20 µM
1.0 µL
0.5 µM
10X
4.0 µL
1X
1 mM
2.0 µL
0.05 mM
1.0 µL
0.75 U/µL
Mix before proceeding
Template Prep Buffer
ATP Lo
Mix before proceeding
Ligasea
30 U/µL
H2O
to 40.0 µL
Total Volume
-
-
40 µL
a. The Ligase Buffer should remain closed and on ice when not frozen.
Page 22
-
If your insert size or input amount deviates from this table, you can calculate the amount of annealed blunt adapter to be added to the reaction using the following equation. Be sure to keep a 32.5 fold excess of
hairpin adapters and adjust the final volume such that the hairpin
adapter concentration does not exceed 1 µM.
Total µg of DNA insert X * 106 * 1/650 X 1/Insert size in bp = X picomoles of DNA available for ligation
X picomoles of DNA available for ligation X 32.5 = Total excess
annealed adapters (Y)
Y/20 (20 µM annealed adaptor stock) = Z total µL of annealed adaptor
to be added to the reaction
If scaling of the reaction volume is necessary, keep the buffer and
enzyme concentrations proportional to the recommended amounts
shown above.
1. Mix the reaction well by pipetting or flicking the tube.
2. Spin down the tube contents with a quick spin in a microfuge.
3. Incubate at 25ºC for 15 minutes. At this point, the ligation can be
extended up to 24 hours or cooled to 4ºC (for storage of up to 24
hours).
4. Incubate at 65ºC for 10 minutes to inactivate the ligase, then return
the reaction to 4ºC. You must proceed with adding exonuclease
after this step.
Add Exonuclease
and Incubate
Add exonuclease to remove failed ligation products.
Tube Cap
Color
Reagent
Stock
Conc.
Ligated DNA
Volume
40 µL
ExoIII
100 U/µL
1.0 µL
ExoVII
10 U/µL
1.0 µL
-
42 µL
Total Volume
-
1. Spin down the tube contents with a quick spin in a microfuge.
2. Incubate at 37º C for 1 hour, then return the reaction to 4ºC. You
must proceed with purification after this step.
Page 23
Purify SMRTbell™
Templates
In this purification process, there are three (3) distinct and consecutive
AMPure PB bead purification steps. The first two (2) steps are performed using 0.45X volumes of AMPure PB beads and the final step
can be performed using either 0.40X or 0.45X volumes of AMPure PB
beads. Perform all purification steps at room temperature to adequately remove enzymes (exonucleases, ligases, etc.) and ligation
products smaller than 0.4 kb (e.g., adapter dimers).
AMPure PB Size-Selection and Purification Step #1:
1. Add 0.45X volumes of AMPure PB beads to the exonucleasetreated ligation reaction.
Before using, mix the bead reagent well until the solution appears
homogenous. Pipette the reagent slowly (since the bead mixture is
viscous and precise volumes are critical to the purification
process).
2. Mix the bead/DNA solution thoroughly. Mix the beads with the
ligation reaction by pipetting up and down or inverting the tube until
the solution is homogenous.
3. Quickly spin down the tube (for 1 second) to collect the beads.
4. Allow the DNA to bind to beads by shaking in a VWR® vortex mixer
at 2000 rpm for 10 minutes at room temperature. Note that the
bead/DNA mixing is critical to yield. After vortexing, the bead/DNA
mixture should appear homogenous.
We recommend using a VWR vortex mixer with a foam microtube
attachment (see Overview section with Catalog part number). If
using other instrumentation, ensure that the mixing is equally
vigorous. Failure to thoroughly mix the DNA with the bead reagent
will result in inefficient DNA binding and reduced sample
recoveries.
5. Spin down the tube (for 1 second) to collect beads.
6. Place the tube in a magnetic bead rack until the beads collect to
the side of the tube and the solution appears clear. The actual time
required to collect the beads to the side depends on the volume of
beads added.
7. Slowly pipette off cleared supernatant and save (in another tube).
Avoid disturbing the bead pellet.
8. Wash beads with freshly prepared 70% ethanol.
Note that 70% ethanol is hygroscopic and should be prepared
FRESH to achieve optimal results. Also, 70% ethanol should be
stored in a tightly capped polypropylene tube for no more than 3
days.
a. Do not remove the tube from the magnetic bead rack.
Page 24
b. Use a sufficient volume of 70% ethanol to fill the tube (1.5 mL
for 1.5 mL tube or 2 mL for 2 mL tube). Slowly dispense the
70% ethanol against the side of the tube opposite the beads.
Let the tube sit for 30 seconds.
c. Do not disturb the bead pellet.
d. After 30 seconds, pipette and discard the 70% ethanol.
9. Repeat step 8 above.
10. Remove residual 70% ethanol and dry the bead pellet.
a. Remove tube from magnetic bead rack and spin to pellet
beads. Both the beads and any residual 70% ethanol will be
at the bottom of the tube.
b. Place the tube back on magnetic bead rack.
11. Check for any remaining droplets in the tube. If droplets are
present, repeat step 10.
12. Remove the tube from the magnetic bead rack and allow beads to
air-dry (with tube caps open) for 30 to 60 seconds.
13. Elute the DNA off the beads in 50 µL Elution Buffer. Mix until
homogenous, then vortex for 1 minute at 2000 rpm.
a. Thoroughly resuspend beads by vortexing for 1 minute at
2000 rpm. If the beads appear over-dried or cracked, let the
Elution Buffer sit on the beads for 2 to 3 minutes then vortex
again.
b. Spin the tube down to pellet beads, then place the tube back
on the magnetic bead rack
c. Discard beads.
14. The eluted DNA, in 50 µL of Elution Buffer, should be taken into the
second 0.45X AMPure PB bead purification step.
AMPure PB Size-Selection and Purification Step #2:
1. Add 22.5 µL (0.45X volume) of AMPure PB beads to the 50 µL of
eluted DNA from the first AMPure PB bead purification step above.
Before using, mix the bead reagent well until the solution appears
homogenous. Then pipette the reagent slowly (since the bead
mixture is viscous and precise volumes are critical to the
purification process).
2. Mix the bead/DNA solution thoroughly. Mix the beads with the
ligation reaction by pipetting up and down or inverting the tube until
the solution is homogenous.
3. Quickly spin down the tube (for 1 second) to collect the beads.
Page 25
4. Allow the DNA to bind to beads by shaking in a VWR® vortex mixer
at 2000 rpm for 10 minutes at room temperature. Note that the
bead/DNA mixing is critical to yield. After vortexing, the bead/DNA
mixture should appear homogenous.
We recommend using a VWR vortex mixer with a foam microtube
attachment (see Overview section with Catalog part number). If
using other instrumentation, ensure that the mixing is equally
vigorous. Failure to thoroughly mix the DNA with the bead reagent
will result in inefficient DNA binding and reduced sample
recoveries.
5. Spin down the tube (for 1 second) to collect beads.
6. Place the tube in a magnetic bead rack until the beads collect to
the side of the tube and the solution appears clear. The actual time
required to collect the beads to the side depends on the volume of
beads added.
7. Slowly pipette off cleared supernatant and save (in another tube).
Avoid disturbing the bead pellet.
8. Wash beads with freshly prepared 70% ethanol.
Note that 70% ethanol is hygroscopic and should be prepared
FRESH to achieve optimal results. Also, 70% ethanol should be
stored in a tightly capped polypropylene tube for no more than 3
days.
– Do not remove the tube from the magnetic bead rack.
– Use a sufficient volume of 70% ethanol to fill the tube (1.5 mL for
1.5 mL tube or 2 mL for 2 mL tube). Slowly dispense the 70%
ethanol against the side of the tube opposite the beads. Let the
tube sit for 30 seconds.
– Do not disturb the bead pellet.
– After 30 seconds, pipette and discard the 70% ethanol.
9. Repeat step 8 above.
10. Remove residual 70% ethanol and dry the bead pellet.
a. Remove tube from magnetic bead rack and spin to pellet
beads. Both the beads and any residual 70% ethanol will be
at the bottom of the tube.
b. Place the tube back on magnetic bead rack.
c. Pipette off any remaining 70% ethanol.
11. Check for any remaining droplets in the tube. If droplets are
present, repeat step 10.
12. Remove the tube from the magnetic bead rack and allow beads to
air-dry (with tube caps open) for 30 to 60 seconds.
Page 26
13. Elute the DNA off the beads in 100 µL of Elution Buffer. Vortex for
1 minute at 2000 rpm.
14. Verify your DNA amount and concentration with either a Nanodrop
or Qubit quantitation platform reading. If recovery is sufficient to
allow for an additional 25% loss in the final AMPure PB purification
step (more if the library contains a high number of small
fragments), and it is desirable to increase the stringency of size
selection, consider using 0.40X volumes of AMPure PB beads.
This will remove most fragments <1.5 kb which will dominate
loading, if present. Otherwise, proceed to the third 0.45X volumes
of AMPure PB bead purification step.
Note that yield from 0.40X is typically ~ 10% lower than 0.45X
volumes of AMPure PB bead purification.
AMPure PB Size-Selection and Purification Step #3:
1. Add 45 µL (0.45X volume) or 40 µL (0.40X volume) of AMPure PB
beads to the 100 µL of eluted DNA. Note that for 0.40X volume, it
is critical to accurately pipet the desired volume of AMPure PB
bead solution; there is a steep drop-off in recovery for
concentrations <0.40X.
2. Mix the bead/DNA solution thoroughly.
3. Quickly spin down the tube (for 1 second) to collect the beads. Do
not pellet beads.
4. Allow the DNA to bind to beads by shaking in a VWR vortex mixer
at 2000 rpm for 10 minutes at room temperature.
5. Spin down the tube (for 1 second) to collect beads.
6. Place the tube in a magnetic bead rack to collect the beads to the
side of the tube.
7. Slowly pipette off cleared supernatant and save (in another tube).
Avoid disturbing the bead pellet.
Note: It is especially important to save the supernatant for 0.40X
volumes of AMPure PB purification steps, in case of low recovery
8. Wash beads with freshly prepared 70% ethanol.
9. Repeat step 8 above.
10. Remove residual 70% ethanol and dry the bead pellet.
– Remove tube from magnetic bead rack and spin to pellet beads.
Both the beads and any residual 70% ethanol will be at the
bottom of the tube.
– Place the tube back on magnetic bead rack.
– Pipette off any remaining 70% ethanol.
Page 27
11. Check for any remaining droplets in the tube. If droplets are
present, repeat step 10.
12. Remove the tube from the magnetic bead rack and allow beads to
air-dry (with tube caps open) for 30 to 60 seconds.
13. Elute the DNA off the beads in 10 µL of Elution Buffer. Vortex for 1
minute at 2000 rpm.
14. Verify your DNA amount and concentration with either a Nanodrop
or Qubit quantitation platform reading. For general library yield
expect 20% total yield from the Damage Repair input. If your yield
concentration is below 12ng/µL, use the Qubit system for
quantitation.
To estimate your final concentration: (____ ng of DNA going into
Damage Repair X 0.2) / ___ of Elution Buffer =____ng/µL
15. Perform qualitative and quantitative analysis using a Bioanalyzer
instrument. Note that typical DNA yield, at this point of the process
(at the end of library preparation) is between approximately 5-20%
of the total starting DNA amount.
SMRTbell™
Library Quality
Assessment
Successful sequencing of a SMRTbell library depends on an understanding of the molarity of templates. This requires accurate quantitation and sizing of the final library.
Size distribution can be measured using an Agilent 2100 Bioanalyzer
High Sensitivity Kit. Typical library yields will require at least a 1:10
dilution prior to analysis on the Bioanalyzer instrument to ensure reliable quantitation.
The SMRTbell library should be quantitated via fluorescence either in
single sample (Qubit system) or plate-based (Quant-iT system) formats. Follow manufacturers instructions and ensure that a doublestranded DNA standard is used for the quantitation.
Page 28
A NNEAL SMRT BELL ™ T EMPLATES
AND P RIMERS
Page 29
Primer Annealing
and Polymerase
Binding
Prior to sequencing, you must anneal primers to the SMRTbell template, bind annealed templates to DNA polymerase, and set up the
sample plate for sequencing. A discussion of the optional loading titration, to optimize yield per SMRT® Cell, is also included.
Template
Preparation
Calculator
A Template Preparation Calculator (“Calculator”) is provided to assist
you through setting up the annealing and binding reactions and setting
up the sample plate for sequencing. The Calculator can be used in
three different modes:
• Volume to use: In this mode, the Calculator uses the entire
sample specified to run the maximum number of SMRT Cells
possible.
• # of SMRT Cells: In this mode, the user specifies how many
SMRT Cells to prepare, and the Calculator determines the
amount of sample necessary.
• Loading Titration: This mode allows the user to set up a
loading titration of the bound complex to optimize the yield of
data per SMRT Cell. The Calculator suggests four
concentrations around the recommended complex
concentration on the sample plate, however, the user can
customize the titration range as desired for their sample.
To Access the
Calculator
You can access the Calculator in two ways:
• By typing in the Instrument IP address (provided by your IT
department) into a web browser. The Calculator will be
residing on your local network and can be launched using the
link at the top of the RS Dashboard.
• By downloading from the web at http://calc.pacb.com or
http://calc.PacificBiosciences.com. Be sure to always check
for updates.
The Calculator is best viewed using Firefox or Chrome browsers.
Primer Annealing
Insert Sizes
For annealing, binding and instrument setup purposes, insert sizes are
separated into distinct groups. See the tables in the Binding section for
recommended primer:template, polymerase:template, and Control
Complex ratios and On Sample Plate concentrations for each insert
size.
Page 30
Reaction Conditions
The primer annealing reaction takes place in 1X Primer Buffer (stock is
10X). The concentrations of the primer and SMRTbell template are
dependent on insert size. See Table 2 in the Binding section, for the
primer:template ratios as used by the Calculator.
Primer Sequence
The primer sequence currently in use is shown in The Before You
Begin section.
The stock concentration provided in the Template Prep Kit is 5 µM.
SMRTbell molarity calculation
In calculating SMRTbell molarity, we use the following formula:
Insert concentration (ng/µl) * 1,000,000 = Insert concentration in
Mean insert size (bp)
650
(nM) (or fmol/µL)
The detailed calculation is:
Insert Concentration (ng/µL) * 1 mol basepairs * 1 g * 1015 fmol = fmol = nM
Mean insert size (bp)
650 g
109 ng 1 mol
µL
base
pairs
See Table 3 in the Sequencing section for a summary of the recommended concentrations and reuse options for each insert size.
Page 31
B INDING P OLYMERASE TO
T EMPLATES
Page 32
Binding Reaction
Overview
In the binding reaction step, the primer-annealed SMRTbell templates
are bound to DNA polymerases.
Reaction Conditions
The reaction takes place in the presence of a buffer, DTT, nucleotides,
and a divalent metal cation which stabilizes the complex. For all samples loading by diffusion, the recommended reaction time is 4 hours at
30ºC, followed by 4ºC indefinitely. For all samples bound at a 10:1
polymerase to template ratio and using MagBead loading, a heat inactivation step at 37ºC for 30 minutes is required.
Binding Concentration (Small scale or Large scale)
The concentrations recommended in the Calculator are optimized to
result in the highest possible fraction of active template:polymerase
complexes.
Large Scale: Depending on template availability, we recommend doing
the binding reaction at Large scale (high) concentrations, where the
binding reaction is more efficient. Moreover, the bound complex can be
diluted in a glycerol-based storage buffer and stored for several
months at -20ºC with no significant loss of activity. This Complex Storage Buffer is included in the DNA/Polymerase Binding Kit.
Small scale: When limited sample is available, the binding reaction can
be done at the Small scale (low) concentration. The Small scale concentration bound complex should be stored at 4ºC and used within
three days.
Control Complex: Identity and Amount
The control complex is provided by Pacific Biosciences as a means for
independent control of the binding and sequencing reactions. If a problem arises with a run, then the results from the control can assist in
determining where the problem occurred. These controls are SMRTbell templates already bound with the polymerase. They are added to
the sample during sample dilution for sequencing. See Table 1 for the
recommended control complex ratios for your insert size with the
upper and lower bounds of actual insert sizes and corresponding Control Complex molarity ratios that can be accommodated by each of the
insert size groups.
Page 33
Table 1: Insert Size and Control Complex Molarity Ratios
Insert
Size
Lower
Bound
Upper
Bound
Control Complex to target <10%
250 bp
101 bp
300 bp
2.5%
500 bp
301 bp
750 bp
1.3%
1 kb
751 bp
1,500 bp
1.0%
2 kb
1,501 bp
3,000 bp
0.9%
5 kb
3,001 bp
7,500 bp
0.6%
1 kb
7,501 bp
50,00 bp
0.7%
of total number of reads per movie
For Standard sequencing, there are two controls: DNA Control Complex P4 (for 250 bp to 3 kb) and DNA Control Complex P4 (for 3.0 kb to
10 kb). The DNA Control Complex P4 (for 250 bp to 3 kb) has a 600 bp
insert size while the DNA Control Complex P4 (for 3.0 kb to 10 kb) has
a 4.3 kb insert size. During sequencing, the control complexes can be
used to troubleshoot underperforming samples. The exact sequences
are provided at the end of this document.
The amount of Control Complex to add to experimental templates is
governed by two considerations. First, the required amount of the Control Complex depends on the desired fraction of Control reads. Currently, the recommended yield of Control reads is <10% of the total
number of reads per movie. Secondly, the size of the Control relative to
the size of the experimental templates matters. Loading of templates
into zero-mode waveguides (ZMWs) is size dependent: small inserts
load better than large (see the figure below). Because of this size
dependence, different ratios of control:sample templates are needed
for small versus large libraries.
Page 34
ZMW Loading Bias for Various Insert Sizes
Relative loading (as % of total sequencing ZMWs) versus insert size from a SMRTbell
size ladder. A restriction digestion of an 18.5 kb plasmid generated an equimolar
distribution of fragments from 160 bp to 4251 bp. The resulting fragments were
converted to SMRTbell templates via a modified blunt-end ligation protocol which
retains all fragment sizes > 75 bp. The SMRTbell size ladder was then bound, loaded
and sequenced using standard protocols.
Polymerase:Template ratios
The stoichiometric optimum for the polymerase:template ratio is 2
polymerases bound to each template molecule (one to each hairpin
adapter). At lower concentrations excess polymerase is used to
increase the efficiency of binding. It is highly recommended that all
samples bound at a 10:1 polymerase to template ratio be loaded using
MagBeads. This excess is washed away during the MagBead protocol
washing step. See Table 2 for the recommended polymerase to template ratios for different insert sizes.
Table 2 shows the recommended primer:template ratios, polymerase:template ratios and the On Sample Plate concentrations per
insert size. These recommended values are the default values in the
Calculator but can be adjusted by the user. Use the Calculator to set
up all your binding reactions.
Page 35
Table 2: Insert Size, Primer to Template Ratio, Polymerase to
Template Ratio and Loading Recommendations
MagBead
Diffusion
Diffusion
vs.
MagBead
Primer:
Template
Ratio
Insert
Size
Polymerase:
Template
Ratio
On Sample
Plate
Concentration (pM)
Small
Scale
Large
Scale
Small
Scale
Large
Scale
Small
Scale
Large
Scale
250 bp
20
2
2:1
2:1
112.5
112.5
500 bp
20
2
2:1
2:1
300
187.5
1 kb
20
5
3:1
3:1
150
97.5
2 kb
20
10
3:1
3:1
180
150
5 kb
20
5
3:1
3:1
150
120
10 kb
20
5
3:1
3:1
225
150
1 kb
20
5
10:1
3:1
15
15
2 kb
20
10
10:1
3:1
15
15
5 kb
20
5
10:1
3:1
15
15
10 kb
20
5
10:1
3:1
15
15
Page 36
S EQUENCING
Page 36
Sequencing
Overview
Prior to sequencing, the bound template-polymerase complex must be
transferred into the 96-well sample plate at the correct concentration
and volume to support the desired number of SMRT Cells. This section
provides background information necessary for preparing the bound
complex for sequencing.
Diffusion vs. MagBead Loading
Note that there are two loading options for bound complexes. For loading using the MagBead Station, you must bind the complex to MagBeads using the PacBio MagBead Kit.
For more specific information on preparing your library using the MagBead station, see Pacific Biosciences Procedure & Checklist - Low
Input 10 kb Library Preparation and Sequencing (MagBead Station).
The Procedure can be found on our Customer Portal or our website at
www.smrtcommunity.com/SampleNet.
MagBead Loading
Following the polymerase binding reaction, the MagBead Kit is used to
bind the library complex with MagBeads before sequencing. MagBead
bound complexes provide for more reads per SMRT Cell due to:
• Reduced adapter dimers,
• Short insert contaminants,
• Free polymerase.
The Calculator provides recommended sample concentrations for
large scale and small scale binding reactions; however, it is recommended that a loading titration be run to optimize the yield per SMRT
Cell for a given sample (described in the next section).
The MagBead Wash Buffer and MagBead Binding Buffer that are used
for this step are included in the MagBead kit. The bound samples are
placed in the sample plate, which is then placed on the instrument for
sequencing. Note that the samples are stable for one day but it is recommended that they be loaded as soon as possible after MagBead
binding.
Page 37
Diffusion Loading
Following the binding reaction, the complex must be diluted to achieve
the correct concentration for sequencing. This dilution step allows the
user to:
• Adjust for differences in yield among SMRTbell library preps,
• Use either low or high concentration binding reactions (or both),
• Run an optional loading titration to optimize the yield per SMRT
Cell for a given sample (described in the next section).
The Complex Dilution Buffer 2.0 and DTT that are used for this dilution
step are included in the DNA/Polymerase Binding kit. The dilution calculations are done by the Calculator.
The diluted samples are placed in the sample plate, which is then
placed on the instrument for sequencing. Note that the diluted complexes become slightly less stable at these lower concentrations, and
should be used as soon as possible.
Complex Dilution by the PacBio® System
The PacBio system takes the sample from the sample plate and further dilutes it before placing it on the SMRT Cell for immobilization.
The dilution factor depends upon the insert size: shorter inserts require
lower concentrations on the SMRT Cell to achieve optimal loading,
while larger inserts require a higher concentration. As a result, shorter
inserts have a larger dilution factor while longer inserts have a smaller
dilution factor.
Immobilization
During the immobilization step, the bound polymerase-template complexes diffuse or are loaded by MagBeads into the Zero-Mode Waveguides (“ZMW”) and become immobilized at the bottom of the ZMWs.
Immobilization of complexes into ZMWs occurs via diffusion or MagBead loading and behaves according to Poisson statistics, meaning
that multiple polymerase-template complexes could become immobilized in the same ZMW. Megabases per SMRT Cell will increase with
loading, but accuracy and read length may decrease due to ZMWs
with multiply-loaded polymerase:template complexes. See “Optional
Loading Titration” in the Troubleshooting section for more information.
For diffusion loading, the complex immobilization time on the SMRT
Cell is 30 minutes for all Standard sequencing samples up to 3.0 kb
and 1 hour immobilization for fragments greater than 3.0 kb (5000 bp
and 10000 bp).
Page 38
For MagBead loading, the complex immobilization time on the SMRT
Cell is one hour for all samples greater than 1 kb.
Bound Complex Reuse
The bound complex used for immobilization on one SMRT Cell may be
reused on several subsequent SMRT Cells, allowing for greater data
output for a given amount of input DNA. When Complex Reuse is
selected on the RS Remote, up to two additional SMRT Cells can be
immobilized using the diluted complex from the first SMRT Cell (this is
limited by both evaporation and the volume recovery capabilities of the
instrument).
Complex reuse is available for all Standard sequencing insert sizes. It
is not available for MagBead loading.
Loading Concentration Recommendations
The recommended concentration on the SMRT Cell depends on the
binding concentrations, insert sizes, and immobilization time. Table 2,
in the Binding section, provides recommendations for loading concentrations on the plate for different insert sizes at both Small scale and
Large scale binding conditions.
Complex Volumes for Loading
The liquid volume to load into the 96-well sample plate depends on the
desired number of SMRT Cells, the insert size, and whether or not
Complex Reuse will be used. Note that the sample plate has a maximum fill volume of 80 µL and an instrument pipetting dead volume of 5
µL for diffusion loading and 10 µL for MagBead loading.
When using diffusion loading for a single SMRT Cell, the instrument
pipettes 4 µL of 250 or 500 bp complex or 9 µL of the 1000, 2000,
5000, or 10000 bp complex. If Complex Reuse is selected and two or
three SMRT Cells are requested, the instrument pipettes 4.8 µL of 250
or 500 bp complex and 12 µL of 1000, 2000, 5000, or 10000 bp complex. Complex Reuse requires a slightly larger volume of liquid to compensate for incomplete sample recovery by the instrument, but this
total volume is spread over two or three SMRT Cells.
For example, to run four SMRT Cells of a 10 kb library without Complex Reuse, a minimum of 41 µL of complex (4 x 9 µL sample + 5 µL
dead volume) should be placed in the sample well. To run four SMRT
Cells of 10 kb library with Complex Reuse, a minimum of 26 µL of complex (12 µL for the first three SMRT Cells + 9 µL for fourth SMRT Cell +
5 µL dead volume) should be placed in the sample well. Refer to Table
3 below for recommended complex volumes to load onto the sample
plate.
Page 39
Table 3: Recommended Complex Volumes for Diffusion Loading
on Sample Plates
# of SMRT
Cells per
Sample
Well
250 bp and 500 bp
Libraries
1 kb, 2 kb, 5 kb, 10 kb
Libraries
No
Complex
Reuse
Complex
Reuse
No
Complex
Reuse
Complex
Reuse
1
9 µL
9.0 µL
14 µL
14 µL
2
13 µL
9.8 µL
23 µL
17 µL
3
17 µL
9.8 µL
32 µL
17 µL
4
21 µL
13.8 µL
41 µL
26 µL
5
25 µL
14.6 µL
50 µL
29 µL
6
29 µL
14.6 µL
59 µL
29 µL
7
33 µL
18.6 µL
68 µL
38 µL
8
37 µL
19.4 µL
77 µL
41 µL
9
41 µL
19.4 µL
41 µL
10
45 µL
23.4 µL
50 µL
11
49 µL
24.2 µL
53 µL
12
53 µL
24.2 µL
53 µL
13
57 µL
28.2 µL
62 µL
14
61 µL
29 µL
65 µL
15
65 µL
29 µL
65 µL
16
69 µL
33.0 µL
74 µL
17
73 µL
33.8 µL
74 µL
18
77 µL
33.8 µL
74 µL
19
37.8 µL
20
38.6 µL
21
38.6 µL
22
42.6 µL
Page 40
When using MagBead loading for a single SMRT Cell, the instrument
pipettes 9 µL of the MagBead bound sample. Since a 10 µL dead volume is necessary, the total volume required is 19 µL. Two SMRT Cells
require 9 µL X 2 + 10 µL dead volume = 28 µL. Refer to Table 4 below
for recommended complex volumes to load onto the sample plate.
Table 4: Recommended Complex Volumes for MagBead Loading
on Sample Plates
Prepare Your
Reagent Plates
# of SMRT Cells per Sample Well
Greater than 1 kb Libraries
1
19
2
28
3
37
4
46
5
55
6
64
7
73
8
82
Thaw the following kit components accordingly:
1. OS Enzyme: Remove the OS Enzyme from the reagent package.
Keep at -20 ºC at all times. When ready to use, spin down the tube
for 5 seconds, replace cap with tube septa, and place on the
reagent drawer of the instrument.
2. Reagent plate: The reagent plate can be thawed overnight at 4ºC.
Thaw an additional 15 minutes, at room temperature, before using.
Note the following precautions which may impact reagent
performance:
• Do not thaw in hot water.
• Do not remove plate seal until it is ready to be placed on
instrument.
• Do not keep at room temperature after thawing.
• Do not keep the unsealed plate exposed to air. Place the
septa mat on plate immediately.
3. Place the reagent plate on a VWR Microplate Shaker and shake for
1 minute at 1200 rpm.
4. If undissolved precipitates are present in any of the filled wells, mix
thoroughly by vigorously vortexing until the solution is clear.
5. Spin the plate in a centrifuge briefly at 2000 rpm.
Page 41
6. Peel the foil seal off the plate as shown:
7. Place the supplied Septa mat on the plate.
8. Using a roller, further press down the Septa mat onto the plate.
Prepare Your
Sample Plate
Dilute Your Bound Complex
Load your samples on to a Sample plate.
Place the white Septa mat on the plate and press down with a roller to
a ensure a tight fit:
– Spin your sample plate down for 30 seconds at 2000rpm
– Place on the instrument
Load Your
Reagent, Mixing
and Sample Plates
At the instrument, open the Reagents/Samples drawer. You can either
press the illuminated Open button on the instrument Reagents/Samples drawer or the Open button on the touchscreen User Interface.
Load your Reagents on to the Instrument:
1. When the drawer opens, lift up the metal door covering the
Reagents slots.
Lift
Lift here
2. Place your reagent plate in the Reagent slot. Note that there are 2
slots, if you have only one plate, you can place it in either slot. The
Barcode Scanner will locate the plate.
Page 42
3. Remove the OS Enzyme from the refrigerator or ice.
4. Replace the cap with a tube septa. Be careful not to remove the
barcode collar, the Machine Vision System will read the barcode.
5. Place the tube in the left slot encircled by your reagent plate
location.
6. Remove the blue cap from the SMRT Cell Oil tube.
7. Replace the cap with a tube septa. Place the SMRT Cell Oil tube in
the right hand reagent slot. Note that the SMRT Cell Oil tube is
slightly larger and will fit only in that slot.
OS Enzyme tube
location
SMRT Cell Oil tube
location
8. Gently close the metal door.
Page 43
Load your samples and mixing plate on to the Instrument:
9. Lift up the metal door covering the Sample and Mixing slots.
Lift here
10. Place your sample plate in the slot labelled Sample.
Page 44
11. Place a 384-well mixing plate (Eppendorf LoBind Deepwell plates)
in the slot labeled Mixing.
12. Gently close the metal door.
13. Press the Close button on the touchscreen User Interface
(optionally, press the Close button on the instrument).
Load the SMRT®
Cells and Tips
Open the SMRT Cells/Tips drawer. You can either press the illuminated Open button on the instrument SMRT Cells/Tips drawer or the
Open button on the touchscreen User Interface.
Load your SMRT Cells/Tips on to the Instrument:
1. When the drawer opens, place the appropriate number of SMRT
Cell 8Pacs (determined previously during project planning) into the
SMRT Cells tray.
Place this end in first
Page 45
2. Place tip boxes in the slots. Note that, at a minimum, there should
be a tip box in slot 1 and slot 6. Be sure to remove the lid and tape
from the tip boxes.
3. Gently close the drawer door.
4. Press the Close button on the touchscreen User Interface
(optionally, press the Close button on the instrument).
WARNING! Pinch Point. Do not place fingers inside drawers as they are
closing.
Start Your Run
Before starting your run, press Scan (on the RS touch screen) in order
for the instrument to scan the contents of the drawers. Once the contents have been scanned, the Start button will be activated. After
Page 46
pressing Start, the UI will prompt you to verify that certain steps have
been performed prior to sequencing:
– Waste has been emptied. Verify that the Waste bin is less than
half full.
– Nitrogen supply is within range. Locate your facility's N2 tank
supply gauge and verify that the supply is > 80 psi (preferably >
100 ~ 120 psi).
Note that you must have designed your run prior to running the instrument. Refer to the RS Remote online help systems for more information.
Page 47
T ROUBLESHOOTING
Troubleshooting
Low Library Yields
When Adapter Dimers May Be Cause of Low Yield
If you suspect that the low yield is due to adapter dimers, then you can
try re-purifying the library:
– Increase the current annealed template volume to 50 µL using
1X Primer Buffer (dilute the Primer Buffer 1:10 in water).
– Then perform an additional AMPure® PB bead purification step
using (e.g., for a 10 kb library use 0.45X AMPure PB beads).
However, do not shake in a VWR vortex mixer at 2000 rpm
(room temperature) for more than 10 minutes as adapter-dimers
may bind to the beads.
– After the ethanol wash, resuspend the beads in 1X Primer Buffer.
– Calculate the appropriate volume of Elution Buffer and elute the
DNA off the beads.
– Perform an OD260/280 calculation to recalculate molarity before
setting up the Annealing and Binding reaction. Then repeat the
Primer Annealing steps using the Sample Preparation Calculator
(see the Anneal and Binding sections of this Guide).
When DNA Quality is Suspected to be Sub-Optimal
– Ensure that the concentration of AMPure PB beads is
appropriate for the size of the library being prepared. For
example, 250 bp libraries should be purified with 1.8X volume of
AMPure PB beads; if less than this amount is used then library
yield will suffer.
– The ends of the DNA insert fragments should not be labeled in
order to allow the hairpin adapter -insert DNA ligation reactions
to proceed. For instance, 5’FAM labeled PCR products can not
be used as the input DNA for making SMRTbell templates. A
failure at the ligation step will lead to little or no library after the
exonuclease treatment, as partially ligated products are
degraded.
– The PacBio DNA Template Prep Kit should be properly handled
with all reagents and enzymes stored at -20°C. The Template
Prep Kit uses a number of different enzymes and improper
storage of these enzymes can lead to reductions in their catalytic
efficiency and drops in either library recovery or eventual
sequencing yield. For example, using inactive ligase will
compromise the ligation step and lead to little or no library
recovery.
Page 48
– Use the New England BioLabs® PreCR® Repair Mix prior to
starting the End-Repair reaction (see UB - Sequential Reaction
DNA Damage Repair for the procedure and materials needed).
When the Sheared Library is the Wrong Size
– Make sure to optimize shearing conditions. While this guide
makes certain recommendations about shearing conditions, it is
also important to verify conditions effective for shearing your
particular DNA sample on your shearing device.
– Verify that the input DNA used for shearing is high molecular
weight DNA at the appropriate concentration for your shearing
device. If the input DNA is damaged, this can lead to smaller
insert sizes and difficulty in generating large insert size libraries,
which can be especially problematic for strobe sequencing
projects. Additionally, the concentration of the input DNA can
also alter the shear-size.
When Library Yield is High but Sequencing Yield from the Library
is Still Low
– Properly quantify SMRTbell libraries before annealing
sequencing primer. Run a Bioanalyzer gel (from Agilent)
following manufacturer’s loading recommendations. Sheared
libraries are comprised of a distribution of fragment sizes around
a targeted size, and molarities are best approximated using the
Bioanalyzer software.
– Check the level of adapter dimer contamination in the SMRT
Portal secondary analysis report under Diagnostic. Because of
an intrinsic loading bias that favors the immobilization of smaller
DNA template sizes in the SMRT Cells, the amount of hairpin
dimers in your sample should be kept as low as possible (ideally
< 1%; adapter dimer levels approaching 2% or higher will
significantly decrease sequencing yields). We strongly
encourage performing at least a double-AMPure PB bead
purification step prior to performing the primer-template
annealing reactions (when automating the library preparation
procedure using a robotic platform, a triple purification process
may be necessary).
Page 49
– Check activity of exonucleases; if exonuclease digestion is
incomplete, library yields may be inflated due to the presence of
partial ligation products and the persistence of damaged
SMRTbell templates, neither of which will sequence efficiently
leading to decreases in sequencing metrics (e.g., decreases in
read length, accuracy, and yield).
Optional Loading
Titration
Overview
The optimal on-SMRT Cell loading concentration may vary by sample.
Slight variations are cumulative in large projects spanning tens or hundreds of SMRT Cells, and a pilot experiment with a loading titration is
recommended to maximize coverage and overall yields. The data that
is generated in the pilot run can be included in any downstream analyses along with larger optimized data sets.
The Calculator facilitates setting up the complex dilutions on the sample plate to titrate on-SMRT Cell template concentrations. The calculator will generate four dilutions around the recommended concentration.
The user can make these dilutions from the same bound complex and
run the four samples in a pilot loading titration run.
After the run has completed and the data processed, the output of secondary analysis can be used to select the optimal on-SMRT Cell concentration for running a larger batch of SMRT Cells. We recommend
using the on-SMRT Cell concentration that yields the most data output
at an acceptable accuracy. An underloaded SMRT Cell will generate
less data. An overloaded SMRT cell may have slightly lower raw accuracy due to multiple polymerase-template complexes in the same
ZMW (see accompanying graphs).
Figure 1
Page 50
Figure 1. Yield (Mapped Reads) vs On-SMRT Cell Loading Concentration
Page 51
Figure 2. Yield (Mapped Reads) vs On-SMRT Cell Loading Concentration
Figures 1 and 2: Yield and Accuracy vs. on-SMRT Cell Loading Concentration. Sample1: 200 bp PhiX174 amplicon, small scale prep;
Sample2: E. coli 2 kb library, small-scale prep; Sample3: E .coli 10 kb
library, large scale prep. Figure 1 shows Yield in number of mapped
reads vs. on-SMRT Cell loading concentration. Figure 2 shows Raw
accuracy vs. on-SMRT Cell loading concentration. These results are
for demonstration purposes only – actual results may vary.
Page 52
A PPENDIX
DNA Control Complex Sequence (250 bp to < 3 kb)
TCCTCCTCCTCCGTTGTTGTTGTTGAGAGAGAGAAGgctgggcaggctatgcaccctggtccaggtcaaaagctgcggaa
cccgctagcggccatcttggccactaggggtcccgcagattcatattgtcgtctagcatgcacaatgctgcaaacccagcttgcaatgcccacagca
agcggccaatctttacgccacgttgaattgtttattacctgtgactggctatggcttgcaacgccactcgtaaaactagtactttgcggttaggggaagta
gacaaacccattactccacttcccggaagttcaactcattccaacacgaaataaaagtaaactcaacaccccaagcaggctatgtgggggggtga
taggggtggattctatttcctatcccatcccctaggatctcaattaagttactagcgagttaaatgtctgtagcgatcccgtcagtcctatcgcgcgcatca
agacctggttggttgagcgtgcagtagatcatcgataagctgcgagttaggtcatcccagaccgcatctggcgccaaacgttcagtggtagctaagg
cgtcaccttcgactgtctaaaggcaatatgtcgtccttagctccaagtccctagcaagcgtgtCGGGTCTCTCTCTTTTCCTCCTCCT
CCGTTGTTGTTGTTGAGAGAGACCCGacacgcttgctagggacttggagctaaggacgacatattgcctttagacagtcgaaggt
gacgccttagctaccactgaacgtttaggcgccagatgcggtctgggatgacctaactcgcagcttatcgatgatctactgcacgctcaaccaacca
ggtcttgatgcgcgcgataggactgacgggatcgctacagacatttaactcgctagtaacttaattgagatcctaggggatgggataggaaatagaa
tccacccctatcacccccccacatagcctgcttggggtgttgagtttacttttatttcgtgttggaatgagttgaacttccgggaagtggagtaatgggtttgt
ctacttcccctaaccgcaaagtactagttttacgagtggcgttgcaagccatagccagtcacaggtaataaacaattcaacgtggcgtaaagattggc
cgcttgctgtgggcattgcaagctgggtttgcagcattgtgcatgctagacgacaatatgaatctgcgggacccctagtggccaagatggccgctagc
gggttccgcagcttttgacctggaccagggtgcatagcctgcccagcCTTCTCTCTCTCTTT
Insert sequence (lowercase, no color)
Hairpin stem sequence
Hairpin loop sequence (primer binding site in bold/underline)
Site of first incorporation
DNA Control Complex Sequence (3 kb to 10 kb)
TCCTCCTCCTCCGTTGTTGTTGTTGAGAGAGATatcccgcaagaggcccggcagtaccggcataaccaagcc
tatgcctacagcatccagggtgacggtgccgaggatgacgatgagcgcattgttagatttcatacacggtgcctgactgcgttagcaatt
taactgtgataaactaccgcattaaagcttatcgatgataagctgtcaaacatgagaattcttgaagacgaaagggcctcgtgatacgc
ctatttttataggttaatgtcatgataataatggtttcttagacgtcaggtggcacttttcggggaaatgtgcgcggaacccctatttgtttattttt
ctaaatacattcaaatatgtatccgctcatgagacaataaccctgataaatgcttcaataatattgaaaaaggaagagtatgagtattca
acatttccgtgtcgcccttattcccttttttgcggcattttgccttcctgtttttgctcacccagaaacgctggtgaaagtaaaagatgctgaag
atcagttgggtgcacgagtgggttacatcgaactggatctcaacagcggtaagatccttgagagttttcgccccgaagaacgttttccaa
tgatgagcacttttaaagttctgctatgtggcgcggtattatcccgtgttgacgccgggcaagagcaactcggtcgccgcatacactattc
tcagaatgacttggttgagtactcaccagtcacagaaaagcatcttacggatggcatgacagtaagagaattatgcagtgctgccata
accatgagtgataacactgcggccaacttacttctgacaacgatcggaggaccgaaggagctaaccgcttttttgcacaacatgggg
gatcatgtaactcgccttgatcgttgggaaccggagctgaatgaagccataccaaacgacgagcgtgacaccacgatgcctgcagc
aatggcaacaacgttgcgcaaactattaactggcgaactacttactctagcttcccggcaacaattaatagactggatggaggcggat
aaagttgcaggaccacttctgcgctcggcccttccggctggctggtttattgctgataaatctggagccggtgagcgtgggtctcgcggt
atcattgcagcactggggccagatggtaagccctcccgtatcgtagttatctacacgacggggagtcaggcaactatggatgaacga
aatagacagatcgctgagataggtgcctcactgattaagcattggtaactgtcagaccaagtttactcatatatactttagattgatttaaa
acttcatttttaatttaaaaggatctaggtgaagatcctttttgataatctcatgaccaaaatcccttaacgtgagttttcgttccactgagcgtc
agaccccgtagaaaagatcaaaggatcttcttgagatcctttttttctgcgcgtaatctgctgcttgcaaacaaaaaaaccaccgctacc
agcggtggtttgtttgccggatcaagagctaccaactctttttccgaaggtaactggcttcagcagagcgcagataccaaatactgtcctt
ctagtgtagccgtagttaggccaccacttcaagaactctgtagcaccgcctacatacctcgctctgctaatcctgttaccagtggctgctg
ccagtggcgataagtcgtgtcttaccgggttggactcaagacgatagttaccggataaggcgcagcggtcgggctgaacggggggtt
cgtgcacacagcccagcttggagcgaacgacctacaccgaactgagatacctacagcgtgagctatgagaaagcgccacgcttcc
cgaagggagaaaggcggacaggtatccggtaagcggcagggtcggaacaggagagcgcacgagggagcttccagggggaaa
cgcctggtatctttatagtcctgtcgggtttcgccacctctgacttgagcgtcgatttttgtgatgctcgtcaggggggcggagcctatggaa
aaacgccagcaacgcggcctttttacggttcctggccttttgctggccttttgctcacatgttctttcctgcgttatcccctgattctgtggataa
ccgtattaccgcctttgagtgagctgataccgctcgccgcagccgaacgaccgagcgcagcgagtcagtgagcgaggaagcggaa
Page 53
gagcgcctgatgcggtattttctccttacgcatctgtgcggtatttcacaccgcatatggtgcactctcagtacaatctgctctgatgccgca
tagttaagccagtatacactccgctatcgctacgtgactgggtcatggctgcgccccgacacccgccaacacccgctgacgcgccctg
acgggcttgtctgctcccggcatccgcttacagacaagctgtgaccgtctccgggagctgcatgtgtcagaggttttcaccgtcatcacc
gaaacgcgcgaggcagctgcggtaaagctcatcagcgtggtcgtgaagcgattcacagatgtctgcctgttcatccgcgtccagctcg
ttgagtttctccagaagcgttaatgtctggcttctgataaagcgggccatgttaagggcggttttttcctgtttggtcactgatgcctccgtgta
agggggatttctgttcatgggggtaatgataccgatgaaacgagagaggatgctcacgatacgggttactgatgatgaacatgcccgg
ttactggaacgttgtgagggtaaacaactggcggtatggatgcggcgggaccagagaaaaatcactcagggtcaatgccagcgctt
cgttaatacagatgtaggtgttccacagggtagccagcagcatcctgcgatgcagatccggaacataatggtgcagggcgctgacttc
cgcgtttccagactttacgaaacacggaaaccgaagaccattcatgttgttgctcaggtcgcagacgttttgcagcagcagtcgcttcac
gttcgctcgcgtatcggtgattcattctgctaaccagtaaggcaaccccgccagcctagccgggtcctcaacgacaggagcacgatca
tgcgcacccgtggccaggacccaacgctgcccgagatgcgccgcgtgcggctgctggagatggcggacgcgatggatatgttctgc
caagggttggtttgcgcattcacagttctccgcaagaattgattggctccaattcttggagtggtgaatccgttagcgaggtgccgccggc
ttccattcaggtcgaggtggcccggctccatgcaccgcgacgcaacgcggggaggcagacaaggtatagggcggcgcctacaatc
catgccaacccgttccatgtgctcgccgaggcggcataaatcgccgtgacgatcagcggtccagtgatcgaagttaggctggtaaga
gccgcgagcgatccttgaagctgtccctgatggtcgtcatctacctgcctggacagcatggcctgcaacgcgggcatcccgatgccgc
cggaagcgagaagaatcataatggggaaggccatccagcctcgcgtcgcgaacgccagcaagacgtagcccagcgcgtcggcc
gccatgccggcgataatggcctgcttctcgccgaaacgtttggtggcgggaccagtgacgaaggcttgagcgagggcgtgcaagatt
ccgaataccgcaagcgacaggccgatcatcgtcgcgctccagcgaaagcggtcctcgccgaaaatgacccagagcgctgccggc
acctgtcctacgagttgcatgataaagaagacagtcataagtgcggcgacgatagtcatgccccgcgcccaccggaaggagctgac
tgggttgaaggctctcaagggcatcggtcgacgctctcccttatgcgactcctgcattaggaagcagcccagtagtaggttgaggccgt
tgagcaccgccgccgcaaggaatggtgcatgcaaggagatggcgcccaacagtcccccggccacggggcctgccaccataccc
acgccgaaacaagcgctcatgagcccgaagtggcgagcccgatcttccccatcggtgatgtcggcgatataggcgccagcaaccg
cacctgtggcgccggtgatgccggccacgatgcgtccggcgtagaggatccacaggacgggtgtggtcgccatgatcgcgtagtcg
atagtggctccaagtagcgaagcgagcaggactgggcggcggccaaagcggtcggacagtgctccgagaacgggtgcgcatag
aaattgcatcaacgcatatagcgctagcagcacgccatagtgactggcgatgctgtcggaatggacgatATCTCTCTCTTTT
CCTCCTCCTCCGTTGTTGTTGTTGAGAGAGATatcgtccattccgacagcatcgccagtcactatggcgtgctgct
agcgctatatgcgttgatgcaatttctatgcgcacccgttctcggagcactgtccgaccgctttggccgccgcccagtcctgctcgcttcg
ctacttggagccactatcgactacgcgatcatggcgaccacacccgtcctgtggatcctctacgccggacgcatcgtggccggcatca
ccggcgccacaggtgcggttgctggcgcctatatcgccgacatcaccgatggggaagatcgggctcgccacttcgggctcatgagc
gcttgtttcggcgtgggtatggtggcaggccccgtggccgggggactgttgggcgccatctccttgcatgcaccattccttgcggcggcg
gtgctcaacggcctcaacctactactgggctgcttcctaatgcaggagtcgcataagggagagcgtcgaccgatgcccttgagagcct
tcaacccagtcagctccttccggtgggcgcggggcatgactatcgtcgccgcacttatgactgtcttctttatcatgcaactcgtaggaca
ggtgccggcagcgctctgggtcattttcggcgaggaccgctttcgctggagcgcgacgatgatcggcctgtcgcttgcggtattcggaat
cttgcacgccctcgctcaagccttcgtcactggtcccgccaccaaacgtttcggcgagaagcaggccattatcgccggcatggcggcc
gacgcgctgggctacgtcttgctggcgttcgcgacgcgaggctggatggccttccccattatgattcttctcgcttccggcggcatcggg
atgcccgcgttgcaggccatgctgtccaggcaggtagatgacgaccatcagggacagcttcaaggatcgctcgcggctcttaccagc
ctaacttcgatcactggaccgctgatcgtcacggcgatttatgccgcctcggcgagcacatggaacgggttggcatggattgtaggcgc
cgccctataccttgtctgcctccccgcgttgcgtcgcggtgcatggagccgggccacctcgacctgaatggaagccggcggcacctcg
ctaacggattcaccactccaagaattggagccaatcaattcttgcggagaactgtgaatgcgcaaaccaacccttggcagaacatatc
catcgcgtccgccatctccagcagccgcacgcggcgcatctcgggcagcgttgggtcctggccacgggtgcgcatgatcgtgctcct
gtcgttgaggacccggctaggctggcggggttgccttactggttagcagaatgaatcaccgatacgcgagcgaacgtgaagcgactg
ctgctgcaaaacgtctgcgacctgagcaacaacatgaatggtcttcggtttccgtgtttcgtaaagtctggaaacgcggaagtcagcgc
cctgcaccattatgttccggatctgcatcgcaggatgctgctggctaccctgtggaacacctacatctgtattaacgaagcgctggcattg
accctgagtgatttttctctggtcccgccgcatccataccgccagttgtttaccctcacaacgttccagtaaccgggcatgttcatcatcagt
aacccgtatcgtgagcatcctctctcgtttcatcggtatcattacccccatgaacagaaatcccccttacacggaggcatcagtgaccaa
acaggaaaaaaccgcccttaacatggcccgctttatcagaagccagacattaacgcttctggagaaactcaacgagctggacgcgg
atgaacaggcagacatctgtgaatcgcttcacgaccacgctgatgagctttaccgcagctgcctcgcgcgtttcggtgatgacggtgaa
aacctctgacacatgcagctcccggagacggtcacagcttgtctgtaagcggatgccgggagcagacaagcccgtcagggcgcgt
cagcgggtgttggcgggtgtcggggcgcagccatgacccagtcacgtagcgatagcggagtgtatactggcttaactatgcggcatc
agagcagattgtactgagagtgcaccatatgcggtgtgaaataccgcacagatgcgtaaggagaaaataccgcatcaggcgctcttc
Page 54
cgcttcctcgctcactgactcgctgcgctcggtcgttcggctgcggcgagcggtatcagctcactcaaaggcggtaatacggttatccac
agaatcaggggataacgcaggaaagaacatgtgagcaaaaggccagcaaaaggccaggaaccgtaaaaaggccgcgttgctg
gcgtttttccataggctccgcccccctgacgagcatcacaaaaatcgacgctcaagtcagaggtggcgaaacccgacaggactata
aagataccaggcgtttccccctggaagctccctcgtgcgctctcctgttccgaccctgccgcttaccggatacctgtccgcctttctcccttc
gggaagcgtggcgctttctcatagctcacgctgtaggtatctcagttcggtgtaggtcgttcgctccaagctgggctgtgtgcacgaaccc
cccgttcagcccgaccgctgcgccttatccggtaactatcgtcttgagtccaacccggtaagacacgacttatcgccactggcagcag
ccactggtaacaggattagcagagcgaggtatgtaggcggtgctacagagttcttgaagtggtggcctaactacggctacactagaa
ggacagtatttggtatctgcgctctgctgaagccagttaccttcggaaaaagagttggtagctcttgatccggcaaacaaaccaccgct
ggtagcggtggtttttttgtttgcaagcagcagattacgcgcagaaaaaaaggatctcaagaagatcctttgatcttttctacggggtctga
cgctcagtggaacgaaaactcacgttaagggattttggtcatgagattatcaaaaaggatcttcacctagatccttttaaattaaaaatga
agttttaaatcaatctaaagtatatatgagtaaacttggtctgacagttaccaatgcttaatcagtgaggcacctatctcagcgatctgtcta
tttcgttcatccatagttgcctgactccccgtcgtgtagataactacgatacgggagggcttaccatctggccccagtgctgcaatgatac
cgcgagacccacgctcaccggctccagatttatcagcaataaaccagccagccggaagggccgagcgcagaagtggtcctgcaa
ctttatccgcctccatccagtctattaattgttgccgggaagctagagtaagtagttcgccagttaatagtttgcgcaacgttgttgccattgc
tgcaggcatcgtggtgtcacgctcgtcgtttggtatggcttcattcagctccggttcccaacgatcaaggcgagttacatgatcccccatgt
tgtgcaaaaaagcggttagctccttcggtcctccgatcgttgtcagaagtaagttggccgcagtgttatcactcatggttatggcagcact
gcataattctcttactgtcatgccatccgtaagatgcttttctgtgactggtgagtactcaaccaagtcattctgagaatagtgtatgcggcg
accgagttgctcttgcccggcgtcaacacgggataataccgcgccacatagcagaactttaaaagtgctcatcattggaaaacgttctt
cggggcgaaaactctcaaggatcttaccgctgttgagatccagttcgatgtaacccactcgtgcacccaactgatcttcagcatcttttac
tttcaccagcgtttctgggtgagcaaaaacaggaaggcaaaatgccgcaaaaaagggaataagggcgacacggaaatgttgaata
ctcatactcttcctttttcaatattattgaagcatttatcagggttattgtctcatgagcggatacatatttgaatgtatttagaaaaataaacaa
ataggggttccgcgcacatttccccgaaaagtgccacctgacgtctaagaaaccattattatcatgacattaacctataaaaataggcg
tatcacgaggccctttcgtcttcaagaattctcatgtttgacagcttatcatcgataagctttaatgcggtagtttatcacagttaaattgctaa
cgcagtcaggcaccgtgtatgaaatctaacaatgcgctcatcgtcatcctcggcaccgtcaccctggatgctgtaggcataggcttggtt
atgccggtactgccgggcctcttgcgggatATCTCTCTCTTT
Insert sequence (lowercase, no color)
Hairpin stem sequence
Hairpin loop sequence (primer binding site in bold/underline)
Site of first incorporation
06122013
Page 55