1
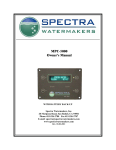
LIMITED WARRANTY
3-YEAR LIMITED WARRANTY ON NEW INSTRUMENTS:
Instrumentation
purchased new from Welch Allyn, Inc. (Welch Allyn) is warranted to be free from original
defects in material and workmanship under normal use and service for a period of three years
from the date of first shipment from Welch Allyn. This warranty shall be fulfilled by Welch
Allyn or its authorized representative repairing or replacing at Welch Allyn's discretion, any
such defect, free of charge for parts and labor.
SureTemp Thermometer
Welch Allyn should be notified via telephone of any defective product and the item should
be immediately returned, securely packaged and postage prepaid to Welch Allyn. Loss or
damage in shipment shall be at purchaser's risk.
Model 678
Welch Allyn will not be responsible for loss associated with the use of any Welch Allyn
product that (1) has had the serial number defaced, (2) has been repaired by anyone other than
an authorized Welch Allyn Service Representative, (3) has been altered, or (4) has been used
in a manner other than in accordance with instructions.
1-YEAR LIMITED WARRANTY ON PROBES AND PROBE COVERS:
Welch Allyn warrants probe covers and probes to meet Welch Allyn’s specifications for the
Product at the time of purchase and to be free from original defects in material and
workmanship under normal use and service for a period equal to 1 year from the date of first
shipment of such Product to the customer by or on behalf of Distributor.
THIS WARRANTY IS EXCLUSIVE AND IN LIEU OF ANY IMPLIED WARRANTY OF
MERCHANTABILITY, FITNESS FOR PARTICULAR PURPOSE, OR OTHER WARRANTY OF QUALITY, WHETHER EXPRESSED OR IMPLIED. WELCH ALLYN
WILL NOT BE LIABLE FOR ANY INCIDENTAL OR CONSEQUENTIAL DAMAGES.
Operating
Instruction
Manual
(800) 854-2904 • (858) 621-6600 • FAX (858) 621-6610
Welch Allyn, Inc. San Diego, CA 92121
0050
70873-0000D
SPECIFICATIONS
• Patient Temperature Range: 84.0°F - 108.0°F (28.9°C - 42.2°C).
• Calibration Accuracy: +0.2°F (+0.1°C).
• Dimensions (approximate): 2.25 in x 3 in x 7 in (5.72cm x 7.62cm x 17.78cm);
weight 10.5 oz (300 gr).
CUSTOMER SERVICE
Thank you for purchasing the Welch Allyn Model 678 SureTemp®
thermometer. The operating and maintenance instructions found in this
manual should be followed to ensure years of accurate and reliable service.
Please read these instructions thoroughly before using your 678 SureTemp®
thermometer.
For customer service, technical or clinical support, please contact Welch Allyn
at (800) 854-2904 from 7:00 AM to 5:00 PM Pacific Time.
Technical service manuals may be ordered by contacting Welch Allyn
Customer Service at (800) 854-2904.
The CE mark on this product indicates it has been tested to and conforms with the provisions
noted within the 93/42/EEC Medical Device Directive.
European Regulatory Manager, Medical Division
Welch Allyn Ltd., Navan, Co. Meath
Republic of Ireland
© 1997 by Welch Allyn, Inc. All rights reserved. No part of this manual may be reproduced or transmitted in any form
or by any means, electronic or mechanical, including photocopy, without prior consent in writing from Welch Allyn.
Printed in the U.S.A.
U.S. patent 5,632,555.
Additional U.S. and foreign patents pending.
15
MAINTENANCE
Other than using a new probe cover for each temperature reading, keeping the
instrument clean, and replacing the batteries, there is no requirement for user
maintenance. Refer to the 678 SureTemp Technical Service Manual for detailed
information on security settings, sterilization, and calibration verification.
Battery Replacement
1. With thumb and forefinger, firmly
press-in on indentations located on the
sides of the rear housing. This will
release two snaps.
2. Remove the battery door.
3. Remove batteries by lifting the battery
strap. IMPORTANT: After removing
the old batteries press and hold the
MODE button for 5 seconds before
inserting the new batteries.
4. Replace batteries with 3 AA Alkaline
only. Orient per markings on the inside
of the battery well.
CONTENTS
INTRODUCTION .................................................................. 1
SAFETY & WARNINGS ......................................................... 1
WALL MOUNTING INSTRUCTIONS ....................................... 3
CHANGINGTHE SECURITY SETUP ........................................ 3
ENTERING THE BIOTECH MODE ...................................................... 3
SETTING THE SECURITY FEATURE ................................................. 4
SETUP ............................................................................... 5
CHANGING PROBES ........................................................................ 5
FEATURES .......................................................................... 5
MODE TABLE ..................................................................................... 6
DISPLAY INDICATORS .......................................................... 7
OPERATION ........................................................................ 9
TAKING ORAL TEMPERATURES ...................................................... 9
5. Replace the battery door by inserting two tabs into bottom of thermometer and snapping back into place.
USING THE MONITOR MODE ........................................................ 10
CLEANING & STERILIZATION
TAKING AXILLARY TEMPERATURES (4 yrs - Adult) ..................... 12
The 678 SureTemp housings may be cleaned with a cloth dampened with
alcohol, warm water, or a nonstaining disinfectant such as Sporicidin® Spray
and Towelettes or MetriSpray™. Care should be taken not to scratch the LCD
faceplate. Low temperature Ethylene Oxide (ETO) sterilization of Oral or
Rectal probes is to be used only when absolutely necessary. The procedure for
ETO sterilization is described in the 678 SureTemp Technical Service Manual
and is available from Customer Service.
TAKING AXILLARY TEMPERATURES (Under 4 yrs) ...................... 11
TAKING RECTAL TEMPERATURES ................................................. 13
MAINTENANCE .................................................................. 14
BATTERY REPLACEMENT .............................................................. 14
CLEANING & STERILIZATION .............................................. 14
SPECIFICATIONS ............................................................... 15
CUSTOMER SERVICE ......................................................... 15
LIMITEDWARRANTY ............................................. Back Cover
Sporicidin is a registered trademark of Sporicidin International (800) 424-3733. MetriSpray is a
trademark of Metrex Research Corporation (800) 841-1428.
14
i
TAKING RECTALTEMPERATURES - RED CAPPED PROBE
1. Exchange the oral probe (blue ejection button) for the rectal probe (red
ejection button) by removing the probe from the storage channel, unplugging the probe connector from the thermometer, and repeating steps 1
through 6 in the SETUP section.
2. Attach a probe cover in the same manner as in the oral procedure. Make sure
the rEC is displayed.
3. Separate the buttocks with one hand.
Using the other hand, gently insert the
probe only 1.5 cm (5/8 of an inch) inside
the rectal sphincter (less for infants and
children). The use of lubricant is optional.
WARNING: Incorrect insertion can
cause bowel perforation.
Tilt the probe so the tip is touching tissue. Keep hand separating buttocks
in place. Hold the probe in place during the entire temperature measurement
process.
4. When the final temperature is reached, a
tone will sound and the temperature will
be displayed. Rectal temperature measurements will take about 15 seconds.
5. After the temperature measurement is
complete, remove the probe from the
patient, then eject the probe cover by
firmly pressing the ejection button on the probe. (Figure 1).
6. Insert the probe into the storage channel to clear the display, in preparation
for another temperature.
7. Wash hands (note: washing hands greatly reduces the risk of crosscontamination and NSI).
13
7. Place the arm snugly at the patient’s side. Hold the arm in this position
without movement of the arm or probe during the measurement cycle.
Movement of the arm or probe during this time will activate the probe
position icon and may cause inaccurate readings.
9. An audible tone and display of a
temperature reading indicates the final
temperature has been reached.
10. After the temperature measurement is
complete, remove the probe from the
patient’s axilla, then eject the probe cover
by firmly pressing the ejection button on
the probe (Figure 1).
11. Insert the probe into the storage channel to clear the display, in preparation
for taking another temperature.
TAKING AXILLARY TEMPERATURES - BLUE CAPPED PROBE
(PATIENTS OVER 4 YEARS THROUGH ADULT)
Axillary temperatures for patients 4 years and older should only be taken when
the SureTemp is in the Monitor mode using an oral probe.
1. Withdraw the oral probe from its storage channel and observe a quick
thermometer display test.
2. Attach a probe cover in the manner as described in step 2 of the
OPERATION Section.
3. Place the probe in the axilla and place arm
snugly at the patient’s side to reduce the
cooling effects of evaporation and
convection.
4. After the temperature is displayed, depress
the Mode button for more than 2 seconds.
The “M” icon will appear on the LCD
indicating the unit is in Monitor mode.
Continue taking the temperature reading
for about 5 minutes.
5. After the Monitor mode temperature has
been taken, insert the probe into the
storage channel to clear the display and
reset the thermometer to Normal mode in
preparation for another temperature.
12
INTRODUCTION
The Welch Allyn 678 SureTemp is a portable thermistor thermometer to
be used for measuring patient temperatures ranging from 84°F to 108°F
(28.9°C to 42.2°C). Oral/axillary and rectal probes utilize single-use
disposable probe covers which limit cross-contamination. Oral, axillary
and rectal temperatures can be taken using Normal or Monitor operating
modes. Axillary temperatures taken using the Normal operating mode
will display temperatures in about 10 seconds for patients under 4 years.
Axillary temperatures for patients 4 years through adult are taken using
the Monitor operating mode and will display temperatures in about 5
minutes. In the Normal mode, the thermometer’s microprocessor
“predicts” body temperature in about 4 seconds for oral temperatures
and in about 15 seconds for rectal temperatures. The Monitor mode
continuously displays the temperature of the probe which will reflect the
patient’s actual oral or rectal temperature in about 3 minutes and will
continue for as long as the probe remains in place.
SAFETY&WARNINGS
DO NOT USE IN THE PRESENCE OF FLAMMABLE
ANESTHETICS.
Caution: Federal (USA) law restricts this device to sale by or on the order of
a physician.
In order to obtain accurate and reliable temperature-taking results and ensure
patient safety, it is important that this booklet be read thoroughly prior to using
the instrument. If you have any technical or clinical questions concerning the
thermometer’s use and/or care, please contact our Customer Service Department at (800) 854-2904.
• Single-use disposable probe covers, available from Welch Allyn, will limit
patient cross-contamination. The use of any other probe cover or the
failure to use a probe cover may produce temperature errors and will
invalidate the instrument’s warranty.
• Oral probes (blue ejection button) are to be used for taking oral and
axillary temperatures only. Rectal probes (red ejection button) are to be
used for taking rectal temperatures only. The use of the wrong probe
will produce temperature errors.
• The thermometer case is not waterproof; do not drip fluids onto it.
• Do not use this instrument for any purpose other than that specified in
this booklet. Doing so will invalidate the instrument’s warranty.
1
TAKING AXILLARY TEMPERATURES- BLUE CAPPED PROBE
• Do not use the thermometer if you notice any signs of damage to the
probe or instrument. Contact our Customer Service Department for
immediate assistance.
(PATIENTS UNDER 4YEARS)
• Do not ETO sterilize without using proper procedures described in the
678 SureTemp technical manual.
Axillary temperature in children ages’ birth through three years can be taken
with the SureTemp in the Axillary Mode, with an oral probe.
This unit is equipped with two security alarm systems to reduce theft:
• Anti-Theft Temperature Counter System, and
• Instant Anti-Theft Audio Alarm System
“SEC” is displayed and audio tones are sounded when either alarm system is
triggered. The unit is inoperable during this time. The unit must be
returned to its wall holder to reset either of these security alarm
systems. Refer to the “Changing The Security Setup” section of this
manual to set the security feature.
1. Withdraw the oral probe from its storage channel and observe a quick
thermometer self-test on the display.
2. With OrL probe type
displayed, depress and
hold the Mode button
for two seconds. ALy
will now appear in the
display, indicating that
the thermometer is
ready to take an axillary temperature measurement. Unless the
thermometer is in the
axillary mode, inaccurate axillary temperature readings will result.
Note: The thermometer may be placed in the Axillary mode as the default
mode using the Biotech mode, see the Technical Service Manual for further
details. When the default mode is set to Axillary, you will not need to press
the mode button.
3. Attach a probe cover as described in step 2 of the OPERATION Section.
4. Lift the patient’s arm so that the entire axilla is easily visualized.
5. Place the probe as high as possible in the
axilla. Do not allow the probe tip to come
into contact with the patient until it is
deliberately placed in the measurement
site. Any tissue contact before this time
will activate the probe position icon and
may cause inaccurate temperature
readings.
Figure 1
2
1.
Probe cover box
6.
Probe handle
2.
Display
7.
Probe storage channel
3.
Pulse timer button
8.
Latching probe connector
4.
Mode button
9.
Battery door
5.
Probe cover ejection button
6. Be sure that the probe tip will be completely surrounded by axillary tissue.
Clothing or any other material touching the probe tip may cause inaccurate
readings.
11
3. During the temperature measurement
cycle, “walking” segments will appear on
the display indicating measurement is in
process.
4. When the final temperature has been
reached, a tone will sound and the patient’s
temperature will be displayed.
5. After the temperature measurement is complete, remove the probe from the patient, then eject the probe cover by firmly
pressing the ejection button on the probe. (Figure 1)
6. Insert the probe into the storage channel to clear the display, in preparation
for another temperature.
WALL MOUNTING INSTRUCTIONS
The wall mount bracket should be mounted approximately 48 inches from the
floor. This allows the end user of average height relatively easy access to the
probe and probe covers. It should have at least 12 inches of clearance on the
top of the unit so that the end user can easily remove the thermometer probe and
load a probe cover without hindrance. Clearance of at least 4 inches from the
bottom of the unit and from either side is also advisable to prevent tangling of
the probe cord with other equipment at the bedside.
The wall mount bracket should be mounted in a location so that when a
thermometer is installed, the display can be read from the patient's bedside.
Placement should also ensure that the probe can be readily removed from
the thermometer, a probe cover can be easily installed and the probe can
be returned to its position without stress being placed on either the
instrument, the wall mount or most importantly, the patient.
CHANGING THE SECURITY SETUP
The SureTemp Model 678 is equipped with a security option that is
designed to reduce the possibility of theft.
USINGTHE MONITOR MODE
To change the security options, you must first enter the Biotech mode.
Remove the probe from the storage channel and take a temperature using Oral,
Rectal, or Axillary Mode. After the temperature is displayed, depress the Mode
button for more than 2 seconds. The “M” icon will appear on the LCD
indicating the unit is in Monitor mode. The unit is ready to continuously display
temperatures in Monitor mode. After the Monitor mode temperature has been
taken, replacing the probe in the storage channel clears the display and resets
the thermometer to Normal mode. The unit will automatically enter the Monitor
mode by removing the probe from the probe storage channel and waiting 60
seconds.
Entering the Biotech Mode
NOTE: When using the Monitor mode, allow the temperature readout
to stabilize for 3 minutes for oral and rectal temperatures and 5 minutes
for axillary temperatures.
• Place the unit into the wall holder.
• Press and hold the mode button while
removing the probe from the probe
holder. You are now in the Biotech
Mode.
• Remove the thermometer from the
wall holder.
Note: Replacing the probe into the probe
holder will place the thermometer back
into its normal operating state.
Once in the Biotech Mode, there are
several functions that can be accessed.
These function are described completely in the Model 678 Technical
Manual. The following section describes the security functions only.
10
3
Setting the Security Feature
In the Biotech Mode, you will need to step through the various Biotech
functions until you reach the functions that apply to the security modes.
To step through the Biotech functions, press and hold the Mode button for
approximately 2 seconds until the function number changes and a double
beep is heard. The function number of the currently displayed function is
displayed in the lower right hand corner of the display.
OPERATION
1. Withdraw the probe from the storage channel and observe a thermometer display
test followed by an audible tone and a
display of the probe type OrL = Oral,
ALy=Axillary, or rEC = Rectal.
Once the Biotech function number has been changed, release the Mode
button.
Once the desired function number is reached, press and immediately release
the Mode button to toggle the settings within the function.
The security-related functions are as follows:
• Function 5: Temperature Count Security Feature
The displayed number indicates the
number of temperatures that can be
taken before the unit goes into security
alarm mode and must be returned to the
security wall holder. The counts are 0,
25, 50, 100 and 200 and appear
sequentially. If the count is set to “0”, the
temperature count function is disabled or
turned off and no security alarm will
occur regardless of the number of temperatures taken. This function is
independent of function 6 which is the instant-on security feature.
• Function 6: Instant-On Security Feature
With this function set to ON, the
thermometer immediately goes into
security alarm when removed from the
security wall holder. The options here
are on and off. In the “OFF” setting, the
unit will not alarm when removed from
the wall holder.
2. Load a probe cover onto the probe. Hold
probe handle collar with thumb and forefinger, being careful not to hold or press
the “ejection” button. Press the collar
down firmly to secure the cover.
TAKING ORALTEMPERATURES - BLUE CAPPED PROBE
The ability of the 678 SureTemp to take an accurate oral temperature in about
4 seconds requires correct user technique.
1. With OrL showing on the display, insert the
probe tip gently into the patient’s slightly
opened mouth. Quickly slide the probe
under the tongue on either side of the mouth
to reach the sublingual pocket. Have the
patient close his/her lips around the probe.
SUBLINGUAL POCKETS
98.4
98.2
98.4
98.2
98.0
98.0
97.4 97.2
96.8
98.0
98.2
96.8
2. Hold the probe in place, keeping the tip in
contact with tissue during the entire temperature measurement process. Holding
the probe still will ensure a fast and
accurate measurement.
Once the security functions have been set
to the desired state, replace the probe back into the probe holder to exit the
Biotech mode.
4
9
High Temperature: This icon is displayed if the patient’s temperature
is greater than 108.0°F (42.2°C).
Low Temperature: This icon is displayed if the patient’s temperature
is less than 84.0°F (28.9°C).
High Ambient Temperature: This icon is displayed if the ambient
temperature is greater than 104°F (40°C).
Low Ambient Temperature: This icon is displayed if the ambient
temperature is less than 60.8°F (16.0°C).
Low Battery: This icon flashes when batteries are low and will
remain on when batteries are dead.
Security Mode: Return the thermometer to the wall holder in order
to resume normal operation.
Display Test: All segments of the thermometer display will appear
briefly when the probe is removed from the storage channel to ensure
proper function.
SETUP
1. Install the supplied Oral/Axillary probe or optional Rectal probe by inserting
the latching plug on the end of the coiled cord into the plug receptacle on the
unit. The plug snaps into place and cannot be removed without depressing
the latch. (Figure 1).
Note: The Oral probe is also used to
take Axillary measurements.
2. Observe the LCD to see that the probe
type OrL = Oral, ALy = Axillary, or rEC
= Rectal is displayed.
3. Insert probe shaft completely into probe
storage channel.
4. Remove the probe from the storage
channel.
5. Observe the LCD to see that all display
segments appear followed by the display
of the probe type OrL = Oral , ALy =
Axillary, or rEC = Rectal and temperature scale (°C or °F). Replace probe in
storage channel.
6. Insert a box of disposable probe covers (part number 05031) into the
probe cover storage well.
CHANGING PROBES
• Depress the latch and unplug the probe connector from the thermometer.
• Remove the probe from the storage channel.
• Repeat steps 1 through 6 in the SETUP section.
FEATURES
•
8
Normal Mode: The thermometer takes oral temperatures in about 4
seconds and rectal temperatures in about 15 seconds. Axillary temperatures taken using the Normal operating mode will display temperatures in
about 10 seconds for patients under 4 years. The unit will always operate
in Normal mode unless the Mode button is depressed for more than 2
seconds after the initial temperature is displayed, which changes it to
Monitor Mode. Replacing the probe in the storage channel automatically
resets the unit to Normal mode.
5
•
Monitor Mode: Monitor mode is generally used for long term (continuous)
temperature monitoring, taking adult axillary temperatures, or when difficult situations prevent accurate temperatures from being taken in the
Normal mode.
•
Automatic backlight, for easier reading of temperature display in darkened
rooms.
•
Oral/Axillary Probe with 4’ coiled cord and latching plug to prevent
unintentional plug removal.
•
Optional Rectal Probe with 4’ coiled cord and latching plug.
•
Mode Button: Recalls the last Normal mode temperature taken, converts
temperatures from °F to °C, switches the unit to Monitor Mode and allows
the clinician to change the measurement site from Oral to Axillary (or vice
versa).
•
Pulse Timer Button: Used to time pulse, respiration, IV drip rate or any
other timed measurement. Audible beeps occur at 0, 15, 30, 45 and 60
seconds. It turns off automatically after a full 60 seconds. The timer may
be stopped at any time by pressing the Pulse Timer or Mode button or by
removing the probe from the probe storage channel.
ModeTable
DISPLAYINDICATORS
Instrument Malfunction: This icon is displayed if the unit is not
functioning properly. Contact the Welch Allyn Customer Service
Department.
Broken Probe: If displayed, probe may be damaged. Remove and
reinstall probe. If error persists, then install a new probe.
Probe Position: Probe has broken contact with the tissue. Once proper
contact has been achieved, the icon will be turned off but will reappear
at the end of the temperature measurement. It is recommended that a
new temperature be taken.
or
Axillary Probe: This icon is displayed to show that the axillary
mode has been selected.
or
Oral Probe: This icon is displayed to show that the oral mode has
been selected.
or
Rectal Probe: This icon is displayed to show that the rectal mode
has been selected.
Walking Segments: This will be displayed when the thermometer is
in process of taking a temperature in the Normal mode.
Monitor Mode: Monitor mode is generally used for long term
temperature monitoring, taking axillary temperatures, or when
difficult situations prevent accurate temperatures from being taken
in the Normal mode.
Pulse Timer: This icon is displayed when the pulse timer is in use.
6
7