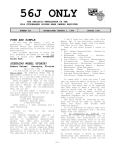
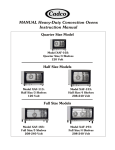
1
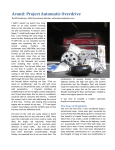
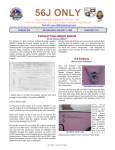
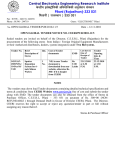
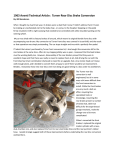
Avanti Repair
Main Wiring Harness Replacement
By: Bill Henderson, AOAI member, [email protected]
It is not a topic you will find covered anywhere in the
lengthy and detailed Avanti service manual. An Internet search
on this subject turns up nearly nothing, and looking at the title of
this article, your passing thought might be, “how hard could this
be? You simply unplug all the old wires and plug the new ones
in!” Except in reality it is not quite that easy. The real challenge
comes from the tight confines in which one must work to make the
replacement; the fact that all old wiring must be removed before
the new wiring will fit; that testing and troubleshooting needs to
be done in close quarters; and the fact that there are some modifications that you will probably need to make along the way to have
everything work like you hoped when all finished.
This under hood rats’ nest shows much evidence of splices and patches gained
over the years. Everything worked, at least most of the time. But just looking at this
mess made me shudder.
The common school of thought is to leave things like this alone
unless they are really broken. But I’ve replaced the wiring harnesses on each of the three antique cars I have restored. It’s not a glamorous job, and when complete it is nearly invisible and thoroughly
unexciting in function. No car owner says, “Oh, come, you must
see how safe and reliable my lights, horn and heater are!” People
simply expect things to work when the knobs are turned, and it
is much, much more fun to spend money on things like chrome
wheels, electronic gadgets or fancy paint. But the real reason that
this topic is not even mentioned in the shop manual is that no one
anticipated that we would still be driving our cars a half-century
after they were built. The main wiring harness was not something
that was ever intended to wear out in the lifetime of the car, and
surely no one ever planned for these cars to be driven fifty or more
years after they were made. But besides the simple passage of
time, the environment in which these wires and connection live
2
AVANTI Magazine
are very harsh… freezing cold, broiling heat, bathed in dirty water,
oils, solvents, acids: these all corrode connections and cause
cracks in once-pliable insulation. Copper wires are bared and
once-tight connections become corroded and loose. Bad connections add resistance to circuits and generate heat; brittle and
cracked insulation on wires and connections is a short circuit and
a fire waiting to happen, and a fire in a fiberglass car is not a pretty
scene to imagine. The first signs of problems may be dim or flickering lights, accessories that work sometimes and not the next,
instruments that can’t be seen at night, turn signals that blink too
slowly or not at all. These are all dangerous and annoying.
Sadly, I have experienced first-hand a serious electrical “incident”
in another one of my collector cars, when an un-fused circuit (yes,
there are several of these in every car, including the Avanti) connection came loose under the carpet; the cracked wire insulation
allowed the copper inside to short to the floorpan, and within
a minute while I waited at a stoplight, the entire wiring harness
quickly melted into a sticky, smoldering burning mass. As the
harness burned, every accessory bypassed its switch and became
energized: the lights, horn, wipers, starter cranking while the
engine ran; heater and radio all blaring away, as bitter, choking
smoke from the burning carpeting and wire insulation billowed
out from under the dash and into my face as I stared with frozen
panic at what was happing at my feet. I shut the ignition key off
but since it was short circuited, the switch was useless and the engine continued to run! The only thing that saved a total catastrophe was my luck of having a pair of large wire cutters in the trunk,
which with quick thinking I used to snip the battery cable to cut
the power to stop the inferno from worsening. Had my wife been
driving the car at the time she would have had no idea what to do,
and the car would have burned to the ground, hopefully only after
she had gotten out of it!
Under the dash, my Avanti’s wiring looked serviceable—at least
in most places, but under the hood it displayed many splices and
disintegrating insulation on connectors. Remembering my brush
with disaster, I decided to replace the harness before lightning
struck me again. I admit I briefly considered splicing the new
harness to the old one, replacing only the under hood wiring so I
would not have to work under the dash, but decided that this was
not a smart shortcut, and decided to do it “right”.
Rewiring a car is one of the few jobs in car repair that you’d almost
never pay a shop to do, unless it was being done as a part of
a complete restoration. While it is not technically difficult and
requires few specialized tools, it involves so much tedious labor
you need to realize in advance that it will take hours and hours to
complete. Sure, if the entire dash was exposed on a workbench,
and one could replace the connections serially one at a time, the
job would consume two hours at most. But with the dash in the
car and working on your back, I promise you the work can easily
consume three or four solid days.
Fall/Winter 2011 Issue 156
Avanti Repair
Let’s get started!
Let’s start with the basics. You will need a specialized Avanti harness. In a fiberglass bodied car, all hot leads must have accompanying ground wires. These many extra grounds are not needed
with wiring for metal cars, so don’t even consider using the less
expensive harness from a Lark and expect it to work!
I ordered my harness from Studebakers West, and they told me
it would take three months to make, though it arrived in just six
weeks. At $445 (in 2010) it was not inexpensive, but it is made to
close specifications with all the proper connectors, lead lengths,
and correct wire colors. As much as I like to do-it-yourself, if available, buying a pre-made harness for one’s car is money well spent.
The Avanti’s main harness as it arrived from Studebakers West. A couple specialty
connectors and grommets are not included and must be reuesed from the old. All
the many white wires are grounds ,needed since this is a fibreglass bodied car.
The Studebaker Avanti has a single main harness that starts at
the front of the car at the headlights and horns, travels all the way
through the engine compartment past the voltage regulator and
starter solenoid, and through the firewall, connecting all the instruments, lights and the devices in the dash and in the console. There
is no “quick disconnect” plug at the firewall like you would expect
to find on a later model car.
Be aware that the standard Avanti replacement main harness from
Studebakers West does not include the following:
•
•
•
•
•
Wiring for anything located in the car behind the console: so,
excluded are wiring to the rear courtesy lights, gas tank sender, tail
lights and backup lights.
The set of wires that travels up and inside the left windshield pillar
to feed the overhead console switches for the lights and heater.
The turn signal wiring harness that feeds inside the steering column.
The optional power windows, which have their own separate harness.
The floor-mounted window washer pedal and pump wiring, if
your car has this option.
Tip: Buy a color wiring diagram. True, there is a black and white
Fall/Winter 2011 Issue 156
wiring diagram for the Avanti included in the service manual,
and one is also available on line on Bob Johnstone’s wonderful
resource site (https://www.studebakerparts.com/studebakerparts/
store/s/html/images/63-4-avanti-wire.jpg) but I strongly suggest
buying a color diagram from a vendor like www.classiccarwiring.
com. Seeing the colors is far easier than trying to read all the tiny
codes and text on the black and white line drawings. Note that
these Avanti diagrams all seem to omit the circuits for power windows, the radio and the windshield washer pump. The power window wiring diagram can be found at: www.studebakerparts.com/
studebakerparts/store/s/html/images/avantiwindowwiring.jpg
Remove the following “in the way” parts before starting: The battery, front seats; steering column (unbolt the rag joint at steering
box and pull the column out through inside of car); unbolt the
master cylinder and brake power booster as a single unit from the
firewall; remove the entire brake/clutch pedal assembly from under the dash, unbolt the parking brake handle from the dash and
position it out of the way.
Now, before you groan in disbelief and skip to the next step hoping you read incorrectly, note that there are surprisingly few bolts
that hold all of these items in place, and compared to other-make
cars I have worked on, it is much easier to disassemble the Studebaker. You must believe me—the time spent to remove these parts
is miniscule compared to the time you will waste trying to work
around them or the damage you may cause to your upholstery,
your knuckles (and your back!) if you try to replace the harness
with them in place.
Carefully document your disassembly: A small digital camera is
your best friend. You can stick it up behind the dash and take
photos of where every wire is connected before you begin pulling
things apart. You will be surprised and delighted to find how valuable one of these photos will be to answer future questions like:
“which lug on the wiper switch does the purple wire attach to?”
Use masking tape and tag old wires as you remove them to be able
to go back and use them for reference. The new wires’ tracer colors
often don’t look exactly like the old ones, and it will not be intuitive where things connect when you are contemplating a large
bundle of fresh wires with unmarked connections!
AVANTI Magazine
3
Avanti Repair
Helpful Tip: Invest in a garage laptop. I have an old laptop computer, totally obsolete for business use and with a bad battery,
but that still works when plugged into the wall. I use in the
garage for the sole purpose of viewing the photos I took at disassembly. My garage laptop is a godsend when trying to remember
where the yellow wire goes, or how an assembly looked before
I took it apart to paint it. Laptops like this are a dime a dozen on
eBay or sites like Craig’s List.
When you have everything disconnected, you will find that the
old harness comes out more easily by threading the wires from
the engine compartment through the firewall and into the car’s
interior. If you prefer, you can cut the harness at the bulkhead for
easier removal, but be very careful not to cut the power window
wiring – or any other later-owner added wires that will not be included in the new harness. Also, I recommend against this because
having the old harness in one piece is helpful as a point of reference if you are trying to trace wires in the new one.
Before you start installing the new harness, lay the old and new
harnesses beside each other on the floor to compare them. You
will notice that your new harness may be missing several of the
special molded connectors, plug interlocks, and molded-on
grommets that are a part of the old one. The special white plastic
shielding connectors at the windshield wiper switch, the shifter
“start in park” interlock wire and backup light connector can be
carefully removed from the old harness and be slipped onto the
new wires. The old ashtray light bulb socket must also be reused.
The rubber grommets that are molded to the old harness where it
passes through holes in the console are not included on my new
harness, and I carefully sliced them off the old harness and taped
them on the new.
If you look closely, you may also see wires that have been spliced
or modified in the original harness over the years, used to power
a modern audio component or for auxiliary gauges that you are
still using. It is best to neatly modify and surgically add these
connections to the new harness here on the workbench before
everything is stuffed back up under the dash. In my car’s case, it
had its tachometer “guts” replaced with modern electronics hidden
discretely behind the old gauge face. I found the wires that fed the
old-style sending unit had been clipped and taped off on the old
harness, and new connections were substituted. Likewise, auxiliary
audio components are installed in my glove box, and spliced connections had been made to attach their power, memory circuits
and light bulbs to the rest of the dash wiring. It is easier to make
these modifications now, than later while lying on your back under
the dash!
Above and below, these “before” shots proved to be incredibly helpful when connecting the new wires. The wiper switch above has five lugs, but the new harness
needs these connectors to be reused; the main fuse panel below has a confusing
number of black wires that all belong to different circuits.
The new wiring harness will feed through the firewall hole from
either side- though it is marginally easier to fit the wires through
the hole from the interior, pushing them through the hole into the
engine compartment.
Now, here indeed begins a process of replacing each wire where
the old one was removed, using your photos, masking tape tags
and wiring diagram for reference. The following are valuable tips,
learned from doing:
•
•
•
4
AVANTI Magazine
Because the Avanti’s body is fiberglass, nearly everything needs
to be individually grounded, and that’s why there are so many
white wires in the Avanti harness. For example, each gauge needs
a ground, as does the windshield wiper switch, and anything with
a light bulb. All grounds must be tight and clean, or hard-to-trace
erratic behavior is the result, especially when the headlights are
on.
Check all the fuse values while the little fuse panel is out of the car
and on the workbench. Heaven knows what handy-but-incorrectvalue fuses previous owners may have put in these spots without
any regard to their rating.
Replace all instrument panel light bulbs while you have everything
Fall/Winter 2011 Issue 156
Avanti Repair
•
•
•
•
•
apart, don’t be cheap and reuse the old ones. It is just not worth
the hassle of going back and changing bulbs in future months
after everything is back together. New red bulbs are available
from Studebaker International, or do as I did and get a small bottle
of special red dye at the hobby store used for making stained
glass, and dye your own bulbs. Don’t try to use regular red spray
paint, it makes the glass dark and your lights dim. Make a few
extras and keep them in a safe place.
Changing the instrument panel light bulbs in the tachometer is
arguably one of the worst parts of the whole job. To do it properly you should really first remove the ignition switch assembly
(easy- hold the bezel in place on the front of the dash with one
hand, while reaching behind the dash to push and turn the switch
assembly, giving it a 1/8th turn counter-clockwise. It should pop
right out) You may then may have to loosen the two nuts on the
tach bracket (in the center; the same threaded shafts used as the
electrical contacts) and twist the whole tachometer assembly 1/8
turn to get at the top bulb.
Replacement harnesses use clip-in, self grounding light bulb sockets for dash and instrument lighting that are often inferior (or at
least different) from the ancient originals. More than occasionally,
I have unsoldered and reused many of the old light sockets from
the original harness because the new ones would not stay tightly
in their dashboard or console holes, therefore making bad ground
connection and causing annoying flickering until I replaced them
with the timeworn originals. Remember, if interior lights flicker
or are unreliable while the car is sitting in your garage, I promise
they will be unreliable in service, and stop working after the third
railroad grade crossing you encounter, well after everything is
all put back together. The Avanti’s center floor console lighting is
especially Rube Goldberg in its wiring design. Consider adding
soldered grounds screwed to a good ground to the two bulbs that
illuminate the lettering on the console heater/vent controls.
Carefully tighten all electrical connections as you go. There is nothing more frustrating than suspecting loose wires after everything
is all buttoned up because something is not working right or fuses
keep blowing.
As you go along and attach the wires you are looking for, you will
come across wires you are not ready to use just yet. If you figure
out what each is for, take a second to add a tag with masking tape
and marker—this saves so much time in the end!
A steel bar runs under the dash from one side of the car to the
other. Known as the “Z Bar”, It is used as a grounding point for several electrical connections. Drill a hole in an inconspicuous place
and add a dedicated grounding lug to the bar. Run a medium-
Fall/Winter 2011 Issue 156
•
heavy 8 or 10 gauge wire from the grounding lug, through the
firewall, to a place on the frame near the battery, just as a safety
backup ground.
When you begin to wire the dash gauges, use a heavy plastic ziptie to hold the thick wire bundle tight to the Z-Bar so the weight of
the thick harness doesn’t rip apart the small connections you are
making. Then, when you are finished making connections, permanently strap the harness neatly and securely to the Z-bar with wire
ties in several places.
Here is the back of the ignition switch-. Notice the live terminals and their close
proximity to the grounded steel z-bar. In last month’s issue we showed you how
to insulate this trouble spot using a simple aeresol can lid.
How to trace wires: One thing you will notice is the overuse of plain
black wires in the Avanti harness. Each carries current, but they are
not all on the same circuit so they are not interchangeable. The
method of tracing these wires from one end of the harness to the
other is a simple trick and requires a multi-tester or an ohm meter,
preferably one that beeps when it registers a “hit”. Here’s how you
do it. Use a clip on the meter’s black test lead to attach to one end
of the mystery wire. With the meter set to “Infinity Ohms” or “Continuity”, use the red lead’s probe to touch the other ends of the
suspect wires. When you have found the right one, the meter will
register continuity, beeping if it is so configured. Use a strip of tape
to mark what both ends of the wire are what they are for (if you
know), and move on.
•
The wiper switch must be grounded for the wipers to work properly, and the factory method of simply using a washer under the
knob to press the assembly against the metal dash trim, is sketchy
at best. I added an additional soldered ground to the switch that I
more securely attached to my new grounding lug that I added to
the Z-bar.
•
If you plan to reuse the door pillar courtesy light switches, take
great care in handling them. It very difficult to remove the old
wires from the switches without damaging them. Use a pair ofneedle nose pliers and apply firm, consistent pressure to the metal
connectors only. Pulling on the brittle bakelite switch bodies will
break them for sure.
For ease in running the new wires into the door jambs from under
the dash, use the old wires to pull the new ones through the holes.
•
AVANTI Magazine
5
Avanti Repair
•
To do this, clip the old wires that feed through the cowl side panels
and tape the new wires to the newly cut ends, then pull the new
wires through the hole as you simultaneously pull out the old
switch and wires.
While you are under the dash, replace all of the firewall passthrough grommets. These plugs help keep heat, odors and noise
out of the cabin, and they are far easier to address now than at any
other time. Some of mine were so brittle that they literally shattered when I tried to remove them.
•
•
and consider adding a fused link between the battery and the
always hot terminal on the starter solenoid for safety.
Cover the back of the ignition switch with a homemade plastic
cap (see our last issue for a “how to”.)
Some early cars with power windows will only allow the windows to be raised with the key in the “on” position, and not in
the “accessory” position. This was changed sometime in mid1963 after it was discovered that owners were burning their ignition points by turning the key to “on” with the car not running
for the purpose of raising the windows. If you have such a car,
(as I do) consider moving the power source for the windows to
the “hot with key” side of the starter solenoid. This will allow the
windows to be raised with the key in the accessory position.
Done- and time to test
•
This is boring, but important: before applying power to the new
harness, ensure that all loose, stripped wires are either connected to their devices, or taped off to avoid a short circuit.
Notice the small , four fuse auxiliary panel installed beside the original, wired directly to the battery. It is wired so that two circuits are switched with the key, two
are always hot. The silver surface is Eastwood ‘s Thermo-coustic heat barrier
Also, while you have everything apart:
•
•
•
•
•
•
•
•
6
Add a little auxiliary fuse panel for stereo, your GPS, power antenna, etc. connected to ignition switch white/black tracer (shown at
far right in photo) I got mine at the NAPA store.
Absolutely use the opportunity to heat insulate the firewall, trans
tunnel with Dynamat Extreme or its equivalent
Consider adding an theft-protection ignition kill switch hidden
under the dash
Consider installing a more modern under-dash, pedal activated
brake light switch (This article is in an earlier issue in Avanti Magazine or at http://www.studebaker-info.org/tech/Bhend/AvantiBSW.
pdf)
Swap in a solid state signal flasher
Consider a change to a solid state voltage regulator
Test your alternator to see if it is putting out enough power: If the
original equipment alternator still in your car, consider it suspect.
Originally rated at 45 amps, mine was barely producing 18 AMPS
and led to a frequent dead battery, that I incorrectly assumed was
happening just because the car wasn’t driven enough. A non-stock
replacement internally-regulated alternator producing 55 amps
served me well; for restoration purists have your old alternator
rebuilt. Whatever you do, don’t throw it away!
Add a electric cut off switch at the battery’s negative terminal,
AVANTI Magazine
The knob on the negative battery terminal is a cuttoff switch that completely
•
•
•
•
Ensure that a bulb is installed in every empty bulb socket! Without bulbs in place, shorts are guaranteed in the empty sockets
as the wires and springs in the sockets shift around.
You will want to test that everything on the instrument panel
works before reinstalling the steering column and pedals.
While you could just reconnect the battery and see what happens, I strongly recommend a specific testing procedure that is
far more sensible in the likely event that you have connected
something improperly. Instead of hooking up the powerful car
battery, use your trickle battery charger set to its lowest setting,
usually 2 amps. Connect its clip-on leads to the battery positive and negative cables, leaving the battery out of the equation. You can now test each of the circuits for proper operation
without frying anything, and have less likelihood of annoyingly
blowing the fuses if there should be a momentary short circuit
someplace while you work.
Start by testing the circuits that are always hot regardless of the
Fall/Winter 2011 Issue 156
Avanti Repair
•
•
•
position of the ignition key. Make a complete list of these devices
and check off each as you have tested it. These include the headlights, taillights, brake lights, horn, courtesy lights, cigarette lighter,
instrument panel lights, glove box light, and clock.
Next, turn the key to the “on” position and test the circuits that
operate only when the car is switched on. These include the radio,
wipers, heater fan, power windows, shift lever indicator light, and
the fuel gauge. Check every light bulb for illumination. Note that
some electric devices that draw a lot of current, like the headlights,
horn and power windows may seem nearly dead, work erratically
or not work at all when connected to the 2 amp battery charger.
Also, sensitive electronics like stereos and amplifiers should not be
run on the two-watt feed as it may damage them. For these you
will need to verify their proper operation only after the car battery
is attached.
Use extra caution testing the wipers if you have disconnected the
motor from the wiper arms at any point in your project. Paint jobs
are easily ruined by wipers that attempt to bury themselves in the
cowl with great force when they are attached misaligned.
Once you are satisfied that everything is operational, you can now
reinstall the pedals and steering column and reconnect the turn
signal wires to test the function of the signal and brake lights.
If everything is good so far, only now reconnect the battery and
try out the power windows, horn and headlights on both high and
low beam settings checking for proper operation. Finally, you are
nearly ready to try the starter to ensure that it cranks when the key
is turned all the way to the “start” position. The operation of the
tachometer and the water temperature gauge can only be tested
with the engine running.
This may seem like a nagging point to add, but before you do try
to crank the engine, STOP here and spend the time to secure all
wires and hoses away from spinning accessories or hot engine
surfaces, and look at every connection for possible short circuit
conditions. Nothing will spoil your pride in a project well done
than suddenly melted wires that had been lying unnoticed against
the exhaust manifold; wires that get caught or wrapped up in the
steering mechanism or ripped out unceremoniously by a spinning
fan pulley. Likewise, the time to find out that your starter cable
is lying against the exhaust manifold is now, and NOT after it has
burned halfway through and the sparks start flying through the
smoke. Have I been affected by any of these problems? Sadly the
answer is yes. In my excited haste to “try things out” in the past I
have melted wires and even fried my speedometer cable against
an exhaust header pipe because I carelessly removed and forgot to
replace a small clip that held these to the steering column mount.
And, yes, even on this job, with all my care- when I first started
the engine I was confused and mystified to see brake fluid oddly
spritzing out of the end of one of the disconnected master cylinder
brake lines, and then when I grasped the brake line to redirect it,
was very surprised to find it burning hot. The brake fluid was unexplainably actually boiling inside the tube and squirting out the
end! Nursing my burned hand, I observed that the brake line was
indeed wedged up against the fender-mounted starter solenoid,
and the line was in direct contact with the un-insulated solenoid
connection end of the thick cable running to the starter. So, every
Fall/Winter 2011 Issue 156
time I cranked the starter, I created a short circuit using the brake
line as my unintended ground, causing it to get hot enough to
instantly boil the brake fluid inside.
Heat shrink tubing is your best friend: I went back and repositioned things, but also took the precaution of slipping a thick piece
of heat shrink tubing over both the exposed metal ends of that
new starter cable to lessen this accident’s likelihood of happening
ever again.
So...something doesn’t work and you are
stumped?
Read this before tearing things apart in search of a broken motor
or burned solenoid. Remember what I said about grounds... and
unless you are highly accustomed to working on fiberglass cars
or boats, chances are good that even after my warnings you will
take your grounds for granted. Now, many devices need to have
their cases grounded to work properly, but after all, in a steel
vehicle, anything screwed to the frame or unibody is automatically
grounded without you even needing to think about it. Not so in
the Avanti.
Case in point: the starter solenoid mounted under the hood on the
fender apron performs the important task of engaging the starter
to the engine when you turn the key in the dash. Without that little
solenoid, you’d need a huge high-amp starter switch on the instrument column with battery-cable thick wires connected to it. (That’s
why old-old fashioned cars had their starter button on the floor!)
The more modern solenoid works by signaling a magnetic switch
relay inside its case to jump closed and make the heavy-duty connection between battery and the starter when you turn the key.
But for that magnet to work, the solenoid itself must be grounded.
Now, in my old Ford, that ground happens simply because the
solenoid is screwed to the metal fender. But in the Avanti, an
individual white ground wire in the harness is reserved for the solenoid, and that wire must connect solidly to the solenoid’s fender
mounting bolt. How long did it take me to realize my problem?
Embarrassingly, over an hour, as I swapped out the new solenoid
for an the old one, then cursed and puzzled why they both would
work with test leads attached on the test bench, but neither would
work when in the car.
So, I am almost too red-faced to admit to you that I then wasted
yet another hour with what turned out to be the same problem
when reconnecting the power windows, and finding them stone
cold dead. I was sure that I had swapped the relay wires backwards
(I hadn’t) and burned it out (I hadn’t). It simply never occurred
to me that I needed to make my own grounding connection for
the power window relay, as there is no ground terminal provided
on this solenoid at all. I must have looked at that wiring diagram
easily ten times before I finally saw that ground connection, diagrammed there plain as day, yet invisible to me having spent my
whole life up until this point working on steel-bodied cars!
*********
Congratulations on doing an important but largely invisible job
that will make your car safer and more reliable for the next fifty
years.
AVANTI Magazine
7
Avanti Repair
8
AVANTI Magazine
Fall/Winter 2011 Issue 156