1
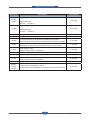
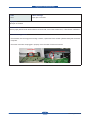
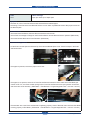
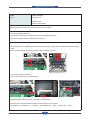
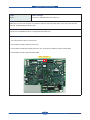
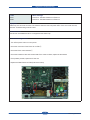
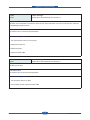
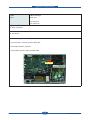
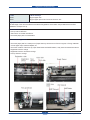
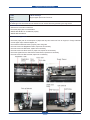
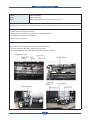
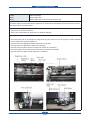
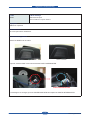
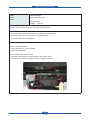
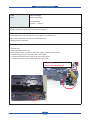
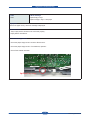
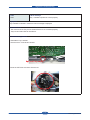
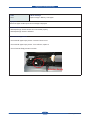
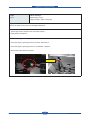
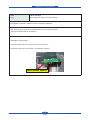
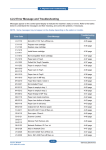
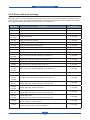
Alignment & Troubleshooting
4.2.2 Error code and message
Messages appear on the Smart Panel program window or on the control panel display to indicate machine
status or errors. Refer to the tables below to better understand the meanings of each message, then follow
the suggested solution provided on the page that you are referred to.
Error Code
Error Message
Troubleshooting
01-000
Door is open or Check Transfer belt
4-31 page
01-004
Paper jam in MP tray
4-32 page
01-005
Paper jam in tray 1
4-33 page
01-006
01-018
Paper jam in tray 2
4-34 page
01-009
Paper jam inside of machine
4-35 page
01-010
Paper jam in exit area
4-36 page
01-015
Paper jam at the top of duplex path
4-37 page
01-016
Paper jam inside of duplex path
01-017
Output bin full. Remove printed paper.
4-38 page
02-000
System error: #02-000. Please turn off then on
4-39 page
02-001
02-006
Fuser error: #02-001/006. Please turn off then on
4-40 page
02-002
System error: #02-002. Please turn off then on
4-41 page
02-005
System error: #02-005. Please turn off then on
4-41 page
03-000
Motor error. Error: #03-000. Turn off then on
4-42 page
03-007
03-008
03-009
Motor error. Error: #03-007/008/009. Turn off then on
4-43 page
03-015
Motor error. Error: #03-015. Turn off then on
4-44 page
04-001
04-002
04-008
LSU error: #04-001/002/008. Please turn off then on.
4-45 page
08-000
08-001
Original paper Jam
Original paper jam inside of scanner. Remove Jam
4-46 page
08-002
08-006
Original paper jam inside of scanner
4-47 page
08-003
08-010
Original paper Jam
Original paper jam inside of scanner. Remove Jam
4-48 page
08-004
08-006
Original paper Jam
Original paper jam inside of scanner. Remove Jam
4-49 page
08-008
Scanner door Open
Door of scanner is open. Close it
4-50 page
11-003
Scanner locked
Scanner locking switch is locked. Release it
4-51 page
Service Manual
-
4-29
Samsung Electronics
Alignment & Troubleshooting
Error Code
Error Message
Troubleshooting
Paper mismatch Tray1/2
12-000
12-001
4-52 page
Load [A4] [Plain]
Continue ൟ Cancel X
Paper mismatch MP.
12-004
4-53 page
Load [A4] [Plain]
Continue ൟ Cancel X
18-000
Fax memory is almost full.
4-54 page
18-001
Fax memory is full. Print or remove received fax job
4-54 page
18-002
Too many faxes are in the print queue waiting to be printed.
Wait, reprioritize, and/or remove unwanted jobs from the print queue.
4-54 page
18-003
Too many faxes are received.
Reprioritize, and/or remove unwanted jobs from the print queue.
4-54 page
21-002
Paper Empty in tray1
Paper is empty in tray1. Load paper
4-55 page
21-003
Tray 1 cassette is pulled out. Insert it properly
4-56 page
21-010
Paper is empty in MP tray. Load paper
4-57 page
21-018
Paper Empty in tray2
Paper is empty in tray2. Load paper
4-58 page
21-019
Tray2 cassette is pulled out. Insert it properly
4-59 page
28-001
28-002
28-003
Transfer belt is not installed. Install it.
Transfer belt is not compatible for this machine. Check user’s guide.
4-60 page
Service Manual
4-30
Samsung Electronics
Alignment & Troubleshooting
● Code
01-000
● Error message
Door is open or
Check Transfer belt
● Symptom
Front cover or top cover is opened.
● Possible Cause
1. Harness is defective, Connector is not connected properly.
2. Sensor is defective.
● Troubleshooting method :
1. Ensure the Front and Top Covers are closed properly.
2. If the PTB [paper transfer belt] is not installed, install it.
3. Check the cover switch harness between Main PBA and HVPS.
4. Check the 24V enable signal on Main PBA. If the voltage is high(5V), replace the Main PBA.
5. Check the 24V1 on SMPS. If there is no output, replace the SMPS board.
Cover Switch
Connector
CN29 Connector
24V1 ˧ No. 2,3,4 Pin
24V enable ˧ No. 28 Pin
Service Manual
4-31
Samsung Electronics
Alignment & Troubleshooting
● Code
01-004
● Error message
Paper Jam in MP tray
● Symptom
The paper from the MP tray has not reached to the feed sensor within a predetermined period of time after pick up.
● Possible Cause
1. Pickup roller rubber is worn out.
2. Pickup Clutch does not work.
3. Feed Sensor is defective.
● Troubleshooting method
1. Ensure the Front and Top Covers are closed properly.
2. If the PTB [paper transfer belt] is not installed, install it.
3. Check the cover switch harness between Main PBA and HVPS.
4. Check the 24V enable signal on Main PBA. If the voltage is high(5V), replace the Main PBA.
5. Check the 24V1 on SMPS. If there is no output, replace the SMPS board.
Flat
Pickup
Solenoid
6p Feed/Tray
empty
Service Manual
7p MP empty/MP
solenoid
4-32
Samsung Electronics
Alignment & Troubleshooting
● Code
01-005
● Error message
Paper jam in tray 1
● Symptom
The paper from the tray1 has not reached to a feed sensor within a predetermined period of time after pick up.
● Possible Cause
1. Pickup roller rubber is worn out.
2. Pickup Clutch does not work.
3. Feed Sensor is defective.
● Troubleshooting method
1. Take out the cassette and remove the jammed paper.
2. Check the separator pad of the cassette. If it become loose or has reached its PM interval, replace it.
* MEA Holder Pad (JC97-02892A)
3. If the pick up roller does not rotate, check the Gear Pick up(JC97-02895A) and solenoid.
If it is defective, replace it.
4. If the pick up roller rotates but the paper is not feeding, replace the Feed motor (JC31-00112A).
5. Check the connectors are plugged in properly on CN4,5,9 on HVPS.
6. Check the connectors are plugged in properly on CN1,2 on HVPS and check the flat cable.
7. Check that the PM interval for Pick-up Roller has expired. If so, replace it.
8. Check the actuator on the Feed Sn. If it does not work correctly, replace the feed-sensor.
9. Check for proper positioning of the Knockup-Plate(JC97-02888A)
10. Check if the Guide-adjust is adjusted for paper entry properly.
Service Manual
4-33
Samsung Electronics
Alignment & Troubleshooting
● Code
01-006
01-018
● Error message
Paper jam in tray 2
● Symptom
The paper from the tray2 has not reached to a feed sensor within a predetermined period of time after pick up.
● Possible Cause
1. Pickup roller rubber is worn out.
2. Pickup Clutch does not work.
3. Feed Sensor is defective.
● Troubleshooting method :
1. Take out the 2nd cassette and remove the jammed paper.
2. If the pick up roller does not rotate, check the Gear Pick up(JC97-03228A). If it is defective, replace it.
3. If the pick up roller rotates but the paper is not feeding, replace the Clutch-Feed(JC97-03270A).
4. Check the connector is plugged in properly on CN9 connector on Main PBA
5. Check the sensor and connector in SCF.
Service Manual
4-34
Samsung Electronics
Alignment & Troubleshooting
● Code
01-009
● Error message
Paper jam inside of machine
● Symptom
Paper jam inside of machine
1. At Power On, the paper is jamming at Regi sensor or Feed sensor.
2. At printing, the paper is detecting at Regi sensor or Feed sensor continuously.
3. At printing, the paper is not detected at exit sensor within a predetermined time.
● Possible Cause
1. Feed sensor or Regi Sensor is defective.
2. Exit sensor is defective.
3. Feed Clutch is defective.
4. Regi Clutch is defective.
● Troubleshooting method
1. Check the Spring tension of the Regi. roller and Regi shaft. If the spring is defective, replace it.
2. Check and replace the exit sensor.
3. Check the connectors are plugged in properly on the flat cable / exit sensor harness / Feed sensor harness.
4. Check the OPC motor is working. / OPC lock.
5. Check PTB [paper transfer belt] working condition, if PTB-Belt is torn replace it.
Flat Cable
3p Exit sensor
6p Feed/Tray
empty
Service Manual
4-35
Samsung Electronics
Alignment & Troubleshooting
● Code
01-010
● Error message
Paper jam in exit area
● Symptom
Paper jam in exit area
● Possible Cause
There is paper jammed under the Exit Sensor at Power ON, or the Fuser Actuator Arm, or Exit Sensor is defective.
● Troubleshooting method
1. If the actuator fuser sensing part is binding or broken, replace the Fuser Actuator [JC66-01404A] and exit sensor
if required.
2. Check the connectors are plugged in properly on the flat cable / Exit sensor harness.
Flat Cable
3p Exit sensor
Service Manual
4-36
Samsung Electronics
Alignment & Troubleshooting
● Code
01-015
● Error message
Paper jam at the top of duplex path
● Symptom
1. At Power On, if the Fuser Exit Sensor and/or Reverse Sensor detects paper.
2. At Printing, Fuser Exit sensor and Reverse Sensor is not on within a predetermined time after paper moves into
the Reverse path.
● Possible Cause
1. Check the Fuser Exit Sensor, Reverse Sensor Harness and Connector.
2. Check if the UI message is changed in the Fuser Exit Sensor and the Reverse Sensor operation (EDC Mode).
3. Check the Reverse Motor and Fuser Exit Motor. (EDC Mode).
● Troubleshooting method
1. Lift the Scan Unit and Open the Reverse Top Cover and the Middle Open Cover. Check for Paper in the Fuser
and Reverse Unit.
2. If the paper is jammed, remove the paper in the Fuser.
3. If the paper is not present, check if the Fuser Exit and Reverse actuator’s return action as the EDC Mode just
checks on/off. If so, check the actuator springs of the Fuser Exit and Reverse return spring tension is sufficient,.
and sensor arm works smoothly. ( EDC Mode -> Test Routines -> Engine Diagnostic Test -> 102-370 / 102-xxx)
4. If the Actuator Arm in the Fuser and Reverse is Operating properly. Check if Reverse motor and Fuser Exit Motor
is turning properly in EDC Mode. ( EDC Mode -> Test Routines -> Engine Diagnostic Test -> 100-xxx / 100-xxx)
Service Manual
4-37
Samsung Electronics
Alignment & Troubleshooting
● Code
01-017
● Error message
Output bin Full
Output bin Full.
Remove printed paper
● Symptom
When the tray limit is reached, the out-bin full sensor is on for 600ms.
● Possible Cause
1. Check the Out-Bin Full Sensor.
2. Check if the UI message is changed by the Out-Bin Full Sensor operation.
3. Check the Out-Bin Full Sensor Harness and Connector.
● Troubleshooting method
1. Check the BIN_FULL_SENSOR (picture’1’ below) by pushing the trigger (picture’2’ below) beneath the SCAN_
ASSY.
Check if the UI message is changed by the Out-Bin Full Sensor operation
2
1
2. Check if the Harness is defective.
Check if the connector is connected properly.
3. Replace the Main PBA or the Scan_Joint PBA or the Panel PBA.
4. Enter the EDC mode and follow the below sequence after the repair is done.
( EDC Mode ˧ Test Routines ˧ 101-Clutch ˧ 0190-OutBin Full ˧ Start ˧ Status check ˧ Stop )
Service Manual
4-38
Samsung Electronics
Alignment & Troubleshooting
● Code
02-000
● Error message
Fuser Error :#02-000 Please turn off then on.
● Symptom
At Warm-up, this error has occurred. The machine does not work until power off/on. If the error code reoccurs,
follow the “Troubleshooting method” below.
● Possible Cause
Fuser Unit is not installed and AC is not supplied to the Heat Lamp.
● Troubleshooting method
1. Turn off the power. And turn on the power.
2. If the problem persists, replace the fuser unit.
3. If the problem persists after replacing the fuser unit, reconnect the CN35 connector on Main-PBA.
4. If the problem persists, replace the Main-PBA.
CN35 ˧Thermistor
Service Manual
4-39
Samsung Electronics
Alignment & Troubleshooting
● Code
02-001
02-006
● Error message
Fuser Error :#02-001 Please turn off then on.
Fuser Error :#02-006 Please turn off then on.
● Symptom
At Warm-up, this error has occurred. The machine does not work until power off/on. If the error code reoccurs,
follow the “Troubleshooting method” below.
● Possible Cause
Fuser Unit is not installed and AC is not supplied to the Heat Lamp.
● Troubleshooting method
1. Turn off the power. And turn on the power.
2. Check the connection of the Fuser AC on FDB ཛྷ.
3. Check the Fuser control harness ཛ.
4. Check the resistance value of the thermostat. If the value is infinite, replace the thermostat.
5. If the problem persists, replace the Fuser unit.
6. Replace the SMPS board or FDB (Fuser drive board).
ྚ
ྙ
Service Manual
4-40
Samsung Electronics
Alignment & Troubleshooting
● Code
02-002
● Error message
System Error :#02-002 Please turn off then on.
● Symptom
The fuser unit is overheated. The machine does not work until power off/on. If the error code reoccurs, follow the
“Troubleshooting method” below.
● Possible Cause
The machine can not control fuser temperature.
● Troubleshooting method
1. Turn off the power. And turn on the power.
2. Replace the Fuser unit.
3. Replace the FDB.
4. Replace the Main-PBA.
● Code
02-005
● Error message
System Error :#02-005 Please turn off then on.
● Symptom
The ADC port is short.
● Possible Cause
The machine can not control fuser temperature.
● Troubleshooting method
1. Turn the power off then on again.
2. If the problem persists, replace the Main PBA.
Service Manual
4-41
Samsung Electronics
Alignment & Troubleshooting
● Code
03-000
● Error message
Motor error
Error: #03-000
Turn off then on
● Symptom
Motor Signal is abnormal.
● Possible Cause
1. Harness is defective, Connector is not connected properly.
2. Main BLDC Motor is defective.
3. Main Board is defective.
● Troubleshooting method
1. Replace Harness if defective.
2. Replace the Main BLDC Motor if defective.
3. Replace the Main Board if defective.
Service Manual
4-42
Samsung Electronics
Alignment & Troubleshooting
● Code
03-007
03-008
03-009
● Error message
Motor error
Error: #03-007/008/009
Turn off then on
● Symptom
Motor Signal is abnormal.
● Possible Cause
1. Harness is defective, Connector is not connected properly.
2. Color OPC BLDC Motor is defective.
3. Main Board is defective.
● Troubleshooting method
1. Check the motor connector. Reconnect the harness.
2. If the problem persists, replace the BLDC motor.
3. If the problem persists after replacing BLDC motor, replace the Main PBA.
Fuser BLDC
OPC BLDC
DEVE BLDC
Service Manual
4-43
Samsung Electronics
Alignment & Troubleshooting
● Code
03-015
● Error message
Motor error
Error: #03-015
Turn off then on
● Symptom
Fan does not operate.
● Possible Cause
Fan is defective.
● Troubleshooting method
1. Check the CN17 connector (FAN) on Main PBA.
2. If the FAN is defective, replace it.
3. If the problem persists, replace the Main PBA.
CN17 ˧ Fan
Service Manual
4-44
Samsung Electronics
Alignment & Troubleshooting
● Code
04-001
04-002
04-008
● Error message
LSU error: #04-001. Please turn off then on.
LSU error: #04-002. Please turn off then on.
LSU error: #04-008. Please turn off then on.
● Symptom
Laser beam detect signal has not occurred or is irregular.
LSU motor does not operate.
● Possible Cause
1. Harness is defective, Connector is not connected properly.
2. LSU is defective.
3. Main Board is defective.
● Troubleshooting method
1. Check the LSU connector on Main PBA. Reconnect it. If necessary, replace it.
2. If the problem persists, replace the LSU or Main PBA.
CN10/11 ˧
LSU LD, Hsync
Connector
Service Manual
4-45
CN15 ˧
LSU Motor
Connector
Samsung Electronics
Alignment & Troubleshooting
● Code
08-000
08-001
● Error message
Original paper Jam
Original paper jam inside of scanner. Remove Jam
● Symptom and Possible Cause
The lead edge of the document failed to actuate the Registration sensor within the predetermined time after
initialization of Paper Pick up.
● Possible Cause
1. Pick up roller is defective.
2. Scan sensor or actuator is defective.
3. Document paper path is contaminated.
● Troubleshooting method
1. Check the paper path for a small piece of paper that may have been torn from an original; or foreign materials
such as paper clips, extracted staples, etc.
2. Check the condition of the Pick-up, Paper Feed Roller and DADF Rubber, it may have reached its PM interval.
3. Registration Sensor change
4. Registration Sensor drive Board change
5. Pick-up Solenoid change
Service Manual
4-46
Samsung Electronics
Alignment & Troubleshooting
● Code
08-002
08-006
● Error message
Original paper jam inside of scanner
● Symptom and Possible Cause
The leadedge of the document has not reached to scan sensor after being sensed by the regi sensor.
● Possible Cause
1. Gate sensor or actuator is defective.
2. Document paper path is contaminated.
3. WHITE BAR SHEET is not attached properly.
4. WHITE BAR is defective.
● Troubleshooting method
1. Check the paper path for a small piece of paper that may have been torn from an original; or foreign materials
such as paper clips, extracted staples, etc.
2. Check that the White bar sheet is properly set to the guide.
3. Check and clean the Registration Roller, replace as is necessary.
4. Check and clean the Exit Roller, replace as is necessary.
5. Check and clean the Scan Senor for paper dust, replace as is necessary.
6. Check the signals from the Scan Sensor Drive Board, replace as is necessary.
7. Check and clean the Exit Solenoid, replace as is necessary.
Service Manual
4-47
Samsung Electronics
Alignment & Troubleshooting
● Code
08-003
08-010
● Error message
Original paper Jam
Original paper jam inside of scanner. Remove Jam
● Symptom and Possible Cause
At duplex scan, the leadedge of the document has not reached to the duplex sensor after scanning the front side.
● Possible Cause
1. Duplex sensor or actuator is defective.
2. There is the contamination on paper path or a defective assembly.
3. The Duplex Gate does not work properly.
4. Duplex motor is defective.
● Troubleshooting method
1. Check and clean the Duplex Solenoid, replace as is necessary.
2. Check and clean the Exit Roller, replace as is necessary.
3. Check the signals from the DADF Drive Board, replace as is necessary.
Service Manual
4-48
Samsung Electronics
Alignment & Troubleshooting
● Code
08-004
08-006
● Error message
Original paper Jam
Original paper jam inside of scanner. Remove Jam
● Symptom and Possible Cause
The bottom edge of the document failed to pass the scan sensor after the leadedge of the document has reached
to the duplex sensor and scan sensor.
● Possible Cause
1. Scan sensor or actuator is defective.
2. There is the contamination on paper path or a defective assembly.
● Troubleshooting method
1. Check the paper path for a small piece of paper that may have been torn from an original; or foreign materials
such as paper clips, extracted staples, etc.
2. Check and clean the Registration Roller, replace as is necessary.
3. Check and clean the Exit Roller, replace as is necessary.
4. Check and clean the Scan Sensor for paper dust, replace as is necessary.
5. Check the signals from the Scan Sensor Drive Board, replace as is necessary.
6. Check and clean the Exit Solenoid, replace as is necessary.
Service Manual
4-49
Samsung Electronics
Alignment & Troubleshooting
● Code
08-008
● Error message
Scanner door Open
Door of scanner is open. Close it
● Symptom
DADF door is opened.
● Possible Cause
The cover open sensor is defective.
● Troubleshooting method
Check if the DADF cover is closed.
<door is opened>
<door is closed>
If opened, close the DADF cover until it blocks the PHOTO-INTERRUPTER.
PHOTO-INTERRUPTER
If UI message is not changed, open the COVER-DADF REAR and replace the PHOTO-INTTERRUPTER.
Service Manual
4-50
Samsung Electronics
Alignment & Troubleshooting
● Code
11-003
● Error message
Scanner locked
Scanner locking switch is locked. Release it
● Symptom
Scanner locking switch is locked or Home checking is abnormal.
● Possible Cause
Scanner locking switch is locked.
● Troubleshooting method
Check if the scanner locking switch is locked.
If the scanner locking switch is locked, move the switch from ཛ to ཛྷ.
X
Y
Service Manual
4-51
Samsung Electronics
Alignment & Troubleshooting
● Code
12-000
12-001
● Error message
Paper mismatch Tray1/2
Load [A4] [Plain]
Continue ൟ Cancel X
● Symptom
The paper in tray1 and/or tray 2 does not match the size selected.
● Possible Cause
1. Check that the size selected matches the copy paper in the tray selected.
2. Check the harness and connector of the Trya1/2 Size Sensor.
3. Tray1/2 Size Sensors and it operation.
● Troubleshooting method
1. Pull out Tray1/2 Cassette.
2. Load [Letter] paper in Tray1/2 Cassette.
3. Install Tray1/2 Cassette.
Check if Feed-Actuator works correctly.
1. Check the tension spring is properly loaded on the Actuator_Feed.
2. Check that the connector for the photo sensor is plugged in securely.
Service Manual
4-52
Samsung Electronics
Alignment & Troubleshooting
● Code
12-004
● Error message
Paper mismatch MP.
Load [A4] [Plain]
Continue ൟ Cancel X
● Symptom
The paper in Manual Tray does not match the size selected.
● Possible Cause
1. Check that the size selected matches the copy paper in the Manual Tray.
2. Check the harness and connector of the MP Size Sensor.
3. MP Size Sensor is defective.
● Troubleshooting method
1. Open MP Tray.
2. Load [Letter] paper in MP Tray.
3. If the problem persists, check if the MP_Paper_Detect_Actuator works correctly.
a. Check the spring is put in the right place of the actuator
b. Check the harness and the connector fit on the photo sensor.
c. Check the connection of the Drawer_MP and screw points.
JC39-01333A
(Harness-MP DRAWER_MP)
Service Manual
4-53
Samsung Electronics
Alignment & Troubleshooting
● Code
18-000
18-001
18-002
18-003
● Error message
Fax memory is almost full.
Fax memory is full. Print or remove received fax Job
Too many faxes are queued to be sent. Wait or remove queued job.
Too many faxes are received. Print or remove job
● Symptom
Cannot execute the Fax function.
● Possible Cause
There is not enough fax memory.
● Troubleshooting method
1. “Fax memory is almost full.” message case :
1) Check the printing condition of machine. (Toner or Paper of tray)
2) Even though the printing condition of machine is normal, if this message is displaying, check the Secure
Receive option.
(Fax mode > Menu > Fax Feature > Secure Receive > Off)
3) Even though the option of Secure Receive is off, if this message is displaying, remove the job using the STOP
button.
2. “Fax memory is full. Print or remove receive fax job.” message case :
1) Check the printing condition of machine. (Toner or Paper of tray)
2) Even though the printing condition of machine is normal, if this message is displaying, check the Secure
Receive option.
(Fax mode > Menu > Fax Feature > Secure Receive > Off)
3) Even though the option of Secure Receive is off, if this message is displaying, remove the job using the STOP
button.
3. “Too many faxes are queued to be sent. Wait or remove queued job.” message case :
1) Check the delayed Fax job. (Reserved delay send job)
2) If the number of reserved send jobs is reached Max Job Count, reservation of send job is denied.
3) So, remove the delayed job .
(Fax mode > Menu > Fax Feature > Cancel job)
4. “Too many faxes are received. Print or remove job.” message case :
1) Check the printing condition of machine. (Toner or Paper of tray)
2) Even though the printing condition of machine is normal, if this message is displaying, check the Secure
Receive option.
(Fax mode > Menu > Fax Feature > Secure Receive > Off)
3) Even though the option of Secure Receive is off, if this message is displaying, remove the job using the STOP
button.
Service Manual
4-54
Samsung Electronics
Alignment & Troubleshooting
● Code
21-002
● Error message
Paper Empty in tray1
Paper is empty in tray1. Load paper
● Symptom
There is the paper in tray1 but error message is displayed.
● Possible Cause
1. Tray1 empty sensor harness is not connected properly. .
2. Empty Sensor is defective.
● Troubleshooting method
1. Check the paper empty sensor connector. Reconnect it.
2. Check the paper empty sensor. If it is defective, replace it.
3. Check if the actuator is broken.
6p Feed/Tray empty
Service Manual
4-55
Samsung Electronics
Alignment & Troubleshooting
● Code
21-003
● Error message
Tray 1 cassette is pulled out. Insert it properly
● Symptom
Tray1 cassette is inserted in machine but error message is displayed.
● Possible Cause
1. The connector of the Tray1 Home Position Sensor is not connected properly.
2. Tray1 Home Position Sensor is defective.
● Troubleshooting method
1. Reinstall the tray1 cassette.
2. Reconnect the / Feed sensor harness.
6p Feed/Tray empty
3.Check the CST Draw connector. Reconnect it.
Service Manual
4-56
Samsung Electronics
Alignment & Troubleshooting
● Code
21-010
● Error message
Paper is empty in MP tray. Load paper
● Symptom
There is the paper in MP tray but error message is displayed.
● Possible Cause
1. MP Paper Empty Sensor harness is not connected properly.
2. MP Paper Empty Sensor is defective.
● Troubleshooting method
1. Check the MP paper empty sensor connector. Reconnect it.
2. Check the MP paper empty sensor. If it is defective, replace it.
3. Check if the MP Empty actuator is broken.
Actuator-Empty
Service Manual
4-57
Samsung Electronics
Alignment & Troubleshooting
● Code
21-018
● Error message
Paper Empty in tray2
Paper is empty in tray2. Load paper
● Symptom
There is the paper in tray2 but error message is displayed.
● Possible Cause
1. Tray2 empty sensor harness is not connected properly. .
2. Empty Sensor is defective.
● Troubleshooting method
1. Check the paper Tray2 empty sensor connector. Reconnect it.
2. Check the paper Tray2 empty sensor. If it is defective, replace it.
3. Check if the Tray2 actuator is broken.
Actuator
Service Manual
4-58
Samsung Electronics
Alignment & Troubleshooting
● Code
21-019
● Error message
Tray2 cassette is pulled out. Insert it properly
● Symptom
Tray2 cassette is inserted in machine but error message is displayed.
● Possible Cause
1. The connector of the Tray2 Home Position Sensor is not connected properly.
2. Tray2 Home Position Sensor is defective.
● Troubleshooting method
1. Reinstall the tray2 cassette.
2. Check the Tray2 Open micro sensor connector. Reconnect it.
3. Check the Tray2 Open micro sensor. If it is defective, replace it.
micro switch sensor
Service Manual
4-59
Samsung Electronics
Alignment & Troubleshooting
● Error message
Transfer belt is not installed. Install it.
Transfer belt is not compatible for this machine. Check user’s guide.
● Code
28-001
28-002
28-003
● Symptom
The red LED is turning on and the machine does not operate.
● Possible Cause
The transfer belt unit is installed in the machine but the machine could not read the information from the CRUM.
CRUM information is different from machine.
● Troubleshooting method
1.Check if transfer belt unit is properly installed.
2. Check CRUM PBA connector pins.
Replace the CRUM PBA with normal thing and test it. If the CRUM PBA is defective, replace the transfer belt unit
or CRUM PBA.
3. Check if the Transfer Belt CRUM Harness is defective and check that the connector is properly plugged into the
Engine Board.
4. Replace the Main Board with a known good one and test it. If it works replace Main Board.
CRUM Harness and
connector
CRUM and Main
board connector
PBA CRUM
Service Manual
4-60
Samsung Electronics