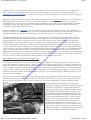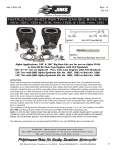
1
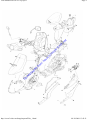
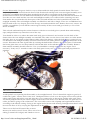
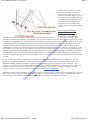
1990 Honda Elite 50 cc LX project
Page 1
Honda Elite SA50L (aka Elite LX) modifications
ne
t
WARNING: Whether your scooter is simply a travel appliance or an escape pod used to fight the gravitational pull of the "daily
.S
co
ot
e
rT
im
e.
grind" I am hoping this page will offer something useful. The information contained in this page is a record of my experience and is in
no way a reflection of what a trained mechanic or rational person might do. If in doubt a Honda factory trained mechanic is usually
availiable within scooting range. Nevertheless the following journal will , I hope, contain information valuable to any owner. The Honda
Elite was cheap and I was curious about automatic scooter transmissions so I thought that even if it never ran again, I would get my
moneys worth in entertainment. I was not disappointed.
The Hazards of Window Shopping
D
ow
nl
oa
de
d
fro
m
w
w
w
On a trip originally intended to pick up a carburetor for another scooter, I ended up buying a 1990 Honda
Elite LX in March of 1999 at a local Bike wrecking shop. The engine made a growling sound when turned
over and everyone agreed it was probably a main bearing needing replacement. The scooter had seen service
as a rental and the mirrors, turn signals, and parts of the body had been broken off or heavily scratched. The
seat and instrument panel were in good shape. Underneath, the frame and mechanicals looked in good
condition with no corrosion, scratched pieces etc. The first thing I did was check the availability of service
manuals but the local dealer said they were "out of print". A quick search on the internet revealed that
manuals are still availiable through companies like Helm inc. ( www.helminc.com ) for most Honda scooters
from the early 1980s. For a bit of a giggle, read Canadian Motorcycle Guide's article comparing a Honda
Dio and Yamaha BWS.
http://www3.telus.net/dougsimpson/Elite_1.html
08/10/2006 13:43:21
Page 2
D
ow
nl
oa
de
d
fro
m
w
w
w
.S
co
ot
e
rT
im
e.
ne
t
1990 Honda Elite 50 cc LX project
http://www3.telus.net/dougsimpson/Elite_1.html
08/10/2006 13:43:21
1990 Honda Elite 50 cc LX project
Page 3
Scooter Disassembly I began to look for ways to disassemble the body panels from the frame. The lower
body trim pieces that stretch from the front of the floorboards and up to the rear turn signal assembly were
secured by two phillips head bolts that attached from the side to two points on the frame under the
floorboard area. There was an additional attachment at the rear originally but mine had the tabs broken off.
Next the seat was raised and the rear rack and taillight assembly were removed after removing two nuts
from under the seat located at the front part of the rack and another two bolts located directly under the
stoplight assembly. The rack/tailight assembly was lifted free and left to dangle. There are an additional two
bolts located at the very deepest part of the storage area underneath the seat. Remove those two, remove the
oil filler cap and then you can lift the seat/storage assembly off the scooter and get a birds eye view of the
motor assembly.
Take a break and match up the various fasteners with the correct body pieces (attach them with masking
tape) and put them away somewhere out of the way.
D
ow
nl
oa
de
d
fro
m
w
w
w
.S
co
ot
e
rT
im
e.
ne
t
You should be able to see where the main back body piece is fastened. one location is at the back of the
frame where the rear taillight assembly was attached. The other is at the lower front where two bolts mount
the body piece to two points on the frame at either side of the battery. After the body piece is removed, you
can disconnect the taillight assembly electrical connection at the white junction on the right hand side of the
scooter. Disconnect the turn signal bulbs by twisting the bulb holder. Remove the license plate. Underneath
the license plate there are two deep tunnels with 10 mm bolts at the end that attach the assembly. Remove
them and the assembly should come free. Now you should have enough room to do any engine work
necessary. In my case, I wanted to remove the body parts in any case so I could repair and prep them for
painting.
The Heart of The Beast
At this point I was expecting the disassembly to be straightforward . First I cleaned the engine as good as I
could with "gunk" cleaner and a water hose. I had paused here to look over the engine and see where all the
tubing and wiring and cables went and what they were connected to at the engine and the other end. There
was an oil pump located by the starter engine at the front of the motor. The throttle cable was split into two
cables just before going to the carburettor. The extra cable went to the oil pump and regulated the oil flow
according to the throttle setting. Seeing as the engine had a blown crank bearing I thought about how I could
increase the flow of oil by varying the adjustment on the cable.
There was no fuel on/off control like on most
motorcycles and scooters I'd seen. There was a lot of
tubing (vacuum/ oil feed/gas) and I made a note to
http://www3.telus.net/dougsimpson/Elite_1.html
08/10/2006 13:43:21
1990 Honda Elite 50 cc LX project
Page 4
label each with masking tape when I disconnected
them.
The engine assembly is attached mechanically at one
pivot point under the engine case. By removing one
long bolt, the engine would come free but first all
wiring, tubing and other attachments have to be disconnected. The engine wiring was in bundled assemblies
that had quick disconnect electrical junctions (white). Two junctions had to be separated to disconnect the
engine. One was for the electric choke on the carburettor and the other junction included all other wiring.
The tubing from oil pump to oil reservoir, gas tank to carburettor, vacuum attachment from intake
manifold to gas tank were disconnected and labelled. The gnurled throttle slide holder (where the throttle
cable enters the carb) was unscrewed and the throttle slide assembly removed and left to dangle. Lastly,
loosen the retaining bolt and remove the rear shock/spring assembly from the engine case.
You could pop the engine assembly now but first I removed the:
im
e.
ne
t
1) air cleaner assembly
2) cylinder cooling shrouds
3) muffler
d
fro
m
w
w
w
.S
co
ot
e
rT
I won't go into detail about the engine tear down. If you are not comfortable with disassembling motors and
have no experience, now might be a good time to take the motor you have removed into your local
motorcycle or scooter mechanic for any modifications. The factory manual is useful if you wish to try it
yourself and the cost of the manual was more or less the same as one hour of a Honda mechanics labour cost
so I recouped the cost of the manual pretty quickly. You won't need any special tools (aside from
screwdrivers, sockets and combination wrenches) as long as you don't intend on removing the flywheel or
loosening the clutch or speed variator mechanism on the drive side. Sooner or later, the drive belt will need
replacing and you will want to change the variator weights if you do any substantial engine modifications. Do
take the engine assembly to a dealers if there is a point you will need specialized tools. A lot of damage can
be done unless you have the correct tools and I used the local dealer to re-assemble my crankshaft assembly
and lower case. If you have a lot of spare money and want to buy your own factory tool set Kowa tools
website has some interesting tools specifically for the Honda.
D
ow
nl
oa
de
I drew diagrams and used sandwich baggies to package and label the different sub-assemblies. Take it slow
and draw your own exploded diagrams of how things fit together. It will pay off on reassembly. While the
engine itself is straight forward, the various clips, routing of wires and tubing is unique to this engine and
you should make drawings before disassembling or, if you're lazy, take photographs. Lots of photographs. It
is much easier with a service manual, but even then drawings and photos are a big help. DO NOT RUSH!!!!!
Sooner or later you'll need a tool to hold the crankshaft while you loosen the flywheel or simply hold the
flywheel while you loosen the nut holding the drive side pulley so you can change the drive belt. It would be
great if the same tool held the clutch so you could loosen the clutch nut and check the clutch linings. The
Honda service manual refers to just such a tool (universal holder part #07725-0030000) but I was quoted a
price of $150 (the same price as the LeoVinci SP3 I'm saving for) so built something as shown in the drawing
below.The allen head bolts must fit into the slots in the flywheel and the clutch. The head of the bolt fits the
slot, not the threaded portion as
nothing should stick inside the
flywheel where it could harm the
magneto. Put a bit of tension on
the flywheel or drive pulley nut
until the long arms of the tool
are up against the floor or a
beefy part of the scooter. When
the arms have a bit of tension,
the tool did not slip out of the
slots but held, much to my
surprise. one of the arms should
http://www3.telus.net/dougsimpson/Elite_1.html
08/10/2006 13:43:21
1990 Honda Elite 50 cc LX project
Page 5
be bent so that it is in the same
plane as the other where they
both attach to the flywheel or
clutch. I hope this makes sense to
you as it is an invaluable tool at a
reasonable cost. Make the arms
out of thicker material than
shown if you can. Mine flexes
when I used it on a larger Honda
scooter.
Porting and polishing
(dremelitis extremis)
w
w
w
.S
co
ot
e
rT
im
e.
ne
t
Somewhere along the line I
started noticing how the motor had a lot of nice design features such as a case reed valve, 6 intake ports,
hemi head combustion chamber, cdi ignition. The case and cylinder had reasonably smooth passageways but
also room for improvement. There were casting marks in the reed valve passageway in the case as well as the
intake manifold. The exhaust passageway in the cylinder looked a little rough as well. All these areas were
smoothed and polished using sandpaper and dremel tool. If I had not been doing a bottom end rebuild, I
would have restricted the polishing to the intake manifold and the exhaust port. While I was polishing, I did
the inside of the crankcase as well. There was no great amount of metal removed except in the exhaust port
where it appeared that the middle part of the passageway was constricted. The intake manifold was absurdly
long and had a bend in it that defeated any efficient flow of air but, aside from polishing, I couldn't see any
easy fix. A new manifold would make a big difference but was not on my short list of improvements this time
around.
oa
de
d
fro
m
It was at this stage that "the dark side" overcame me and I started thinking about a "big bore" kit and
maybe an expansion chamber. I finally ended up buying just a bigger piston (47 mm) as there was some
difficulty finding a Malossi or Polini cylinder kit that matched the port cut-outs in my crankcase. The
cylinder for the Honda Vision had smaller ports than mine and the Honda Dio had larger ports, a different
exhaust port outlet and the wrist pin was 12 mm compared to my 10 mm. I ended up ordering just the
Malossi "Vision" piston after much correspondence withTerry at Taffspeed.
D
ow
nl
Roman H from Chicago modified a european model "Vision" big bore cylinder kit to fit his 88 Elite. I've put
up a separate page with info from Roman here. This is a viable alternative if you have a 1988 to 1993 Elite.
The modifications would be much easier if you ensure you order an aluminum cylinder.
http://www3.telus.net/dougsimpson/Elite_1.html
08/10/2006 13:43:21
1990 Honda Elite 50 cc LX project
Page 6
e.
ne
t
To avoid the whole issue of trying to figure out the
european model designation for your 50 cc Honda,
there are a couple of shops in Hawaii that handle
Japanese performance kits to enable your Elite to
reach 90 mph . You'll even be able to say you have
an 88 Elite and they'll know what part you need. Its
difficult to find out about Japanese performance
parts although their web pages can be translated by
Alta Vista. I wish I'd taken Japanese instead of
French in school. I have the contact info for the
American shops (Hawaiian and otherwise) at this
page.
fro
m
w
w
w
.S
co
ot
e
rT
im
Thanks Charlie for the Pics and Hawaiian links!
D
ow
nl
oa
de
d
The compression height of the piston is 5 mm greater than stock but I've made a 5 mm spacer for the base of
the cylinder using a cylinder base gasket as a template and using a 3/16 piece of aluminum( 25.4 mm per
inch divided by 16 and multiplied by 3 gives 4.76 mm and in addition to an extra cylinder base gasket should
bring it close to 5 mm).
http://www3.telus.net/dougsimpson/Elite_1.html
I would have preferred buying the complete cylinder
kit as it has improved porting and was not that much
more money over the cost the machine shop charged
for boring the stock cylinder. If at all possible buy
the "big bore cylinder kit" and it will save you a lot
of hassle. The displacement will end up at 65 cc- a
30% increase. The Honda Dio cylinder kits are
generally 70 cc because of the increased stroke of the
dio crank. Some of the Hawaiian shops have 85cc
kits. Even larger displacements can be had if you are
willing to install a "stroker" crankshaft. One thing I
overlooked originally was the fact that the intake and
exhaust port heights will change after boring. As the
ports enter the cylinder at an angle, the more that is
taken off the cylinder wall the greater the distance
between the ports and the top of the cylinder. This
will radically affect how the engine runs . To ensure
that the exhaust and intake timing remains the same,
you should measure the distances between the top of
the ports and the top of the cylinder before boring.
After boring, those heights should be restored by
08/10/2006 13:43:21
1990 Honda Elite 50 cc LX project
Page 7
grinding. This is not just a matter of raising the heights but also ensuring the angle of entry remains the
same. A good site that explains these issues as well as showing how to go about "cylinder mapping" is
MacDizzys two stroke tuning page. Also visit the links page as he has links to several good sites covering two
stroke tuning.
When I get some more money in the scooter fund, I'll send away for a LeoVinci exhaust. The LeoVinci SP3 is
purportedly good for about a 20% increase in power with noise remaining at stock levels. A LeoVinci
"handmade Z" is a pure expansion chamber with a standard "glass pack" flow through muffler. It should
yield higher power but with greater noise. The hawaiian shops also offer exhausts that are specifically
designed for larger displacement scooters.
I had also ordered some Boyesen reed valves. Same problem with ordering in that no "Elite" model was
listed. I sent Boyesen a diagram of my reed valve with measurements and they sent me a model for the "Dio"
(model 708) which fits just great. Earlier Elites may take the "Vision" reed valves so check first.
w
.S
co
ot
e
rT
im
e.
ne
t
The final modification was to the air cleaner. Air being drawn into the filter goes through quite a maze. I
initially smoothed out and enlarged (removing reinforcing ribs in a rectangular inlet) the air intake. This
change made quite a bit of an increase in acceleration. The picture below shows the first and suggested
modifications. I was hoping the boyesen reed's tendency to richen the mixture would be balanced by the
leaning of the mixture caused by "enhancing" the air intake. Initial rides tell me I've got a bit of tuning yet
to do to get the fuel mixture right. To avoid any jetting hassles, you may want to avoid major modifications
to the air intake ( air filter) assembly until all other planned modifications are made. My local Honda dealer
only lists two jet sizes for the "Elite" so I'm going to have to play with drilling the jet to get the right size.
Adjusting the mixture can be a pain and there is no point having to do it twice. A final note on modifying the
air filter ~ you will increase the noise considerably and if quietness is a preference or a necessity then best to
leave it as close to stock as possible. Do take the effort to clean the element often.
w
w
An Argument for leaving well enough alone
ow
nl
oa
de
d
fro
m
I reassembled with the new reed valves, stock piston and cylinder but new rings (hey the weather was nice
and I was itching to try this scoot out ). There is quite a bit of power up to about 2/3 throttle. After that the
engine loses power so that may mean replacing the main jet with something larger to richen the mixture . In
order to make it rideable, I ended up adding another foam filter on top of the stock one as I had drilled lots
of holes in the original air filter body and it was running lean. The doubling up on the foam seems to have
richened it up some and it is now rideable until I can get a set of number drills (my Honda parts guy says a
larger jet is not available).
D
The needle valve on my 1990 Elite has only three positions for adjustment. Most motorcycle carbs have five.
The Idle mixture screw can be turned clock-wise to richen the mixture. The clip on the needle valve can be
moved closer to the pointy end to richen the mixture. The reverse adjustment on either will lean out the
mixture.
The float bowl drains through a piece of tubing
located on the opposite side of the carburettor shown
in the photo. It is handy to drain the bowl before
removing the carburettor and disassembling. The air
intake modification shown produces quite a bit of
extra acceleration along with additional noise. The
original air filter body covered the carburettor and
was cut to make adjustment easier. Unless you are
running very rich, it is probably not an especially
intelligent move to muck about with the air filter
other than disassembling it to clean the foam
element. That is, unless you love the waaaaaaaaahh
sound it makes when accelerating in which case I'd
recommend going all out and buying a new air filter.
The stock one definitely inhibits performance.
http://www3.telus.net/dougsimpson/Elite_1.html
08/10/2006 13:43:21
1990 Honda Elite 50 cc LX project
Page 8
Later...
I got my cylinder back from the machine shop yesterday. The cylinder had been bored to accept the 65cc(47
mm) malossi piston I had bought from Taffspeed . The original scooter seems to have come with a 0.0015
inch (.0381 mm) piston to cylinder clearance but the machinist suggested, and I agreed, to a 0.002 (0.0508
mm) clearance for the larger piston. The maximum wear seems to be about 0.006 inches. My Elite with 6000
km had about 0.002 wear on the original piston. Along with two cylinder gaskets, a new small end roller
bearing and a 3/16" aluminum spacer, I assembled the engine. I've put up a separate web page with torque
values you'll need when re-assembling the scooter. Printing the page as a reference would be a good idea.
im
e.
ne
t
The addition of the extra cylinder base gasket and spacer increased the height of the cylinder by 5mm. I was
running about 115 lbs compression in the cylinder previously and am now running 175 lbs. I drilled a 2"
hole in the 3/16" aluminum spacer and then used the cylinder gasket to outline the area to be removed for
the ports. I was hoping to put the spacer in place and then dremel out the spacer so that the ports matched
exactly but my dremel broke and I had to send it away to be repaired under warranty. I ended up doing it
with a hand file which was close but not as perfect as originally intended. The base cylinder gasket appears
to be assymetrical (the two main intake ports are not the same size or shape) so I ended up notching the
spacer on one side so I could tell which way it should be installed . After the cylinder base spacer was
finished , I installed it along with the piston and cylinder. I have not used longer bolts to mount the cylinder.
oa
de
d
fro
m
w
w
w
.S
co
ot
e
rT
I modified the head by first tracing out a 47 mm circle to match the new piston. I used a hand file to remove
material from the head using about the same angle as the original. I kept fitting the head(without the head
gasket) and refiling until the piston would go through a complete revolution without hitting the head. I then
cleaned up the head with steel wool in a succession of finer grades until the cylinder head was without any
visible scratches. I then inserted a stick of solder throught the spark plug hole in the assembled engine and
measured it. It was well below 1 mm at the tightest spot so I re-assembled the engine using the head gasket
this time. There should be at least 1mm clearance ( preferably more) which the head gasket provided, even if
the piston just missed the cylinder head in some spots without the head gasket. Without that clearance your
engine will self destruct the first time it reaches speed so be very careful to ensure you have proper head to
piston clearance. The higher compression definitely translates into more pulling power and hills are no
problem. If I ever take the cylinder off again I will raise the exhaust port "a bit" so that should bring the
compression lower as well as let the engine rev a bit more. The July weather is too nice to think about
disassembling the motor again.
D
ow
nl
The scoot was running lean which had probably been a result of my fiddling with the aircleaner and getting
a bit too carried away with my dremel. I had originally expected to be running rich because of the increase
in displacement and the Boyesen reed valves. I had ordered another main jet from Honda in the same size I
had as they don't offer an oversize jet. The idea was that I would drill the new jet until it was obviously too
big and then I could go back and drill the original jet to one drill size smaller, hopefully the "right" jet size.
My jet was stamped with an 88 which I finally figured out meant it was 0.88 mm. I figured this out by
comparing some guitar string sizes against my main jet. The strings carry metric as well as imperial
measurement so I noted which of the various strings would fit through the main jet opening. My D string
(.711 mm) would fit but my A string (.965 mm) was too big. The chart below shows the various number drills
that will increase the scooters main jet size.
Number Drill Size
Imperial measurement
Metric measurement
#65
0.0350 inch
0.889 mm
#64
0.0360 "
0.914 mm
#63
0.0370 "
0.940 mm
#62
0.0380 "
0.965 mm
#61
0.0390 "
0.990 mm
#60
0.0400 "
http://www3.telus.net/dougsimpson/Elite_1.html
1.016 mm
08/10/2006 13:43:21
1990 Honda Elite 50 cc LX project
Page 9
#59
0.0410 "
1.041 mm
#58
0.0420 "
1.067 mm
#57
0.0430 "
1.092 mm
The stock main jet is just a small amount less than a #65 drill so it would make sense to start with a #64 drill
and work towards the larger sizes (larger holes; the number drill sizes get smaller). A word of caution here
before you start. The richness or leaness of your mixture can also be affected by a number of other factors so
make sure these other parts are operating to specs before you start drilling. These other areas are:
1. The oil injection. Make sure you are running at the desired mixture ratio. More oil will "lean out" your
gas to air mixture. After 1993, there was no adjustment but before that you could adjust the amount of oil
being sent to the carb. If there were no problems before, you should be OK but if you intend to fiddle with it,
do the adjustment before playing with your main jet. Also make sure you were not leaking oil from the
various connections. If so replace the tubing or the clamp that secures the tubing.
im
e.
ne
t
2. Check and clean the filters leading from both the oil and gas tanks. Both filters are located right at the
respective tanks where the lines exit from the tank. They should be visually inspected and then blown with
compressed air to remove any debris that has collected.
rT
3. Check that neither the fuel line nor the oil lines are kinked and restricting flow.
w
w
w
.S
co
ot
e
4. Check the fuel float level in the carburetor.
m
Later.....
ow
nl
oa
de
d
fro
HooHaa! It's quite stiff yet and will probably take a while but there is a noticeable increase in power. The
scooter wants to wheelie ! At this writing, I've put 150 km (90+ miles) on the scooter and it's gotten smoother
with each ride. Hills that previously made me check my rear view mirror for traffic are no longer a problem.
The scooter doesn't appear to be running lean at full throttle but because I'm still running in the new rings
and cylinder, I've avoided full throttle for any thing but very short bursts. The plug is a nice medium
chocolate brown .
D
This would be a good time to tell my personal dimensions so you can judge what you can expect from any
modifications you choose to do. First of all, my weight is over 200 with riding gear. Yes, I weigh 30% more
than the scooter. I have a neighbour who weighs considerably less and he took a quick "ride around the
block" and confirmed that there was a large increase in power since when he'd ridden it with the stock
piston. He also said he wouldn't want to ride it if it were any quicker. He was doing 60 km/hour uphill and
this when the engine is still being run in. The next logical step is to put on a performance exhaust and I
would favour the SP3 from LeoVinci due to the claim of low noise (quiet as stock) and a 20% increase in
power However if noise was not an issue (loud mufflers save lives) an expansion chamber type exhaust could
boost power by 30%.
Later............
I took off the head and shaped it a bit better as I have my dremel back. I kept grinding and re-fitting until I
had a compression ratio of about 10.3:1 or 150 lbs cylinder pressure. Even though the days are still dry and
sunny here, I decided to do this now as I had been surfing the web last night and come across a motocross
tuners website that mentioned a high compression ratio could result in a "flat spot" at high RPM. I was still
reaching top speed at about half to two thirds throttle. My continual up-jetting was an attempt to remove the
flat spot as I thought it was due to the engines running lean . Reducing the compression ratio has increased
the top speed and I've got at least another 5 km/h on the top end. The speedo runs out at 60 km/h but I don't
think it could be running more than 65 km/h (41 mph approx). I know this isn't an incredible increase in top
speed but the thing is it seems to reach top speed quicker and does not slow down on small "hills". There is
http://www3.telus.net/dougsimpson/Elite_1.html
08/10/2006 13:43:21
1990 Honda Elite 50 cc LX project
Page 10
still no throttle response after 3/4 throttle that I can tell. My gas mileage has been consistently running about
25 km/l since the most recent jet change. I am currently running a main jet that has been opened up to 1.02
mm (#60 drill - 0.04 inches) which is an increase of 16% !!! Not wonderful for gas mileage and, in hindsight,
probably much too rich. The port timing was checked as it is quite common on big bore conversions for the
exhaust and intake timing to be retarded which would account for the flat spot at high RPM. This would
explain the substantially increased power at the bottom end of the RPM range. This is one of the things you
wouldn't have to worry about if you bought the malossi/polini etc barrel.
After measuring, the intake timing was extremely retarded. That probably was the reason for the lack of
RPM. The intake timing was about 106 degrees duration whereas the original should be 112 degrees. The
boost ports located opposite the exhaust were only open 56 degrees where they should be only a few degrees
less than the intake ports. The engine would have been starving for fuel and not capable of any great RPM.
The weights in the variator pulley also showed a lot of wear. I'm hoping that correcting these two "problems
will increase top speed and smoothen out the engine at top speed. I've re-ported the cylinder to 180 degrees
exhaust duration; 120 degrees intake duration and 110 degrees duration for the boost port.
rT
im
e.
ne
t
I've downsized the main jetting (down two sizes to.965 mm #62 drill) as it was running much too rich and I
have a scooter that is much smoother than before (new roller weights) and it now goes off the speedo (65 km/
h) . I really don't want any extra top speed due to the size of the brakes vs the momentum of my body at
65+km/hour. The plug is running medium brown colour. The meantime the days are getting longer and I
think for now I should just ride and spend any extra time working on one of my other scooters.
.S
co
ot
e
To sum up, the modifications to date are :
The results are :
ow
nl
oa
de
d
fro
m
w
w
w
malossi 47 mm piston increasing displacement to 65 cc
grinding the head to obtain a 10.3:1 compression ratio (150 psi cylinder pressure)
Boyesen reed valves
modifying the stock air filter to increase the air intake
porting and polishing of the crankcase, inlet manifold, exhaust port and intake ports. Cylinder
porting consisted of removing rough edges or casting marks and altering the port timing from
stock (see text).
opening up the main jet to .965 mm. (still too rich)
opening up the carburetor bore to increase full throttle air intake
D
A large smile on my face
increased pulling power especially noticeable on hills
decreased gas mileage by at least 25%
slightly noisier
slightly higher top speed
an incredible investment of time which for the most part was enjoyable
a scooter that is pleasant to ride in traffic.
The operating conditions are:
200+ pounds driver
sea level driving,
premium non-leaded gas (94 octane)
Motul "motolube" 2T oil
http://www3.telus.net/dougsimpson/Elite_1.html
08/10/2006 13:43:21
1990 Honda Elite 50 cc LX project
Page 11
m
w
w
w
.S
co
ot
e
Visit the MyScoot Design Shop with Tshirts, Coffee
mugs, Clocks etc all with unique scooter designs from
the "MyScoot workshop". Support this site and get
some cool looking items for yourself or friends.
Click Here!
rT
im
e.
ne
t
photo courtesy of
Canadian Motorcycle Guide
oa
de
d
fro
factory service tools for your Honda scooter
ow
nl
Torque Values for the SA50
D
Japanese Scooter index
Honda 50cc Performance parts
Used scooter
Checkup
Honda
scooter ID
Yamaha BWS vs
Honda DIO
Used
Scooter parts
Honda
Elite 50cc
Honda
Aero 80cc
Honda
125/ 150/ 250
50 cc Honda
scooters
Jan 2002 ~Well its been 2~3 years since I finished the project above. I sold the scooter but missed the
fun of a 50cc scoot so I've bought another wreck and have started the 2002 SA50 Project. I hope to
capitalize on my experience with the above project to reduce labour and expense as well as increase
performance.
http://www3.telus.net/dougsimpson/Elite_1.html
08/10/2006 13:43:21
Page 12
D
ow
nl
oa
de
d
fro
m
w
w
w
.S
co
ot
e
rT
im
e.
ne
t
1990 Honda Elite 50 cc LX project
http://www3.telus.net/dougsimpson/Elite_1.html
08/10/2006 13:43:21