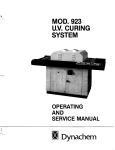
1
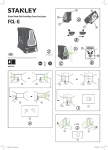
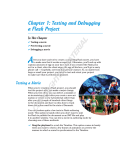
TECH by Tyler Greenblatt
S&S CAMS &
POWER VISION
Part III: We gained six ponies and 11 ft-lbs. of torque with this bolt-in cam kit!
L
Our 2010 Electra Glide
1 Limited is up on
TOOL S NEEDED
S&S Cycle’s Power Tune Duals headers and crossover
pipe, as well as a set of its SPO Touring mufflers, onto a
2010 Electra Glide Ultra Limited 103". We got a power
boost of 5 hp and 3 ft-lbs. of torque. The issue before that, we
bolted on a S&S Airstream Stealth air cleaner kit and got a
power increase of 7 hp and 8 ft-lbs. of torque. For both installations, we didn’t need to install an EFI fuel tuner. The stock
ECM was able to recalibrate itself to work with the new highperformance equipment, since we did them one at a time.
As is usually the case, the quest for more power continues,
so we’re throwing a set of S&S Cycle’s 551C chain-driven
cams (#106-4858/$314.95) in our ever-quickening Ultra.
Made for 2007 and later Touring bikes, the 551C is a low-tomidrange, torque-improving cam grind designed to provide
an increase in power from idle to 4000 rpm. This cam set
will work best with 96"-106" stock or mildly modified engines. And these cams are designed to use all the other stock
components such as lifters, pushrods, rocker arms, and valve
springs, so there’s no extra expense. In fact, this is a perfect
kit to install when you have to pull apart the gearcase section
to replace worn cam tensioner shoes. The labor and parts
costs are the same, except for the price of the new cams.
This young-in-years engine had quite a bit of mileage on it,
so we decided to play it safe and also upgrade the lifters
• Assembly lube
• Blue Loctite
• Red Loctite
• Torx T-25
• Torx T-27
• 3/16" Allen
• Snap ring pliers
• Steel straightedge
• Flat feeler gauge
• 1/4" wrench
• 5/16" socket
• 7/16" wrench (2)
• 1/2" socket
• 9/16" socket
• Torque wrench (in-lbs.)
• Torque wrench (ft-lbs.)
• Dial indicator
• JIMS alignment dowels (2)
• SE locking tool
• SE inner cam bearing puller
• SE inner cam bearing installer ■
Photos by Chris Maida
Dan’s lift with the
complete exhaust
system, both side
covers, and air
cleaner cover removed, as well as the
right floorboard and
pushrod assemblies.
The gearcase section
is emptied, and the
inner cam bearings
are removed.
AST MONTH WE SHOWED YOU HOW TO INSTALL A SET OF
66 • Motorcycle Bagger • October 2013 • Vol. 4, No. 7
Dan first checks the pinion shaft runout using a
2 dial indicator. He gets only 0.002", which is
acceptable. Dan also checked the pinion shaft
bushing in the support plate for excessive wear.
MotorcycleBagger.com
(tappets) with a S&S Tappet Set (#335350/$129.95). The S&S lifters are precision-machined to provide a precise fit
and are a perfect value for engines with
bolt-in cams, stock cams, and other performance valvetrain products.
So we didn’t have to open up the
rocker boxes, we simply cut out the stock
pushrods and replaced them with S&S’
Quickee Pushrod and Cover Kit (#1066051/$224.95). Using the Quickee kit,
we leave the rocker boxes just as they are,
greatly reducing labor costs. These
pushrods are made of chromoly steel, so
they flex less, which leads to more accurate valve timing. The Quickee kit works
with all displacement Twin Cams and
includes chrome pushrod covers.
Just like with the air cleaner and pipes,
this isn’t a street-legal set of cams. And
though you can get away without a fuel
tuner when doing an air cleaner or pipe
swap, and sometimes both like we did,
there’s no way you’ll get by without one
when installing cams. That’s why we installed a Dynojet Power Vision tuner
($549). We didn’t get the Auto Tune feature with the Power Vision since S&S has
Dan changes the inner cam bearings using a SE
3 puller and installer and the S&S-supplied bearings. Once he has removed the tool, Dan puts
some assembly lube onto both bearings.
mystry design
Once he has inspected the oil pump, put some
4 assembly lube onto all the gerotor gears, and
slipped a new S&S-supplied O-ring (don’t
reuse the old one!) onto the pump snout, Dan
reinstalls the pump onto the pinion shaft.
Dan then positions both new S&S cams into the
5 stock H-D inner cam chain with their alignment
dots next to each other, noting the directional
mark he made on the chain when he removed it.
68 • Motorcycle Bagger • October 2013 • Vol. 4, No. 7
MotorcycleBagger.com
a downloadable map for this exact threepart power package that worked great.
We also did this third part of our
power upgrade project at Rob’s Dyno, but
Dan was the one turning the wrenches
for us instead of Rob. The accompanying
dyno chart tells you what the bike now
puts out at wide-open throttle, but how
does it feel to ride the Ultra with its new
S&S Cycle performance enhancements?
Rob says, “This setup is great for touring!
There’s gobs of torque at low rpm and it
pulls like a freight train in sixth gear.”
Well, there ya go!
SOURCES
DYNOJET RESEARCH
702/399-1423
Dynojet.com
ROB’S DYNO SERVICE
978/895-0441
RobsDyno.com
S&S CYCLE INC.
866/244-2673
SSCycle.com
With some assembly lube on the bearing
6 surfaces on the end of the cams, Dan slips the
stock support plate over the cams. He then
checks that the dots are still aligned using a
steel straightedge.
After Dan slips the stock 0.100"-thick spacer
7 over the end of the front cam, he secures it
boyesen
using a new S&S-supplied retaining ring and
external ring pliers. He then moves the retaining ring to ensure it’s fully in its groove.
Dan installs the stock inner hydraulic chain
8 tensioner using the stock bolts, blue Loctite,
and a 3/16" Allen. He torques the bolts to
90-120 in-lbs.
70 • Motorcycle Bagger • October 2013 • Vol. 4, No. 7
MotorcycleBagger.com
bike barn
egide
After putting two new O-rings on the right case
9 and putting assembly lube on the cam lobes and
chain, Dan slips the support plate assembly into
the right case.
frankenstein
Dan secures the support plate to the right
10 case using the stock bolts, a little blue
Loctite, and a 3/16" Allen. He torques the
bolts to 90-120 in-lbs. as per the procedure
in the H-D manual.
Dan aligns the pump by spinning the engine
11 while using two JIMS alignment dowels, a
5/16" socket, blue Loctite, and the stock
bolts. When done, all four bolts are torqued
to 90-120 in-lbs.
72 • Motorcycle Bagger • October 2013 • Vol. 4, No. 7
MotorcycleBagger.com
To check that there’s endplay on the rear cam,
After slipping the original spacer onto the
14 Dan makes sure the rear cam sprocket rotates
12 rear cam, Dan secures both stock sprockets
onto the rear cam and pinion shaft using the
stock hardware, SE sprocket lock, and 9/16"
and 1/2" sockets.
freely and has slight in-and-out movement.
Dan checks sprocket alignment using a steel
Dan can now remove the rear cam sprocket,
ets. He uses a flat feeler gauge to see that the
gap between them is under 0.010".
sprocket alignment is aligned with the line
(arrow) on the face of the support plate.
➲
dft
SAE Horsepower
RPM (x1000)
SAE Torque (ft-lbs.)
▲
▲
13 straightedge across the face of both sprock- 15 and turn the engine over until the pinion
120
120
110
110
100
100
90
90
80
80
70
70
60
60
50
50
40
40
30
30
20
20
10
10
0
0
1000
1250
1500
1750 2000 2250
2550 2750 3000 3250 3500 3750 4000 4250 4500 4750 5000 5250 5500 5750
Baseline • Max Power = 75.2 • Max Torque = 93.6
S&S Cams • Max Power = 81.3 • Max Torque = 104.8
6000
Dyno provided by
Robs Dyno Service
robsdyno.com
CF: SAE, SMOOTHING @ 5
74 • Motorcycle Bagger • October 2013 • Vol. 4, No. 7
MotorcycleBagger.com
cruze tools
After Dan positions both sprockets into the
16 stock cam chain (noting the directional mark
he made earlier) with their alignment dots
next to each other, he slips both sprockets
onto their respective shafts.
Dan installs the new H-D sprocket bolts and
17 washers using the SE locking tool, red Loctite,
and a 1/2" and 9/16" socket. He torques the
bolts to 25 and 35 ft-lbs., respectively, as per
the service manual procedure.
Lindby
Dan installs the stock outer hydraulic chain
18 tensioner using the stock bolts, some blue
Loctite, and a Torx T-27. He then torques the
bolts to 90-120 in-lbs.
MotorcycleBagger.com
Vol. 4, No. 7 • October 2013 • Motorcycle Bagger • 75
j&p
skull crush
With a new S&S-supplied gasket in place,
19 Dan installs the cam cover using the stock
bolts, blue Loctite, and a 3/16" Allen. He
torques the bolts to 90-120 in-lbs. as per the
service manual procedure.
Dan pumps up each of the four new S&S
20 lifters with fresh engine oil through the oil
db sales
hole in the side of the lifter until the oil
comes out of the oil hole in the top of the
lifter.
Dan drops the lifters into their bores in the
21 right case with a flat side of the lifter against
the wall. He next puts both alignment pins in
their slots in the right case.
76 • Motorcycle Bagger • October 2013 • Vol. 4, No. 7
MotorcycleBagger.com
TIPS & TRICKS
After putting new H-D lifter cover gaskets
22 in place, Dan reinstalls the stock covers
using the stock bolts, blue Loctite, and a
3/16" Allen. He torques the bolts to
90-120 in-lbs. in a crisscross pattern.
➲
avon
Dan assembles all four S&S pushrod tubes,
23 using the stock collar, spring, and steel
washer. The new S&S O-ring is the last part
(arrow) on the upper tube.
After Dan installs new S&S O-rings into
24 both heads and all four lifter covers, he
slips the new S&S adjustable pushrods into
their tubes. These pushrods are all the
same length until adjusted.
78 • Motorcycle Bagger • October 2013 • Vol. 4, No. 7
DAN MAKES A MARK ON BOTH
cam drive chains so they will be
moving in the same direction as
before when they go back in
with the new S&S cams.
Before assembling anything,
Dan makes sure all old gasket
material is removed from the
stock parts and cases. He also
uses a Q-tip soaked in brake
cleaner to break down and
remove any oil trapped in the
bolt holes.
Don’t mix up the cam
support plate bolts with the
cam cover bolts, which are
longer. If you do, you will crack
the right case since the longer
cam cover bolts will bottom out
in the right case.
Dan aligns the oil pump by
spinning the engine while
torquing two JIMS alignment
dowels in stages to 45 in-lbs.
using a 5/16" socket. He then
installs two of the stock bolts,
with blue Loctite on them, and
torques all four to 90-120 in-lbs.
He then removes the two dowels
and installs the last two stock
bolts, with blue Loctite on them,
using a 3/16" Allen and torques
the bolts to 90-120 in-lbs.
When checking the sprocketto-sprocket alignment, push
the rear cam sprocket all the
way in against the support
plate. Then lay a steel straightedge across the face of both
sprockets, but the straightedge
must be flat against the pinion
sprocket. Use a flat feeler
gauge to see what the gap is
between the steel straightedge
and the outer face of the rear
cam sprocket. It must be under
0.010". If it’s not, change the
rear sprocket spacer to make
it so.
When adjusting the
pushrods, make sure both
lifters for the cylinder you’re
going to work on are at their
lowest point. After adjusting
the pushrods as per the S&S
instructions, you have to wait
until the lifters have bled down
before rotating the engine and
do the same for the other set of
pushrods. The lifters have bled
down when you can spin the
pushrods with your fingers. ■
MotorcycleBagger.com
25
After he has rotated the engine so the front
lifters are at their lowest point, Dan
positions the front pushrods and tubes in
the engine and adjusts them using a 1/4"
wrench and two 7/16" wrenches.
color rite
Once the front lifters have bled down and
26 Dan has done the same for the rear
pushrods, he pops the top clips into all
four pushrod tubes using a flat-bladed
screwdriver.
hitchdoc
Once Dan has fully assembled the bike and
27 cranked the engine over until the oil light
goes out, Rob uses a Dynojet Power Vision
fuel tuner and the maps on the S&S web site
to dial in the engine. MB
MotorcycleBagger.com
Vol. 4, No. 7 • October 2013 • Motorcycle Bagger • 79