1
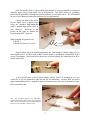
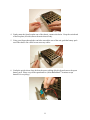
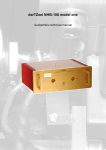
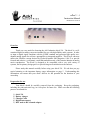
dAck! 2.0
Instruction Manual
Document revision 1.0
Overview
Thank you very much for choosing the Ack! Industries dAck! 2.0. The dAck! is a selfcontained digital-to-analog converter intended for use with high-fidelity audio systems. It takes
as input a digital signal compliant with the S/PDIF standard and generates high quality twochannel analog signals for use into a preamplifier or integrated amplifier. This D-to-A converter
utilizes the filterless concept devised by Ryohei Kusunoki (MJ Magazine, 1996-7) to provide
focused and cohesive, yet dynamic, sound that embodies many of the features inherent in analog
music reproduction. The dAck! is designed to be compatible with a very wide variety of
systems, and its primary design goal is to provide long-term satisfaction to the end user.
Please study this manual carefully before using your dAck! 2.0. We ask that you pay
special attention to the important battery usage information on page 5. Understanding this
information will ensure that your dAck! delivers its full potential for the duration of your
ownership.
Preparation for use
Your dAck! should be carefully removed from the packaging. Keep the packaging,
including the pink anti-static bag, in a safe place for future use. Make sure that the following
parts are accounted for:
1)
2)
3)
4)
5)
dAck! 2.0
Battery charger
Charger Cable
Digital interconnect
BNC male to RCA female adapter
1
The charger requires minor assembly before it can be used. The distribution cable is packed
separately from the charger and must be connected to the terminals of the charger before use.
You will need a Philips head screwdriver for assembly. Follow these steps:
1. Identify the polarity of the terminals on the
cable as well as on the charger (see photos
†
on right).
2. Unscrew the terminal screws slightly and
insert the terminal forks underneath the
square washers.
3. Tighten the terminal screws with moderate
force. Do not overtighten.
4. Put the plastic cap over the screw terminals to
prevent an accidental short. If the polarity is
reversed, the cap will not fit properly.
†
Do not connect charger with incorrect polarity to the dAck!, as this
will degrade and ultimately destroy the power cells.
Place the dAck! on a stable support surface in a secure location where it will not be
bumped into or knocked over. As with any high-fidelity equipment, a good support surface may
improve its performance by isolating it from external vibrations. Do not place any equipment or
small items on top of the dAck!’s vent holes. If you would like to prevent dust from entering the
chassis, it is OK to cover the unit with a light cloth when not in use.
Familiarize yourself with the dAck!’s inputs, outputs, and controls.
figures show the important features and their purposes.
Front
Back
2
The following
First, connect the dAck!’s outputs (Red=right channel) to your pre-amplifier or integrated
amplifier inputs using a high-quality pair of interconnects. The dAck! derives its grounding
point from the preamplifier through the ground conductor of your interconnect. We recommend
the use of Ack! Industries analog interconnects for best performance.
Connect the input of the dAck!
to your digital source’s digital output
using the included high-bandwidth
cable or another high-quality cable of
your choosing.
Referring to the
picture on the right, to connect the
keyed locking BNC connector:
While gripping the gnurled cowl,
1) Insert
2) Rotate clockwise 90° to lock
2
1
Plug the other end of the digital interconnect into your transport’s digital output jack (or
other digital source). An RCA-male to BNC-female adapter is included for compatibility with a
variety of transports. The picture below shows how to use the adapter for connection to an RCA
digital output (left):
A special BNC-male to RCA-female adapter (shown below) is included in case you
would like to use an aftermarket cable that has RCA terminations. Because BNC has much
higher bandwidth than RCA, using this adapter will not adversely affect the performance of your
RCA-terminated cable.
Note: The included adapters are impedancematched; aftermarket adapters may not provide the
same level of performance as the included adapters
due to incorrect impedance characteristic.
3
Plug the charger unit into an available power outlet (120VAC) and
connect the charger’s output to the charger in socket on the dAck!’s rear
panel. The quality of power supplying the charger has no effect on sonic
performance, so the charger does not need to be placed on a specially
conditioned AC circuit. It is advantageous to place the charger in a location
where its indicator lights will be easily seen.
Charger use
The indicator on the charger denotes the health status of the charger and battery. The
colors depict the state of the charger, and the condition of the batteries can be inferred by reading
this indicator.
POWER/FLOAT – When the charger is plugged into
the AC mains with no cells connected, the indicator
should be green. When the power cells are connected
to the charger, this indicator also shows when the
cells are float charging. This is the healthiest
condition and the dAck! should be kept in this mode
as often as possible.†
FAST CHARGE – When the charger is connected to depleted cells, they undergo
a rapid charge cycle. At this point, the indicator should turn orange. The orange
indicator will turn green when the charger enters float mode.
FAULT – A red indicator denotes fault status.
It indicates a grounding error,
batteries connected with incorrect polarity, or internal fault. If a red indicator
illuminates and you cannot determine the cause of the problem, please contact
Ack! Industries for assistance.
†
Technical note: When the indicator switches from yellow to green, the cells are not 100% charged. In actuality,
the charger switches to float status at about 90% capacity and gradually ramps the cells to 100% over a long period
of time.
4
Operation
When the power switch is flipped to the up position, your dAck! is energized and ready
for use. A blue indicator on the front panel will illuminate, showing that the circuit is receiving
power. When there is a compatible signal at the digital input, a green indicator will also
illuminate, showing that there is a data latch. Some digital transports maintain a datastream even
when not playing while others latch only when playing music, so the behavior of the latch
indicator will depend on your particular transport. The dAck! is designed to latch quickly to
incoming digital signals. If for some reason the unit fails to latch when first turned on, quickly
cycling power on the unit may yield the latch condition.
The dAck! will sound great as soon as it is turned on. However, allowing a few minutes
for the circuit to stabilize will result in best performance. Since the circuit does not run hot, the
only major break-in will be in forming and conditioning capacitor dielectrics. This will occur
over the course of a couple weeks, after which the unit will give a slightly warmer, fuller sound.
Since it has been designed for utmost simplicity, the dAck! will only decode 16-bit stereo
signals up to 96KHz (includes formats from personal computers). If provided with 24-bit stereo
data, it will truncate the data to 16 bits. If the input contains the wrong type of signal (for
example, DTS 5.1 from a DVD), the dAck! will still try to interpret the incorrect data, producing
noise from its analog outputs. In the case of multi-channel movies, the dAck! will only work
properly if the digital source is configured to downsample to two-channel stereo.
Important!
¾ For best battery life, we recommend that you not use your
dAck! for more than 8 hours between recharge cycles, or
about 10 CDs.
¾ When your dAck! is not being used, it should always be
switched to charge mode (switch in down position).
¾ Do not forget to turn off your dAck! when not in use or you may
severely diminish its battery performance.†
†
Note: If you discover you have forgotten to turn your dAck! off for several hours, immediately switch it into
charge mode and allow it to reach float charge (green) mode before use.
5
Care and Maintenance
When the switch is in the down position, the batteries are automatically being charged.
Keep the charger attached to your dAck! at all times, and remember to turn off your dAck! when
you are not listening to it. No other routine care is necessary. More details on battery and
charger use can be found in Appendix A at the end of this manual.
Store the batteries in a fully charged state. If you are not going to use your dAck! for a
long period of time, keep the charger on AC power and connected to the dack!. For very longterm storage, do not leave the dAck! connected to an unplugged charger – the batteries will
deteriorate if connected to a non-energized charger for a long period of time.
The dAck! is designed for use in the horizontal position. It can also be placed in a spacesaving vertical tower configuration with a small footprint. If this is the preferred configuration,
place it on its right side with the switch toward the top so that the heavy batteries are at the
bottom of the unit.
The enclosure can be cleaned with a slightly moist cloth. Avoid allowing water to enter
inside the chassis. A weak solvent such as rubbing alcohol can be used to remove smudges and
fingerprints. No other routine service is necessary.
With proper care, your dAck! will provide the same level of performance for years.
Happy listening!
Christopher S. Own
6
Technical specifications
The Ack! Industries dAck! 2.0 is a high-performance digital to analog converter. It
utilizes a transformer-coupled differential receiver compatible with AES and S/PDIF signals to
package the digital signal for data conversion. Digital to Analog conversion is provided by the
TDA1545A continuous calibration DAC chip from Philips. The DAC output is converted to
analog voltage signals using high-precision FET-input operational amplifiers from Analog
Devices biased into class-A operation for high linearity and low output impedance. Three
precision-regulated supplies power the main circuit, with bulk power provided by batteries for
perfect isolation and stable supply.
Special care has been taken to guarantee low noise and electrical isolation. The metal
chassis acts to block RFI and stray magnetic fields. The input is configured to latch very quickly
to incoming signals while isolating the downstream analog subsystem from noise and ground
loops. This also makes the dAck! an outstanding interface between hi-fi systems and PC’s,
which are notoriously noisy due to high-speed internal signals and switching power supplies.
Best performance will be obtained if a 75Ω cable with 75Ω BNC terminations is used (if
using a BNC cable, keep in mind that BNC termination alone is not an indicator of matched
impedance; many BNC terminations have a non-75Ω impedance spec, usually 50Ω).
The signal for each analog channel passes through a single ultra-precision bulk foil
resistor and a high-quality film capacitor. Ground is referenced to the preamplifer ground
through the RCA jacks.
Specifications:
Operating principle:
Input:
Outputs:
Quiescent current:
Battery-powered digital filterless D-to-A converter utilizing active solid state
amplification (patent pending)
High-bandwidth BNC input for receiving S/PDIF compliant signal
16-bit stereo only up to 96KHz
BNC male to RCA female adapter included
Gold-plated stereo single-ended outputs with Teflon dielectric
Output Z: <0.05Ω @ 1KHz into 10K load (<30Ω broad band)
Downstream component should have >10Kohm input Z
2V peak-to-peak for 1KHz 0dB signal (5Vp-p: high output option)
4mA per channel (matched)
Power supply:
Power consumption:
Charger supply:
Ultra-low noise rechargeable battery system
<0.07C
300mA automatic charger
Play time per charge:
Charge time:
Battery life:
6-8 hours maximum (recommended)
~1hr typical after 4 hours use, <5hr from deep discharge
1.5-4yr depending on usage
Dimensions:
Weight:
15.5cm x 19cm x 6.5cm (6.15” x 7.5” x 2.5”)
2.25kg (5lbs)
7
Warranty
¾ 30 day limited warranty on batteries
¾ 1 year parts and labor limited warranty
Batteries are covered for one month from date of purchase. Batteries will be replaced
within the 30-day warranty period in the event of failure to supply 4 hours of continuous power
after having had 24 hours of continuous float charge. The warranty coverage does not apply in
the event of battery misuse (i.e., deliberate deep discharge), incorrect connection, or use of
batteries for devices other than the Ack! Industries dAck!.
The parts and labor warranty covers defects in materials and workmanship in your dAck!
2.0, excluding batteries, for up to one years from the date of purchase. Warranty service or
replacement will be provided free of charge in the event of component failure. This does not
cover neglectful use, utilization in a way not specified in this manual, or normal wear and tear
(surface finish, humidity, etc.). In the event of service need, the customer is responsible for
transport costs to and from factory, and assuring safeguards such as adequate packaging, correct
anti-static precautions, and insurance provisions.
All questions and concerns should be directed to Ack! Industries
WWW: http://www.ack-industries.com
E-mail: [email protected]
8
Appendix A: Maintaining the life of your power cells
The following table shows the recommended schedule for charge/discharge:
rating
(recommended)
cycle time
max cycle
time
recharge
300mA
0-8hr
10hr
overnight
For best battery life, cycle the batteries in a shallow fashion, and try to allow the cells to reach
float status before using them again. We do not advise exceeding the recommended cycle time.
If you discover that you have forgotten to turn your dAck! off for several hours beyond the
recommended cycle time, immediately switch to charge mode and allow it to reach float charge
mode before use.
As the power cells age, their maximum cycle time will get shorter. Appropriately derating (shortening) the cycle time will allow more recharge cycles out of the cells. When the
maximum cycle time becomes too short for your listening habits, it is time to replace the cells.
Replacement power cells are available from Ack !Industries.
The usage schedule presented is designed for battery longevity – if you do not mind
shortening battery lifespan, you can push the cells further. The key to battery longevity is to
keep the indicator green most of the time, which means remembering to turn the dAck! off when
not in use.
9
Appendix B: Battery replacement
The battpAck! is a replacement battery module for the Ack! Industries dAck!. Installation will
take under 10 minutes and requires no tools. The diagram below shows the general construction
of the dAck! and demonstrates how the battery pack fits within the chassis.
Please follow the step-by-step instructions below for the replacement. It is worthwhile to read
through the directions first to familiarize yourself with the procedure. Before replacing the
batteries, protect the dAck from ESD damage by touching your hand to the chassis of a grounded
metal appliance to discharge any static buildup.
Extraction of the spent cells:
1. Place your dAck! on a clean, well-lit, and static-free surface.
2. While holding the acorn nut on the front panel, unscrew the thumb nut. Take care not to lose
the small washer. Set the washer and thumb nut aside in a safe place.
3. Pull the threaded rod through the front panel out of the dAck! 2.0. The faceplates should
come loose. Like the thumb nut and washer, place the threaded rod aside.
10
4. Gently rotate the front faceplate out of the chassis, counter-clockwise. Keep the switch end
of the faceplate (left side) nearer the main chassis body.
5. Using your fingers through the vent holes toward the rear of the unit, push the battery pack
out of the chassis. Be careful to not stress any cables.
6. Unclip the quick-release clasp lock on the power cabling (black/red) and remove the spent
battery pack. Please recycle the spent batteries. (Most RadioShack® locations accept
batteries for recycling.)
11
The assembly process is simply the reverse:
7. Insert the new battery pack part-way into the chassis.
8. Attach the quick-release clasp lock on your new battery pack to the termination inside the
dAck! 2.0. Ensure that the clasp has engaged, however do not apply too much pressure.
9. Move the battery pack all the way into the chassis and replace the front and rear chassis
plates, making sure not to leave any loops of internal wire dangling outside.
10. Carefully insert the threaded rod all the way through the dAck! 2.0 making sure it does not
pinch any wires against the battery pack. The rod will protrude out of the back by several
millimeters if inserted correctly.
11. Replace the washer and the thumb nut and tighten the nut down. Do not overtighten! The nut
should be tight enough so that the plates are flush with the chassis and do not move.
12. Turn the power switch on. If the blue LED illuminates, you are back in business.
Congratulations, your dAck! 2.0 is ready to go.
12