1
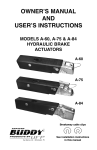
The Bearing Lube system provides an easy way to fill axle hubs and
repack bearings with grease to ensure proper bearing lubrication.
To locate the grease (zerc) fitting, simply remove the rubber plug in the
hub dust cap. Passages inside the spindle allow grease to flow into the space
between the inner bearing and seal. As you add grease, it will flow through
the bearings toward the front of the hub. If there is evidence of water around
the zerc area, add grease until all contaminated grease is driven out. If the
grease is in good condition when inspected, add a small amount of grease
until you see grease movement between the hub and spindle.
WHEN TO GREASE
Grease prior to towing and after launching or retrieval every time. Add
grease to expel any water or contaminants that may enter hub cavity during
hub submersion. If water enters the hub, wheel bearing damage and failure
can occur.
NOTE: Evidence of water contamination could void warranty.
Reference warranty policy. Use only a hand operated gun to add lubricant.
Adding grease with a power gun can damage seals.
2
RECOMMENDED LUBRICANT
Use a good quality, EP #2 based grease. Use a water repellent
grease if you'd like. Grease consists of oil, soap and additives. Oil sometimes separates from the soap and a small amount may leak under the rear
seal. This is normal and won't cause any problems. Select a quality grease
and stay with it. Some grease bases aren't compatible with others which can
cause the combination to break down.
DIAPHRAGM IN DUST CAP PLUG
The rubber diaphragm may bulge out slightly when the grease-filled
hub is hot (a non-brake hub will normally run at 120o to 150o F). This design
feature prevents excessive pressure buildup inside the hub.
BEARING REPACKING AND INSPECTION
There is no need to repack bearings in the traditional manner because you
achieve the same result by adding grease through the zerc fitting. The new
grease entering the hub will push old grease, water and contaminants out the
front. If water remains in the hub for extended period of time, you should check
bearings to be sure they haven't been damaged.
BEARING ADJUSTMENT
Wheel bearings have been precisely torque set at the factory. To maximize bearing life, we suggest you check bearing adjustment every 2 or 3
years. Jack up one side of the trailer. Grip the edge of the tire on both sides
and try to rock or move it. If you can move the outer edge of the wheel
more than 1/8" (end play), remove the dust cap, the cotter pin and spindle
nut retainer. Tighten the spindle nut to 18-24 inch pounds, which is slightly
more than "finger tight". Don't over-tighten. When the nut is positioned
properly the wheel should turn easily and there should be no end play
(lateral movement) of the hub with respect to the spindle.
To replace the nut retainer, find a position where it will fit over the
spindle nut so that the cotter pin can be inserted without having to loosen
or tighten the nut. Insert a new cotter pin. Recheck end play. Spread the
ends of the cotter pin to keep it in place. Add grease as necessary and
replace the dust cap.
3
Axle
Load Capacity
1500#-2500#
2900#-3750#
4200#
5200# (6 Bolt) 2.328”
5200# (6 Bolt) 2.441”
5200# (8 Bolt)
Inner
Cone
Cup
L44649
L68149
L68149
25580
25580
25580
L44610
L68110
L68110
25520
25520
25520
4
Outer
Cone
Cup
L44649
L44949
L68149
LM67048
15123
14125A
L44610
L44610
L68110
LM67010
15245
14276
Seals currently in use are:
Axle Load
Capacity
1500#-2500#
2900#-4200#
5200# (6 Bolt)
5200# (8 Bolt)
Seal Outer & Inner
Diameter
1.98” x 1.38”
2.33” x 1.68” or
2.56” x 1.68”
3.38” x 2.13”
3.26” x 2.13”
3.38” x 2.13”
Inner
Bearing Cone
L44649
L68149
L68149
25580
25580
SEAL CONVERSION INFORMATION
Replacement Part Numbers
Seal
Trailer
Description
Buddy
NOK
198-138-SP1-1 07026
AB1990EO
233-168-SP2-1 07027
AD2527EO
256-168-SP2-1 07028
AD2528EO
326-213-SP2-1 07029
AD7131EO
338-213-SP2-1 07040
AD8717EO
WHEEL BOLTS (OR CONE NUTS)
CR
13557
16657
–––––
–––––
21352
National
482163N
473317
––––––
––––––
––––––
If you remove a wheel from a hub it is very important to properly tighten
the wheel bolts (or cone nuts) when you reinstall the wheel.
Mount the wheel on the hub and start the wheel bolts into the hub as far as
possible by hand. Then, using a proper lug wrench, tighten each wheel
bolt moderately tight. Work your way around the wheel, tightening every
other bolt until all bolts have been tightened. Then work your way around
the wheel again, using the every other bolt sequence, and tighten each bolt to
torque recommended by trailer manufacturer.
It is important that the wheel be centered on the hub. The wheel may reseat
itself during the first miles of travel after installation. After 50-100 miles of
travel, check wheel bolt tightness. Check annually thereafter.
DO NOT use impact type wrenches. These can overstress fasteners,
causing them to fatigue and break during service.
5
6
BEARING PROTECTORS
For additional bearing protection, you can install wheel bearing protectors
on your axle. Remove the dust cap, check bearing adjustment, and fully grease
the hub through the zerc to replace all grease. Remove the zerc. Fill the
protector half full of grease and install it into the hub. Check the lubricant level
per the wheel bearing protector installation instructions.
A wheel bearing protector offers the advantage of keeping the hub
pressurized. The positive internal pressure assures that all moisture is kept out.
Wheel bearing protectors permit lubricant level check without removing the
dust cap or adding grease.
––––––––––––––––––––––––
We are confident that our products will contribute to your boating
pleasure by eliminating worry and trouble with trailer running gear.
If we can be of assistance or answer any questions, please contact our
customer service department.
7
Trailer Buddy Bearing Lube Axle Assembly
Two Year Limited Warranty
Bearing Lube equipped axle assemblies are guaranteed against bearing failure
and against defects in materials or workmanship under normal use and service for a
period of two years after the date of trailer purchase by the first owner.
Limitations of Coverage
This warranty does not cover:
• Normal wear and tear. Damage resulting from failure to keep bearings lubricated and hub full of grease.
• Damage caused by accidents. road hazards, overload or modification of products
• Failure attributable to improper assembly of, or damage to components if hub
is removed from axle spindle.
• Damage caused by use of wheels not supplied by trailer manufacturer.
• Failure of drum brakes (warranted by the brake manufacturer), worn brake
linings and corrosion or damage of brake components caused by moisture or
improper adjustment.
This warranty is limited to defective parts replacement only. Charges for installing replacement parts, damage incurred to other equipment as well as incidental or
consequential damages connected therewith are excluded.
Some states do not allow the exclusion or limitation of incidental or consequential damages. so the above limitations may not apply to you.
Repair or Replacement Procedure
If a failure or defect occurs during the warranty period, promptly contact
warrantor’s (UFP) customer service department for RGA number. Until such notice is
received, UFP will not be responsible for any repair or replacement costs. UFP, at its
option, may require return of the axle assembly or the component in question to the
factory, transportation charges prepaid. UFP will replace, FREE OF CHARGE, either
the entire axle assembly or the part that proves defective, at its option. Any part found
not to be defective will be returned freight collect with an explanation.
Use of Vehicle Identification Number (VIN)
The VIN is a 17-digit number located on the trailer identification label on the left
side of the trailer. Be sure to include the VIN number and the date of trailer manufacture in all communications with UFP.
Purchaser’s Rights
This warranty gives you specific legal rights, and you may have other rights
which vary from state to state
Product Improvement
UFP has a policy of continuous product improvement. We reserve the right to
change or improve the design of our products without assuming any obligation to
modify any product previously manufactured.
32713
12/06
(760) 744-1610
www.ufpnet.com
135 Sunshine Lane ★ San Marcos, CA 92069