1
EasyOne-CS
Field Service Manual
EasyOne-CS Spirometer
Manufactured for GE Medical Systems Information Technologies
ndd Medizintechnik AG
Technoparkstrasse 1
CH-8005 Zürich, Schweiz
www.ndd.ch
2030434-006 Rev. D
2030434-006 Rev. D
EasyOne-CS Field Service Manual
Page 1
Contents
1
Manual Purpose .............................................................................................................................. 2
2
Intended Audience .......................................................................................................................... 3
3
Introduction ................................................................................................................................... 3
4
Operation Principle ......................................................................................................................... 3
5
Technical Details ............................................................................................................................ 4
5.1
EasyOne-CS Spirometer Handheld Unit ........................................................................................... 4
5.2
Screen-Connector ........................................................................................................................... 5
5.3
Block Diagram ................................................................................................................................ 6
5.4
Printed Circuit board....................................................................................................................... 6
6
Specifications ................................................................................................................................. 7
6.1
EasyOne-CS Model 2001 Spirometer .............................................................................................. 7
6.2
EasyOne-CS Model 2010 Screen-Connector ................................................................................... 8
7
Replacement Parts List .................................................................................................................... 8
7.1
Manuals ......................................................................................................................................... 8
7.2
Accessories .................................................................................................................................... 9
7.3
Spare Parts .................................................................................................................................. 10
7.4
Exchange Unit .............................................................................................................................. 12
8
Checkout Procedure ...................................................................................................................... 12
9
Hidden Keys ................................................................................................................................. 13
10
Device Error Codes ........................................................................................................................ 14
11
EasyOne-CS Device Software Update .............................................................................................. 15
11.1
Introduction ................................................................................................................................. 15
11.2
Validated Upgrade Steps .............................................................................................................. 15
11.3
Preparation .................................................................................................................................. 15
11.4
Unpacking of Upgrade Package .................................................................................................... 15
11.5
Installation of EasyFlash PC Software ............................................................................................ 15
11.6
EasyOne-CS Device Software Update Procedure ............................................................................ 17
12
EasyWare PC Software Installation ................................................................................................. 18
13
EasyOne-CS Lithium Battery Replacement ...................................................................................... 20
13.1
Background .................................................................................................................................. 20
13.2
Environment ................................................................................................................................. 21
13.3
Preparation (save database) ......................................................................................................... 21
13.4
Battery exchange procedure ......................................................................................................... 22
13.5
Restart EasyOne-CS ...................................................................................................................... 23
13.6
Restore database ......................................................................................................................... 23
14
EasyOne-CS board with sensor and housing parts Replacement ....................................................... 23
14.1
Background .................................................................................................................................. 23
15
Appendix ...................................................................................................................................... 25
15.1
Schematic Diagrams ..................................................................................................................... 25
2030434-006 Rev. D
EasyOne-CS Field Service Manual
Page 2
Document History
Version
2030434-006 Rev. A
2030434-006 Rev. D
Description
First Release
Chapter 7.1 with new content
Chapter 7.2 with V2.9.5
Chapter 9 with additional comment for 1-2-5
Chapter 11.2 with Windows 2000, XP or Vista
Chapter 11.3 update: added resource update
Chapter 8 updated and renamed as ‘Checkout Procedure’
Chapter 12 EasyWare PC Software Installation - new
This page with additional addresses
Header info modified to “EasyOne-CS Field Service Manual”
Chapter 7.2 Accessories – CD pictures adapted to V2.9.5
Chapter 11 modified to document update FW v4.1 to v4.3
2030434-006 Rev. C
2030434-006 Rev. D
Datum
August 8, 2006
August 31, 2009
Octobre 27, 2009
November 6, 2009
Europe:
ndd Medizintechnik AG
Technoparkstrasse 1, CH-8005 Zurich, Switzerland
Tel.: +41 44 445 29 70
Fax: +41 44 445 25 31
Web: www.ndd.ch
USA:
ndd Medical Technologies
Two Dundee Park
Andover, MA 01810
Tel: +1 877 904 0090
Fax: +1 978 470 0924
Web: www.nddmed.com
Asia - Please contact GE Healthcare:
Asia Headquarters
GE China Co., Ltd.
No1 Huatuo Road,
Zhangjiang Hi-Tech Park Pudong,
Shanghai, P.R.China 201203
Tel: +86 21 38777888
Fax: +86 21 38777402
Distributed by:
GE Medical Systems Information Technologies, Inc.
8200 West Tower Avenue, Milwaukee, WI 53223 USA
Tel.: +1 414 355 5000
+800 558 5120 (USA only)
Fax: +1 414 355 3790
1 Manual Purpose
This manual supplies technical information for service representative and technical personnel so they
can maintain the equipment to the assembly level. Use it as a guide for maintenance and electrical
repairs considered field repairable. Where necessary the manual identifies additional sources of
relevant information and or technical assistance.
See the operator manual for the instructions necessary to operate the equipment safely in accordance
with its function and intended use.
2030434-006 Rev. D
EasyOne-CS Field Service Manual
Page 3
2 Intended Audience
This manual is intended for the person who uses, maintains, or troubleshoots this equipment.
3 Introduction
The EasyOne-CS Spirometer uses digital ultrasonic flow measurement technology for fast, accurate,
reliable operation. The EasyOne-CS was designed for full range testing in primary care, specialty
physician, industrial and hospital settings. It offers automated comparison to predicted values, preand post Broncho Dilator comparisons, interpretation of results and test quality control that
automatically assesses patient effort offering helpful suggestions to obtain optimum results. Optional
easy to read and interpret color printout with graphic display for instant test review is available. The
single-patient-use spirette minimizes risk of cross-infection.
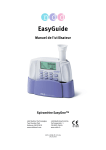
4 Operation Principle
This EasyOne-CS flow sensor is equipped with two ultrasonic transducers, mounted at different sides of
the flow channel. In order to determine gas flow (and molar mass), ultrasonic pulses are transmitted in
up- and downstream direction. Precisely measured transit-times are the basis for determining flow and
molar mass. The following figure shows a diagram of the flow sensor including its internal sound
transmission path.
Figure 1: Schematic of EasyOne-CS flow sensor
2030434-006 Rev. D
EasyOne-CS Field Service Manual
Page 4
5 Technical Details
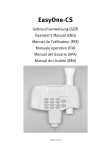
5.1
EasyOne-CS Spirometer Handheld Unit
The following pictures show the top, rear and bottom views of the EasyOne-CS.
Figure 2: Top view of EasyOne-CS
Figure 3: Rear view with empty battery compartment
The two screws on the back side are used to open EasyOne-CS. With the exception of the lithium
battery there are no serviceable parts inside the unit. Therefore do not open the unit!
Figure 4: Bottom view of EasyOne-CS
The bottom view shows the name plate, the serial number and the EasyOne-CS-to-Screen-Connector.
2030434-006 Rev. D
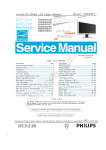
5.2
EasyOne-CS Field Service Manual
Screen-Connector
The following pictures show the top and bottom views of the EasyOne-CS Screen-Connector.
Figure 5: Screen-Connector top view
Figure 6: Screen-Connector bottom view
The Screen-Connector uses a standard USB connection to the PC.
Page 5
2030434-006 Rev. D
5.3
EasyOne-CS Field Service Manual
Page 6
Block Diagram
The following picture shows the functional block diagram of the EasyOne-CS Spirometer.
Flow Sensor
ASIC
Buzzer
Real Time
Clock (RTC)
Microcontroller
M16C62
Graphic LC
Display
Serial Data
Flash
Screen
Connector
Keypad
PC (USB)
ON/OFF
Power
Management
5.4
EZ1-BlockDiagram.sdr
Printed Circuit board
All electrical components of EasyOne-CS are mounted on a single PCB.
With the exception of the lithium battery no components can be serviced.
The following two pictures show a top and bottom view of the PCB.
Figure 7: Bottom view of EasyOne-CS PCB
The lithium battery located on the top right of the PCB has an approximate life time of 5 to 10 years. In
early revisions of the hardware the lithium battery is soldered on the board.
2030434-006 Rev. D
EasyOne-CS Field Service Manual
Page 7
Figure 8: Top view of EasyOne-CS PCB (without EMI shielding)
6 Specifications
6.1
EasyOne-CS Model 2001 Spirometer
Size:
Weight:
Measuring accuracy
Measuring range:
Resistance:
Display:
Data entry:
Data memory:
Test modes:
Parameters:
Respiratory tube:
Measurement principle:
Adult predicted:
Pediatric predicted:
Power supply
Power consumption:
Report:
Storage:
83 x 158 x 43 mm (3.3 x 6.2 x 1.7 inches)
242 grams (8,6 ounces), with batteries
Volume: ±2% or 0.050 l
Flow:
±2% or 0.020 l/s, (except PEF)
PEF:
±5% or 0.200 l/s
MVV:
±5% or 5 l/min.
Volume: ±12 l
Flow:
±16 l/s
below 0.3 cm H2O/L/s
64 x 160 graphic display
14-key keyboard
For up to 700 tests, stored in EasyOne CS
FVC, FVL, Slow VC, MVV, Pre/Post
FVC, MVV, FEV6, FEV1, FEV1/FVC, FEV1/VC , FEV1/FEV6, MEF25 (FEF75),
MEF50 (FEF50), MEF75 (FEF25), MEF25%-75%, PEF, FET, FIVC, PIF, IVC, ERV,
IRV, pre-post % variation, Lung Age
Disposable spirette respiratory tube
Ultrasound transit-time measurement
NHANES-III, Knudson_83, Knudson_76, Crapo, Morris, ERS (ECCS/EGKS),
Forche (Austria), Sapaldia (Switzerland), Roca (Spain), Berglund, Gulsvik,
Hedenström, Gore, Cherniak (only for MVV)
Dockery (Harvard), Hsu, Zapletal, Polgar, Hibbert
2 alkaline batteries, Type AA, 1.5V
Typical 0.6 W
A4
Temperature: -20 to 50 °C
Relative humidity: 5% to95%
Ambient pressure: 500 to 1060 hPa
2030434-006 Rev. D
Operating conditions:
Certifications and standards:
EasyOne-CS Field Service Manual
Temperature: 0 to 40 °C
Relative humidity: 0% to 95%
Ambient pressure: 500 to 1060 hPa
CE Declaration of Conformity
C CSA US approval, CAN/CSA-C22.2 No. 601.1-M90, S1-94, CSA 601.1
Amendment 2:1998, UL Std No. 2601.1
FDA 510 (k) approval, K993921
EasyOne-CS meets or exceeds the published targets of the European
Respiratory Society (ERS), the American Thoracic Society (ATS) and the
National Lung Health Education Program (NLHEP).
Instrument classification:
Life time:
6.2
Page 8
Type BF applied part (when used with a PC, protection class 2
according to IEC 60601-1)
Instrument not suitable for use in flammable anesthetic gases in mixtures
with O2 or NO.
7 years
EasyOne-CS Model 2010 Screen-Connector
Size:
Weight:
Power supply:
Power consumption:
Function:
Interface:
64 x 44 x 25 mm (2.5 x 1.7 x 1.0 inches)
82 grams (3 ounces)
From USB port
Type 0.15W
Connects the EasyOne-CS spirometer to a PC
Standard USB type A connector for connection to PC
Pins: 1 = VBus, 2 = D–, 3 = D+, 4 = GND
Storage:
Operating conditions:
PC:
Temperature: -20 to 50 °C
Relative humidity: 5% to 95%
Ambient pressure: 500 to 1060 hPa
Temperature: 0 to 40 °C
Relative humidity: 0% to 95%
Ambient pressure: 500 to 1060 hPa
The PC must comply with corresponding IEC standard (ex. IEC 60950-1. The
user is responsible that requirements of IEC 60601-1-1 for safety of medical
electrical systems are met.
7 Replacement Parts List
The following parts are available for replacement:
7.1
Manuals
Part Number
Short Description
2030434-006 MNL SVCE EASYONE-CS
2030434-013
2030434-014
2030434-015
2030434-016
2030434-017
2030434-018
2030434-019
2030434-020
2030434-021
2030434-023
Description
Field Service Manual (this document)
Operator’s Manual German
Operator’s Manual English
Operator’s Manual French
Operator’s Manual Italian
Operator’s Manual Spanish
Operator’s Manual Portuguese
Operator’s Manual Danish
Operator’s Manual Dutch
Operator’s Manual Chinese
Operator’s Manual English-US
2030434-006 Rev. D
7.2
EasyOne-CS Field Service Manual
Accessories
Part Number
Short Description
2030431-003
CABLE EASYONE-CS - PC
Description
2030431-005
CD EASYWARE V2.9.5
CD with EasyWare V2.9.5 software
2030431-006
SPLY SPIRETTES #50
50 spirettes
2030431-007
SPLY SPIRETTES #200
200 spirettes
2030431-008
SPLY NOSECLIP #25
25 nose clips
Screen-Connector, connects EasyOne-CS with
the PC via USB connection
Page 9
2030434-006 Rev. D
EasyOne-CS Field Service Manual
2030431-009
SPLY PAD FOR NOSECLIP #100
100 pads for noseclips
2030431-010
SPLY CALIBRATION SYRINGE EASYONE-CS
Calibration syringe
7.3
Spare Parts
Part Number
Short Description
2033231-001
SPARE EASYONE-CS FRONTHALF
Description
Case front half
Page 10
2030434-006 Rev. D
EasyOne-CS Field Service Manual
Part Number
Short Description
2033231-002
SPARE EASYONE-CS REARHALF
Description
2033231-003
SPARE EASYONE-CS BATTERY DOOR
Battery door
2033231-004
SPARE EASYONE-CS KEYPAD
Keypad
2033231-005
SPARE EASYONE-CS SCREW SET
Screw set, consisting of:
- #1 Spring lock ring 12mm
- #2 Torx screw K30x6, WN1452
- #2 Washer
- #2 Allen screw M3x25
- #2 Hook-sleeve 5.6x6.5
2033231-006
SPARE EASYONE-CS BOARD WITH SENSOR
Case rear half
-
PCB board with sensor and
programmed serial number
Page 11
2030434-006 Rev. D
Part Number
Short Description
EasyOne-CS Field Service Manual
Description
-
2033231-007
SPARE EASYONE-CS LITHIUM BATTERY
7.4
Page 12
Serial number label (Silver label)
BR1225 Lithium battery coin
Exchange Unit
Part Number
Short Description
2030431-002
RCDR EASYONE-CS
Description
EasyOne-CS unit for exchange
8 Checkout Procedure
After repair or maintenance of the EasyOne-CS the following procedure is recommended in order to
check correct operations of EasyOne-CS:
Optional step: If all data in EasyOne-CS must be deleted, perform the ‘hidden key’ sequence 12-5 described in the following chapter in order to perform a factory reset. Please be aware that
this step clears all customer data and resets the device to factory default settings.
Get a calibration adapter and a calibration syringe (2030431-010)
Ensure that the correct syringe volume is entered in the instrument’s configuration setting.
Choose item “Check calibration” in the main menu of EasyOne.
2030434-006 Rev. D
EasyOne-CS Field Service Manual
Page 13
Connect the spirometer as shown below using the calibration adapter and the syringe. Ensure
that the piston is fully inserted and at the stop position.
Now press ENTER.
Wait until the baseline has been set and you hear an audible signal.
Now execute one full inspiratory pump stroke followed by one full expiratory pump stroke at
moderate speed.
After you perform the maneuver, you will see the text "Accuracy confirmed" at the top of the
display and, beneath it, the percentage deviation and the average flow velocity of the pump
stroke.
If desired, make a printout of the calibration report.
9 Hidden Keys
The “hidden key” sequences access special features that are not available in the standard menu
structure of EasyOne-CS. The following table shows what key sequences are available. The column
labeled ‘Location’ indicates in what menu / screen the described key sequence has to be used.
Caution: The key sequences should not be used in conjunction with patient testing.
Location
Key
sequence
Description
Main Menu
Device self test error
screen
Device info screen (from
Configuration Menu).
Device info screen
1-3-5
1-3-5
Factory defaults (same as in Configuration Menu).
Ignore error and go on. Use only for troubleshooting! Do not
perform a patient test, because the results could be errorneous
Show additional device information.
Device info screen
Device info screen
Device info screen
1-2-6
1-2-7
1-2-8
Device info screen
1-3-9
1-2-4
1-2-5
Hard factory reset (configuration settings are reset and database is
deleted (In case of synchronisation with EasyWare, please do not
forget to synchronize EasyOne with new database.)
FVC filter disable temporarily (until next power cycle).
Switch off BTPS correction temporarily (until next power cycle).
Switch off flow linearity correction temporarily (until next power
cycle).
Restore corrupt database: Caution use only for inconsistent
databases
2030434-006 Rev. D
EasyOne-CS Field Service Manual
Page 14
10 Device Error Codes
Internal errors are reported using the following screen:
ERROR
Device Selftest
Failure #xx
Please contact
service
The number xx indicates the type of error that is detected. The following list shows all error numbers
and a description of the internal error.
No.
1
2
3
4
5
6
7
13
14
15
16
17
18
19
20
21
22
23
24
25
49
50
51
52
53
54
55
56
57
65
66
67
68
69
70
144
Description
internal software error (wrong argument)
internal software error (unsupported)
internal software error (timeout)
internal software error (data inconsistent)
internal software error (write error)
internal software error (read error)
internal software error (not found error)
internal software error (WD timeout)
the ultrasonic receive amplitude is too low (check spirette insertion)
the ultrasonic receive amplitude is too high (check spirette insertion)
Bootloader software inconsistent (CRC failure)
User software inconsistent (CRC failure). Update EasyOne-CS device software.
Calibration data inconsistent.
Failure of flash memory.
Flow sensor transit time range check error. Possible reasons: a) Blocked sound path, e.g. caused by
wrongly inserted spirette, b) almost empty batteries.
ndd ASIC serial transmission error (STX expected)
ndd ASIC serial transmission error (sequence error)
ndd ASIC serial transmission error (unknown character)
Real time clock RAM error
Configuration data inconsistent (lithium battery failure possible)
internal software error (overrun error)
internal software error (timeout error)
internal software error (storage error)
internal software error (record structure error)
internal software error (address error)
Serial data flash or serial communication data inconsistent (CRC failure)
internal software error. Writing to the internal Flash failed (flash command sequence error)
internal software error. Erasing the internal Flash failed (flash block erase error)
internal software error. Writing to the internal Flash failed (flash program error)
internal software error. Writing to the internal Flash failed (flash block program error)
internal software error. Accessing the internal Flash failed (flash busy)
First record of database reached. Go beyond this record failed (FIRST_RECORD)
Last record of database reached. Go beyond this record failed (LAST_RECORD)
No valid record in the database found (NO_VALID_RECORD)
internal software error (UNKNOWN_ERROR)
Sensor serial communication error
2030434-006 Rev. D
EasyOne-CS Field Service Manual
Page 15
11 EasyOne-CS Device Software Update
11.1 Introduction
The internal software of EasyOne-CS is stored in a Flash EPROM. It is therefore possible to update the
internal software. The following procedure describes how this update is executed.
11.2 Validated Upgrade Steps
The following upgrade steps are validated:
Old Version
New Version
Item Number
EasyOne-CS device software
CRC
V04.01.00.00
V04.03.00.00
2033231-008
GE-EOV04030000-P-EU_Resources.hex
with EU language package
0xF3D7
11.3 Preparation
The following items are required:
2033231-008.zip (upgrade package with EasyFlash and EasyOne-CS device software V4.3)
ndd Screen-Connector cable 2030431-003.
PC program EasyFlash, V2.4.12 or higher.
EasyOne-CS device software for the download (*.hex).
PC with Windows 2000, XP or Vista (all 32 Bit).
The following installation description presumes that you have basic knowledge of your PC operating
system.
11.4 Unpacking of Upgrade Package
After getting upgrade package 2033231-008.zip the zip archive can be extracted to a folder of your
choice, e.g. to C:\nddmed\2033231-008.
11.5 Installation of EasyFlash PC Software
The PC software EasyFlash is needed to update EasyOne-CS device software:
1. Start “C:\nddmed\2033231-008\EasyFlash\Setup.exe” to install the EasyFlash software.
2030434-006 Rev. D
EasyOne-CS Field Service Manual
2. Click “Next >”
3. Select target installation folder if you prefer another one. Click “Next >”.
4. Click “Next >”
5. The EasyFlash software is now installed on your PC. Click “Close” to terminate the setup
program.
6. To start EasyFlash you find an appropriate short cut in the start menu of your PC.
Page 16
2030434-006 Rev. D
EasyOne-CS Field Service Manual
Page 17
11.6 EasyOne-CS Device Software Update Procedure
In order to update the EasyOne-CS device software follow this procedure:
1. Connect the EasyOne-CS Screen-Connector with an unused USB port of your PC.
2. Turn the power of EasyOne-CS on and connect it with the ScreenConnector. The EasyOne-CS
display shows: „EasyOne“.
3. Start the PC software “EasyFlash”.
4. Set “Device Selection” to “EasyOne” and communication port to “Screen Connector”.
5. Press the “Update Device Info” button. The window on the right side shows the Model and the
version information of the EasyOne-CS.
6. The device software can be selected through selecting the “Open” icon or with menu command
“File/Open” C:\nddmed\2033231-008\ EasyOne-CS V4.3 Firmware EU\GE-EOV04030000-PEU_Resources.hex”).
7. The programming is started by pressing the “Download” button. You are requested to enter
your company and user name.
8. Under certain circumstances the following message can appear.
In order to procede perform the following steps.
a. Click “OK”.
b. Disconnect EasyOne-CS from the ScreenConnector. The display of EasyOne-CS shows
“Receive Idle mode, Setting 19200 Baud”.
c. Reconnect EasyOne-CS with the ScreenConnector
d. Click “Update Device Info” and press the “Download” button again.
9. During the programming of EasyOne-CS a progress bar is shown. The programming takes
approx. 3 to 5 minutes. Please do not interrupt the programming process. After successful
programming the following message is shown:
10. The EasyOne-CS device has to be restarted using the ON/OFF key.
2030434-006 Rev. D
EasyOne-CS Field Service Manual
Page 18
11. The correct programming can be checked by pressing “Update Device Info” button and
validating “Firmware Version” and “CRC” information.
Troubleshooting:
If the programming of the software is interrupted: Turn the power of EasyOne-CS off and turn it
on again. Retry the programming procedure.
12 EasyWare PC Software Installation
You will require Administrator privileges to install the software. Proceed as follows:
Do not yet connect the ScreenConnector to the PC.
You will require Administrator privileges on the PC in order to install the software.
Quit all programs and insert the EasyWare CD into your CD ROM drive. The installation routine
should start automatically within 30 seconds of inserting the CD. If the installation routine does
not start automatically, switch to root directory on the CD-ROM and run the
"SmartInstallation.exe" program. You will then see the following window:
2030434-006 Rev. D
EasyOne-CS Field Service Manual
Page 19
Click on "Install EasyWare".
Click on "Next >".
In the bottom part of the window, you can still select whether this application is to be installed
for all users ("Everyone") or for you only ("Just me").
Click on "Next >" to confirm the displayed installation path. If you wish to change the displayed
installation path, you can do this by clicking on "Browse…"
2030434-006 Rev. D
EasyOne-CS Field Service Manual
Page 20
Confirm the summarized installation information by clicking on "Next >".
If button "Install FlashPlayer" is not visible the Macromedia FlashPlayer has also been installed
automatically. Confirm completion of installation by clicking on "Close".
Optional: On Windows Vista the FlashPlayer has to be installed manually (Macromedia Flash
Player must be installed on your system in order to display the pediatric animation). Click on
"Install FlashPlayer" if button is displayed.
Confirm installation by clicking on “Yes”.
Click on "OK".
Your computer may need to be restarted during this installation procedure under certain
circumstances.
The SmartInstaller can be terminated by clicking on "Exit". Remove the CD from the drive.
An EasyWare icon will have been installed on your desktop after installation.
Launch EasyWare. When EasyWare is launched for the first time, you are prompted to choose
the language and enter the software serial number. Enter the software serial number that is
provided on the CD-ROM sleeve and then quit EasyWare.
13 EasyOne-CS Lithium Battery Replacement
This procedure is intended for use by trained electronic service technicians. It describes how to
exchange the internal Lithium battery.
13.1 Background
The internal Lithium battery of the EasOne-CS has a lifetime of more than 5 years (designed to last up
to 10 years). If the lithium battery is empty, the device shows an error #25 message. The battery is
needed to hold the date & time and parts of the device configuration information which is stored in the
RAM area of the RTC. If the battery is empty, this data is corrupt and leads to the above error. In this
case, it is necessary to change this battery.
2030434-006 Rev. D
EasyOne-CS Field Service Manual
Page 21
13.2 Environment
1. Windows PC with installed and working EasyOne-CS connection (Serial cradle, USB cradle or
Screen-Connector)
2. Installed EasyWare greater or equal V02.04
3. Torx T8 / Allen key /hex key screw driver depending on serial number
4. Electrostatic save working environment for the device disassembly
13.3 Preparation (save database)
To make sure that no data is lost/altered, the internal EasyOne-CS database should be saved first.
Please follow the below steps.
1. Start EasyWare by the link on the desktop
2.
Switch EasyOne-CS on and press key sequence 1-3-5 when the below shown error screen
appears. Enter the date & time if requested. Then the normal main menu should be shown.
ERROR
Device Selftest
Error #25
Please contact
service
3. Connect the EasyOne-CS to the PC (Device Connected is shown in the status line of EasyWare/
“PC interface active” on the EasyOne-CS screen)
4. Go to menu: File/Backup Device DB… And the following progress bar appears
5. The EasyOne-CS backup file will be written (takes several minutes) and the success is indicated
by the following dialog
6. The backup file of the form EZ1BackupXXXXX_DateTime.txt
- XXXXX: device serial number
- Date: YearMonthDay
-Time: HourMinute
(e.g. EZ1Backup40126_200506071607.txt) is located in the folder where EasyWare has been
started e.g. C:\programmfiles\ndd Medizintechnik\EasyWare
2030434-006 Rev. D
EasyOne-CS Field Service Manual
Page 22
13.4 Battery exchange procedure
Please make sure that your working environment is electrostatic safe to avoid damage to the used
electrostatic sensitive electronic components
Open the front cover by removing the two main screws.
Remove the printed circuit board (PCB)
Do not remove the sensor tube (two additional screws)
Remove the Lithium battery (see figures below)
Insert only 3V BR 1225 batteries which are approved by ndd Medizintechnik AG (e.g. Panasonic
3V BR 1225)
Make sure that the + Sign form holder and battery are matched.
Enter the new battery by preventing any short circuit (use only your fingers)
Insert the PCB back to the EasyOne-CS case.
Attach the front half of the case (make sure no cable will be squeezed)
False
Correct
2030434-006 Rev. D
EasyOne-CS Field Service Manual
Page 23
13.5 Restart EasyOne-CS
Switch the EasyOne-CS back on. The above described error screen (#25) should be shown. Do the steps
as described before. If you are in the main menu, check that all records are there by going to View
results. If you are sure that all records are there, the exchange is finished.
13.6 Restore database
Under normal conditions EasyOne-CS restores the database by it self (Please wait… screen after 1-3-5).
Double-check the amount of stored records. If the “Please wait…” screen appears longer than ca. 3
minutes you can interrupt it by pressing the ESC key (hold 0 key for more than 2sec.). This is only
possible for firmware versions >= V02.14.00.00. If restore database failed, it will be necessary to
restore the database manually. This can only be done at ndd!
14 EasyOne-CS board with sensor and housing parts Replacement
This procedure is intended for use by trained electronic service technicians. It describes how to
exchange the internal board with sensor and how to change the housing parts.
14.1 Background
If the sensors and/or the board fail, the complete board with the sensors has to be changed. If one
housing part gets disturbed, change it following the description.
Please make sure that your working environment is electrostatic safe to avoid damage to the used
electrostatic sensitive electronic components
Open the battery door and remove the 2 AA batteries
Open the front cover by removing the two main screws on the backside
Remove the board (no screws) so you can remove the sensor tube by removing the two screws
When you only change the front you must not remove the board with the sensors, remove the
keypad from the damaged front and put it into the new front part.
When you change the board, remove the old one and replace it with the new one. Bring the
sensor tube into position and screw it with the washers – be carefully, do not turn the screws to
tight! Bring the board into position.
2030434-006 Rev. D
EasyOne-CS Field Service Manual
Page 24
Put the front part with the keyboard back on the instrument in that way that the window is
placed over the LCD display and that the front fits tight on the back cover
Turn the instruments (front at the bottom) and turn the screws in. The holes in the hook sleeves
must be in the right position, look to the left and right side of the instrument
When you change the rear half of the housing, please remove the pocket and the serial number
label (silver label) from the old housing part and but the pocket into the rear half and glue the
label at the same position on the new rear half part.
When you change the board with sensor, remove the old label and glue the new delivered one
onto the rear half.
Put in the 2 AA batteries, close the battery door
Pocket
D
C
B
A
ROW123
ROW456
ROW789
ROWX0Y
PWRHOLD
ON_OFF
V5C_ON
ASIC_ON
TXD0
EE_CS2
EE_UD
EE_CK
1
1
ROW123
ROW456
ROW789
ROWX0Y
U_EasyOne-Keypad
Keypad.schdoc
PWRHOLD
ON_OFF
V5C_ON
ASIC_ON
U_EasyOne-Power
Power.schdoc
TXD0
EE_CS2
EE_UD
EE_CK
U_EasyOne-Sensor
ASIC.schdoc
COL147X
COL2580
COL369Y
ON_OFF
ENTER
ON_OFF_FB
RXD0
COL147X
COL2580
COL369Y
ON_OFF
ENTER
ON_OFF_FB
RXD0
D0
D1
D2
D3
D4
D5
D6
D7
RXD0
RXD1_RCLK
CTS1_ACK
BUSY
FAULT
AN0
COL147X
COL2580
COL369Y
ENTER
ON_OFF_FB
2
DISP_RS
DISP_RD
DISP_WR
DISP_CS
DISP_RST
D0
D1
D2
D3
D4
D5
D6
D7
D0
D1
D2
D3
D4
D5
D6
D7
DISP_RS
DISP_RD
DISP_WR
DISP_CS
DISP_RST
D0
D1
D2
D3
D4
D5
D6
D7
U_EasyOne-Display
Display.schdoc
RXD0
RXD1_RCLK
CTS1_ACK
BUSY
FAULT
AN0
COL147X
COL2580
COL369Y
ENTER
ON_OFF_FB
U_EasyOne-Proc
Processor.schdoc
2
ASIC_ON
EE_CS2
EE_UD
EE_CK
TXD1_D
RTS1_CLK
STRB
DISP_RST
PWRHOLD
V5C_ON
ROW123
ROW456
ROW789
ROWX0Y
TXD0
DISP_WR
DISP_RD
DISP_CS
DISP_RS
Date: 19.05.2006
3
Drawn by: Th. Mathis
File: Overview.SchDoc
Size: A
EasyOne Overview
Title
ASIC_ON
EE_CS2
EE_UD
EE_CK
TXD1_D
RTS1_CLK
STRB
DISP_RST
PWRHOLD
V5C_ON
ROW123
ROW456
ROW789
ROWX0Y
TXD0
DISP_WR
DISP_RD
DISP_CS
DISP_RS
3
RXD1_RCLK
CTS1_ACK
BUSY
FAULT
4
Sheet 1 of 7
ndd Medizintechnik AG
Technoparkstr. 1
8005 Zürich
TXD1_D
RTS1_CLK
STRB
Released by: C. Buess
Revision: 7.0
TXD1_D
RTS1_CLK
STRB
U_EasyOne-Interface
Interface.schdoc
4
CONFIDENTIAL
Copyright
ndd Medizintechnik AG
RXD1_RCLK
CTS1_ACK
BUSY
FAULT
D
C
B
A
2030434-006 Rev. D
EasyOne-CS Field Service Manual
Page 25
15 Appendix
15.1 Schematic Diagrams
2030434-006 Rev. D
EasyOne-CS Field Service Manual
Page 26
D
C
B
A
1
1
FAULT
BUSY
STRB
RTS1_CLK
TXD1_D
CTS1_ACK
RXD1_RCLK
FAULT
BUSY
STRB
RTS1_CLK
TXD1_D
CTS1_ACK
RXD1_RCLK
2
RXD1_RCLK
BUSY
FAULT
CTS1_ACK
2
GND
STRB
R36
R40
R41
R37
D3
V5P
RXD_RCLK
RTS1_CLK
TXD1_D
BUSY2
FAULT2
CTS_ACK
D9
D7
F2
GND
V5C
8
7
6
5
4
2
1
Dataline Protection
F3
C34
D6
GND
V5C
C44
3
Date: 19.05.2006
V5C
BUSY
STRB
V5C
CTS_ACK
FAULT
GND
TXD_D
RTS_CLK
RXD_RCLK
4
Sheet 3 of 7
ndd Medizintechnik AG
Technoparkstr. 1
8005 Zürich
1
2
3
J10
1
2
3
J9
1
2
3
J7
Released by: C. Buess
Revision: 7.0
STRB
BUSY2
GND
FAULT2
CTS_ACK
RXD_RCLK
RTS1_CLK
TXD1_D
Base Unit Connector
4
CONFIDENTIAL
Copyright
ndd Medizintechnik AG
D
C
B
A
EasyOne-CS Field Service Manual
3
Drawn by: Th. Mathis
File: Interface.SchDoc
Size: A
EasyOne-Interface
Title
GND
3
2030434-006 Rev. D
Page 27
D
C
B
A
Toff=0.1s
ON_OFF
Power ON/OFF
3V, alkalin
GND
B3
B2
MP17
GND
R19
MP12
F1
Battery Voltage:2..3.5V
R28
GND
1
Ton=0.01s
D4
1
GND
C45
GND
Q6
VBAT
GND
R33
C19
MP18
D2
GND
C61
C5
R59
2
ON_OFF_FB
PWRHOLD
PWRON
GND
R63
V33S
2
VBAT
VC
FB
SHDN
GND
1
2
3
4
FB
LBI
LBO
REF
U9
VBAT
L3
R20
8
7
6
5
V55P
OUT
LX
GND
SHDN
LBO
LBI
VIN
SW
3.3V Power
C4
GND
GND
1
2
3
4
5.0V Power
U8
D11
8
7
6
5
R65
GND
Q9
Date: 19.05.2006
ASIC_ON
ON_OFF_FB
V5C_ON
Released by: C. Buess
Sheet 4 of 7
4
5
6
7
8
GND
R70
V33S
V5S
CONFIDENTIAL
Copyright
ndd Medizintechnik AG
ASIC_ON
ON_OFF_FB
V5C_ON
ON_OFF
PWRHOLD
PWRON
PWRHOLD
ON_OFF
D2
D2
D1
D1
MP21
3.3V ON/OFF
3.3V ON/OFF
T2
4 G2
3 S2
2 G1
T3
1 S1
ASIC ON/Off
ndd Medizintechnik AG
Technoparkstr. 1
8005 Zürich
GND
V33OFF
R46
Revision: 7.0
V33P
GND
T1
R31
V55P
4
D
C
B
A
EasyOne-CS Field Service Manual
3
Drawn by: Th. Mathis
File: Power.SchDoc
Size: A
C3
V5C_ON
V5C
EasyOne-Power
T10
GND
C18
Cradle ON/OFF
GND
Title
D10
ASIC_ON
V33OFF
R58
T12
GND
GND
VBAT
L2
3
2030434-006 Rev. D
Page 28
D
C
B
A
D7
D6
D5
D4
D3
D2
D1
D0
DISP_CS
DISP_RD
DISP_RS
DISP_WR
D7
D6
D5
D4
D3
D2
D1
D0
EE_CK
EE_UD
EE_CS2
ON_OFF_FB
RXD0
AN0
V5C_ON
PWRHOLD
DISP_RST
ON_OFF_FB
RXD0
AN0
V5C_ON
PWRHOLD
DISP_RST
1
DISP_CS
DISP_RD
DISP_RS
DISP_WR
EE_CK
EE_UD
EE_CS2
1
GND
V33S
1
3
GND
VCC
U15
V33S
GND
RESET
XCLK
R55
R39
2
GND
GND
V33S
C50
R53
C27
U5
C26
R50
C20
GND
2
GND
RESET
10
11
22
21
20
19
18
17
30
29
28
27
26
25
24
23
9
8
12
13
15
97
95
94
93
92
91
90
89
R30
GND
C21
V33S
GND
ENTER
COL147X
COL2580
COL369Y
ON_OFF_FB
SCLK3
SI3
SO3
BUZZER
FLS_WP
CTS1_ACK
RTC_CS
SCLK2
FLS_CS
SIO2
38
37
36
35
34
33
32
31
14
64
96
7
6
5
4
3
2
1
100
GND
RXD0
TXD0
RTS1_CLK
SCLK
RXD1_RCLK
TXD1_D
MP1
2
C25
CNVSS0
BYTE
RESET
XOUT
XIN
P100/AN0
P101/AN1
P102/AN2
P103/AN3
P104/AN4/KI0
P105/AN5/KI1
P106/AN6/KI2
P107/AN7/KI3
P90/TP0IN/CLK3
P91/TB1IN/SIN3
P92/TB2IN/SOUT3
P93/DA0/TBB3IN
P94/DA1/TB4IN
P95/ANEX0/CLK4
P96/ANEX1/SOUT4
P97/ADTRG/SIN4
P87/XCIN
P86/XCOUT
P80/TA4OUT/U
P81/TA4IN/U
P82/INT0
P83/INT1
P84/INT2
P85/NMI
C49
P70/TXD2/SDA/TA0OUT
P71/RXD2/SCL/TA0IN/TB5IN
P72/CLK2/TA1OUT/V
P73/CTS2/RTS2/TA1IN/V
P74/TA2OUT/W
P75/TA2IN/W
P76/TA3OUT
P77/TA3IN
P60/CTS0/RTS0
P61/CLK0
P62/RXD0
P63/TXD0
P64/CTS1/RTS1/CTS0/CLKS1
P65/CLK1
P66/RXD1
P67/TXD1
VSS
VSS
AVSS
U10
GND
C53
V33S
P44/CS0
P45/CS1
P46/CS2
P47/CS3
P00/D0
P01/D1
P02/D2
P03/D3
P04/D4
P05/D5
P06/D6
P07/D7
P10/D8
P11/D9
P12/D10
P13/D11
P14/D12
P15/D13
P16/D14
P17/D15
P20/A0
P21/A1
P22/A2
P23/A3
P24/A4
P25/A5
P26/A6
P27/A7
P30/A8
P31/A9
P32/A10
P33/A11
P34/A12
P35/A13
P36/A14
P37/A15
P40/A16
P41/A17
P42/A18
P43/A19
VCC
VCC
AVCC
AVREF
3
C51
P54/HLDA
P55/HOLD
P56/ALE
P57/RDY
P53/BCLK/CLKOUT
P52/RD
P51/WRH/BHE
P50/WRL/WR
3
C33
42
41
40
39
43
44
45
46
50
49
48
47
88
87
86
85
84
83
82
81
80
79
78
77
76
75
74
73
72
71
70
69
68
67
66
65
63
61
60
59
58
57
56
55
54
53
52
51
16
62
99
98
MP13
MP16
MP15
MP11
MP14
ROW123
ROW456
ROW789
ROWX0Y
STRB
BUSY
FAULT
EE_CS2
EE_UD
EE_CK
FLS_BUSY
D0
D1
D2
D3
D4
D5
D6
D7
DISP_WR
DISP_CS
DISP_RD
DISP_RS
LVEN
DISP_RST
PWRHOLD
V5C_ON
ASIC_ON
V33S
R27
R29
GND
V33S
4
4
R48
GND
V33S
B1
SCLK2
SIO2
RTC_CS
GND
FLS_CS
SCLK3
SO3
SI3
BUZZER
V33S
R32
V33S
FLS_BUSY
RESET
FLS_WP
GND
T9
R44
V55P
GND
R54
U20
VBAT
CLK
DQ
RST
U7
VCC
X1
X2
GND
B
Drawn by:
5
Date: 19.05.2006
Th. Mathis
File: Processor.SchDoc
Size:
GND
V33S
BUZZER
1
2
3
4
28
27
26
25
24
23
22
21
20
19
18
17
16
15
GND
NC
NC
NC
NC
NC
NC
NC
NC
NC
NC
NC
NC
NC
NC
EasyOn e-Proce ssor
Title
8
7
6
5
RDY/BUSY
RESET
WP
NC
NC
VCC
GND
NC
NC
NC
CS
SCK
SI
SO
U11
D8
1
2
3
4
5
6
7
8
9
10
11
12
13
14
5
7.0
2
Released by:
Revision:
U6
1
U4
ENTER
COL369Y
COL2580
COL147X
ROWX0Y
ROW789
ROW456
ROW123
TXD0
C. Buess
6
CONFIDENTIAL
Copyright
ndd Medizintechnik AG
ENTER
COL369Y
COL2580
COL147X
ROWX0Y
ROW789
ROW456
ROW123
TXD0
FAULT
BUSY
STRB
RTS1_CLK
TXD1_D
CTS1_ACK
RXD1_RCLK
Sheet 5 of 7
ndd Medizintechnik AG
Technopargstr. 1
8005 Zürich
FAULT
BUSY
STRB
RTS1_CLK
TXD1_D
CTS1_ACK
RXD1_RCLK
6
D
C
B
A
2030434-006 Rev. D
EasyOne-CS Field Service Manual
Page 29
D
C
B
A
1
D7
D6
D5
D4
D3
D2
D1
D0
D7
D6
D5
D4
D3
D2
D1
D0
DISP_RST
DISP_CS
DISP_WR
DISP_RD
DISP_RS
1
DISP_RST
DISP_CS
DISP_WR
DISP_RD
DISP_RS
R9
2
GND
2
R68
GND
C43
C69
GND
C40
C36
C41
C67
R67
V33S
C68
C38
C32
C30
C28
C6
C42
C39
C35
C31
C29
C1P
C1N
C2P
C2N
C3P
C3N
C4P
C4N
DVSS
VLL2
VLL3
DUM4
DUM3
DUM2
DVSS
DUM1
DVSS
VLL4
VLL5
VLL6
OSC1
DVSS
C+
CVCC
VF
VR
AVSS
OSC2
AVDD
P/S
68/80
NC
NC
NC
NC
NC
U12
VDC
DVDD
RES
D/C
R/W/RD
CLK/WR
DVSS
SDA/D0
D1
D2
D3
D4
D5
D6
D7
CE
Date: 19.05.2006
1
2
3
4
5
6
7
8
9
10
11
12
13
14
15
16
4
Sheet 6 of 7
ndd Medizintechnik AG
Technoparkstr. 1
8005 Zürich
Released by: C. Buess
Revision: 7.0
V33S
DISP_RST
DISP_RS
DISP_RD
DISP_WR
GND
D0
D1
D2
D3
D4
D5
D6
D7
DISP_CS
4
CONFIDENTIAL
Copyright
ndd Medizintechnik AG
D
C
B
A
EasyOne-CS Field Service Manual
3
Drawn by: Th. Mathis
File: Display.SchDoc
Size: A
EasyOne-Display
Title
17
18
19
20
21
22
23
24
25
26
27
28
29
30
31
32
33
34
35
36
37
38
39
40
41
42
43
44
45
46
47
48
49
50
51
52
53
3
2030434-006 Rev. D
Page 30
D
C
B
A
1
ENTER
ON_OFF
COL369Y
COL2580
COL147X
ROWX0Y
ROW789
ROW456
ROW123
1
ENTER
ON_OFF
COL369Y
COL2580
COL147X
ROWX0Y
ROW789
ROW456
ROW123
2
COL147X
COL2580
COL369Y
ROW123
ROW456
ROW789
ROWX0Y
2
KP1
<-
7
4
1
8
5
0
2
->
9
6
3
Enter
ON/OFF
3
1
1
2
2
3
3
4
4
5
5
6
6
7
7
8
8
9
9
0
0
LEFT
LEFT
RIGHT
RIGHT
ENTER
ENTER
ON/OFF
ON/OFF
Drawn by: Th. Mathis
Released by: C. Buess
Revision: 7.0
4
Sheet 7 of 7
ndd Medizintechnik AG
Technoparkstr. 1
8005 Zürich
4
Copyright
ndd Medizintechnik AG
CONFIDENTIAL
D
C
B
A
EasyOne-CS Field Service Manual
3
ENTER
VBAT
ON_OFF
Date: 30.05.2006
File: Keypad.SchDoc
Size: A
EasyOne-Keypad
Title
GND
1
2
3
4
5
6
7
8
9
10
11
12
13
14
15
16
17
18
19
20
21
22
23
24
25
26
27
28
2030434-006 Rev. D
Page 31
GE Medical Systems
Information Technologies, Inc.
8200 West Tower Avenue
Milwaukee, WI 53233 USA
Tel: +1 414 355 5000
1 800 558 5120 (US only)
Fax: +1 414 355 3790
GE Medical Systems
Information Technologies, GmbH
Munzinger Straße 5
D-79111 Freiburg
Germany
Tel: +49 761 45 43 - 0
Fax: +49 761 45 43 - 233
Asia Headquarters
GE China Co., Ltd.
No1 Huatuo Road,
Zhangjiang Hi-Tech Park Pudong,
Shanghai, P.R.China 201203
Tel: +86 21 38777888
Fax: +86 21 38777402