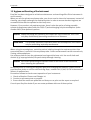
1
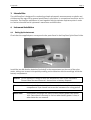
EasyGuide
EasyOne™ Spirometer
ndd Medizintechnik AG
Technoparkstrasse 1
CH-8005 Zurich, Switzerland
www.ndd.ch
2070-3EU_EN_V50.doc
EasyGuide
Page 1
Contents
1
INTRODUCTION ..................................................................................................................................2
2
WARNING INFORMATION ....................................................................................................................3
3
INTENDED USE ...................................................................................................................................4
4
INSTRUMENT INSTALLATION...............................................................................................................4
4.1 SETTING UP THE INSTRUMENT ..........................................................................................................................4
4.2 SETTING LANGUAGE, DATE, TIME, ALTITUDE (ABOVE SEA LEVEL) AND PRINTER TYPE .......................................................5
4.3 OPERATING THE KEYS ....................................................................................................................................6
5
PERFORMING SPIROMETRY.................................................................................................................6
5.1 PREPARING THE PATIENT ................................................................................................................................6
5.2 MEASURING THE FORCED VITAL CAPACITY (FVC) ..................................................................................................7
5.3 CHECKING THE TEST QUALITY ..........................................................................................................................8
5.4 INTERPRETING RESULTS .................................................................................................................................9
5.5 PRINTING A REPORT ......................................................................................................................................9
5.6 SAVING AND RETRIEVING MEASUREMENTS ..........................................................................................................9
5.7 QUICK TEST ..............................................................................................................................................10
5.8 EDITING PATIENT DATA ................................................................................................................................10
6
SPECIFICATIONS ..............................................................................................................................10
6.1 EASYONE MODEL 2001 SPIROMETER .............................................................................................................10
6.2 EASYONE MODEL 2010 CRADLE ..................................................................................................................11
7
DEFINITION OF PARAMETERS ............................................................................................................11
8
SYSTEM CONFIGURATION .................................................................................................................12
8.1 TEST SETTINGS ..........................................................................................................................................12
8.2 GENERAL SETTINGS ....................................................................................................................................13
8.3 PRINTER SETTINGS .....................................................................................................................................14
9
TEST TYPES......................................................................................................................................15
9.1 FVC (EXPIRATION)......................................................................................................................................15
9.2 FVL (INSPIRATION AND EXPIRATION)................................................................................................................15
9.3 MVV......................................................................................................................................................16
9.4 SLOW VC ................................................................................................................................................16
9.5 POST-TEST ...............................................................................................................................................16
9.6 ADDING A TRIAL .........................................................................................................................................17
10
QUALITY MESSAGES AND QUALITY GRADES.......................................................................................17
10.1 QUALITY MESSAGES ...................................................................................................................................17
10.2 QUALITY GRADES .......................................................................................................................................18
11
INTERPRETATION..............................................................................................................................19
12
PREDICTED VALUES ..........................................................................................................................20
12.1 PREDICTED VALUES FOR ADULTS ....................................................................................................................20
12.2 PREDICTED VALUES FOR CHILDREN..................................................................................................................20
13
HYGIENE AND SERVICING OF THE INSTRUMENT ..................................................................................21
14
CHECKING CALIBRATION...................................................................................................................22
15
TROUBLESHOOTING TIPS..................................................................................................................23
16
BIBLIOGRAPHY ................................................................................................................................25
Copyright© 2002 by ndd Medizintechnik AG, Switzerland. All rights reserved.
EasyOne and spirette are protected by the following patents: EP 0597060, EP 0653919, US 5419326, US 5503151, US
5645071, US5647370.
EasyGuide
Page 2
1 Introduction
Thank you for choosing the EasyOne Spirometer.
With EasyOne you have chosen a high quality spirometer that minimizes the need for
maintenance due to its unique ultrasound technology. EasyOne does not need calibration and
remains consistently accurate over years. The spirette breathing tube assures perfectly
hygienic conditions for every patient at low cost even if the spirometer is frequently used.
The EasyOne Diagnostic Spirometer has two operating modes for you to choose from:
In the Diagnostic mode, EasyOne offers you extensive and diverse options for spirometric
tests in accordance with the standards of the European Respiratory Society (ERS) and the
American Thoracic Society (ATS).
In the Frontline mode, EasyOne offers you the option of greatly simplified spirometric
measurement in accordance with the recommendations of the National Lung Health Education
Program (NLHEP [4])
The differences between the two operating modes are described in the table that follows.
Diagnostic mode
Frontline mode
Test modes
FVC (expiratory), F/V Loop (inspi- FVC (expiratory), Pre-Post
ratory and expiratory), slow VC,
measurement
MVV, Pre-Post measurement
Parameters
FEV1, FVC, FEV1/FVC, FEV6,
FEV1/FEV6, MEF25-75, MEF25,
MEF50, MEF75, PEF, FET, FIVC,
PIF, IVC, IRV, ERV, FEV1/VC,
MVV, pre-post % variation, QC
rating
FEV1, FEV6, FEV1/FEV6, FVC,
FEV1/FVC, PEF, pre-post %
variation, QC rating
Quality control
Requires 3 acceptable, reproducible maneuvers.
Details in Chapter 10.1.
Requires 2 acceptable, reproducible maneuvers.
Details in Chapter 10.1.
Automatic quality
control
Quality control can also be overridden manually.
Automatic control is always active.
Trial storage and
display
Can store and display the best,
or the best 3 trials, including
curves.
Stores and displays only the best
trial and curve.
Report
Configuration
Report can be customized for
curve type and size.
Report is fixed, showing the
smaller sized FV and VT curves.
The default setting of the EasyOne Spirometer is the Diagnostic Mode. To switch the EasyOne
into the Frontline Mode, see Chapter 8 under “General Settings”.
EasyGuide
Page 3
2 Warning Information
The following terms are used as follows in this document:
Caution:
Possibility of injury or serious damage
Please note:
Important information for avoiding damage to the instrument or facilitating
operation of the instrument
Please note the following information on safe operation of the EasyOne spirometer:
means: Read the User Manual.
Caution: The instrument is not suitable for use in the presence of explosive or
flammable gases.
Caution: Connect only printers and computers that comply with IEC 950 Standards for
safety of information technology equipment, or that bear the UL or CSA mark.
Caution: For AA batteries, do not attempt to charge, connect improperly, or dispose of
in fire as there is possibility of leakage or explosion. Follow manufacturer’s
recommendation for proper disposal.
Caution: Calibration and servicing may be carried out only by ndd staff. Do not open
the instrument.
Caution: Pulmonary function tests require maximum effort on the part of the patient
and may lead to sensations of dizziness or giddiness.
Please note:
Use only alkaline batteries, and remove the batteries from the battery
compartment if you intend not to use the instrument for a long period.
EasyGuide
Page 4
3 Intended Use
The ndd EasyOne is designed for conducting simple spirometric measurements on adults and
children over the age of 4 by general practitioners, specialists, in occupational medicine and in
hospitals. The EasyOne spirometer is used together with the spirette respiratory tube in order
to conduct slow and forced spirometric maneuvers and MVV tests.
4 Instrument Installation
4.1
Setting Up the Instrument
Check that the supplied parts correspond to the parts listed in the EasyStart Quick-Start Guide.
Install the two AA alkaline batteries (included) in the compartment on the rear of the spirometer, taking care to match the polarity marking on the batteries with the markings inside the
battery compartment.
Caution: Do not attempt to charge or burn the AA batteries used in the instrument.
Please follow the manufacturer's instructions on battery disposal.
Please note:
Use only alkaline batteries, and remove the batteries from the battery
compartment if you intend not to use the instrument for a long period.
Please note:
A low battery message will alert you when battery power falls below
10%. Data saved in memory is not lost when battery power is low, or
when batteries are removed.
EasyGuide
Page 5
Install the spirette as shown. Be sure to orient the spirette so that the arrow on the spirette
lines up with the arrow on the spirometer. Push the spirette all the way in to the stop. For
maximum hygiene, consider tearing the spirette bag from the bottom, leaving spirette partially
wrapped during insertion and until the spirometer is handed to the patient. The spirette is
easily removed by pushing it up from the bottom.
If you wish to print reports or export data to a PC, connect the EasyOne base unit to the printer
or to the PC using the corresponding cable.
Caution: Connect only printers and computers that comply with IEC Standards for
safety of information technology equipment, or that bear the UL or CSA mark.
4.2
Setting Language, Date, Time, Altitude (above sea level) and Printer Type
Press the (ON/OFF) key for at least 2 seconds in order to switch on the instrument. The
instrument switches off automatically if no key is pressed for 15 minutes.
If you are switching on the instrument for the first time, you will be prompted to choose the
language and to enter the date, time, altitude above sea level and approximate relative
humidity at the instrument's location. This data is not pre-set. If you intend to print reports,
you can also select the right printer type on the instrument.
EasyGuide
Page 6
The spirometer is delivered with the pre-set default settings. Please refer to Chapter 8 of this
User Manual for the procedure for changing the settings. Adapting the settings to your needs
allows you to get the most out of your EasyOne instrument.
After you have made the above settings when switching on the instrument for the first time,
you can then change any settings at any time using the CONFIGURATION menu item from the
main menu.
4.3
Operating the Keys
(ON/OFF)
This switches EasyOne on or off. Press and hold the key (for at least 2 sec.) until
you hear an audible signal.
(ENTER)
This confirms data entry or the selection and moves you to the next entry field.
(<)
Deletes last character,
scrolls to the left or up.
(>)
Scrolls to the right or down
(0,ESC)
Press the key briefly in order to enter (0),
keep the key pressed longer (at least 1 sec.) in order to return to the previous
field with (ESC) or abort the operation,
press the key briefly twice in order to enter a blank (the key function operates
only if letters can be entered).
(2,abc), etc. Press the key briefly in order to enter the digit "2",
press the key briefly in order to enter "A" (the key function operates only if letters
can be entered),
press the key briefly twice in order to enter "B" (the key function operates only if
letters can be entered),
if you press the same key quickly several times consecutively, you will scroll first
to the upper-case letters, then to the number and then to the, lower-case letters,
Umlauts and special characters can be found on key (1).
Please note:
The escape key (Esc-0) is particularly helpful and important in unit
navigation. The escape function requires the key to be pressed and
held momentarily. Escape is useful for moving to previous menus,
items, or fields, and escaping a spirometry test. Pressing this key
rapidly in fields where letters are possible, such as patient name and
report header, allows the entry of a blank space or a zero.
5 Performing Spirometry
5.1
Preparing the Patient
Prepare for testing by having the patient loosen tight clothing, remove dentures, and relax. The
patient may sit or stand. If standing you may want to perform testing in an area free of sharp
table or counter edges, or have a chair handy as there is a slight possibility that the patient
could faint during the strenuous spirometry maneuver.
Explain that the purpose of the test is to determine how much air a person’s lungs can hold
and how quickly that air can be expelled with a forceful, maximal effort. Since the spirometry
test requires active participation by the patient it is very important to demonstrate the
maneuver for the patient. Emphasize the essential elements of the test:
EasyGuide
•
Page 7
filling lungs completely
•
sealing lips around the spirette so that there are no leaks, taking care not to block its opening with
teeth or tongue or bite down excessively
•
•
blasting out as hard and fast as possible
continue blowing out until the lungs are completely empty
If you are new to spirometry, you should practice testing yourself and others prior to testing
patients. You will learn to recognize a poor effort by observing the patient and/or interpreting
the Quality Messages displayed by the spirometer after each effort. After a poor effort you must
explain what went wrong. Develop enthusiastic coaching techniques to use during the
maneuver to maximize your chances of getting quality results with a minimum number of
efforts.
Caution: Pulmonary function tests require maximum effort on the part of the patient
and may lead to dizziness or giddiness.
5.2
•
•
•
•
•
•
•
•
•
Measuring the Forced Vital Capacity (FVC)
Choose “Perform Test” in the main menu and then NEW. Confirm with ENTER. The
instrument will now allow you to enter the patient data.
Enter the corresponding patient data line by line. Use the keys as described in Chapter 4.3.
Confirm with ENTER each time.
After entering the patient data, you then move on to the "Test selection" menu. Choose the
FVC test and confirm with ENTER.
Insert a spirette into the instrument. Ensure that the arrow on the spirette is lined up with
the arrow on the instrument.
Once again briefly prepare the patient for the test. When the patient is ready, press ENTER.
You will now hear the sensor buzzing.
The instrument now prompts you to avoid air flow in the spirette since it is setting the
baseline. It is advisable to block off the spirette on one end in order to ensure that the
baseline is set precisely even if the room is draughty. An audible signal will sound when
the baseline has been set. You will see prompt "Blast out" on the screen.
Hand the instrument to the patient. Ask the patient to breath in deeply, insert the spirette
correctly into his or her mouth. Now ask the patient to exhale as firmly and as quickly as
possible, and continue exhaling until all air has been exhaled.
At the end of the manoeuvre, you will see a message on the display indicating whether the
manoeuvre was acceptable. At least three acceptable manoeuvres must have been
performed before you see message "Session complete".
Using keys (>) and (<), you can view the result on the screen. In order to print the result,
choose the PRINT field and press ENTER. Then place the instrument into the base unit. The
report is then printed.
EasyGuide
Page 8
You can conduct the following tests with EasyOne: FVC (expiratory), FVL (inspiratory and
expiratory), pre/post tests, slow spirometry and MVV. Please also see Chapter 9.
5.3
Checking the Test Quality
In order to assess the pulmonary function of the patient, it is necessary to obtain acceptable
test quality. The test quality depends on co-operation of the patient and this, in turn, depends
on the quality of the physician's instructions. Consequently, EasyOne incorporates an automatic quality control function with prompts to facilitate the physician's job of providing the
patient with good instructions. After each manoeuvre, a message on the screen will inform you
as to whether the manoeuvre was acceptable or not. If not, the message will guide you on how
to coach the patient to do better.
A quality grading from A to F is displayed at the end of the test. It provides information on the
overall quality of the test. Please refer to Chapter 10.2. for further information on the quality
grades. The table below gives you the possible prompts that EasyOne provides you with after a
manoeuvre:
Prompt
The prompts relates to
How to improve
Don’t hesitate
...the quality of the last
test
The patient should exhale in one breath
and should not stop in-between.
Blast out faster
...the quality of the last
test
The patient must exhale more explosively
and as firmly and quickly as possible.
Blow out longer
...the quality of the last
test
The patient has discontinued exhalation
too early. The patient must exhale even
more and press as much air as possible out
of his or her lungs.
Good effort, do next
...the quality of the last
test
Good test. Just one to two more good tests
and the test is complete.
Blast out harder
(only in Frontline
mode)
...the reproducibility of
the maneuvers: PEF is
non-reproducible
The test differs greatly from the previous
tests. The patient can blow still more firmly
and achieve a higher peak flow.
EasyGuide
Deeper breath
Page 9
...the reproducibility of
the maneuvers. FVC or
FEV1 are nonreproducible
Session complete
The test differs greatly from previous tests.
The patient can inhale even more deeply
and exhale even more air.
The test is complete. An adequate number
of good maneuvers have been conducted.
Only one of the above prompts is shown after a manoeuvre. As soon as you see message
"Session complete", you need not conduct further manoeuvres. If, even after repeated
attempts, it is not possible to obtain an adequate number of good manoeuvres, you should
take a break, depending on how the patient feels or stop measurement. Even after a break, the
measurement is stored and can be printed out under “Print results” in the main menu. You
also have the option of adding tests subsequently. Read more on this in Chapter 9.6.
5.4
Interpreting Results
When interpreting the results, it is important to allow for the quality rating of the test. The
quality ratings A to C indicate a reliable result. A quality rating between D and F indicates
insufficient test quality. The result must then be interpreted with caution.
As soon as you obtain the message "Test complete" after conducting a test, you can either
print out the report immediately with ENTER or select the DATA field and view the result on the
display.
On the printed report, parameters that are below the lower limit of normal (LLN) are printed in
red and marked with an asterisk (*). EasyOne also offers an automatic interpretation aid.
Please refer to Chapter 11 for further information on this interpretation.
It is possible to deactivate both the QC-Grade function and the Interpretation function. To
deactivate these functions see Chapter 8.
5.5
Printing a Report
You will require a base unit and a compatible printer in order to print a report.
Immediately after completion of the test, you have the option of printing by selecting the PRINT
field and confirming this with ENTER. You will see message "Please connect device to cradle".
Insert the instrument into the cradle and wait until the print job has been printed. EasyOne
issues an audible signal indicating when the instrument can be removed.
You can also print old tests. to do this, select option ”Print Results”, “Single Test” in the main
menu, choose the required test with key (>) or (<) and press ENTER. You can also print a number
of tests at once by choosing “Print Results”, “Range of Tests” and entering a start and end
date. You will once again see message "Please connect device to cradle ".
Depending on the type of printer, it will take between 45 and 90 seconds to print out the
report. Should you have problems printing out, please refer to the information in Chapter 15.
5.6
Saving and Retrieving Measurements
EasyOne saves all test results automatically. No data is lost even if the batteries are removed.
The oldest test is overwritten when the memory is full (up to 700 measurements).
You can recall saved measurements for the purpose of conducting a new test with the same
patient, adding manoeuvres, adding a post-test, viewing results, or printing results. You can
add a manoeuvre or a post-test only on the same day that the original test was performed. See
Chapters 9.5 and 9.6.
EasyGuide
Page 10
In order to add a test to an old measurement, choose “Perform Test” in the main menu and
then choose RECALL. Follow the rest of the instructions.
In order to view an old test, choose “View Results” in the main menu and choose the desired
test.
5.7
Quick Test
You have the option to perform a quick test without entering patient data. Select “Perform
Test” in the main menu and then QUICK. Choose the desired test using the arrow keys and
press ENTER.
Please note:
When Quick Test is selected, no comparison to predicted normals are
displayed or printed. Predicted normals are only available when age,
height and gender are entered.
It is possible to enter patient data after having performed a quick test. Proceed as described in
Chapter 5.8. Once patient data is entered predicted normals will be displayed and printed.
5.8
Editing Patient Data
You have the option of editing or adding patient data after a test has been performed. To do
this, choose “Edit Patient Data” in the main menu and press ENTER. Choose the desired test
with keys (<) and (>) and make the changes.
Please note:
Editing patient data may influence predicted computation and
interpretation of the test result. You should thus recheck the measured
result when age, height or gender are changed.
6 Specifications
6.1
EasyOne Model 2001 Spirometer
Size:
Weight:
Measuring accuracy
Measuring range:
Resistance:
Display:
Data entry:
Data memory:
Test modes:
Parameters:
Respiratory tube:
Measurement principle:
83 x 158 x 43 millimetres (3.3 x 6.2 x 1.7 inches)
255 grams (9 ounces)
Volume: ±3% or 0.050 l
Flow: ±5% or 0.200 l/s, (except PEF)
PEF: ±10% or 0.400 l/s, (accuracy:±5% or 0.200 l/s)
MVV: ±10% or 15 l/min.
Volume: 0.5 to 8 l
Flow: ±14 l/s
less than 1.5 cm H2O/L/sec
64 x 160 graphic display
14-key keyboard
for up to 700 tests
FVC, FVL, Slow VC, MVV, Pre/Post
FVC, MVV, FEV6, FEV1, FEV1/FVC, FEV1/FEV6, MEF25, MEF50,
MEF75, MEF25%-75%, PEF, FET, FIVC, PIF, IVC, VC, FEV1/VC, ERV,
IRV, pre-post % variation, Lung Age
Disposable spirette respiratory tube
Ultrasound transit-time measurement
EasyGuide
Predicted:
Power supply:
Battery service life:
Report:
Storage:
Operating conditions:
Certifications and
standards:
Page 11
ERS, Barcelona, Austria, NHANES III, Knudson 1976, Knudson
1983, Crapo, Morris, Cherniak
Paediatrics: Zapletal, Dockery, Hsu
(2) AA batteries
approx. 400 tests
A4 or 8.5” x 11”, in conjunction with a printer compatible with
HP, Canon or Epson
Temperature: -40 to 70 °C
Relative humidity: 0% to95%
Ambient pressure: 500 to 1060 hPa
Temperature: 0 to 40 °C
Relative humidity: 0% to 95%
Ambient pressure: 500 to 1060 hPa
European Council Directive 93/42/EEC, 14.6. 1993IEC 601/EN
60601 (international/European) Standard for Medical Devices
EasyOne meets or exceeds the published targets of the European Respiratory Society, the American Thoracic Society
CSA International, CAN/CSA-C22.2 No. 601.1-M90, S1-94, CSA
601.1 Amendment 2:1998, UL Std No. 2601.1
CE Certificate
Instrument classification:
Type BF instrument
Powered internally with (2) AA alkaline batteries
Short time operation, less than 10 minutes
Instrument not suitable for use in flammable anaesthetic gases
in mixtures with O2 or NO.
6.2
EasyOne Model 2010 Cradle
Size:
Weight:
Power supply:
Function:
Interface:
Storage:
Operating conditions:
119 x 173 x 83 millimetres (4.7 x 6.8 x 3.3 inches)
284 grams (10 ounces)
From the batteries of the EasyOne spirometer
Connects the EasyOne spirometer to a printer or PC
Standard USB type A and B connectors (alternatively DB25
connector for serial or parallel interface), for connection to PC or
printer
Temperature: -40 to 70 °C
Relative humidity: 0% to 95%
Ambient pressure: 500 to 1060 hPa
Temperature: 0 to 40 °C
Relative humidity: 0% to 95%
Ambient pressure: 500 to 1060 hPa
7 Definition of Parameters
FVC
FIVC
FEV1
FEV6
FEV1/FVC
Forced Vital Capacity (expiratory)
Forced Vital Capacity (inspiratory)
Forced Expiratory Volume (1 sec).
Forced Expiratory Volume (6 sec).
Ratio of FEV1 to FVC
EasyGuide
Page 12
FEV1/VC
FEV1/FEV6
MEF 25
MEF 50
MEF 75
MEF 25-75
PEF
PIF
FET
PRE/POST% variation
Ratio of FEV1 to VC taken from SVC test
Ratio of FEV1 to FEV6
Forced Expir. Flow at 25% of Vital capacity
Forced Expir. Flow at 50% of Vital capacity
Forced Expir. Flow at 75% of Vital capacity
Forced Expir. Flow at 25%-75% of Vital capacity
Peak Expiratory Flow (in l/min or l/sec)
Peak Inspiratory Flow
Forced Expiratory Time
Percentage variation of measured values before and
after bronchial spasmolysis
Lower Limit of Normal
Back Extrapolated Volume
Tidal Volume
Expiratory Reserve Volume
Inspiratory Reserve Volume
Maximum Vital Capacity
Expiratory Vital Capacity
Inspiratory Vital Capacity
Inspiratory Capacity
Maximum Voluntary Ventilation (per min.)
Lung Age, see Chapter 17, (8) for reference
LLN
BEV
VT
ERV
IRV
VC or VCmax
VCex
VCin
IC
MVV
Lung Age
8 System Configuration
If you wish to change the instrument setting, please choose the “Configuration” option in the
main menu. You will now be in the Configuration menu. The tables below provide an overview
of the setting options offered to you by EasyOne. Choose the option you require.
8.1
Test Settings
Relates to
Options
Default
setting
Description
Predicted
ERS/Zapletal,
Austria, Barcelona, NHANESIII
Knudson 76,
Knudson 83,
Crapo, Morris
ERS /
Zapletal
You can select your desired predicted
values from the predicted publications
listed.
Additional
paediatrics
Dockery, Hsu,
none
None
You have the option of selecting different
predicted values for children than those
for adults.
Best value
selection
Best value, best
test
Best test
In "best value" setting, the relevant, best
value from different tests is selected.
"Best test" selects the test which has
provided the best results.
Interpretation
Yes, no
Yes
Automatic interpretation (see Chapter 11)
is activated or deactivated here.
Lung Age
yes, no
no
if set to “yes”, the lung age is displayed
on the result screen and printed on the
report. Lung Age is only shown if the
EasyGuide
Page 13
Relates to
Options
Default
setting
Description
patient is a smoker.
Automated
Test QC
Yes, no
Yes
The automated test QC (see also Chapter
10) is activated and deactivated here.
FVC selection
FVC, FEV6
FVC
FEV6 indicates the exhaled volume after 6
seconds. When set to FEV6, EasyOne
stops the measurement after 6 seconds.
MEF25, MEF50, MEF75 and MEF25-75 are
not reported in that setting. When set to
FVC, EasyOne continues the measurement
until end of test criteria are met.
PEF unit
l/s, l/min
l/s
Peak flow can be specified in litres per
minute or in litres per second.
African ethnic
corr.
75%-110%
88%
The predicted value is corrected by this
additional factor if the selected predicted
publication does not specify a separate
calculation for this ethnic group.
Asian ethnic
corr.
75%-110%
100%
The predicted value is corrected by this
additional factor if the selected predicted
publication does not specify a separate
calculation for this ethnic group.
Latin
American
ethnic corr.
75%-110%
100%
The predicted value is corrected by this
additional factor if the selected predicted
publication does not specify a separate
calculation for this ethnic group.
Other ethnic
corr.
75%-110%
100%
The predicted value is corrected by this
additional factor if the selected predicted
publication does not specify a separate
calculation for this ethnic group.
Curve storage
3 best curves,
best curve
best curve EasyOne can also save the 3 best curves
of a test. This is necessary if you want to
print the 3 best curves or if you want to
export the curve data of the three best
trials. Please note that saving 3 curves
uses substantially more memory. EasyOne
can then only save about 250 tests before
it starts to overwrite the first test.
8.2
General Settings
Relates to
Options
Time format
24 hours, am/pm
Date format
DD.MM.YY,
DD/MM/YY,
MM/DD/YY
Default
Settings
24 hours
Description
Sets the time format for 12 or 24 hour.
DD.MM.YY Sets the data format.
EasyGuide
Page 14
Relates to
Options
Default
Settings
Description
Current date
Please enter the correct date at this point
and confirm with ENTER.
Current time
Please enter the correct time at this point
and confirm with ENTER.
Alphanumeric
ID
Yes, no
No
If the ID you use also consists of letters,
please set to “Yes”.
Technician ID
Yes, no
No
If you want the technician ID to be saved
as well and listed on the report, please
choose “Yes”.
Syringe
volume
1.0l, 1.5l, ...7.0l
3.0l
Choose the volume of your syringe if you
wish to use it to conduct a calibration
check.
Height unit
m/cm, ft/inch
m/cm
Choose how the unit will indicate height
and altitude.
Weight unit
kg, lbs
kg
Choose how the unit will indicate weight.
Age, date of
birth
Age, date
Date
If you use a database, consider entering
the date of birth so that the age can be
calculated correctly at a later point.
Contrast
30, ...., 63
40
Changes the display contrast.
Lang.
German, English,
others
English
Choose the desired language.
Altitude above 0m, ...4000m
sea level
0m
Set the altitude above sea level of your
location.
Op. mode
Diagnostic,
Frontline
Diagnostic
see Chapter 1
Temp. unit
°C, °F
°C
Determines how temperature is reported.
Rel. humidity
0...100%
40%
Enter the average relative humidity at your
location.
8.3
Printer Settings
Relates to
Options
Default
setting
HP b&w
Description
Printer type
HP b&w, HP color,
Canon b&w,
Canon color,
Epson b&w, Epson
color, via PC
Choose the right option to match your
available printer. See Chapter 15 if you
have problems.
Result data
3 best values,
best values
best
values
Number of
Curves
3 best curves
best curve Choose if you want to print the 3 best
curves of the tests or only the best curve.
You have the choice of printing out only
the best test or the 3 best tests on the
report.
EasyGuide
Page 15
Options
Relates to
Default
setting
Description
It is only possible to print the 3 best
curves if the 3 best curves were saved
(see test settings ”Save curve data”)
best curve
Graph Types
FV&VT small, FV
large, VT large,
FV&VT large
FV&VT
small
Choose what curves you wish to have on
the report.
Header
1-4
Optional entry
Blank
You can enter the name and address of
the institution or other information in 4
lines of 40 characters each.
9 Test Types
When you enter the patient data or select an existing patient, you will see the Test menu with
the following selection options:
• FVC (expiration)
• FVL (inspiration and expiration)
• MVV
• Slow VC
It is also possible to add a “Post” test to a FVC or FVL Test.
The various measurement methods are outlined below. Good co-operation on the part of the
patient is essential with all methods. Consequently, you should explain to the patient clearly
beforehand what he or she has to do and motivate the patient to co-operate. Choose the
required measurement method with keys (>) or (<) and confirm with ENTER.
9.1
FVC (expiration)
This is the most commonly used spirometric measurement. Prepare the patient as described in
Chapter 5.1. before you start the test. Then proceed as follows.
•
•
•
•
•
9.2
Insert a spirette into the instrument. When doing this, please ensure that the arrow on the
spirette is lined up with the arrow on the instrument.
Press ENTER when the patient is ready. You will now hear the sensor buzz.
The instrument prompts you to avoid flow in the spirette™ while it is setting the baseline. It
is necessary to block off the spirette™ at one end in order to ensure that the baseline is set
precisely. An audible signal sounds when the baseline is set. You will see the prompt
"Blast out" on the screen.
Hand the instrument to the patient and ask the patient to breath in deeply first, then to
insert the spirette correctly into his or her mouth, to exhale as firmly and quickly as
possible and to continue exhaling until all the air has been exhaled.
At the end of the manoeuvre, you will see a message on the screen indicating whether the
manoeuvre was acceptable. At least three acceptable, reproducible manoeuvres must be
performed before you see message "Session complete". In Frontline mode, only two
acceptable, reproducible manoeuvres need be performed.
FVL (inspiration and expiration)
With this test mode, a deep inhalation follows the exhalation manoeuvre directly. Proceed in
the same way as with the above-described FVC test. However, instruct the patient not to
EasyGuide
Page 16
remove the spirette from his or her mouth after exhaling, but to follow up with a deep,
maximum inhalation. Three acceptable tests should be conducted with this test as well.
9.3
•
•
•
•
9.4
MVV
Insert a spirette into the instrument. Ensure that the arrow on the spirette is lined up with
the arrow on the instrument.
Press ENTER when the patient is ready. You will now hear the sensor buzz.
The instrument now prompts you to avoid flow in the spirette while it is setting the baseline. It is advisable to block off the spirette at one end to ensure precise setting of the
baseline. An audible signal sounds when the baseline is set.
The patient must then insert the spirette into his or her mouth and must fully inhale and
exhale for an uninterrupted period of at least 12 seconds.
Slow VC
Slow spirometry serves to determine the vital capacity and the lung volumes (see Chapter 7).
You can repeat the manoeuvre several times. The best test is saved. Proceed as follows:
•
•
•
•
•
•
Insert a spirette into the instrument. Ensure that the arrow on the spirette lines up with the
arrow on the instrument.
Press ENTER when the patient is ready. You will now hear the sensor buzz.
The instrument now prompts you to avoid flow in the spirette while it is setting the baseline. It is advisable to block off the spirette at one end to ensure the baseline is set
precisely. An audible signal sounds when the zero point is set.
The patient must now insert the spirette into his or her mouth and breathe at rest (about 35 breaths) until you hear an audible signal.
The patient must then take a deep inspiration followed by a maximum exhalation.
The instruments stops automatically at the end of the manoeuvre.
If you are only interested in the vital capacity without determination of the other volumes (ERV,
IRV, VT, IC) the VC manoeuvre can also be performed without waiting for the acoustic signal.
At the end of the SVC test you can decide to immediately add an FVC test. If you do so the
parameter FEV1/VC (Tiffeneau) is also shown on the printed report of the FVC test.
9.5
Post-Test
The Post-Test is usually performed to determine the response on bronchodilating asthma
medication. This is done by treating the patient with a bronchodilator after having performed a
FVC or FVL test. Approximately 10 to 20 minutes after the medication (when bronchodilator
shows effect) a second FVC or FVL test (“post-Test”) is performed. The results of the pre-test
and the post test are then compared on the result screen and on the test protocol. Post-Tests
can only be added to previous tests on the same day.
To add the “Post”-test immediately after the FVC or the FVL test select the field POST on the
result screen.
When coming from the main menu you can add a post test to a previous test as follows:
• Select “Perform Test” in the main menu
• Choose the field RECALL and press ENTER
• Scroll through the list of tests until you get to the desired pre-med test and press ENTER
• Select the field POST
• Proceed as described in Chapter 9.1 and 9.2
EasyGuide
9.6
Page 17
Adding a Trial
If you would like to add trials to a previous test, e.g. if the patient needed a break, please
proceed as follows:
• Select “Perform Test” in the main menu
• Choose the field RECALL and press ENTER
• Scroll through the list of tests until you get to the desired test and press ENTER
• Select the field ADD
• Proceed as described in Chapter 9.1 and 9.2
Please mind that it is only possible to add a trial to a previous test that was performed on the
same day.
10 Quality Messages and Quality Grades
10.1 Quality Messages
The quality messages assist you in conducting the measurement. After each test, they provide
information as to whether the test is acceptable or what to do to improve the result.
Message
Criterion
Recommended action
Don’t hesitate
Back-extrapolated volume
greater than 150 ml or 5%
whichever is greater
The patient must exhale all air at
once and not exhale in short bursts
Blast out faster
Time until peak flow greater
than 120 ms
The patient must exhale more
explosively and as firmly and quickly
as possible.
Blow out longer
Expiration time less than 2
seconds or volume
accumulation has not dropped
below 100 ml per 0.5 seconds
The patient stopped exhaling too
early. The patient must exhale still
further and force as much air as
possible out of his or her lungs.
Good effort, do
next
Test meets above criteria
Good test. Only one to two more
good tests and the test is complete.
Blast out harder
(only in Frontline
mode)
Peak flow not reproducible.
Difference with respect to best
test greater than 1.0 l/s.
The test differs greatly from previous
best test. The patient can blow even
more firmly and achieve a higher
peak flow.
Deeper breath
FEV1 or FVC* not reproducible.
Difference with respect to best
test greater than 150 ml.
The test differs greatly from previous
tests. The patient can inhale even
more deeply and exhale even more
air.
Test complete
Three acceptable tests, FEV1
The test is complete. An adequate
and FVC* within 200 ml / 250 ml number of good tests is available.
(after 5 trials).
* when using FEV6 instead of FVC, FEV6 is also used for the determination of the quality message
EasyGuide
Page 18
10.2 Quality Grades
The quality grades allow you to assess the reliability of the measurement result. Quality grades
A to C indicate a reliable result. A quality grade between D and F indicates inadequate test
quality. The result must then be interpreted with caution.
The quality ratings can be activated or deactivated under “Configuration”.See also Chapter 8.
The table below defines the criteria for the classification of quality grades:
Rating
Criteria in Diagnostic mode
Criteria in Frontline mode
A
At least 3 acceptable tests AND the
difference between the best two FEV1
and FVC values is equal to or less than
150ml.
At least 2 acceptable tests AND the
difference between the two FEV1 and
FEV6 values is equal to or less than
100ml (or FVC is equal or less 150ml) .
B
At least 3 acceptable tests AND the
difference between the best two FEV1
and FVC values is equal to or less than
200ml.
At least 2 acceptable tests AND the
difference between the two FEV1 and
FEV6 values is equal to or less than 150
ml (or FVC is equal or less 200 ml).
C
At least 2 acceptable tests AND the
difference between the best two FEV1
and FVC values is equal to or less than
250ml.
At least 2 acceptable tests AND the
difference between the two FEV1 and
FEV6 values is equal to or less than 200
ml (or FVC is equal or less 250 ml).
D
At least 2 acceptable trials but the
results are not reproducible.
Quality message "Result not
reproducible" OR only one acceptable
trial. Quality message: “Only one
acceptable trial”.
At least 2 acceptable trials but the
results are not reproducible.
Quality message "Result not
reproducible" OR only one acceptable
test.
Quality message "Only one acceptable
trial”.
F
No acceptable test available .
No acceptable test available.
If the Automated Test QC function is activated the instrument determines automatically which
trial is acceptable. For the evaluation of the best trial, the interpretation and the Pre/Post
comparison acceptable trials are used first.
In the Diagnostic mode the Automated Test QC function can be deactivated (see chapter 8). In
this case each trial can be accepted manually. To do so simply select ACCEPT after the
manoeuvre and the trial will be considered acceptable.
EasyGuide
Page 19
11 Interpretation
The diagram below describes how the interpretation is determined. Automatic interpretation
can be activated or deactivated under “Configuration” (see Chapter 8).
Reference: Enright PL, Hyatt RE. Office spirometry. Lea & Febiger, Philadelphia, 1987.
START
test session
good
no
Caution: Interpret with care
yes
FEV1/FVC
>= LLN
yes
no
FVC < LLN
no
normal spirometry
yes
low vital capacity possibly
due to restriction of lung vol.
FEV1
>= LLN
yes
normal spirometry
yes
mild obstruction
yes
moderate obstruction
no
FEV1 >= 60%
predicted
no
FEV1 >= 40%
predicted
no
severe obstruction
FVC <LLN
and low vital capac. possibly
due to restriction of lung vol.
Notes:
yes
1. LLN = Lower Limit of Normal
2. Where FVC is indicated in chart FEV6 may be substituted, if used.
3. Where there is no lower limit of normal (LLN) defined within the selected predicted normal, the
value used for LLN for FEV1/FVC is 90% predicted, and for FEV1 and FVC is 80% of predicted.
EasyGuide
Page 20
12 Predicted Values
EasyOne offers a number of published predicted value tables allowing comparison of the
measurement results. In order to compute the predicted values, it is necessary to enter the
sex, age and height and, in many cases, the ethnic group and the weight of the patient. See
also Chapter 8 on selection of the predicted values.
If no lower limits (LLN) are defined in the predicted publication, EasyOne uses 80% of the
predicted value to interpret FEV1 and FVC (resp. FEV6) and uses 90% of the predicted value in
the case of ratios (e.g. FEV1/FVC%).
If the patient data lies outside of the range defined in the publication, EasyOne uses
extrapolated values. The report explicitly points out that the predicted values are extrapolated
values and that, consequently, particular caution must be taken when interpreting the results.
12.1 Predicted Values for Adults
[1]
[2]
[3]
[4]
[5]
[6]
[7]
[8]
[9]
Morris, James F., Koski, Arthur, Lavon Johnson, “Spirometric Standards for Healthy NonSmoking Adults”, American Review of Respiratory Disease, Volume 10-3, 1971. p.57-67
Morris, James F., Koski, Arthur, Breese, John,'Normal Values and Evaluation of Forced
Expiratory Flow', Am Rev Respir Dis, Vol. 111, 1975, p.755-761
Cherniak, R.M. and Raber M.B. “Normal Standards for Ventilatory Function using an
Automated Wedge Spirometer” Am Rev Respir Dis, Vol. 106, 1972, p.38-46
Knudson, Ronald J., Ronald Slatin, Michael Lebowitz, Benjamin Burrows, “The Maximal
Expiratory flow-Volume Curve”, American Review of Respiratory Disease, Volume 113,
1976, p. 587-600.
Knudson, Ronald J., Michael Lebowitz, Holberg Catherine J., Benjamin Burrows, “Changes
in the Normal Maximal Expiratory Flow-Volume Curve with Aging”, American Review of
Respiratory Disease, Volume 127, 1983, p. 725-734
Crapo, Robert O., Gardner Reed M., Morris Alan H., “Reference Spirometric Values Using
Techniques and Equipment that Meets ATS Recommendations”, American Review of
Respiratory Disease. Volume 123, 1981, p. 659-674
Forche G., Harnoncourt K., Stadlober E.. “Neue spirometrische Bezugswerte für Kinder,
Jugendliche und Erwachsene”, Öst. Ärzteztg. 43/15/16 (1988) 40
P.H. Quanjer. Lung Volumes and Forced Ventilatory Flows. Eur Respir J, Vol 6, Suppl 16,
p.5-40, 1993
NHANES III: Hankinson, Odencrantz, Fedan, 'Spirometric Reference Values from a Sample
of the General U.S. Population' Am J Respir Crit Care Med, Vol. 159, 1999, p 179-187.
12.2 Predicted Values for Children
[1]
[2]
[3]
[4]
Zapletal, T. Paul, M. Samanek. “Die Bedeutung heutiger Methoden der Lungenfunktionsdiagnostik zur Feststellung einer Obstruktion der Atemwege bei Kindern und Jugendlichen.” Z. Erkrank. Atm.-Org., Volume 149, 343-371, 1977
Hsu KHK, Bartholomew PH, Thompson V, Hseih GSJ, “Ventilatory Functions of Normal
Children and Young Adults – Mexican-American, White, Black. I. Spirometry”, J.
Pediatrics 1979, 95: p.14-23
NHANES III: Hankinson, Odencrantz, and Fedan, 'Spirometric Reference Values from a
Sample of the General U.S. Population', Am J Respir Crit Care Med, Vol. 159, 1999, p.
179-187.
Dockery, D.W. et al., Distribution of Forced Vital Capacity and Forced Expiratory Volume in
One Second in Children 6 to 11 Years of Age, American Review of Respiratory Disease.
Volume 128, p. 405-412, 1983
EasyGuide
Page 21
13 Hygiene and Servicing of the Instrument
EasyOne has been designed to minimise maintenance and servicing effort if the instrument is
used correctly.
When you use the spirette respiratory tube, you do not need to clean the instrument. Instead of
cleaning, you simply exchange the respiratory tube. In order to ensure absolute hygiene, we
recommend that that the spirette be used only once.
However, if you conduct only expiratory tests, there is also the option of using reusable
spirette-m respiratory tubes (order No. 2050-7) and exchanging only the mouthpiece (order
number 2051) from patient to patient.
Caution: Always exchange the spirette if you suspect the risk of infection. This is the
only way of absolutely preventing transmission of diseases.
Please note:
The reusable spirette-m respiratory tubes and mouthpieces are suitable
only for performing expiratory manoeuvres.
When using the mouthpieces, avoid the patient inhaling through the respiratory tube. Also
ensure that there is no fluid in the respiratory tube. Correct measurement can be ensured only
if using ndd mouthpieces.
Use a damp cloth to clean the spirometer housing and the base unit. Use a soft cloth and
alcohol (e.g. isopropyl alcohol) for particularly thorough cleaning.
Caution: Avoid fluid penetrating the spirette holder or the inside of the instrument
when cleaning the spirometer.
No maintenance or servicing are required apart from changing the batteries. Please consult
your EasyOne dealer or call the ndd Servicing Dept., number +41 (1) 445 29 70 in the event of
defects or malfunctions.
Proceed as follows to check correct operation of your instrument:
1. Check calibration. Please read Chapter 14.
2. Conduct a spirometry test on yourself.
3. Ensure that the results are plausible and that you can print out the report as required.
Consult your EasyOne dealer if you encounter problems with one of these points.
EasyGuide
Page 22
14 Checking Calibration
Calibration of the instrument can be checked with a syringe using the calibration check
function. The American Thoracic Society (ATS) recommends that calibration be checked every
day. The EasyOne spirometer requires no calibration, even if used frequently.
To perform a calibration check, you need the ndd calibration adapter and a calibration
syringe, in addition to the spirometer and a spirette™. Ensure that the correct syringe volume
is entered in the instrument’s configuration setting (see also Chapter 8). Proceed as follows:
•
•
Choose item “Check calibration” in the main menu.
Connect the spirometer as shown below using the calibration adapter and the syringe.
Ensure that the piston is fully inserted and at the stop position.
•
•
•
Now press ENTER
Wait until the baseline has been set and you hear an audible signal.
Now execute one full inspiratory pump stroke followed by one full expiratory pump stroke
at moderate speed.
After you perform the manoeuvre, you will see the text "Accuracy confirmed" at the top of
the display and, beneath it, the percentage deviation and the average flow velocity of the
pump stroke.
You can repeat the test, print the result or quit the program. The calibration test remains
stored and can also be viewed or printed out later.
•
•
If you do not reach ±3% accuracy, please follow the troubleshooting instructions in Chapter
15. Should you not be able to remedy the defect by following these instructions either, please
consult your EasyOne dealer.
Please note:
Field service or internal calibration of this unit is not recommended.
Cover should not be removed except by qualified service personnel.
EasyGuide
Page 23
15 Troubleshooting Tips
Should you encounter problems operating your spirometer, please consult the table below.
Problem
EasyOne cannot be
switched on
When the EasyOne is
switched on, you hear
three consecutive tones
as a warning signal
Possible cause
Batteries are dead
Insert new batteries
Batteries are inserted wrong.
Insert the batteries correctly
(see Chapter 4.1.)
Did not press and hold the
ON/OFF key for at least 2
seconds.
Press and hold the ON/OFF key
for at least 2 seconds.
The spirometer is defective.
Consult your EasyOne dealer.
When the EasyOne is
The spirometer is possibly
switched on, you see the defective.
following message on the
display: "Self-test failed"
Every time you switch the
instrument on you are
prompted to enter Date
etc.
Solution
Try again. If you receive the
same message again, contact
your EasyOne dealer
The internal battery of EasyOne Consult your EasyOne dealer
is defective
When you start a test, you The spirette is not correctly
see the following
positioned.
message: "Please insert
spirette correctly"
Ensure that the triangle on the
spirometer is lined up with the
triangle on the spirette
EasyOne is outside of
The spirette is not correctly
±3% when conducting the positioned.
calibration check
You have not used an ndd
adapter.
Insert the spirette as described
in Chapter 4.1.
The curve is missing on
the printout
Use the ndd calibration
adapter.
There are leaks in the syringe
connection.
Check the connections.
The specified syringe volume
does not correspond to the
actual syringe volume.
Choose the correct syringe
volume under”Configuration”.
The color cartridge of your
printer is empty
Replace the cartridge
In the configuration of your
EasyOne a black and white
printer is selected, but you
actually use a color printer
Go to “Configuration”, then
“Report Settings” and select
the right printer
EasyGuide
Page 24
Problem
Possible cause
When printing a report the A wrong printer type has been
printer prints meaningless selected in the settings.
characters.
The printer cable is not correctly
connected or is defective.
The printer does not
respond.
The printer is not switched on
or is not ready.
Solution
Set the correct printer. Read
Chapter 8.2.
Switch off the spirometer and
printer. Check all plug
connections.
Ensure that the printer is
switched on and also has
paper. Switch the printer off
and back on again.
The printer cable is not correctly Switch off the spirometer and
connected or is defective.
printer. Check all plug
connections.
EasyOne is not correctly
positioned on the base unit.
Insert EasyOne correctly into
the base unit.
When switching on the
instrument, the message
“device self test error
#20” appears on the
screen
A spirette was inserted while
turning on the instrument OR
was not inserted correctly
Try again with the spirette
inserted correctly. If you receive
the same message again,
contact your EasyOne dealer
When starting a new test,
the message “device
selftest error #14 or #15”
appears in the screen
the spirette is not positioned
correctly
Insert the spirette as described
in Chapter 4.1
When switching on the
instrument, the message
“device self test error
#25” appears on the
screen
The internal battery of the
EasyOne may be defect
Switch the EasyOne off and on
again. If the same message
appears again please contact
your EasyOne dealer
EasyGuide
Page 25
16 Bibliography
[1]
[2]
[3]
[4]
[5]
[6]
[7]
[8]
[9]
American Thoracic Society. Standardization of Spirometry: 1994 Update, Nov. 11,1994.
Am J Resp Crit Care Med 1995; 152:1107-1136.
Occupational Health and Safety Administration (OSHA), Pulmonary Function Standards
for Cotton Dust, 29 CFR: 1910.1043 Appendix D.
Social Security Administration Disability (SSD) Guidelines, CFR404: Appendix 1 to
Subpart P.
Ferguson GT, Enright PL, Buist AS, et al. Office spirometry for lung health assessment in
adults: a consensus statement from the National Lung Health Education Program. Chest
2000; 117:1146-1161.
ATS Pulmonary Function Laboratory Management and Procedure Manual, American
Thoracic Society, New York, NY 10019.
Enright PL, Hyatt RE. Office Spirometry. Lea & Febiger, Philadelphia, 1987.
Hyatt, RE, Scanlon PD, Nakamura M. Interpretation of Pulmonary Function Tests – A
Practical Guide. Lippincott – Raven, Philadelphia, 1997.
American Thoracic Society. Lung Function Testing: Selection of Reference Values and
Interpretative Strategies, Am Rev Respir Dis 1991; 144:1202-1218.
Morris JF, Temple W. Short Report: Spirometric “Lung Age” Estimation for Motivating
Smoking Cessation, Preventive Medicine 14. 655-662 (1985).
2070-3EU_EN_V50.doc