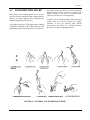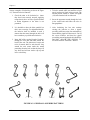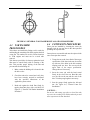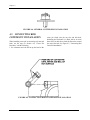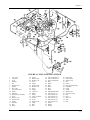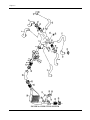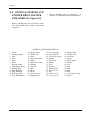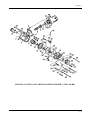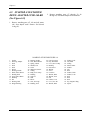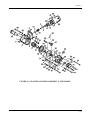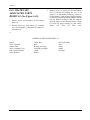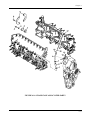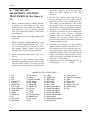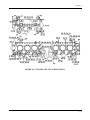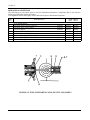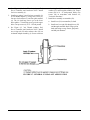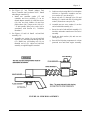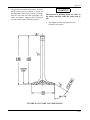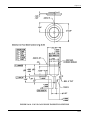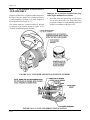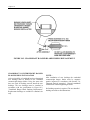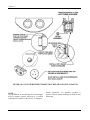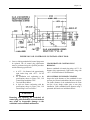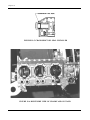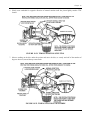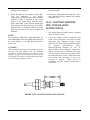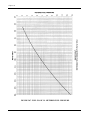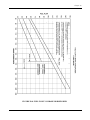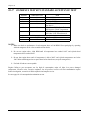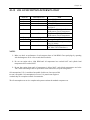
1
OVERHAUL MANUAL MODELS L/TSIO-360-RB Courtesy of Bomar Flying Service www.bomar.biz FORM NO. X30596A Supplement 1 © 1998 FAA APPROVED FEBRUARY 1998 INTENTIONALLY LEFT BLANK ii About… CURRENT STATUS OF PAGES AS OF: FEBRUARY 1998 See “Manual Revisions,” in the introduction section for distribution procedure. THE ORIGINAL DATE OF THIS PUBLICATION IS FEBRUARY 1998. INSERT LATEST PAGES; DESTROY SUPERSEDED PAGES. WARNING If the user of this manual is uncertain whether all current revisions have been incorporated into the manual, contact Teledyne Continental Motors. Do not perform any operation, maintenance, installation or other operation until the manual is confirmed current. MODEL: L/TSI0-360-RB PAGE ALL STATUS ORIGINAL FORM X30596AS1 PAGE ALL STATUS ORIGINAL PAGE ALL STATUS ORIGINAL PAGE ALL STATUS ORIGINAL iii Replacement Parts WARNING Use only parts meeting the engine type design. Replacement Parts Beware of replacement parts, materials and accessories that may be sold as aircraft quality but whose origin and quality are not known. These parts may be deceptively advertised as "unused," "like new," or "remanufactured," and purchasers are often unaware that they are not eligible for use on certificated aircraft. The hazards involved in installing these types of parts on your aircraft are obvious. Know Your Supplier Many original parts and components are copied and the copies are sold at discounted prices for installation on U.S. certified aircraft. An original manufacturer's part is often used as a guide to make duplicates that appear to be as good as the original, but there are many unknowns about the quality of design, materials, and workmanship. Other factors that go into quality parts are the degree of heat treating and plating, and inspections, tests, and calibrations. Unfortunately, a cheaply produced part that looked "as good as the original" is usually found out too late. Federal Aviation Regulations FAR 43.13 and FAR 145.57 specify performance rules for replacement of parts and materials used in the maintenance and alteration of United States certificated aircraft. FAR 91.403, FAR 121.363, FAR 123.45, and FAR 135.143 (a) holds the owner/operator responsible for the continued airworthiness of the aircraft, and that includes the quality of replacement parts. Identifying Approved Parts Approved serviceable replacement parts are identified by: 1. Federal Aviation Administration (FAA) Form 8130-3 Airworthiness Approval Tag. An Airworthiness Approval Tag identifies a part or group of parts that have been approved by an authorized FAA representative. iv 2. FAA Technical Standard Order (TSO) number and identification mark indicating that the part or appliance was manufactured in accordance with the requirements of FAR 21 Subpart O. 3. FAA Parts Manufacturer Approval (PMA) symbol with the manufacturer's name, part number, make and model of the type certified product on which the part can legally be installed stamped on the part. An FAA/PMA is issued under FAR 21.305. Make and model information may be on a tag attached to the part. 4. Shipping ticket, invoice, or other document which verifies that the part was manufactured by a facility that was holding an FAA Approved Production Inspection System Certificate issued under FAR 21 Subpart F, or by a manufacturer holding an FAA Production Certificate issued under FAR 21 Subpart G. 5. Certificate of airworthiness for export issued by governments in countries other than the United States of America under the provisions of FAR 21 Subpart N. It's Your Responsibility The owner/operator is responsibile for the continued airworthiness of the aircraft. In accordance with FAR, certification of materials, parts and appliances for return to service for use on aircraft is the responsibility of the person/agency who signs the approval. To insure the continued safe operation of your aircraft, you must exercise great care when inspecting, testing, and determining the acceptability of all parts and materials. A very important part of this is verifying the origin of all materials, parts, and accessories that are used on your aircraft. About… Notice to all users This manual does not contain operating, maintenance, overhaul or installation information for supplemental type certificated components or systems. This manual contains information on engines, components and systems designed, tested and certified by TCM in accordance with the pertinent type design data. The following publication contains overhaul information. All personnel involved with these functions must thoroughly read and understand the information provided; these instructions inform of the procedures necessary to maintain continued airworthiness and they must be followed carefully. This manual contains no warranties, either expressed or implied. Publication Format This publication is formatted for practical use and ease of reference. Chapter and page numbering are independent so that revisions can be made without affecting the entire publication. Due to the large volume of information necessary for overhaul, chapters are independently numbered. For example, chapter 1 begins on page 1; chapter 2 begins again with page 1, etc. To locate information easily, use the Publication Table of Contents and the Chapter Contents provided at each division. WARNING This manual, the Service Documents, the Maintenance Manual and the Parts Catalog constitute the instructions for Continued Airworthiness prepared by TCM as approved by the FAA, pursuant to FAR Part 33. As required by FAR § 43.13, each person performing overhaul, maintenance, alteration or preventive maintenance on the engine or accessories must use the methods, techniques and practices prescribed in the Instructions for Continued Airworthiness. Failure to comply with the Instructions for Continued Airworthiness may result in engine malfunction, engine failure, injury or death. The Mechanic Prior to alteration performing or maintenance, maintenance the overhaul, preventive mechanic must meet requirements of FAR 65 and must follow FAR Parts 43, 91 and 145 as applicable. Use this manual in conjunction with Teledyne Continental Motors (TCM) service documents, related publications, accessory manufacturer’s instructions, FAR and FAA Advisory Circulars. Notes, Cautions and Warnings… NOTE... Special interest information which may facilitate performance of a procedure or operation of equipment. CAUTION... Used to emphasize certain information or instructions which if disregarded may result in damage to engine or accessories. WARNING Used to provide warning with respect to information and/or instructions which if disregarded will endanger personnel and/or severely damage the engine resulting in subsequent engine malfunction or failure. Notes, cautions and warnings do not impose undue restrictions. They are inserted to obtain maximum safety, efficiency and performance. Abuse, misuse or neglect of equipment can cause eventual engine continued… malfunction or failure. Remember... Notes, Cautions, and Warnings do not impose undue restrictions. They are provided to help you obtain maximum safety, efficiency, and performance. Any misuse, abuse, or neglect of the engine or related equipment can eventually cause engine malfunction or failure. v INTENTIONALLY LEFT BLANK vi Chapter 1 Publication Table of Contents COVER PAGES PAGE Status Page ....................................................................................................................iii Replacement Parts Warning ..........................................................................................iv Notice To All Users.......................................................................................................v Definition of Notes, Cautions and Warnings ................................................................v Chapter Index CHAPTER 1 2 3 4 5 6 7 8 9 10 11 12 13 14 15 16 17 18 19 20 PAGE Introduction.........................................................................................................1-1 Tools, Equipment, Sealants and Lubricants ........................................................2-1 Airworthiness Limitations...................................................................................3-1 Standard Practices ...............................................................................................4-1 Reciprocating Engine Overhaul ..........................................................................5-1 Engine Disassembly............................................................................................6-1 Exhaust System ...................................................................................................7-1 Ignition System ..................................................................................................8-1 Fuel Injection System..........................................................................................9-1 Induction System.................................................................................................10-1 Air Conditioning .................................................................................................11-1 Electrical Charging System.................................................................................12-1 Starting System ...................................................................................................13-1 Accessory Case ...................................................................................................14-1 Lubrication System .............................................................................................15-1 Cylinders And Pistons.........................................................................................16-1 Crankcase............................................................................................................17-1 Engine Drive Train .............................................................................................18-1 Final Assembly ...................................................................................................19-1 Post Overhaul Adjustment And Test ..................................................................20-1 vii Chapter 1 INTENTIONALLY LEFT BLANK viii Chapter 1 CHAPTER 1 SECTION 1-1 1-2 1-3 1-4 1-5 1-6 1-7 1-8 PAGE Introduction.........................................................................................................1-2 Scope...................................................................................................................1-2 Definition of Terms.............................................................................................1-2 Manual Revisions................................................................................................1-3 Related Publications............................................................................................1-3 Service Documents .............................................................................................1-4 Service Reports and Inquiries .............................................................................1-4 Engine Design Features ......................................................................................1-4 1-1 Chapter 1 1-1 INTRODUCTION This overhaul manual and publications listed in Section 1-5, "Related Publications," contain the information necessary to overhaul an aircraft engine when it reaches manufacturers specified time between overhaul (TBO). For a list of chapters contained in this manual refer to the Chapter Index on page vii. For a list of sections, figures and tables contained in each chapter, see the first page of each chapter. The pages, figures and tables contained in this publication are numbered consecutively. This manual covers the L/TSI0-360 RB engine models. 1-2 SCOPE This publication contains the information necessary to disassemble, clean, inspect, repair and replace, reassemble, adjust and test the above model engines. 1-3 DEFINITION OF TERMS In this manual, front, rear, left and right refer to the engine as viewed from the accessory end. The accessory end is the rear and the propeller flange is the front of the engine. Cylinders are numbered starting from the rear, with odd numbers on the right and even numbers on the left. 1-4 MANUAL REVISIONS Teledyne Continental Motors manuals are revised as necessary. Revisions to this manual will be furnished to purchasers who fill out and return the registration post card located in the front of this manual. Page iii, "Current Status Of Pages," is updated at each revision. Remove and discard the old page iii. Insert the new page iii as a record of which revisions have been incorporated into the manual. 1-2 WARNING If for any reason the user of this manual is uncertain whether all current revisions have been incorporated into the manual, contact Teledyne Continental Motors or a TCM Distributor to confirm the manual is the most current revision. Do not use the manual and do not perform any overhaul procedures or other operations upon the engine or accessories until the manual has been confirmed to be current. This manual is current and correct to the best of Teledyne Continental Motors knowledge at the time of publication. Teledyne Continental Motors solicits and encourages users comments regarding suggested changes to this manual (a post card is provided at the front of the manual for this purpose.) Routine recommended changes or questions should be sent to: Teledyne Continental Motors P.O. Box 90 Mobile, Alabama 36601 ATTN:Technical Publications Department If the user observes incorrect information or mistakes in this publication that may affect safety in any manner, immediately call the Technical Publications Department of Teledyne Continental Motors at (334) 438-3411, or contact a Teledyne Continental Motors Distributor or the Federal Aviation Administration. Chapter 1 1-5 RELATED PUBLICATIONS The following is a listing of related manuals: 1. Maintenance and Operators Manual for L/TSI0-360-RB, Form X30645A 2. Illustrated Parts Catalog for L/TSI0-360-RB, Form X30597A Supplement 1. 3. Operator Installation Manual for TSI0-360-RB, Form X30644. 4. Teledyne Continental Motors Aircraft Engine Service Documents (including service bulletins). 5. Fuel Injection Manual, Form X30593A. 6. Starter Service Instructions, Form X30592. 7. TCM Ignition Systems Master Service Manual, Form No. X40000. 8. Alternator Maintenance and Parts Catalog, Form No. X30531-3. The above publications can be ordered through your Teledyne Continental Motors Distributor or ordered directly, if prepaid, from: Teledyne Continental Motors P. 0. Box 90 Mobile, Alabama 36601 ATTN: Publication Sales Department Telephone: (334) 438-3411 For price information on the above publications request TCM Publications Pricing Index of Current Publications and Optional Publications. 9. Slick Ignition Systems Master Service Manual Index and Order Form No. F-1 1 00. Order through: Slick Aircraft Products, Unison Industries 530 Blackhawk Park Avenue Rockford, Illinois 61104 ATTN: Subscription Department Telephone: (815) 965-4700 11. American Society for Testing and Materials (ASTM). Order through: ASTM 1916 Race Street, Philadelphia, PA. 19103-1187 USA Ph: (215) 299-5400 12. Overhaul Manual for Aircraft System Turbochargers and Overhaul Manual for Aircraft System Valves and Controllers. Order Through: Airesearch 232 W. 190 Street Torrence, California 90504-6094, (213) 323-9500. 13. Fuel System Manuals, Form 15-338, RSA5 Operator and Service Manual and Form 15-900, RSA5AD2 Overhaul Instructions, Precision Airmotive Corporation 3220 100TH Street S.W. #E Everett, WA 98204 · USA (206) 353-8181 1-3 Chapter 1 1-6 SERVICE DOCUMENTS. Teledyne Continental Motors service documents are divided into six categories: (1) Mandatory Service Bulletin, (2) Critical Service Bulletin, (3) Service Bulletin, (4) Service Information Directive (5) Service Information Letter and (6) Special Service Notice (SSN). See Section 1-5, "Related Publications," for service document ordering information. SERVICE DOCUMENT CATEGORY DEFINITIONS CATEGORY 1: "MANDATORY SERVICE BULLETIN" (MSB)- Service documents relating to known or suspected hazards to safety that have been incorporated in whole or in part in an Airworthiness Directive (AD) issued by the FAA or have been issued, at the direction of FAA, by the manufacturer in order to require compliance with an already issued AD (or an equivalent issued by another country's airworthiness authority). CATEGORY 2: "CRITICAL SERVICE BULLETIN" (CSB)- Service documents (not included in Category 1) that have been determined by the product manufacturer to constitute a threat to continued safe operation of an aircraft or to persons or property on the ground unless some specific action (inspection, repair, replacement, etc..) is taken by the product owner or operator. Documents in this category are candidates for incorporation in an Airworthiness Directive issued by the FAA (but may not be.) CATEGORY 3: "SERVICE BULLETIN" (SB)Service documents (not included in Categories 1 and 2) considered by the product manufacturer to constitute a substantial improvement to the inherent safety of an aircraft or component of an aircraft. This "Service Bulletin" category also includes updates of instructions for continued airworthiness. CATEGORY 4: "SERVICE INFORMATION DIRECTIVE" (SID)- Service documents (not included in Categories 1, 2 or 3) that have been determined by the manufacturer to be of value to an owner/operator in the use of a product by enhancing safety, maintenance or economy. 1-4 CATEGORY 5: "SERVICE INFORMATION LETTER" (SIL)- This category includes all information (not included in Categories 1 through 4) that may be of use to the owner/operator or maintainer of the aircraft. CATEGORY 6 “SPECIAL SERVICE NOTICE” (SSN)-TCM may issue a Special Service Notice when a product condition can be rectified by direct contact with each customer to whom the product was delivered. Special service notices will be upgraded to Service Bulletins if confirmation of compliance with the Special Service Notice cannot be verified by TCM. 1-7 SERVICE REPORTS AND INQUIRIES. If for any reason you have an inquiry or require technical assistance, contact your local TCM distributor or TCM field representative. Requests for copies of Teledyne Continental Aircraft Engine service publications should be made through your distributor or Teledyne Continental Motors, P. 0. Box 90, Mobile, AL 36601, ATTN: Publications Sales Department. 1-8 ENGINE DESIGN FEATURES For a complete description of the engine, systems, components and maintenance of the engine prior to engine overhaul see the L/TSI0-360-RB Maintenance Manual, Form X30645A. Chapter 1 1-9 GLOSSARY BURNING: As applied to valve heads this term indicates roughening or erosion due to high temperature gases escaping past valve faces. In other instances, it indicates drawing of the temper of steel parts to a soft (blue) condition, as a result of overheating, during an absence of lubrication on moving surfaces, such as, gear teeth subject to high loading. NICK: A sharp sided gouge or depression with a "V" shaped bottom which is generally the result of careless handling of tools and parts. BURR: A sharp or rough projection of metal. RUNOUT: Eccentricity or wobble of a rotating part. Eccentricity of two bored holes or two shaft diameters. A hole or bushing out of square with a flat surface. Usually measured with a dial indicator, and limits stated indicate full deflection of indicator needle in one revolution of part or indicator support. CHAFING: Rubbing action between adjacent or contacting parts under light pressure which results in wear. COLD FLOW: Term used to describe deep and permanent impressions or cracks caused by hose clamp pressure. CRACK: A partial separation of material usually caused by vibration, overloading, internal stresses, improper assembly or fatigue. DENT: A rounded hollow in the surface. PEENING: A series of blunt depressions in a surface PITTING: The formation of pockets of corrosion products on the surface of a metal. SCORING: Deep grooves in a surface caused by abrasion. Scoring is caused by fine hard particles that are forced between moving surfaces, as in a bearing and journal, or by galling when a moving part is not supplied with lubricant. SPALLING: Distress to a loaded surface in which chips of the hardened surface are broken out. ELONGATE: To stretch out or lengthen. EROSION: Carrying away of material by the flow of hot gases, grit or chemicals. FRETTING: A condition of surface erosion caused by a slight movement between two parts that are fastened together. GALLING: A severe condition of chafing or fretting in which a transfer of metal from one part to another occurs. It is usually caused by a slight movement of mated parts having limited relative motion and under high loads. GROOVED SURFACE: Shallow channels, wider than scratches and usually smooth resulting from wear effected by concentrated contact stress. 1-5 Chapter 1 INTENTIONALLY LEFT BLANK 1-6 TOOLS CHAPTER 2 TOOLS, EQUIPMENT, SEALANTS AND LUBRICANTS Section 2-1 2-2 2-3 2-4 Page General Information ........................................................................................... 2-2 Possible Special Tool Procurement Sources ...................................................... 2-3 Special Tools...................................................................................................... 2-4 Sealants and Lubricants...................................................................................... 2-8 2-1 TOOLS 2-1 GENERAL INFORMATION The mechanic should be equipped with a complete set of the necessary tools that include the following: 1. Wrenches - 1/4” through 1 1/4" 2. Common and Philips Head Screwdrivers 3. Pliers - Common, Diagonal Cutters, Needle Nose, Duck Bill, Snap Ring, Safety Wire 4. Ratchets 1/4", 3/8", 1/2" Drive 5. Sockets - 1/4”' Drive 5/32" through 1/2",- 3/8" Drive 3/8" through 1" - 1/2" Drive 7/16" through 1-1/ 4" 6. Sockets (Deepwell) -1/2" Drive, 7/16" through 1" 7. Feeler Gauges 8. Leather or Soft Plastic Mallet 9. Torque Wrenches* 0-500 In. Lbs. and 0-100 Ft. Lbs. 10. Micrometers* 11. Slide Hammer 12. Pullers 13. Thickness Gauges 14. Vernier Calipers* 15. Small Hole Gauges * Must be currently calibrated, and the calibration must be traceable to the National Bureau of Standards. 2-2 TOOLS 2-2 POSSIBLE SPECIAL TOOL PROCUREMENT SOURCES —NOTICE— All tools in the "Special Tool" list are for reference only, and not for the purpose of promoting or suggesting tools to be purchased from the indicated sources. The following information is given as an aid for special tool procurement purposes. COMPANY ALCOR Box 32516 10130 Jones Maltsberger Rd. San Antonio, TX 78284 Ph.512/349-3771 KENT- MOORE 29784 Little Mack Roseville, Ml 48066-2298 Ph. 800/253-0138 CHAMPION SPARK PLUG, CO. Box 910, 900 Upton Ave. Toledo, OH 43661 Ph. 419/535-2461 EASTERN ELECTRONICS, INC. 180 Roberts St. East Hartford, CT 06108 Ph. 203/528-9821 FEDERAL TOOL SUPPLY CO., INC. 1144 Eddy St. Providence, Rhode Island 02940 Ph. 800/343-2050 AIRCRAFT TOOL SUPPLY P.O. Box 4525, 2840 Breard St. Monroe, LA 71201 Ph. 507/451 -5310 McMASTER-CARR SUPPLY CO. P.O. Box 4355 Chicago, Illinois 60680 Ph. 312/833-0300 SNAP ON TOOLS 2611 Commerce Blvd. Birmingham, Alabama 35210 Ph. 205/956-1722 KELL-STROM TOOL COMPANY, INC. 214 Church St. Wethersfield, CT 06109 FAX CORPORATION 210 South King St. Danbury, Connecticut 06813 Ph. 203/748-6117 MERRIT PRODUCTS 201 W. Mansville Compton, California 90224 Ph. 310/639-4242 AERO TEST, INC.© 29300 Goddard Road Romulus, Michigan 48174 Ph. 313/9465547 PARKER RESEARCH CORPORATION P.O. Box 1406 Dunedin Fla. 34697 Ph. 1-800-525-3935 Fax. 813-797-3941 GENERAL PRODUCT SUMMARY Instruments for Light Powered Aircraft Special Tools Precision Instruments Measuring Instruments Precision Tools, Special Tools Spark Plugs, lgnitors, Oil Filters Special Tools Fuel Pressure Test Equipment Measuring Instruments Precision Tools Piston Position Indicators Precision Inspection Instruments Special Tools Precision Tools Special Tools Precision Tools Special Tools Precision Tools Special Tools Ignition Test Equipment Ultrasonic Test Equipment Special Tools Model 20 ATM-C Porta-Test Unit Model DA-200 Contour Probe 2-3 TOOLS 2-3 SPECIAL TOOLS Specific tools listed or equivalent tools marketed by other manufacturers are necessary for overhaul and maintenance of the aircraft engine. ITEM NO. 1. 2. 3. 4. 5. 6. 7. 8. 9. 10. 11. 12. 13. 14. 15. 16. 17. 18. 19. 20. 21. 22. 23. 24. 25. 26. 27. 28. 29. 30. 31. 32. 33. NOTE 2-4 TOOL GENERAL ENGINE RECIPROCATING 646953 Master Orifice Tool for cylinder compression test available from Kent - Moore. 7251 Differential Pressure Cylinder Checker available from Kent - Moore. IGNITION SYSTEM Borrough's 3608A Protractor/Timing Indicator Disc or equivalent for setting engine timing. Model E25 Timing Indicator available from Eastern Electronics, Inc. 11-9110-1 Magneto Timing Light available from KELL-STROM Tool Company Inc. FUEL INJECTION Borrough's 8165 Injector Nozzle Remover and Installer or equivalent. CHARGING SYSTEM Borrough's 7726 Tork Band Tension Adjuster or equivalent for Gen./Alt. Belt Tensioning. BT-33-73F Belt Tension Gauge available from Kent - Moore. Borrough's 4973 Generator Drive Holders or equivalent. Borrough's 61-5 Pulley Puller or equivalent for gen./alt. sheave removal Borrough's 8091 GEN./ALT. Output Tester or equivalent. 647 Alternator Analyzer Voltage Regulator Tester available from Eastern Electronics, Inc. E100 Alternator/Regulator/Battery Tester available from Eastern Electronics, Inc. Model 29 Voltage & Circuit Tester available from Eastern Electronics, Inc. STARTING SYSTEM Borrough's 8093C Bearing Puller or equivalent for needle bearing removal. Borroughs 23-1 Needle Bearing Installer or equivalent. LUBRICATION SYSTEM 8048 Oil Pressure Relief Spot Facer available from Kent - Moore. CYLINDERS 68-3 Push Rod Spring Compressor available from Kent - Moore. 3882 Cylinder Base Nut Wrenches available from Kent - Moore. Borrough's 8079 Cylinder Base Nut Wrenches or equivalent. 3882, 3882-2 Cylinder Base Nut Wrenches available from Kent - Moore. 3601 Ring Compressor for cylinder installation available from Kent - Moore. 8121 Piston Pin Removers available from Kent - Moore. 24. 3602 Valve Spring Compressor available from Kent - Moore. 545-116 Dial Bore Gauges available from Federal Tool Supply Co., Inc. CFL10 Cylinder Hone available from Snap On Tools. No. 1675 Valve Seat Grinder Set "Sioux Brand" available from Aircraft Tool Supply. AEX 375 Valve Seat Grinder Pilot .437 Dia. available from Aircraft Tool Supply. K498 Intake Valve Seat Grinding Stone (Roughening 30°) available from Aircraft Tool Supply. K428 Intake Valve Seat Grinding Stone (Finishing 30°) available from Aircraft Tool Supply. K491 Exhaust Valve Seat Grinding Stone (Roughening 30°) available from Aircraft Tool Supply. K21 Exhaust Valve Seat Grinding Stone (Finishing 30°) available from Aircraft Tool Supply. Borrough's 5221 Holding Fixture Adapters or equivalent. See possible sources on page 2-3 for tool procurement SEE SECTION 5-4 5-4 12-6 12-7 12-7 13-3 16-5 16-5 16-5 16-5 16-5 16-5 16-5 16-5 17-5 17-5 19-3 20-6 20-6 TOOLS ITEM NO 34. 35. 36. 37. 38. 39. 40. 41. 42. 43. 44. 45. 46. 47. 48. 49. 50. 51. 52. 53. 54. 55. 56. 57. 58 59. 60. 61. 62. 63. 64. 65. 66. 67. 68. 69. 70. 71. TOOL Borrough's 5221 15A Cylinder Holding Fixture or equivalent. Borrough's 8156 Cylinder Heating Stand or equivalent. Borrough's 8086 Valve Seat Insert Remover & Replacer or equivalent. Borrough's 4910 Installer Valve Seat Insert or equivalent. Borrough's 4956 Installer Valve Seat Insert or equivalent. Borrough's 8116 Common Parts Kit or equivalent. Borrough's 8116-1 B through 15B Boring Bars or equivalent. Borrough's 8116-1 R through 15R Reamers or equivalent. Borrough's 8116-1 through 16 Expanding Guide Bodies or equivalent. 4909 Valve Seat (Straight Side) Insert Cutters available from Kent - Moore. 4954 Valve Seat (Straight Side) Insert Cutters available from Kent - Moore. 4985 Valve Seat (Straight Side) Insert Cutters available from Kent - Moore. 5224 Valve Seat (Straight Side) Insert Cutters available from Kent - Moore. 5225 Valve Seat (Straight Side) Insert Cutters available from Kent - Moore. 8135 Valve Seat (Step Side) Insert Cutters available from Kent - Moore. 8136 Valve Seat (Step Side) Insert Cutters available from Kent - Moore. 8138 Valve Seat (Step Side) Insert Cutters available from Kent - Moore. Borrough's 8122A Common Drive Handle or equivalent. 122 Valve Guide Cleaner available from Kent - Moore. 4981 Valve Guide Remover available from Kent - Moore. 3619 Valve Guide Replacer available from Kent - Moore. Borrough's 3170 Floating Holder or equivalent. 4981 Valve Guide Remover available from Kent - Moore. Borrough's 8116-24 through 29 Valve Stem Hole Reamers or equivalent. 3606-CP Reamer (Carbide Tipped) available from Kent - Moore. 3606-HP Reamer (High Speed Steel) available from Kent - Moore. 2848-1 Plug Gauge for valve guide inspection available from Kent - Moore. 4943-1 HS through 5HS Reamers, Valve Guide Boss available from Kent - Moore. Borrough's 4918 Spark Plug Insert Replacer or equivalent. Borrough's 4919 Spark Plug Insert Remover or equivalent. Borrough's 445, 18mm Spark Plug Tap or equivalent for straightening out damaged 2769A13 Rosan® Stud Remover available from McMASTER-CARR Supply Co. Rosan® is a registered trademark of Fairchild Aerospace Fastener Division. . 8074 Rosan® Lock Ring Installer available from Kent - Moore. 8118 Rocker Arm Bushing Remover/lnstaller available from Kent - Moore. 3610 Reamer Rocker Arm Bushing available from Kent- Moore. CRANKCASE Borrough's 8114 Crankcase Through Bolt Removers or equivalent. L423 Crankcase Splitter available from Kent - Moore. Borrough's 505 Stud Drivers or equivalent. ENGINE DRIVE TRAIN Borrough's 8117A Runout Block Set or equivalent for crankshaft inspection. Wheel Fax Jr. Mark IV Model O for Crankshaft Ultrasonic Testing available from Fax Corporation. Operator must be certified by TCM standards. Borrough's 8087A Polishing Tools for Crankshaft Bearings or equivalent. 3604, 8068 Crankshaft Blade and Damper Bushing Remover/Replacer available from Kent- Moore.. Borrough's 8077A Bushing Remover & Replacer, Counterweight or equivalent. . Borrough's 8111A Connecting Rod Fixture or equivalent. SEE SECTION 20-6 20-6 21-5 21-5 21-5 22-5 22-5 NOTE... See possible sources on page 2-3 for tool procurement. 2-5 TOOLS ITEM NO. 72 73. 74. 75. 76. 77. 78. 79. 80. TOOL Borrough's 8072C Adapter Kit or equivalent for connecting rod inspection 8071 Reamers for connecting rod bushing available from Kent - Moore D-4000 Federal Dimension Air Gauge for connecting rod bushing inspection available from Federal Tool Supply Co., Inc. 1.00025 Setting Ring for checking 1.0000 to 1.0005 tolerance available from Federal Tool Supply Co., Inc. 1.00025 Air Plug for checking 1.0000 to 1.0005 tolerance available from Federal Tool Supply Co., Inc. 5209 Propeller Shaft Oil Seal Installer available from Kent - Moore OPERATIONAL INSPECTION 85328 Alcor Portable Digital EGT Unit available from Alcor, Inc. 85329 Alcor Portable Digital CHT available from Alcor, Inc. Model 20 ATM-C Porta-Test Unit available from Aero Test, Inc.© NOTE... See possible sources on page 2-3 for tool procurement. NOTE... The rights to manufacture Borrough's Tools has been acquired by Kent - Moore. 2-6 SEE SECTION 22-5 22-5 23-1 23-1 23-2 Sealants And Lubricants 2-4 SEALANTS AND LUBRICANTS Aviation Engine Oil Ashless Dispersant Recommended Grade: Above 40'F ambient air, sea level SAE 50 or Multi Viscosity Below 40'F ambient air, sea level SAE 30 or Multi Viscosity Manufacturer Brand Name BP Oil Corporation Castrol Castrol Limited (Australia) Chevron U.S.A., Inc. Continental Oil Delta Petroleum Company Exxon Company, U.S.A. Gulf Oil Company Mobil Oil Company NYCO S.A. Pennzoil Company Phillips Petroleum Company Phillips Petroleum Company BP Aero Oil Castrol Aero AD Oil Castrol Aero AD Oil Chevron Aero Oil Conco Aero S Delta Avoil Oil Exxon Aviation Oil EE Gulfpride Aviation AD Mobil Aero Oil TURBONYCOIL 3570 Pennzoil Aircraft Engine Oil Phillips 66 Aviation Oil, Type A X/C Aviation Multiviscosity Oil SAE 2OW50, SAE 2OW60 Quaker State AD Aviation Engine Oil Red Ram X/C Aviation Oil 2OW50 Aeroshell (R) W Aeroshell Oil W, Aeroshell Oil W 15W50 Anti-Wear Formulation Aeroshell Oil W 15W50 Aeroshell Oil W, Aeroshell Oil W 15W50 Anti-Wear Formulation Aeroshell Oil W 15W15 Sinclair Avoil Texaco Aircraft Engine Oil - Premium AD Total Aero DM 15W50 Union Aircraft Engine Oil HD Quaker State Oil & Refining Company Red Ram Limited (Canada) Shell Australia Shell Canada Limited Shell Oil Company Sinclair Oil Company Texaco Inc. Total France Union Oil Company of California Break-in Oil MIL-C-6529 Type 11 Corrosion preventive mineral oil. NOTE... Mineral oil conforming with MIL-C-6529 Type 11 contains a corrosion preventive additive and must not be used for more than 25 hours or six months, whichever occurs first. If oil consumption has not stabilized in this time, drain and replenish the oil and replace the oil filter. . 2-7 Sealants And Lubricants Preservative Oil TYPE SUGGESTED SOURCES APPLICATION MIL-C-6529 Type 11 (Aeroshell Fluid 2F or equivalent) For Temporary storage (up to 90 days) MIL-P-46002, Grade 1 oil (NOX RUST VCI-105 or equivalent) May be purchased through: Rock Island Lubricant & Chemical Co. P.O. Box 5015 1320 1st Street Rock Island, Illinois 61204 Phone: 1 -800-522-1150 For Indefinite storage Lubricants TYPE SUGGESTED SOURCES APPLICATION Molyshield Grease May be purchased through: American Lubricants 1227 Deeds Dayton, Ohio 45401 Phone: (513) 222 - 2851 Needle bearings and ball bearings Valve stems All ACC. drive splines and couplings Idler gear and pin Fuel injection controls, o-rings, springs, shafts and bushings Magneto rubber drive bushings Oil pump and scavenge pump gear shafts, ends and teeth. Oil pump and scavenge pump housing and cover gear contact areas. Starter worm gear drive teeth and bevel gear teeth Dow Corning® G-N Paste [Dow Corning G-N Paste is a registered trademark of Dow Corning Corporation.] For Distributor information call 1-800-248-2481, have state & city information available Camshaft lobes and lifter faces Alvania (Shell #2) For Distributor information Shell Product Information Center, Phone: 1-800-231-6950 Front crankshaft oil seal Apply light coat at point of contact between nut seat and ferrule on ignition lead MIL-S-3545C Grease (Shell #5) Shell Product Information Center, Phone: 1-800-231-6950 Fuel injection linkage pivot points, throttle shaft bushings, lever bushings Permatex Maintain® Lubricant For Distributor information call: Permatex Customer Service @ Phone: 1-800-641-7376 Fuel injection linkage pivot points, throttle shaft bushings, lever bushings 2-8 Sealants And Lubricants Lubricants TYPE SUGGESTED SOURCES APPLICATION 646943 - Anti Seize Lubricant or May be purchased through your local TCM Distributor or For Distributor information: Loctite Customer Service @ Phone: 1-800-243-4874 All fuel injector nozzles (at cylinder head) Loctite Anti-Seize Lubricant 767 Oil temp. control valve (Vernatherm) Exhaust studs (nut end before Courtesy of Bomar Flying Service torquing) www.bomar.biz All .3125 and larger studs unless otherwise specified All mechanical tach drive housing threads not through to an oil source Air reference fittings on all throtle bodies Lubricants TYPE SUGGESTED SOURCES APPLICATION See Aviation Engine Oil Ashless Dispersant Table Cylinder stud threads and through bolt threads, crankcase stud threads, connecting rod bolt and nut threads and engine accessory stud threads where specified torques are utilized Approved Clean Break-In Oil See Break-In Oil Table Crankshaft bearings, connecting rod bearings, camshaft bearings, tachometer gears and adapters, accessory spur gear teeth, starter cone, bushing and nut, starter adapter clutch spring (ID & OD), sealing surface of valve guide seals, pistons, piston pins and piston rings, rocker arms, pivots, valves and tappets, thrust washers and o-rings, oil filter adapter seals CHAMPION® - Spark Plug Thread Lubricant No. 2612 [CHAMPION® is a registered trademark of Cooper Industries.] For Champion Products Distributor information: Phone: 803-843-5400 Spark plugs WD-40 orChesterton No. 4 Chesterton Technical Product Information Phone: (508) 469-6783 Induction system hose connections Dow Corning® No. 4 For Distributor information call 1-800-248-2481, have state & city information available Spin-on oil filter rubber seals Gasket, governor pad (both sides) Approved, Clean, 50 Weight Ashless Dispersant Oil 2-9 Sealants And Lubricants Sealants TYPE SUGGESTED SOURCES APPLICATION LUBRIPLATE® 930 AA (P/N L0096-035) For Distributor information Call LUBRIPLATE® @ Phone: 1-800-733-4755 Apply to the outside diameter of valve guides at installation TCM P/N 654514 CRC 336 Rust Preventative Compound May be purchased through your local TCM Distributor Spray exhaust end of turbocharger for engine preservation Permatex Aviation Grade 3D For Distributor information call: Permatex Customer Service @ Phone: 1-800-641-7376 Crankcase parting face, oil pump covers, scavenge pump covers and #641543 Silk Thread and May be purchased through your local TCM Distributor #646942 Gasket Maker or May be purchased through your local TCM Distributor Loctite Gasket Eliminator 515 Sealant For Distributor information call: Loctite Customer Service @ Phone: 1-800-243-4874 653692 - Primer May be purchased through your local TCM Distributor Crankcase crankshaft nose oil seal area or Loctite LocQuic Primer 7649 For Distributor information: Loctite Customer Service @ Phone: 1-800-243-4874 #646942- Gasket Maker May be purchased through your local TCM Distributor or Loctite Gasket Eliminator 515 Sealant For Distributor information: Loctite Customer Service @ Phone: 1-800-243-4874 Engine nose seal, outside diameter of all uncoated oil seals except fuel pump adapter seal, 642910 oil seal outside diameter, between oil sump and oil sump gaskets Sealants TYPE SUGGESTED SOURCES APPLICATION #642188 - Gasket Sealant (TCM) 1.5 oz. tube May be purchased through your local TCM Distributor or K & W Copper Coat For Distributor information r-all: K & W Products Customer Phone: 1-800423-9446 Accessory case to crankcase gasket crankcase side only, oil cooler gasket both sides, pressed in plugs, parting line areas at three way joints sump to crankcase to accessory case, Loctite Teflon PS/T Pipe Sealant For Distributor information: Loctite Customer Service @ Phone: 1-800-243-4874 Pipe threads (except fuel system fittings), pressure relief valve housing threads, tach drive threads, stud holes that are exposed to oil 2-10 Sealants And Lubricants Sealants TYPE SUGGESTED SOURCES APPLICATION #646940 - F/I Sealant May be purchased through your local TCM Distributor All pipe thread fittings in fuel injection system (use sparingly on male threads only) or Loctite Hydraulic Sealant 569 For Distributor information: Loctite Customer Service, Phone: 1-800-243-4874 Miller Stephenson MS 122/CO2 Spray For Distributor information: Miller-Stephenson Customer Service, Phone: 1-800-992-2424 Ignition harness terminals at magneto block end Adhesives TYPE SUGGESTED SOURCES APPLICATION 646941 High Strength Adhesive Sealant or Loctite 271 May be purchased through your local TCM Distributor Cylinder deck studs, squirt nozzles, fuel manifold valve diaphragm and plunger assembly, crankshaft nose seal retainer bolts 653696 Primer or Loctite LocQuic Primer 7471 For Distributor information: Loctite Customer Service, Phone: 1-800-243-4874 649306 Sealant (optional 646940) or Loctite Adhesive Sealant 222 (optional Loctite Hydraulic Sealant 569) May be purchased through your local TCM 3M Brand EC1252 White Spot Putty Through stud holes on accessory end of crankcase, manifold valve to bracket screws For Distributor information: Loctite Customer Service, Phone: 1-800-243-4874 3M Cylinder deck stud nuts, through bolt nuts, magneto flanges, throttle body and fuel metering unit 2-11 Sealants And Lubricants Miscellaneous TYPE SUGGESTED SOURCES APPLICATION TCM P/N 626531-1 Enamel - Gold (1 qt) TCM P/N 626531-2 Enamel - Gold (1 gal) May be purchased through your local TCM Distributor High temp. paint for cosmetic and corrosion protection TCM P/N 535001S Lockwire -.032 inch dia. Steel, Corrosion Resistant May be purchased through your local TCM Distributor Where applicable for lockwiring "ACCELAGOLD" Turco® Products Tucker, GA 30084 [Accelagold is manufactured by Turco® Products, Inc.] For sales and service: Elf Atochem N.A. Turco® Products Div. P.O. Box 195 State Route 95 West Marion, Ohio, 43302, Corrosion protection interior and ENGINE PRESERVATION KIT • dehydrator plugs • desiccant bags • streamers, warning sign • preservative oils 2-12 215-419-5376 May be purchased through: TANAIR P.O. BOX 117 Glenwood, MN 56334 (US & CAN) 1-800-4432136 (MN) 1-800-862-2443 exterior aluminum parts Engine Preservation Chapter 3 AIRWORTHINESS LIMITATIONS This Airworthiness Limitations section has been FAA approved and specifies maintenance required under §§ 43.16 and 91.403 of the Federal Aviation Regulations unless an alternative program has been FAA approved. Federal Aviation Regulations §§ 43.16 and 91.403 require owner/operator compliance with all maintenance limitations in this section concerning mandatory replacement times, inspection intervals and other related procedures that are specific to this engine. Any such limitations listed below are part of the design limits of the engine and the engine was type certificated based upon required owner/operator compliance with the limitations. 1. Mandatory Replacement Times. Subject to additional information contained in FAA Airworthiness Directives (AD) issued after the date of certification, the engines covered in this manual do not contain any components having mandatory replacement times required by type certification. 2. Mandatory Inspection Intervals. Subject to additional information contained in FAA Airworthiness Directives (AD) issued after the date of certification, the engine does not require specific intervals of inspection pursuant to type certification. 3. Other Related Procedures Subject to additional information contained in the Airworthiness Directives (AD) issued after the date of certification, there are no other related procedures required pursuant to the type certification for this engine. 4. Distribution of Changes to Airworthiness Limitations. Changes to the Airworthiness Limitations section constitute changes to the type design of this engine and require FAA approval. Such changes will be published in FAA Airworthiness Directives (AD). NOTE The limitations in this section apply only to specific limitations which are part of the engine design. Under the Federal Aviation Regulations numerous other additional limitations are applicable to this engine and it's accessories. For example Federal Aviation Regulation Parts 91 and 43, among other parts, define inspection criteria, maintenance requirements and procedures that are applicable to this engine. It is the responsibility of the owner / operator to maintain the engine in an airworthy condition by complying with all applicable Federal Aviation Regulations and by performing maintenance in accordance with TCM Instructions for Continued Airworthiness, which consist of TCM publications and service documents. 3-1 Chapter 3 INTENTIONALLY LEFT BLANK 3-2 Chapter 4 CHAPTER 4 STANDARD PRACTICES SECTION 4-1 4-2 4-3 4-4 4-5 4-6 4-7 PAGE General ..................................................................................4-2 Lockwire Procedure..............................................................4-3 Tab Washer Procedure..........................................................4-5 Cotter Pin Procedure.............................................................4-5 Connecting Rod Cotter Pin Procedure .................................4-6 Application Of Adhesives.....................................................4-7 Installation Of Gaskets..........................................................4-7 FIGURE 4-1 4-2 4-3 4-4 4-5 PAGE General Lockwire Procedure ................................................4-3 General Lockwire Patterns ...................................................4-4 General Tab Washer Installation Procedure.........................4-5 General Cotter Pin Installation .............................................4-6 Connecting Rod Cotter Pin Installation................................4-6 4-1 Chapter 4 4-1 GENERAL To facilitate and insure proper reinstallation, tag or mark all parts and hardware as they are removed or disassembled. Tag any unserviceable parts or units for investigation and possible repair. Take extreme care to prevent lockwire, nuts, washers, dirt, etc., from entering the engine on or off the aircraft. Make use of protective caps, plugs and covers to insure openings are unexposed. CAUTION… Dust caps used to protect open lines must be installed OVER the tube ends and NOT IN the tube ends. Flow through the lines will be blocked if lines are inadvertently installed with the dust caps in the tube ends. If anything is dropped into the engine work must be stopped immediately and the item removed. Insure all parts are thoroughly clean and lubricated as specified before assembling. 4-2 All lockwire and cotter pins must fit snugly in holes drilled in specific hardware. On castellated nuts, unless otherwise specified, the cotter pin head must fit into a recess of the nut with the other end bent such that one leg is back over the stud and the other is down flat against the nut in accordance with Section 4-4. Use only manufacturer specified corrosion resistant steel cotter pins. All lockwire utilized on TCM engines must conform to MS20995 Condition A. When replacing gaskets, packings, or rubber parts use the type or composition specified by the manufacturer. Make sure replacement nonmetallic and metallic parts show no sign of storage deterioration. Parts exceeding specified shelf life limitations must not be used. When a hammer is required to come in direct contact with an engine part during assembly or disassembly, use a mallet made of plastic or rawhide material only. Parts removed from the engine must be cleaned and inspected in accordance with the specified instructions located in the applicable system chapter. Chapter 4 4-2 LOCKWIRE PROCEDURE Lock wiring is the securing together of two or more parts with lockwire installed in such a manner that any tendency for a part to loosen will be counteracted by additional tightening of the lockwire. All lockwire utilized on TCM engines must conform to MS20995 Condition A. Most bolts utilized in TCM engines that require lockwiring will use .032 lockwire and require twisting at a rate of 7 to 10 twists per inch. Smaller lockwire (when specified or required) will require twisting at a rate of 9 to 12 twists per inch. Lockwire must be new at each application. Lockwire must be pulled taut while being twisted and caution must be exercised during the twisting operation to keep the lockwire tight without overstressing. See Figure 4-1, "General Lockwire Procedure," for steps in applying lockwire. FIGURE 4-1. GENERAL LOCKWIRE PROCEDURE 4-3 Chapter 4 Various examples of lockwiring are shown in Figure 4-2, "General Lockwire Patterns." 1. Check the units to be lockwired to insure they have been correctly torqued. Applying torque that is above or below specified limits to obtain alignment of the holes is not permitted. 2. It is desirable to have the holes parallel, but this is not a necessity. For right hand threads, the lockwire shall be installed in such a manner that the strand through the hole will have a tendency to pull the unit clockwise. 3. Insert half of the required lengh of lockwire through the first unit and bend around the head of the unit. The direction of wraps and twist of strands shall be such that the loop around the unit comes under the strand protruding from the hole so that the loop will stay down and will not tend to slip up and leave a slack loop. 1. Twist the strands while taut until the twisted part is just short of a hole in the next unit. The twisted portion should be within one-eighth (1/8) inch from the hole in either unit. 2. Insert the uppermost strand through the hole in the second unit and follow the rules in Paragraph three. 3. After lockwiring the last unit continue twisting the lockwire to form a pigtail, providing sufficient twists (four minimum) to assure that the pigtail will not unravel. Cut off the excess lockwire and bend the pigtail toward the part and against the bolt head flats. DO NOT ALLOW THE PIGTAIL TO EXTEND ABOVE THE BOLT HEAD. FIGURE 4-2. GENERAL LOCKWIRE PATTERNS 4-4 Chapter 4 FIGURE 4-3 GENERAL TAB WASHER INSTALLATION PROCEDURE 4-3 TAB WASHER PROCEDURES Tab washers are installed by fitting a tab in a tab slot and bending the remaining tabs firmly against the bolt or nut flat. Tab washers are used in various locations in TCM engines and must not be re-used after removal. Tabs that are provided to be bent up against the head flats must be seated firmly with no scarring of the tabs. This provides proper locking of the unit and prevents tabs from breaking off. 1. Make certain the holding tab is located in the tab hole or slot. 2. Check the units to be secured and verify they have been correctly torqued in accordance with the specified instructions of the applicable system section. 3. Bend tabs against the head flats firmly by tapping them into place with a soft drift. See Figure 4-3, "General Tab Washer Installation Procedure." 4-4 COTTER PIN PROCEDURE Cotter pins are installed by inserting the cotter pin through a hole in one part, slots in the other part and spreading the exposed ends. Cotter pins are not reusable and must be replaced with a new cotter pin after removal. 1. Torque the nut to the lower limit of the torque specification. If the slots in the nut do not line up with one of the holes in the bolt continue torquing until one does. Do not exceed the upper limit of the torque specification. Change the nut if necessary. 2. Insert the cotter pin with the head seated firmly in the slot of the nut. Bend the ends over the flat on the nut and the end of the bolt. Trim the prong lengths as necessary. 3. Seat the prongs firmly against the bolt and nut. See Figure 4-4, "General Cotter Pin Installation." CAUTION… Do not use side-cutting type pliers to bend the ends over since the resulting nick could weaken the pin and allow a portion to become detached. 4-5 Chapter 4 FIGURE 4-4. GENERAL COTTER PIN INSTALLATION 4-5 CONNECTING ROD COTTER PIN INSTALLATION When installing cotter pin in connecting rod nuts and bolts, use the steps in Section 4-4, "Cotter Pin Procedure," and the following: 1. Use a hammer and soft drift to tap the head of the cotter pin firmly into the nut slot and bolt hole, deforming the head until it is flush with or no more than .030 of an inch above both the flat on the nut and the end of the bolt. See Figure 4-5, "Connecting Rod Cotter Pin Installation." FIGURE 4-5. CONNECTING ROD COTTER PIN INSTALLATION 4-6 Chapter 4 4-6 APPLICATION OF ADHESIVES Adhesives and sealants will be used only in specific applications outlined in Chapter 2, "Table Of Sealants and Lubricants." WARNING The improper use of sealants and lubricants will cause engine malfunction or failure. Gasket Maker P/N 646942 - Surfaces must be clean and free of nicks, burrs, oil and grit. Apply a thin even coat of Gasket Maker between .010 and .020 inch thick to the surface specified in Chapter 2, "Tools, Equipment, Sealants and Lubricants." Gasket Maker is an easily workable tacky gel which can be extruded onto one side of a flange surface from a tube and evenly spread. Small parts can be covered adequately by pressing them into a saturated polyester urethane sponge or by roll coating them with a short nap roller. Once Gasket Maker has been applied evenly torque assembly into place. Excess material can be cleaned by wiping with chlorinated solvent. Material on hands can be cleaned with waterless mechanics hand soap followed by soap and water. NOTE… TCM general purpose primer P/N 653160 must be used for surface preparation before applying Gasket Maker at the engine nose seal area. 4-7 INSTALLATION OF GASKETS All gaskets must be new, of the proper material and visually inspected prior to installation. Following visual inspection, if the gasket shows any indication of gouges, nicks, cuts or bend and fatigue marks replace with a new manufacturer specified gasket. Gasket surfaces must be clean and free of nicks, burrs, oil and grit. Apply a thin coat of TCM Gasket Sealant P/N #642188-1 to both sides of gasket unless otherwise specified. See Chapter 2, "Tools, Equipment, Sealants and Lubricants," for application of gasket sealant. Once TCM Gasket Sealant has been applied install gasket. Install assembly and evenly torque hardware to specified value. This will prevent over stressing gasket. WARNING Gaskets and components must be properly positioned, hardware torqued and safetied as required during assembly to prevent oil loss. 4-7 Chapter 4 INTENTIONALLY LEFT BLANK 4-8 Chapter 5 CHAPTER 5 RECIPROCATING ENGINE OVERHAUL SECTION 5-1 5-2 5-3 5-4 5-5 5-6 5-7 5-8 5-9 5-10 5-11 5-12 5-13 5-14 5-15 5-16 5-17 5-18 5-19 5-20 5-21 5-22 5-23 5-24 PAGE General ...................................................................................... 5-2 Engine Removal Instructions ..................................................... 5-2 Preliminary Cleaning ................................................................ 5-3 Extent of Disassembly ............................................................... 5-3 Parts to be Discarded ................................................................. 5-4 100% Replacement Parts ........................................................... 5-4 General Cleaning ....................................................................... 5-5 Visual Inspection ....................................................................... 5-6 Magnetic Particle Inspection...................................................... 5-6 Crankshaft Ultrasonic Inspection Procedure ............................. 5-7 Cylinder Barrel Ultrasonic Inspection Procedure ...................... 5-7 Fluorescent Penetrant Inspection .............................................. 5-7 Dimensional Inspection ............................................................. 5-7 Dimensional Limits ................................................................... 5-7 Original Dimensions ................................................................. 5-8 Parts Limits ............................................................................... 5-8 Authorized Oversize and Authorized Undersize Parts............... 5-8 Protective Coating ..................................................................... 5-8 Application Of Accelagold ....................................................... 5-8 Enamel Coatings ....................................................................... 5-8 Helical Coil Insert Replacement ............................................... 5-9 Stud Replacement ...................................................................... 5-11 New Parts .................................................................................. 5-11 Torque Applications................................................................... 5-11 FIGURE 5-1 5-2 PAGE Installation Of Typical Helical Coil Insert ................................ 5-9 Standard and Oversize Stud Identification ................................ 5-10 TABLE 5-1 5-1A 5-2 5-3 5-4 5-5 PAGE Bolt, Nut and Screw Torques .................................................... 5-12 Driving Stud Torques................................................................. 5-12 Pipe Plug Torques ..................................................................... 5-12 Torque Specifications For Fittings............................................. 5-12 Torque Specifications For Hose Fittings.................................... 5-13 Specific Torques ........................................................................ 5-14 5-1 Chapter 5 5-1 GENERAL WARNING Use only parts meeting the engine type design. Prior to engine removal, using a differential pressure gage perform the following leak check on each cylinder. Record findings. LEAK CHECK This check serves as an identifier for conditions which may not be detectable by visual inspection. 1. Position the piston as close to bottom dead center on the compression stroke as possible, insuring that the intake valve remains closed to allow the cylinder to hold pressure. With the compression tester connected, apply 5 PSI to the cylinder. WARNING It will be necessary to hold the propeller stationary while pressure is applied to the cylinder. Use extreme caution to prevent injury to personnel or damage to equipment. WARNING During pressurization of cylinders do not stand or allow anyone else to stand in the propeller arc area. 3. Increase the pressure slowly to a maximum value of 80 PSI. Saturate the entire cylinder assembly with a soap and water solution. Optional airframe manufacturer accessories and various engine components that obstruct engine removal must also be disassembled from the engine and airframe. For airframe manufacturer supplied accessory removal and airframe to engine disconnection consult the appropriate airframe manufacturer's instructions. Chapter 5 contains disassembly of the engine. Chapters 6 through 16 contain overhaul information for each of the engine systems. Use Chapter 5 to completely disassemble engine and Chapters 7 through 18 to perform the remaining cleaning, inspection, repair and replacement and sub-assembly. Chapter 19 contains final engine assembly procedures. Chapter 20 contains post overhaul adjustment and test procedures. As the aircraft engine is being overhauled all engine parts and accessories must be overhauled. All engine parts and accessories must conform with the engine and accessory manufacturer's specifications after overhaul prior to re-installation on the engine. See the accessory manufacturer's overhaul instructions for accessories supplied by manufacturers other than Teledyne Continental Motors. During Major Overhaul of Teledyne Continental Motors aircraft engines, all parts and components must conform with the manufacturer's new specifications or be replaced. See Section 5-16, "New Parts," for further information. 5-2 Engine Removal Instructions As each part is disconnected and removed it must be identified. Photographs can be helpful for orientation of parts and components during engine re-assembly. NOTE… 4. Inspect the complete cylinder for leakage. Leakage will be indicated by an accumulation of bubbles. If the engine is being removed to be placed in storage, prior to engine removal, accomplish the steps listed in the chapter on "Indefinite Storage," of the appropriate Maintenance Manual. 5. After complete cylinder inspection, relieve cylinder pressure and remove compression tester. 1. Insure all electrical switches, circuit breakers, ignition switches and fuel selector valves are in the OFF position. 6. Perform this inspection on each cylinder. 2. Disconnect battery ground cable or strap. 3. Disconnect the starter cable. 5-2 Chapter 5 4. Remove all cowling and nacelle access panels that obstruct engine removal in accordance with the airframe manufacturer's instructions. 11. Remove engine mount to airframe attaching hardware in accordance with the airframe manufacturer's instructions. 5. Remove the oil sump drain plug and washer. See Figure 6-13, "Oil Sump." Completely drain oil from engine and replace plug and washer. NOTE… 6. Disconnect and tag the engine wiring bundles and other connections from the following components in accordance with the airframe manufacturer's instructions. a. Magneto ground terminal leads, retard terminal leads, sensor unit lead b. Alternator c. Pneumatic pump d. Tach drive e. Oil temperature connection f. Cylinder head temperature connections g. Exhaust gas temperature connection h. Remove all wiring bundle attaching clamps and hardware. Route wiring bundle clear of engine i. Miscellaneous airframe accessories 7. Disconnect the throttle and mixture control in accordance with the airframe manufacturer's instructions. 8. Remove manifold pressure gage line and airframe fuel supply hoses in accordance with the airframe manufacturer's instructions. Properly cap off lines and connections to prevent fuel spillage and the admittance of debris. 9. Removal of the exhaust system may be necessary prior to engine removal. See the applicable airframe manufacturer's instructions. CAUTION… Place a suitable stand under the aircraft tail at the proper load bearing area before removing the engine to prevent airframe damage due to the aircraft tail dropping. 10. Attach an engine hoist to the engine. The engine hoist must be attached to the engine lifting eyes only. Extend the hoist relieving engine weight from the engine mounts. Hoist the engine slowly making sure all wiring, lines, hoses and connections have been properly disconnected. Do not bump or drop engine. 12. Install the engine on an engine stand, transportation dolly or engine shipping container base as applicable. Install protective covers on all open lines and fittings. Do not use tape or plugs inside the lines or fittings. 5-3 PRELIMINARY CLEANING Clean engine exterior by spraying or brushing with a solvent used for general cleaning of engine parts. Remove caked dirt on bolt heads and nuts. At the same time remove the oil sump drain plug and drain any remaining oil. WARNING Oil must be caught in an approved container and disposed of properly. CAUTION… Do not use any alkaline cleaning solutions for external engine pre-cleaning, these solutions will remove the "alodized" finish of aluminum parts. 5-4 EXTENT OF DISASSEMBLY Exploded parts illustrations used in the engine disassembly and system chapters are similar to those used in the parts catalog. Use the illustrations along with the written procedures to disassemble the engine, systems and components. Disassemble the engine systems and components to the extent specified in the written procedure of the applicable engine system chapter. WARNING Do not attempt to identify components using the illustrations in this manual. Component identification must be accomplished using the nomenclature and part numbers in the related parts catalog or contact the factory. 5-3 Chapter 5 5-5 PARTS TO BE DISCARDED Discard all parts listed in Section 5-6, "100% Replacement Parts" and/or Service Bulletin M97-6, “Mandatory Replacement Parts,” in such a manner they will not be used again inadvertently. Care must be taken in removing gaskets from aluminum parts by scraping. Such removal should be delayed until the part is to be cleaned. 5-6 100 PERCENT(%) REPLACEMENT PARTS. At assembly, during maintenance, preventive maintenance and engine or component overhaul replace all gaskets, seals, packings, hoses, "O" rings, cotter pins, retaining rings (snap rings), safety wire, self locking fasteners (including exhaust manifold nuts) and lock washers with new parts. Engine mounted accessories not manufactured by TCM must be overhauled at engine overhaul and maintained in accordance with the instructions provided by the manufacturer. Do not re-use any fasteners that are worn, deformed, or are designed to be used only once. Do not replate any cadmium plated fasteners or washers. If the cadmium plating has been removed discard the item and replace it with a new part. At engine overhaul in addition to the previously listed items, the following listed parts must be discarded and replaced with new parts. NOTE… If for any reasons hydraulic valve tappets are removed for inspection before the overhaul period has been reached, they must be placed back in the same location from which they were removed. 1. Hydraulic valve lifters (tappets) 2. Bearings: connecting rod, crankshaft main and thrust, needle, ball, and roller 3. Bushings: rocker arm, connecting rod, counter weight and crankshaft counterweight blade 4. Counterweight pins, retaining plates and snap rings 5. Camshaft gear bolts 6. Connecting rod forging number 626119, TCM P/N’s 646320 and 646321 with beam 5-4 7. 8. 9. 10. 11. 12. 13. 14. 15. 16. 17. 18. 19. 20. 21. 22. 23. 24. 25. 26. 27. 28. 29. 30. 31. width less than .625 inches. Reference TCM CSB96-13. Camshaft gear bolts Crankshaft gear bolts Woodruff keys Connecting rod bolts and nuts Magneto drive rubber bushings Exhaust valves Roto-coils, exhaust valves Intake and exhaust valve keepers Inner and outer valve springs Piston pins Piston rings Pistons Rocker shafts Rockers shaft thrust washers Crankcase Through Bolts Cylinder deck stud nuts and through bolt nuts Exhaust clamps Cold Start primer diverter valves Alternator drive coupling rubber bushings Turbocharger oil supply and return check valves Replace 649470, 649471, 652669, 652670 oil suction screens with 653658 oil suction screen Replace oil pump gears in accordance with TCM Service Bulletin SB 96-4 latest revision Ignition system wiring harness Spark plugs Alternator and air conditioning drive belts 5-7 GENERAL CLEANING NOTE… Parts listed in Section 5-6, "100% Replacement Parts," must be replaced and therefore do not require cleaning. WARNING During any cleaning process always follow the cleaning material manufacturer's instructions for use, and Material Safety Data Sheets for safety precautions and disposal information. Chapter 5 Engine components must be thoroughly cleaned so they can be properly inspected. All surfaces must be protected from corrosion after cleaning by rinsing with a petroleum base solvent and applying a coat of clean 50 weight aviation engine oil. CAUTION… Cleaning methods other than the following may be destructive to engine parts and must not be used. Aluminum Alloy Parts: Degrease aluminum alloy components by spraying or brushing with any fortified mineral spirit solvent. Heavy grease or dirt deposits can be cleaned effectively by allowing parts to soak in this solvent for a short period of time. Carbon deposits and gum (oil varnish) may be removed easily by immersing the part in a hot bath of an inhibited, mild alkaline cleaning solution. Immersion time should be only as long as necessary to remove the deposit. Give special attention to cleaning studs, tapped holes and drilled holes. Caution must be exercised when cleaning aluminum alloy parts using any alkaline cleaning solutions. Immediately after removing soaked parts from inhibited, mild alkaline bath or hot soapy water, remove all traces of the alkaline by spraying the parts with a jet of steam, or brushing vigorously with a mineral spirit solvent. Cleaned parts may be dried by a jet of dry, compressed air to remove all solvent liquids. CAUTION… When using alkaline cleaning solutions, the cleaning solution manufacturer's usage, safety data and disposal information must be strictly followed. Alkaline etching solutions must not be used. CAUTION… All alkaline residues must be removed from crevices, recesses and holes to prevent the formation of a foaming emulsion in the engine lubrication oil after reassembly. If Accelagold surface was removed by the cleaning process it must be re-applied in accordance with the procedure in Section 5-19, "Application Of Accelagold." [Accelagold is manufactured by Turco® Products Inc.] CAUTION… Alkaline cleaning solutions will cause corrosion to metals if not completely removed. Carbon solvent should be employed only when carbon deposits are too hard or thick for removal by other solvents. No polishing compound, abrasive paste or powder is needed for cleaning engine parts. Do not scrape parts or use wire brushes, sandpaper, abrasive cloth or abrasive wheels. Scratches resulting from such methods allow concentrated stress at the scratch and may cause fatigue failure. Blasting techniques can be employed to remove hard carbon deposits if suitable equipment is available. Suitable types of grit for dry blasting are plastic pellets and processed natural materials such as wheat grains and crushed fruit pits or shells. Air pressure must be adjusted to the lowest setting that will produce the desired cleaning action. Small holes and machine finished surfaces must be protected from the blast by seals and covers. 5-5 Chapter 5 WARNING All cleaning material must be removed from parts and components after cleaning. CAUTION… Do not use sand, metal grit or glass beads for any type of cleaning. If water mixed degreasing solutions containing caustic compounds or soap are used to clean aluminum alloy components they must be thoroughly and completely rinsed with clear boiling water or steam to prevent corrosion. CASTINGS: Gasket surfaces must be thoroughly cleaned with a suitable hydrocarbon solvent such as naphtha, methyl ethyl keytone (MEK) or trichloroethylene (TCE) to remove dirt, oil and grease. Surfaces must be clean, dry and free of all old gasket material before applying new gaskets. SMALL STEEL PARTS: Degrease steel parts by spraying or brushing with mineral spirit solvent. Heavy grease or dirt deposits can be cleaned effectively by allowing the part to soak in this solvent for a short period of time. NOTE… See Chapters 7 through 18 for specific individual system component and part cleaning instructions. 5-8 VISUAL INSPECTION All engine parts except those to be replaced 100% must be inspected visually with at least a 10 X (power) magnifying glass under good light for surface damage such as nicks, dents, deep scratches, visible cracks, distortion, burned areas, pitting, transfer of metal, corrosion, erosion and removal of enamel coating. Visual inspection should also determine the need for further cleaning of obscure areas. Inspect all studs for bending, looseness or partial removal. Inspect all threaded parts for nicks and other damage to the screw threads. After visual inspection place the engine parts in three groups: apparently serviceable parts, repairable parts and parts to be discarded. 5-6 NOTE...See Chapters 7 through 18 for specific individual system components and part visual inspection instructions. 5-9 MAGNETIC PARTICLE INSPECTION CAUTION… Before magnetic particle inspection of any part, it must be completely cleaned and free of dirt, carbon, varnish, gum and paint. Plug small holes leading to obscure cavities with tight-fitting wood plugs or with a hard grease which is soluble in lubricating oil. This will prevent particles from lodging in places where they would be difficult to remove and places not subject to visual inspection. After magnetic particle inspection remove all such plugs and clean the part thoroughly in solvent. Dry the part with compressed air. Check for complete demagnetization. Magnetic particle inspection must be conducted on all ferrous parts. Where magnetic particle inspection is required, it must be performed in accordance with ASTM E 1444. The wet continuous method utilizing full wave rectified altemating current and fluorescent particles is required. ACCEPT / REJECT CRITERIA Rejectable discontinuities are any of the following: fatigue cracks, forming cracks, grinding and heat treat cracks, embrittlement cracks, seams, laps, burst. Parts which contain linear indications which cannot be reworked or indications which break into comers, edges, holes, thread roots, fillets, gear tooth roots or keyways must be rejected. The particular magnetic particle manufacturer's information regarding use, safety data and disposal must be followed carefully. Chapter 5 5-10 CRANKSHAFT ULTRASONIC INSPECTION PROCEDURE The crankshaft must be ultrasonic inspected in accordance with TCM MHS 200 by individuals certificated to perform this detailed inspection. For approved inspection locations contact TCM at: (334) 438-3411. 5-11 CYLINDER BARREL ULTRASONIC INSPECTION PROCEDURE Cylinders must be ultrasonic inspected in accordance with TCM MHS 198 by individuals certificated to perform this detailed inspection. For approved inspection locations contact TCM at: (334) 4383411. 5-12 FLUORESCENT PENETRANT INSPECTION Inspection by the fluorescent penetrant method must be conducted on all non-ferrous metal parts. Where fluorescent penetrant inspection is required, it must be performed in accordance with ASTM E 1417. Specific process procedures are referenced in ASTM E 1208, E 1209, or E 1219. The penetrant method used must be Type I (fluorescent), Method A, B, C or D. ACCEPT / REJECT CRITERIA Rejectable discontinuities are any of the following: fatigue cracks, forming cracks, grinding and heat treat cracks, embrittlement cracks, seams, laps, burst. Parts which contain linear indications which cannot be reworked or indications which break into comers, edges, holes, thread roots, fillets, gear tooth roots or keyways must be rejected. NOTE… The particular fluorescent penetrant manufacturer's information regarding use, safety data and disposal must be followed carefully. 5-13 DIMENSIONAL INSPECTION Inspect for manufacturer specified fit with mating parts by comparative linear measurements and alignment measurement using standard precision measuring instruments. 5-14 DIMENSIONAL LIMITS After comparative measurement of mating parts and determination of running clearance refer to the limits section related to the part. Limits under the column heading New Parts are manufacturing limits. Clearances in the New Parts column apply to mating parts. Example: Check inside and outside diameters of mating part surfaces. Take the recorded dimensions and subtract the smaller from the larger. If the remainder falls within the New Parts minimum and maximum clearance the part may be re-used during overhaul provided it conforms with all other inspection requirements. Oversize parts are supplied in some instances to permit conformity to this requirement. See individual component or system sections as applicable for limits and fits. 5-15 ORIGINAL DIMENSIONS Although comparative measurements of mating parts will determine the serviceability of the fit it may be difficult to determine which part has worn. In some instances (e.g., main journals in new bearing inserts) accurate dimensional measurements of fit are not always possible. While no limits of wear on critical dimensions have been assigned to specific parts it is helpful in determining wear to know the original dimensions. Therefore, consult the manufacturing limits, "Critical New Parts Dimensions," in each individual system chapter when the serviceability of a specific part is in doubt. See Chapters 7 through 18 for specific individual system components and part fluorescent penetrant inspection instructions. 5-7 Chapter 5 5-16 PARTS LIMITS TCM provides parts dimensions and assembly clearances in its publications which are considered essential to perform an overhaul of its engines. These values are termed "New Parts Limits." Values are taken from production drawings in effect at the time of publication. TCM also provides a list of items that must be replaced at overhaul. See section 5-6, "100% Replacement Parts." WARNING Service limits must not be used when performing major overhaul of the engine. 5-17 AUTHORIZED OVERSIZE AND AUTHORIZED UNDERSIZE PARTS Replacement authorized oversize (AO) or authorized undersize (AU) parts must be used with the proper AO and AU mating parts. Example: Use .015 oversize piston and piston rings with .015 oversize cylinder assembly. 5-18 PROTECTIVE COATING The manufacturer protects all aluminum alloy castings, sheet metal and tubing from corrosion by treating all surfaces of the parts with Accelagold aluminum conversion coating. [Accelagold is manufactured by Turco Products, Inc.] For sales and service contact Elf Atochem N.A. Turco® Products Div., P.O. Box 195, State Route 95, West Marion Ohio, 43302; (215) 419-5376. 5-19 APPLICATION OF ACCELAGOLD After any machining or repair operation aluminum surfaces must be treated with an aluminum conversion coating. If the original aluminum 5-8 conversion coating has been removed or deteriorated, it must be re-applied. The application of Accelagold solution must be performed in accordance with the manufacturer's Technical Data Bulletin Number 108-31 TURCOAT®) ACCELAGOLD ALUMINUM CONVERSION COATING. Wrought or die cast smooth surface parts such as valve rocker covers and intake tubes are "tumble blasted" prior to machining to roughen surfaces before treatment. Tumble Blasting must not be applied at overhaul on parts with machined surfaces. CAUTION… Do not use enamel paint or primer for internal parts. The paint or primer may flake or break off during engine run and contaminate lubricating oil. 5-20 ENAMEL COATINGS Ferrous parts when painted with gold enamel must be baked with infra-red equipment for 15 minutes at 275-300°F following the application of each coat. Magnesium parts must be pickled and primed before painting. Then baked with infra-red equipment for 15 minutes or oven dry 60 minutes at 275°-300° following application of each coat of enamel. NOTE… If a part which was originally alodized is to be refinished with enamel it is not necessary to apply zinc chromate primer unless surface areas have been completely stripped of Accelagold. CAUTION… Before application of primer and enamel to a part carefully mask all connection joints and mating surfaces. No primer or enamel is permissible on interior surfaces of any parts contacted by engine lubricating oil after assembly. Chapter 5 5-21 HELICAL COIL INSERT REPLACEMENT Helical coil inserts are installed at the factory in various tapped holes of some engine components. Stainless steel helical coil inserts of special design are installed in all spark plug holes. Any of these inserts may be replaced if damaged. Tools, inserts and information are available through HeliCoil®, Emhart Fastening Teknologies. Contact HeliCoil® Applications Engineering or customer service at: (203) 924-4737 for local distributor information. The manufacturer's Bulletins 959A, 995, 943, T4000 and 1000 latest revisions list manual and powerdriven installing tools, tang break-off tools, special taps, plug gauges and tap/drill information. Helical coil inserts are available in both National Course and National Fine series in lengths equal to 1, 1 -1 /2 and 2 times nominal diameter and in pipe thread sizes. They are made of either carbon steel, phosphor bronze or stainless steel, as specified by part number. They are supplied with or without a notch above the driving tang. The notch is provided to facilitate breaking off the tang in open holes. Helical coil inserts are helical coils of wire with a diamond-shaped cross section forming both a male and female thread. When compressed into a special tapped hole at the widest part of the wire, between male and female threads, the diameter of the insert is equal to the nominal screw size. The special finishing taps size the casting hole so the pitch diameter of the female thread of the installed insert conforms to Class 3 fit with standard bolt threads or class 4 (tight) fit with standard-size studs. The difference in fit is due to a difference in pitch diameters of bolts and studs. Only one set of helical coil special taps is required for installation of these inserts in both bolt holes and stud holes. Tap drilling depths and tapping depth for helical coil inserts to be installed in blind holes should conform to the recommendations relative to inserts of length equal to 2 times nominal diameter, as tabulated in the manufacturer's Bulletin Numbers 1000 and T4000 latest revision. Helical coil tap drills and special taps must be run in perpendicular to the machined surface of the casting. Drilling must be done in a drill press after the casting is firmly supported, clamped and alignment checked. The tap will tend to follow the drilled hole. For drilling and tapping aluminum alloy castings use a commercial grade cutting lubrication oil to prevent overheating of the metal and tearing of the thread. FIGURE 5-1. INSTALLATION TYPICAL HELICAL COIL INSERT 5-9 Chapter 5 5-21 HELICAL COIL INSERT REPLACEMENT (cont’d) To remove a damaged helical coil insert use the proper size of extracting tool for the nominal thread size. Tap it into the insert so the sharp edges get a good bite, then turn the tool to the left, and back out the helical coil until it is free. To install new insert in a properly tapped hole, after blowing out all liquid and chips, slide it over the slotted end of the driving mandrel of the proper size installing tool, and engage the driving tang (bent end) of the helical coil in the mandrel slot; then, wind the insert slowly into the tapped hole. See Figure 5-1, "Installing Typical Helical Insert." The outer end of the insert must lie within the first full thread of the hole. Break off the driving tang of a notched helical coil by bending back and forth across the hole with long-nose pliers, or with a special tang break-off tool. After helical coil replacement the remaining wall thickness (edge distance) must not be less than one half the helical coil diameter or .08 minimum whichever is greater. WARNING The 2 and 4 o'clock cylinder deck stud positions must not be repaired by helical coil insert installation. 5-22 STUD REPLACEMENT Remove damaged whole studs with a stud remover turning slowly to avoid heating the casting. Remove broken studs which cannot be gripped with a standard stud extractor by drilling on center to the correct diameter and unscrewing with a splined stud extractor. Splined extractors and drills are usually sold in sets. Examine the course thread end of the damaged stud before discarding it to determine its size. Standard studs have no marking. For oversize stud identification, see Figure 5-2, "Standard And Oversize Stud Identification." Clean the casting tapped hole with solvent and blow dry with compressed air. Then examine the thread. If it is not torn install the next larger oversize stud. If the old stud was of the maximum oversize or if the thread is damaged the hole may be tapped and a helical coil insert installed for a standard-size stud provided sufficient stock is available. FIGURE 5-2. STANDARD AND OVERSIZE STUD IDENTIFICATION 5-10 Chapter 5 Coat the new stud's course thread with High Strength Adhesive P/N 646941 if the hole is blind or if the hole goes through to a cavity subject to leakage. Drive the new stud with a tee handle stud driver. Turn it slowly and compare the torque values listed in the Table 5-2, "General Use Torques." Drive the stud in until it projects a distance equal to the specified setting height. See stud setting heights in the applicable component or system section. 5-23 NEW PARTS Parts which require protection from atmospheric dust and moisture are wrapped or boxed individually. These parts must not be unpacked until they are to be installed. This includes precision bearing inserts and anti-friction bearings. Check new parts on receipt for transit damage. All parts must be clean and lubricated as specified prior to installation. Refer to the L/TSI0-360-RB Parts Catalog, Form X30597A Supplement 1, for part number of the complete gasket set, the main bearing set and the piston ring set. Refer to Chapter 2, "Tools, Equipment, Sealants And Lubricants," for approved products, all of which must be on hand when work is started. Use only new shakeproof or split lock washers, tab washers, elastic stop nuts, cotter pins and corrosion-resistant lockwire. Refer to Section 56, "100% Replacement Parts," before assembly. Measure clearances of running parts as they are assembled and compare with clearances listed in the applicable component or system chapter. During major engine overhaul use only NEW PARTS LIMITS. See Section 5-16, "New Parts And Service Limits." 5-24 TORQUE APPLICATIONS Prior to torquing any hardware apply the specified lubricants in accordance with Chapter 2. The accuracy of any torque indicating wrench depends on a smooth application of force and current calibration traceable to the National Bureau of Standards. If a nut slot cannot be aligned with a cotter pin hole within the specified limits, substitute another serviceable nut. If the cotter pin hole in stud lies beyond the nut slots, when the nut has been torqued properly check stud for proper installation or backing out. Check part to see if it has been reduced in thickness. Check to insure nut and washer are correct parts for that location. The situation must be corrected by whatever replacement is indicated by inspection. NOTE... See Tables 5-2 through 5-6 on the following pages for, "Bolt, Nut and Screw Torques, Driving Stud Torques, Pipe Plug, Torques, Torque Specifications For Fittings, Torque Specifications for Hose Fittings and Specific Torques." The engine overhaul must be performed in a clean dust free environment, and engine sub-assemblies must be covered whenever they are not in the process of cleaning, inspection, repair or assembly. 5-11 Chapter 5 GENERAL USE TORQUES TABLE 5-1. Bolt, Nut and Screw Torques SIZE INCH POUNDS FOOT POUNDS 8-32 10-24 10-32 1/4-20 1/4-28 5/16-18 5/16-24 3/8-16 3/8-24 7/16-14 7/16-20 1/2-20 17.5-22.5 21.0-25.0 36.0-50.0 75.0-85.0 90.0-110 155-175 180-220 220-260 275-325 − 400-450 550-600 1.5-1.9 1.7-2.0 3.0-4.2 6.3-7.1 7.5-9.2 12.9-14.6 15.0-18.3 18.3-21.7 22.9-27.1 − 33.3-37.5 45.8-50.0 NOTE… Torque loads listed are for use with oil on threads as specified in Chapter 2. SIZE 5/16-24 5/16-24 3/8-24 3/8-24 7/16-20 7/16-20 7/16-24 9/16-18 9/16-18 3/4-16 3/4-16 7/8-14 7/8-14 NOTE… Stud driving torques apply when studs are coated with lubricant or sealer as specified in Chapter 2. TABLE 5-2. PIPE PLUG TORQUES SIZE 1 /8-27 1/4-18 3/8-18 1/2-14 3/4-14 INCH POUNDS 60-80 130-150 185-215 255-285 310-350 FOOT POUNDS 5.0-6.7 10.8-12.5 15.4-18.0 21.3-23.8 25.8-29.2 TABLE 5-3. TORQUE SPECIFICATIONS FOR FITTINGS FITTING AND MATERIAL TUBE O.D. INCH POUNDS #2 (Brass/Aluminum) .125 15-30 #2 (Steel) .125 15-50 #3 (Brass/Aluminum) .188 40-65 #3 (Steel) .188 50-90 #4 (Brass/Aluminum) .250 60-80 (Steel) .250 70-120 #4 (Steel) .190 60-80 #6 (Brass/Aluminum) .375 75-125 #6 (Steel) .375 90-150 #8 (Brass/Aluminum) .500 150-250 #8 (Steel) .500 135-250 #10 (Brass/Aluminum) .625 200-350 #10 (Steel) .625 300-400 See notes on page 5-18. 5-12 TABLE 5-1.A DRIVING STUD TORQUES SIZE INCH POUNDS FOOT POUNDS 1/4-20 50-70 4.2-5.8 5/16-18 100-150 8.3-12.5 3/8-16 200-275 16.7-22.9 7/16-14 300-425 25.0-35.4 Chapter 5 TABLE 5-4. TORQUE SPECIFICATIONS FOR HOSE FITTINGS HOSE SIZE THREAD SIZE FITTING MATERIAL INCH POUNDS #2 (5/16-24) Hose End Fitting To Brass/Allum. Fitting Hose End Fitting To Steel Fitting 50-80 75-120 #3 (3/8-24) Hose End Fitting To Brass/Allum. Fitting Hose End Fitting To Steel Fitting 70-105 95-140 #4 (7/16-20) Hose End Fitting To Brass/Allum. Fitting Hose End Fitting To Steel Fitting 100-140 135-190 #5 (1/2-20) Hose End Fitting To Brass/Allum. Fitting Hose End Fitting To Steel Fitting 130-180 170-240 #6 (9/16-18) Hose End Fitting To Brass/Allum. Fitting Hose End Fitting To Steel Fitting 150-195 215-280 #8 (3/4-16) Hose End Fitting To Brass/Allum. Fitting Hose End Fitting To Steel Fitting 270-350 470-550 # 10 (7/8-14) Hose End Fitting To Brass/Allum. Fitting Hose End Fitting To Steel Fitting 360-430 620-745 # 12 (1-1/16-12) Hose End Fitting To Brass/Allum. Fitting Hose End Fitting To Steel Fitting 460-550 855-1055 WARNING Failure to lubricate threads, apply the specific torque and follow the specific torquing procedure may result in damage and subsequent engine malfunction or failure. 5-13 Chapter 5 TABLE 5-5. SPECIFIC TORQUES LOCATION and HARDWARE Connecting Rod and Cap Camshaft Rear Gear Crankshaft Gear Crankcase Backbone Crankcase Nose Crankcase Nose 1-3 -5 Side Crankcase Rear Above Crankshaft Crankcase Rear Below Crankshaft Crankcase Rear Below Crankshaft Engine Mount Brackets Magneto Drive Gear Shaft Crankshaft Oil Seal Retainer Plate Cover Camshaft Cylinder To Crankcase Rocker Arm Shaft To Cylinder Rocker Cover To Cylinder Oil Pump Cover To Accy. Case Accessory Case To Crankcase Tach Drive Adapter Cover To Acc. Case Oil Suction Tube To Oil Sump Oil Sump To Crankcase and Acc. Case Oil Sump Oil Screen, Scavenge Oil Oil Filter Adapter To Acc. Case Oil Filter Oil Pressure Relief Valve Housing To Acc. Case Oil temperature control valve Oil Cooler to Plate Starter Adapter To Acc. Case Starter to Adapter Spring to starter clutch 5-14 TORQUE INCH POUNDS FOOT POUNDS SIZE QTY. Nut Bolt Bolt Nut Nut Nut Nut Nut Oil Cooler Adapt. Nut Oil Cooler Adapt. Nut Nut Nut Bolt Bolt Nut Nut Nut Screw Bolt Nut Bolt Self Locking Nut Tube Nut 3/8 - 24 5/16 - 24 5/16 - 24 1/4 - 28 7/16 - 20 1/4 - 28 7/16-20 7/16 - 20 7/16 - 20 12 4 4 11 4 2 2 1 1 400 - 475 240 - 260 240 - 260 100 - 125 440 - 460 100 - 125 440 - 460 440 - 460 440 - 460 33.3 - 39.6 20.0 - 21.7 20.0 - 21.7 8.3 - 10.4 36.6 - 38 38.3 - 10.4 36.6 - 38.3 36.6 - 38.3 36.6 - 38.3 3/8 - 24 1 275 - 325 22.9 - 27.0 3/8 - 24 5/16 - 24 10 - 24 1/4 - 20 7/16 - 20 3/8 1/4 - 28 1/4 - 20 1/4 - 20 5/16 - 24 5/16 - 24 1/4 - 28 11 2 4 2 12 36 24 32 4 7 5 3 275 - 325 190 - 210 21 - 25 75 - 85 590-610 440 - 460 110 - 120 55 - 65 75 - 85 180 - 220 180 - 220 90-110 22.9 - 27.0 15.8 - 17.5 1.7 - 2.1 6.3 - 7.1 49.1 - 50.8 36.6 - 38.3 9.2 - 10.0 4.6 - 5.4 6.3 - 7.1 15.0 - 18.3 15.0 - 18.3 7.5 - 9.2 1/4 - 28 1 14 310 - 350 90 - 110 25.8 - 29.1 7.5 - 9.2 Plug Screen Nut Filter Housing 5/8 - 18 1.00 - 18 5/16 - 24 3/4 - 16 7/8 - 16 1 1 3 1 1 190 - 210 200 - 210 180 - 220 192 - 216 190 - 210 15.8 - 17.5 16.7 - 17.5 15.0 - 18.3 16.0 - 18.0 15.8 - 17.5 1"-14NS3A THD 1/4 - 20 5/16 - 24 5/16 - 24 3/8 - 24 .25 - 20 1 440 - 460 36.7 - 38.3 8 3 2 2 1 100 - 110 155 - 175 155 - 175 200 - 220 75 - 85 8.3 - 9.2 12.9 - 14.6 12.9 - 14.6 16.7 - 18.3 6.3 - 7.1 Screw Bolt Nut Nut Screw, Special Chapter 5 TABLE 5-5. SPECIFIC TORQUES (Cont’d) TORQUE LOCATION and HARDWARE Scavenge pump cover to scavenge pump housing Sheave to starter shaftgear Alternator To Acc. Case Alternator Adjusting Bracket To Alternator Mount Bracket Alternator Adjusting Bracket Air Throttle Adapter to Fuel Servo Induction Manifold Flange To Cylinder Fuel Pump To Crankcase Fuel Servo To Intake Manifold Aftercooler To Mount Bracket Fuel Nozzle To Cylinder Fuel Line To Fuel Nozzle Fuel Line To Manifold Valve Nut Union To Manifold Valve Magneto To Acc. Case Harness To Magneto Spark Plug To Cylinder Harness Lead To Spark Plug Turbocharger Oil Inlet Adapter Turbocharger Oil Outlet Adapter Turbocharger Mount Brackets To Aftercooler Mount Bracket Mount Bracket To Turbocharger Turbine Housing Flange To Exhaust Manifold Wastegate To Exhaust Manifold By-Pass Flange Exhaust Manifold Flange To Cylinder INCH POUNDS FOOT POUNDS SIZE QTY. Screw .25 - 20 6 75 - 85 6.3 - 7.1 Bolt Nut Bolt/Nut 7/16 - 20 5/16 - 24 3/8 - 24 3 1 600 - 650 180 - 220 200 - 275 50.0 - 55.2 15.0 - 18.3 16.7 - 22.9 Nut Screw Nut 3/8 - 24 1/4 - 20 5/16 - 24 1 4 12 200 - 275 75 - 85 50 - 70 16.7 - 22.9 6.3 - 7.1 4.2 - 5.8 Nut Screw Nut Nozzle Nut Nut Nut Nut Screw Plug Nut Screw Screw Screw/Nut 5/16 - 24 5/16 - 18 1/4 - 20 .125 - 27 .312 - 32 .375 - 24 .375 - 24 5/16 - 24 10 - 32 18 mm 3/4 - 20 5/16 - 18 5/16 - 24 5/16 - 24 4 4 3 6 6 6 2 4 6 12 12 2 2 3 180 - 220 155 - 175 75 - 85 55 - 65 40 - 45 55 - 60 55 - 60 100 - 120 20 - 22 300 - 360 110 - 120 155 - 175 220 - 260 180 - 220 15.0 - 18.3 12.9 - 14.6 6.3 - 7.1 4.6 - 5.4 3.3 - 3.8 4.6 - 5.0 4.6 - 5.0 8.3 - 10.0 1.7 - 1.8 25.0 - 30.0 9.2 - 10.0 12.9 - 14.6 18.3 - 21.7 15.0 - 18.3 Bolt Bolt/Nut ------- 3 4 155 - 175 90 - 110 12.9 - 14.6 7.5 - 9.2 Bolt/Nut 1/4 - 28 8 240 - 280 20.0 - 23.3 Nut 5/16 - 24 12 200 - 210 16.7 - 17.5 ➀ Torque loads listed are for use with oil on threads. If cotter pin holes must be aligned set torque wrench at low limit and torque nut to first hole beyond this torque. Stud driving torques apply when studs are coated with lubricant or sealer. Do not exceed the high limit torque. ➁ Hardware requiring torque, not listed in Table Of Specific Torques, must be torqued according to general use Torque Chart or Pipe Plugs, Hydraulic line fitting charts and Torque Specifications For Hose Fittings as applicable. WARNING Failure to lubricate threads, apply the specific torque and follow the specific torquing procedure may result in damage and subsequent engine malfunction or failure 5-15 Chapter 5 INTENTIONALLY LEFT BLANK 5-16 Chapter 6 CHAPTER 6 DISASSEMBLY SECTION 6-1 6-2 6-3 6-4 6-5 6-6 6-7 6-8 6-9 6-10 6-11 6-12 6-13 6-14 6-15 6-16 6-17 FIGURE 6-1 6-2 6-3 6-4 6-5 6-6 6-7 6-8 6-9 6-10 6-10A 6-11 6-12 6-13 6-14 6-15 6-15A 6-16 6-17 6-18 6-19 PAGE Exhaust System Removal and Disassembly .................................6-2 Ignition System Removal and Disassembly .................................6-4 Fuel Injection System Removal and Disassembly........................6-6 Induction System Removal and Disassembly...............................6-8 Compressor Mounting Components, Starter and Starter Drive Adapter Removal................................................................6-10 Belt Driven Alternator Removal...................................................6-12 Accessory Case Mounted Alternator Removal.............................6-15 Optional Starter and Starter Adapter (TSI0-360-RB)...................6-16 Starter and Starter Adapter (LTSI0-360-RB) ...............................6-18 Accessory Case Disassembly .......................................................6-20 Oil Pump Removal .......................................................................6-23 Oil Cooler Removal......................................................................6-24 Oil Sump Removal .......................................................................6-25 Cylinder Baffling Disassembly ....................................................6-26 Cylinders and Piston Removal .....................................................6-28 Crankcase Associated Parts Removal...........................................6-30 Crankcase Disassembly and Train Removal ................................6-32 PAGE Exhaust System ............................................................................6-3 Ignition System.............................................................................6-5 Fuel Injection System ...................................................................6-7 Induction System ..........................................................................6-9 Compressor Mounting Components, Starter and Starter Adapter Assembly ........................................................................6-11 Belt Driven Alternator Assembly .................................................6-13 Accessory Case Mounted Alternator ............................................6-15 Optional Starter Adapter Assembly (TSI0-360-RB) ....................6-17 Starter Adapter Assembly (LTSI0-360-RB).................................6-19 Accessory Case (TSI0-360-RB) ...................................................6-21 Accessory Case (TSI0-360-RB) ...................................................6-22 Oil Pump Assembly......................................................................6-23 Oil Cooler .....................................................................................6-24 Oil Sump.......................................................................................6-25 Cylinder Baffle Assembly ............................................................6-27 Cylinder and Piston Assembly .....................................................6-29 Connecting Rod Support ..............................................................6-29 Crankcase Associated Parts ..........................................................6-31 Crankcase Attaching Parts............................................................6-33 Camshaft Assembly ......................................................................6-34 Crankshaft Assembly....................................................................6-35 6-1 Chapter 6 remove tailpipe (10), from turbocharger (21). Discard "V" band clamp assembly (43). 6-1 EXHAUST SYSTEM REMOVAL AND DISASSEMBLY (See Figure 6-1) 1. Remove turbocharger to scavenge pump hoses (57, 59), check valve (58) and fittings(60, 61). Discard hoses (57, 59) and check valve (58). 2. At two locations, remove turbocharger oil supply hose clamp (71), brackets (72) or (73), bolts (70), washers (74), and nuts (75). 3. Remove turbocharger oil supply hose assembly (53) and check valve (54). Discard hose (53) and check valve (54). 4. Remove wastegate to controller hose assembly (68). Discard hose (68). 5. Remove oil filter adapter to wastegate hose assembly (64). Discard hose (64). 6. Remove bolt (24 and Nut (25). Discard Nut (25). Loosen "V' band clamp assembly (43) and 7. Remove bolts, nuts and washers (39 through 42). Discard nuts (42). Remove wastegate assembly (38), gaskets (37) and tube (11). Discard gaskets (37). 8. Remove bracket (22), bolts, nuts and washers (26, 27, 28). Discard nuts (28). Remove bolts, nuts and washers (48, 49, 50). Discard nuts (50). Remove turbocharger (21) and bracket (45). 9. Remove tie rod (13), two spacers (14), bolt (15), nut (16) from left side exhaust manifold. Remove tie rod (17), two spacers (14), bolt (15), nut (16) from right side exhaust manifold. Loosen, remove and discard clamp assemblies (12). Discard clamp assemblies (12). Remove exhaust elbows (7, 8) and remove turbo inlet manifold (9). Discard nuts (16). 10. Remove nuts (13), right side exhaust system items (1), (3), (5), (8) and left side exhaust system sections (2), (4), (6) and (7). Remove exhaust flange gaskets (18) and discard. NOMENCLATURE FOR FIGURE 6-1. 1. 2. 3. 4. 5. 6. 7. 8. 9. 10. 11. 12. 13. 14. 15. 16. 17. 18. 19. 6-2 Tee,Riser Tee, Riser Tee, Riser Tee, Riser Tee, Riser Tee, Riser Elbow Elbow Manifold Tailpipe Tube Clamp Tie Rod Spacer Bolt Nut Tie Rod Gasket Nut,, Exhaust 20. 21. 22. 23. 24. 25. 26. 27. 28. 29. 30. 31. 32. 33. 34. 35. 36. 37. 38. Gasket Turbocharger Bracket Clamp Bolt Nut Bolt Washer Nut Gasket Adapter Washer, Lock Bolt Gasket Adapter Washer,, Lock Bolt Gasket Wastegate 39. 40. 41. 42. 43. 44. 45. 46. 47. 48. 49. 50. 51. 52. 53. 54. 55. 56. 57. Bolt Bolt Washer Nut Clamp Bolt Bracket Bracket Bracket Bolt Washer Nut Elbow Reducer Hose Check Valve Tee Elbow Hose 58. 59. 60. 61. 62. 63. 64. 65. 66. 67. 68. 69. 70. 71. 72. 73. 74. 75. 76. Check, Valve Hose Elbow Elbow O-Ring Elbow Hose Elbow O-Ring Elbow Hose Elbow Bolt Clamp Bracket Bracket Washer Nut, Self Locking Washer, Tab Chapter 6 FIGURE 6-1. EXHAUST SYSTEM 6-3 Chapter 6 a. Remove attaching rocker cover screw and lock washer, and remove single lead clamps (24) (typical twelve places). 6-2 IGNITION SYSTEM REMOVAL AND DISASSEMBLY (See Figure 6-2.) b. Remove ignition lead from each spark plug (7). 1. Remove magneto pressurization system: c. Remove two six-lead clamps (25) by removing self-locking nut (28) and screw (27). a. On the 2-4-6 magneto, loosen clamp (18) and remove clamp and hose (17) from 90° elbow (19). Discard hose (17). d. Cut and remove cable ties (26). b. Remove 90° elbow (19) and bushing (20) from the 2-4-6 magneto. e. On each magneto, remove three screws (23) from cable outlet plate and remove plates from magnetos (2). c. On the 1-3-5 magneto, loosen clamp (18) and remove clamp and hose (16) from 90° elbow (19). Discard hose (16). f. d. Remove 90° (19) and bushing (20) from the 1-3-5 magneto. 3. Disconnect ground terminal kit from magnetos (2) in accordance with airframe manufacturer's instructions. e. Loosen clamps (18) and remove hose (15), filter (14), reducer (29) hose (12) and tee (13) from intake manifold. Discard hoses (12, 15, 16, 17), filter (14) and reducer (29). f. Remove ignition harness assembly from engine and discard. 4. Remove nuts (5), lock washers (4), and magneto holding washers (3) from each magneto. Discard lock washers (4). Separate clamps (18), hoses (12, 15), Filter (13) and tee (13). Discard hoses (12, 15), Filter (13) and tee (13). 5. Remove both magnetos (2) from the engine. 2. Remove ignition harness assembly: NOMENCLATURE FOR FIGURE 6-2. 1. 2. 3. 4. 5. 6. 7. 8. 6-4 Magneto Gasket Washer, Holding Washer, Lock Nut Bushing Retainer Gear 9. 10. 11. 12. 13. 14. 15. 16. Washer, Thrust Bearing, Needle Sleeve Hose Tee Filter Hose Hose 17. 18. 19. 20. 21. 22. 23. 24. Hose Clamp Elbow Bushing Harness Sparkplug Screw Clamp 25. 26. 27. 28. 29. Clamp Tie, Cable Screw Nut, Self Locking Reducer Chapter 6 FIGURE 6-2 IGNITION SYSTEM 6-5 Chapter 6 6-3 FUEL INJECTION SYSTEM REMOVAL AND DISASSEMBLY (See Figure 6-3.) 1. Mark each fuel injection line (49) through (54) with its cylinder number to facilitate re-installation. WARNING Fuel injection lines must not be bent or deformed. Discard and replace bent or deformed fuel injection lines. 1. Fuel injection line removal: a. Remove self-locking nuts (68), flat washers (67), cushioned loop clamps (66), and bolts (69). Cushioned loop clamp (65) will be removed later. Discard self locking nuts (68). b. Disconnect fuel lines (49 through 54) from fuel injection sleeves (70). c. Disconnect other end of fuel lines from fuel manifold valve assembly (48) and remove fuel lines from engine. d. Remove washers (55, 56). 3. Remove the 2-4-6 side air reference tube assembly (39) and air manifold tube assembly (41). Loosen and remove sleeves (70) from air manifold tube assembly (41). 4. Remove the 1-3-5 side air reference tube assembly (40) and air manifold tube assembly (41). Loosen and remove sleeves (70) from air manifold tube assembly (41). 6-6 5. Fuel Nozzle Removal: a. Remove fuel nozzles (58) from each cylinder. b. Remove o-rings (57) from nozzles (58) and discard. 6. Remove fuel hose (42), fitting (43), and hose (44) from fuel servo and fuel pump. Discard fuel hoses (42, 44). 7. Cut and remove tie strap (71). Loosen clamps (36) and remove air reference hose (37) from air throttle adapter and fuel pump. Discard hose (37) and tie strap (71). 8. Remove hose (46) from fuel servo and fuel manifold valve. Remove hoses (73, 72) from controller assembly (2). Discard hoses (46, 72, 73). 9. Remove the crankcase backbone hardware that secures the fuel manifold valve to the engine and remove fuel manifold valve (48). 10. See Figure 6-4, "Induction System." Remove clamp (23) and hose (21) between air throttle adapter and induction tube (22). Remove the assembled tubes, aftercooler, bracket and place on a work bench to be separated later. Discard hose (21). See Figure 6-3, "Fuel System." Remove screws (23), lock washers (22) and washers (21). Remove air throttle adapter assembly (28), fuel servo(1), controller (2) and overboost valve (32) as an assembly from the engine. Discard gaskets (20, 24) and lock washers (22, 26). 11. Remove nuts (61), lock washers (60) and washers (59). Remove fuel pump assembly (64) and gasket (62). Reach into crankcase fuel pump cavity and remove drive shaft (63). Discard fuel pump gasket (62) and lock washers (60). Chapter 6 FIGURE 6-3. FUEL INJECTION SYSTEM 1. 2. 3. 4. 5. 6. 7. 8. 9. 10. 11. 12. 13. 14. 15. 16. 17. 18. 19. Servo, Fuel Controller Lever Bushing Pin Washer, Wave Washer Pin, Cotter Nut, Self Locking Spring Rod End Rod and Link Assembly Screw Washer, Lock Washer, Plain Gasket Manifold Plug Elbow 20. 21. 22. 23. 24. 25. 26. 27. 28. 29. 30. 31. 32. 33. 34. 35. 36. 37. 38. Gasket Washer, Plain Washer, Lock Screw Gasket Washer, Plain Washer, Lock Screw Adapter Connector Fitting Fitting Valve, Overboost O-Ring Screw Washer, Lock Clamp Hose Hose 39. 40. 41. 42. 43. 44. 45. 46. 47. 48. 49. 50. 51. 52. 53. 54. 55. 56. 57. Tube, Air Reference Tube, Air Reference Tube, Air Manifold Hose Nipple Hose Elbow Hose Elbow Fuel Manifold Valve Tube, Fuel #1 Cyl. Tube, Fuel #2 Cyl. Tube, Fuel #3 Cyl. Tube, Fuel #4 Cyl. Tube, Fuel #5 Cyl. Tube, Fuel #6 Cyl. Washer Washer O-Ring 58. 59. 60. 61. 62. 63. 64. 65. 66. 67. 68. 69. 70. 71. 72. 73. Fuel Nozzle Washer, Plain Washer, Lock Nut Gasket Shaft, Fuel Pump Drive Fuel Pump Clamp Clamp Washer,, Flat Nut, Self Locking Bolt Sleeve Strap, Tie Hose Hose 6-7 Chapter 6 6-4 INDUCTION SYSTEM REMOVAL AND DISASSEMBLY (See Figure 6-4.) 1. The aftercooler and attached tubes, air throttle adapter, fuel servo, overboost valve and controller assembly were removed during fuel system disassembly. intake manifold (2) and induction tubes (6 through 13) as an assembly from the engine. Discard lock washers (17). 3. Loosen clamps (19) and separate induction tubes (6 through 13) from intake manifold (2). Remove and discard hoses (20). 4. Remove gaskets (15) from cylinders and discard. 2. Remove nuts (18), lock washers (17) and plain washers (16) from each cylinder. Remove the NOMENCLATURE FOR FIGURE 6-4. 1. 2. 3. 4. 5. 6. 7. 8. 9. 10. 6-8 Gasket, Manifold Washer, Plain Washer, Lock Screw Tube, Ind., Cyl. #1 Tube, Ind., Cyl. #2 Tube, Ind., Cyl. #3 Tube, Ind., Cyl. #4 Tube, Ind., Cyl. #5 11. 12. 13. 14. 15. 16. 17. 18. 19. 20. Tube, Ind., Cyl. #5 Tube, Ind. Cyl. #6 Tube, Ind., Cyl. #6 Flange, Ind. Tube Gasket Washer, Plain Washer, Lock Nut, Plain Clamp Hose 21. 22. 23. 24. 25. 26. 27. 28. 29. 30. Hose Tube, Ind., Aftercooler Clamp, Assembly Hose Clamp, Assembly Aftercooler Bracket, Aftercooler Mount, Vibration Damper Washer, Lock Nut, Plain 31. 32. 33. 34. 35. Sealant, Adhesive Hose Bumper, Rubber Adhesive Elbow Chapter 6 FIGURE 6-4. INDUCTION SYSTEM 6-9 Chapter 6 6-5 COMPRESSOR MOUNTING COMPONENTS, STARTER AND STARTER DRIVE ADAPTER REMOVAL TSI0-360-RB (See Figure 6-5.) 1. Remove airframe supplied freon compressor and compressor drive belt in accordance with the airframe manufacturer's instructions. 2. Remove attaching parts (30,31) and pull starter (29) from adapter studs. Remove and discard O-Ring (28). 3. Remove attaching parts (68 through 74). Remove bracket (63) and lifting eye (64). Pull starter and accessory drive adapter from crankcase. 4. Remove and discard silk thread (1). NOMENCLATURE FOR FIGURE 6-5. 1. 2. 3. 4. 5. 6. 7. 8. 9. 10. 11. 12. 13. 14. 15. 6-10 Thread, Silk Housing, Adapter Stud Stud Stud Dowel Bearing, Needle Shaft, Str. Worm Bearing, Ball Ring, Retaining Ring, Retaining Bearing, Needle Gear, Worm Wheel Spring, Clutch Washer, Tab 16. 17. 18. 19. 20. 21. 22. 23. 24. 25. 26. 27. 28. 29. 30. Screw Shaft Gear O-Ring Gear, Scavenge Bushing Gear Scav. Cover Scav. Bearing, Needle Washer Screw Lockwire Key, Woodruff 0-Ring Motor, Starter Washer 31. 32. 33. 34. 35. 36. 37. 38. 39. 40. 41. 42. 43. 44. 45. Nut Bushing Adapter, Hsg. Plug Seal, Oil Seal, Oil Bushing Bushing Dowel Stud Stud Elbow Elbow Shaft Gear Key, Square 46. 47. 48. 49. 50. 51. 52. 53. 54. 55. 56. 57. 58. 59. 60. Gear, Bevel Ring, Retaining Gear, Bevel Gear, Bevel Gasket, Cover Cover, Acc. Washer, Plain Washer, Lock Nut, Plain Bearing Seal, Oil Housing Sheave Washer, Sheave Bolt 61. 62. 63. 64. 65. 66. 67. 68. 69. 70. 71. 72. 73. 74. Thread, Silk Bracket Bracket Eye, Lifling, Washer Nut Nut Washer, Plain Washer, Lock Bolt Bolt Nut Bolt Bolt Chapter 6 FIGURE 6-5. COMPRESSOR MOUNTING COMPONENTS, STARTER AND STARTER ADAPTER ASSEMBLY (TSIO-360-RB) 6-11 Chapter 6 2. Remove alternator adjusting bolt (11), washer (10) and lock washer (9). Discard lock washer (9). 6-6 BELT DRIVEN ALTERNATOR REMOVAL (See Figure 6-6) 1. The alternator drive belt was removed during engine removal in section 6-2. 3. Remove alternator mounting bolt (4), washers (5), shims (6) and nut (7). Remove alternator assembly (1) from mounting bracket (3). 4. Alternator brackets (3) and (8) will be removed from the engine during crankcase disassembly. NOMENCLATURE FOR FIGURE 6-6. 1. 2. 3. 4. 5. 6-12 Alternator Belt, Alternator Drive Bracket, Alternator Mount Bolt Washer 6. 7. 8. 9. 10. Shim Nut Bracket, Adjusting Washer, Lock Washer 11. 12. 13. 14. Bolt Washer Nut Bolt Chapter 6 FIGURE 6-6. BELT DRIVEN ALTERNATOR ASSEMBLY 6-13 Chapter 6 INTENTIONALLY LEFT BLANK 6-14 Chapter 6 6-7 ACCESSORY CASE MOUNTED ALTERNATOR REMOVAL (See Figure 6-7.) 1. Remove three sets of attaching parts (2, 3). Remove alternator (4) from crankcase. Remove and discard gasket (1). 2. Remove cotter pin (7) and nut (6). Remove gear hub assembly from alternator shaft. Remove and discard woodruff key (8). 3. Using a blind oil seal puller remove and discard oil seal (9). 4. Remove and discard o-ring (10). NOMENCLATURE FOR FIGURE 6-7. Gasket Washer, Plain Nut Alternator Hub, Assembly Nut Pin, Cotter Key, Woodruff Oil Seal O-Ring FIGURE 6-7. ACCESSORY CASE MOUNTED ALTERNATOR ASSEMBLY 6-15 Chapter 6 6-8 OPTIONAL STARTER AND STARTER DRIVE ADAPTER TSI0-360-RB (See Figure 6-8) 2. Remove attaching parts (35 through 37, 47 through 52). Pull starter adapter from crankcase. 1. Remove attaching parts (45, 46) and pull starter (44) from adapter studs. Remove and discard o-ring (43). NOMENCLATURE FOR FIGURE 6-8. 1. 2. 3. 4. 5. 6. 7. 8. 9. 10. 11. 12. 13. Gasket Housing, Adapter Stud Stud Stud Dowel Bearing, Needle Shaft, Starter Worm Bearing, Ball Ring, Retaining Ring, Retaining Bearing, Needle Gear, Worm Wheel 6-16 14. 15. 16. 17. 18. 19. 20. 21. 22. 23. 24. 25. 26. Spring, Clutch Washer, Tab Screw Shaft Gear, Starter 0-Ring Body, Scav. Pump Bushing Seal, Oil Stud Elbow Elbow Gear, Scavenge Bushing, Gear 27. 28. 29. 30. 31. 32. 33. 34. 35. 36. 37. 38. 39. Gear, Scavenge Key, Woodruff Cover, Scav. Pump Bushing Pin, Dowel Washer Screw Lockwire Washer, Plain Washer, Lock Nut Gasket, Cover Cover, Acc. Dr. 40. 41. 42. 43. 44. 45. 46. 47. 48. 49. 50. 51. 52. Washer, Plain Washer, Lock Nut, Plain 0-Ring Motor, Starter Washer Nut Bolt Bolt Bolt Bolt Eye, Engine Lifting Spacer Chapter 6 FIGURE 6-8. OPTIONAL STARTER ADAPTER ASSEMBLY (TSIO-360-RB) 6-17 Chapter 6 6-9 STARTER AND STARTER DRIVE ADAPTER LTSI0-360-RB (See Figure 6-9) 2. Remove attaching parts (37 through 39, 49 through 56). Pull starter adapter from crankcase. 1. Remove attaching parts (47, 48) and pull starter (46) from adapter studs. Remove and discard o-ring (45). NOMENCLATURE FOR FIGURE 6-9. 1. 2. 3. 4. 5. 6. 7. 8. 9. 10. 11. 12. 13. 14. Gasket Housing, Adapter Stud Stud Stud Dowel Bearing, Needle Shaft, Starter Worm Bearing, Ball Gear, Starter Worm Bushing Pin Bearing, Ball Ring, Retaining 6-18 15. 16. 17. 18. 19. 20. 21. 22. 23. 24. 25. 26. 27. 28. Bearing, Needle Gear, Worm Wheel Spring, Clutch Washer, Tab Screw Shaft Gear, Starter 0-Ring Body, Scav. Pump Bushing Seal, Oil Stud Elbow Gear, Scavenge Bushing, Gear 29. 30. 31. 32. 33. 34. 35. 36. 37. 38. 39. 40. 41. 42. Gear, Scavenge Key, Woodruff Cover, Scav. Pump Bushing Pin, Dowel Washer Screw Lockwire Washer, Plain Washer, Lock Nut Gasket, Cover Cover, Acc. Dr. Washer, Plain 43. 44. 45. 46. 47. 48. 49. 50. 51. 52. 53. 54. 55. 56. Washer, Lock Nut, Plain 0-Ring Motor, Starter Washer Nut Bolt Washer, Plain Washer, Lock Bolt Bolt Bolt Eye, Engine Lifting Spacer Chapter 6 FIGURE 6-9. STARTER ADAPTER ASSEMBLY (LTSI0-360-RB) 6-19 Chapter 6 6-10 ACCESSORY CASE REMOVAL (See Figures 6-10 and 6-10A.) 1. Remove bolt (36), washers (32), lock washer (33) and nut (34). Remove seven sets of washers (32), 6-20 2. lock washers (33) and nuts (34). Discard lock washers (33). Remove four sets of washers (32), lock washers (33) and bolts (35). Discard lock washers (33). 3. Gently bump accessory case (2) with a soft rubber or rawhide mallet and separate from crankcase. Remove and discard gasket (1). Chapter 6 FIGURE 6-10. ACCESSORY CASE (TSIO-360-RB) 1. 2. 3. 4. 5. 6. 7. 8. 9. 10. 11. 12. 13. Gasket Accessory Case Tube, Oil Filler Gasket Plug Lockwire Fitting Plunger Spring Gasket Cap Screw, Adjusting Washer 14. 15. 16. 17. 18. 19. 20. 21. 22. 23. 24. 25. 26. Nut Nut Gasket Cover Washer Washer, Lock Nut Gasket Screen Gasket 0-Ring Adapter Stud 27. 28. 29. 30. 31. 32. 33. 34. 35. 36. 37. 38. 39. Fitting Filter, Oil Washer Washer, Lock Nut Washer Washer, Lock Nut Screw Bolt Gasket Cap Hose 6-21 Chapter 6 FIGURE 6-10A. ACCESSORY CASE (LTSIO-360-RB) 1. 2. 3. 4. 5. 6. 7. 8. 9. 10. 11. 12. 13. 6-22 Gasket Accessory Case Tube, Oil Filler Gasket Plug Lockwire Fitting Plunger Spring Gasket Cap Screw, Adjusting Washer 14. 15. 16. 17. 18. 19. 20. 21. 22. 23. 24. 25. 26. Nut Nut Gasket Cover Washer Washer, Lock Nut Gasket Screen Gasket 0-Ring Adapter Stud 27. 28. 29. 30. 31. 32. 33. 34. 35. 36. 37. 38. 39. Fitting Filter, Oil Washer Washer, Lock Nut Washer Washer, Lock Nut Screw Bolt Gasket Cap Hose Chapter 6 6-11 OIL PUMP REMOVAL (See Figure 6-11) See Chapter 14 for oil pump removal. NOMENCLATURE FOR FIGURE 6-11. 1. 2. 3. 4. 5. 6. 7. 8. Bushing Gear, Oil Pump Bushing Gear Assembly, Oil Pump Cover, Oil Pump Washer, Tab Bolt Gear, Oil Pump Drive FIGURE 6-11. OIL PUMP ASSEMBLY 6-23 Chapter 6 6-12 OIL COOLER REMOVAL (See Figure 6-12.) 1. The oil cooler is located on the left (2-4-6) side, rear portion of the crankcase. 2. Loosen and remove shoe (8), screw (10), nut (9) from the number two cylinder rocker cover. Loosen and remove screws (5), lock washers (4) and washers (3). Remove oil cooler (2) and gasket (1) from oil cooler adapter. Discard gasket (1) and lock washers (4). NOMENCLATURE FOR FIGURE 6-12. 1. 2. 3. 4. Gasket Oil Cooler Washer, Plain Washer, Lock 5. 6. 7. 8. Screw Gasket Vernatherm (Oil Temp. Control Vlv.) Shoe FIGURE 6-12. OIL COOLER 6-24 9. 10. 11. 12. Nut Screw Gasket Plug Chapter 6 6-13 OIL SUMP REMOVAL (See Figure 6-13) 2. Gently bump oil sump (2) with a soft rubber or rawhide mallet and separate from crankcase. Remove and discard gasket (1). 1. Remove fourteen sets of nuts (6), lock washers (5) and washers (4). 3. Remove oil suction tube (9) from oil sump (2). NOMENCLATURE FOR FIGURE 6-13. Gasket, Oil Sump Sump, Oil Helical Coil Washer Washer, Lock Nut Plug Gasket, Plug Tube, Oil Suction FIGURE 6-13. OIL SUMP 6-25 Chapter 6 6-14 CYLINDER BAFFLING DISASSEMBLY (See Figure 6-14) 1. On 1-3-5 side of engine, remove bolts (5) and spacers (1). On 2-4-6 side of engine, remove bolts (5) and spacers (1). 2. Remove screws (3), washers (14), and remove supports (4). 3. Push fasteners (8) upward against springs (9) to disengage fasteners from supports (2). Remove fasteners and springs (8, 9). Remove supports (2) from cylinder fins. Remove baffle assemblies (6, 7) and (10 through 14) from cylinders. Discard springs (9). NOMENCLATURE FOR FIGURE 6-14. 1. 2. 3. 4. 5. 6. 7. 6-26 Spacer Support, Baffle, Outer Screw Support, Baffle, Inner Bolt Baffle Baffle 8. 9. 10. 11. 12. 13. 14. Baffle, Fastener Spring Baffle Baffle Baffle Baffle Washer, Plain Chapter 6 FIGURE 6-14. CYLINDER BAFFLE ASSEMBLY 6-27 Chapter 6 6-15 CYLINDER AND PISTON REMOVAL (See Figure 6-15) 1. Loosen and remove cylinder drain tubes (42). Remove and discard drain tube seals (43). Remove drain tube fittings (18). 2. Remove attaching hardware (30,31,32, 33) and remove rocker covers (28, 29) from all cylinders. Remove and discard gaskets (27). 3. Position the crankshaft so the piston is at top dead center and both intake and exhaust valves of cylinder to be removed are closed. Bend tab of washers (25) down and remove nuts (26), tab washers (25) and retainers (24). Remove rocker arms (19) and shafts (23) from cylinder studs. Discard tab washers (25), nuts (26), rocker shafts (23) and retainers (24). Withdraw pushrods (41) from housings. 4. Place the engine in the inverted position by rotating the engine stand. Remove all pushrod housings (36) by pushing in toward the crankcase while lifting the cylinder end. Remove springs 5. 6. 7. 8. (38), washers (39) and seal (37). Discard all seals (37, 40) and springs (38). Place the engine in the upright position by rotating the engine stand. Make sure piston in cylinder being removed is at the top dead center position. Remove cylinder flange nuts (46, 47). Cradle cylinder in arm and withdraw cylinder straight out. To prevent damage to the crankcase support the piston with your free hand as it clears the cylinder. Place cylinders upright on a workbench as they are removed. Remove piston pin (50) and piston (55) from connecting rod. Remove the cylinder base packing (1) from the cylinder skirt and install it in a figure "8" pattern around the cylinder deck studs and connecting rod for support. See Figure 615A, "Connecting Rod Support." Remove all cylinders and pistons using steps "1" through "6". Discard all piston pins (50), pistons (55), piston rings (49, 51, 52, 53). Using a retrieval magnet, remove all hydraulic tappets (48) from the crankcase tappet bores. Discard hydraulic tappets (48). NOMENCLATURE FOR FIGURE 6-15. 1. 2. 3. 4. 5. 6. 7. 8. 9. 10. 11. 12. 13. 14. 6-28 Packing Cylinder Helical Coil Guide, Intake Seal, Int. Vlv. Guide Guide, Exhaust Stud Stud Insert, ExhaustSeat Insert, Intake Seat VaIve, Exhaust Valve, intake Spring, Inner Spring, Outer 15. 16. 17. 18. 19. 20. 21. 22. 23. 24. 25. 26. 27. 28. Retainer Roto-Coil Key, Valve Retainer Fitting Rocker Arm Bushing Screw,Drive #2 Washer, Thrust Shaft Retainer Washer, Tab Nut Gasket Cover, Rocker 29. 30. 31. 32. 33. 34. 35. 36. 37. 38. 39. 40. 41. 42. Cover, Rocker Washer, Plain Washer, Lock Screw Screw Gasket Nut Brass Housing, Pushrod Seal Spring Washer Seal Pushrod Tube, Drain 43. 44. 45. 46. 47. 48. 49. 50. 51. 52. 53. 54. Sleeve Baffle Spring Nut, Flanged Nut, Flanged Tappet, Hydraulic Ring, Compression Ring, Compression Ring, Oil Control Ring, Scraper Pin Piston Piston Chapter 6 FIGURE 6-15. CYLINDER AND PISTON ASSEMBLY FIGURE 6-15A. CONNECTING ROD SUPPORT 6-29 Chapter 6 6-16 CRANKCASE ASSOCIATED PARTS REMOVAL (See Figure 6-16) 1. Remove screws (6) and remove oil seal retainer plates (5). 2. Remove screws (4), lock washers (3), camshaft cover (2) and gasket (1). Discard lock washers (3) and gasket (1). 3. Remove screw (14), washer (12) and self locking nut (13). Discard self locking nut (13). If oil gauge (17) is still installed in housing , remove it. Loosen clamps (7) and separate oil gauge housing (9) and hose (8) from oil housing adapter. Discard hose (8). Remove o-ring (16) and lock ring(10) from oil gauge rod and discard. Remove clamp (11) from oil gauge housing (9) and remove clamp (15) from oil filler neck. 4. NOMENCLATURE FOR FIGURE 6-16. Gasket Cover, Camshaft Washer, Lock Screw, Camshaft Cover Plate, Oil Seal Retainer Screw, Retainer 6-30 Clamp, Hose Hose Housing, Oil Gauge Lock Ring, Oil gauge Clamp Washer Nut, Self Locking Screw Clamp 0-Ring 0il Gauge Chapter 6 FIGURE 6-16. CRANKCASE ASSOCIATED PARTS 6-31 Chapter 6 discard all o-rings (23, 24 and 29) from engine mount oil cooler adapter and 2-4-6 side crankcase. 6-17 CRANKCASE DISASSEMBLY AND DRIVE TRAIN REMOVAL (See Figure 617.) 6. Lift off 2-4-6 crankcase half being careful to prevent connecting rods from hitting cylinder decks. Place the 2-4-6 side crankcase half on a work bench. For determination of wear before removing drive train, use the proper fixture and dial indicators to check gear backlash and record. See Figure 19-5, "Gear Backlash Fits and Limits." 7. See Figures 6-18 and 6-19. Lift out camshaft and governor drive gear. Remove crankshaft assembly. Place the camshaft and crankshaft assemblies on the proper holding fixtures to prevent damage. Remove and discard crankshaft bearings and thrust washers. 1. Remove crankcase backbone attaching hardware (1 through 6), remove lifting eye (25), shock mount braces (8), shock mount (9), washer (10), lock washer (11), nut (12) and fuel manifold valve (26). Discard lock washer (11) and rubber shock mount (9). 2. Rotate engine stand to place right crankcase half downward. 3. Remove remaining attaching hardware (4, 5 and 28, 30). Remove attaching hardware (20, 21, 22). Tap 7/16 through bolts (31 through 34) with a non marring hammer. Remove and discard through bolts (31 through 34) and o-rings (29). 8. See Figure 6-17. Disconnect 1-3-5 side crankcase engine mounts from engine stand. Remove 1-3-5 side crankcase from engine stand and place on a work bench. Remove engine mount bracket (35), turbocharger support bracket (48), engine mount bracket (37), alternator support bracket (39) and spacers (40). Remove and discard all o-rings (23, 24) from 1-3-5 side crankcase. 9. Disassembly of drive train components will be accomplished in Chapter 18. 4. Remove and discard through bolts (13, 14, 15, 18 and 19). 5. Disconnect 2-4-6 side crankcase engine mounts from engine stand. Remove engine mount bracket (38), prop cable bracket (17), bushing (16) and engine mount oil cooler adapter (36). Remove and NOMENCLATURE FOR FIGURE 6-17. 1. 2. 3. 4. 5. 6. 7. 8. 9. 10. 11. 12. 13. 14. Bolt Bolt Bolt Washer, Plain Nut, Plain Washer, Plain Bolt, Through Brace, Shock Mount Mount, Shock Washer Washer, Lock Nut Bolt, Through Bolt Through 6-32 15. 16. 17. 18. 19. 20. 21. 22. 23. 24. 25. 26. 27. 28. Bolt, Through Bushing Bracket, Prop Cable Bolt, Through Bolt, Through Washer, Plain Washer, Plain Nut, Plain O-Ring O-Ring Eye, Engine Lifting Manifold, Valve Bolt, Through Nut 29. 30. 31. 32. 33. 34. 35. 36. 37. 38. 39. 40. 41. 42. O-Ring Washer, Plain Bolt, Through Bolt, Through Bolt, Through Bolt, Through Bracket, Engine Mount Bracket, Engine Mount Bracket, Engine Mount Bracket, Engine Mount Bracket, Alternator Mount Spacer, Bracket Bushing, Magneto Support Nut, Spiral Lock 43. 44. 45. 46. 47. 48. 49. 50. Cover, Governor Gasket, Cover, Governor Spacer Washer, Plain Washer, Lock Bracket, Turbo, Inner Gasket, Copper Plug Chapter 6 FIGURE 6-17. CRANKCASE ATTACHING PARTS 6-33 Chapter 6 FIGURE 6-18. CAMSHAFT ASSEMBLY. Camshaft Assembly Gear, Camshaft Bolt 6-34 Key, Woodruff Gear, Governor Drive Gear, Governor Driven Fuel Pump Drive Shaft Tappet, Hydraulic Chapter 6 FIGURE 6-19. CRANKSHAFT ASSEMBLY 1. 2. 3. 4. 5. 6. Plug, Crankshaft Bushing, Crankshaft Counterweight Assembly Bushing, Counterweight Pin, 4-1/2 Order Pin, 6th Order 7. 8. 9. 10. 11. 12. Plate, Retaining Ring, Retaining Pin, Dowel Bearing, Crankshaft Beanng, Crankshaft Packing 13. 14. 15. 16. 17. 18. Washer, Thrust Gear, Crankshaft Screw, Crankshaft Gear Seal, Oil Spring Connecting Rod 19. 20. 21. 22. 23. 24. Bushing Bolt, Connecting Rod Nut Bearing, Conn. Rod Cotter Pin Crankshaft 6-35 Chapter 6 INTENTIONALLY LEFT BLANK 6-36 Chapter 7 CHAPTER 7 EXHAUST SYSTEM SECTION 7-1 7-2 7-3 7-4 7-5 7-6 7-7 PAGE Exhaust System Removal And Disassembly..................7-2 Turbocharger Disassembly..............................................7-4 Wastegate Disassembly...................................................7-4 Cleaning...........................................................................7-4 Inspection.........................................................................7-4 Exhaust System Repair And Replacement .....................7-5 Exhaust System Component Sub-assembly ...................7-5 FIGURE 7-1 7-2 PAGE Exhaust System ..............................................................7-3 Slipjoint Assembly ..........................................................7-4 7-1 Chapter 7 7-1 TURBOCHARGER REMOVAL 1. See Figure 6-1. Bend tabs of tab washers (76) away from bolt (44) head flats. Remove three bolts (44) and separate bracket (47) from turbocharger (21). Discard tab washers (76). 2. Remove two bolts (32), lockwashers (31), oil outlet adapter (30) and gasket (29). Discard gasket (29) and lockwashers (31). 3. Remove two bolts (36), lockwashers (35), oil inlet adapter (34) and gasket (33). Discard gasket (33) and lockwashers (31). 4. Separate adapters (30, 34) and fittings (51, 56). 5. The turbocharger must be cleaned, inspected and repaired or replaced in accordance with the component manufacturer's instructions at engine overhaul. See section 1-5, "Related Publications." 7-2 WASTEGATE REMOVAL 1. See Figure 6-1. Remove fittings (63, 67) and o-rings (62, 66) from wastegate (38). Discard o-rings (62, 66). 2. The wastegate must be cleaned, inspected and repaired or replaced in accordance with the component manufacturer's instructions at engine overhaul. See section 1-5, "Related Publications." 7-3 CLEANING 1. In order to thoroughly inspect the exhaust system, components must be clean and free of carbon, oil, grease, and any other material. Use a suitable solvent (such as Stoddard solvent), apply by spraying, allow solvent to drain and wipe dry with a clean cloth. CAUTION… Never use flammable solvents, wire brushes or abrasive to clean exhaust systems and never use a lead pencil to mark any exhaust system component. 7-4 INSPECTION Inspection of the complete exhaust system must be accomplished at overhaul. The entire exhaust must be cleaned and visually inspected for condition and leaks using the following procedure. 1. Visual Inspection - Stacks, Risers, Elbows Inspect these components for burned areas, corrosion, erosion, cracks and looseness using a 10X magnifying glass. Exhaust system components exhibiting erosion, corrosion or that are less than the required thickness must be replaced with new. During this inspection examine the condition of welded areas and seams for cracks. Any exhaust system component that is cracked must be discarded. Visually inspect slipjoints for bulging and cracks. See Figure 7-1. "Slipjoints." FIGURE 7-1 SLIPJOINT ASSEMBLY 7-2 Chapter 7 1. The "V" band clamps must be replaced at engine overhaul. Discard "V" band clamps. 7-5 EXHAUST SYSTEM REPAIR AND REPLACEMENT 1. Welding of exhaust system components is not permissible. Any components found to be malfunctioning must be replaced. 7-6 EXHAUST SYSTEM COMPONENT SUB-ASSEMBLY 1. Using new gasket (33), install oil inlet adapter (34) on turbocharger (21) and secure with two bolts (36) and new lockwashers (35). Torque bolts (36) to 155-175 inch pounds. 2. Using new gasket (29), install oil outlet adapter (30) on turbocharger (21) and secure with two bolts (32) and new lockwashers (31). Torque bolts (36) to 220-260 inch pounds. 3. Install bushing (52) and fittings (51, 56). 4. Using new o-rings (62, 66), install fittings (63, 67) in wastegate assembly (38). 5. Store all exhaust system components in a clean protected area until final engine assembly. 7-3 Chapter 7 INTENTIONALLY LEFT BLANK 7-4 Chapter 8 CHAPTER 8 IGNITION SYSTEM SECTION 8-1 8-2 8-3 8-4 8-5 8-6 8-7 8-8 PAGE Magneto Drive Gear Disassembly ............................................. 8-2 Magneto Overhaul ...................................................................... 8-2 Magneto Drive Gear Cleaning.................................................... 8-2 Magneto Drive Gear Inspection ................................................. 8-2 Magneto Drive Gear Disassembly.............................................. 8-4 Magnetic Particle Inspection ...................................................... 8-4 Magneto Drive Gear Assembly .................................................. 8-4 Ignition System sub-assembly ................................................... 8-5 FIGURE 8-1 8-2 8-3 PAGE Gear Tooth Profile ...................................................................... 8-3 Magneto Drive Gear Assembly .................................................. 8-4 Needle Bearing Installation ........................................................ 8-5 8-1 Chapter 8 8-1 MAGNETO DRIVE GEAR DISASSEMBLY (See Figure 8-1.) 1. Remove both magneto drive gear assemblies: 2. Reach into the accessory case magneto openings and carefully slide each magneto drive gear assembly out. 3. Separate rubber drive bushings (6), retainers (7) and drive gears (8). Discard rubber drive bushings (6). 8-2 MAGNETO OVERHAUL 1. Discard all ignition system parts listed in Section 5-6, "100% Replacement Parts." 2. Magneto assemblies must be overhauled in accordance with the magneto manufacturer's instructions. For TCM magnetos, see TCM Ignition Systems Master Service Manual, Form No. X40000. For Slick ignition components, see Slick Ignition Systems Master Service Manual, Index and Order Form Number F-1100. See Section 1-5, "Related Publications," for ordering information. 8-3 MAGNETO DRIVE GEAR CLEANING Clean the magneto drive gear assemblies using mineral spirits solvent or by immersion in an alkaline 8-2 stripping bath if mineral spirit solvent is not effective. After cleaning with alkaline solution, the gears must be sprayed with steam to remove all traces of alkaline. After steam rinsing, the gears must be thoroughly flushed with mineral spirits solvent. Insure that the magneto drive gear lubrication holes are clear and unobstructed. CAUTION... Alkaline cleaning solutions will cause corrosion on metals if not completely removed. WARNING Do not pressure blast gears with an abrasive media. Blasting will remove surface hardening. 8-4 MAGNETO DRIVE GEAR INSPECTION Inspect the magneto drive gear teeth for signs of overheating and excessive wear. Normal wear produces a fine polish on the tooth thrust faces. Gears that have alteration of the tooth profiles, score marks, burning, pitting, nicks, burrs or corrosion must be discarded. See Figure 8-1, “Gear Tooth Inspection,” for acceptable and unacceptable gear tooth wear. FIGURE 8-1. GEAR TOOTH INSPECTION 8-3 Chapter 8 FIGURE 8-2. MAGNETO DRIVE GEAR ASSEMBLY 8-5 MAGNETO DRIVE GEAR DISASSEMBLY See Figure 8-3. Place each of the drive gear assemblies (one at the time) on bearing/thrust washer removal fixture with the sleeve end up. Center the drive gear and removal fixture under the removal tool and arbor press. Press the thrust washer and needle bearing out of the drive gear. Do not remove sleeve from the drive gear. Discard the removed thrust washer and needle bearing. Inspect the drive gear inside diameter. Drive gears with inside diameters exceeding 1.1244 - 1.1255 must be discarded. Drive gears with loose sleeves must be discarded. Drive gear assemblies with any damage resulting during the disassembly procedure must be discarded. 8-6 MAGNETIC PARTICLE INSPECTION Magneto drive gears and drive bushing retainers must be inspected by a certified technician in accordance 8-4 with Section 5-9, "Magnetic Particle Inspection." Magneto drive gears that exhibit cracks, must be discarded. 8-7 MAGNETO DRIVE GEAR ASSEMBLY Clean the magneto drive gears in accordance with Section 8-3. Using the proper size installation tool install a new thrust washer in each of the the magneto drive gear assemblies as specified in Figure 8-3. The thrust washer must be seated against the sleeve. See Figure 8-3, "Needle Bearing Installation." Using an arbor press and an installation tool conforming with the specifications in Figure 8-3, install a new needle bearing into each of the magneto drive gear assemblies to the location specified in Figure 8-2. Clean the magneto drive gears in accordance with Section 8-3. Drive gear assemblies with any damage resulting during the assembly procedure must be discarded. Chapter 8 FIGURE 8-3. NEEDLE BEARING INSTALLATION 8-8 IGNITION SYSTEM SUB-ASSEMBLY 1. Magneto assemblies must be sub-assembled in accordance with the magneto manufacturer's instructions. For TCM magnetos, see TCM Ignition Systems Master Service Manual, Form No. X40000. For Slick ignition components, see Slick Ignition Systems Master Service Manual, Index and Order Form Number F-1100. See Section 1-5, "Related Publications," for ordering information. 2. The magneto drive gear assemblies and magnetos will be installed on the engine during final engine assembly. Store all components in a clean protected area until final engine assembly. 8-5 Chapter 8 INTENTIONALLY LEFT BLANK 8-6 Chapter 9 CHAPTER 9 FUEL INJECTION SYSTEM SECTION PAGE 9-1 Fuel Injection System Component Disassembly........................ 9-2 Fuel Manifold Valve................................................................... 9-2 Fuel Pump ................................................................................... 9-3 Air Throttle Adapter ................................................................... 9-4 Fuel Nozzles................................................................................ 9-6 9-2 Fuel Injection System Cleaning.................................................. 9-6 9-3 Fuel Injection System Inspection ............................................... 9-7 9-4 Fuel Injection System Repair And Replacement ....................... 9-9 9-5 Fuel Injection System Sub-assembly.......................................... 9-9 FIGURE PAGE 9-1 Fuel Manifold Valve Fitting Orientation.................................... 9-2 9-2 Fuel Pump Fitting Locations ...................................................... 9-3 9-3 Air Throttle Adapter, Fuel Servo, Controller And Overboost Valve ................................................................. 9-5 9-4 Fuel Nozzle ................................................................................. 9-6 9-5 Fuel Pump Drive Coupling Fits And Limits .............................. 9-8 9-6 General Lever Bushing Replacement......................................... 9-9 9-7 General F/I Sealant Application ................................................. 9-10 9-8 Link Rod Assembly .................................................................... 9-11 9-1 Chapter 9 9-1 FUEL INJECTION SYSTEM COMPONENT DISASSEMBLY FUEL MANIFOLD VALVE 1. See Figure 9-1, "Fuel Manifold Valve Fitting Orientation." Remove fittings "A" through "C." 2. The fuel manifold valve must be overhauled in accordance with TCM Fuel Injection Systems Overhaul Manual and Parts Catalog, Form X30593A. See Section 1-5, "Related Publications," for ordering information. Teledyne Continental Motors offers factory rebuilt fuel injection system components at exchange prices as an alternative to field overhaul of these units. FIGURE 9-1. FUEL PUMP FITTING LOCATIONS 9-2 ENGINE MODEL Fitting "A" FUEL INLET L/TSI0-360-RB 45° Elbow @ (135°) Fitting "B" Metered Fuel Press. Conn Plug Fitting "C" Manifold Vent 90° Elbow @ (225°) Chapter 9 FUEL PUMP 1. See Figure 9-2, "Fuel Pump Fitting Locations." Remove fittings "A" through "D." 2. The fuel pump must be overhauled in accordance with TCM Fuel Injection Systems Overhaul Manual and Parts Catalog, Form X30593A. See Section 1-5, "Related Publications," for ordering information. Teledyne Continental Motors offers factory rebuilt fuel injection system components at exchange prices as an alternative to field overhaul of these units. FIGURE 9-2. FUEL PUMP FITTING LOCATIONS ENGINE MODEL L/TSI0-360-RB FITTING "A" Inlet 90° Elbow @ 180° FITTING "B" Outlet 90° Elbow @ 180° FITTING "C" Seal Drain Straight Fitting FITTING "D" Air Reference 90° Elbow @ 90° 9-3 Chapter 9 AIR THROTTLE ADAPTER 1. See Figure 9-3, "Adapter, Fuel Servo, Controller & Overboost Valve." Remove controller (7) from air throttle adapter assembly (1): a. Cut and remove lockwire. b. Record rod end position on rod and link assembly by counting exposed threads of nut (16). Remove nut (16) from rod and link assembly (13). c. Remove cotter pin (12) and plain washer (10) from rod end (15). Discard cotter pin (12). d. Remove wave washer (11), rod end (15), and spring (14) from rod and link assembly (13). Discard wave washer (11) and spring (14). e. Remove rod and link assembly (13) by removing cotter pin (12), plain washer (10), and wave washer (11). Discard cotter pin (12) and wave washer (11). f. Remove swaged lever pin (28) from lever (29) and remove lever from the controller (2). Discard pin (28). g. Remove four phillips head screws (6), four lock washers (5), and four washers (4). Discard lock washers (5). h. Remove controller (2) from air throttle adapter assembly (1). 9-4 I. Discard controller gasket (3). j. The turbocharger controller assembly must be overhauled in accordance with the Airesearch Overhaul Manual for Aircraft System Valves and Controllers. See Section 1-5, "Related Publications," for ordering information. 2. See Figure 9-3, "Adapter, Fuel Servo, Controller & Overboost Valve." Remove overboost valve (22) from air throttle adapter assembly (1): a. Cut and remove lockwire. b. Remove four phillips head screws (26), four plain washers (24), and four lock washers (25). Discard lock washers (25). c. Remove overboost valve assembly (22) from air throttle adapter (1). d. Discard "O"ring seal (23). e. The overboost valve must be overhauled in accordance with the Airesearch Overhaul Manual for Aircraft System Valves and Controllers. See Section 1-5, "Related Publications," for ordering information. 3. See Figure 9-3, "Adapter, Fuel Servo, Controller & Overboost Valve." Remove fuel servo assembly (2) from air throttle adapter assembly (1): a. Remove cap screws (6), four plain washers (4), and four lock washers (5). Discard lock washers (5). b. The fuel servo assembly must be overhauled in accordance with Precision Fuel System Manuals, Form 15-338, RSA5 Operator and Service Manual and Form 15-900, RSA5AD2 Overhaul Instructions. See Section 1-5, "Related Publications," for ordering information. 4. See Figure 6-3, "Fuel Injection System." Remove magneto pressure fittings (30, 31) and air reference tube fittings (29) from air throttle adapter (28). Chapter 9 FIGURE 9-3. AIR THROTTLE ADAPTER, FUEL SERVO, CONTROLLER AND OVERBOOST VALVE 9-5 Chapter 9 FUEL NOZZLES NOTE… 1. The fuel nozzles must be overhauled in accordance with TCM Fuel Injection Systems Overhaul Manual and Parts Catalog, Form X30593A. See Section 1-5, "Related Publications," for ordering information. Further disassembly of the fuel injection system components is not advised unless the proper flow test equipment is available. Teledyne Continental Motors offers factory rebuilt fuel injection system components at exchange prices as an alternative to field overhaul of these units. FIGURE 9-4. FUEL NOZZLE 9-2 FUEL INJECTION SYSTEM CLEANING All fuel injection system components and associated hardware must be cleaned in accordance with the instructions in Section 5-7, "General Cleaning," and the following special instructions: 1. All gaskets, packings, o-rings, seals, self locking nuts, wave washers, cotter pins and lock washers removed from the fuel injection system and components must be replaced 100% at overhaul. Cleaning these parts is not required. 2. The fuel pump, fuel manifold valve and fuel nozzles must be cleaned, inspected, overhauled and tested in accordance with the instructions in TCM Fuel Injection Systems Overhaul and Parts 9-6 Catalog, Form X30593A, unless factory rebuilt units are purchased for replacement. 3. The fuel servo assembly must be cleaned, inspected, overhauled and tested in accordance with Precision Fuel System instructions. See Section 1-5, "Related Publications," for ordering information. 9-3 FUEL INJECTION SYSTEM INSPECTION VISUAL INSPECTION The visual inspection must be performed in accordance with the instructions in Section 5-8, "Visual Inspection". Special attention must be given to the following components and areas: 1. Visually inspect all fuel injection system plumbing for cracks, dents, chafing, flared ends for cracks, out of roundness. Inspect fittings for distorted or stripped threads and damaged wrench flats. Components exhibiting any of the above indications must be discarded. FLUORESCENT PENETRANT INSPECTION Fluorescent penetrant inspection must be performed on applicable aluminum alloy fuel injection system components by a certified technician in accordance with the instructions in Section 5-12, "Fluorescent Penetrant Inspection." 2. Inspect brackets as applicable for cracks, dents and wear. Inspect hardware for distorted, stripped threads and damaged wrench flats. Components exhibiting any of the above indications must be discarded. During overhaul of fuel injection system components in accordance with Form X30593A all aluminum alloy parts such as fuel pump body, vapor separator, manifold valve body, air throttle adapter body, covers and flanges must be fluorescent penetrant inspected by a certified technician in accordance with Section 5-12, "Fluorescent Penetrant Inspection," of this manual. Any components exhibiting cracks must be discarded. 3. Visually inspect the fuel pump, manifold valve and fuel nozzle outside areas for evidence of wear, deterioration and leakage. Inspect tapped holes and helical coils for distorted or stripped threads. Inspect for cracks and dents. Further inspection of the fuel pump, manifold valve, nozzles and fuel metering unit must be performed in accordance with the instructions in TCM Fuel Injection Systems Overhaul and Parts Catalog, Form X30593A. MAGNETIC PARTICLE INSPECTION The fuel pump drive shaft must be magnetic particle inspected by a certified technician in accordance with the instructions in Section 5-9, "Magnetic Particle Inspection." Any components exhibiting cracks must be discarded. 9-7 Chapter 9 DIMENSIONAL INSPECTION The following new parts limits must be used for dimensional inspection. Components that do not meet the following specifications must be discarded. All components must be thoroughly cleaned and air dried prior to dimensional inspection. REF. NO 1. 2. 3. 4. 5. 6. 7. 8. DESCRIPTION FUEL PUMP DRIVE Fuel pump adapter pilot in crankcase................................................... diameter: Fuel pump body pilot in adapter .......................................................... diameter: Oil seal in adapter ................................................................................. diameter: Fuel pump drive shaft in impeller shaft ............................................... diameter: Fuel pump drive shaft in governor gear ............................................... clearance: Governor driven gear in crankcase....................................................... diameter: Governor driven gear bore in crankcase .............................................. diameter: Governor drive gear to camshaft gear .................................................. backlash: NEW PARTS MIN. MAX. 0.001L 0.0005L 0.003T 0.002L 0.0015 0.0014L 0.875 0.002 FIGURE 9-5. FUEL PUMP DRIVE COUPLING FITS AND LIMITS 9-8 0.005L 0.0045L 0.009T 0.008L 0.0039 0.0034L 0.876 0.012 Chapter 9 9-4 FUEL INJECTION SYSTEM REPAIR AND REPLACEMENT Any fuel injection system component worn beyond new parts limits or failing to meet the inspection criteria in Section 9-3 must be replaced unless repair is possible with the following instructions: 1. Any fuel system brackets, hardware, plumbing or shafts found to have any of the discrepancies listed in Section 9-3 must be replaced. 2. The turbocharger controller lever bushing must be replaced during engine overhaul. Place the lever bushing over a ring that will allow the bushing to pass through. Using the correct size tool and an arbor press, remove the old bushing. Inspect the lever bushing bore for a diameter of .249 - .251. Discard levers that exceed the specified dimension. Using the correct size tool and an arbor press, install the new bushing in accordance with the specifications in Figure 9-7. The lever and bushing must have a press fit of .007T to .013T. 3. Replace all fuel injection system parts listed in Section 5-6, "100% Replacement Parts." 4. Section 5-19, "Application Of Accelagold," applies to all aluminum alloy castings, sheet metal and tubing. 9-5 FUEL INJECTION SYSTEM SUB-ASSEMBLY NOTE… All fuel injection system components must be overhauled or new, clean and free of debris before assembly. The fuel pump, fuel manifold valve and fuel nozzles must be new, factory rebuilt or field overhauled and tested in accordance with TCM Form X30593A Fuel Injection Systems Overhaul and Parts Catalog. NOTE… Before reinstallation of fuel system component fittings insure they are free of any debris by screwing them into the proper size holes of a softwood block then thoroughly flushing them with an approved solvent. WARNING Never use Teflon tape on fuel injection component fittings. 1. See Figure 9-1. Sparingly apply TCM 646940 F/I sealant on fittings that have male tapered pipe threads in accordance with Figure 9-7, "General F/I Sealant Application." Install fittings “A” through “C” into fuel manifold valve at the proper locations and correct orientations. 2. See Figure 9-2. Sparingly apply TCM 646940 F/I sealant on fittings that have male tapered pipe threads in accordance with Figure 9-8, "General F/I Sealant Application." Install fittings “A” through “D” into fuel pump at the proper locations and correct orientation. 3. See Figure 6-3. Sparingly apply TCM 646940 F/I sealant on fittings that have male tapered pipe threads in accordance with Figure 9-8, "General F/I Sealant Application." Install fittings (29, 30 and 31) into air throttle adapter ((28). FIGURE 9-6. GENERAL LEVER BUSHING REPLACEMENT 9-9 4. See Figure 9-3, "Air Throttle Adapter, Fuel Servo, Controller And Overboost Valve." Install fuel servo assembly (1): 5. Install new gasket (3) and fuel servo assembly (2) on air throttle adapter (1) using four screws (6), four new lock washers (5), and four plain washers (4). The .88 inch long screws go in the lower holes and the .75 inch long screws go in the upper holes. Torque screws (6) to 75 - 85 inch pounds. 6. See Figure 9-3, "Air Throttle Adapter, Fuel Servo, Controller And Overboost Valve." Install new o-ring seal (23) and overboost valve (22) on air throttle adapter assembly (1). Secure overboost valve using four 10-24 screws (26), four new lock washers (25), and four plain washers (24). Torque screws (26) to 21 - 25 inch pounds. Safety wire screws (26) in accordance with Section 4-2, "Lockwire Procedure." 7. Install lever assembly on controller (29): a. Install lever (29) on controller (2) shaft. b. Install new lever pin (28) through lever (29) and through controller shaft. Swage pin on both ends using a swage fixture, pin punch and ball peen hammer. FIGURE 9-7. GENERAL F/I SEALANT APPLICATION 9-10 Chapter 9 8. See Figure 9-3, "Air Throttle Adapter, Fuel Servo, Controller And Overboost Valve." Install turbocharger controller (7): a. Install new controller gasket (17) and controller and lever assembly (7) on air throttle adapter assembly (1) with four screws (18), four new lock washers (19) and four plain washers (20). Torque screws (18) to 21 - 25 inch pounds. Safety wire screws (18) in accordance with Section 4-2, "Lockwire Procedure." 9. See Figures 9-3 and 9-8. Install rod and link assembly (13): a. Assemble new spring (14) on rod and link assembly (13) and insert end through rod end (15). Install new self-locking nut (16) on threaded end of (13). Adjust rod and link assembly to original length as recorded. b. Lubricate rod pin using Shell #5 or Lubriplate #630AA or equivalent. Assemble one new wave washer (11) on rod end (15). c. Insert rod end (11) through lever (29) and bushing (31). Attach rod end (15) using plain washer (10) and new cotter pin (12). d. Assemble one new wave washer (11) on free end of rod & link assembly (13). e. Insert free end of rod and link assembly (13) into hole on throttle control arm of fuel servo assembly. f. Install one plain washer (10) and one new cotter pin (12). g. Store all fuel injection components in a clean protected area until final engine assembly. FIGURE 9-8. LINK ROD ASSEMBLY 9-11 Chapter 9 INTENTIONALLY LEFT BLANK 9-12 Chapter 10 CHAPTER 10 INDUCTION SYSTEM SECTION 10-1 10-2 10-3 10-4 10-5 PAGE Aftercooler Disassembly .................................................10-3 Induction System Cleaning .............................................10-3 Induction System Inspection...........................................10-3 Induction System Component Repair And Replacement ................................................10-3 Induction System Sub-assembly .....................................10-3 10-1 Chapter 10 INTENTIONALLY LEFT BLANK 10-2 Chapter 10 10-1 AFTERCOOLER DISASSEMBLY 1. See Figure 6-4, “Induction System.” Loosen clamps (25, 23) and remove hoses (21, 24, 32) and tube (22) from aftercooler (26). Discard hoses (21, 24, 32). Remove three nuts (30), three lock washers (29) and separate bracket (27) from aftercooler (26). Remove three vibration damper mounts (28) from aftercooler assembly and discard. 10-2 INDUCTION SYSTEM CLEANING All induction system components and associated hardware must be cleaned in accordance with the instructions in Section 5-7, "General Cleaning," and the following special instructions: threads. Inspect the aftercooler anchor nuts for distorted or stripped threads. 4. Inspect the aftercooler mount bracket for cracks, bending and corrosion. Discard aftercooler mount brackets exhibiting any of these indications. 5. Inspect all induction system clamps for cracks, corrosion and damaged screw threads. The screw mechanism must operate without any binding. Inspect the clamp for broken/loose rivets or spot welds. Clamps exhibiting any of the above conditions must be discarded. FLUORESCENT PENETRANT INSPECTION Fluorescent penetrant inspection must be performed by a certified technician on all aluminum alloy induction system components in accordance with the instructions in Section 5-12, "Fluorescent Penetrant Inspection." All gaskets, hoses, lock washers and self locking nuts removed from the induction system and components must be replaced 100% at overhaul. Cleaning these part is not required. 10-4 INDUCTION SYSTEM COMPONENT REPAIR AND REPLACEMENT 10-3 INDUCTION SYSTEM INSPECTION Any induction system component worn beyond new parts limits or failing to meet the inspection criteria in Section 10-3 must be replaced. VISUAL INSPECTION The visual inspection must be performed in accordance with the instructions in Section 5-8, "Visual Inspection" and the following: 1. Visually inspect induction tubes, risers and intake manifold for cracks, dents and chafing. Check tube ends and flanges on a surface plate for warpage and out of roundness. Components exhibiting cracks, dents, chafing, warpage or out of roundness must be discarded. 2. Inspect all areas of the aftercooler especially welded areas for cracks using a 10X magnifying glass. Inspect the aftercooler for signs of leaks. Inspect the aftercooler core for bent or cracked fins. 3. Inspect tapped holes and helical coils in the intake manifold and aftercooler for distorted or stripped 1. There are no structural repairs allowed to the aftercooler assembly. Aftercoolers with structural damage, bent, broken or cracked cooling fins must be replaced with a new or serviceable aftercooler. Weld repairs to the mounting flange brackets may be accomplished by a certified repair facility. 2. Section 5-19, "Application Of Accelagold," applies to all aluminum alloy castings, sheet metal and tubing. 10-5 INDUCTION SYSTEM SUB-ASSEMBLY (See Figure 6-4.) Apply a small amount of TCM P/N 646439 adhesive on the aftercooler end of vibration damper mounts (28) and install in aftercooler (26). 10-3 Chapter 10 INTENTIONALLY LEFT BLANK 10-4 Chapter 11 CHAPTER 11 AIR CONDITIONING SECTION 11-1 11-2 11-3 11-4 11-5 FIGURE 11-1 11-2A 11-2B 11-2C 11-3 11-4 11-5 PAGE Starter Motor, Starter Adapter And Accessory Drive Adapter Disassembly .......................................... 11-2 Compressor Mounting Components, Starter And Starter Adapter Cleaning ........................... 11-2 Compressor Brackets, Starter And Starter Adapter Inspection ........................................................ 11-3 Compressor Mounting Component, Starter And Starter Adapter Repair And Replacement..................... 11-8 Compressor Mounting Component, Starter And Starter Adapter Sub-assembly TSI0-360-RB ............... 11-12 PAGE Starter Adapter Stud Setting Heights............................ 11-4 Starter Adapter Fits & Limits ....................................... 11-6 Shaftgear Drum Dimensions......................................... 11-7 Worm Wheel Drum Dimensions .................................. 11-7 Starter Adapter Needle Bearing Installer...................... 11-9 Accessory Drive Adapter Cover Needle Bearing Installation ....................................................... 11-11 Accessory Drive Housing Threading Procedure .......... 11-13 11-1 Chapter 11 11-1 STARTER MOTOR, STARTER ADAPTER AND ACCESSORY DRIVE ADAPTER DISASSEMBLY STARTER MOTOR 1. The starter motor assembly must be overhauled in accordance with the manufacturer's instructions. See TCM Form X30592 for TCM starters. See Section 1-6, "Related Publications," for ordering information. STARTER ADAPTER DRIVE ADAPTER AND ACCESSORY 2. See Figure 6-5, Compressor Mounting Components, Starter and Starter Drive Adapter. NOTE… Do not clamp adapter housing in vise. 3. Place the starter shaft gear in a shielded vise. Remove retaining ring (11) using snap ring pliers. Discard retaining ring (11). See Figure 13-1, "Starter Adapter Disassembly Tools" and Figure 6-5. Insert worm shaft tool into the worm shaft slot and rotate the shaft counterclockwise to break bearing (9) loose from the housing. Remove the entire shaft assembly (8 through 10) from the housing. Remove retaining ring (10). Separate bearing (9) and shaft assembly (8). Discard retaining ring (10) and bearing (9). It may be necessary to use an arbor press to remove ball bearing (9) from shaft (8). Remove bolt (60), washer (59) and drive sheave (58). 4. Separate accessory drive adapter (33) from starter adapter (2). Cut and remove lockwire from screws (25). Remove screws (25), washers (24), scavenge pump cover assembly (22, 23), bushing (20), gear (19) and gear (21). Scavenge pump covers and scavenge pump cover bushings with indications of wear must be discarded. Remove and discard woodruff key (27). Remove and discard o-ring (18). Remove attaching hardware, covers and gaskets (50 through 54, 65 through 67) and bracket (62). Discard gaskets (50). Using snap ring pliers disengage retaining (47) and slide it back on shaft (44). Press shaft (44) through left accessory drive pad opening. As shaft is pressed out, retaining ring (47) and gear (48) will fall free inside accessory drive adapter for removal. 11-2 Discard retaining ring (47). Key (45) must be removed from shaft (44) and discarded. 5. Remove oil seals (35, 36). Bushings (37, 38) must be removed using an arbor press. Remove gear (46) and bushing (32). Remove gear (49), bearings (55) and oil seal (56) from cover (57). Discard bearings (55) and oil seal (56). 6. Remove shaft gear and worm wheel assembly from starter adapter housing. Clamp starter shaft gear teeth in shielded vise jaws. Rotate the worm gear in a clockwise direction, at the same time pull axially on the shaft gear to separate it from the worm wheel and spring. Remove starter shaft gear from the vise. 7. Clamp gear (13) in shielded vise. Remove spring retaining screw (16) and tab washer (15). Discard tab washer (15). Place a straight slot screwdriver through a hole in the worm wheel (13) to catch the end of spring (14). Rotate spring (14) clockwise to release it from the land in the worm wheel gear. Separate spring (14) from worm gear (13). 8. Use a slide hammer and Borrough's 8093C Bearing Puller or equivalent to remove needle bearing (7) from housing (2). 11-2 COMPRESSOR MOUNTING COMPONENTS, STARTER AND STARTER ADAPTER CLEANING All starter adapter components and associated hardware must be cleaned in accordance with the instructions in Section 5-7, "General Cleaning," and the following special instructions: 1. All bearings, sleeves, spacers, springs, gaskets, o-rings, oil seals, lock washers, tab lock washers, retainers, self locking nuts and the starter clutch spring removed from the starter adapter must be replaced 100% at overhaul. Cleaning of these parts is not required. 2. The starter adapter housing cavities and oil passages must be flushed with mineral spirit solvent. 3. If the starter adapter or accessory drive housing is immersed in an alkaline bath, when removed, it must be sprayed with steam removing all traces of alkaline. After the housing dries inspect for any alkaline residues and if necessary re-spray with steam until all alkaline is removed. The housing exterior, cavities and all oil passages must be thoroughly flushed with mineral spirit solvent after any alkaline cleaning process has been used. CAUTION… Alkaline cleaning solutions will cause corrosion to metals if not completely removed. 5. Clean the compressor mounting brackets, starter sheave, scavenge pump cover and worm shaft using mineral spirit solvent. 6. Clean gears that have bushings using mineral spirit solvent and a brass wire brush. Gears with bushings must not be cleaned using alkaline solutions. Gears that do not have bushings can be cleaned using mineral spirit solvent or by immersion in a alkaline stripping bath if mineral spirit solvent is not effective. After cleaning with alkaline solution the gears must be sprayed with steam removing all traces of alkaline. After steam rinsing the gears must be thoroughly flushed with mineral spirit solvent. CAUTION… Alkaline cleaning solutions will cause corrosion to metals if not completely removed. WARNING Do not pressure blast gears with an abrasive media. Blasting will remove surface hardening. 11-3 COMPRESSOR BRACKETS, STARTER AND STARTER ADAPTER INSPECTION VISUAL INSPECTION The starter adapter, accessory drive adapter and compressor mounting components must be visually inspected in accordance with instructions in Section 5-8, "Visual Inspection." and the following areas: 1. The starter motor assembly must be overhauled in accordance with the starter manufacturer's instructions. See TCM Form X30592 for TCM starters. See Section 1-6, "Related Publications," for ordering information. 2. Using a flashlight and a 10X magnifying glass, visually inspect the exterior and the cavity of the starter and accessory drive adapter housings for cracks. Housings exhibiting cracks must be discarded. Inspect the starter adapter cover and scavenge pump cover for cracks. Adapter covers and scavenge pump covers exhibiting cracks must be discarded. Housing and cover oil passages must be clear and free flowing. Housings and covers with clogged oil passages that cannot be opened must be discarded. Inspect all oil passages for restrictions. Inspect all compressor mounting components for cracks. Compressor mounting components exhibiting cracks must be discarded. 3. Inspect the shaft gear, worm wheel gear and worm gear teeth for signs of overheating and excessive wear. Normal wear produces a fine polish on the tooth thrust faces. Gears that have alteration of the tooth profiles, score marks, burning or pitting must be discarded. See Figure 8-1, “Gear Tooth Inspection,” for acceptable and unacceptable gear tooth wear. See Figure 8-1, “Gear Tooth Inspection,” for acceptable and unacceptable gear tooth wear. 4. Inspect all nuts, bolts and screws for distorted or stripped threads, corrosion and bending. Discard any hardware exhibiting the above conditions. 5. Inspect the starter adapter housing studs for distorted or stripped threads. Inspect studs for corrosion, pitting, incomplete threads and looseness. Replace studs with any of these indications. Check studs with a tool makers square for alignment. The starter adapter housing studs must have their setting heights checked for indications of backing out. See the following for stud setting heights. 11-3 Chapter 11 ITEM NO 1. 2. 3. 4. 5. 6. LOCATION THREAD SIZE Stud, Starter Accessory Adapter to Starter Adapter Stud, Starter Motor to Starter Adapter Stud, Starter Motor to Starter Adapter Dowel, Starter Adapter to Crankcase Stud, Gearshaft Housing to Accessory Adapter Dowel, Gearshaft Housing to Accessory Adapter 5/16-18 X 5/16-24 X 1.25 3/8 - 16 X 3/8 - 24 X 1.53 3/8 - 16 X 3/8 - 24 X 1.75 ---1/4 - 20 X 1/4 - 28 X 1.56 ---- SETTING HEIGHT 1.30 1.00 1.22 .17 1.03 .27 QTY. 1 1 1 2 4 2 FIGURE 11-1. STARTER ADAPTER STUD SETTING HEIGHTS FLUORESCENT PENETRANT INSPECTION Aluminum alloy components such as the starter adapter housing, accessory drive adapter and gearshaft housing must be fluorescent penetrant inspected by a certified technician in accordance with Section 5-12, "Fluorescent Penetrant Inspection." Housings or covers exhibiting cracks must be discarded. 11-5 MAGNETIC PARTICLE INSPECTION The shaft gear, worm shaft, worm gear, bevel gears and drive shaft must be magnetic particle inspected by a certified technician in accordance with instructions in Section 5-9, "Magnetic Particle Inspection." Gears or shafts exhibiting cracks must be discarded. Chapter 11 DIMENSIONAL INSPECTION The following new parts limits must be used for dimensional inspection. Components that do not meet the following specifications must be discarded. All components must be thoroughly cleaned and air dried prior to dimensional inspection. REF. NO 1. 2. 3. 4. 5. 6. 7. 8. 9. 10. 11. 12. 13. 14. 15. 16. 17. 18. 19. 20. 21. 22. 23. 24. 25. 26. 27. 28. 29. 30. 31. 32. 33. 34. 35. 36. 37. 38. 39. DESCRIPTION Starter shaftgear in bushing ............................................................ Diameter: Starter shaftgear front (bearing) journal ......................................... Diameter: Starter shaftgear in needle bearing ................................................. Diameter: Starter shaftgear in accessory drive adapter bushing ..................... Diameter: Bushing in adapter cover ................................................................ Diameter: Gearshaft housing oil seal bore ...................................................... Diameter: Starter adapter cover pilot in adapter housing................................ Diameter: Worm wheel gear....................................................................End Clearance: Worm wheel drum outside ............................................................. Diameter: Clutch spring on Starter Shaftgear drum .50-.56 from drum end .......................................................... Diameter: Starter shaftgear drum..................................................................... Diameter: Starter clutch spring outside ........................................................... Diameter: Starter clutch spring inside ............................................................. Diameter: Needle bearing bore ........................................................................ Diameter: Clutch spring on worm wheel drum ............................................... Diameter: From center line of worm gearshaft to starter adapter thrust pads ...........................................................................: Worm gearshaft in ball bearing ...................................................... Diameter: Ball bearing in starter adapter housing........................................... Diameter: Starter pilot to starter drive adapter ................................................ Diameter: Starter drive tongue to worm shaft drive slot .........................Side Clearance: Needle bearing to worm gear shaft................................................. Diameter: Worm gearshaft............................................................................... Diameter: Starter gear to crankshaft gear Backlash: Starter worm wheel gear and worm shaft gear............................... Backlash: Scavenge pump driven gear on shaft.............................................. Diameter: Scavenge pump gears in adapter .................................................... Diameter: Scavenge pump drive gear on starter shaftgear.............................. Diameter: Scavenge pump driven gear to drive gear ...................................... Backlash: R/H side accessory drive bushing in adapter ................................. Diameter: R/H accessory drive shaft end in bushing ...................................... Diameter: L/H side accessory drive bushing in adapter.................................. Diameter: L/H accessory drive shaft end in bushing ...................................... Diameter: Driver bevel gear on shaftgear........................................................ Diameter: Accessory drive shaft...................................................................... Diameter: Accessory drive shaft...................................................................... Diameter: Accessory drive shaft...................................................................... Diameter: Driven bevel gear inside ................................................................. Diameter: R/H oil seal bore ............................................................................. Diameter: L/H oil seal bore.............................................................................. Diameter: NEW PARTS MIN. MAX. 0.001L 0.003L 1.059 1.060 0.0005L 0.0029L 0.0005L 0.002L 0.003T 0.005T 1.574 1.576 0.001L 0.003L 0.0025L 0.0115L See Figure 11-2B 0.008T 0.012T See Figure 11-2C Replace 100% Replace 100% .7485 .7495 0.015T 0.022T 0.252 0.0004T 0.0004L 0.001L 0.001T 0.001L 0.0065L 0.010L 0.021L 0.0005L 0.0029L 0.5620 0.5626 0.008 0.012 0.009 0.013 0.0005L 0.0025L 0.0055L 0.0080L 0.0002L 0.0017L 0.014 0.0218 0.002T 0.004T 0.001L 0.003L 0.002T 0.004T 0.001L 0.003L 0.0017L 0.002L 1.0600 1.0610 .9360 .9370 .8100 .8110 .9370 .9380 1.249 1.251 1.500 1.502 11-5 Chapter 11 REF. NO 40. 41. 42. DESCRIPTION Driven and driver bevel gears .........................................................Backlash: Gearshaft housing bearing bore.......................................................Diameter: Sheave gearshaft .............................................................................Diameter: FIGURE 11-2A. STARTER ADAPTER FITS & LIMITS 11-6 NEW PARTS MIN. MAX. 0.004 0.006 1.0610 1.0620 0.8120 0.8125 Chapter 11 FIGURE 11-2B. SHAFTGEAR DRUM DIMENSIONS DESCRIPTION “A" DIAMETER MIN. MAX. 1.948 1.950 1.933 1.935 New Shaftgear Drum 0.015 Undersize "B" DIAMETER MIN. MAX. 1.9365 1.9385 1.9215 1.9235 FIGURE 11-2C. WORM WHEEL DRUM DIMENSIONS DESCRIPTION New Worm Wheel Drum 0.015 Undersize “A" DIAMETER MIN. MAX. 1.9365 1.9385 1.9215 1.9235 "B" DIAMETER MIN. MAX. 1.955 1.960 1.940 1.945 11-7 Chapter 11 NEW PARTS DIMENSIONS PART NAME Starter Worm Drive Shaft Starter Shaft Gear Starter Clutch Drum Scavenge Pump Starter Clutch Spring FEATURE Diameter Needle bearing hole in starter adapter diameter Front journal diameter Drum diameter Clutch drum spring support diameter Inside diameter Cover Inside diameter Outside diameter Inside diameter 11-4 COMPRESSOR MOUNTING COMPONENT, STARTER AND STARTER ADAPTER REPAIR AND REPLACEMENT Any starter or starter adapter component found to be worn beyond new parts limits or failing to meet the inspection criteria in Section 11-3 must be replaced unless repair is possible with the following instructions: Starter adapter housings, accessory drive adapter housings, adapter covers, shaft gears, worm wheel gears, worm gears, worm gear shafts or accessory drive shafts exhibiting cracks must be discarded and replaced. Accessory mount brackets exhibiting cracks must be discarded and replaced. Scavenge pump covers worn beyond specifications must be discarded 11-8 NEW DIMENSIONS (INCHES) 0.5620 - 0.5626 0.7485 - 0.7495 1.059 - 1.060 1.9348 - 1.9385 1.9365 - 1.9385 1.3115 - 1.3125 1.2485 - 1.2495 2.267 - 2.282 1.938 - 1.940 and replaced. Accessory drive sheaves with any indications of wear must be discarded and replaced. Scavenge pump gears with any indications of wear must be discarded and replaced. The starter adapter housing worm shaft needle bearing must be replaced using the following procedure and special tools: 1. Arbor Press. 2. TCM Starter Adapter Housing Needle Bearing Installer or equivalent. See Figure 11-3. See Figure 6-4, "Compressor Mounting Components, Starter And Starter Adapter Assembly (TSI0-360-RB)." Using the specified tools install a new needle bearing (7) into the starter adapter housing. Press the new bearing in until it is 0.03 thousandths of an inch below inner surface. Chapter 11 FIGURE 11-3. STARTER ADAPTER NEEDLE BEARING INSTALLER 11-9 Chapter 11 FIGURE 11-3. STARTER ADAPTER NEEDLE BEARING INSTALLER (continued) 11-10 Chapter 11 FIGURE 11-4. ACCESSORY DRIVE ADAPTER COVER NEEDLE BEARING INSTALLATION Using a blind bearing puller, remove needle bearing (23) from scavenge pump cover (22) and discard. Using an arbor press and an installation tool conforming with the specifications in Figure 11-4, "Scavenge Pump Cover Needle bearing Installation," install a new needle bearing (23) in scavenge pump cover (22) to the required specifications. discard. Using the same tools, install a new roller bearing (12) in worm wheel (22). Using an arbor press and proper size tool, remove roller bearing (12) from worm wheel (13) and Section 5-19,"Application Of Accelagold," applies to all aluminum alloy castings, sheet metal and tubing. Any studs found to be damaged or loose must be replaced in accordance with the instructions in Section 5-22. See Figure 11-1," Starter Adapter Stud Setting Heights," for proper stud setting heights. 11-11 Chapter 11 11-5 COMPRESSOR MOUNTING COMPONENT, STARTER AND STARTER ADAPTER SUB-ASSEMBLY TSI0-360-RB 1. See Figure 6-4, "Compressor brackets, Starter And Starter Adapter TSI0-360-RB." Press new bearing (9) onto worm shaft and gear assembly (8). Press bearing until seated against flange. Install new retaining ring (10). Coat worm gear teeth using clean Molyshield grease. Insert assembly into adapter housing and install new retaining ring (11). Insure that retaining rings are properly seated. 2. Install new clutch spring (14) on worm wheel (13). Turn spring so it tends to unwind until offset end drops into the worm wheel gear land. Position spring on gear so screw notch is aligned with screw hole in gear web. Install new tab washer (15) and screw (16). Torque screw (16) to 75.0-85.0 inch pounds torque, and bend tab up against screw head. 3. Lubricate spring and shaft gear liberally with clean 50 weight aviation engine oil. Press worm wheel and spring assembly onto shaft gear (17). Insert shaft gear and worm wheel assembly into adapter. Make sure worm wheel and worm gear teeth are aligned. 4. Using an arbor press install new bushings (32, 37 and 38) in accessory drive adapter (33). Apply TCM Gasket Maker to the outside diameter of new uncoated oil seals. Install new oil seals (35, 36) in accessory drive adapter (33). Clean accessory drive adapter removing any debris. Lubricate bushings and oil seals with clean 50 weight aviation engine oil. Lubricate new or serviceable scavenge pump gears (19, 21) shafts, ends and teeth with clean Molyshield grease. Lubricate the scavenge pump housing and cover gear contact areas using clean Molyshield grease. Install scavenge gears (19, 21) in accessory drive adapter (33). Install new or serviceable scavenge pump cover (22) on accessory drive adapter (33) and secure using washers (24) and screws (25). Torque screws (25) to 75-85 inch pounds and 11-12 lockwire in accordance with Section 4-2. Insure that gears (19, 21) rotate freely. 5. Install bracket (63), lifting eye (64), new lock washers (69), washers (68) and bolts (71, 73) on accessory drive adapter (33). Center scavenge pump gear (21) inside accessory drive adapter (33). Using new o-ring (18), install accessory drive adapter on starter adapter housing and insure that shaftgear (17) has completely engaged scavenge pump gear (21). As the accessory drive adapter is installed insure bolts (71, 73) line up and slide through starter adapter housing. Secure the brackets, lifting eye and accessory drive adapter to the starter adapter housing using washer (68), new lockwasher (69) and nut (72). Snug but do not torque nut (69) at this time. Coat bevel gear teeth with clean Molyshield grease. Using a new woodruff key (27), install bevel gear (46) on end of shaftgear (17) inside of accessory drive adapter (33). Position gear (48) inside accessory drive adapter. Using a new square key (45), install drive shaft (44) in accessory drive adapter (33). Insure that shaft (44) properly engages bevel gear (48) and that key (45) is properly positioned. Install a new retaining ring (47) on shaft (44) and insure that it is properly seated. Inspect bevel gears for a backlash of .004 to .006. 6. Apply TCM Gasket Maker to the outside diameter of new uncoated oil seals. Install new oil seal (56) and new bearings (55) in accessory drive housing (57). Lubricate bevel gear (49) with clean 50 weight aviation engine oil. Install bevel gear (49) in accessory drive cover (57). Apply Permatex and silk thread to accessory drive housing flange (57) in accordance with Figure 11-5, "Accessory Drive Housing Threading Procedure." Install accessory drive housing (57) on accessory drive adapter and secure using washers (65) and nuts (66).Torque nuts (66) to 75-85 inch pounds. Install bracket (62) on accessory drive housing (57) and secure Chapter 11 using washers(65) and nuts (67). Torque nuts (67) to 75-85 inch pounds and lockwire in accordance with Section 4-2. Install drive sheave (58) using washer (59) and bolt (60). Place the starter shaft gear in a shielded vise and torque bolt (60) to 600-650 inch pounds. NOTE… 7. Install new gaskets (50), covers ((51) and secure using washers (52), new lock washers (53) and nuts (54). Torque nuts (54) to 75-85 inch pounds. 8. Store the compressor mounting components, starter and starter adapter in a clean protected area until final engine assembly. Bolt (60) threads are left hand. FIGURE 11-5. ACCESSORY DRIVE HOUSING THREADING PROCEDURE 11-13 Chapter 11 INTENTIONALLY LEFT BLANK 11-14 Chapter 12 CHAPTER 12 ELECTRICAL CHARGING SYSTEM SECTION 12-1 12-2 12-3 12-4 12-5 12-6 12-7 12-8 12-9 12-10 PAGE Belt Driven Alternator Disassembly................................................ 12-2 Electrical Charging System Component Cleaning .......................... 12-2 Electrical Charging System Component Inspection........................ 12-2 Electrical Charging System Component Replacement.................... 12-2 Electrical Charging System Component Sub Assembly ................. 12-2 Direct Drive Alternator Removal..................................................... 12-3 Electrical Charging System Component Cleaning .......................... 12-3 Electrical Charging System Component Inspection........................ 12-3 Electrical Charging System Component Replacement.................... 12-5 Electrical Charging System Component Sub Assembly ................. 12-5 FIGURE 12-1 12-2 12-3 PAGE One Piece Coupling.......................................................................... 12-4 Slippage Inspection Tool.................................................................. 12-4 Alternator Drive Component Assembly .......................................... 12-6 12-1 Chapter 12 12-1 BELT DRIVEN ALTERNATOR DISASSEMBLY 1. The alternator assembly must be overhauled in accordance with the alternator manufacturer's instructions. 12-2 ELECTRICAL CHARGING SYSTEM COMPONENT CLEANING The alternator mount bracket, adjusting bracket and associated hardware must be cleaned in accordance with the instructions in Section 5-7, "General Cleaning," and the following special instructions: 1. All lock washers and self locking nuts removed from the electrical charging system must be replaced 100% at overhaul. Cleaning of these parts is not required. 12-3 ELECTRICAL CHARGING SYSTEM COMPONENT INSPECTION VISUAL INSPECTION The visual inspection must be performed in accordance with the instructions in Section 5-8, "Visual Inspection," and the following: 1. Inspect all nuts, bolts and screws for distorted or stripped threads, corrosion and bending. Discard any hardware exhibiting the above conditions. FLUORESCENT PENETRANT INSPECTION The alternator mount bracket and adjusting bracket must be thoroughly cleaned prior to fluorescent penetrant inspection. All oil and preservative material must be removed. The alternator mount bracket and adjusting bracket must be fluorescent penetrant inspected by a certified technician in accordance with Section 5-12, "Fluorescent Penetrant Inspection." Cracks in the brackets are not acceptable or repairable. Alternator mount or adjusting brackets that exhibit cracks or indications of cracks must be discarded. 12-2 MAGNETIC PARTICLE INSPECTION The alternator pivot bolt must be magnetic particle inspected by a certified technician in accordance with the instructions in Section 5-9, "Magnetic Particle Inspection." Cracked pivot bolts must be discarded. 12-4 ELECTRICAL CHARGING SYSTEM COMPONENT REPAIR AND REPLACEMENT Any electrical charging system component failing to meet the inspection criteria in Section 12-3 must be replaced unless repair is possible with the following instructions: 1. Any electrical charging system hardware found to have any of the discrepancies listed in Section 12-3 must be replaced. 2. Replace all electrical charging system parts listed in Section 5-6, "100% Replacement Parts." 3. Section 5-19, "Application Of Accelagold," applies to all aluminum alloy castings, sheet metal and tubing. 12-5 ELECTRICAL CHARGING SYSTEM SUB-ASSEMBLY Note…All electrical charging system components must be clean and free of debris before assembly. 1. After the alternator has been properly overhauled, store it in a clean protected area along with its associated components until final engine assembly. Chapter 12 NOTE… The following information is for L/TSI0-360-RB engines that utilize a direct drive alternator. 12-6 DIRECT DRIVE ALTERNATOR DISASSEMBLY (See Figure 6-7.) 1. Remove cotter pin (7) and nut (6). Remove gear hub assembly from alternator shaft. Remove and discard woodruff key (8). 2. Using a blind oil seal puller remove and discard oil seal (9). 3. Remove and discard o-ring (10). 4. The alternator assembly must be overhauled in accordance with the alternator manufacturer's instructions. 12-7 ELECTRICAL CHARGING SYSTEM COMPONENT CLEANING All electrical charging system components and associated hardware must be cleaned in accordance with the instructions in Section 5-7, "General Cleaning," and the following special instructions: 1. All gaskets, o-rings, oil seals, lock washers, woodruff keys and self-locking nuts removed from the electrical charging system must be replaced 100% at overhaul. Cleaning these parts is not required. 2. Clean gears that have bushings using mineral spirit solvent and a brass wire brush. Gears with bushings must not be cleaned using alkaline solutions. Gears that do not have bushings can be cleaned using mineral spirit solvent or by immersion in an alkaline stripping bath if mineral spirit solvent is not effective. After cleaning with alkaline solution the gears must be sprayed with steam removing all traces of alkaline. After steam rinsing, the gears must be thoroughly flushed with mineral spirit solvent. CAUTION… Alkaline cleaning solutions will cause corrosion to metals if not completely removed. WARNING Do not pressure blast gears with an abrasive media. Blasting will remove surface hardening. 12-8 ELECTRICAL CHARGING SYSTEM COMPONENT INSPECTION VISUAL INSPECTION The visual inspection must be performed in accordance with the instructions in Section 5-8, "Visual Inspection." Special attention must be given to the following components and areas: Drive Hub 1. Inspect gear teeth for signs of overheating and excessive wear. Normal wear produces a fine polish on the tooth thrust faces. Gears that have alteration of the tooth profiles, score marks, burning or pitting must be discarded. See Figure 8-1, “Gear Tooth Inspection,” for acceptable and unacceptable gear tooth wear. FLUORESCENT PENETRANT INSPECTION Fluorescent penetrant inspection must be performed on all aluminum alloy electrical charging system components by a certified technician in accordance with instructions in Section 5-12, "Fluorescent Penetrant Inspection." Any components exhibiting cracks must be discarded. MAGNETIC PARTICLE INSPECTION The alternator drive hub (gear) assembly must be magnetic particle inspected by a certified technician in accordance with the instructions in Section 5-9, "Magnetic Particle Inspection." Drive hubs exhibiting cracks must be discarded. 12-3 Chapter 12 ALTERNATOR DRIVE HUB INSPECTION (See Figures 12-1 and 12-2.) 1. The P/N 635796 single piece coupling is designed to slip when abnormal torque is required to rotate the alternator/generator. This can prevent internal engine damage in the event of an alternator/generator seizure. Inspect this coupling for shearing or tearing of the elastomeric (rubber) element. Replace coupling if damage is observed. The following test must be performed at engine overhaul or when slippage is suspected. a. With the coupling removed from the alternator/generator, place the coupling body in the protected jaws of a vise. b. Figure 12-2 provides necessary dimensions to produce a tool for checking coupling slippage torque. c. Install the tool over the coupling gear and apply 100 inch pounds of torque. No slippage can occur at or below 100 inch pounds of torque. Replace couplings that fail this test. FIGURE 12-1. ONE PIECE COUPLING FIGURE 12-2. SLIPPAGE INSPECTION TOOL 12-4 12-9 ELECTRICAL CHARGING SYSTEM COMPONENT REPAIR AND REPLACEMENT Any electrical charging system component failing to meet the inspection criteria in Section 12-3 must be replaced unless repair is possible with the following instructions: 1. Repair and replacement procedures for the alternator assembly must be performed in accordance with the alternator manufacturer's instructions. 2. Replace all electrical charging system parts listed in Section 5-6, "100% Replacement Parts." 3. Place the toothed portion of drive hub gear in shielded vise jaws and tighten vise only enough to prevent rotation during torquing of nut. Using a currently calibrated torque wrench, torque the P/N 530412 nut to 175 inch pounds. Torque may be increased to a maximum of 200 inch pounds to align castellated nut with the cotter pin hole. If alignment cannot be achieved with torque between 175 - 200 inch pounds, replace nut. Do not over or under torque! Install new P/N MS24665-151 cotter pin and secure in accordance with Section 4-4, "Cotter Pin Procedure." 4. Store the alternator and attaching hardware in a clean protected area until final engine assembly. 3. Section 5-19, "Application Of Accelagold," applies to all aluminum alloy castings, sheet metal and tubing. 12-10 ELECTRICAL CHARGING SYSTEM COMPONENT SUB-ASSEMBLY NOTE… All electrical charging system components must be clean and free of debris before assembly. 1. See Figure 6-7. Install a new oil seal (9) in alternator (4) using an arbor press and a tool conforming with the specifications in Figure 12-3. 2. See Figure 6-7. Lubricate o-ring (10) with clean 50 weight aviation engine oil. Install a new o-ring (10) on alternator shaft. 12-5 Chapter 12 FIGURE 12-3. ALTERNATOR DRIVE COUPLING COMPONENT ASSEMBLY 12-6 Chapter 13 CHAPTER 13 STARTING SYSTEM SECTION 13-1 13-2 13-3 13-4 13-5 13-6 13-7 FIGURE 13-1 13-2 13-3 PAGE Starter And Starter Adapter Disassembly............. 13-2 Starter Motor Overhaul......................................... 13-3 Starter And Starter Adapter Cleaning................... 13-3 Starter And Starter Adapter Inspection ................ 13-4 Starter And Starter Adapter Repair And Replacement.................................................. 13-8 Optional Starter And Starter Adapter Sub-assembly TSI0-360-RB................................. 13-8 Starter And Starter Adapter Sub-assembly LTSI0-360-RB .............................. 13-9 PAGE Starter Adapter Disassembly Tools ...................... 13-2 Starter Adapter Stud Setting Heights.................... 13-5 Starter Adapter Fits & Limits .............................. 13-7 NOTE… See Chapter 11 for TSI0-360-RB Standard Starter Adapter And Freon Compressor Mounting Equipment. 13-1 Chapter 13 13-1 STARTER ADAPTER DISASSEMBLY OPTIONAL STARTER AND STARTER ADAPTER DISASSEMBLY TSI0-360-RB (SEE FIGURE 6-8) 1. Place the starter shaft gear in a shielded vise. Remove retaining ring (11) using snap ring pliers. Insert worm shaft tool into the worm shaft slot and rotate the shaft counterclockwise to break bearing (9) loose from the housing. Remove the entire shaft assembly (8 through 10) from the housing. Remove retaining ring (10). Separate bearing (9) and shaft assembly (8). Discard retaining rings (10, 11) and bearing (9). It may be necessary to use an arbor press to remove ball bearing (9) from shaft (8). 2. Separate cover (19) from adapter housing (2). Cover (19) may require a few taps with a soft mallet to remove. 3. Cut and remove lockwire from screws (33). Remove screws (33), washers (32), scavenge pump cover assembly (29), gear (25), bushing (26) and gear (27). Remove and discard woodruff key (28). Scavenge pump covers and scavenge pump cover bushings with indications of wear must be discarded. Remove and discard o-ring (18). 4. Use an arbor press and proper size tool to remove bushing (20) and oil seal (21) from cover (19). 5. Remove shaft gear and worm wheel assembly from adapter housing. Clamp starter shaft gear teeth in shielded vise jaws. Rotate the worm gear in a clockwise direction, at the same time pull axially on the shaft gear to separate it from the worm wheel and spring. Remove starter shaft gear from the vise. 6. Clamp worm wheel gear (13) in shielded vise. Remove spring retaining screw (16) and tab washer (15). Place a straight slot screwdriver through a hole in the worm wheel (13) to catch the end of spring (14). Rotate spring (14) clockwise to release it from the land in the worm wheel gear. Separate spring (14) from worm wheel gear (13). Remove roller bearing (12) from worm wheel gear (13). 7. Use a slide hammer and Borrough's 8093C Bearing Puller or equivalent to remove needle bearing (7) from housing (2). FIGURE 13-1. STARTER ADAPTER DISASSEMBLY TOOLS 13-2 Chapter 13 STARTER AND STARTER ADAPTER DISASSEMBLY LTSI0-360-RB (SEE FIGURE 69) 1. Place the starter shaft gear in a shielded vise. Remove retaining ring (14) using snap ring pliers. Insert worm shaft tool into the worm shaft slot and rotate the shaft counterclockwise to break bearing (13) loose from the housing. Remove the entire shaft assembly (8 through 12) from the housing. Remove pin (12), bushing (11) and separate shaft (8), Gear (10) and woodruff key (9). Discard woodruff key (9). Separate bearing (13) and shaft assembly (8). It may be necessary to use an arbor press to remove ball bearing (13) from shaft (8). Discard retaining ring (14) and bearing (13). 2. Separate cover (22) from adapter housing (2). Cover (22) may require a few taps with a soft mallet to remove. 3. Cut and remove lockwire from screws (35). Remove screws (35), washers (34), scavenge pump cover assembly (31), gear (27), bushing (28) and gear (29). Remove and discard woodruff key (30). Scavenge pump covers and scavenge pump cover bushings with indications of wear must be discarded. Remove and discard o-ring (21). 4. Use an arbor press and proper size tool to remove bushing (23) and oil seal (24) from cover (22). 5. Remove shaft gear and worm wheel assembly from adapter housing. Clamp starter shaft gear teeth in shielded vise jaws. Rotate the worm gear in a counterclockwise direction, at the same time pull axially on the shaft gear to separate it from the worm wheel and spring. Remove starter shaft gear from the vise. 6. Clamp worm wheel gear (16) in shielded vise. Remove spring retaining screw (19) and tab washer (18). Place a straight slot screwdriver through a hole in the worm wheel (16) to catch the end of spring (17). Rotate spring (17) counterclockwise to release it from the land in the worm wheel gear. Separate spring (17) from worm wheel gear (16). Remove roller bearing (15) from worm wheel gear (16). 7. Use a slide hammer and Borrough's 8093C Bearing Puller or equivalent to remove needle bearing (7) from housing (2). 13-2 STARTER MOTOR OVERHAUL The starter motor assembly must be overhauled in accordance with the manufacturer's instructions. See TCM Form X30592 for TCM starters. See Section 1-6, "Related Publications," for ordering information. 13-3 STARTER AND STARTER ADAPTER CLEANING All starter adapter components and associated hardware must be cleaned in accordance with the instructions in Section 5-7, "General Cleaning," and the following special instructions: 1. All bushings, bearings, sleeves, spacers, springs, gaskets, o-rings, oil seals, lock washers, tab lock washers, retainers, self locking nuts and the starter clutch spring removed from the starter adapter must be replaced 100% at overhaul. Cleaning of these parts is not required. 2. The starter adapter housing and scavenge pump housing cavities and oil passages must be flushed with mineral spirit solvent. 3. If the starter adapter housing or scavenge pump housing are immersed in an alkaline bath, when removed, they must be sprayed with steam removing all traces of alkaline. After the housing dries inspect it for any alkaline residues and if necessary re-spray with steam to remove. The housing exterior, cavities and all oil passages must be thoroughly flushed with mineral spirit solvent after any alkaline cleaning process has been used. CAUTION… Alkaline cleaning solutions will cause corrosion to metals if not completely removed. 4. Clean the starter sheave, scavenge pump cover and worm shaft using mineral spirit solvent. 5. Clean gears that have bushings using mineral spirit solvent and a brass wire brush. Gears with bushings must not be cleaned using alkaline solutions. Gears that do not have bushings can be 6. cleaned using mineral spirit solvent or by immersion in a alkaline stripping bath if mineral spirit solvent is not effective. After cleaning with alkaline solution the gears must be sprayed with 13-3 Chapter 13 steam removing all traces of alkaline. After steam rinsing the gears must be thoroughly flushed with mineral spirit solvent. CAUTION… Alkaline cleaning solutions will cause corrosion to metals if not completely removed. WARNING Do not pressure blast gears with an abrasive media. Blasting will remove surface hardening. 13-4 STARTER AND STARTER ADAPTER INSPECTION VISUAL INSPECTION The starter adapter components must be visually inspected in accordance with instructions in Section 5-8, "Visual Inspection." Special attention must be given to the following components and areas: 1. Using a flashlight and a 10X magnifying glass visually inspect the exterior and the cavity of the starter adapter housing and scavenge pump housing for cracks. Housings exhibiting cracks must be discarded. Using a flashlight and a 10X 13-4 magnifying glass visually inspect the scavenge pump cover and bushing. Scavenge pump covers and bushings exhibiting any indications of wear must be discarded and replaced. Inspect the starter adapter covers for cracks. Adapter covers exhibiting cracks must be discarded. Inspect all oil passages for restrictions. Housing oil passages must be clear and free flowing. Housings with clogged oil passages that cannot be opened must be discarded. 2. Inspect the shaft gear, worm wheel gear and worm gear teeth for signs of overheating and excessive wear. Normal wear produces a fine polish on the tooth thrust faces. Gears that have alteration of the tooth profiles, score marks, burning or pitting must be discarded. See Figure 8-1. “Gear Tooth Wear,” for acceptable and unacceptable gear tooth wear. 3. Inspect the starter adapter housing and scavenge pump housing studs for distorted or stripped threads. Inspect studs for corrosion, pitting, incomplete threads and looseness. Replace studs with any of these indications. Check studs with a tool makers square for alignment. The starter adapter housing studs must have their setting heights checked for indications of backing out. See the following for stud setting heights. Chapter 13 ITEM LOCATION NO 1. Stud,, Starter Accessory Adapter to Starter Adapter 2. Stud,, Starter Motor to Starter Adapter 3. Stud,, Starter Motor to Starter Adapter 4. Dowel,, Starter Adapter to Crankcase 5. Stud,, Cover to Scavenge Pump Housing 6. Stud,, Cover to Scavenge Pump Housing FLUORESCENT PENETRANT INSPECTION THREAD SIZE 5/16-18 X 5/16-24 X 1.25 3/8 - 16 X 3/8 - 24 X 1.53 3/8 - 16 X 3/8 - 24 X 1.75 ---1/4 - 20 X 1/4 - 28 X 1.19 1/4 - 20 X 1/4 - 28 X 1.12 SETTING HEIGHT .78 1.00 1.22 .17 .69 .62 QTY. 1 1 1 2 4 4 FIGURE 13-2. STARTER ADAPTER STUD SETTING HEIGHTS Aluminum alloy components such as the starter adapter housing and scavenge pump housing must be fluorescent penetrant inspected by a certified technician in accordance with Section 5-12, "Fluorescent Penetrant Inspection." Housings or covers exhibiting cracks must be discarded. MAGNETIC PARTICLE INSPECTION The shaft gear, worm shaft and worm gear must be magnetic particle inspected by a certified technician in accordance with instructions in Section 5-9, "Magnetic Particle Inspection." Gears or shafts exhibiting cracks must be discarded. 13-5 Chapter 13 DIMENSIONAL INSPECTION The following new parts limits must be used for dimensional inspection. Components that do not meet the following specifications must be discarded. All components must be thoroughly cleaned and air dried prior to dimensional inspection. STARTER AND STARTER ADAPTER FITS & LIMITS REF. NO 1. 2. 3. 4. 5. 6. 7. 8. 9. 10. 11. 12. 13. 14. 15. 16. 17. 18. 19. 20. 21. 22. 23. 24. 25. 26. 27. 28. 29. 30. 31. 32. 13-6 DESCRIPTION Starter shaftgear in bushing.............................................................................. Diameter: Starter shaftgear front (bearing) journal............................................................ Diameter: Starter shaftgear in needle bearing .................................................................. Diameter: Scavenge pump gear shaft in cover bushing ................................................... Diameter: Bushing in adapter cover .................................................................................. Diameter: Adapter cover oil seal bore ............................................................................... Diameter: Starter adapter Cover Pilot In Adapter Housing ............................................... Diameter: Worm wheel gear.....................................................................................End Clearance: Clutch spring on Starter Shaftgear drum .50-.56 from drum end ...................................................................................... Diameter: Starter shaftgear drum...................................................................................... Diameter: Starter clutch spring outside ............................................................................. Diameter: Starter clutch spring inside................................................................................ Diameter: Clutch spring on worm wheel drum .................................................................. Diameter: Worm wheel drum outside................................................................................ Diameter: Worm wheel drum inside .................................................................................. Diameter: From center line of worm gearshaft to starter adapter thrust pads.............................................................................................: Needle bearing bore ......................................................................................... Diameter: Starter worm drive shaft.................................................................................... Diameter: Ball bearing in starter adapter........................................................................... Diameter: Worm gearshaft in ball bearing......................................................................... Diameter: Starter pilot to starter drive adapter .................................................................. Diameter: Starter drive tongue to worm shaft drive slot .........................................Side Clearance: Needle bearing to worm gear shaft................................................................... Diameter: Starter gear to crankshaft gear......................................................................... Backlash: Starter worm wheel gear and worm gear ......................................................... Backlash: Scavenge pump driven gear on shaft............................................................... Diameter: Scavenge pump drive gear in adapter.............................................................. Diameter: Scavenge pump gears in adapter..................................................................... Diameter: Scavenge pump gears in adapter............................................................End Clearance: Scavenge pump drive gear in starter shaftgear................................................ Diameter: Starter shaftgear in scavenge pump cover....................................................... Diameter: Starter shaftgear rear journal............................................................................ Diameter: Scavenge pump driven gear to drive gear........................................................ Backlash: NEW PARTS MIN. MAX 0.001L 0.003L 1.059 1.060 0.0005L 0.0029L 0.0005L 0.0035L 0.001T 0.003T 1.249 1.251 0.001L 0.003L 0.0025 0.0115 0.008T 0.012T See Figure 11-2B Replace 100% Replace 100% 0.015T 0.022T See Figure 11-2C 1.3115 1.3125 0.252 0.7485 0.7495 0.5620 0.5626 0.001L 0.001T 0.0004T 0.0004L 0.001L 0.0065L 0.010L 0.021L 0.0005L 0.0029L 0.008 0.012 0.009 0.013 0.0005L 0.0025L 0.0005L 0.0025L 0.0055L 0.0080L 0.0010 0.0035 0.0010L 0.0030L 0.0005L 0.0025L 0.9995 1.0000 0.0140 0.0218 Chapter 13 FIGURE 13-3. STARTER ADAPTER FITS AND LIMITS 13-7 Chapter 13 PART NAME Starter Worm Drive Shaft Starter Shaft Gear Starter Clutch Drum Starter Clutch Spring NEW PARTS DIMENSIONS FEATURE Diameter Needle bearing hole in starter adapter diameter Front journal diameter Drum diameter Clutch drum spring support diameter Inside diameter Outside diameter Inside diameter 13-5 STARTER AND STARTER ADAPTER REPAIR AND REPLACEMENT Any starter or starter adapter component found to be worn beyond new parts limits or failing to meet the inspection criteria in Section 13-4 must be replaced unless repair is possible with the following instructions: The starter motor assembly must be overhauled in accordance with the manufacturer's instructions. See TCM Form X30592 for TCM starters. See Section 1-5, "Related Publications," for ordering information. Starter adapter housings, scavenge pump housings, adapter covers, shaft gears, worm wheel gears, worm gears, worm gear shafts or accessory drive shafts exhibiting cracks must be discarded and replaced. Accessory mount brackets and lifting eyes exhibiting cracks must be discarded and replaced. Scavenge pump covers and bushings with any indications of wear must be discarded and replaced. Accessory drive sheaves with any indications of wear must be discarded and replaced. Scavenge pump gears with any indications of wear must be discarded and replaced. The starter adapter housing worm shaft needle bearing must be replaced using the following procedure and special tools: 1. Arbor Press. 2. TCM Starter Adapter Housing Roller Bearing Installer or equivalent. See Figure 11-3 ,"Starter Adapter Needle Bearing Installer." Using the specified tools install a new roller bearing (7) into the starter adapter housing. Press the 13-8 NEW DIMENSIONS (INCHES) 0.5620 - 0.5626 0.7485 - 0.7495 1.059 - 1.080 1.9348 - 1.9385 1.9365 - 1.9385 1.3115 - 1.3125 2.267 - 2.282 1.938 - 1.940 new bearing in until it is 0.03 thousandths of an inch below inner surface. Any studs found to be damaged or loose must be replaced in accordance with the instructions in Section 5-22. See Figure 13-2," Starter Adapter Stud Setting Heights," for proper stud setting heights. Section 5-19,"Application Of Accelagold," applies to all aluminum alloy castings, sheet metal and tubing. 13-6 OPTIONAL STARTER AND STARTER ADAPTER SUB-ASSEMBLY TSI0-360-RB 1. See Figure 6-8, "Optional Starter And Starter Adapter TSI0-360-RB." Press new bearing (9) onto worm shaft and gear assembly (8). Press bearing until seated against flange. Install new retaining ring (10). Coat the worm gear teeth with clean molyshield grease. Insert assembly into adapter housing and install new retaining ring (11). Insure that retaining rings are properly seated. 2. Install a new roller bearing (12) in worm wheel gear (13). Install new clutch spring (14) on worm wheel (13). Turn spring so it tends to unwind until offset end drops into the worm wheel gear land. Position spring on gear so screw notch is aligned with screw hole in gear web. Install new tab washer (15) and screw (16). Torque screw (16) to 75.0-85.0 inch pounds torque, and bend tab up against screw head. 3. Lubricate spring and shaft gear liberally with clean 50 weight aviation engine oil that conforms with MIL-C-6529 Type ll specification. Press worm wheel and spring assembly onto shaft gear (17). Insert shaft gear and worm wheel assembly into adapter. Make sure worm wheel and worm gear teeth are aligned. 4. Apply TCM Gasket Maker to the outside diameter of new uncoated oil seals. Using an arbor press install new bushing (20) and oil seal (21) in scavenge pump body (19). Clean scavenge pump body removing any debris. Lubricate bushing and oil seal with clean 50 weight aviation engine oil. Lubricate new or serviceable scavenge pump gear shafts, ends and teeth (25, 27) with clean molyshield grease. Lubricate the scavenge pump housing and cover gear contact areas using clean molyshield grease. Install scavenge gears (25, 27) in scavenge pump body (19). Install new or serviceable scavenge pump cover (29) on scavenge pump body (19) and secure using washers (32) and screws (33). Torque screws (33) to 75-85 inch pounds and lockwire in accordance with Section 4-2. Insure that gears (25, 27) rotate freely. 5. Center scavenge pump gear (27) inside scavenge pump body (19). Using new o-ring (18), install scavenge pump body (19) on starter adapter housing and insure that shaftgear (17) has properly aligned with scavenge pump gear (27). Install lifting eye (51) and secure using washers (35), new lock washer (36) and nut (37). Snug but do not torque nut (37) at this time. 6. Using new gasket (38), install cover (39) and secure using washers (40), new lock washers (41) and nuts (42). Torque nuts (42) to 75-85 inch pounds torque. 7. Store the starter and starter adapter in a clean protected area until final engine assembly. 13-8 STARTER AND STARTER ADAPTER SUB-ASSEMBLY LTSI0-360-RB 1. See Figure 6-9, "Starter And Starter Adapter LTSI0-360-RB." Press new bearing (13) onto worm shaft (8). Press bearing until seated against flange. Using new woodruff key (9) install gear (10) on worm shaft (8). Install bushing (11) and new pin (12) on worm shaft (8). Coat the worm gear teeth with clean molyshield grease. Insert assembly into adapter housing and install new retaining ring (14). Insure that retaining ring is properly seated. 2. Install a new roller bearing (15) in worm wheel gear (16). Install new clutch spring (17) on worm wheel (16). Turn spring so it tends to unwind until offset end drops into the worm wheel gear land. Position spring on gear so screw notch is aligned with screw hole in gear web. Install new tab washer (18) and screw (19). Torque screw (19) to 75.0-85.0 inch pounds torque, and bend tab up against screw head. 3. Lubricate spring and shaft gear liberally with clean 50 weight aviation engine oil. Press worm wheel and spring assembly onto shaft gear (20). Insert shaft gear and worm wheel assembly into adapter. Make sure worm wheel and worm gear teeth are aligned. 4. Apply TCM Gasket Maker to the outside diameter of new uncoated oil seals. Using an arbor press install new bushing (23) and oil seal (24) in scavenge pump body (22). Clean scavenge pump body removing any debris. Lubricate bushing and oil seal with clean 50 weight aviation engine oil. Lubricate new or serviceable scavenge pump gear shafts, ends and teeth (27, 29) with clean molyshield grease. Lubricate the scavenge pump housing and cover gear contact areas using clean molyshield grease. Install scavenge gears (27, 29) in scavenge pump body (22). Install new or serviceable scavenge pump cover (31) on scavenge pump body (22) and secure using washers (34) and screws (35). orque screws (35) to 75-85 inch pounds and lockwire in accordance with Section 4-2. Insure that gears (27, 29) rotate freely. 13-9 Chapter 13 5. Center scavenge pump gear (29) inside scavenge pump body (22). Using new o-ring (21), install scavenge pump body (22) on starter adapter housing and insure that shaftgear (20) has properly aligned with scavenge pump gear (29). Install lifting eye (55) and secure using washers (50, 37), new lock washer (38) and nut (39). Snug but do not torque nut (39) at this time. 13-10 6. Using new gasket (40), install cover (41) and secure using washers (42), new lock washers (43) and nuts (44). Torque nuts (44) to 75-85 inch pounds torque. 7. Store the starter and starter adapter in a clean protected area until final engine assembly. Chapter 14 CHAPTER 14 ACCESSORY CASE SECTION 14-1 14-2 14-3 14-4 14-5 14-6 PAGE Accessory Case Disassembly........................................ 14-2 Oil Pump Removal ........................................................ 14-2 Accessory Case Cleaning.............................................. 14-2 Accessory Case and Associated Parts Inspection......... 14-2 Accessory Case Repair and Replacement..................... 14-6 Accessory Case Sub-Assembly .................................... 14-6 FIGURE 14-4 14-5 PAGE Accessory Case Stud Setting Heights ........................... 14-4 Oil Pressure Relief Valve Fits and Limits .................... 14-5 14-1 Chapter 14 14-1 ACCESSORY CASE DISASSEMBLY (See Figures 6-10 and 6-10A.) 1. All gaskets, lock washers and self-locking nuts removed from the accessory case must be replaced 100% at overhaul. Cleaning these parts is not required. 1. Remove attaching hardware (29, 30, 31). Remove oil filter and oil filter adapter (25, 28) from accessory case (2). Remove fitting (27) from oil filter adapter ((25). Cut and remove safety wire (6) and separate oil filter (28) from oil filter adapter (25). Remove o-ring (24) from oil filter adapter ((25) and discard. Discard oil filter (28) and lock washers (29). Remove gasket (23) from accessory case (2) and discard. 2. The accessory case oil passages must be flushed with mineral spirit solvent and inspected with a flashlight. 2. Cut and remove safety wire (6). Loosen and remove oil pressure relief valve cap (11), adjusting screw (12), washer (13, Nut (14), gasket (10), spring (9) and plunger (8). Discard gasket (10) and spring (9). 3. Cut and remove safety wire (6). Loosen and remove screen (22) and gasket (21). Discard gasket (22). 4. Cut and remove safety wire (6). Loosen and remove plugs (5) and gaskets (4). Discard gaskets (4). 5. Remove attaching hardware (18, 19, 20). Remove cover and gasket (17, 16). Discard gasket (16). 14-2 OIL PUMP REMOVAL (See Figures 6-10, 6-10A and 6-11.) 1. See Figures (6-10 and 6-10A). Remove Nut (15) from oil pump drive gear. See Figure (6-11). Remove oil pump drive gear (8). Bend tabs of tab washers (6) down. Remove bolts (7). Discard tab washers (6). 2. Separate cover (5) from oil pump cavity and remove oil pump gears (2 and 4). 14-3 ACCESSORY CASE CLEANING The accessory case must be cleaned in accordance with the instructions in Section 5-7, "General Cleaning," and the following special instructions: 14-2 3. If the accessory case casting is immersed in an alkaline bath, it must be sprayed with steam to remove all traces of alkaline. After the casting dries, inspect it for any alkaline residues. If necessary, re-spray with steam to remove remaining residue. The accessory case and all oil passages must be thoroughly flushed with mineral spirit solvent after any alkaline cleaning process has been used. CAUTION… Alkaline cleaning solutions will cause corrosion to metals if not completely removed. 14-4 ACCESSORY CASE AND ASSOCIATED PARTS INSPECTION VISUAL INSPECTION The accessory case and associated components must be visually inspected in accordance with instructions in Section 5-8, "Visual Inspection," and the following special instructions: 1. Visually inspect the inside and outside of the accessory case for cracks. Pay particular attention to areas on and adjacent to accessory mount flanges, case flange, oil pump cavity and oil pressure relief valve boss. Look for scoring in the oil pump cavity and shaft bores. Visually inspect all machined surfaces for nicks and roughness. Inspect the accessory case mounting flange on a surface plate for warpage. Inspect the oil pump driven gear shaft for security and wear. Accessory cases with loose or worn oil pump driven gear shafts must be replaced. Chapter 14 2. Inspect all oil passages for restrictions. Accessory cases with restricted oil pump housing oil passages that cannot be cleared by solvent action must be discarded. Inspect the oil pump housing gear shaft for scoring. Housings with scored gear shafts must be discarded. 3. Inspect the oil pressure relief valve seat for any indications of wear. Oil pressure relief valve seats with indications of wear must be refaced. CAUTION… Reface pressure relief valve seat using light finger pressure when turning refacing tool. CAUTION… Thoroughly clean oil pressure relief valve cavity after refacing procedure. 4. Visually inspect all pipe plugs for stripped or distorted threads and damaged wrench flats. Pipe plugs exhibiting damaged threads or wrench flats must be discarded. 5. Visually inspect the tach drive adapter mounting flange for cracks, nicks and scratches on machined surfaces. Inspect adapter for distorted or stripped threads. 6. Visually inspect all accessory case helical coils, threaded holes and studs for stripped or distorted threads. Inspect studs for corrosion, rusting, pitting, incomplete threads and looseness. Check all studs with a tool maker's square for alignment. All studs must have their setting heights checked for indications of backing out. See the following for accessory case stud setting heights. 14-3 Chapter 14 ITEM NO. 1. 2. 3. 4. 5. 6. 7. 8. 9. LOCATION Oil Filler Neck Helical Coil Helical Coil Stud, Alternator Mount Stud,, Oil Filter Adapter Stud,, Magneto Mount Plug Stud, Tach Drive Mount Plug THREAD SIZE ---5/16 - 18 5/16 - 18 5/16 -18 x 5/16-24 5/16 -18 x 5/16-24 5/16 -18 x 5/16-24 ---1/4 - 20 x 1/4 - 28 ---- SETTING HEIGHT ---------.81 1.00 .72 ---.59 ---- FIGURE 14-1. ACCESSORY CASE STUD SETTING HEIGHTS 14-4 QTY. 1 2 1 3 3 3 1 3 2 Chapter 14 FLUORESCENT PENETRANT INSPECTION The accessory case must be fluorescent penetrant inspected by a certified technician in accordance with the instructions in Section 5-12, "Fluorescent Penetrant Inspection." Accessory cases that exhibit cracks must be discarded or repaired in accordance with the instructions in Section 14-5. DIMENSIONAL INSPECTION The following new parts limits must be used for dimensional inspection. Components that do not meet the following specifications must be discarded. All components must be thoroughly cleaned and air dried prior to dimensional inspection. FIGURE 14-2. OIL PRESSURE RELIEF VALVE FITS AND LIMITS REF. NO. 1. DESCRIPTION Oil pressure relief valve seat ............................................................ Depth: NEW PARTS MIN. MAX. 1.19 1.29 14-5 Chapter 14 14-5 ACCESSORY CASE REPAIR AND REPLACEMENT 1. The accessory case must be replaced if worn beyond new parts limits or fails to meet the inspection criteria in Section 14-4 unless repair is possible with the following instructions. 2. If the accessory case is cracked, warped, oil pump gear shaft bores or oil pump gear chambers are enlarged or scored the accessory case must be replaced. Accessory cases with loose or worn oil pump driven gear shafts must be replaced. 3. Reface worn or damaged oil pressure relief valve seats as follows. Using an 8048 Oil Pressure Relief Spot Facer reface the pressure relief valve seat in the accessory case oil pressure relief valve cavity. See Chapter 2, "Tools, Equipment Sealants and Lubricants." Do not exceed the specified limit in oil pressure relief valve fits and limits. If the oil pressure relief valve seat is worn beyond the specified limit and cannot be refaced the accessory case must be discarded. 4. Accessory cases with oil pump housing gear shafts that exceed the specifications in new parts dimensions or that are loose must be discarded. The oil pump housing driven gear shaft is pressed into the accessory case oil pump housing and is not field replaceable. 5. Accessory cases with nicks or gouges on the oil pump housing flange must be discarded unless the parting surface can be lapped smooth and made perfectly flat without exceeding the specifications in new parts dimensions. 6. Damaged or loose studs may be replaced in accordance with instructions in Section 5-22. See Figure 14-1,"Accessory Case Stud Setting Heights," for location and height dimensions. 7. Section 5-19,"Application Of Accelagold," applies to all aluminum alloy castings, sheet metal and tubing. NEW PARTS DIMENSIONS PART NAME Oil pump housing and shaft assembly FEATURE Driven gear shaft outside diameter Upper oil pump gear shaft bore diameter Oil pump cavity, Gear chamber depth 14-6 ACCESSORY CASE SUBASSEMBLY (See Figure 14-1.) NOTE… All accessory case components must be clean and free of debris before assembly. 1. See Figures 6-10 or 6-10A as applicable. Install a new gasket (10) on cap (11). Coat cap (11) threads with anti-seize lubricant TCM P/N 646943. See Chapter 2 for anti-seize lubricant supplier. Install adjusting screw (12) into cap (11) and screw in about half way. Install washer (13) 14-6 NEW DIMENSION (INCH) .3735 - .3740 .719 - .720 .7450 - .7470 and nut (14) on protruding end of adjusting screw (12) but do not torque at this time. Assemble pressure relief valve cap (11) plunger (8), new spring (9) and slide into accessory case relief valve opening. Torque relief valve cap to 190-210 inch pounds. Safety wire cap (11) in accordance with Section 4-2, "Lockwire Procedure." 2. The oil pump will be assembled in Chapter 15. 3. Store accessory case and components in a clean protected area until lubrication system sub-assembly. Chapter 15 CHAPTER 15 LUBRICATION SYSTEM SECTION 15-1 15-2 15-3 15-4 15-6 PAGE Oil Cooler Disassembly.................................................... 15-2 Lubrication System Component Cleaning ....................... 15-2 Lubrication System Component Inspection ..................... 15-3 Lubrication System Component Repair and Replacement............................................................... 15-5 Lubrication System Sub- Assembly................................. 15-7 FIGURE 15-1 15-2 PAGE Lubrication System Fits And Limits ................................ 15-5 Oil Filter Adapter Stud Setting Height............................. 15-6 15-1 Chapter 15 15-1 OIL COOLER DISASSEMBLY (See Figure 6-12) 1. Cut and remove lock wire. Remove oil temperature control valve (7) and gasket (6) from oil cooler adapter. Discard gasket (6). 2. Cut and remove lock wire. Remove plug (12) and gasket (11). Discard gasket (11). 15-2 LUBRICATION SYSTEM COMPONENT CLEANING All lubrication system components and associated hardware must be cleaned in accordance with the instructions in Section 5-7, "General Cleaning," and the following special instructions: 1. All oil pressure springs, gaskets, packings, o-rings, seals, lock washers, tab washers and selflocking nuts removed from the lubrication system components must be replaced 100% at overhaul. Cleaning these parts is not required. 2. There are no structural repairs allowed to the oil cooler assembly. Oil coolers with structural damage, bent, broken or cracked cooling fins must be replaced with a new or serviceable oil cooler. Weld repairs to the mounting flange brackets may be accomplished by a certified repair facility. 3. Clean the oil sump assembly using mineral spirit solvent. 4. If the oil sump is immersed in an alkaline bath, when removed, it must be sprayed with steam removing all traces of alkaline. After the sump dries, inspect it for any alkaline residues and if necessary re-spray with steam to remove. The sump exterior, cavities and all oil passages must be thoroughly flushed with mineral spirit solvent after any alkaline cleaning process has been used. 15-2 CAUTION… Alkaline cleaning solutions will cause corrosion to metals if not completely removed. 5. Clean the oil filter adapter assembly using mineral spirit solvent. All oil passages must be clear and free flowing. 6. Clean the oil suction tube assembly using mineral spirit solvent. All oil passages must be clear and free flowing. 7. Clean gears that have bushings using mineral spirit solvent and a brass wire brush. Gears with bushings must not be cleaned using alkaline solutions. Gears that do not have bushings can be cleaned using mineral spirit solvent or by immersion in a alkaline stripping bath if mineral spirit solvent is not effective. After cleaning with alkaline solution the gears must be sprayed with steam removing all traces of alkaline. After steam rinsing the gears must be thoroughly flushed with mineral spirit solvent. CAUTION… Alkaline cleaning solutions will cause corrosion to metals if not completely removed. WARNING Do not pressure blast gears with an abrasive media. Blasting will remove surface hardening. Chapter 15 15-3 LUBRICATION SYSTEM INSPECTION VISUAL INSPECTION The lubrication system components must be visually inspected in accordance with instructions in Section 5-8, "Visual Inspection." Special attention must be given to the following components and areas: 1. Inspect oil pump gear teeth for signs of overheating and excessive wear. Normal wear produces a fine polish on the tooth thrust faces. Gears that have alteration of the tooth profiles, score marks, burning or pitting must be discarded. Check the oil pump drive gear shaft and shaft threads for wear and damage. Discard drive gears with any of these indications. See Figure 8-1, “Gear Tooth Inspection,” for acceptable and unacceptable gear tooth wear. 2. Visually inspect the oil sump bolt holes for cracks. Inspect mounting surface for scratches, warpage and cracks. Warped, cracked or leaking oil sumps must be discarded. Inspect the oil drain plug boss and drain plug for damaged threads. Inspect the drain plug for damaged wrench flats. Discard oil drain plugs with damaged threads. 3. Using a flashlight and a 10X magnifying glass inspect all areas of the oil filter adapter for cracks and indications of cracks. Discard any oil filter adapter with cracks or crack indications. Inspect the oil filter adapter flange for warpage. Filter adapters exhibiting warpage must be discarded. 4. Visually inspect the oil suction tube assembly for dents, cracks and distorted or restricted openings. Oil suction tubes exhibiting dents, cracks or distorted openings must be discarded. FLUORESCENT PENETRANT INSPECTION Aluminum alloy components such as the oil filter adapter and oil sump must be fluorescent penetrant inspected by a certified technician in accordance with Section 5-12, "Fluorescent Penetrant Inspection." Adapters or sumps exhibiting cracks must be discarded. MAGNETIC PARTICLE INSPECTION Oil pump gears must be magnetic particle inspected by a certified technician in accordance with the instructions in Section 5-9, "Magnetic Particle Inspection." Oil pump gears exhibiting cracks must be discarded. 15-3 Chapter 15 DIMENSIONAL INSPECTION The following new parts limits must be used for dimensional inspection. Components that do not meet the following specifications must be discarded. All components must be thoroughly cleaned and air dried prior to dimensional inspection. LUBRICATION SYSTEM FITS AND LIMITS REF. NO 1. 2. 3. 4. 5. 6. 7. 8. 9. 10. DESCRIPTION Oil pump gears in housing........................................................ End Clearance: Oil pump gears in housing.................................................................Diameter: Oil pump gear shafts in housing ........................................................Diameter: Oil pump gear shafts in cover............................................................Diameter: Oil pump driven gear on shaft ...........................................................Diameter: Oil pump driver gear to driven gear ..................................................Backlash: Driver gear shaft in oil pump drive gear............................................Diameter: Oil pump driver gear to camshaft gear ..............................................Backlash: Oil pressure relief valve spring (compressed to 1.58 inches) ..................Load: Oil temperature control valve 0.090 inch minimum travel at...................................................................................Oil Temperature: Oil temperature control valve must be fully closed ..............Oil Temperature: Oil temperature control valve must crack open at 180°F......................... PSI: NEW PARTS MIN. MAX. 0.001 0.004 0.0015L 0.004L 0.0005L 0.002L 0.0005L 0.002L 0.0005L 0.002L 0.014 0.0218 0.0005L 0.002L 0.010 0.014 14.5-15.5 Lbs. FIGURE 15-1. LUBRICATION SYSTEM FITS AND LIMITS 15-4 120°F-170°F 168°F-172°F 18 Pounds Chapter 15 NEW PARTS DIMENSIONS PART NAME Oil Pump Drive Gear Oil Pump Gears Oil pump cover FEATURE Shaft outside diameter Upper oil pump gear inside diameter Upper oil pump gear outside diameter Driven Gear Inside Diameter Upper oil pump gear shaft bore diameter 15-4 LUBRICATION SYSTEM COMPONENT REPAIR AND REPLACEMENT Any lubrication system component worn beyond new parts limits or failing to meet the inspection criteria in Section 15-3 must be replaced unless repair is possible with the following instructions: 1. Oil pump covers with scored gear contact surfaces must be discarded, NEW DIMENSION (INCH) .3735 - .3740 .3745 - .3755 .7180 - .7185 .3745 - .3755 .719 - .720 2. Oil filter adapters exhibiting cracks must be discarded. 3. Oil pump drive gears worn beyond specifications must be discarded. Oil pump driven gears with bushings that are worn beyond specifications must be discarded. See Section 15-3, "New Parts Dimensions." 4. Oil sumps that leak or that are cracked must be discarded. 5. Section 5-19, "Application of Accelagold," applies to all aluminum alloy castings, sheet metal and tubing. 15-5 Chapter 15 FIGURE 15-2. OIL FILTER ADAPTER STUD SETTING HEIGHT ITEM NO Stud LOCATION Oil Filter to Adapter THREAD SIZE 3/4 - 16 X 13/16 -16 7. Install new stud in accordance with the following procedure: a. Remove old stud and inspect the threads in the adapter housing for damage. Replace the adapter housing if any thread damage is evident. b. Clean the adapter housing threads thoroughly to remove any remaining thread adhesive and oil. c. Install the applicable new stud (P/N 653489) and confirm that the incomplete thread on the stud stops at the first thread in the adapter housing and does not continue into the housing below the minimum 0.500 inch extension. See Figure 15-10, "Oil Filter Adapter Stud Inspection." Replace the adapter housing if the extension is less than the specified 0.500 inch minimum. . 15-6 SETTING HEIGHT 500 - .700 QTY. 1 d. After extension height inspection, remove the stud from the adapter. Clean the threads of the adapter housing and stud with Loctite "Primer T" (TCM P/N 646944) and allow to dry. e. Apply a line of Loctite 271 (TCM P/N 646941) along the large threads (.8125-16 end) of the stud and install into the adapter finger tight to 30 inch pounds torque. Check for proper stud extension height in accordance with Figure 15-10, "Oil Filter Adapter Stud Inspection." f. Allow the parts to cure a minimum of 30 minutes prior to installation of the oil filter. CAUTION… Curing times may vary depending on ambient temperature. Consult Loctite instructions Chapter 15 15-6 LUBRICATION SYSTEM SUB-ASSEMBLY NOTE… All lubrication system components must be clean and free of debris before assembly. NOTE… Before assembly insure all parts listed in Section 5-6, "100% Replacement Parts," have been replaced. 1. See Figure 14-3, "Oil Pump Assembly." Using clean 50 weight aviation engine oil, coat oil pump drive and driven gears (2, 4) liberally. See Chapter 3 for lubricant suppliers. Install gears (2, 4) into accessory case oil pump cavity. Install oil pump cover (5) and secure with attaching hardware (6, 7). Torque bolts (7) to 75-85 inch pounds. Safety bolts (7) by bending tabs of tab lock washers (6) up against bolt heads in accordance with Section 4-3, "Tab Washer Procedures." Check oil pump gears for freedom of rotation. NOTE… Before installing oil temperature control valve and plug in oil cooler adapter, insure they are clean and free of any debris. 2. See Figure 15-1, "Oil Cooler.” Using new copper gasket (11) install plug (12) in oil cooler adapter. Torque plug to 190-210 inch pounds. Using new o-ring (6) install oil temperature control valve (7) in oil cooler adapter. Torque oil temperature control valve (7) to 440 - 460 inch pounds. Safety wire oil temperature control valve (7) and plug (12) in accordance with Section 4-2, "Lockwire Procedure." WARNING Never use teflon tape on lubrication system fittings. 3. See Figure 15-2, Apply a small amount of Loctite Pipe Sealant 592 to oil suction tube threads. Install oil suction tube assembly (9) into oil sump (2). Torque the oil suction tube to 310-350 inch pounds. Using a new gasket (8), install plug (7) into oil sump (2). Torque plug (7) to 185-215 inch pounds and safety wire in accordance with Section 4-2, "Lockwire Procedure." 4. The accessory case, oil filter adapter, oil filter assembly and oil sump will be installed during final engine assembly. Cover components and store in a clean protected area until final assembly. 15-7 Chapter 15 INTENTIONALLY LEFT BLANK 15-8 Chapter 16 CHAPTER 16 CYLINDERS AND PISTONS SECTION 16-1 16-2 16-3 16-4 16-5 16-6 PAGE Cylinder and Associated Parts Disassembly ......................... 16-2 Precleaning Inspection........................................................... 16-2 Cylinder and Associated Parts Cleaning ............................... 16-2 Cylinder and Associated Parts Inspection ............................. 16-3 Cylinder Assembly Repair and Replacement........................ 16-14 Cylinder and Piston Sub-Assembly....................................... 16-27 FIGURE 16-1 16-2 16-3 16-4 16-5 16-6 16-7 16-8 16-9 16-10 16-11 16-12 16-13 16-14 16-15 16-16 16-17 16-18 PAGE Cylinder Inspection................................................................ 16-5 Cylinder Stud Setting Heights ............................................... 16-6 Cylinder Fits and Limits ....................................................... 16-11 Cylinder Dimensions ............................................................ 16-12 Intake Valve Seat Refacing ................................................... 16-18 Exhaust Valve Seat Refacing ................................................ 16-18 Prying Spark Plug Helical Coil away from Cylinder............ 16-20 Removing Spark Plug Hole Helical Insert ............................ 16-20 Installing Spark Plug Hole Helical Insert.............................. 16-20 Expanding Spark Plug Hole Helical Insert ........................... 16-20 Rocker Arm Bushing Replacement....................................... 16-22 Rocker Arm To Rotocoil Clearance ...................................... 16-23 Intake Valve Refacing ........................................................... 16-24 Valve Gauge Line Inspection Fixture.................................... 16-26 Cylinder and Piston Position Number ................................... 16-27 Valve and Spring Installation ................................................ 16-27 Installing Baffle...................................................................... 16-28 Securing Baffle ...................................................................... 16-28 16-1 Chapter 16 1. See Figure 6-15, "Cylinder And Piston Assembly." Place the cylinder to be disassembled on a cylindrical block of wood anchored to a work bench. 2. Discolored or burnt paint may indicate piston and piston pin scoring of the cylinder bore caused by overheating. Scored cylinder barrel bores and barrel bores that have been overheated must be discarded and replaced. Do not attempt to remove overheating damage by grinding cylinder bore to the next allowable oversize. Cylinder barrel overheating can destroy the strength of the material. 2. Using a valve spring compression tool, carefully compress valve springs (do not cock the rotocoil and score the valve stem.) Remove retaining keys (17) with a retrieval magnet and discard. Remove and discard rotocoil (16), outer springs (14) and inner springs (13). Remove inner retainers (15). Remove and discard intake valve guide seal (5). Hold the valve stems while lifting the cylinder from its support and place the cylinder on its side. Remove any nicks on the valve stems using an emery stone or cloth before removing valves. Discard exhaust valves (11). 3. If the cylinder deck stud nuts have been properly torqued during operation, when the cylinder is removed, a contact pattern can be observed around the stud holes and between the stud holes of the cylinder contact flange. If the engine has operated with loose cylinder deck studs fretting and galling will be present in this area. Inspect the cylinder to crankcase mating flange for fretting and galling indicating cylinder movement. If movement has occurred, replace all cylinder deck studs on the corresponding cylinder deck of the crankcase. 3. Remove the cylinder exhaust flange studs and rocker shaft hold down studs using a stud remover. Discard studs. 16-3 CYLINDER AND ASSOCIATED PARTS CLEANING 16-1 CYLINDER AND ASSOCIATED PARTS DISASSEMBLY 4. Support the rocker arm on a ring that will allow the old bushings to pass through. Press the worn bushings out using the proper size tool. Discard the bushings. 5. Disassemble the remaining cylinders and rocker arms using the above procedure. 16-2 PRECLEANING INSPECTION 1. Prior to cleaning the cylinder assemblies, inspect them for any signs of head to barrel leakage, leaking oil, fuel, exhaust or combustion residue and any condition that could indicate loss of integrity of the cylinder assembly or the cylinder head to barrel junction. Inspect the cylinder barrel fins and fin tips for rust pitting and damage in the power stroke stress areas. Discard any cylinder with the above described conditions. Inspect the remainder of the cylinder barrel, barrel fins, fin tips and cylinder base flange for rust pitting and damage that cannot be repaired in accordance with the instructions in Section 15-5. Discard all cylinders which cannot be repaired. 16-2 WARNING Do not use sand, glass shot or metal grit for cleaning. 1. Clean cylinder assemblies and associated parts in accordance with the instructions in Section 5-7, "General Cleaning," and the following special instructions: 2. Precautions applicable to both aluminum and steel must be exercised in cleaning the cylinder assembly. Remove oil and loose material with a mild alkaline cleaner by spraying or brushing. Remove all traces of the alkaline by spraying with steam. After the cylinder dries, inspect it for any alkaline residues and, if necessary, respray with steam to remove. CAUTION… Alkaline cleaning solutions will corrode metals if not completely removed. Chapter 16 3. Remove all paint, varnish and carbon from the cylinder assembly to allow complete inspection. The cylinder assembly may be dry blasted. Use blasting techniques to remove hard carbon deposits with the lowest air pressure that will produce the desired results. All machine surfaces, the cylinder mount flange nut seats, cylinder barrel wall, small holes and finished surfaces must be protected from the blast by seals and covers. Suitable types of materials for dry blasting are plastic pellets and processed natural materials such as wheat grains and crushed fruit pits or shells. 4. After any blasting process, blow off all dust with dry compressed air and insure that no blasting material has lodged in crevices, recesses or holes. Clean the cylinder with hot, soapy water and a stiff bristled scrub brush to remove all blasting material from the cylinder. After washing, remove all soap residue by thoroughly rinsing with hot water. Dry the cylinder completely and coat all bare steel surfaces thoroughly with clean 50 weight aviation engine oil. Failure to clean and protect the cylinder in this manner could result in cylinder bore damage from rust and contamination. 5. Degrease the intake valves with mineral spirits. Remove all carbon, varnish and gum from the intake valves using a carbon solvent or by dry blasting. Use blasting techniques to remove hard carbon deposits with the lowest air pressure that will produce the desired results. Suitable types of materials for dry blasting are plastic pellets and processed natural materials such as wheat grains and crushed fruit pits or shells. After dry blasting, clean with mineral spirits and air dry. Clean all pushrods and rocker arms using mineral spirits. Using a small squirt bottle, insure all pushrod and rocker arm oil passages are open by flushing with mineral spirits. Discard any pushrod or rocker arm that has obstructed oil passages that cannot be cleared by solvent action. DO NOT CLEAN PUSHRODS AND ROCKER ARMS BY BLASTING. Dry all components completely and thoroughly coat with clean 50 weight aviation engine oil. 6. Clean all cylinder baffles and associated hardware using mineral spirits. 16-4 CYLINDER AND ASSOCIATED PARTS INSPECTION VISUAL INSPECTION Visually inspect the cylinder assembly and associated components in accordance with the instructions in Section 5-8, "Visual Inspection," and the following special instructions: CYLINDER BARREL 1. Power Stroke Stress Area of the cylinder barrelVisual inspection must include a detailed external inspection of the areas of the cylinder barrel which experience the highest operational stresses from the piston power stroke. These areas are the 12 o'clock area of the first six fins below the head on one side of the engine, and the 6 o'clock area on the other side as described in Figure 16-1. 2. Inspect the cylinder barrel areas including the cylinder barrel fins and the areas between and adjacent to the fins for cracks, sharp indentations, rust, pitting, broken or bent fins, (including bent fins that have been straightened) and chafing damage that alter the original barrel surface contour, fin tip contour or reduce the thickness of the barrel fins. Cylinder barrels with any of the above conditions must be discarded. 3. Remaining Cylinder Barrel Areas -. Thoroughly inspect the remaining cylinder barrel areas including the cylinder barrel fins and the areas between and adjacent to the fins for cracks, sharp indentations, chafing damage, rust and pitting. Inspect the cylinder barrel flange and flange radius for rust and pitting. Cylinder barrels with bent fins in this area may continue in use, provided that the fin is not bent more than one-half of the distance to the next fin, that no attempt is made to straighten the bent fin and there are no cracks or evidence of cracks. Minor fin tip damage repair may be accomplished on fin tips in this area as described in Section 16-5. OTHERWISE CYLINDER REPLACEMENT IS REQUIRED. 16-3 Chapter 16 WARNING Corrosion pits reduce wall thickness and will cause stress concentrations and subsequent fracture. Damage or removal of external barrel material that results in a reduction of the barrel wall thickness is strictly prohibited regardless of location and requires cylinder replacement. 4. Inspect the entire cylinder barrel for electrical arc pitting or weld repairs. Electrical arc pitting or weld repairs of any surface on the cylinder barrel is strictly prohibited. if such conditions are present discard cylinder. 5. Inspect the cylinder bore for overheating or high temperature operation, detonation, piston scoring, or piston pin damage to the cylinder bore. Discard all such cylinders. 16-4 CYLINDER HEAD 1. Inspect the external surfaces of the cylinder head including the exhaust port cylinder head fins, in between the fins, exhaust ports, top and bottom spark plug bosses and fuel nozzle boss for cracks or indications of cracks. Discard any cylinder with cracks or indications of cracks. 2. Minor cooling fin cracks that do not extend into the cylinder head structure may be repaired in accordance with Section 16-5 3. Heat checks in the exhaust port that are 1/8” inch in length or less may continue in service. Chapter 16 FIGURE 16-1. CYLINDER INSPECTION 16-5 Chapter 16 FIGURE 16-2. CYLINDER STUD SETTING HEIGHTS 16-6 Chapter 16 WARNING Welding of the cylinder head structure can destroy the assembly preloads and casting strength resulting in cylinder assembly failure. 4. Inspect the intake flange studs for damaged, distorted or stripped threads. Inspect studs for corrosion, rusting, pitting, incomplete threads and security. Replace studs with any of these indications. 5. Inspect the cylinder exhaust flange studs and rocker shaft hold down stud holes for distorted and stripped threads. Repair damaged, distorted and stripped threads in accordance with Section 5-21. 6. Check all studs with a tool maker's square for perpendicularity. Check all studs for security and correct setting height. See Figure 16-2 for stud setting heights. 7. Damage to threaded bores - Inspect rocker cover flange screw holes for complete threads. Inspect all helical coils for damage. The spark plug helical coil outer ends must lie in the first full thread of the tapped holes in which they are installed. The helical coil teeth at the outer end of the helical coil must not be visible. Repair threaded bores in accordance with Section 5-21 and Figure 16-2. INTAKE VALVES Visually inspect the intake valves using a 10X magnifying glass. Inspect the intake valve stems for scoring, damage in valve retainer grooves and spalling on stem tips. Place the valve head on a one inch wide precision parallel bar and inspect for distortion with a .001" feeler stock. Discard valves that are damaged, distorted, cracked, burned, pitted or rusted. Valve faces may be machined to the dimensions specified in Figure 16-13, "Intake Valve Refacing." ROCKER ARMS Visually inspect all rocker arm foot contact areas for wear, galling, spalling, scoring or grooves. Inspect rocker arm ball seats for smoothness. Discard rocker arms with any signs of wear, galling, spalling, scoring or grooves. Inspect the thrust surfaces of the rocker shaft bore for displaced metal, galling and spalling. Discard all rocker arms with these conditions. Inspect for, and discard any rocker arm that has peeling copper plating. Inspect for and discard rocker arms with loose or missing oil passage rivets. Inspect oil passages for obstruction. Use an oil squirt bottle and clean 50 weight aviation engine oil to check oil passages for free flow. Rocker arms with blocked oil passages that cannot be cleared by solvent action must be discarded. PUSHRODS Visually inspect pushrod ball ends for smoothness, cracks, galling, scoring, spalling and security. Inspect pushrods for bending and warping. Discard pushrods with any signs of wear, cracks, galling, scoring, spalling, bending or warpage. Inspect pushrod oil passages for obstructions. Use an oil squirt bottle and clean 50 weight aviation engine oil to check oil passages for free flow. Pushrods with blocked oil passages that cannot be cleared by solvent action must be discarded. PUSHROD HOUSINGS Visually inspect pushrod housings for cracks, dents, bending and chafing damage. Discard cracked, dented, bent or chafed pushrod housings. Discard any pushrod housings with rust pitting and missing cadmium plating. CYLINDER BAFFLES Visually inspect all cylinder baffles for cracks, loose rivets, chafing damage and inspect anchor nuts for security and damaged threads. Baffling that has chafing damage caused by cylinder barrel fins indicates that cylinder barrel fin damage may have occurred. At this time inspect the corresponding cylinder barrel fins for damage in accordance with the cylinder assembly inspection procedure of this section. Discard any baffles exhibiting cracks and chafing damage. Replace damaged anchor nuts and loose rivets. 16-7 Chapter 16 FLUORESCENT PENETRANT INSPECTION The cylinder assembly must be thoroughly cleaned prior to fluorescent penetrant inspection. All oil and preservative material must be removed. The cylinder heads must be fluorescent penetrant inspected by a certified technician in accordance with Section 5-12, "Fluorescent Penetrant Inspection." Cracks in the cylinder head structure are not acceptable or repairable. Cylinder heads that exhibit cracks or indications of cracks in the cylinder head structure must be discarded. See Section 16-5 for repair of cracked cylinder head fins. MAGNETIC PARTICLE INSPECTION The cylinder assembly must be thoroughly cleaned prior to magnetic particle inspection. All oil and preservative material must be removed. 16-8 The cylinder barrel must be magnetic particle inspected by a certified technician in accordance with Section 5-9, "Magnetic Particle Inspection." Inspect the inner and outer surfaces of the cylinder barrel using circular and longitudinal magnetization. Cylinder barrels with cracks or crack indications are not acceptable or repairable. Discard all such cylinder assemblies. The intake valves and rocker arms must be magnetic particle inspected by a certified technician in accordance with Section 5-9, "Magnetic Particle Inspection." Inspect the intake valves and rocker arms using circular and longitudinal magnetization. Intake valves and rocker arms with cracks or crack indications are not acceptable or repairable. Discard all such valves and rocker arms. Chapter 16 DIMENSIONAL INSPECTION The following new parts limits must be used for dimensional inspection. Components that do not meet the following specifications must be discarded. All components must be thoroughly cleaned and air dried prior to dimensional inspection. CYLINDER AND ASSOCIATED PARTS FITS AND LIMITS Ref. No. Description CYLINDERS Cylinder bore (lower 4-1/4 inch of barrel) ..............................Diameter: Cylinder bore choke (at 5.75 inch from open end of barrel) .......Taper: Cylinder bore out-of-round..................................................................... : Cylinder bore ..........................................................Allowable Oversize: Cylinder bore surface (Nitrided Barrels) Cross hatch....................................................................................Angle: Finish (in micro inches) .......................................................................Ra: 6. Cylinder barrel in crankcase ....................................................Diameter: 7. Intake valve seat insert in cylinder head..................................Diameter: 8. Intake valve guide in cylinder head.........................................Diameter: 9. Exhaust valve guide in cylinder head......................................Diameter: 10. Exhaust valve seat insert in cylinder head...............................Diameter: 11. Intake valve seat............................................................................Width: 12. Exhaust valve seat.........................................................................Width: Exhaust valve seat-to-valve guide axis ........................................Angle: Intake valve seat-to-valve guide axis ...........................................Angle: ROCKER ARMS AND SHAFTS 13. Rocker shaft in rocker arm bushing....................................... Diameter: 14. Rocker arm bushing bore.........................................................Diameter: Rocker arm bushing (inside)............................... Finish Bore Diameter: 15. Rocker arm Side Clearance: 16. Rocker arm to Rotocoil..........................................................Clearance: 17. Rocker arm grind ..........................................................................Width: 18. Intake valve guide........................................................Inside Diameter: Intake valve in guide ...............................................................Diameter: 19. Exhaust valve guide.....................................................Inside Diameter: Exhaust valve in guide.............................................................Diameter: 20. Intake valve face (to stem axis) .................................................. Angle: 21. Exhaust valve face (to stem axis) ............................................... Angle: 22. Intake Valve ................................................................................ Length: 23. Exhaust valve face-to-stem ........................................................ Length: 24. Intake valve face-to-stem ........................................................... Runout: 25. Exhaust valve face-to-stem (full indicator reading)................... Runout: 26. Rocker arm foot to valve stem (dry valve gear lash) ............................. : PISTONS, RINGS AND PINS 27. Piston, moly coated (bottom of skirt) in cylinder ...................Diameter: Piston, non moly coated (bottom of skirt) in cylinder ............Diameter: 28. Top piston ring in groove ..............................................Side Clearance: 29. Second piston ring in groove.........................................Side Clearance:, Chapter 16 30. Third piston ring in groove............................................Side Clearance: 1. 2. 3. 4. 5. NEW PARTS MIN. MAX. See Figure 16-4 See Figure 16-4 0.0000 0.001 See Figure 16-4 22° - 32° — 30 50 0.0030L 0.0110L 0.0055T 0.0085T 0.0010T 0.0025T 0.0010T 0.0025T 0.0070T 0.0100T See Figure 16-5 See Figure 16-6 44°30' 45° 00' 59° 30' 60° 00' 0.0010L 0.0040L .716 .719 0.5945 0.5955 0.0020 0.0150 0.020 — — 0.34 .3745 .3770 0.0010L 0.0040L .3745 .3770 0.0025L 0.0057L 59°45' 60°15' 45°45’ 46°15' See Figure 16-13 Replace 100% 0.0000 0.0020 Replace 100% 0.060 0.200 0.004L 0.006L 0.0015 0.0015 0.003 0.009L 0.010L 0.008 0.008 0.005 16-9 Chapter 16 Ref. No. 31. 32. 33. 34. 35. 36. 37. NOTES: Description Fourth piston ring in groove..........................................Side Clearance: Top ring gap at 1.00 ± .50 depth (in cylinder barrel)...................... Gap: Second ring gap at 1.00 ± .50 depth (in cylinder barrel) ................ Gap: Gap for second ring must be at least .006 larger than gap for top ring. Third ring gap at 1.00 ± .50 depth (in cylinder barrel) .................. Gap: Fourth ring gap at 1.00 ± .50 depth (in cylinder barrel) ................. Gap: Piston pin in piston .................................................................Diameter: Piston Pin .................................................................................Diameter: T=Tight 0.019 0.015 0.0002L 0.9984 0.035 0.031 0.0006L 0.9986 L=Loose CYLINDER DIMENSIONAL INSPECTION 1. Inspect cylinder bore dimensions in accordance with Figure 16-4, "Cylinder Dimensions." Cylinders bores that do not conform to the standard size dimensions after honing must be ground to the next oversize dimension. 2. Inspect the cylinder base flanges for flatness. If cylinder base flange exceeds .001" out of flat, the cylinder must be discarded. 3. Dimensionally inspect the cylinder exhaust flange stud and rocker shaft hold down stud holes using a thread gauge and determine the appropriate oversize stud for replacement. 4. If intake flange studs have been removed for replacement, dimensionally inspect the intake flange stud hole(s) using a thread gauge and determine the appropriate oversize stud for replacement. 5. Dimensionally inspect the valve guides inside diameter. Guide dimensions must be within specifications the entire length of the guide. Replace all valve guides that are worn beyond the required specifications in accordance with the procedures in Section 16-5. 16-10 NEW PARTS MIN MAX. 0.003 0.005 0.026 0.042 0.032 0.048 6. Visually inspect the valve seats for any indication of burning, pitting, erosion or cracks. Determine if the valve seat dimensions exceed the specifications in Figures 16-5 and 16-6 . Any valve seats that are burned, pitted eroded, cracked or that do not conform with the specifications in Figures 16-5 and 16-6 must be replaced. INTAKE VALVE DIMENSIONAL INSPECTION 1. Inspect the entire length of the valve stem outside diameter with a micrometer. Discard valves with stems less than 0.3730 diameter. 2. Using a micrometer inspect the valve head outside diameter. Intake valves with heads smaller than 2.035 diameter must be discarded. ROCKER ARM DIMENSIONAL INSPECTION 1. Dimensionally inspect the rocker arm bushing bore. The bushing bore must be .716 to .719 inch diameter. 2. Dimensionally inspect the rocker arm thrust width. The rocker arm width must be .937 to .940. Chapter 16 FIGURE 16-3. CYLINDER FITS AND LIMITS 16-11 Chapter 16 NOTE…Dimensions shown are finished dimensions after honing. FIGURE 16-4. CYLINDER DIMENSIONS 16-12 Chapter 16 NEW PARTS DIMENSIONS Part Name Cylinder Assembly Rocker Arm Bushings Intake Valve Exhaust Valve Piston (Standard) Piston Pin Assembly Feature Intake Valve Guide Bore Exhaust Valve Guide Bore Inside Diameter Stem Diameter Stem Diameter Diameter at Top Diameter Below 1st Groove Diameter at Bottom Pin Bore Diameter Third Ring Groove Width Fourth Ring Groove Width Length (including plugs) Diameter New Dimension (inches) 0.5307 - 0.5317 0.5307 - 0.5317 0.5945 - 0.5955 0.3730 - 0.3735 0.3713 - 0.3720 4.4030 - 4.4050 4.3960 - 4.3980 4.4270 - 4.4280 0.9988 - 0.9990 0.1585 - 0.1595 0.0970 - 0.0980 4.410 - 4.430 0.9984 - 0.9986 Measure piston diameter at right angles to pin bore. Measurement must be made at .165 inch from bottom of piston. 16-13 Chapter16 16-5 CYLINDER ASSEMBLY REPAIR AND REPLACEMENT CYLINDER HEAD WELD REPAIR Only minor non-structural weld repairs are permitted. TCM allows welding repairs of the intake and exhaust port flanges, rocker cover flange and threaded holes (other than spark plug) and requires that these repairs be performed under carefully controlled conditions using an approved procedure and process which meets the requirements of the applicable federal aviation regulations. No structural weld repairs are allowed. TCM does not allow weld repairs to the combustion chamber, head structure and rocker shaft bosses Any cylinder head that is cracked or damaged in a structural area must be replaced. WARNING Welding the cylinder head structure may destroy the assembly preloads and casting strength resulting in cylinder assembly failure. CYLINDER HEAD FIN REPAIR Do not attempt to straighten cylinder head cooling fins. If it becomes necessary to cut out a vee notch to stop a head fin crack, use a slotted drill bushing to fit over the fin and a 3/16 inch twist drill to cut the notch. Its apex and edges must be rounded. If such repairs and previous breakage have removed 10% or more of the total cylinder head fin area, the cylinder has reached its limit of cooling fin repair and must be replaced. CYLINDER BARREL FINS Repairs can be accomplished only on fin tips which are outside of the power stroke stress area of the cylinder barrel. Reference Figure 16-1. 16-14 Pitting, sharp indentations or chafing damage in the fin tip LESS than .050 inch deep - Remove only enough material to eliminate the damage with a small hand-held grinder and fine grit disk or stone, or by turning the cylinder on a lathe. Precautions must be taken to prevent damage to adjacent fins and localized fin heating during the material removal process. Blend the area smooth so that no sharp edges remain and insure that original fin profile and contours are retained. Inspect the area for cracks. WARNING Do not weld cylinder barrel or barrel fins. CYLINDER BARREL Any cylinder or cylinder associated parts worn beyond new parts limits or failing to meet the inspection criteria in sections 16-1 through 16-5 must be replaced unless repair is possible with the following instructions: Cylinder machining may be accomplished by a repair facility certified for specialized cylinder repairs. The cylinder bore may be ground and honed to, but must not exceed, the maximum allowable 0.015 oversize dimension specified in Figure 16-4, "Cylinder Dimensions." Grind the cylinder bore with a cam controlled grinder. Use grinding stones that will produce an RMS finish of 60 or less. Magnetic particle inspect cylinder bore after grinding in accordance with section 5-9. Identify the cylinder with the correct bore size by steel stamping the cylinder barrel flange with the appropriate oversize designation in accordance with Figure 16-16. Chapter 16 VALVE SEAT REPLACEMENT Valve seats that are damaged or have worn beyond acceptable specifications must be replaced using the following special tools and procedures. Special Tools Required 1. Borrough's valve seat remover and replacer 8086 or equivalent. 2. Borrough's 5221B cylinder holding fixture and 5221-15a adapter or equivalent. 3. Borrough's 8122a common drive handle or equivalent. 4. Valve stem or valve guide hole pilot of correct size. 5. Valve seat boss cutter of correct size. Use the cutter size required for new valve seat outside diameter. 6. Universal drive from Borrough's 8116 common parts kit or equivalent. 7. Heavy duty drill press. WARNING Do not use a torch to heat the cylinder assembly. The heating process must be performed using uniform heating methods only. After cylinder has been heated, do not bump the head or barrel. To establish an inspection point for head to barrel movement, mask off a 1/4” wide x 1” high area across the cylinder head to barrel junction on the intake port side of the cylinder. Apply a heavy coat of high temperature paint and allow the paint to dry thoroughly. Remove the masking material. After a cylinder assembly has been subjected to a heating operation, always inspect the cylinder assembly and insure that the head has not turned in relation to the barrel. Movement of the head in relation to the barrel will destroy the assembly preload. Discard any cylinder with indications of head to barrel movement. a cracked valve seat bore or a valve seat bore that has eroded beyond the allowable valve seat oversize bore repair. VALVE SEAT BORE MACHINING Measure the new valve seat insert outside diameter and select the proper size valve seat bore cutter. Install the cylinder in the holding fixture. Using the specified tools, machine the valve seat bore(s) to the correct diameter. Deburr the valve seat bore and clean the cylinder removing all debris from machining procedure. Inspect and record the valve seat bore inside diameter and new valve seat outside diameter. An interference fit of 0.007T to 0.010T is required for exhaust valve seats. An interference fit of 0.0055T to 0.0085T is required for intake valve seats. VALVE SEAT INSTALLATION Heat the cylinder assembly to 450°F maximum. Heat soak one hour. Using the specified tools, install the new valve seat(s). The valve seat(s) must be installed firmly against the bottom of the valve seat bore. Valve seat(s) that are not seated properly or that are misaligned will cause valve leakage and burning. FLUORESCENT PENETRANT INSPECTION AFTER VALVE SEAT INSTALLATION After valve seat installation, the cylinder head must be fluorescent penetrant inspected in accordance with section 5-12, "Fluorescent Penetrant Inspection." Structural cracks in the cylinder head are not acceptable or repairable. Cylinder heads that exhibit cracks must be discarded. NOTE… If valve guides are being replaced this inspection may be delayed until the valve guides have been installed. VALVE GUIDE REPLACEMENT Valve guides worn beyond specification must be replaced using the following procedure and special tools: 1. Borrough's 5221b cylinder holding fixture and 5221-15a adapter or equivalent. VALVE SEAT REMOVAL 2. Borrough's 4981 remover or equivalent. Heat the cylinder assembly to 450°F maximum. Heat soak one hour. Using the correct remover from the list above, remove the worn valve seat or seats. Allow cylinder to cool to room temperature. Inspect the seat bore for cracks and erosion. Discard any cylinder with 3. Valve guide replacer. 4. 3606CP Valve guide stem hole reamer. 5. Proper size morse adapter. 16-15 Chapter16 6. Borrough's equivalent. 3170 floating holder or 7. Heavy duty drill press. VALVE GUIDE REMOVAL WARNING Do not use a torch to heat the cylinder assembly. The heating process must be performed using uniform heating methods only. After cylinder has been heated, do not bump the head or barrel. Allow the cylinder to stabilize to room temperature and inspect the valve guide inside diameter. If necessary ream the valve guide inside diameter to the required specifications. CYLINDER HEAD FLUORESCENT PENETRANT INSPECTION After valve guide installation, the cylinder head must be fluorescent penetrant inspected in accordance with section 5-12, "Fluorescent Penetrant Inspection." Structural cracks in the cylinder head are not acceptable or repairable. Cylinder heads exhibiting cracks in the structure must be discarded. REAMING VALVE GUIDES Install proper size head on removing tool. Attach to cold water supply. Heat the cylinder to 450° F. Heat soak one hour. Install cylinder in the holding fixture. Install pilot into guide. Hold valve guide removal tool down firmly into guide bore with hand on water release button. Use other hand to work sliding hammer. Release the water and hammer out guide while water is running. Both guides can be removed with one heating. Allow cylinder to cool to room temperature. The intake and exhaust valve guide bore inside diameters are prefinished and will conform to the required specifications when installed under controlled production procedures. However, field repair conditions may vary and some valve guide bores may require a finish reaming operation in accordance with the following procedures. VALVE GUIDE BORE MACHINING Do not attempt this procedure with a hand held power tool. CAUTION… Always ream guide bore to the proper oversize. Never install an oversize guide in the old bore. Measure valve guide bore and select proper size reamer. Install cylinder in holding fixture. Ream valve guide bore to required oversize. Guide bore must be free of grooves. Deburr the valve guide bore and clean the cylinder removing all debris from the machining procedure. Inspect the valve guide bore new inside diameter and new valve guide outside diameter. An interference fit of 0.001T to 0.0025T is required for exhaust and intake valve guides. VALVE GUIDE INSTALLATION CAUTION… The intake and exhaust valve guides are different and must be installed in the correct positions. Apply a small amount of LUBRIPLATE® 930AA to the outside diameter of the guide to reduce the chance of binding during installation. Heat the cylinder assembly to 450°F maximum. Heat soak for one hour. Using the specified installation tool install the new valve guides. 16-16 WARNING Install the holding fixture into drill press. Index fixture to proper angle and install cylinder into fixture. Zero in guide with dial indicator. Using the proper size reamer, ream the valve guides. Ream at 400 RPM for high speed steel reamers and 700 RPM for Carbide tip reamers using plenty of lubricant. Inspect finished bore size to the required specification. Refer to Figure 16-4, "Cylinder Dimensions," for correct stem hole finished sizes. The valve guide finish must be 32 RMS inspect finish with a profilometer. VALVE SEAT REFACING Valve seat refacing must be performed in accordance with the specifications shown in Figures 16-5 and 166, "Intake and Exhaust Valve Seat Refacing," using the following special tools: Chapter 16 1. Sioux Brand" Valve Seat Grinder Set No. 1675 or equivalent. 2. Valve Seat Grinder Pilot- check valve guide inside dia. for proper size. 3. Grinding Stones K498 roughening and K428 finishing for intake valve seats K491 roughening and K421 finishing for exhaust valve seats. 45° Grinding Stones K28 roughening and K98 finishing for intake valve seats CAUTION… Valve seats and valves may be lapped after refacing if desired. Lapping compounds are extremely abrasive and must be completely removed from the valves, valve seats and cylinder by cleaning thoroughly using hot soapy water and a stiff bristled scrub brush. All lapping compound must be removed from cylinder. After washing, all soap residue must be removed by thoroughly rinsing with hot water. The cylinder must be dried completely and all bare steel surfaces thoroughly coated with clean 50 weight aviation engine oil. K91 roughening and K21 finishing for exhaust valve seats. 4. Borrough's 5221B Cylinder Holding Fixture and 5221-15A Adapter or equivalent. 16-17 Chapter16 FIGURE 16-5. INTAKE VALVE SEAT REFACING FIGURE 16-6. EXHAUST VALVE SEAT REFACING 16-18 Chapter 16 CYLINDER BORE FINISH EQUIPMENT Use a wet honing process and hone stones that will produce a surface finish as specified below. After honing the cylinder barrel to the required specifications, inspect the cylinder barrel wall for corrosion, pitting and scoring. Discard cylinders exhibiting any of the above indications. Surface finish measurements are to be made with a Hommel Tester T500 part number 191800. The software for receiving data from the tester is Hommel America TIOOO Turbo. Both the tester and software are available from Hommel America, New Britain, CT. The tester is to be set to inch units, traverse lengths Lt of .19 and Lm of .16, a cutoff length (Lc) of 0.03, Ml filter, and R profile (Prof). CROSS HATCH PATTERN The bore finish shall show a cross hatch pattern produced by a wet honing process. The included angle of the cross hatch measured perpendicular to the axis of the cylinder shall be 22 to 32 degrees. Hone turn around areas up to 0.5 inch from the skirt and barrel stop are exempt from cross hatch angle requirements SURFACE FINISH SPECIFICATION The surface finish of the cylinder barrel bore must meet the values listed in the table below. The hone pattern as taken by fax film and viewed at 100X shall be cleanly cut and substantially free of torn and folded metal. The cylinder bore must be cleaned thoroughly using hot soapy water and a stiff bristled scrub brush. All honing material must be removed from cylinder. After washing, all soap residue must be removed by ITEM 1. 2. 3. 4. SYMBOL Ra Sk R3Z RPM/Rz thoroughly rinsing with hot water. The cylinder must be dried completely and all bare steel surfaces thoroughly coated with clean 50 weight aviation engine oil. SPARK PLUG HELICAL COIL INSERT REPLACEMENT Spark plug helical coil inserts that require replacement as determined by the inspection procedures in section 16-4 must be replaced using the following instructions. Before attempting to back out a damaged insert, use a sharp pointed tool to pry the teeth at the outer helical coil end away from the cylinder head metal. Tap a helical coil extracting tool into the insert until it has a good bite. See Figure 16-8, "Removing Spark Plug Hole Helical Coil Insert." Using the proper size mandrel on installing tool, place a new helical coil in the cutout side of the installing tool and engage the driving tang toward the threaded end. Engage the tang with the slotted end of the driving mandrel and wind the insert into the sleeve thread compressing the insert. Hold the sleeve so the helical coil can be seen through the slot in the threaded end. Turn the mandrel crank until the insert starts into the cylinder head hole. If the sleeve is not in contact with the head surface, grip sleeve and mandrel and turn until the sleeve touches lightly. See Figure 16-9, "Installing Spark Plug Hole Helical Coil Insert." Wind the helical coil into the cylinder head until its toothed end lies within the first full thread. The teeth should be in position to enter the depressions made by the original insert. If driven too far, the insert will emerge in the combustion chamber and will have to be wound through and removed. When the helical coil is in the correct position, use long-nose pliers to bend the driving tang back and forth across the hole until it breaks off at the notch. NAME RANGE Arithmetic average surface roughness 30 - 50 micro inches Skew, a measure of plateau -1. to -3.5 Three point height, distance between third highest 130 - 275 peak and third lowest valley micro inches Ratio of mean peak to total depth of pattern < .35 16-19 Chapter16 Coat a Heli-Coil Corporation Number 520-2 expanding tool, threaded end, with Alcoa thread lube or a mixture of white lead and oil. Screw the expanding tool into the new insert until its final thread forces the teeth firmly into the cylinder head metal. See Figure 16-10, "Expanding Spark Plug Hole Helical Coil Insert." See Figure 16-2, "Cylinder Stud Setting Heights," for proper spark plug helical coil depth. CAUTION… Replacement helical coils must be stainless steel. WARNING The helical coil insert end must not protrude into the combustion chamber after it has been installed. CYLINDER STUD INSTALLATION FIGURE 16-7. PRYING SPARK PLUG HELICAL COIL AWAY FROM CYLINDER FIGURE 16-9. INSTALLING SPARK PLUG HELICAL COIL FIGURE 16-8. REMOVING SPARK PLUG HOLE HELICAL INSERT FIGURE 16-10. EXPANDING SPARK PLUG HOLE HELICAL INSERT 16-20 Chapter16 FIGURE 16-11. ROCKER ARM BUSHING REPLACEMENT Install new exhaust flange studs, rocker shaft hold down studs and new intake flange studs of the appropriate oversize as determined by dimensional inspection in accordance with Figure 16-2 and section 5-22. CYLINDER PROTECTIVE COATING 1. Clean the exterior cylinder head surface and apply a protective coating of Accelagold aluminum conversion in accordance with section 5-20. WARNING 2. Thoroughly clean the entire cylinder with mineral spirits and air dry. Mask the cylinder flange nut seat contact surfaces, cylinder skirt and flange to crankcase mating surfaces. Apply a protective coating of specified TCM enamel paint or equivalent to the cylinder barrel in accordance with section 5-20. 3. After the paint has dried completely, remove all masking materials and coat all bare steel surfaces with clean 50 weight aviation engine oil. Store the cylinder assembly in a clean protected area until cylinder subassembly. Do not paint the cylinder flange nut seats, skirt or flange to crankcase mating surface. 16-21 Chapter 16 ROCKER ARM BUSHING REPLACEMENT 1. The same tool used to remove the old bushings from the rocker arm(s), if properly designed, can be used to install the new bushings in the rocker arm(s). 2. Oil the new bushing with clean 50 weight aviation engine oil and press the new bushings in flush with to 0.020” below surface of the rocker hub. CAUTION… Before reaming rocker arms plug the oil passages with beeswax. 3. Ream the new bushings to the diameter specified in Figure 16-11, "Rocker Arm Bushing Replacement." Lightly break the sharp edge at each end of new bushings. Inspect the bushing size and RMS finish to the required specifications. ROCKER ARM TO ROTOCOIL CLEARANCE MACHINING 1. See Figure 16-12. A minimum clearance of .020 inch must be maintained between the rocker arm and rotocoil at the time of assembly. 2. If the minimum clearance of .020 is not present at the time of assembly, it is permissible to smoothly grind across the forging flash line on the underside of the rocker arm to obtain the specified clearance. Prior to grinding, the rocker arm bushing bore and oil passage must be protected to prevent debris entry. The grind must not exceed the width illustrated in Figure 16-12. If the required clearance cannot be obtained without exceeding this grind width, the rocker arm must be replaced. CAUTION… After reaming, clean and flush the oil passages using clean solvent. Insure that the oil passages are clear of any debris, contamination or beeswax. Any rocker arms with obstructed oil passages must be cleared by flushing with mineral spirits. Any rocker arm with obstructed oil passages that cannot be cleared must be discarded. FIGURE 16-12. ROCKER ARM TO ROTOCOIL CLEARANCE 16-22 Chapter16 3. The grind must be smooth and uniform. All of the ground surface must be polished to remove all grinding marks. Remove the protective coverings from the rocker arm and clean thoroughly. The rocker arm must be magnetic particle inspected for cracks following the polishing operation. WARNING The presence of grinding marks or cracks in the rocker arm may cause the rocker arm to fail. 4. Thoroughly clean the rocker arm(s) before assembly on the engine. FIGURE 16-13. INTAKE VALVE REFACING 16-23 Chapter 16 INTAKE VALVE GRINDING 1. Clean the intake valves with mineral spirits. 2. Using a valve grinding machine and proper valve grinding wheel, grind the intake valve contact seat at 59°- 45' to 60°-15' to remove any indication of wear. This will increase the distance from the new gauge line to the valve stem tip. See Figure 16-13, "Intake Valve Refacing." 3. Clean the valve using mineral spirits. 4. Using the gauge line inspection fixture, measure the dimension from the gauge line to the bottom of the valve. This dimension must be no less than .100". Reground valves not conforming to this criteria must be discarded. Valves conforming to this criteria must have the tip ground to maintain the tip to gauge line dimension of 4.246" to 4.252". 5. After valve tip grinding, measure the intake valve overall length. The valve overall length cannot be 16-24 less than 4.352". Discard valves that are less than 4.352" in length. 6. After grinding process thoroughly clean the valve with mineral spirits and air dry. 7. Using a vee block with a surface plate and a dial indicator, inspect each intake valve face for run-out (eccentricity). Intake valves exceeding .002" total indicator reading must be discarded. 8. Using an optical comparator, inspect the valve contact seat angle. Intake valve face angles which do not conform to 59°- 45' to 60°-15' must be discarded. 9. Using a profilometer, inspect the valve contact seat finish. Intake valves exceeding 25 RMS must be discarded. 10. Perform magnetic particle inspection on the valves. Discard any valve with cracks or indications of cracks. Clean the valves using mineral spirits and air dry. Coat all surfaces thoroughly with clean 50 weight aviation engine oil. Chapter16 FIGURE 16-14. VALVE GAUGE LINE INSPECTION FIXTURE 16-25 Chapter 16 16-6 CYLINDER AND PISTON SUBASSEMBLY Original cylinders have a position number stamped on the edge of the base flange. New cylinders must have a position number (1 through 6), as used, stamped in the location shown in Figure 16-15.” New pistons must have a position number (1 through 6) stamped in the location shown in Figure 16-15, "Cylinder And Piston Position Number." WARNING Improper use of sealants and lubricants may cause engine malfunction or failure. 1. Insure the piston and piston rings are the correct size for the cylinder bore size. Inspect the piston to cylinder clearance of each matching piston and cylinder in accordance with Figure 16-4. FIGURE 16-15. CYLINDER AND PISTON POSITION NUMBER FIGURE 16-16. VALVE AND SPRING INSTALLATION 16-26 Chapter16 2. Each piston ring must be inspected for proper gap in the cylinder bore in which it will be assembled. Insert one ring at the time into the cylinder bore and push it to the position specified in the table of limits using the piston. Remove the piston and inspect the ring gap using a leaf type feeler gauge. If the ring gap is smaller than specified, record actual gap size and remove the ring from the cylinder bore. Mount a fine toothed flat file in a vise. Holding the ring ends firmly and squarely against the file, remove the desired amount of material. Deburr the ring gap ends using crocus cloth. Thoroughly clean the ring with mineral spirits and air dry. Install the ring in the cylinder bore to the correct position and inspect the ring gap. Repeat the above procedure until all ring gaps meet the required specification. Do not use rings that are not within the specified ring gap dimensions. 4. See Figure 6-15. Install baffles (44) and springs (45) on all cylinders. Install baffle as shown in Figures 16-17 and 16-18. Insert the spring through cylinder. Using another spring or a hook fashioned from stiff wire, hook and pull the spring end over the cylinder fin. Immediately before cylinder subassembly, thoroughly clean the cylinder bore using hot soapy water and a hard bristled scrub brush. After washing, all soap residue must be removed by thoroughly rinsing with hot water. The cylinder must be dried completely and all bare steel surfaces thoroughly coated with clean 50 weight aviation engine oil. NOTE… Gap for second ring must be at least .006 larger than gap for top ring. 3. Thoroughly clean the cylinder baffles, cylinder, valves, valve springs, retainers, rotocoils, valve spring retainer keys, pistons, piston rings, piston pins, pushrod housings, springs and washers with mineral spirits and air dry. Inspect all parts for any damage that may have occurred during handling or shipment. FIGURE 16-18. SECURING BAFFLE FIGURE 16-17. INSTALLING BAFFLE 5. See Figure 6-15, "Cylinder and Piston Assembly." Using the following instructions, assemble each of the six cylinders. If the valves have been lapped, they must be installed into the positions for which they were lapped. Spread a film of Molyshield grease on the intake valve stem (12) and the exhaust valve stem (11). Install valves into the correct location. Grasp the valve stems and install the cylinder on a cylindrical block of wood anchored to a work bench. Again apply Molyshield grease to valve stems. Place valve spring retainers (15) over valve guides (4 and 6), cupped side up. Coat the sealing surface of a new intake valve guide seal with clean 50 weight aviation engine oil. Install new seal (5) on the intake valve guide by hand. See Figure 16-19 for valve guide seal installation tool and correct installation. Using the specified installation tool and a plastic mallet tap the seal on to the guide 16-27 Chapter 16 until it is firmly seated. Install new inner and outer valve springs (13, 14) and new rotocoils (16). The valve springs must be installed with the closed coils toward the cylinder head as shown in Figure 16-16, "Valve and Spring Installation." CAUTION… Do not allow the valve spring compressing tool to cock the rotocoils. Contact between the rotocoils and valve stems will cause damage to the valve stems. 6. Using a valve spring compressor, compress the valve springs and insert the valve stem retainer keys (17). The springs should be depressed only enough to admit the keys to seat into the valve stem grooves. If keys drop too far, they may become fouled. This condition could cause them to damage the stem when the springs are released. Make sure the keys are properly seated into the grooves of the valve stem before releasing pressure on springs. Remove the cylinder from fixture and set it upright on the workbench. Place a plastic mallet squarely on the end of the valve stem and strike the plastic mallet sharply with a rawhide mallet to insure correct seating of valve retainer keys. DO NOT STRIKE ROTOCOIL. Insure the valve spring retainer keys are properly positioned. 7. Carefully position each cylinder assembly so the cylinder bore is facing upward and the cylinder is resting on the rocker shaft mounting bosses. Place a new cylinder base packing (1) on the cylinder skirt and push it against the base flange. Make sure the cylinder base packing is not twisted. Using clean 50 weight aviation engine oil, coat the cylinder barrel wall thoroughly. Assemble the remaining five cylinders using the above instructions. 8. Using the following instructions, assemble each of the six new pistons and rings. 9. See Figure 6-15. Install all rings with the part number toward the top of the piston. Install the 16-28 expander (51) into the third ring groove first by disconnecting it and then reconnecting it fully. With a ring expander place the oil ring (52) over the expander with the ring gap positioned 180° from the expander joint. With a ring expander, install ring (53) into the second ring groove, install ring (54) into the first ring groove and install ring (49) into the fourth ring groove. 10. Inspect all ring side clearances with the ring edge flush with the piston outside diameter. All ring side clearances must conform with the dimensions in “Cylinder And Associated Parts Fits And Limits.” NOTE… Weight differences of piston pairs in opposing bays must not exceed 1/2 ounce or 14.175 grams. 11. Lubricate the piston pin and piston and ring assemblies with clean 50 weight aviation engine oil. Place the new piston and ring assembly with the cylinder assembly for which it was previously sized and gapped. Place a new piston pin with each piston and ring assembly. Install the piston pins in the piston pin bores. The piston pins must slide freely in the piston pin bores. 12. Position the rings so the ring gaps are 180° apart with the first or top ring gap toward top of the piston Using a ring compressor, install each piston into it's cylinder so that the top three rings are in the cylinder barrel and the piston pin is accessible for installation on the connecting rod. Install the piston and ring assemblies into the cylinder bore with the piston position number toward the propeller flange when the cylinder is installed on the engine. 13. Place the cylinders on a clean protected work bench in position order and cover until final engine assembly. Chapter16 14. Install new gasket (37) on cylinder end of pushrod housings (36). Place two each, pushrod housings, new springs (38), washers (39), new packings (40) and second washer (39) with each cylinder. FIGURE 16-19. VALVE GUIDE SEAL INSTALLATION 16-29 Chapter16 INTENTIONALLY LEFT BLANK 16-30 Chapter 17 CHAPTER 17 CRANKCASE SECTION 17-1 17-2 17-3 17-4 17-5 FIGURE 17-1 17-2 17-3 17-4 17-5 17-6 PAGE Crankcase Studding Disassembly ............................... 17-2 Crankcase and Associated Parts Cleaning .................. 17-2 Crankcase and Associated Parts Inspection ................ 17-2 Crankcase and Associated Parts Repair and Replacement.............................................. 17-9 Crankcase Sub-Assembly............................................ 17-11 PAGE Inspection Of Crankcase Non Critical Area................ 17-3 Inspection Of Crankcase Critical (white) and Non Critical (shaded) Areas ................................. 17-4 Crankcase Stud Setting Heights ................................. 17-6 Crankcase Dimensional Inspection Torquing Sequence...................................................... 17-7 Crankcase Fits and Limits ........................................... 17-8 Crankcase Cylinder Deck Helical Coil Installation .... 17-9 17-1 Chapter 17 17-1 CRANKCASE STUDDING DISASSEMBLY (See Figure 17-3.) 1. Studs, dowels and helical inserts should only be removed for replacement when they are found to be loose, corroded, pitted or damaged. Refer to Sections 17-3 and 17-4 for stud, dowel, and helical insert replacement. 2. Remove starter shaftgear bushing (2). 3. Crankcase plugs must be removed to allow pressure flushing of the crankcase halves. 4. Do not attempt to remove oil squirt nozzles field replacement is not possible. NOTE… When plugs are removed they must be identified by tagging. During crankcase sub-assembly, all plugs must be placed back in the same crankcase location from which they were removed to prevent oil pressure loss. 17-2 CRANKCASE AND ASSOCIATED PARTS CLEANING The crankcase halves must be cleaned in accordance with the instructions in Section 5-7, "General Cleaning," and the following special instructions: 1. All through bolts, bushings, bearings, thrust washers, gaskets, packings, rubber shock mounts, o-rings, seals, lock washers and self locking nuts removed from the crankcase must be replaced 100% at overhaul. Cleaning these parts is not required. 2. The crankcase oil passages must be pressure flushed with mineral spirit solvent and inspected with the aid of a flashlight. The crankcase oil squirt nozzles must be flushed with mineral spirit solvent to insure they are not obstructed. Use caution when flushing the oil squirt nozzles because they are not field replaceable. 17-2 3. The engine mount brackets must be cleaned using mineral spirit solvent. Insure that the engine mount oil cooler bracket oil passages are thoroughly flushed and unobstructed. 4. If the crankcase castings are immersed in an alkaline bath, they must be sprayed with steam to remove all traces of alkaline. After the castings dry, inspect them for any alkaline residues. If necessary, re-spray with steam to remove remaining residue. The crankcase and all oil passages must be thoroughly flushed with mineral spirit solvent after any alkaline cleaning process has been used. CAUTION… Alkaline cleaning solutions will cause corrosion to metals if not completely removed. 17-3 CRANKCASE AND ASSOCIATED PARTS INSPECTION VISUAL INSPECTION The crankcase and associated components must be visually inspected in accordance with instructions in Section 5-8, "Visual Inspection," and the following special instructions: 1. Visually inspect the inside and outside of both crankcase halves for cracks. Pay particular attention to areas on and adjacent to the cylinder mount flanges, tappet guides, case flange, nose seal land and bearing bosses. Look for scoring in the old crankshaft bearings. Look for scoring in the tappet guides and camshaft bearings. Inspect main bearing boss parting surfaces for fretting. Inspect the bearing saddles for bearing lock slot elongation and any indications of bearing movement. Visually inspect all machined surfaces for nicks and roughness. Chapter 17 2. Use the following to determine if a cracked crankcase can be repaired. See Figures 17-1 and 17-2. If a crack is observed in any non-critical (shaded) area that is more than two (2) inches in length, or if a previously observed crack has progressed to two (2) or more inches in length, the crankcase must be repaired or replaced. If any crack is observed in a critical (white) area the crankcase must be discarded. Reasons for crankcase replacement: a. Any crack in the critical (white) areas. b. Any crack two (2) inches or more in length in the non-critical (shaded) area. c. Any crack that is leaking oil (not seeping). FIGURE 17-1. INSPECTION OF CRANKCASE NON CRITICAL AREAS 4. Visually inspect the breather for cracks and dents. Inspect tube ends for scoring and out of roundness that may have caused a bad seal and oil leakage. Discard components with any of these indications. 5. Visually inspect all pipe plugs for stripped or distorted threads and damaged wrench flats. Pipe plugs exhibiting damaged threads or wrench flats must be discarded. 6. Inspect engine mount brackets and alternator support bracket for cracks, dents and wear. Inspect hardware for distorted, stripped threads and damaged wrench flats. Components exhibiting any of the above indications must be discarded. Inspect tapped holes and helical coils for distorted or stripped threads. 17-3 Chapter 17 FIGURE 17-2. INSPECTION OF CRANKCASE CRITICAL (WHITE) AND NON CRITICAL (SHADED) AREAS 4. Visually inspect all crankcase helical coils and studs for stripped or distorted threads. Inspect studs for corrosion, rusting, pitting, incomplete threads and looseness. Check all studs with a tool maker's square for alignment. Check studs for 17-4 looseness. All studs must have their setting heights checked for indications of backing out. See the following for crankcase stud setting heights. Chapter 17 NOTE… All studs, helical coils and plugs must be installed in accordance with the instructions in Sections 5-21, 5-22 and 5-24. See Figure 5-2, "Standard And Oversize Stud Identification." CRANKCASE STUD SETTING HEIGHTS (See Figure 17-3.) ITEM NO 1. 2. 3. 4. 5. 6. 7. 8. 9. 10. 11. 12. 13. 14. 15. 16. 17. 18. 19. 20. 21. 22. 23. 24. PART LOCATION THREAD SIZE QTY. —— SETTING HEIGHT 2.19 Breather Front 1-3-5 Side Crankcase Bushing, Starter Shaftgear, Between Crankcase Halves Stud, Cylinder Mount Deck Stud, Governor Pad Bushing Reducer, 2-4-6 Side Crankcase Elbow, 2-4-6 Side Crankcase Swivel, Tee, 2-4-6 Side Crankcase Reducer, Orifice, 2-4-6 Side Crankcase Nut, 2-4-6 Side Crankcase Stud, Crankcase, Engine Mount Stud, 1-3-5 Side Crankcase Stud, 2-4-6 Side Crankcase Plug, 2-4-6 Side Crankcase, Front Plug, Both Crankcase Halves, Front Housing, Oil gauge, 2-4-6 Side Crankcase Rear Gasket, 2-4-6 Side Crankcase Plug, 2-4-6 Side Crankcase Dowel, Crankcase Rear Dowel, Both Crankcase Halves, Rear Stud, Both Crankcase Halves, Rear Stud, Both Crankcase Halves, Rear Stud, Both Crankcase Halves, Rear Stud, Fuel Pump Pad Stud, Oil Sump Mount Flange —— 3/8-16x3/8-24 5/16-18x5/16-24 —— —— —— —— —— 3/8-16x3/8-24 3/8-16x3/8-24 3/8-16x3/8-24 —— —— —— —— .78 1.38 —— —— —— —— —— 1.19 1.69 1.69 —— —— —— 1 36 4 1 1 1 1 1 4 3 1 11 21 1 —— —— ——, —— 5/16-18x5/16-24 5/16-18x5/16-24 5/16-18x5/16-24 5/16-18x5/16-24 1/4-20x1/4-28 —— —— .05 - .07 .31 .84 2.00 1.37 .75 .75 1 1 1 2 3 3 2 4 14 1 17-5 Chapter 17 FIGURE 17-3. CRANKCASE STUD SETTING HEIGHTS 17-6 Chapter 17 FLUORESCENT PENETRANT INSPECTION The crankcase halves and all aluminum alloy brackets must be fluorescent penetrant inspected by a certified technician in accordance with the instructions in Section 5-12, "Fluorescent Penetrant Inspection. Crankcase halves that exhibit cracks must be discarded or repaired in accordance with the instructions in Section 17-4. NOTE… Prior to dimensional inspection of the crankcase crankshaft and camshaft bores the crankcase must be assembled and torqued in accordance with the following: 1. All crankcase attaching hardware must be torqued to the sequence specified in Figure 17-4. 2. Use 1/4 inch thick cadmium plated washers at cylinder 7/16 inch through bolt locations. 3. Torque 7/16 inch nuts at positions 9, 10, 12, 13 to a preliminary value of 225 inch pounds. 4. Torque 7/16 inch nuts at positions 1, 2, 4, 5, 7, 8 to a preliminary value of 250 inch pounds. 5. Torque 3/8 inch nuts to a preliminary value of 150 inch pounds. 6. Torque 1/4 inch nuts to a preliminary value of 57 inch pounds. 7. Torque 7/16 inch nuts at positions 9, 10, 12, 13 to a final value of 450 inch pounds. 8. Torque 7/16 inch nuts at positions 1, 2, 4, 5, 7, 8 to a final value of 500 inch pounds. 9. Torque 3/8 inch nuts to a final value of 300 inch pounds. 10. Torque 1/4 inch nuts to a final value of 114 inch pounds. NOTE… See "New Parts Dimensions," of this section for crankcase bore diameters. FIGURE 17-4. CRANKCASE DIMENSIONAL INSPECTION TORQUING SEQUENCE 17-7 Chapter 17 DIMENSIONAL INSPECTION The following new parts limits must be used for dimensional inspection. Components that do not meet the following specifications must be discarded. All components must be thoroughly cleaned and air dried prior to dimensional inspection. Ref. No 1. 2. 3. 4. 5. 6. Description CRANKCASE Through bolt in crankcase ............................................................. Diameter: Hydraulic valve tappet in crankcase.............................................. Diameter: Governor driven gear in crankcase................................................................: Starter shaft bushing in crankcase .................................................................: Crankcase (each half).......................................................................... Width: Crankcase (cylinder deck-to- cylinder deck)...................................... width: NOTE…See Critical New Parts Dimensions for crankcase bores. FIGURE 17-5. CRANKCASE FITS AND LIMITS 17-8 New Parts Min. Max. 0.0007T 0.001L 0.0014L 0.0005L 4.559 9.118 0.0011L 0.0025L 0.0034L 0.001T 4.565 9.130 Chapter 17 NEW PARTS DIMENSIONS Part Name Crankcase Feature Crankshaft front journal bore Crankshaft rear and intermediate journal bores Thrust washer lands diameter Camshaft bore diameter Tappet guides diameter Starter shaftgear bushing hole diameter Camshaft journal diameter 17-4 CRANKCASE AND ASSOCIATED PARTS REPAIR AND REPLACEMENT Any crankcase or associated parts worn beyond new parts limits or failing to meet inspection criteria in Section 17-3 must be replaced 100% unless repair is possible with the following instructions: 1. Crankcases with cracks must be repaired or replaced. Teledyne Continental Motors has established that welding of crankcases is an acceptable repair process. Weld repairs in the crankcase non critical areas shown in Figures 17-1, 17-2 may be accomplished by a repair New Dimension (inches) 2.4370 - 2.4380 2.5625 - 2.5635 3.410 - 3.420 1.3745 - 1.3755 1.0005 - 1.0015 1.2500 - 1.2510 1.3725 - 1.3735 facility certified for specialized crankcase repairs. The dimensional integrity of the crankcase must be maintained. WARNING No weld repairs are allowed in the critical areas shown in Figures 17-1 and 17-2. 2. Installation of crankcase cylinder deck stud hole helical coils must be accomplished in accordance with the specifications in Figure 17-6 and the instructions in Section 5-21, "Helical Coil Insert Replacement." FIGURE 17-6. CRANKCASE CYLINDER DECK HELICAL COIL INSTALLATION 17-9 Chapter 17 WARNING The 2 and 4 o'clock crankcase cylinder deck stud positions must not be repaired by helical coil insert installation. 3. Any crankcase stud found to be damaged or loose must be replaced in accordance with the instructions in Section 5-22. See Figure 17-3, "Crankcase Stud Setting Heights," for proper stud setting heights. See the following for crankcase cylinder mount deck studs. NOTE… Crankcase cylinder mount deck studs requiring replacement must be replaced in accordance with the following instructions: a. Studs and tapped holes must be clean and dry. b. Apply Lockquick Primer grade "N" to stud and cylinder deck threads and allow to dry. c. Apply Loctite grade 271 to both threads. d. Install studs to appropriate setting height. See Section 17-3. e. Wipe excess Loctite from cylinder deck. f. Allow two hours minimum setting time before testing stud break away torque. g. Test studs after they have cured. The studs must not break away under a torque load of 100 inch pounds. h. Studs conforming with the break away toque test can be utilized for cylinder installation. 4. Crankcases with crankshaft or camshaft bearing bores that exceed the specified critical new parts diameter must be discarded or line bored oversize. Line boring may be accomplished by a repair facility certified for specialized crankcase repairs. See Section 17-3 for new parts dimensions. 17-10 5. Crankcase halves exhibiting fretting must be machined or discarded. Crankcase machining may be accomplished by a repair facility certified for specialized crankcase repairs. The crankcase parting line to cylinder deck new parts dimension is 4.559 minimum to 4.565 maximum. After machining process the service minimum cylinder deck height dimension must not exceed 4.5535 minimum. Crankcase halves exceeding this dimension must be discarded. CAUTION… Gear backlashes must not be less than the specified minimum after machining. 6. The case half parting line surface must be flat within .005 true indicator reading but not to exceed cumulative of .008 true indicator reading with mating crankcase half. Crankcase halves exceeding these dimensions must be discarded. After all machining procedures have been completed the crankcase halves must be fluorescent penetrant inspected by a certified technician as specified in Section 17-3 in accordance with Section 5-12, "Fluorescent Penetrant Inspection." 7. Section 5-19, "Application Of Accelagold," applies to all aluminum alloy castings, sheet metal and tubing. Chapter 17 17-5 CRANKCASE SUB-ASSEMBLY NOTE… All crankcase components must be clean and free of debris before assembly. 1. See Figure 17-3, "Crankcase Stud Setting Heights." Install all pipe plugs that were removed in accordance with the specifications in Figure 17-3 as applicable. Before installation, apply Loctite Pipe Sealant with Teflon (PS/T) sparingly on the pipe plug male threads. Install and torque plugs to the specified values in Table 6-3, "Pipe Plug Torques." 2. Install a new oil gauge lock ring (10) on oil gauge housing (9). Assemble housing (9) to crankcase oil gauge housing extension using a new hose (8) and two clamps (7). Torque clamps (7) to 12-16 inch pounds. 3. Cover and store crankcase halves and associated parts in a clean protected area until final engine assembly. 17-11 Chapter 17 INTENTIONALLY LEFT BLANK 17-12 Chapter 18 CHAPTER 18 ENGINE DRIVE TRAIN SECTION 18-1 18-2 18-3 18-4 18-5 18-6 PAGE Camshaft Disassembly ....................................................18-2 Crankshaft and Connecting Rod Disassembly ...............18-2 Engine Drive Train Cleaning ..........................................18-2 Engine Drive Train Inspection ........................................18-3 Engine Drive Train Repair and Replacement .................18-9 Engine Drive Train Sub-Assembly .................................18-17 FIGURE 18-1 PAGE Crankshaft, Camshaft and Connecting Rod Fits And Limits................................................................18-6 Connecting Rod Fits And Limits ....................................18-8 Crankshaft Hanger Blade Bushing Replacement ...........18-10 Counterweight Inspection, Repair and Installation.........18-12 Oil Control Plug Installation Tool...................................18-13 Oil Control Plug Leak Test Fixture.................................18-14 Crankshaft Leak Test.......................................................18-15 Helix Pattern Application................................................18-16 Connecting Rod Position Number ..................................18-19 18-2 18-3 18-4 18-5 18-6 18-7 18-8 18-9 18-1 Chapter 18 18-1 CAMSHAFT DISASSEMBLY (See Figure 6-18) See Figure 6-18, "Camshaft Assembly." Remove the governor drive gear (5) and woodruff key (4). Cut and remove lockwire from bolts (3). Remove four bolts (3) and camshaft gear (2). Discard woodruff key (4) and lockwire. 18-2 CRANKSHAFT AND CONNECTING ROD DISASSEMBLY (See Figure 6-19) 1. See Figure 6-19, "Crankshaft Assembly." Use wooden support blocks under the front and rear main journals of the crankshaft during disassembly. Remove and discard cotter pins (23), nuts (21) and bolts (20). Separate connecting rod caps and rod (18). Remove and discard bearing inserts (22). Loosely reassemble rods, caps, bolts and nuts with their position numbers matched. 2. Remove and discard retaining rings (8), plates (7) and pins (5, 6). Lift counterweight assemblies (3) from crankshaft. 3. Cut safety wire and remove four bolts (15) and gear (14). Tap circumference on gear using a rawhide mallet and remove. 4. Work oil seal spring (17) from oil seal groove and detach from seal. Twist and remove oil seal from crankshaft. Discard oil seal (16) and spring (17). WARNING The counterweights and crankshaft must not be punch marked or scribed for location identification. Use tagging or ink methods to identify. 18-3 ENGINE DRIVE TRAIN CLEANING The camshaft, crankshaft, connecting rods and their associated parts must be cleaned in accordance with the instructions in Section 5-7, "General Cleaning," and the following special instructions: 1. All hydraulic tappets, woodruff keys, rubber oil seals, springs, crankshaft main bearings, thrust washers, connecting rod bearings, counterweight pins, retainer plates, snap rings, o-rings and cotter 18-2 pins removed from the camshaft, crankshaft and crankcase must be replaced 100% at overhaul. Cleaning of these parts is not required. Crankshaft counterweight hanger blade bushings, counterweight bushings and connecting rod bushings must also be replaced 100% at overhaul. 2. All areas of the camshaft and crankshaft must be degreased by brushing or spraying with mineral spirit solvent. The crankshaft crank pins, main journals, oil seal race and camshaft journals and gear mount flange must be smoothed with crocus cloth moistened in mineral spirits. This is to be accomplished while the shaft is rotated in a lathe at approximately 100 RPM. All gum (varnish) deposits must be removed to permit reliable magnetic indications during magnetic particle inspection. Flush the internal portion of the crankshaft using mineral spirit solvent. Insure that all threads, oil passages and recesses are clean and free of debris. Clean the counterweights using mineral spirits. WARNING Do not pressure blast counterweights with an abrasive media. Blasting will remove surface hardening. 3. Remove the connecting rod bolts and nuts but do not discard at this time. All areas of the connecting rods must be degreased by brushing or spraying with mineral spirit solvent. Insure all bolt holes, oil passages and recesses are clean and free of debris. All gum (varnish) deposits must be removed to permit reliable magnetic indications during magnetic particle inspection. 4. Clean gears that have bushings using mineral spirit solvent and a brass wire brush. Gears with bushings must not be cleaned using alkaline solutions. Gears that do not have bushings can be cleaned using mineral spirit solvent or by immersion in a alkaline stripping bath, if mineral spirit solvent is not effective. After cleaning with alkaline solution, the gears must be sprayed with steam removing all traces of alkaline. After steam rinsing the gears must be thoroughly flushed with mineral spirit solvent. Chapter 18 CAUTION… Alkaline cleaning solutions will cause corrosion to metals if not completely removed. WARNING Do not pressure blast gears with an abrasive media. Blasting will remove surface hardening. 18-4 ENGINE DRIVE TRAIN INSPECTION burning. Inspect the gear bolt holes for distorted or stripped threads. Check oil passages for obstructions and loose oil tubes. Check the gear dowel for a tight fit. Inspect the oil control plug for presence, obstructed oil hole and tight fit. Visually inspect the entire crankshaft for rust and pitting. Crankshafts exhibiting any of the above indications must be repaired or replaced. Crankshaft repairs must be performed under carefully controlled conditions using an approved procedure and process which meets the requirements of the applicable federal aviation regulations. WARNING WARNING Use only crankshafts that are manufactured from VAR forgings identified by the letters VAR forged into a crankshaft cheek. VISUAL INSPECTION The crankshaft, camshaft, connecting rods and associated engine drive train components must be visually inspected in accordance with the instructions in Section 5-8, "Visual Inspection," and the following special instructions. 1. Visually inspect the camshaft journals and lobes using a 10X magnifying glass. Inspect the camshaft journals and lobes for scoring, pitting, corrosion and any indications of wear. Camshafts exhibiting scoring pitting, corrosion or wear indications must be repaired or discarded. Inspect the camshaft gear flange for nicks, peening and other irregularities. The flange must be smooth to align gear. Inspect the camshaft gear flange bolt holes for distorted or stripped threads. Camshaft repairs must be must be performed under carefully controlled conditions using an approved procedure and process which meets the requirements of the applicable federal aviation regulations. 2. Using a Borrough's 8087A polishing tool or equivalent rotate the crankshaft in a lathe and polish the mains and crankpins to a finish of 8 Ra maximum. Inspect the finish using a profilometer. Dimensionally inspect the crankshaft mains and crankpins for required specified size. 3. Visually inspect the crankshaft main journals, crank pins and oil seal area for scoring and The counterweights and crankshaft must not be punch marked or scribed for location identification. Use tagging or ink methods to identify. 4. Visually inspect counterweights for cracks, nicks, evidence of contact between bottom of counterweight and crankshaft. Counterweights exhibiting these indications must be discarded. 5. Inspect the connecting rod and rod cap for matching position numbers stamped on the bolt boss. Discard any connecting rod and cap assemblies that do not have matching numbers. Inspect the connecting rod and cap for cracks, bending, twisting, galling, mechanical damage and discoloration (bluing). Inspect the connecting rod and cap parting surface for fretting, rub or any mechanical damage. Discard connecting rods with bolt holes that exhibit raised nicks, burrs or mechanical damage. Also inspect the bolt hole dowel area for fretting. Discard connecting rods with cracks, bending, twisting, galling or mechanical damage. Discard any rod assembly exhibiting fretting or rub on the parting surfaces or the dowel area of the bolt holes. Discard any rod assembly exhibiting corrosion etching, rust or rust pitting. NOTE… No rework is permitted to connecting rod and end cap parting surface. Remove any sharp edge on the bolt holes at the parting surfaces with crocus cloth. Inspect the sides of the connecting rod and cap for any indications of hard contact with the crankshaft. If 18-3 Chapter 18 hard contact damage has occurred, discard the connecting rod and cap and inspect the corresponding area of the crankshaft. If damage has occurred to the crankshaft it must also be discarded. Inspect the complete outside area of the connecting rod and cap assembly for any damage to the shot peened surface. Discard any connecting rod and cap assembly exhibiting damage to the shot peened surface. 6. Using a 10X magnifying glass, visually inspect the crankshaft gear and idler gear drive gear teeth for signs of overheating and wear. Normal wear produces a fine polish on the tooth thrust faces. Gears that have alteration of the tooth profiles, score marks, pitting or galling must be discarded. See Figure 8-1, “Gear Tooth Wear,” for acceptable and unacceptable gear tooth wear. CRANKSHAFT ULTRASONIC INSPECTION The crankshaft must be ultrasonic inspected by a certified technician in accordance with Section 5-11. MAGNETIC PARTICLE INSPECTION The crankshaft, counterweights, camshaft, crankshaft gears, camshaft gear, idler gear and governor drive gear must be magnetic particle inspected by a certfied technician in accordance with the instructions in Section 5-9, "Magnetic Particle Inspection." Clean the connecting rods, caps, bolts and nuts with solvent and blow dry. Inspect the bolt and nut threads for damage. Do not assemble connecting rods and caps with damaged bolts or nuts. Lubricate the connecting rod bolt and nut threads using clean 50 weight aviation engine oil. Assemble the connecting rod and cap as follows: Align the matching numbers on the connecting rod and cap and hand press the new bolts into the connecting rod. Do not force bolts through the cap or rod bolt holes. The connecting rod and cap must be completely seated and both bolt heads must be completely seated against the connecting rod cap seats. Any connecting rod assembly requiring more than hand pressure to seat the connecting rod, caps and bolts must be discarded. Install the nuts finger tight. On assemblies using the 530213 bolts and 626140 nuts, torque the nuts to 400-475 inch pounds. On assemblies using the 654693 bolts and 654487 nuts, torque the nuts to 490-510 inch pounds. Magnetic particle inspect all connecting rod and cap assemblies in accordance with the instructions in Section 5-9, "Magnetic Particle Inspection." Connecting rods exhibiting cracks or indications of cracks must be discarded. Leave the connecting rods and caps assembled and torqued for bushing replacement. NOTE… Crankshafts, counterweights, camshafts, crankshaft gears, camshaft gears, idler gears or governor drive gears exhibiting cracks must be discarded. 18-4 The standard magnetic particle inspection procedure found in the latest revision of ASTM Standards on nondestructive testing describes the method of magnetization, inspection and demagnetization. Chapter 18 DIMENSIONAL INSPECTION The following new parts limits must be used for dimensional inspection. Components that do not meet the following specifications must be discarded. All components must be thoroughly cleaned and air dried prior to dimensional inspection. Ref. No 1. 2. 3. 4. 5. 6. 7. 8. 9. 10. 11. 12. 13. 14. 15. 16. 17. 18. 19. 20. 21. 22. 23. 24. 25. Description CRANKSHAFT Crankshaft in main bearings............................................................Diameter: Crankshaft in thrust bearing ................................................... End Clearance: Camshaft journals in crankcase.......................................................Diameter: Camshaft in crankcase............................................................ End Clearance: Crankpins...........................................................................Out-of-Round: Main journals.....................................................................Out-of-Round: Rear & Intermediate Journals......................................................Diameter: Crankshaft Thrust Journal ...........................................................Diameter: Crankpins.........................................................................................Diameter: Crankshaft run-out at center main journals (shaft supported at thrust and rear journals) full indicator reading : Taper over crankshaft journal width .............................................................. : Crankshaft run-out at propeller flange (when supported at front and rear main journals) full indicator reading.............................................................. : Damper pin bushing in hanger blade bore .....................................Diameter: Damper pin bushing in counterweight ............................................Diameter: Damper pin in counterweight................................................. End Clearance: Damper pin ......................................................................................... Length: Crankshaft gear on crankshaft.........................................................Diameter: Counterweight on hanger blade ............................................. Side Clearance: Damper pin 643626-110......................................................................................Diameter: 643626-111......................................................................................Diameter: CAMSHAFT Camshaft run-out at center journals (shaft support at end journals) full indicator reading ...................................................................................... : Camshaft gear on camshaft flange ..................................................Diameter: Governor drive gear on camshaft....................................................Diameter: CONNECTING ROD Connecting rod bearing on crankpin...............................................Diameter: Connecting rod bolt in connecting rod............................................Diameter: Connecting rod bearing side clearance .................................. Side Clearance: Piston pin in connecting rod bushing..............................................Diameter: GEAR BACKLASH Crankshaft gear-to-camshaft gear ...................................................Backlash: New Parts Min. Max. 0.001L 0.006L 0.001L 0.005L 0.0000 0.0000 2.373 2.2475 1.936 0.004L 0.018L 0.003L 0.012L 0.0005 0.0005 2.374 2.2485 1.937 0.000 0.000 0.0000 0.0150 0.0005 0.0050 0.0015T 0.001T 0.011L 0.8190 .0000 0.004 0.0030T 0.0025T 0.037L 0.821 0.0025T 0.014 .498 .552 .499 .553 0.0000 0.0010 0.0005T 0.0002L 0.0015L 0.002L 0.0005L 0.0005L 0.0056 0.0014L 0.003L 0.0023L 0.008 0.0021L 0.006 0.009 If crankshaft is worn beyond these limits it may be repaired by grinding crankpins and journals to 0.010" under new shaft limits and re-nitriding. Crankshaft machining may be accomplished by a repair facility certified for specialized crankshaft repairs. 18-5 Chapter 18 During dimensional inspection the camshaft and crankshaft must be mounted on matched vee blocks supporting the front and rear main journals. The vee blocks must be mounted on a surface plate. Rotate the shafts under a dial indicator placed on the center main journal to detect bending (runout). Rotate the crankshaft prop flange under a dial indicator to detect bending (runout). See items (10, 11,19) of Figure 18-1, "Crankshaft and Camshaft Fits and Limits," for camshaft and crankshaft runout tolerances. FIGURE 18-1. CRANKSHAFT, CAMSHAFT AND CONNECTING ROD FITS AND LIMITS 18-6 Chapter 18 DIMENSIONAL INSPECTION (continued) The connecting rod piston pin bushing alignment must be checked with the crank pin end bearing bore. Make alignment measurements using a push fit arbor for the bushing bore (piston pin end) and another for the bearing seat (crank pin end). The arbors must be eight inches long. A surface plate, two matched vee blocks, and two blocks of ground flat steel stock of equal height are required. To measure twist, insert the arbors into the rod bores. Then place the big end arbor (crank pin end) in the vee blocks on the surface plate. Place the ground steel blocks under the ends of the bushing arbor (piston pin end) a measured distance apart. Use a leaf type feeler gage to detect any clearance under the arbor ends. This divided by the separation of the blocks in inches will give the twist per inch of length. To measure bushing and bearing convergence mount a dial indicator on a surface gage and swing the rod around the crank pin end arbor to the vertical position against a firm stop. Pass the indicator over the bushing arbor on both sides of the connecting rod at points an exact number of inches apart. For exact parallelism the two measurements must be the same. See Figure 18-2, "Connecting Rod Fits And Limits." 18-7 Chapter 18 FIGURE 18-2. CONNECTING ROD FITS AND LIMITS 18-8 Chapter 18 NEW PARTS DIMENSIONS Part Name Crankshaft Assembly Camshaft Connecting Rod Feature Rear and Intermediate Journals Thrust journal Crankpins Crankshaft Counterweight Hanger Blade Bushing Bore Main Journals Bushing Bore Diameter Bushing Center to Crank Pin Center 18-5 ENGINE DRIVE TRAIN REPAIR AND REPLACEMENT 1. Any engine drive train component found to be worn beyond new parts limits or failing to meet the inspection criteria in Section 18-4 must be replaced 100% unless repair is possible with the following instructions: 2. The crankshaft can be repaired by grinding crank pins and journals to 0.010" under new shaft limits and re-nitriding. Crankshaft machining may be accomplished by a repair facility certified for specialized crankshaft repairs. NOTE… Reground crankshafts must be re-nitrided. 3. Do not attempt to remove scoring or indications of overheating which render the crankshaft unserviceable. 4. The crankshaft hanger blade and counterweight bushings must be replaced 100% at engine overhaul regardless of condition. Crankshaft hanger blade bushing replacement must be performed using the specified procedure and the following special tool: New Dimension (inches) 2.373 - 2.374 2.2475 - 2.2485 1.936 - 1.937 815 - .816 1.3725 - 1.3735 1.0000 - 1.0005 6.3730 - 6.3770 a. Borrough's 8077A Crankshaft Hanger Blade Bushing Removal/Installation Set or equivalent. WARNING Removing and replacing bushings with makeshift tools and methods may result in irreparable damage to the crankshaft and crankshaft malfunction. CRANKSHAFT COUNTERWEIGHT HANGER BLADE BUSHING REMOVAL Using the specified tool remove the crankshaft counterweight hanger blade bushings. CRANKSHAFT COUNTERWEIGHT HANGER BLADE BUSHING HOLE INSPECTION After removal of the crankshaft counterweight hanger blade bushings measure the inside diameter of the bushing holes. The replacement bushings must have an interference fit of .0015 to .0035 inch into the bushing holes. The bushing holes must be smooth. Crankshafts with worn, pitted, fretted or out of round bushing holes must be discarded. 18-9 Chapter 18 FIGURE 18-3. CRANKSHAFT HANGER BLADE BUSHING REPLACEMENT CRANKSHAFT COUNTERWEIGHT HANGER BLADE BUSHING INSTALLATION After serviceability of crankshaft has been determined new bushings must be installed in the crankshaft counterweight hanger blades. Using the same tools that were used for bushing removal install the new bushings. The new bushings must be installed in accordance with the specifications in Figure 18-3, "Crankshaft Hanger Blade Bushing Replacement." Replacement bushings are available in standard size only. 18-10 NOTE… After installation of new bushings the crankshaft counterweight hanger blades must be magnetic particle inspected in accordance with Section 5-9, "Magnetic Particle inspection." Discard crankshafts with cracked counterweight hanger blades. No finishing operation is required. The new installed bushings are made to final dimensions. Chapter 18 5. The counterweight bushings must be replaced 100% at engine overhaul regardless of condition. The bushing replacement must be performed using the specified procedure and the following special tools: a. Borrough's 8077C Counterweight Bushing Removal/Installation Fixture or equivalent. b. Arbor Press. WARNING Removing and replacing bushings with makeshift tools and methods may result in irreparable damage to the counterweight and counterweight, crankshaft malfunction. COUNTERWEIGHT BUSHING REMOVAL Using the specified tools remove the counterweight bushings. COUNTERWEIGHT BUSHING HOLE INSPECTION After removal of the counterweight bushings measure the inside diameter of the bushing holes. The replacement bushings must have an interference fit of .0015 to .0035 inch into the bushing bores. The bushing holes must be smooth. Counterweights with worn, pitted, fretted or out of round bushing holes must be discarded. Carefully inspect the counterweight counterbores for signs of wear in the wall that retains the counterweight pin retaining plates. The area referred to is immediately adjacent to the inside edge of the retaining ring groove. It may appear as an additional step and/or a taper of the hole into the retaining ring groove. If any wear is evident the counterweight must be discarded. See Figure 18-4, "Counterweight Inspection, Repair and Installation." If no plate wear is evident, check the retaining ring groove in each hole for distorted width, depth or other types of wear patterns which can affect the seating of the retaining ring. Any worn condition that may affect retaining ring seating will require replacement of the counterweight. Crankshaft counterweights are matched in pairs with a maximum weight variation of two grams, and the complete crankshaft/counterweight assembly is dynamically balanced. As a result, if either counterweight is damaged, a matched pair must be procured and replaced on that cheek. COUNTERWEIGHT BUSHING INSTALLATION After serviceability of the counterweights has been determined, new bushings must be installed in the counterweight assemblies. Using the same tools that were used for bushing removal, install the new bushings. The new bushings must be installed into the same positions as the original bushings. Replacement bushings are available in standard size only. 18-11 Chapter 18 FIGURE 18-4. COUNTERWEIGHT INSPECTION, REPAIR AND INSTALLATION NOTE… After installation of new bushings the counterweights must be magnetic particle inspected by a certified technician in accordance with Section 5-9, "Magnetic 18-12 Particle inspection." No finishing operation is required. The new installed bushings are made to final dimensions. Chapter 18 FIGURE 18-5. OIL CONTROL PLUG INSTALLATION TOOL 6. Loose or leaking crankshaft oil control plugs must be replaced. The oil control plug replacement must be performed using the specified procedure and the following special tools: a. A .4375 - 20 diameter bolt approximately eight inches long with .4375 - 20 NF threads. b. An installation tool conforming to the specifications shown in Figure 18-5, "Oil Control Plug Installation Tool." c. Two inch Merrit Wheel. d. A leak test fixture conforming with the specifications shown in Figure 18-6, "Oil Control Plug Leak Test Fixture." CRANKSHAFT OIL CONTROL PLUG REMOVAL Remove crankshaft oil control plug using a .4375 - 20 diameter bolt approximately eight inches long with .4375 - 20 NF threads and a slide hammer. OIL CONTROL PLUG HOLE CLEANING Inspect the inside diameter of the crankshaft for rust and rust pits. Discard crankshafts with rust or rust pits. The inside diameter of the crankshaft must be clean and free of any sludge residue prior to new plug installation. Clean crankshaft inside diameter using a pneumatic drill and a two inch Merrit Wheel. WARNING Removing and replacing the crankshaft oil control plug with makeshift tools and methods may result in irreparable damage to the crankshaft and crankshaft malfunction. 18-13 Chapter 18 FIGURE 18-6. OIL CONTROL PLUG LEAK TEST FIXTURE 18-14 Chapter 18 OIL CONTROL PLUG INSTALLATION Using an air impact tool and the special oil control plug installation tool, carefully drive in the new oil control plug. WARNING The use of makeshift tools not conforming with the specifications shown in Figure 18-5, "Oil Control Plug Installation Tool," may cause damage to oil control plug or crankshaft during installation. The 2.375 inch diameter collar at the rear of installation tool prevents driving oil control plug beyond the specified depth of 5.31 inches. OIL CONTROL PLUG INSPECTION Using the special leak test fixture shown on previous page and a "C" clamp that has its spindle and foot protected by neoprene rubber pads, pressure test the crankshaft. See Figure 18-7, "Crankshaft Leak Test." The oil control plug must maintain 60 PSI minimum air pressure. FIGURE 18-7. CRANKSHAFT LEAK TEST 18-15 Chapter 18 7. After all crankshaft repairs have been completed, use a strip of 180 grit emery cloth approximately 1/2 inch wide and apply a helix to the crankshaft as shown in Figure 18-8, "Helix Pattern Application." Apply helix to approximately 1/4 of the surface indicated at a time. The pattern is applied by stroking the cloth outward toward the propeller flange in the direction of rotation, CCW towards you using maximum hand pressure, which will result in a 30° pattern as shown. After doing the first portion, rotate the crankshaft so that the next portion is visible. Apply the same pattern again and continue completely around crankshaft in this manner. The helix is applied to insure proper seating of the crankshaft oil seal. After helix application the crankshaft must be re-cleaned. After the helix has been applied the helix area must be tin plated. See Section 18-3, "Engine Drive Train Cleaning." FIGURE 18-8. HELIX PATTERN APPLICATION 9. All connecting rod piston pin bushings must be replaced 100% at overhaul. The connecting rod piston pin bushing replacement must be performed using the specified procedure and the following special tools: a. Arbor press. b. Borrough's 8098 Connecting Rod Bushing Removal/Installation Set or equivalent. c. Borrough's 8111A Connecting Rod Reaming and Alignment Fixture or equivalent. d. High Speed Reamer of the correct size. e. Borrough's 8042C Adapter Kit or equivalent. f. Vertical Mill or equivalent capable of maintaining 1750 RPM. g. Federal Dimension Air Gage with a 1.00025 Setting Ring and 1.00025 Air Plug or equivalent. 18-16 h. Profilometer. WARNING Removing and replacing the connecting rod piston pin bushings with makeshift tools and methods may result in irreparable damage to the connecting rods and connecting rod/crankshaft malfunction. CONNECTING ROD BUSHING REMOVAL Press out old bushing using connecting rod bushing removal/installation set and an arbor press. No nicks, gouges or other damage is permissible on the bore after bushing removal. Connecting rods exhibiting any of the above must be discarded. Chapter 18 CONNECTING ROD BUSHING INSTALLATION Make sure that the rod bore is smooth. Dip the new bushing in clean 50 wt. aviation engine oil before placing it in position and locate the split as shown in Figure 18-2, "Connecting Rod Fits And Limits." Install new bushing using connecting rod removal/installation set and an arbor press. CONNECTING ROD BUSHING FINISHING Bore the new bushing to the specified diameter of 1.000 - 1.0005 inches. CONNECTING ROD INSPECTION Using a profilometer inspect the piston pin bushing finish. The required surface finish is 32 RMS. Because of the close tolerances required, the replaced bushings must be inspected using an air gage with correct size air plug and setting ring. After connecting rod bushing inspection, the connecting rod bushing alignment with the big end bearing seat must be inspected in accordance with Section 18-4, "Dimensional Inspection." CAUTION… In order to assure good dynamic balance, connecting rod assemblies are selected in pairs with a maximum weight variation of 1/2 ounce in opposite bays. Therefore, rods are supplied in matched sets only. WARNING Never remove material from any connecting rod. 9. Insure that all engine drive train associated parts listed in Section 5-6, "100% Replacement Parts," have been replaced. 18-6 ENGINE DRIVE TRAIN SUBASSEMBLY WARNING Use only crankshafts that are manufactured from VAR forgings identified by the letters VAR forged into a crankshaft cheek. NOTE… All engine drive train components must be clean and free of debris before assembly. NOTE… Before assembly the crankshaft and camshaft must be checked for remaining magnetism from inspection procedures. If found demagnetize. NOTE… The standard magnetic particle inspection procedure found in the latest revision of ASTM standards on nondestructive testing describes the method of magnetization, inspection and demagnetization. 1. See Figure 6-18, "Camshaft Assembly." Install the camshaft in a suitable holding fixture. Using a rawhide mallet tap a new woodruff key (4) into camshaft groove and tap governor drive gear (5) onto camshaft. 2. Install gear (2) on camshaft (1). The gear bolt holes are off-set to assure proper positioning for timing. Install four new bolts (3) and torque to 240-260 inch pounds torque. Safety wire bolt heads in accordance with Section 4-2, "Lockwire Procedure." After assembly coat camshaft with clean 50 wt. aviation engine oil. 3. See Figure 6-19, "Crankshaft Assembly." Place the crankshaft on a bench with a notched wood block under front and rear journals. Attach one counterweight (3) to crank cheek No. 2 hanger blade with two new pins (5). Install new plates and retaining rings (10, 11) with sharp edge outboard. Attach one counterweight (3) to the opposite crank cheek No. 2 hanger blade with two new pins (6). Install new plates and retaining rings (10, 11) with sharp edge outboard. Pins with the same part number and dash number must be installed in each counterweight. CAUTION… The retaining rings, plates and pins must be installed as shown in Figure 18-4, "Counterweight Inspection, Repair and Installation." Chapter 18 The counterweight plates have a small extruded point which provides an interference fit of .001 to 18-17 .007. During installation, check the counterweight plates for an actual interference fit in the bushing bore. An interference fit is required. WARNING Do not use plates that have a loose fit. NOTE… Counterweight pins are identified by dash numbers stamped on one end. Because the counterweight order is controlled by the pin diameter it is imperative only the correct pin, properly identified, be used. The 4-1/2 order 643626-110 pin has an O.D. of .498-.499. The 6th order 643626-111 pin has an O.D. of .552-.553. WARNING Do not exceed ten minutes at 350°F during crankshaft gear heating process. Do not use a torch to heat the crankshaft gear. The heating process must be performed using uniform heating methods only. 4. Heat crankshaft gear (14) to 300°F for 5 to 10 minutes. Use thick gloves to handle gear. Align gear dowel hole with crankshaft dowel and install gear on crankshaft. Attach crankshaft gear (14) to crankshaft using four new bolts (15). Torque bolts to 240-260 inch pounds in a criss-cross pattern. Install lockwire on bolts (15) in accordance with Section 4-2, "Lockwire Procedure." 5. Original connecting rods have a position number stamped on the end cap and rod bolt boss. New 18-18 connecting rods must have a position number, 1 through 6 as applicable, vibro etched in the Chapter 18 location shown in Figure 18-9, " Connecting Rod Position Number." See Figure 6-19. Remove the bolts and nuts from the connecting rods and discard. Place a sheet of crocus cloth on a flat surface plate and dampen with solvent. Lightly rub the parting surface of the rod, cap and rod across the crocus cloth to remove any burrs or nicks. Inspect the parting surfaces, bolt holes and bolt hole edges to insure there are no nicks burrs or sharp edges. Clean rods, caps, bolts and nuts thoroughly, blow dry and place on a clean cloth. Clean the new bearing inserts in solvent and blow dry. Inspect the bearings for damage and insure each bearing is the correct size and part number for the connecting rod/crankshaft to be used. Install a new bearing in each rod cap and rod. Insure that the bearing ends project the same distance even with the parting surface and that they are properly seated. Closely examine for and remove any metal that may have shaved from the bearing back onto the parting surface during installation. Coat the rod bolt completely with clean 50 weight aviation engine oil. Align the matching numbers on the connecting rod and cap and hand press the new bolts into the connecting rod. Do not force bolts through the cap or rod bolt holes. The connecting rod and cap must be completely seated and both bolt heads must be completely seated against the connecting rod cap seats. Any connecting rod assembly requiring more than hand pressure to seat the connecting rod, caps and bolts must be discarded. Remove the connecting bolts and separate the connecting rod and cap Inspect each connecting rod assembly for correct fit. Chapter 18 FIGURE 18-9. CONNECTING ROD POSITION NUMBER 4. Insure that the new bearings are properly seated. Using clean 50 wt. aviation oil, lubricate and install each rod, cap and bearing assembly at the correct position on the crankshaft. Install the connecting rod and cap with their numbers on top when odd number rods are extended to the right and even number rods are to the left viewing crankshaft from the rear (gear end) forward. Lubricate the new connecting rod bolt and nut threads using clean 50 weight aviation engine oil. Secure rods and caps using new special bolts and nuts (20 & 21). On assemblies using the 530213 bolts and 626140 nuts, torque the nuts (21) to 400-475 inch pounds. On assemblies using the 654693 bolts and 654487 nuts, torque the nuts (21) to 490-510 inch pounds. On assemblies using the 530213 bolts and 626140 nuts, install cotter pins (23) and secure in accordance with Figure 4-5 "Connecting Rod Cotter Pin Installation." 7. Remove spring (17) from oil seal (16). Unhook spring ends. Place new spring around crankshaft in oil seal area and re-hook ends. Install new split oil seal (16) over the crankshaft. After oil seal is on shaft, press the reinforcing spring into the oil seal recess by moving fingers in both directions from split. Insure spring is in deepest part of recess all the way around. 8. Store engine drive train components in a clean protected area until final engine assembly. 18-19 Chapter 18 INTENTIONALLY LEFT BLANK 18-20 Chapter 19 CHAPTER 19 FINAL ASSEMBLY SECTION 19-1 19-2 19-3 19-4 19-5 19-6 19-7 19-8 19-9 19-10 19-11 19-12 19-13 19-14 19-15 19-16 19-17 19-18 19-19 FIGURE 19-1 19-2 19-3 19-4 19-5 19-6 19-7 19-8 19-9 19-10 19-11 19-12 19-13 19-14 19-15 PAGE General ....................................................................19-3 Crankcase ................................................................19-3 Crankcase Sealant and Threading Procedure .........19-5 Crankcase Through Bolt Installation and Torquing Sequence .................................................19-6 Oil Sump ................................................................19-12 Accessory Case ......................................................19-12 Compressor Mounting Components, Starter Adapter And Starter Motor TSI0-360-RB .............19-14 Starter Adapter And Starter Motor LTSI0-360-RB ........................................................19-18 Alternator Assembly ...............................................19-18 Valve Mechanism ..................................................19-18 Cylinder Baffling ....................................................19-20 Cylinder Drain Assemblies.....................................19-20 Exhaust System ......................................................19-21 Induction System ...................................................19-22 Fuel Injection System ............................................19-23 Engine Timing Position Procedure ........................19-24 Magneto Timing and Installation On Engine.........19-27 Ignition Harness Pre- Installation Instructions .......19-28 Ignition Harness Installation...................................19-29 PAGE Crankcase and Shafts Assembled on Stand............19-4 Alignment of Timing Marks...................................19-4 Crankcase Sealant And Threading Procedure .......19-6 O-Ring Installation Tool.........................................19-7 Crankshaft Oil Seal Installed ..................................19-8 Right Side View of Crankcase on Stand ...............19-8 Installing Number Five Cylinder............................19-10 Torquing Cylinder Base Nut...................................19-10 Torquing Sequence .................................................19-11 Oil Sump Torquing Sequence.................................19-12 General Bottom View ............................................19-12 Accessory Case Torquing Sequence ......................19-13 General Accessory Case and Accessories Installed...............................................19-14 Starter And Freon Compressor Brackets................19-16 Compressor Bracket Alignment .............................19-17 19-1 Chapter 19 FIGURE 19-16 19-17 19-18 19-19 19-20 19-21 19-22 19-23 19-24 19-25 19-26 TABLE 19-1 19-2 PAGE Rocker Arm to Rotocoil Clearance ........................ 19-19 Checking Rocker Arm Clearance........................... 19-20 General Installing Pushrod Housing ...................... 19-20 Multi-Segment "V" Band Clamp ........................... 19-21 Timing Position Step One ...................................... 19-24 Timing Position Step Two .................................. 19-25 Timing Position Step Three ................................ 19-25 Timing Position Step Four .................................. 19-26 Timing Position Step Five................................... 19-26 Coating Insulating Sleeve ................................... 19-28 Ignition Wiring Diagram..................................... 19-30 PAGE Coupling Nut Torque Values .............................. 19-29 Chapter 19 19-1 GENERAL WARNING Use only parts meeting the engine type design. Apply clean 50 weight aviation engine oil liberally to all bare steel surfaces, journals, bearings and bushings before and after installation, except where special lubricants are required. See Chapter 3, "Table of Sealants and Lubricants." During assembly the mechanic must measure clearances of running parts as they are installed and compare with clearances listed in Fits and Limits of the applicable system or component section. During engine overhaul use only NEW PARTS LIMITS. See Section 6-16, "New Parts and Service Limits." Also TCM requires certain parts be replaced 100% at overhaul. See Section 6-6, "100% Replacement Parts." Engine assembly must be performed in a clean dust free environment. All engine openings must be covered as soon as possible to prevent admittance of debris or small parts. 19-2 CRANKCASE (See figures as indicated in paragraphs.) NOTE… See Chapter 2 for lubricant specifications and suppliers. 1. Uncover crankcase halves. Using clean 50 weight aviation engine oil, thoroughly coat all crankcase camshaft bearing surfaces, prop governor gear bearing surface, starter shaft gear bushing and idler gear bushing. The crankshaft bearing saddles must be dry prior to crankshaft bearing installation do not coat them with oil. Chapter 19 2. See Figure 6-17. Using new o-ring (23), install engine mount bracket (38) and prop cable bracket (17) on 2-4-6 crankcase half. Secure brackets using attaching hardware (20, 21, 22). Using new o-rings (23), install engine and oil cooler mount bracket (36) on 2-4-6 crankcase half. Secure bracket using attaching hardware (20, 21, 22). Using new o-ring (23), install engine mount bracket (37) on 1-3-5 crankcase half. Secure bracket using attaching hardware (20, 21, 22). Install engine mount bracket (35) and turbocharger bracket (48) on 1-3-5 crankcase half. Secure brackets using attaching hardware (20, 22). Snug but do not torque nuts (22) at this time. 3. Install left crankcase half on engine stand open side up. Lay right crankcase half on bench open side up. Using clean 50 weight aviation engine oil, thoroughly lubricate all surfaces that were lubricated on the right crankcase half. Do not lubricate the crankshaft bearing saddles. See Figure 17-3, "Crankcase Stud Setting Heights," install Bushing (2) and align with dowel in position shown on 1-3-5 case half. 4. See Figure 6-19, "Crankshaft Assembly." Using a piece of clean smooth bar stock, roll new packings (12) into both new bearing halves (11). Insure that the packings seat in bearing halves properly. Trim the new packing ends flush to the bearing edge with a razor. Install crankshaft bearings (10, 11) in crankcase crankshaft bearing saddles. Apply clean 50 weight aviation engine oil to thrust washer lands in crankcase to prevent thrust washer halves from falling out during final assembly. Install thrust washer halves (13). Insure that the bearing and thrust washer ends project equally and are properly seated in lands. Lubricate bearings with clean 50 weight aviation engine oil. 19-3 Chapter 19 5. Apply a thin coat of Permatex to outside diameter of crankshaft oil seal. With the aid of an assistant, lift crankshaft assembly by Number 1 connecting rod and propeller flange. While assistant is holding Number 3 connecting rod upward, carefully lower assembly into its position. Check to make sure bearings and thrust washers are still seated properly. Make sure crankshaft oil seal is properly seated. The oil seal split line must be positioned so it is at the one o'clock position from the crankcase splitline. The connecting rod position numbers, if properly installed, will be toward the upper case flange. Carefully lay odd numbered connecting rods on the upper case flange. 6. See Figure 6-18, "Camshaft Assembly." Using clean 50 weight aviation engine oil, lubricate and install camshaft (1) into crankcase. Make sure timing marks on camshaft and crankshaft align as gears mesh. Number 1 connecting rod on crankshaft should be in its fully extended (TDC) position. Governor driven gear may have to be turned slightly to allow camshaft to seat in its bearings properly. FIGURE 19-1. CRANKCASE AND SHAFTS ASSEMBLED ON STAND FIGURE 19-2. ALIGNMENT OF TIMING MARKS 19-4 Chapter 19 CAUTION… If the crankcase has been machined, gear backlashes must not be less than the specified minimum after machining. 7. Check camshaft to crankshaft gear backlash and compare with tolerance in Figure 18-1, " Crankshaft, Camshaft and Connecting Rod Fits and Limits." Coat camshaft lobes with Dow Corning G-N Paste. [Dow Corning® is a registered trademark of Dow Corning Corporation.] 8. Measure crankshaft end clearance using a dial indicator set at zero against the propeller flange. Crankshaft end clearance must be .006 to .018. Measure camshaft end clearance at either end of its rear main bearing. Camshaft end clearance must be .005 to .012. Measure governor drive gear backlash it must be .002 to .012. 9. Apply sealants and thread to crankcase halves in accordance with the instructions in Section 19-3, "Crankcase Sealant And Threading Procedure." 19-3 CRANKCASE SEALANT AND THREADING PROCEDURE 1. Use full strength non-thinned Permatex aviation grade 3D. Shake or mix well before using. WARNING Apply thread illustrated. and permatex only as 2. Apply Permatex Number 3D to the 2-4-6 case half. Apply Permatex only in areas where thread is shown. When applying, use short light brush strokes until an even thin coat is obtained. The Permatex should be viscous enough that most of the brush marks disappear; if not, use a new can of Aviation Permatex. Allow the Permatex to air dry to a tacky condition before threading. 3. Apply a thin even coat of TCM Gasket Maker P/N 646942 to 1-3-5 case half. Apply Gasket Maker in all areas that will mate with areas where Permatex was applied on 2-4-6 case half. Gasket Maker is to be applied sparingly .010 to .020 inch thick. Apply grade D silk thread P/N 641543 on 2-4-6 case half only. Apply thread as shown in Figure 19-3. Be sure free ends of thread are covered by gaskets except at the nose oil seal. 4. Assemble crankcase halves in accordance with the following paragraphs. Install and torque all crankcase hardware in proper sequence, in accordance with Section 19-4 as soon as possible. 5. Stand odd numbered connecting rods straight up. Have an assistant balance and guide connecting rods through 1-3-5 case half cylinder openings as crankshaft assembly is installed. 6. Place the 1-3-5 (right) crankcase half on 2-4-6 (left) case half. Take care to prevent displacement or damage to the crankshaft oil seal and silk thread. Insure thrust washer, bearing halves and starter shaftgear bushing remain in the correct position. 19-5 Chapter 19 FIGURE 19-3. CRANKCASE SEALANT AND THREADING PROCEDURE 19-4 CRANKCASE THROUGH BOLT INSTALLATION AND TORQUING SEQUENCE. CAUTION… All studs and through bolts must be lubricated in accordance with Chapter 2, "Tools, Equipment, Sealants and Lubricants." NOTE… See Figure 6-17, "Crankcase Attaching Parts." See Figure 19-9, "Torquing Sequence," for crankcase stud and through bolt hole positions. 19-6 WARNING Failure to lubricate threads, apply the specific torque and follow the specific torquing procedure may result in crankcase bearing bore damage, crankshaft bearing damage, crankshaft damage and subsequent engine malfunction or failure. Chapter 19 FIGURE 19-4. O-RING INSTALLATION TOOL 1. See Figures 6-17, "Crankcase Attaching Parts and 19-9, "Torquing Sequence." Using an o-ring installation tool conforming with the specifications in Figure 19-4, "O-Ring Installation Tool," and new o-rings (29), install five 7/16 x 10.48 inch through bolts in positions (1, 4, 10, 13 and 30). Install one 7/16 x 9.96 inch through bolt in position (33). Install two 7/16 x 6.80 inch through bolts in positions (27, 28). Install one 3/8 inch through bolt (19) in position (38). Install one 3/8 inch through bolt (14) in position (29). Install one 1/4 inch through bolt (13) in position (40). Install one 3/8 inch through bolt (15) in position (9). Install one 3/8 inch through bolt (18) in position (18). Tap through bolts in to a centered position using a plastic or rawhide mallet. These bolts align crankcase castings and bearings. Install two spacers (40) and bracket (39) on 1-3-5 case half through bolts at positions (19, 27, 28). Install four 7/16 washers (30) and four nuts (28) in positions (27, 28). Install two 7/16 washers (30) and two nuts (28) on 2-4-6 case side in positions (30, 33). Install two 3/8 washers (20) and two nuts (22) in positions (38). Install two 3/8 washers (20) and two nuts (22) in positions (29). Install two 3/8 washers (20) and two nuts (22) in positions (9). Install two 3/8 washers (20) and two nuts (22) in positions (18). Install two 1/4 washers (4) and two nuts (5) in positions (40). Snug but do not torque nuts (5, 22, 28) at this time. This hardware will hold crankcase halves and internal mechanism together during assembly and torquing sequence. 2. Rotate engine stand to place position as shown in Figure View of Crankcase On connecting rods using old o-rings. See Figure 6-15A, Support." engine in upright 19-6, "Right Side Stand." Support (clean) cylinder "Connecting Rod 3. Place brackets and lifting eye in their correct positions on the crankcase backbone in accordance with Figure 6-17, "Crankcase Attaching Parts." Install backbone bolts (1 through 3) with washers (4) and nuts (5) in to hole positions (41 through 51). Snug but do not torque nuts (5) at this time. 19-7 Chapter 19 FIGURE 19-5. CRANKSHAFT OIL SEAL INSTALLED FIGURE 19-6. RIGHT SIDE VIEW OF CRANKCASE ON STAND 19-8 Chapter 19 4. Install the cylinder and piston assemblies in accordance with the following procedure. connecting rod and slide the piston pin into the connecting rod and piston. Using a ring compressor, compress the number 4 piston ring and push the cylinder until the number 4 ring is positioned inside the cylinder barrel. Remove the ring compressor and push the cylinder assembly against the crankcase cylinder deck with the stud holes aligned. NOTE… See Chapter 2 for lubricant specifications and suppliers. WARNING The improper use of sealants and lubricants may cause engine malfunction or failure. a. Verify that all cylinder valve keepers have been properly installed. b. Insure that each cylinder has a new cylinder base packing properly installed as described in section 16-6. Insure that the cylinder baffles have been properly installed as described in section 16-6. c. Carefully rotate the crankshaft placing the number 1 and number 2 connecting rods in their outer most position. Lubricate all cylinder through bolt and deck stud threads using clean 50 weight aviation engine oil. d. Back the number 1 piston pin far enough out to allow the piston to be installed on the number 1 connecting rod. Place the number 1 cylinder and piston assembly on the number 1 connecting rod and slide the piston pin into the connecting rod and piston. Using a ring compressor, compress the number 4 piston ring and push the cylinder until the number 4 ring is positioned inside the cylinder barrel. Remove the ring compressor and push the cylinder assembly against the crankcase cylinder deck with the stud holes aligned. e. Install the cylinder deck and through bolt nuts but do not torque at this time. f. Back the number 2 piston pin far enough out to allow the piston to be installed on the number 2 connecting rod. Place the number 2 cylinder and piston assembly on the number 2 g. Install the cylinder deck and through bolt nuts but do not torque at this time. h. Carefully rotate the crankshaft placing the number 3 and number 4 connecting rods in their outer most position. i. Using the same procedure that was used to install the number 1 and number 2 cylinder and piston assemblies, install the number 3 and number 4 cylinder and piston assemblies. j. Carefully rotate the crankshaft placing the number 5 and number 6 connecting rods in their outer most position. k. Using the same procedure that was used to install the number 1 and number 2 cylinder and piston assemblies, install the number 5 and number 6 cylinder and piston assemblies. l. Apply Champion® thread lubricant to spark plugs in accordance with the manufacturer's instructions. Install gaskets and spark plugs in cylinder spark plug holes. Do not Torque at this time. NOTE… Have an assistant hold nuts on opposite end of cylinder through bolts when torquing cylinder attaching hardware. 19-9 Chapter 19 5. After all cylinders have been installed, using the sequence shown in Figure 19-9, torque nuts at positions (1 through 52) to the following preliminary torques: NOTE… Crankcase and cylinder torquing requires two people. WARNING The torque values specified for engine reassembly are for use with clean nuts, bolts and studs with threads that are free of damage, distortion and that have been lubricated with clean 50 weight aviation engine oil prior to torquing. The torque wrench used for torquing must be currently calibrated and traceable to the National Bureau of Standards. Incorrect through bolt torque may result in subsequent engine malfunction and failure. FIGURE 19-7. INSTALLING NUMBER FIVE CYLINDER 19-10 FIGURE 19-8. TORQUING CYLINDER BASE NUT Chapter 19 CRANKCASE PRELIMINARY TORQUE VALUES PRELIMINARY TORQUE inch pounds 300 225 150 225 56 SEQUENCE NUMBER 1, 4, 10, 13, 19, 22, 30B, 33B 2, 3, 5 through 8, 11, 12, 14 through 17 20, 21, 23 through 26, 31, 32, 34 through 37 9, 18, 29, 38 19B, 22B, 27, 28, 30A, 33A 39 through 52 FIGURE 19-9. TORQUING SEQUENCE NOTE… Crankcase and cylinder torquing requires two people. 6. Using the sequence shown in Figure 19-9, torque nuts at positions (1 through 52) to the following final torques: CRANKCASE FINAL TORQUE VALUES FINAL TORQUE inch pounds 590 - 610 440 - 460 275 - 325 440 - 460 100 - 125 SEQUENCE NUMBER 1, 4, 10, 13, 19, 22, 30B, 33B 2, 3, 5 through 8, 11, 12, 14 through 17 20, 21, 23 through 26, 31, 32, 34 through 37 9, 18, 29, 38 19B, 22B, 27, 28, 30A, 33A 39 through 52 7. See Figure 6-17, "Crankcase Attaching Parts." Torque remaining engine mount bracket nuts (22) to 275-325 inch pounds. 8. See Figure 6-16, "Crankcase Associated Parts." Apply Loctite 271 to screws (6). Apply Loctite Primer 7471 crankcase oil seal retainer screw holes. Install crankshaft oil seal retainer plates (5) and secure with screws (6). Torque screws (6) to 21.0-25.0 inch pounds. Using new gasket (1) install camshaft cover (2) and secure with attaching hardware (3, 4). Torque screws (4) to 75-85 inch pounds. 19-11 19-5 OIL SUMP (See Figure 6-13). 1. Apply a thin coat of TCM Gasket Maker 646942 to oil sump flange and bottom crankcase flange. Install new gasket (1) and oil sump (2) on crankcase, secure with attaching hardware (4, 5, 6). Do not snug or torque oil sump hardware at this time. Proceed with accessory case installation. FIGURE 19-10. OIL SUMP TORQUING SEQUENCE 19-6 ACCESSORY CASE (See figures as indicated in paragraphs.) NOTE… Insure the accessory case has been properly assembled in accordance with Section 14-6 and 15-6 prior to installation on crankcase. 1. See Figures 6-10 and 6-10A. Apply a thin coat of TCM Gasket Maker 646942 to the rear crankcase and oil sump flange. In the area of the accessory case, crankcase and oil sump joint, thicker application of gasket maker (up to .020 of an inch) will assist in proper sealing. Apply a thin coat of TCM Gasket Maker 646942 to accessory case flange. Lubricate the crankcase/accessory case stud threads with clean 50 weight aviation engine oil. Install new accessory case gasket (1) on crankcase/accessory case studs. Install accessory case. Secure case using attaching hardware (32 through 36). Do not torque at this time. FIGURE 19-11. GENERAL BOTTOM VIEW 19-1 Chapter 19 Lubricate the accessory case/oil filter adapter stud threads with clean 50 weight aviation engine oil. Using new gasket (23) install oil filter adapter (25). Secure oil filter adapter using attaching hardware (29, 30, 31). See Figures 6-10 and 6-10A. See Figure 6-13 for oil sump hardware. See Figures 6-10 and 6-10A for accessory case hardware. Using the torque sequences shown in Figures 19-10, "Oil Sump Torquing Sequence" and 19-12, "Accessory Case Torquing Sequence," first torque the oil sump nuts (6) to 50 inch pounds preliminary torque. Torque the accessory case nuts (34), bolts (35) and bolt (36) to 100 inch pounds preliminary torque. Insure the accessory case and oil sump pull up to the crankcase evenly. Using the torque sequences shown in Figures 19-10, "Oil Sump Torquing Sequence" and 19-12, "Accessory Case Torquing Sequence," torque the oil sump nuts (6) to 90-110 inch pounds final torque and torque the accessory case nuts (34), bolts (35) and bolt (36) to 180-220 inch pounds final torque. Install new gasket (16) and tach drive adapter cover (17) on accessory case studs. Secure using attaching hardware (18, 19, 20). Torque nuts (20) to 90-100 inch pounds. 2. See Figures 6-10 and 6-10A. Install fitting (27) in oil filter adapter. Sparingly apply Dow Corning® No. 4 to the oil filter rubber seal. Fill new oil filter with clean Type ll corrosion preventative mineral oil conforming with MIL-C-6529. Install new oil filter assembly on adapter and torque to 550-520 inch pounds. Safety wire oil filter assembly in accordance with Section 4-2, "Lockwire Procedure." 3. See Figure 6-13. Install new gasket (8) and plug (7) in oil sump. Torque plug (7) to 185-215 inch pounds torque. Safety wire plug (7) in accordance with Section 4-2, "Lockwire Procedure." 4. See Figure 6-16. Install new clamps (11, 15) on oil gauge housing (9) and accessory case oil filler neck. Secure the clamps using screw (14), washer (12) and new lock nut (13). Torque lock nut (13) to 17-22 inch pounds. FIGURE 19-12. ACCESSORY CASE TORQUING SEQUENCE 19-13 Chapter 19 FIGURE 19-13. GENERAL ACCESSORY CASE AND ACCESSORIES INSTALLED 19-7 COMPRESSOR MOUNTING COMPONENTS, STARTER ADAPTER AND STARTER MOTOR TSI0-360-RB (See Figure 6-5.) 1. Apply Permatex Number 3D to the accessory case/starter adapter mount flange. When applying, use short light brush strokes until an even thin coat is obtained. The Permatex should be viscous enough that most of the brush marks disappear; if not, use a new can of Aviation Permatex. Allow the Permatex to air dry to a tacky condition before threading. 2. Apply grade D silk thread P/N 641543 between bolt holes and cavity opening and around dowel holes. Be sure that the silk thread is positioned correctly and the thread ends are crossed in the adapter to accessory case contact area. 19-14 3. Apply a thin coat of TCM Gasket Maker 646942 to the starter adapter mating surface only. CAUTION… Sealant must be applied sparingly to prevent contamination of the engine oil system. 4. Lubricate starter shaftgear teeth with clean 50 weight aviation engine oil and mesh with crankshaft gear teeth as adapter is placed in position. Seat adapter against threaded mount flange. Apply Loctite Pipe Sealant with Teflon P S/T to threads on attaching bolts (70, 71, 73). Secure starter adapter, accessory drive adapter and compressor mount bracket(63) to accessory case with attaching parts (68 through 74). Torque bolts to 155-175 inch pounds. Do not torque freon compressor bracket and starter adapter to accessory case nut (72) at this time. Chapter 19 5. Freon compressor bracket alignment NOTE… nuts. Instructions for construction of this tool are shown in Figure 19-15. If the engine is equipped with the large air pump required for aircraft de-ice equipment, it will be necessary to remove the rear freon compressor bracket prior to pump replacement. A complete freon compressor bracket alignment will be necessary upon replacement of this air pump. e. Torque rear freon compressor bracket nuts to 90-110 inch pounds. Safety wire in accordance with Section 4-2, "Lockwire Procedure." Alignment procedure: a. Insure special spacer washers are behind bracket as shown in Figure 19-14, Detail B & C. Snug fasteners finger tight. g. Install freon compressor in accordance with the airframe manufacturer's instructions. b. Insure remaining hardware is installed as shown in Figure 19-14. c. Install alignment fixture in freon compressor location as shown in Figure 19-15. See Figure 19-15 for alignment fixture specifications. Secure with 3/8 inch bolts, washers and nuts two places. Torque front freon compressor bracket nut (72) to 180-220 inch pounds. d. When installing the air pump between the compressor mount brackets, a special tool is also required to torque the lower hold down f. Remove nuts, bolts and alignment fixture. h. Install freon compressor drive belt in accordance with the airframe manufacturer's instructions. i. After minimum of twenty (20) minutes and a maximum of two (2) hours run-in with compressor loaded, re-tension the drive belt in accordance with the airframe manufacturer's instructions. 3. See Figure 6-5. Lubricate o-ring (28) with clean 50 wt. aviation engine oil and install on starter pilot. Turn starter shaft until tongue aligns with worm drive shaft slot. Mount starter (29) and secure with attaching parts (30, 31). Torque nuts (31) to 200-220 inch pounds. 19-16 Chapter 19 FIGURE 19-14. STARTER AND FREON COMPRESSOR BRACKETS 19-16 Chapter 19 FIGURE 19-15. COMPRESSOR BRACKET ALIGNMENT 19-17 Chapter 19 19-8 STARTER ADAPTER AND STARTER MOTOR LTSI0-360-RB (See Figure 6-9.) 1. Apply a thin coat of TCM Gasket Maker 646942 to the crankcase mating surface only. 3. Secure alternator with attaching hardware (2,3). The alternator drive belt and sheave must be installed in accordance with the airframe manufacturer’s instructions. After drive belt and sheave installation nuts (3) must be torqued to 180-220 inch pounds. CAUTION… Sealant must be applied sparingly to prevent contamination of the engine oil system. 2. Lubricate starter shaftgear teeth with clean 50 weight aviation engine oil and mesh with crankshaft gear teeth as adapter is placed in position. Seat adapter against gasket. Secure adapter assembly to crankcase with attaching parts (39, 49 through 54). Torque bolts to 155-175 inch pounds. Torque nut (39) to 180-220 inch pounds. 3. Lubricate o-ring (45) with clean 50 wt. aviation engine oil and install on starter pilot. Turn starter shaft until tongue aligns with worm drive shaft slot. Mount starter (46) and secure with attaching parts (47, 48). Torque nuts (48) to 200-220 inch pounds. 19-9 ALTERNATOR ASSEMBLY (See Figure 6-6.) 1. Position alternator (1) on alternator mount bracket (3). Align alternator support bolt hole with upper mount bracket bolt hole and install washer (5) and bolt (4). Install washer (5) and nut (7) on bolt (4). 2. Install bracket (8) on alternator mount bracket (3) and secure using bolt (14), washers (12) and nut (13). Align adjusting bracket (8) and torque nut, bolt to 200-275 inch pounds. 19-18 19-10 VALVE MECHANISM (See Figure 6-15.) 1. Lubricate all tappet faces using Dow Corning® G-N Paste or equivalent. [Dow Corning® is a registered trademark of Dow Corning Corporation.] 2. Install exhaust tappets into exhaust side tappet guides. Install intake tappets into intake side tappet guides. 3. Install twelve pushrod housings. Install the pushrod housings nearest to engine mount brackets first. The spring compressor tool must lie close to horizontal in order to clear the crankcase flange. Using a Borrough's 68-3 Rod Spring Compressor or equivalent, compress spring (38). Place a new packing (40) between two steel washers (39) and install on the crankcase end of pushrod housing. Place a new gasket (37) on the cylinder end of pushrod housing. Insert housing into crankcase guide until other end can be aligned with cylinder head opening. Move assembly outward until gasket has entered cylinder hole. 4. Release spring slowly until it is free. Remove spring compressor. See Figure 19-18, "General View Installing Pushrod Housing." 5. Lubricate pushrods (41) with clean 50 weight aviation engine oil and install through cylinder openings into housings (36). Chapter 19 FIGURE 19-16. ROCKER ARM TO ROTOCOIL CLEARANCE WARNING Correct rocker shaft retaining nut torque can only be achieved if lifters are completely bled down, valves are closed and no load is applied to rocker assembly. 6. Before installing valve actuating parts on each cylinder, turn the crankshaft until pushrods are at their lowest position. Lubricate rocker assemblies, thrust washers and rocker shafts using clean 50 weight aviation engine oil. Install rocker assemblies (19) and thrust washers (22) on rocker shafts (23). Check parts catalog for proper identification of exhaust and intake rocker arm. Install rocker and shaft assemblies on cylinder in correct positions. Install retainers (24), tab washers (25) and nuts (26). Torque nuts (26) to 110 - 120 inch pounds. 7. Check side clearance between retainers and rocker arms. See Figure 19-17, "Checking Rocker Arm Side Clearance." 8. Rocker arm to rotocoil clearance must be checked with the valve in the closed position and the foot of the rocker in contact with the valve stem tip. 9. Measure rocker arm to rotocoil clearance. See Figure 19-16, "Rocker Arm To Rotocoil Clearance. See Section 16-5 for rework procedure. 10. Measure dry valve gear lash at valve tip to rocker foot and compare with limits given in Figure 16-3, "Cylinder Fits and Limits." Bend tab washers (25) flat up against head of nuts (26) to safety. See Section 4-3, "Tab Washer Procedure." CAUTION… Do not realign nut flats to suit tab washer. 11. Install pushrods (41) and valve actuating mechanism (19 through 26) on remaining cylinders using the same procedure in paragraphs 5 through 10. 12. Using new gaskets (27), install rocker covers (28) and secure with attaching hardware (30, 31, 32, 33). Do not torque screws (32) or (33) at this time. The rocker covers will be removed for engine pre-oiling in Section 20-2. 19-19 1. Install baffle assemblies (12, 13) between cylinders and secure with spacers (1) and bolts (5). Do not torque bolts (5) at this time. 2. Install supports (2) between cylinders and secure baffle assemblies (12,13) using new springs and fasteners (8,9). 3. Insure all interconnecting baffle grooves are in place and torque bolts (5 and 3) to 36-50 inch pounds. 19-12 CYLINDER DRAIN ASSEMBLIES (See Figure 6-15.) FIGURE 19-17. CHECKING ROCKER ARM SIDE CLEARANCE 19-11 CYLINDER BAFFLING (See Figure 6-14.) 1. Position baffles (6, 7, 10, 11) and supports (4) on cylinders. Secure baffles (6, 7, 10, 11) to supports (4) with washers (14) and bolts (3). Do not torque bolts (3) at this time. 1. Coat the male tapered threads of fittings (18) with Loctite Pipe Sealant With Teflon P S/T. Coat the male tapered threads only. Install fittings (18) in cylinders. Torque to limit specified in Table 6-4, "Hydraulic Line Fitting Torques." 2. Install cylinder drain tube assemblies (42) on cylinders. Torque drain tube "B" nuts to the limit specified in Table 6-4, "Hydraulic Line Fitting Tightening Torques." Drain valve assemblies must be installed in accordance with the airframe manufacturer's instructions. FIGURE 19-18. GENERAL VIEW INSTALLING PUSHROD HOUSING 19-20 Chapter 19 19-13 EXHAUST SYSTEM (See Figure 6-1.) 36). Torque bolts (32) to 155-175 inch pounds and torque bolts (36) to 220-260 inch pounds. 1. Slide riser assemblies (1, 3, and 5) together to make up 2-4-6 side collector assembly. Slide riser assemblies (2, 4, 6 and 7) together to make up 1-3-5 side collector assembly. 2. Install fittings (51, 52) into turbocharger oil inlet adapter. Install check valve (54) on fitting (51). Install fitting (56) into turbocharger oil outlet adapter. Torque fittings in accordance with Table 6-4, "Hydraulic Line Fitting Torques." 2. With engine in inverted position install six exhaust flange gaskets (18) . Holding R.H. 1-3-5 side collector assembly together, carefully install on R.H. cylinder exhaust ports, position collector so that flanges seat squarely on ports and secure with nuts (19). 3. Install turbocharger and aftercooler support brackets (45, 46) on crankcase mounted turbocharger support bracket (47). Secure with attaching hardware (48, 49, 50). Align brackets (45, 46, 47) and torque bolts (48) and new nuts (50) to 180-220 inch pounds. 3. Using same procedure above, install 2-4-6 side collector assembly, torque all nuts (19) to 200-210 inch pounds. 4. Turbocharger (21) is attached to bracket (45) with bolts (44) and tab washers (76). Align turbocharger with bracket, install bolts (44) and new tab washers (76). Torque bolts to 155-175 inch pounds. Bend tab washers (76) flat up against head of bolts (44) to safety. See Section 4-3, "Tab Washer Procedure." 4. Install exhaust manifold (9) on exhaust elbows (7, 8) and secure with new clamps (12), tie rods (13, 17), bolts, washers (14) and new nuts (16). Torque clamp and tie rod bolts and nuts in accordance with Table 6-2, "General Use Torques. 1. Using new gaskets (29, 33), install adapters (30, 34) on turbocharger as shown. Secure adapters using new lock washers (31, 35) and bolts (32, 5. Secure turbocharger to exhaust manifold using a new gasket (20), bracket (22), bolts (26), washers (27) and new nuts (28). Torque nuts (28) and bolts (26) to 90-110 inch pounds. FIGURE 19-19. MULTI-SEGMENT “V” BAND CLAMP 19-21 Chapter 19 6. Using new gasket (37), install wastegate assembly (38) on exhaust manifold (9) and secure with bolts (39, 40), washers (41) and new nuts (42). Using a new gasket (37), install tube (11) on wastegate (38) and secure with bolts (39, 40), washers (41) and new nuts (42). Torque bolts (39, 40) and new nuts (42) to 240-280 inch pounds. 7. Slide tailpipe assembly (10) onto tube (11) and align with turbocharger exhaust outlet flange. Install a new clamp (43) on tailpipe and turbocharger flanges. Install new clamp insuring “V” segments go over exhaust flanges, using a rawhide or plastic mallet, tap clamp circumferentially as clamp is torqued to 35-40 inch pounds. 1. Install aftercooler (26) on aftercooler mount bracket (27) and secure using new lock washers (29) and nuts ((30). Torque nuts (30) to 75-85 inch pounds. 2. Using a new gasket (1), new lock washers (4), washers (3) and screws (5) assemble servo and throttle adapter unit to intake manifold (2). Torque screws (5) to 155-175 inch pounds. 3. Install fitting (35) in intake manifold (2). 4. Loosely assemble intake tubes and flanges (6 through 13) and (14) to intake manifold (2) using new hoses and clamp assemblies (19, 20). 5. Place new gaskets (15) on cylinder intake flanges. 8. Install clamp (23) on tailpipe assembly and secure to bracket (22) using bolt (24) and new nut (25). Torque bolt (24) and nut (25) to 180-220 inch pounds. 9. Using a new o-ring (66), install fitting (67) into wastegate assembly. Using new o-rings (62), install fittings (63) into wastegate assembly. Torque fittings in accordance with Table 5-4, "Torque Specifications for Fittings." 10. Install oil filter adapter to wastegate hose assembly (64). Install wastegate to controller hose assembly (68). Install turbocharger oil supply hose assembly (53). Install turbocharger oil supply hose clamp (71), brackets (72) or (73), bolts (70), washers (74), and nuts (75). Install turbocharger to scavenge pump hoses (59, 57). Install new check valve (58). Torque all hose assembly "B" nuts and fittings in accordance with Table 5-4, " Torque Specifications for Fittings." 19-14 INDUCTION SYSTEM (See Figure 6-4.) 19-22 6. Apply a small amount of TCM 646439 adhesive to new bumper (33), place bumper (33) on underside of intake manifold (2) where it will mate with the crankcase backbone. 7. With the aid of an assistant, place intake spider assembly on top of engine. Adjust intake tubes so they seat squarely on cylinder flanges and secure with attaching hardware (16, 17, 18). Torque nuts (18) to 50-70 inch pounds. Torque all clamps (19) to 40-50 inch pounds. 8. Using new hoses (21, 24) , install elbow (22) between throttle adapter assembly and aftercooler (26). 9. Install a new hose (32) and clamp assembly (23) between aftercooler and turbocharger compressor housing. 10. Torque hose clamps (23, 25) to 40-50 inch pounds. Chapter 19 19-15 FUEL INJECTION SYSTEM (See Figure 6-3.) 1. Apply Molyshield grease to splines on fuel pump drive shaft (63). Install fuel pump drive shaft in engine meshing splines with governor drive gear internal splines. Install new gasket (62) on fuel pump. Lubricate fuel pump cavity with clean 50 weight aviation engine oil. Install fuel pump on crankcase studs. Secure fuel pump using washers (59), new lock washers (60) and nuts (61). Torque nuts (61) to 180-220 inch pounds. 2. Install fuel hoses (42, 44) and fitting (43) between fuel servo unit and fuel pump. Install air reference hose (37) between fuel pump and air throttle adapter. Install fuel hose (46) between fuel servo unit and fuel manifold valve. Torque hose "B" nuts to the specified limit in Table 5-5, " Torque Specifications for Hose Fittings." 6. Install 2-4-6 side air reference manifold and tube (41, 39) on sleeves (70) and throttle adapter connection. Install air reference manifold and tube (40, 41) on the 1-3-5 side sleeves and attach to throttle connection. Install the air reference sleeve nuts on the air reference manifold male connectors and turn with fingers until each seal is seated between nut and male connector. Using an open end wrench, tighten the air reference sleeve nuts an additional 3/4 to 1 turn. Avoid deforming the rubber seals. With air reference tubes installed and sleeves properly positioned, install new rubber washer (56) next to nozzle, install new steel washer over rubber washer on each fuel nozzle. Install fuel injection lines (49 through 54) between nozzles and fuel manifold valve. Torque fuel injection line "B" nuts (49 through 54) at nozzles to 40-45 inch pounds. Torque fuel line "B" nuts at manifold valve to 55-60 inch pounds. CAUTION… 3. Install hoses (72, 73) between controller (2) and turbocharger wastegate. Torque hose "B" nuts to the specified limit in Table 5-5, " Torque Specifications for Hose Fittings." 4. Install new o-rings (57) on fuel nozzles (58), apply 646943 anti seize lubricant to nozzle threads (cylinder end) and install fuel nozzles (58) in cylinders 1 through 6. Torque nozzles to 55-65 inch pounds. 5. Carefully slide sleeves (70) onto nozzles do not damage o-rings (55). Never use teflon tape on fuel injection system fittings. WARNING Fuel injection lines must not be deformed. The fuel injection lines securely clamped to the fuel line brackets. Do not assemble in a condition. bent or must be support binding 7. Attach clamps (65, 66) to fuel lines (49 through 54) and induction tubes. Torque nuts and bolts (68, 69) to 36-50 inch pounds. 19-23 Chapter 19 19-16 ENGINE TIMING POSITION PROCEDURE (See Figures 19-20 through 19-24.) NOTE… The engine is equipped with a right angle drive starter adapter. If it does not freely turn in the opposite direction of normal rotation the starter motor must be removed from the starter adapter. Some right angle starter drive adapters incorporate an over-riding spring clutch design that restricts engine rotation in the opposite direction of normal rotation. NOTE… Whenever positioning the crankshaft for magneto installation, always turn the crankshaft steadily in the direction of rotation to eliminate any backlash error. In conducting magneto timing check, use a top dead center locator, protractor and pointer such as the Eastern Electronics Model E25 Timing Indicator or equivalent. Use the following basic timing procedure to insure that timing is accomplished in accordance with the required specifications. Ignition Timing (Compression stroke, breaker opens) Right Magneto, degrees BTC 22° ± 1° Left Magneto, degrees BTC 22° ± 1° 1. Remove all top spark plugs. Rotate the crankshaft in the direction of normal rotation until the number one piston is at top dead center on the compression stroke. Rotate the crankshaft in the opposite direction of normal rotation until the piston is far enough down the barrel to allow the TDC locator to be installed. 2. Install the top dead center locator into No. 1 cylinder top spark plug hole. 3. Install timing disc of indicator being used on the crankshaft flange. 4. Turn crankshaft slowly in direction of normal rotation until piston lightly touches TDC locator. 5. Rotate disc of timing indicator until the 0 degree mark aligns with the pointer. FIGURE 19-20. TIMING POSITION STEP ONE 19-24 Chapter 19 6. Slowly turn crankshaft in opposite direction of normal rotation until the piston lightly touches TDC locator. FIGURE 19-21. TIMING POSITION STEP TWO 7. Observe reading on the disc under the pointer and move the disc, to exactly one-half of the number of degrees observed, toward the top center mark. FIGURE 19-22. TIMING POSITION STEP THREE 19-25 Chapter 19 8. This will be approximately one-half the number of degrees remaining of 360 degrees of crankshaft rotation. You have now located top dead center. FIGURE 19-23. TIMING POSITION STEP FOUR 9. Remove the TDC locator from the cylinder and find the compression stroke on No. 1 cylinder by placing a finger over the spark plug hole, or any other adequate method. As you come up on compression, stop the pointer at the TDC location as determined in step 8. FIGURE 19-24. TIMING POSITION STEP FIVE 19-26 Chapter 19 10. To to place the crankshaft in the correct timing position for magneto installation, move the crankshaft in the opposite direction of normal rotation past the specified magneto timing setting and then back in the direction of normal rotation until the desired setting before top dead center is under the pointer. (This removes gear backlash). 19-17 MAGNETO TIMING AND INSTALLATION ON ENGINE WARNING Prior to any engine or magneto timing procedure disconnect all ignition harness spark plug leads from the spark plugs. Do not attach any ignition harness spark plug leads to the spark plugs until all magneto, engine timing procedures and magneto to switch connections have been entirely completed. The magneto is in a SWITCH ON condition when the switch wire is disconnected. To prevent possibility of serious bodily injury or death, before moving the propeller accomplish the following: a. Disconnect all spark plug leads. b. Verify magneto switches are connected to magnetos, that they are in the"OFF" Position and "P" leads are grounded. c. Throttle position "CLOSED." d. Mixture control "IDLE-CUT-OFF." e. Set brakes and block aircraft wheels. f. Insure that aircraft tie-downs are installed and verify that the cabin door latch is open. g. Do not stand within the arc of the propeller blades while turning the propeller. 1. Insert the T118 timing pin in "L" or "R" hole (depending on magneto rotation) in the distributor block. Turn rotor in the opposite rotation of magneto until pin engages the gear. 2. See Figure 6-2. Clean and dry the retainers (7) and bushings (6). Apply Molyshield grease to the rubber drive bushings and the magneto drive gear needle bearings. Install two magneto drive bushings into each retainer with the radius (rounded) edges facing outward. Install a retainer and bushing assembly firmly into each magneto drive gear assembly. Install both of the magneto drive gear assemblies on their support shafts. WARNING Any debris that falls into the engine interior must be removed prior to engine operation. WARNING Incorrect magneto to engine timing will cause detonation, engine failure, injury or death. 3. Insure that the crankshaft is positioned in accordance with Section 19-16 "Engine Timing Position Procedure." 4. Without turning the magneto coupling, hold the magneto in the position it will occupy when installed. Check the alignment of the gear coupling slot and impulse coupling lugs. If not aligned, pull the magneto drive gear out of mesh and turn to position needed. Push gear back into mesh. 5. Place a new gasket on the magneto flange and install magneto carefully so that the drive coupling lugs mate with the slots of the drive bushings. 6. Install holding clamps, lock washers and nuts. Snug nuts but do not torque. This will allow turning of the magnetos for final timing. Remove the T118 timing pins from Slick magnetos. 7. Using the above procedure, paragraphs 1 through 4, install the remaining magneto. 8. The magneto timing light breaker point leads are connected to the ground terminals of the magnetos. The timing light breaker point leads are connected so that the light on the right side of the timing light box represents the right magneto and the light on the left side of the timing light box Chapter 19 represents the the left magneto. The timing lights should indicate that the points in both magnetos are closed. Tap the right magneto up with a non-marring hammer until the light indicates points just opening. Tap the left 19-27 magneto down until the light indicates points just opening. Secure magnetos. 10. Torque the magneto attaching hardware to 100 120 inch pounds. 9. Watch the lights on the magneto timing light. Turn the crankshaft a few degrees counterclockwise then clockwise until the timing indicator's pointer is pointing to the correct degree. As the pointer aligns with the correct degree both lights on the magneto timing light must indicate that the points just open within one-half-degree of crankshaft rotation. If timing light does not indicate the above re-adjust the magnetos. 11. Disconnect timing light from magnetos. Insure that connections between magneto and ignition switch are secure. NOTE… Point opening is indicated by light illumination on some timing lights while other timing lights operate in the reverse manner, i.e., the light goes out when the points open. CAUTION… When installing the magneto on the engine using the specified nuts and clamps, take the following precautions. Tighten both nuts by hand to finger tightness. Torque each nut alternately to 100 to 120 inch pounds. Exceeding 120 inch pounds torque may cause the mounting flange to crack. 19-18 IGNITION HARNESS PRE- INSTALLATION INSTRUCTIONS 1. The ignition harness assembly must be replaced 100% at engine overhaul. 2. Clean the mating surfaces (grommets and inside of the outlet plate) with a lint free cloth moistened with isopropyl alcohol. Apply MS122N/C02 Spray before installing harness on magneto. MS122N/C02 Spray, Miller-Stephenson Chemical Co., Inc., 16 Sugar Hollow Road, Danbury, Connecticut 06810. Carefully place the harness outlet plate onto the magneto insuring the grommets enter the distributor block towers. Install and torque nuts around plate alternately to seat cover squarely on magneto. Torque screws in accordance with the magneto manufacturer's instructions. FIGURE 19-25. COATING INSULATING SLEEVE 19-28 Chapter 19 1. The harness assemblies are constructed of a lightweight, flexible, silicone coated cable. Because the harness assemblies are lightweight and flexible the following must be observed when installing the harness on an engine: a. Support leads with the necessary clamps and cable ties to prevent any whipping or chafing action. b. Route leads as far away as possible from exhaust manifold to insure they are not exposed to temperatures in excess of 400°F. c. To prevent sticking of sleeves and to minimize twisting of ferrule coat insulating sleeves, use MS122N/C02 Spray, Miller-Stephenson Chemical Co., Inc., 16 Sugar Hollow Road, Danbury, Connecticut 06810. See Figure 19-25, "Coating Insulating Sleeve." NOTE… Hold ferrules while torquing or loosening spark plug coupling nuts to protect against twisting conduit or cable. d. Clamp harness leads as required. 19-19 IGNITION HARNESS INSTALLATION 2. Apply Champion® thread lubricant to spark plug threads in accordance with the manufacturer's instructions. Install all spark plugs and torque to 300-360 inch pounds. 3. Secure the ignition leads to the cylinder rocker covers using the ignition lead clamps and rocker cover screws. Use caution routing and attaching leads. Keep leads away from high heat sources such as the exhaust manifold. Keep the leads away from any engine component that may cause chafing. 4. Connect the right magneto switch ground wire to the right magneto and the left magneto switch ground wire to the left magneto in accordance with the magneto manufacturer's instructions. 5. Install the ignition leads on the proper spark plugs and screw on. Torque ignition lead coupling nuts to 110 - 120 inch pounds. Spark Plug Coupling Thread 5/8 - 24 3/4 - 20 Torque (inch pounds) 90 - 95 110 - 120 TABLE 19-1 COUPLING NUT TORQUE VALUES 6. The mechanic must consult all related service information issued by the ignition harness manufacturer. (continued) 1. The cable outlet plates can be attached to either magneto in only one position. The shortest ignition cable is for No. 1 upper spark plug. The ignition lead to spark plug positions are stamped on the ignition lead to spark plug nuts. 19-29 Chapter 19 PRESSURIZATION PLUMBING INSTALLATION 1. See Figure 6-2. Coat fitting (19) tapered end threads with Loctite #242. Install bushings (20) and fittings (19) in magnetos. Torque bushings and fittings in accordance with Table 5-4, “Hydraulic Line Fitting Torques. Install new hoses (12, 15, 16, 17), clamp assemblies (18), new filter (14), reducer (29), and tee (13) on magnetos as shown in Figure 62. Filter drain (reducer) must be to rear of engine. Connect loose end of hose (9) to air manifold adapter hose fitting and secure with clamp (18). Torque hose clamps (18) to 10-14 inch pounds. Do not over torque clamps to the point of cold flow. FIGURE 19-26. IGNITION WIRING DIAGRAM 19-30 Chapter 20 CHAPTER 20 POST OVERHAUL ADJUSTMENT AND TEST SECTION 20-1 20-2 20-3 20-4 20-5 20-6 20-7 20-8 20-9 20-10 20-11 20-12 20-13 20-14 20-15 20-16 20-17 20-18 20-19 20-20 20-21 PAGE Testing After Overhaul........................................................................... 20-3 Engine Pre-Oiling ................................................................................... 20-3 Test Stand................................................................................................ 20-3 Test Club................................................................................................. 20-3 Cooling Air Scoop .................................................................................. 20-3 Induction Air Intake................................................................................ 20-3 Exhaust And Turbocharger System ....................................................... 20-4 Controls................................................................................................... 20-4 Electrical Wiring..................................................................................... 20-4 Instruments.............................................................................................. 20-4 Breather................................................................................................... 20-4 Fuel System............................................................................................. 20-4 Governor Pad Cover ............................................................................... 20-4 Engine Test ............................................................................................. 20-4 Oil Pressure Adjustment ........................................................................ 20-5 Fuel System Adjustment......................................................................... 20-6 Overhaul Test Run Standard Acceptance Test ...................................... 20-16 Oil Consumption Determination ............................................................ 20-17 Engine Preservation for Storage or Installation after overhaul.............. 20-18 Test Flight ............................................................................................... 20-18 Continued Airworthiness Instructions.................................................... 20-18 FIGURE 20-1 20-2 20-3 20-4 20-5 20-6 20-7 20-8 PAGE Oil Pressure Relief Valve ....................................................................... 20-5 Fuel Pump Adjustment ........................................................................... 20-7 Fuel Servo Adjustments.......................................................................... 20-8 Controller Adjustment ............................................................................ 20-9 Admp Vs. Oil Temperature .................................................................... 20-10 Constant Speed Sea Level Performance Curve...................................... 20-13 Fuel Flow Vs. Metered Fuel Pressure .................................................... 20-14 Fuel Flow Vs. Brake Horsepower .......................................................... 20-15 TABLE 20-1 PAGE Test Specifications.................................................................................. 20-11 Operational Test Form............................................................................ 20-12 20-1 Chapter 20 INTENTIONALLY LEFT BLANK 20-2 Chapter 20 20-1 TESTING AFTER OVERHAUL WARNING During engine test run do not stand or allow anyone else to stand in the propeller arc area. 20-2 ENGINE PRE-OILING All engine internal moving parts must be properly lubricated before initial running of the engine after overhaul. Pre-oil the engine in accordance with the following procedure: 1. Pre-oiling may be accomplished using a bladder type pressure pot capable of holding at least 1 gallon of clean aviation engine oil with an output pressure of 50 not to exceed 60 pounds per square inch. See Section 2-4 for proper oil grade and for approved oil products. 2. Remove rocker box covers from cylinders. Connect pre-oiler supply hose to engine oil pressure gauge line connection (fitting). Open valve on pressure pot and watch cylinder rocker areas for indication of oil flow. Some engines may take as long as 20 minutes for oil indication depending on oil temperature. 3. After oil flow has been confirmed, install rocker box covers and gaskets. Torque rocker cover screws to 55-65 inch pounds. Close valve on pressure pot. Disconnect pressure pot supply hose and cap or re-install engine oil pressure gauge on pressure gauge line connection (fitting) as applicable. 4. Check engine oil quantity and service to correct capacity. See Chapter 7 of the L/TSIO-360-RB Maintenance Manual, Form X30645A, for proper oil grade and for approved oil products. Engine is now ready for initial run-up and test. 20-3 TEST STAND Engine performance must be tested after overhaul. The engine stand must be constructed in a way to permit accessibility to all engine line and instrument cables used to connect instruments and controls must be properly supported, and of sufficient flexibility to permit them to be moved out of the way during installation and removal of the engine. NOTE… When necessary, the airframe can be considered a suitable test stand for running in overhauled engines with the use of a test propeller and equipped with a suitable shroud or scoop to gather and direct cooling air over the cylinders. Engine must be equipped with all the calibrated instruments listed in "Instruments" of this section. 20-4 TEST CLUB It will be necessary to install a test club such as those supplied by the Hartzell Propeller Fan Co., Piqua, Ohio or the flight propeller if the engine is installed in the aircraft. Test clubs are customarily supplied in standard diameters, so that the blade length is reduced by the "cut and try" method. The club will absorb the BHP at the RPM specified in Table 20-1. Use the test club in combination with the cell, test stand and operating limits for which it was calibrated. 20-5 COOLING AIR SCOOP The scoop must be designed to fit over the tops of all cylinders, with padded seals for rear cylinders and valve rocker covers, to direct an adequate flow of air downward through the cylinder fins. Vanes are necessary to direct cooling air to the center cylinder and the oil cooler. CHT should not vary more than 50°F. between coolest and hottest cylinders. Provide an air duct to the alternator vent tube. 20-6 INDUCTION AIR INTAKE An air filter and housing must be attached to the turbocharger inlet flange. The filter area must be sufficient to avoid restriction of air flow. Always clean filter before each test, calculations of filter area should be based on approximately 389 c.f.m. of air required by the engine at full throttle and on the filter capacity per unit of area. The calculated area of a clean filter should be increased by at least 50% to allow for dirt accumulation. connections and to allow frequent inspection of all points of possible leakage. All tubes, wires, rods and 20-3 Chapter 20 20-7 EXHAUST AND TURBOCHARGER SYSTEM For testing purposes, the exhaust and turbocharger system supplied by Teledyne Continental Motors must be installed. 20-8 CONTROLS The only controls required are a mixture control and throttle control capable of operating the fuel control and throttle shafts through their complete ranges, and a magneto switch connected to the magneto ground terminals. If a flight propeller is used, a proper governor control is also required. 20-9 ELECTRICAL WIRING A storage battery must be connected by a No. 0 stranded copper cable from its positive terminal to the power terminal of the starter or starter solenoid. The battery negative terminal must be connected to the engine or both battery terminal and engine may be grounded. A small insulated wire should connect the starter solenoid coil terminal to a 5 ampere push-button switch. The other switch terminal must be connected to the engine or both to common ground. 20-10 INSTRUMENTS The control panel must be equipped with the following calibrated engine instruments. 1. An electrical tachometer compatible with the electrical magneto pick-up. 20-11 BREATHER A clean, substantial hose of 3/4 inch ID must be installed on the crankcase breather elbow and support so it leads to a point above and to the rear of engine. 20-12 FUEL SYSTEM The test stand fuel system is to incorporate an auxiliary pump capable of delivering fuel to and through engine system at a pressure of 2 to 2-1/2 psi indication on fuel pressure gauge. Connect fuel supply line to upper elbow projecting from left side of fuel pump. Connect fuel pump-to-supply tank return line to upper elbow projecting from right side of fuel pump. Connect fuel pressure gauge line to the fitting projecting from the center rear of fuel manifold valve. 20-13 GOVERNOR PAD COVER A removable oil transfer plug directs oil under pressure from the front main bearing through the crankshaft to the propeller hub. The crankshaft and front main bearing design provide passages for governor controlled oil to the crankshaft for use with an oil controlled propeller. When a test club or fixed pitch propeller is used for testing purposes, the governor pad cover must have an internal grooved surface to allow the circulating oil to flow to the crankshaft oil control plug. The governor pad cover is not needed if a propeller governor is installed. 20-14 ENGINE TEST 2. An oil pressure gauge and tube connection. WARNING 3. An oil temperature gauge and capillary assembly. 4. A cylinder head temperature gauge and wiring to each cylinder. See test operating limitations for different maximum temperatures. Over priming can cause hydrostatic lock and subsequent engine failure. 5. A water manometer with rubber hose connection to the vacuum pump oil return hole at the rear of the crankcase. CAUTION… 6. An ammeter connected in the generator or alternator circuit. 7. Fuel flow gauge or fuel pressure gauge. 8. A turbine inlet temperature gauge. 9. Manifold pressure gauge. 20-4 Insure propeller area is clear before initiating starting sequence. Chapter 20 NOTE… Before starting engine, perform step one of “PreSetup Procedure” in Section 20-16. Insure that fuel tanks contain proper type of fuel (100LL-blue or 100 green). Check engine oil sump for proper servicing. See section 2-4 for oil type and specification. Start the engine in accordance with the airframe manufacturer's Airplane Flight Manual (AFM.) Operate the engine at 750 RPM for one minute, gradually increasing RPM to 1000 RPM in three minutes. Check the magneto circuit for proper grounding prior to a normal shut-down. Allow the engine to cool adequately and make a visual inspection for any discrepancies. If engine exhibits any discrepancies, return to the applicable chapter to correct the discrepancy. All discrepancies must be corrected prior to engine adjustment. Oil Pressure - Check, If oil pressure is not indicated within 30 seconds, shut engine down and investigate. CAUTION… Operation of engine without oil pressure may result in engine malfunction or failure. When propeller stops rotating, place ignition switch, master switch and fuel selector in off position. 20-15 OIL PRESSURE ADJUSTMENT The adjusting screw is turned clockwise to increase oil pressure and counterclockwise to decrease oil pressure. With normal operating oil temperature (160° - 200°F), adjust oil pressure to maintain, 30-80 pounds per square inch at full power RPM. Torque locknut and safety as required. FIGURE 20-1. OIL PRESSURE ADJUSTMENT 20-5 Chapter 20 20-16 FUEL SYTEM ADJUSTMENT AND SETUP be inaccurate must be repaired or replaced prior to adjusting the fuel system. WARNING WARNING The procedures and values provided apply to TCM fuel injected engines that have not been modified from their type design. Refer to supplemental type certificate (STC) holder information and instructions for aircraft and engines that have been modified from their type design. Use of inaccurate gauges will result in incorrect adjustment of the engine fuel system, which may result in excessive cylinder wear due to lean operation, preignition, detonation, loss of power and severe engine damage. CAUTION... Engine performance, service life and reliability will be compromised if the engine's fuel injection system is neglected. The following adjustment procedures are presented in a sequential format that must be followed to insure proper fuel system adjustment. Reference the applicable Aircraft Maintenance Manual for detailed fuel system adjustment and maintenance procedures. Any fuel system that can not be adjusted to meet the specified values will require repair or replacement of the affected components prior to further engine operation. 3. Insure that all fuel system components are of the correct part number and installed properly. Correct any discrepancies noted. 4. Remove, inspect, clean and reinstall the engine test stand or aircraft and engine fuel screens in accordance with the manufacturer's instructions. 5. If the engine is installed in the airframe for testing, inspect the aircraft induction air filter and alternate air system for condition, operation and cleanliness. Repair or replace any component that is not operating properly in accordance with the manufacturer's instructions. CAUTION... Refer to Chapter 5, Tables 5-4 and 5-5 for specified values when torquing all hose connections and fittings. 6. Inspect the test stand or aircraft vapor return system for proper operation in accordance with the manufacturers instructions. Correct any discrepancies noted. PRE-SETUP PROCEDURES 7. Insure the fuel manifold valve vent and fuel pump drain lines are properly installed, open and free of obstruction. Correct any discrepancies noted. 1. Insure that the test stand fuel supply is not contaminated. If the engine is installed in the airframe for testing, flush the aircraft fuel system by first removing the engine driven fuel pump inlet hose and terminating the end into a large clean container. Operate the aircraft boost pump and allow a minimum of one gallon fuel to flow through the system. Take necessary precautions to prevent a fire hazard. If contamination is present, locate and correct the source, and repeat this step prior to proceeding. 2. Prior to any checks or adjustments, verify the accuracy of the tachometer, manifold pressure gauge and fuel flow gauge. Any gauge found to 20-6 8. Inspect all engine control rod ends for wear, freedom of movement, proper installation and security in accordance with the test stand or aircraft manufacturer's instructions. Correct any discrepancies noted. Chapter 20 9. Insure all engine controls operate freely throughout their full range of travel and are properly adjusted in accordance with the test stand or aircraft manufacturer's instructions. 10. Lubricate all control rod ends and fuel system components in accordance with the latest revision of the L/TSIO-360 Maintenance Manual, Form X30645A and the Test stand or aircraft manufacturer’s instructions. WARNING Failure to correctly install and maintain engine controls can result in loss of system control and subsequent engine power. Fuel System Adjustment Verify that the engine test stand or aircraft fuel system is operating properly in accordance with the manufacturer's instructions before performing any engine fuel system setup procedures. NOTE:... A currently calibrated Porta-Test Unit Model number 20 ATM-C manufactured by Aero Test, Inc.© or equivalent must be used to adjust the fuel system. The Porta-Test Unit must be connected and operated in accordance with the manufacturer's instructions. Use the operational test form on page 20-12 to record the specifications in Table 20-1 and the actual gauge indications. Start the engine in accordance with Section 20-14. Advance the throttle to 1500 to 1800 RPM. While monitoring all engine gauges, operate the engine at this speed until the engine temperatures and pressures have stabilized in the operational range. Adjust the engine fuel system as follows: Engine-driven fuel pump: With the engine operating at 2600 rpm and 38.0 inches Hg. manifold pressure mixtures to 24.0 to 25.0 gallons per hour, and the emergency fuel pumps in the off position, verify the the engine-driven fuel pump discharge pressure is set to 35-45 psig. If the engine driven fuel pump pressure does not fall within this range, the fuel pressure may be adjusted by the following method: 1. Loosen jam nut on fuel pressure adjustment. 2. Adjust screw clockwise to increase fuel pressure, or counter-clockwise to decrease pressure. FIGURE 20-2. FUEL PUMP ADJUSTMENT 20-7 Chapter 20 1. Repeat static run-up and readjust pressure as required to obtain fuel pump pressure of 35 to 45 psig. 3. Slowly but positively, move the mixture control from full rich to idle cutoff. The engine speed should increase 25 to 50 rpm before beginning to drop toward zero. 2. Torque the fuel pump jam nut to 30 inch pounds. 3. Idle Mixture: Check and adjust idle mixture as follows: Idle Performance 1. Operate the engine at 1500 to 1800 rpm until cylinder head temperatures are 250°F to 350°F and the oil temperature is 160°F to 180°F. 2. Reduce the engine speed and stabilize it at 700± 25 rpm. 4. If the engine speed increase is less that 25 rpm, adjust the idle mixture link rod to enrich the mixture. If the engine speed increase is more that 50 rpm, adjust the idle mixture link rod to lean the mixture. The idle mixture adjustment is made by lengthening (richening) or shortening (leaning) the link rod between the throttle lever and the idle valve lever. Recheck as required to insure the idle mixture is adjusted within the limits specified above. Each time an adjustment is made, clear the engine by running it up to approximately 2000 rpm before making another mixture check. FIGURE 20-3. FUEL SERVO ADJUSTMENTS 20-8 Chapter 20 Idle Speed: Check and adjust idle speed as follows: 1. Operate the engine at 1500 to 1800 rpm until cylinder head temperatures are 250°F to 350°F and the oil temperature is 160°F to 180°F. 2. Reduce engine speed and stabilize it at 700 ±25 rpm. 3. Adjust the idle speed screw that is located on the aft side of the throttle lever until contact is made with the throttle arm stop. Full Power Performance: Check and adjust full power performance as follows: 1. If the engine test is being performed in the airframe orient the aircraft so that it is pointed into the prevailing wind. Run the engine at 1500 to 1800 rpm until the oil temperature is 160°F to 180°F. 2. Using a handheld digital tachometer, adjust the propeller controls to 2600 rpm. With the throttle in the full forward position, set the intake manifold pressure to the value shown in Figure 20-5 (± 0.5 In. Hg.) by adjusting the screw on the top of the controller. Turning the screw clockwise decreases manifold pressure, and turning the screw counterclockwise increases manifold pressure. One complete (360°) turn of the screw changes the manifold pressure approximately 1.0 inch. FIGURE 20-4. CONTROLLER ADJUSTMENT 20-9 Chapter 20 FIGURE 20-5. ADMP VS. OIL TEMPERATURE 3. Adjust fuel flow rates: Set the engine to 2600 rpm, the manifold pressure to 38.0 Hg. and the mixture controls to full rich. Adjust fuel flow rates to the range of 24.0 to 25.0 gallons per hour with the fuel flow adjustment knob that is located on the top, left, side of the RSA-5 fuel servo. Turn the knob clockwise to decrease the fuel flow or counter-clockwise to increase. Turning the knob seven clicks in either direction reduces or increases fuel flow approximately 1 gallon per hour. The final fuel flow setting shall not exceed 15 clicks in the counter-clockwise direction when the knob is adjusted all the way in (lean). Recheck 1. Recheck idle settings 700±25 RPM and adjust as required. 2. Recheck full power settings as specified above and adjust as required. 3. Remove test equipment in accordance with the manufacturer's instructions. 4. After all ground checks and adjustments are completed, safety wire mixture adjustment knob. Torque "jam nuts" on the controller adjustment screw and engine driven fuel pump to the limit specified in Table 4-2, "General Use Torques," to prevent the screw setting from changing. 20-10 CAUTION… The engine should be run at idle RPM approximately 4 minutes before shutdown to allow the turbochargers to spool down and thus prevent starvation of needed lubricating oil. POST SETUP PROCEDURES 1. Insure that the master switch, ignition switch and fuel selector are in the off position. 2. Remove the engine cowling or cooling shroud in accordance with the test stand or aircraft manufacturer's instructions. Remove all test gauges, fittings and hoses that were installed for fuel system setup. Reconnect all fuel hoses to their original locations, support and torque all fittings to the specified value. 3. Perform a complete fuel system leak check. Correct any discrepancies noted. 4. Install engine cowling or cooling shroud in accordance with the test stand or aircraft manufacturer's instructions. Chapter 20 5. Perform a complete operational ground run-up and verify that all fuel system performance specifications are achieved. Repeat the setup and adjustments as required until the fuel injection system is performing within the published specification for the aircraft and engine. TABLE 20-1. TEST SPECIFICATIONS For your convenience we have tabulated the following specifications to facilitate proper adjustment and optimum performance. ITEM Full Throttle Speed - RPM Idle Speed - RPM Fuel Grade (Octane) Fuel Flow at Full Throttle (Lbs. /Hr.) Mixture Rise at Idle Cutoff - RPM Oil Temperature Limit Oil Pressure (Max. Oil Cold) Minimum Oil Pressure at Idle Oil Sump Capacity (Quarts) Magneto Drop (Max.) Magneto Spread Cylinder Head Temperature with Bayonet Thermocouple (Max.) ENGINE MODEL L/TSIO-360-RB 2600 700±25 100LL/100 140-150 25 - 50 240°F 100 10 8 150 RPM 50 RPM 460°F Proceed to standard acceptance and oil consumption determination as required for engine overhaul. NOTE… Test flight and documentation of all test flight operating parameters is MANDATORY before engine can be returned to service. See section 20-17, "Test Flight." See next page for Operational Test Form. 20-11 Chapter 20 20-12 Chapter 20 FIGURE 20-6. CONSTANT SPEED SEA LEVEL PERFORMANCE CURVE 20-13 Chapter 20 FIGURE 20-7. FUEL FLOW VS. METERED FUEL PRESSURE 20-14 Chapter 20 FIGURE 20-8. FUEL FLOW VS. BRAKE HORSEPOWER 20-15 Chapter 20 20-17 OVERHAUL TEST RUN STANDARD ACCEPTANCE TEST PERIOD 1. 2. 3. 4. 5. 6. 7. 8. TIME-MINUTES 5 5 5 10 RPM 1200±25 RPM 1600±25 RPM 2450±25 RPM Rated Power RPM See Note 10 75% Power RPM Check Fuel and Oil Pressures. Check Temperatures. 5 Idle RPM (cooling period 300° Max. CHT at shut down.) Stop engine and perform leak check. 15 75% Power RPM 15 5% Power RPM NOTES: Make one check on performance of each magneto alone at 2100 RPM. Clear spark plugs by operating with both magnetos on for a few seconds between checks. Do not run engine above 1800 RPM until oil temperature has reached 160°F and cylinder head temperatures have reached 200°F. Do not shut engine down until oil temperature is below 200°F. and cylinder temperatures are below 300°F allow turbochargers time to spool down before shut down (except for emergencies). Fuel and oil leaks are not acceptable. Engines failing to pass acceptance test for high oil consumption, major oil leaks, low power damaged components, excessive noise, excessive roughness, low oil pressure, excessive oil filter contamination require further investigation, correction of all discrepancies and complete re-test. See next page for oil consumption determination test run. 20-16 Chapter 20 20-18 OIL CONSUMPTION DETERMINATION PERIOD 1. 2. 3. 4. TIME-MINUTES 5 5 5 10 RPM 1200±25 RPM 1600±25 RPM 2450±25 RPM Rated Power RPM See Note 5. 10 75% Power RPM Check Fuel and Oil Pressures. Check Temperatures. 6. 5 75% Power RPM Check Fuel and Oil Pressures. Check Temperatures. Stop engine, drain and weigh oil in for oil consumption determination. 7. 5 Warm up to rated RPM 8. 30 Rated Power Take engine readings every 10 minutes 9. 5 Idle RPM (cooling period 300° Max. CHT at shut down.) NOTES: Make one check on performance of each magneto alone at 2100 RPM. Clear spark plugs by operating with both magnetos on for a few seconds between checks. Do not run engine above 1800 RPM until oil temperature has reached 160°F and cylinder head temperatures have reached 200°F. Do not shut engine down until oil temperature is below 200°F. and cylinder temperatures are below 300°F allow turbochargers time to spool down before shut down (except for emergencies). Oil consumption of 1 lb. is considered acceptable for this test. One repeat of this test run is acceptable. Oil consumption in excess of 1.0 pound return engine to overhaul shop for a complete recheck of construction. The oil consumption test run is a complete and separate test than the standard acceptance test. 20-17 Chapter 20 20-19 ENGINE PRESERVATION FOR STORAGE OR INSTALLATION AFTER OVERHAUL The engine must be preserved for storage or installed in the airframe in accordance with the L/TSI0-360-RB Maintenance Manual, Form X30645A and the airframe manufacturer’s information. If the engine is installed for return to service, proceed to, "Test Flight." 20-20 TEST FLIGHT Refer to the aircraft manufacturer’s or Supplemental Type Certificate (STC) holders POH/AFM for specific operational information. Ambient air and engine operating temperatures are of major concern during this test flight. Do a normal preflight run-up in accordance with the Airplane Flight Manual. Conduct a normal take off with full power and monitor the fuel flow, RPM, oil pressure, cylinder head temperatures and oil temperatures. Reduce to climb power in accordance with the Airplane Flight Manual. The manual mixture control should be set in the full rich position for all operations except leaning for field elevation, leaning to maintain smoothness during climb and leaning for cruise economy. Leaning operations must be performed in accordance with the Airplane Flight Manual. NOTE… New, rebuilt and overhauled engines or engines that have had new or repaired cylinders installed must be flown in accordance with the following procedure for the first two hours of operation. Level flight cruise should be at 75% power with best power or richer mixture for the first hour of operation. The second hour power settings should alternate between 65% and 75% power with the appropriate best power mixture settings.The best power mixture setting is 100° to 125° rich of peak turbine inlet temperature. Engine controls or aircraft attitude should be adjusted as required to maintain 20-18 engine temperatures specifications. and pressures within Descent from high altitude should be accomplished at low cruise power settings. During descent engine pressures and temperatures must be carefully monitored. Avoid long descents with cruise RPM and manifold pressure below 18" Hg. CAUTION… Rapid descents at high RPM and pressure are to be avoided. low manifold During descent monitor cylinder head and oil temperatures maintaining above the minimum recommended operating range. NOTE… Avoid long descents at low manifold pressure, which can result in excessive engine cooling. Satisfactory engine acceleration may not occur when power is applied. Any discrepancies detected during test flight must be corrected and the aircraft again test flown prior to approval of engine for return to service. The appropriate logbook entries must be made in accordance with Part 43 of the Federal Aviation Regulations (FAR) before the engine can be returned to service. 20-21 CONTINUED AIRWORTHINESS INSTRUCTIONS After engine installation, test and approval for return to service the engine must be kept in an airworthy status. The engine must be kept airworthy in accordance with the engine maintenance instructions in the L/TSIO-360-RB Maintenance Manual, Form X30645A, and related publications as listed in Section 1-5 of this manual.