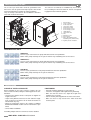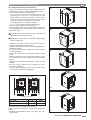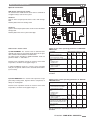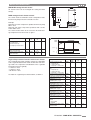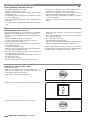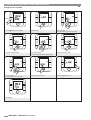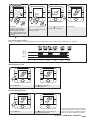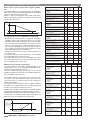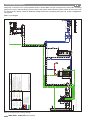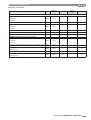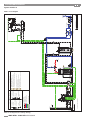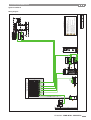
1
INSTALLATION - OPERATING - SERVICE MANUAL
EN
Medium temperature reverse-cycle
water/water heat pump for heating water to
55°C and domestic hot water production.
WWR MTD2
BWR MTD2
0011÷0121
U I A
INDEX
U I A
General warnings
3
A
Checking and starting up the unit
36
U I A
Waiver of liability
3
A
38
U I A
Description of room controller buttons and
display
Fundamental safety rules
3
A
Operation and functions of the room controller 39
Receiving and handling the product
4
A
Control and operating characteristics
48
Unit identification
5
I A
System configuration
53
Description of standard unit
6
A
I
Maintenance and service
59
Installation
6
A
I
Peak limiter alarm signals
61
Dimensioned drawings
7
A
I A
Shutting down for long periods
62
Water connections
8
A
I A
Scheduled maintenance
62
Electrical connections
12
A
I A
Unscheduled maintenance
62
Installer connections
14
A
I A
Disposal
63
Mains power supply connections
15
U I A
I A
Useful information
63
Installer connections
16
U I A
I A
List of parameters
64
General technical data
28
U I A
I A
Installer operations CHECKLIST
66
Operating limits
30
I A
Pump curve
31
I A
U I A
U I A
The following symbols are used in this publication and inside the unit:
U
I
A
User
Important
Installer
Prohibition
Assistance
Danger voltage
Danger high temperatures
Eurovent certification program.
The manufacturer reserves the right to modify the data in this manual without warning.
2
WWR-MTD2 - BWR MTD2 EN 03/2011
GENERAL WARNINGS
These appliances have been designed to chill and/or
heat water and must be used in applications compatible
with their performance characteristics; these appliances
are designed for residential or similar applications.
Incorrect installation, regulation and maintenance or
improper use absolve the manufacturer from all liability,
whether contractual or otherwise, for damage to people,
animals or things.
Only those applications specifically indicated in this list
are permitted
Read this manual carefully. All work must be carried
out by qualified personnel in conformity with legislation in
force in the country concerned.
U I A
The documents supplied with the unit must be consigned to the owner who should keep them carefully for
future consultation in the event of maintenance or service.
All repair or maintenance work must be carried out by
the Company’s Technical Service or qualified personnel
following the instructions in this manual.
The air-conditioner must under no circumstances be
modified or tampered with as this may create situations
of risk. Failure to observe this condition absolves the
manufacturer of all liability for resulting damage.
The warranty is void if the above instructions are not
respected and if the unit is started up for the first time
without the presence of personnel authorised by the
Company (where specified in the supply contract) who
should draw up a “start-up” report.
WAIVER OF LIABILITY
This publication is the sole property of the Manufacturer.
Any reproduction or disclosure of such is strictly prohibited
without the written authorisation of the Manufacturer.
This document has been prepared with maximum care and
attention paid to the content shown. Nonetheless, the Manufacturer waives all liability deriving from the use of such
document.
FUNDAMENTAL SAFETY RULES
U I A
Read this document carefully. All work must be performed,
components selected and materials used in complete accordance with the legislation in force in material in the country
concerned, and considering the operating conditions and
intended uses of the system, by qualified personnel.
U I A
When operating equipment involving the use of electricity and water, a number of fundamental safety rules must be observed,
namely:
The unit must not be used by children or by unfit persons without suitable supervision.
Do not touch the unit with bare feet or with wet or
damp parts of the body.
Never perform any cleaning operations before having
disconnected the unit from the mains power supply.
Do not modify safety or control devices without authorisation and instructions from the manufacturer.
Do not pull, detach or twist the electrical cables coming
from the unit, even when disconnected from the mains
electricity supply.
Do not open doors or panels providing access to the
internal parts of the unit without first ensuring that the
switch QF1 is in the OFF position (see the wiring diagram).
Do not introduce pointed objects through the air
intake and outlet grills.
Do not dispose of, abandon or leave within reach of
children packaging materials (cardboard, staples, plastic
bags, etc.) as they may represent a hazard.
Respect safety distances between the unit and other
equipment or structures. Guarantee adequate space for
access to the unit for maintenance and/or service operations.
Power supply: the cross section of the electrical cables
must be adequate for the power of the unit and the power supply voltage must correspond with the value indicated on the respective units. All units must be earthed in
conformity with legislation in force in the country concerned.
Terminals 6, 7, 9, 10, 11, 12, 13, 21, 22, 23, 24, may be
live even after the unit is disconnected. Make sure power
is not connected before proceeding.
Water connections should be carried out as indicated in
the instructions to guarantee correct operation of the
unit. Add glycol to the water circuit if the unit is not used
during the winter or the circuit is not emptied.
Handle the unit with the utmost care (see weight distribution table) to avoid damage.
EN 03/2011 WWR-MTD2 - BWR MTD2
3
I A
RECEIVING AND HANDLING THE PRODUCT
VISUAL INSPECTION
STORING THE UNITS
When the items are consigned by the carrier:
- make sure that the goods delivered correspond to the
description on the delivery note, comparing this against
the data on the packaging label.
- make sure the packaging and the unit are intact.
The units must be stored sheltered from direct sunlight, rain,
wind or sand.
Avoid exposing the units to direct sunlight, as the pressure
inside the refrigerant circuit may reach dangerous values
and cause the activation of the safety valves, where fitted.
The units cannot be stacked.
If damage or missing components are noted, indicate this on
the delivery note. A formal complaint should be sent via fax
or registered post to the After Sales Department within eight
days from the date of receipt of the items.
HANDLING PACKAGED UNITS
The unit should always be handled by qualified personnel
using equipment adequate for the weight of the unit, in compliance with the safety standards in force (and subsequent
amendments).
• Lifting by forklift (1)
Insert the forks under the long side of base, opening the
forks as fare as possible.
• Lifting by crane (2)
Use slings with hooks suitable for the weight being lifted.
Secure the hook to the lifting bracket fixed to the unit, use
always four equal length slings, as shown in the figure, to
ensure the weight is balanced.
2
1
Packaging dimensions 0011ms 0025ms 0031ms 0041ms 0025t/ts 0031t/ts 0041t/ts 0061t/ts 0071t/ts 0091t/ts 0101t/ts 0121t/ts
L (mm)
750
750
750
750
750
750
750
750
750
750
750
750
P (mm)
920
920
920
920
920
920
920
920
920
920
920
920
H (mm)
1370
1370
1370
1370
1370
1370
1370
1370
1370
1370
1370
1370
Gross weight (kg)
208
210
215
225
210
215
225
240
250
255
260
280
REMOVING THE PACKAGING
The packaging must be removed by the operator using suitable protective equipment (gloves, glasses, etc.).
Take special care not to damage the unit. Observe the local
standards in force as regards disposal of the packaging,
using specialist collection or recycling centres.
Do not dispose of packaging materials in the environment or leave them within reach of children as they may
represent a hazard.
Envelope A, located in the compressor compartment, contains:
• installation - user - maintenance manual;
• user manual;
• EC declaration of conformity;
• list of the main components and sub-assemblies fitted on
the product
• remote room control unit A5 (must be installed)
• DHW storage water temperature probe BT8
• outside air temperature probe BT11 (must be installed)
• probe BT9 only to be installed when supplementary
source is available
Make sure the components listed above are not lost or misplaced.
The installation - user - maintenance manual is an
integral part of the unit and should therefore be read and
kept carefully.
4
WWR-MTD2 - BWR MTD2 EN 03/2011
A
I A
RECEIVING AND HANDLING THE PRODUCT
HANDLING UNPACKAGED UNITS
When the packaging has been removed:
• Remove the wooden base.
• Fit the vibration damping feet (accessories).
• Handle the unit using equipment that is suitable for its
weight, in compliance with the safety standards in force
(and subsequent amendments).
• Do not drag the unit as the feet may be damaged or break.
max. 45°
U I A
UNIT IDENTIFICATION
The heat pump can be identified from:
PACKAGING LABEL
Packaging label
Describes the product identification data
RATING PLATE
Describes the unit technical and performance specifications.
Shows the serial number used to uniquely identify the unit.
The serial number is also used to identify the unit’s spare
parts.
Rating plate
with serial number
If service is required, the following information must be provided to the service centre:
Model, serial number, year of production.
Installation and maintenance operations are much more
difficult if the identification plates or anything else needed to clearly identify the product are tampered with,
removed or missing.
NOMENCLATURE
WWR MTD2
BWR MTD2
0011
m
s
s = peak limiter
Power supply voltage:
m = 230V/50Hz/1ph
t = 400V/3N/50Hz
size
Model
EN 03/2011 WWR-MTD2 - BWR MTD2
5
I A
DESCRIPTION OF THE UNIT
The reverse-cycle water-water units for groundwater and
brine-water units for geothermal loops operate with R410A
refrigerant fluid and are suitable for indoor installation.
They are factory tested and on site installation is limited to
water and electrical connections.
The units are CE marked, as established by the EU directives, including the latest amendments, and the corresponding approximated national legislation.
12
11
13
4
6
14
7
1
3
2
9
1
2
3
4
5
6
7
8
9
10
11
12
13
Electrical panel
4-way reversing valve
Scroll compressor
Low pressure switch
High pressure switch
Heat exchanger, source
Heat exchanger, system
Liquid indicator
Thermostatic valve
Filter
Expansion vessel
System pump
Source pump (BWR version)
modulating valve (WWR version)
14 High/low pressure transducer
10
5
8
VERSIONS AVAILABLE
WWR MTD2
Reverse-cycle water/water heat pump with domestic hot water production.
Built-in water pump assembly for the system and two-way modulating valve for the source.
WWR MTD2/s
Reverse-cycle water/water heat pump with domestic hot water production.
Built-in water pump assembly for the system and two-way modulating valve for the source.
BWR MTD2
Reverse-cycle ground source heat pump with domestic hot water production.
Built-in water pump assembly for the system and source.
BWR MTD2/s
Reverse-cycle ground source heat pump with domestic hot water production.
Built-in water pump assembly for the system and source.
I
INSTALLATION
CHOICE OF INSTALLATION SITE
POSITIONING
Before installing the unit, agree with the customer the site
where it will be installed, taking the following points into consideration:
• check that the support surface is adequate to support the
weight of the unit;
• respect safety distances between the unit and other equipment or structures so that the fan air intake and outlet are
not blocked in any way.
• Follow the instructions shown in the chapter on DIMENSIONED DRAWINGS to allow room for maintenance operations.
• Unit for indoor installation.
• Install the vibration damping feet (accessories).
• Check the unit supports and weights before positioning
• Make sure that the unit is level, adjust the height of the
support feet if necessary
• Use the flexible joints supplied for the water connections
• Make sure there is easy access to the water circuit and
electrical parts
If installing multiple units the clearances must be doubled.
6
WWR-MTD2 - BWR MTD2 EN 03/2011
I
DIMENSIONED DRAWINGS
DISTANCE BETWEEN SUPPORT FEET
100
100
310
100
90
500
90
700
1139
1105 ( 0011÷0121 )
41
160
System water outlet
System water inlet
80 50 50
Source water inlet
Source water outlet
30
Safety valve discharge
Electrical connection input
105 43
70
680
840
CLEARANCE
600
600
600
Weight distribution
W1 rear R (kg)
W2 rear L (kg)
W3 front L (kg)
W4 front R(kg)
total in operation (kg)
total for transport (kg)
0011ms 0025ms 0031ms 0041ms 0025t/ts 0031t/ts 0041t/ts 0061t/ts 0071t/ts 0091t/ts 0101t/ts 0121t/ts
37
38
39
42
38
39
42
44
46
47
48
52
44
45
47
53
45
47
53
57
60
61
62
68
50
50
51
54
50
51
54
57
60
61
63
67
57
57
58
61
57
58
61
67
74
76
77
83
188
190
195
10
190
195
210
225
240
245
250
270
208
210
215
225
210
215
225
240
250
255
260
280
EN 03/2011 WWR-MTD2 - BWR MTD2
7
I A
WATER CONNECTIONS
Warnings
- The choice and installation of components is the responsibility of the installer who should follow good working practice and current legislation.
Before connecting the pipes make sure that these:
- do not contain stones, sand, rust, scale or any foreign
objects that may damage the system.
- wash the system with clean water
Water connection dimensions
100
100
310
100
160
System water outlet
System water inlet
80 50 50
Source water inlet
Source water outlet
30
Safety valve discharge
Electrical connection input
105 43
70
Water connections - dimensions 0011ms 0025ms 0031ms 0041ms 0025t/ts 0031t/ts 0041t/ts 0061t/ts 0071t/ts 0091t/ts 0101t/ts 0121t/ts
Water connections IN/OUT
1"
1"
1"
1"
1"
1"
1"
1"1/4 1"1/4 1"1/4 1"1/4 1"1/4
Domestic hot water
1"
1"
1"
1"
1"
1"
1"
1"1/4 1"1/4 1"1/4 1"1/4 1"1/4
connections IN/OUT
Components
Required components:
1. Two outlet flow switches on both circuits in system and
source sections. Both flow switches must be calibrated by
the installer to 70% of rated flow (compulsory).
2. An inlet filter (compulsory) as close as possible to the
unit and positioned to allow easy access for scheduled
maintenance (both on the system circuit and domestic
source circuit).
9. The connection piping should be supported in such a way
as to avoid it weighing on the unit.
The following recommended components should be installed
for correct installation of the unit:
1. Two pressure gauges with a suitable scale (inlet and outlet);
2. Two vibration damper joints (inlet and outlet).
3. Shut-off valves at the inlet and outlet.
4. Two thermometers (inlet and outlet);
5. All the pipes must be insulated with suitable material to
prevent the formation of condensate and heat loss.
The insulating material must be a vapour barrier.
Make sure that the control and shut off devices protrude
from the insulation.
6. At the lowest points in the system, install drain valves for
easy emptying.
7. At the highest points in the system, install automatic or
manual air vent valves.
8. The unit is fitted as standard with an expansion vessel;
make sure this is correctly sized for the water content of
the system and the expected operating temperature, otherwise install an additional expansion vessel.
The correct operation of the components that help
ensure the safety of the appliance and the system
should be checked regularly:
• make sure the filters are clean
• check operation of the flow switches installed.
• Make sure that the frost protection heaters on the heat
exchanger are powered when the unit is OFF
8
WWR-MTD2 - BWR MTD2 EN 03/2011
Failure to install the flow switches will mean the heat
exchangers are not protected in the event of no flow of
liquid. The Manufacturer cannot be held liable for any
damage to the unit and/or the system following the failure to install these devices or the filter.
Water flow to the heat pump must conform to the values
shown in the section on “General Technical Data”.
The flow of water must be maintained constant during operation.
The water content of the unit must be such as to avoid disturbing operation of the refrigerant circuits
I A
WATER CONNECTIONS
Risk of freezing
If the unit is used with water temperatures below +4.5°C, the
risk of the unit freezing must be prevented by using the
required percentage of antifreeze (see “Water circuit data”).
Non-freezing solutions must also be used at ambient temperatures around 0°C.
The following are recommended:
• use suitable percentages of antifreeze (see “Ethylene glycol solutions”)
• protect the piping with heating sheaths,
• empty the system, making sure no water remains at the
lowest points in the circuit or there are closed valves
where water may stagnate.
It is recommended to use non-toxic food grade antifreeze,
compliant with the standards in force in the countries where
the unit is used, if domestic hot water production is also featured.
The antifreeze used must be corrosion inhibited and compatible with the water circuit components.
Ethylene glycol solutions
Freezing point (°C)
Water and ethylene glycol solutions used as a heat carrier in
the place of water reduce the performance of the unit.
Multiply the performance figures by the values given in the
following table.
The heat pumps must be fitted with a filling/top-up system connected to the return line and a drain valve in the
lowest part of the system.
Systems containing antifreeze or covered by specific
legislation must be fitted with low-loss headers.
Water quality
The water used in the system and domestic hot water circuits must comply with the following characteristics:
Fouling factors
The performance data given refer to conditions with clean
evaporator plates (fouling factor = 1).
For different fouling factors, multiply the figures in the performance tables by the coefficient given in the following table.
0
-5
-10
-15
-20
-25
Percentage of ethylene glycol by weight
cPf
cQ
cdp
0
1
1
1
12%
0,985
1,02
1,07
20%
0,98
1,04
1,11
28%
0,974
1,075
1,18
35%
0,97
1,11
1,22
40%
0,965
1,14
1,24
cPf: cooling capacity correction factor
cQ: flow rate correction factor
cdp: pressure drop correction factor
PH
Electrical conductivity
Chlorine ions
Sulphuric acid ions
Total iron
Alkalinity M
Total hardness
Sulphur ions
Ammonia ions
Silicon ions
Fouling factors
(m2 °C/W)
-5
4,4 x 10
0,86 x 10⁻⁴
1,72 x10⁻⁴
f1
6-8
less than 200 mV/cm (25°C)
less than 50 ppm
less than 50 ppm
less than 0.3 ppm
less than 50 ppm
less than 50 ppm
none
none
less than 30 ppm
Evaporator
fk1
0,96
0,93
0,99
0,98
fx1
0,99
0,98
f1: capacity correction factor
fk1: compressor power input correction factor
fx1: total power input correction factor
EN 03/2011 WWR-MTD2 - BWR MTD2
9
I A
WATER CONNECTIONS
Water content in the system
Size
Minimum system water content (l)
0011ms 0025ms 0031ms 0041ms 0025t/ts 0031t/ts 0041t/ts 0061t/ts 0071t/ts 0091t/ts 0101t/ts 0121t/ts
27
37
44
56
37
44
56
80
100 115 130 170
Expansion vessel size
Size
System expansion vessel volume (l)
0011ms 0025ms 0031ms 0041ms 0025t/ts 0031t/ts 0041t/ts 0061t/ts 0071t/ts 0091t/ts 0101t/ts 0121t/ts
2
2
2
2
2
2
2
5
5
5
8
8
Safety valve calibration
Size
System safety valve (KPa)
0011ms 0025ms 0031ms 0041ms 0025t/ts 0031t/ts 0041t/ts 0061t/ts 0071t/ts 0091t/ts 0101t/ts 0121t/ts
600
600
600
600
600 600 600 600 600 600 600 600
Utility water circuit connection diagram (WWR - BWR)
Factory connections
Installer connections
UTILITY RETURN
UTILITY OUTLET
1
2
3
4
Pressure gauge
Vibration damper joint
Shut off valve
Calibrating valve
5
6
7
8
Flow switch
Thermometer
Pump
Safety valve
9
10
11
12
Expansion vessel
Wire mesh filter
Fill / top-up
Temperature sensor
13
14
15
16
Differential pressure switch
Drain / chemical washing valve
Unit drain valve
System vent
Heat exchange circuit water connection diagram (WWR)
Factory connections
Installer connections
WELL WATER
INLET
WELL WATER
OUTLET
1
2
3
4
10
Pressure gauge
Vibration damper joint
Shut off valve
Flow switch
5
6
7
8
Thermometer
Pump
Flow regulation valve
Wire mesh filter
WWR-MTD2 - BWR MTD2 EN 03/2011
9
10
11
12
Fill / top-up
Temperature sensor
Differential pressure switch
Drain / chemical washing valve
13 Unit drain valve
14 System vent
U I A
WATER CONNECTIONS
Heat exchange circuit water connection diagram (BWR)
Factory connections
Installer connections
GROUND SOURCE
LOOP RETURN
GROUND SOURCE
LOOP OUTLET
1
2
3
4
Pressure gauge
Vibration damper joint
Shut off valve
Calibrating valve
5
6
7
8
Flow switch
Thermometer
Pump
Safety valve
9
10
11
12
Expansion vessel
Wire mesh filter
Fill / top-up
Temperature sensor
13
14
15
16
Differential pressure switch
Drain / chemical washing valve
Unit drain valve
System vent
FILLING THE SYSTEM
- Before starting to fill, place the unit mains
switch QF1 in the OFF position.
- Before filling, check that the system drain
OFF
valve is closed.
- Open all system and terminal air vents.
- Open system shut off valves.
- Start filling by slowly opening the system water fill valve
outside the unit.
- When water begins to leak out of the terminal air vent
valves, close them and continue filling until the pressure
gauge indicates a pressure of 1.5 bar.
ON
The system must be filled to a pressure of between 1
and 2 bars.
It is recommended that this operation be repeated after
the unit has been operating for a number of hours. The
pressure in the system should be checked regularly and
if it drops below 1 bar, the water content should be
topped-up.
Check the tightness of the joints.
EN 03/2011 WWR-MTD2 - BWR MTD2
11
I A
ELECTRICAL CONNECTIONS
The heat pumps must be installed downstream of a main
switch (QF1, see wiring diagram), as required by the standards in force in the country where the unit is installed. Connection to the mains power supply and the connection of the
flow switch to the corresponding terminals must be performed by authorised personnel in compliance with the standards in force.
For all electrical work, refer to the electrical wiring diagrams
in this manual.
It is also recommended to check that:
- The characteristics of the mains electricity supply are adequate for the power ratings indicated in the electrical specifications below, also bearing in mind the possible use of
other equipment at the same time.
Power to the unit must be turned on only after installation work (plumbing and electrical) has been completed.
All electrical connections must be carried out by qualified personnel in accordance with legislation in force in
the country concerned
Respect instructions for connecting phase, neutral and
earth conductors..
The power line should be fitted upstream with a suitable
device to protect against short-circuits and leakage to
earth, isolating the installation from other equipment.
Voltage must be within a tolerance of ±10% of the rated
power supply voltage for the unit (for three phase units,
the unbalance between the phases must not exceed 3%).
If these parameters are not respected, contact the electricity supply company.
For electrical connections, use double insulation cable
in conformity with legislation in force in the country concerned..
A thermal overload switch and a lockable mains disconnect switch, in compliance with the CEI-EN standards (contact opening of at least 3mm), with adequate switching and residual current protection
capacity based on the electrical data table shown
below, must be installed as near as possible to the
appliance.
An efficient earth connection is obligatory.
The manufacturer cannot be held liable for any damage
caused by the failure to correctly earth the unit.
In the case of three phase units, ensure the phases
are connected correctly.
Do not use water pipes to earth the unit.
Electrical data at maximum conditions allowed (full load) WWR MTD2
Power supply
Model
WWR 0011ms MTD2
WWR 0025ms MTD2
WWR 0031ms MTD2
WWR 0041ms MTD2
WWR 0025t / 0025ts MTD2
WWR 0031t / 0031ts MTD2
WWR 0041t / 0041ts MTD2
WWR 0061t / 0061ts MTD2
WWR 0071t / 0071ts MTD2
WWR 0091t / 0091ts MTD2
WWR 0101t / 0101ts MTD2
WWR 0121t / 0121ts MTD2
(V-Ph-Hz)
230-50
230-50
230-50
230-50
400-3N-50
400-3N-50
400-3N-50
400-3N-50
400-3N-50
400-3N-50
400-3N-50
400-3N-50
Total power consumption Icc [A] Iccss [A]
Fuses (5x20T 250V)
P MAX TOT I MAX TOT
L.R.A.
FU1 FU3 FU5 FU6
F.L.I. [kW]
F.L.A. [A]
2,93
13,8
26
4A
4A
4A 1.25A
3,94
17,4
37
4A
4A
4A 1.25A
5,06
23,8
44
4A
4A
4A 1.25A
6,06
31,3
45
4A
8A*
4A 1.25A
3,69
8
35
16
4A
4A
4A 1.25A
4,73
9,6
48
22
4A
4A
4A 1.25A
6,35
12
64
29
4A
8A*
4A 1.25A
7,74
14,3
75
34
4A
8A*
4A 1.25A
9,76
20
95
43
8A*
8A*
4A 1.25A
10,94
25
111
50
8A*
8A*
4A 1.25A
12,79
27,1
118
53
8A*
8A*
4A 1.25A
15,79
32,1
140
63
8A*
8A*
4A 1.25A
F.L.I. Maximum power input
F.L.A. Maximum current input
L.R.A. Start-up current
Maximum values for sizing the protection switches and power supply cables.
ms/ts = Unit with single-phase/three-phase peak limiter
*Fuse 6.3x32T 250V
12
WWR-MTD2 - BWR MTD2 EN 03/2011
I A
ELECTRICAL CONNECTIONS
Electrical data at maximum conditions allowed (full load) BWR MTD2
Power supply
Model
BWR 0011ms MTD2
BWR 0025ms MTD2
BWR 0031ms MTD2
BWR 0041ms MTD2
BWR 0025t / 0025ts MTD2
BWR 0031t / 0031ts MTD2
BWR 0041t / 0041ts MTD2
BWR 0061t / 0061ts MTD2
BWR 0071t / 0071ts MTD2
BWR 0091t / 0091ts MTD2
BWR 0101t / 0101ts MTD2
BWR 0121t / 0121ts MTD2
(V-Ph-Hz)
230-50
230-50
230-50
230-50
400-3N-50
400-3N-50
400-3N-50
400-3N-50
400-3N-50
400-3N-50
400-3N-50
400-3N-50
Total power consumption Icc [A] Iccss [A]
Fuses (5x20T 250V)
P MAX TOT I MAX TOT
L.R.A.
FU1 FU3 FU5 FU6
F.L.I. [kW]
F.L.A. [A]
3,13
14,7
26
4A
4A
4A 1.25A
4,35
19,4
37
4A
4A
4A 1.25A
5,47
25,8
44
4A
4A
4A 1.25A
6,76
35,1
45
4A
8A*
4A 1.25A
4,10
10,0
35
16
4A
4A
4A 1.25A
5,14
11,6
48
22
4A
4A
4A 1.25A
7,05
15,8
64
29
4A
8A*
4A 1.25A
8,58
18,3
75
34
4A
8A*
4A 1.25A
10,9
25,1
95
43
8A*
8A*
4A 1.25A
12,0
30,1
111
50
8A*
8A*
4A 1.25A
14,3
34,3
118
53
8A*
8A*
4A 1.25A
17,3
39,3
140
63
8A*
8A*
4A 1.25A
F.L.I. Maximum power input
F.L.A. Maximum current input
L.R.A. Start-up current
Maximum values for sizing the protection switches and power supply cables.
ms/ts = Unit with single-phase/three-phase peak limiter
*Fuse 6.3x32T 250V
EN 03/2011 WWR-MTD2 - BWR MTD2
13
I A
A9
A2
FU1
A6
TC2
TC1
C1-A1
INSTALLER CONNECTIONS
KA16
KA15
KA7
KA6
KA1
QS1
5
6
7 9 10 11 12 13 21 22 23 24 25 26 27 28 29 30 33 34 39 40 41 42 43 44 45 46 47 48 49 50 51 52 53 54 55 56 57 58 59
INSTALLER TERMINAL BLOCK
14
WWR-MTD2 - BWR MTD2 EN 03/2011
PE
FU8
FU7
FU6
FU5
FU8
FU7
FU6
FU5
A3
QM1
KA1
4
I A
MAINS POWER SUPPLY CONNECTIONS
To complete the electrical connections:
A
- Before connecting the unit to the power supply, make sure
that switch QF1 is open, suitably padlocked and marked.
- Open the front panel of the unit, Fig. A-B-C.
- Fig. A: Remove the 2 screw caps situated on the unit’s
top panel; then unscrew the 2 screws fixing the top
panel, without removing them (unscrew until the panel
can be moved); lift the front panel around 10 mm so that
the bayonet catches on the screws are released.
- Fig. B: Slightly turn the front panel forwards
- Fig. C: remove the panel from the bottom catches
- Open the electrical panel, as shown in Fig. D.
- Use cable gland A for the main electrical power cable and
cable gland B for other external cables to be connected by
the installer, Fig. E.
B
Electrical cables must not enter the unit in positions not
specifically described in this manual.
Avoid direct contact with non-insulated copper piping
and the compressor
• Identify the terminals used for electrical connections on
the layout drawing shown in this manual.
• Make the connections as shown in the wiring diagram provided in this manual.
• The figures show the power supply connection terminals
for 230V and 400V.
• Replace the covers on the electrical panel and the closing
panel.
• Make sure that all the covers removed to make the electrical connections have been replaced before powering up
the unit.
• Position the main switch QF1 (outside the unit) in the “ON”
position.
• Once the remote terminal has been switched on, “OFF”
and “init” are displayed.
• The room unit is ready to use after a few seconds, when
“init” is shown and the clock is displayed
C
Heat pump terminal block
PE
PE
QS1
QS1
D
U
N
230V - 1Ph - 50Hz
U
V
B
W N
400V - 3N ~ 50Hz
A
Installer connections
Power supply
Number of power wires
Power wire size*
230V
2 + PE
6 mmq
400V
4 + PE
6 mmq
Earth connection via heat pump terminal block.
Phase and neutral connection via door lock disconnect
switch.
*Compliant with standards in force in the place where the
unit is installe
E
EN 03/2011 WWR-MTD2 - BWR MTD2
15
I A
INSTALLER CONNECTIONS
H
1 2H
/
Installation instructions
The outside air probe must be installed:
• outside of the home
• not in direct sunlight, away from flue gas discharges, air
outlets, or doors and windows.
• on a perimeter wall facing north/north-west
• at a minimum height of 2.5 metres above the ground or at
most half way up the house.
min2,5 m
Outside air probe (BT11) connection
The outside air probe allows the system water temperature
set point to be compensated during heating or cooling operation.
N
N-W
Mounting method:
• Open the cover of the sensor.
• Attach a probe to the wall and the correct position as
described above.
• For the electrical connections see “Connection diagram”.
• Re-place the cover of the sensor.
TECHNICAL DATA
Sensing element
Degree of protection
Perm. ambient / carriage temperature
Measuring range
Materials
NTC 10Kohm ± 1% (25°C)
IP65
-50°C...+100°C
-50°C...+100°C
PA 15% GK, Colour RAL 9010
BT11
1
45 46
16
WWR-MTD2 - BWR MTD2 EN 03/2011
2
I A
INSTALLER CONNECTIONS
A5 room controller connection
Installation instructions
The room controller must be installed in the best reference
position for temperature control.
Position the room controller as follows:
• around 1.5 metres from the floor, in a part of the room that
allows the sensor to accurately measure the room temperature;
• away from cold air flows, sunlight or other sources of heat.
• leave enough space above the room controller to allow
assembly and removal where necessary.
• If the room controller is removed from its base, it disconnects from the power supply and consequently is no
longer operating.
min.
10 cm
Installation procedure
Assembly
• Separate the front from the rear of the terminal using a
screwdriver r (1)
• Disconnect the 4-pin connector from the front part (2)
• Remove the cover A1, unscrewing the screw A2 (3).
• Fix the controller support to the wall using the holes A3
(4). Support hole size and spacing in figure (5).
• Make the electrical connections as shown in the figure (6),
also see the wiring diagram.
3
4
1
2
5
A3
131
83,5
A3
A1
86
E
A2
6
A5 room controller terminal block
Installer terminal block
24 VAC
GND
TxRx -
GND
Number of wires
Power supply wire size
Maximum distance
TxRx +
51 52 53 54 55
5 shielded
0.5 mm2
500 m
EN 03/2011 WWR-MTD2 - BWR MTD2
17
I A
INSTALLER CONNECTIONS
• Close the cover A1 and secure it with the screw A2
• Plug in the 4-pin connector, figure (7)
• Replace the terminal, starting with the lower tabs, applying
a hinge movement. Make sure that the electrical wires are
inside to ensure correct fastening (click on).
• Dimensions of A5 room controller figure (8).
Wall
7
86
8
143
YV5 Accessory: 3-way valve for domestic hot water production
The 3-way valve installed outside of the unit deviates the
flow of hot water produced by the unit to the DHW storage
tank.
During domestic hot water production, the cooling/heating
demand is not satisfied.
Wire the three-way valve supplied as an accessory by Manufacturer following the instructions shown in the figure.
The valve is also fitted with a limit switch. The limit switch
contact is either closed or open based on the position of the
valve.
Limit switch (red and green wires):
Auxiliary contact closed = Valve open
Auxiliary contact open = Valve closed
If not supplied by Manufacturer, the 3-way valve for domestic hot water production should have the following characteristics:
• Voltage 230V AC, 50/60 Hz
• Opening/closing time 10s.
• Delta P 500 kPa
• Fluid temperature 0°C to 90°C
Use three-way valves with pressure drop below 20 kPa.
For further details see the chapter “Operating characteristics”.
If three-way valves with a travel time greater than 10 seconds are used, modify the setting of parameter 0231
Description
Three-way valve
travel time for
domestic hot water
production
18
Menu Parameter Default
no.
Mn02
12
0231
Value to be set
UOM
Set the travel time sec.
for valves not
supplied by the heat
pump manufacturer
WWR-MTD2 - BWR MTD2 EN 03/2011
8
YV5
9 12 13
Brown
Auxiliary contact
Black
Blue
Green
Red
Yellow/Green
28
I A
INSTALLER CONNECTIONS
Optional connection
1
KM2 System outlet electric heater
An electric heater installed at the outlet can be activated as
a supplementary heater for the system.
6 7
43 44
230V / 400V
Solution 1
System with heat pump and electric heater with storage
tank.
Position probe BT9 in the storage tank.
Solution 2
System with heat pump and outlet electric heater WITHOUT
storage tank.
Position probe BT9 on the system outlet pipe.
BT9
N
2
6 7
43 44
BT9
230V / 400V
N
Outlet electric heater control
A) REPLACEMENT: The electric heater is activated automatically only when the heat pump shuts down due to operation outside of allowed limits or a malfunction.
To enable heater activation in REPLACEMENT mode set
parameter 0303 = 1 and 010G = 1.
Electric heater operation reflects the trend in water outlet
temperature, as shown on the graph in figure 3.
In REPLACEMENT mode the electric heater activation
delay time is ignored, and the device is activated immediately if necessary.
Outlet electric heater operating parameters in REPLACEMENT mode
Description
Menu Parameter Value to be UOM
no
set
Mn03
0300
1
Activation electrical heater
0 = Electrical Heater not enabled
1 = Electrical Heater enabled
Type of outlet electric heater oper- Mn01
ation
0 = Supplementary
1 = Replacement
Mn03
Enable boiler
0 = Boiler not enabled
1 = Boiler enabled
Integration time to activate outlet elec- Mn06
tric heaters
010G
1
0301
0
0617
600
°C*sec
Set the parameters following the sequence described in
the table
B) SUPPLEMENTARY: the electric heater operates in supplementary heating mode, together with the compressor, to
satisfy the heating load.
Electric heater operation reflects the trend in water outlet
temperature, as shown on the graph in figure 3.
Outlet electric heater operating parameters in SUPPLEMENTARY mode
Description
Activation electrical heater
0 = Electrical Heater not enabled
1 = Electrical Heater enabled
Type of outlet electric heater operation
0 = Supplementary
1 = Replacement
Enable boiler
0 = Boiler not enabled
1 = Boiler enabled
Electric heater delay time (allows the
heat pump to reach steady operation
and thus avoid activating the heater
when not needed)
Integration time to activate outlet electric heaters
Menu Parameter Value to be UOM
no
set
Mn03
0300
1
Mn01
010G
0
Mn03
0301
0
Mn06
0616
60
min.
Mn06
0617
600
°C*sec
Set the parameters following the sequence described in
the table
EN 03/2011 WWR-MTD2 - BWR MTD2
19
I A
INSTALLER CONNECTIONS
3
Electric heater activation delay time 0616
Integration time 0617
System water control
set point
Actual water
temperature
System HP control
hysteresis
ON
Heater
OFF
ON
Compressor
OFF
Once the heater is enabled, supplementary heating is activated
when the integration time set for parameter 0617 is reached and
the delay time 0616 has elapsed. The delay time is ignored when
the unit is first started.
Example:
Value 0617 = 600°C*sec
Outlet temperature set point= 50°C
Actual temperature = 40°C
(50 – 40) x 60 sec = 600°Csec. ----> Electric heater ON
Low values of 0617 mean frequent activation of the heater.
Too high values of 0617 mean long delays in activating the heater
20
WWR-MTD2 - BWR MTD2 EN 03/2011
U I A
INSTALLER CONNECTIONS
KM2 Boiler
1
A boiler can be used as a supplementary or replacement
heat source for the system.
6 7
43 44
Solution 1
System with heat pump and boiler with storage tank.
BT9
Boiler
Solution 2
System with heat pump and boiler without storage tank.
2
6 7
43 44
BT9
Boiler
Boiler control
A) REPLACEMENT: The boiler is activated automatically
only when the heat pump shuts down due to operation outside of allowed limits or a malfunction.
To enable boiler activation in REPLACEMENT mode set
parameter 0306=1 and 010H = 1
Boiler operation reflects the trend in water temperature, as
shown on the graph in figure 3.
In REPLACEMENT mode the activation delay time is
ignored, and the boiler is activated immediately if necessary.
Boiler operating parameters in REPLACEMENT mode
Description
Enable electric heater
0 = Heater not enabled
1 = Heater enabled
Activation Boiler
0 = Boiler not enabled
1 = Boiler enabled
Type of boiler operation
0 = Supplementary
1 = Replacemen
Integration time to activate boiler
Menu Parameter Value to be
no.
set
Mn03
0300
0
Mn03
0301
1
Mn01
010H
1
Mn06
0619
600
UOM
°C*sec
Set the parameters following the sequence described in
the table
B) SUPPLEMENTARY: the boiler operates in supplementary heating mode, together with the compressor, to satisfy
the heating load.
Boiler operation reflects the trend in water temperature, as
shown on the graph in figure 3.
Boiler operating parameters in SUPPLEMENTARY mode
Description
Enable electric heater
0 = Heater not enabled
1 = Heater enabled
Activation Boiler
0 = Boiler not enabled
1 = Boiler enabled
Type of boiler operation
0 = Supplementary
1 = Replacemen
Boiler activation delay time
(allows the heat pump to reach
steady operation and thus avoid
activating the boiler when not
needed)
Integration time to activate boiler
Menu Parameter Value to be
no.
set
Mn03
0300
0
UOM
Mn03
0301
1
Mn01
010H
0
Mn06
0618
60
min.
Mn06
0619
600
°C*sec
Set the parameters following the sequence described in
the table
EN 03/2011 WWR-MTD2 - BWR MTD2
21
U I A
INSTALLER CONNECTIONS
3
Boiler activation delay time 0618
Integration time 0619
System outlet temperature
set point
Actual water
temperature
System HP control
hysteresis
ON
Boiler
OFF
ON
Compressor
OFF
Once the boiler has been enabled, supplementary heating is activated when the
integration time set for parameter 0619 is reached and the delay time 0618 has
elapsed. The delay time is ignored when the unit is first started.
Example:
Value 0619 = 600°C*sec
Outlet temperature set point= 50°C
Actual temperature = 40°C
(50 – 40) x 60 sec = 600°Csec. ----> Boiler ON
Low values of 0619 mean frequent activation of the boiler.
Too high values of 0619 mean long delays in activating the boiler
22
WWR-MTD2 - BWR MTD2 EN 03/2011
U I A
INSTALLER CONNECTIONS
KM4 DHW storage electric heater
An electric heater can be managed for heating the DHW
storage.
10 11
DHW storage electric heater control
The electric heater is activated to reach a temperature value
that the heat pump on its own is not able to reach.
N U
Example:
Domestic hot water temperature produced with heat pump
0023 = 55°C
Domestic hot water temperature produced with electric
heater 0209 = 65°C.
The electric heater works so as to increase the DHW storage temperature from 55°C to 65°C, figure 1
Description
Electric heater operating mode
0 = Heat pump only
1 = Electric heater only
2 = Heat pump + Electric heater
Menu Parameter Value to be
no.
set
Mn02
0202
2
UOM
Domestic hot water
electric heater
1
0209
0023
ON
Compressor
Domestic hot water temperature
set point with heat pump
Domestic hot water temperature
set point with heater
Mn00
0023
Mn02
0209
Example
55
Example
65
OFF
°C
°C
Legionella prevention function with electric heater
The Legionella prevention function ensures the elimination
of the Legionella bacteria that reside in domestic water storage tanks. The temperature and duration of the Legionella
prevention cycles are typically:
• 2 minutes > 70°C
• 4 minutes > 65°C
• 60 minutes > 60°C
To enable the Legionella prevention function, set 0222=1
ON
Heater
OFF
t
Description
Domestic hot water heating
0 = heat pump only
1 = electric heater only
2 = heat pump + electric heater
Legionella prevention function
with:
0 = heat pump only
1 = electric heater only
2 = heat pump + electric heater
Domestic hot water temperature
set point for Legionella prevention
Legionella prevention cycle day
MONDAY (0=no; 1=yes)
Legionella prevention cycle day
TUESDAY (0=no; 1=yes)
Legionella prevention cycle day
WEDNESDAY (0=no; 1=yes)
Legionella prevention cycle day
THURSDAY (0=no; 1=yes)
Legionella prevention cycle day
FRIDAY (0=no; 1=yes)
Legionella prevention cycle day
SATURDAY (0=no; 1=yes)
Legionella prevention cycle day
SUNDAY (0=no; 1=yes)
Legionella prevention cycle time
Enable Legionella prevention
function
0 = Not enabled
1 = Enabled
Maximum Legionella prevention
function duration
Menu Parameter Value to be
no.
set
Mn02
0202
2
Mn02
0223
1
Mn02
0211
Mn02
0213
Example
65°C
0
Mn02
0214
0
Mn02
0215
Example 1
Mn02
0216
0
Mn02
0218
0
Mn02
0219
0
Mn02
0220
0
Mn02
0221
02
Mn02
0222
1
Mn02
0225
20
EN 03/2011 WWR-MTD2 - BWR MTD2
UOM
°C
h
min.
23
U I A
INSTALLER CONNECTIONS
HL1 Configurable contact
This contact can be configured for the following functions:
• Alarm signal
• Secondary circuit pump
• Dehumidifier
Alarm signal
A visual or audible signal device can be activated if the unit
shuts down due to a malfunction.
Configure the contact, selecting the desired function by setting parameter 015A:
Description
Enable the contact as:
0= Alarm signal
1= Dehumidifier
3= Secondary circuit pump
Menu Parameter Value to be
no.
set
Mn01
015A
0
21 22
230V 50Hz
U N
UOM
-
Secondary circuit pump
If the system features a low-loss header, contact HL1 can
be used to activate the circulating pump on the secondary
circuit.
21 22
230V 50Hz
U N
Configure the contact, selecting the desired function by setting parameter 015A:
Description
Enable the contact as:
0= Alarm signal
1= Dehumidifier
3= Secondary circuit pump
Menu Parameter Value to be
no.
set
Mn01
015A
3
2
N
L
UOM
-
1
1 Storage tank
2 System pump HL1
Dehumidifier
A dehumidifier can be activated in radiant panel systems to
reduce humidity in cooling mode.
The contact closes and the dehumidifier is activated when
the humidity measured by the probe on the A5 room controller exceeds the value set for parameter 0172.
Configure the contact, selecting the desired function by setting parameter 015A:
Description
Enable the contact as:
0= Alarm signal
1= Dehumidifier
3= Secondary circuit pump
24
Menu Parameter Value to be
no.
set
Mn01
015A
1
WWR-MTD2 - BWR MTD2 EN 03/2011
UOM
-
Dehumidifier
21 22
U I A
INSTALLER CONNECTIONS
HL2 Compressor ON signal
A remote visual signal device can be activated to indicate
compressor operation.
23 24
230V 50Hz
U N
SA1 Remote ON/OFF
The unit can be switched on/off from a remote control unit,
for example a timer or room thermostat.
The remote off function stops the compressor, fan and
pumps, while frost protection remains active.
25 26
- The unit can be switched on/off from contact SA1 only
when the unit has been switched on using the
button on the A5 room controller
SA1
Contact closed = Heat pump ON
Contact open = Heat pump OFF
SA2 Remote cooling/heating
Cooling/heating operating mode can be managed from a
remote control unit.
If remote cooling/heating changeover is enabled, the operating mode cannot be changed on the keypad.
27 28
Set the following parameters:
Description
Enable remote contact
0= remote contact enabled
1= remote contact disabled
(only from keypad)
Menu Parameter Value to be
no.
set
Mn01
0100
0
UOM
SA2
-
Contact closed = Cooling
Contact open = Heating
SA3 Remote system/domestic water priority
The priority of heat pump operation can be selected using a
remote contact.
Use a switch to select the following functions:
29 30
Contact closed = Domestic hot water only
Contact open = Domestic hot water + System
Set the following parameters:
Description
Enable remote contact
0= remote contact enabled
1= remote contact disabled
(selection from keypad only)
Menu Parameter Value to be
no.
set
Mn01
0100
0
SA3
UOM
-
EN 03/2011 WWR-MTD2 - BWR MTD2
25
U I A
INSTALLER CONNECTIONS
SA5 Deactivation contact for excess power consumption
The heat pump accepts an external deactivation signal from
contact SA5 if a power consumption management system is
used to disconnect devices based on set priority, thus avoiding activation of the contactor on the power meter.
Configure the contact, selecting the desired function by setting parameter 015D:
Description
Enable the contact as:
0= Reduced electricity rate
1= Stop operation due to excess
power consumption
Menu Parameter Value to be
no.
set
Mn01
015D
1
33 34
SA5
UOM
-
Contact closed: heat pump operation not allowed.
Contact open: heat pump operation allowed.
SA5 Reduced electricity rate contact
Forced refilling of the reserve storage tanks can be activated based on different electricity rates during the day.
During reduced rate periods, the heat pump can be forced
on so as to heat the domestic hot water or system storage
tank, where fitted.
Configure the contact, selecting the desired function by setting parameter 015D:
Description
Enable the contact as:
0= Reduced electricity rate
1= Stop operation due to excess
power consumption
Enable the set point as:
0= Economy
1= Comfort
Set the value of the domestic hot
water ECONOMY set point
Set the value of the domestic hot
water COMFORT set point
Menu Parameter Value to be
no.
set
Mn01
015D
0
UOM
-
Mn00
0015
0
-
Mn00
0022
°C
Mn00
0023
Example
47
Example
50
°C
Contact closed: forced operation during the reduced rate
period.
Contact open: heat pump operation at full electricity rate.
During operation at reduced electricity rate, contact closed,
the domestic hot water set point is 50°C, as shown in the
example, with the contact open it’s 47°C.
This allows operation at a higher temperature, within the
unit’s operating limits, exploiting the lower electricity cost.
26
WWR-MTD2 - BWR MTD2 EN 03/2011
33 34
SA5
I A
INSTALLER CONNECTIONS
F3 System flow switch
System flow switch connection, compulsory component.
39 40
F3
F5 Source flow switch
Source flow switch connection, required component.
56 57
F5
BT8 Domestic hot water storage temperature probe
The domestic hot water temperature inside the storage tank
is measured using probe BT8.
41 42
BT8
EN 03/2011 WWR-MTD2 - BWR MTD2
27
I AU
GENERAL TECHNICAL DATA
WWR MTD2
Radiant panel heating
Rated heating capacity
Total power consumption
COP
COP EN 14511
Heat exchanger rated water flow-rate
Heat exchanger pressure drop
Hydronic systems heating
Heating capacity
Total power consumption
COP
Heat exchanger water flow-rate
Heat exchanger pressure drop
Radiant panel cooling
Rated cooling capacity
Total power consumption
EER
EER EN 14511
Heat exchanger water flow-rate
Heat exchanger pressure drop
Hydronic cooling systems
Cooling capacity
Total power consumption
EER
ESEER
Heat exchanger water flow-rate
Heat exchanger pressure drop
Other data
Type of compressor
Number of compressors
Refrigerant
Refrigerant charge
Oil charge
Type of system pump
Type of source pump
System and DHW safety valve
System expansion vessel
Power supply
Sound power
Sound pressure
Dimensions
Depth
Width
Height
Water connections (inlet/outlet)
DHW connections (inlet/outlet)
Operating weight
Rif. 0011ms 0025ms 0031ms 0041ms 0025t/ts 0031t/ts 0041t/ts 0061t/ts 0071t/ts 0091t/ts 0101t/ts 0121t/ts
kW
kW
7,23
1,35
5,14
9,66
1,78
5,39
12,1
2,3
5,26
15,3
2,86
5,28
9,85
1,7
5,76
12,1
2,17
5,5
15,9
2,88
5,48
21,1
3,68
5,7
26,2
4,62
5,7
30,5
5,18
5,87
35
6,04
5,83
43,8
7,63
5,76
m3/h
kPa
1,25
14,7
1,67
20,7
2,1
32
2,65
35,2
1,71
21,5
2,09
31,6
2,76
38,1
3,66
39,5
4,54
42
5,28
36,7
6,06
50,4
7,58
49,4
kW
kW
6,83
1,73
4
1,19
13,2
9,23
2,34
4
1,6
19,1
11,6
2,99
3,87
2,02
29,4
14,6
3,62
4,06
2,54
32,4
9,17
2,21
4,18
1,59
18,8
11,4
2,75
4,22
1,98
28,6
15,3
3,71
4,14
2,65
35,2
20
4,61
4,35
3,48
35,7
24,8
5,85
4,28
4,3
37,7
28,8
6,43
4,5
5,01
33
33
7,61
4,34
5,73
45,1
41,7
9,5
4,39
7,25
45,2
7,14
1,55
4,44
9,83
1,95
4,9
12
2,55
4,8
15,1
3,28
4,58
9,47
1,84
5,28
12
2,45
4,8
15,7
3,31
4,76
21,3
4,13
5,2
26,9
5,23
5,17
30,7
6
5,12
34,8
6,97
4,97
33,4
8,44
3,98
m3/h
kPa
1,23
14,2
1,7
21,3
2,07
31
2,6
33,9
1,64
19,8
2,07
31,2
2,71
36,9
3,67
39,8
4,63
43,8
5,29
36,9
6,01
49,6
5,75
28,4
kW
kW
5,17
1,55
3,47
7,16
1,99
3,6
8,84
2,58
3,38
11,3
3,2
3,53
7,34
1,89
3,84
8,88
2,43
3,71
11,8
3,23
3,69
15,7
4,02
3,93
19,8
5,06
3,88
22,9
5,76
3,95
26
6,75
3,82
33,4
8,44
3,96
3
m /h
kPa
0,89
7,44
1,23
11,2
1,52
16,8
1,94
18,8
1,26
11,8
1,53
16,9
2,03
20,6
2,71
21,6
3,42
23,8
3,94
20,5
4,48
27,6
5,75
28,4
n°
1
1
1
1
1
1
1
1
1
kg
kg
1,1
1,1
1,15
1,25
1,24
1,25
1,7
1,89
2,65
2,51
kPa
l
V/ph/Hz
dB(A)
dB(A)
600
2
600
2
52
37
600
2
230/1/50
53
38
53
38
58
43
53
38
53
38
845
680
1105
1
1
188
845
680
1105
1
1
190
845
680
1105
1
1
195
845
680
1105
1
1
210
845
680
1105
1
1
190
845
680
1105
1
1
195
1
2
m3/h
kPa
kW
kW
3
4
mm
mm
mm
inch
inch
kg
5
6
SCROLL ON-OFF
1
1
1
R410A
1,15 1,24 1,55
1,25 1,25 1,24
1,55
1,24
Circulating
Circulating
600
600
2
2
600
2
(1) System water temperature 30/35°C, source water temperature 10/5°C
(2) System water temperature 40/45°C, source water temperature 10/5°C
(3) System water temperature 23/18°C, source water temperature 30/35°C
(4) System water temperature 12/7°C, source water temperature 30/35°C
(5) Sound power based on measurements performed in accordance with ISO 3744
(6) Average sound pressure on reflecting surface (Q=2) at a distance of 1 metre from the outside surface of the unit.
28
WWR-MTD2 - BWR MTD2 EN 03/2011
600
2
600
5
400/3/50
58
59
43
44
845
680
1105
1
1
210
845
680
1105
1-1/4
1-1/4
225
600
5
3,1
3,5
3,25 3,25
Centrifugal
Centrifugal
600
600
5
8
3,7
3,25
600
8
66
51
66
51
70
55
70
55
845
680
1105
1-1/4
1-1/4
230
845
680
1105
1-1/4
1-1/4
245
845
680
1105
1-1/4
1-1/4
250
845
680
1105
1-1/4
1-1/4
270
I A
GENERAL TECHNICAL DATA
BWR MTD2
Radiant panel heating
Rated heating capacity
Total power consumption
COP
COP EN 14511
Heat exchanger rated water flow-rate
Heat exchanger pressure drop
Hydronic systems heating
Heating capacity
Total power consumption
COP
Heat exchanger water flow-rate
Heat exchanger pressure drop
Radiant panel cooling
Rated cooling capacity
Total power consumption
EER
EER EN 14511
Heat exchanger water flow-rate
Heat exchanger pressure drop
Hydronic cooling systems
Cooling capacity
Total power consumption
EER
ESEER
Heat exchanger water flow-rate
Heat exchanger pressure drop
Other data
Type of compressor
Number of compressors
Refrigerant
Refrigerant charge
Oil charge
Type of system pump
Type of source pump
System and DHW safety valve
System expansion vessel
Power supply
Sound power
Sound pressure
Dimensions
Depth
Width
Height
Water connections (inlet/outlet)
DHW connections (inlet/outlet)
Operating weight
Rif. 0011ms 0025ms 0031ms 0041ms 0025t/ts 0031t/ts 0041t/ts 0061t/ts 0071t/ts 0091t/ts 0101t/ts 0121t/ts
kW
kW
1
5,46
1,31
4,23
7,42
1,77
4,11
9,37
2,27
4,07
11,9
2,77
4,25
m3/h
kPa
kW
kW
7,61
1,69
4,47
9,26
2,09
4,43
12,4
2,79
4,43
16,2
3,5
4,63
20,1
4,43
4,57
23,3
4,93
4,76
26,9
5,78
4,64
32,5
9,02
3,61
1,32
12,9
1,6
18,6
2,15
23
2,81
23,2
3,48
24,6
4,04
21,5
4,66
29,8
5,64
27,4
5,23
1,69
3,06
0,909
7,75
7,21
2,33
3,13
1,25
11,6
9,11
2,97
3,03
1,58
18,2
11,5
3,55
3,19
2
20
7,13
2,21
3,23
1,24
11,4
8,84
2,66
3,26
1,54
17,1
12
3,65
3,24
2,08
21,7
15,5
4,41
3,52
2,69
21,4
19,1
5,64
3,41
3,31
22,4
22,2
6,22
3,58
3,86
19,6
25,5
7,35
3,45
4,43
26,9
32,5
9,02
3,61
5,64
27,4
7,14
1,55
4,44
9,83
1,95
4,9
12
2,55
4,8
15,1
3,28
4,58
9,47
1,84
5,28
12
2,45
4,8
15,7
3,31
4,76
21,3
4,13
5,2
26,9
5,23
5,17
30,7
6
5,12
34,8
6,97
4,97
33,4
8,44
3,98
m3/h
kPa
1,23
14,2
1,7
21,3
2,07
31
2,6
33,9
1,64
19,8
2,07
31,2
2,71
36,9
3,67
39,8
4,63
43,8
5,29
36,9
6,01
49,6
5,75
28,4
kW
kW
5,17
1,55
3,47
7,16
1,99
3,6
8,84
2,58
3,38
11,3
3,2
3,53
7,34
1,89
3,84
8,88
2,43
3,71
11,8
3,23
3,69
15,7
4,02
3,93
19,8
5,06
3,88
22,9
5,76
3,95
26
6,75
3,82
33,4
8,44
3,96
3
m /h
kPa
0,89
7,44
1,23
11,2
1,52
16,8
1,94
18,8
1,26
11,8
1,53
16,9
2,03
20,6
2,71
21,6
3,42
23,8
3,94
20,5
4,48
27,6
5,75
28,4
n°
1
1
1
1
1
1
1
1
1
kg
kg
1,1
1,1
1,15
1,25
1,24
1,25
1,7
1,89
2,65
2,51
kPa
l
V/ph/Hz
dB(A)
dB(A)
600
2
600
2
52
37
600
2
230/1/50
53
38
53
38
58
43
53
38
53
38
845
680
1105
1
1
188
845
680
1105
1
1
190
845
680
1105
1
1
195
845
680
1105
1
1
210
845
680
1105
1
1
190
845
680
1105
1
1
195
2
m3/h
kPa
kW
kW
3
4
mm
mm
mm
inch
inch
kg
5
6
SCROLL ON-OFF
1
1
1
R410A
1,15 1,24 1,55
1,25 1,25 1,24
1,55
1,24
Circulating
Circulating
600
600
2
2
600
2
600
2
600
5
400/3/50
58
59
43
44
600
5
3,1
3,5
3,25 3,25
Centrifugal
Centrifugal
600
600
5
8
3,7
3,25
600
8
66
51
66
51
70
55
70
55
845
680
1105
1-1/4
1-1/4
230
845
680
1105
1-1/4
1-1/4
245
845
680
1105
1-1/4
1-1/4
250
845
680
1105
1-1/4
1-1/4
270
EN 03/2011 WWR-MTD2 - BWR MTD2
29
845
680
1105
1
1
210
845
680
1105
1-1/4
1-1/4
225
(1) System water temperature 30/35°C, source water temperature 10/5°C
(2) System water temperature 40/45°C, source water temperature 10/5°C
(3) System water temperature 23/18°C, source water temperature 30/35°C
(4) System water temperature 12/7°C, source water temperature 30/35°C
(5) Sound power based on measurements performed in accordance with ISO 3744
(6) Average sound pressure on reflecting surface (Q=2) at a distance of 1 metre from the outside surface of the unit.
U I A
OPERATING LIMITS
HEATING WWR MTD2
System outlet temperature (°C)
60
55
50
45
40
35
30
25
3
5
7
9
11
13
15
System circuit temperature difference, minimum 4°K
maximum 8°K
Source circuit temperature difference, minimum 3°K
17
Source outlet temperature (°C)
COOLING WWR MTD2
System outlet temperature (°C)
20
18
16
14
12
10
8
6
4
2
27
30
33
36
39
42
45
48
System circuit temperature difference, minimum 4°K
maximum 8°K
Source circuit temperature difference, minimum 3°K
51
Source outlet temperature (°C)
HEATING BWR MTD2
System outlet temperature (°C)
60
55
50
45
40
35
30
25
-15
-10
-5
0
5
10
15
Source outlet temperature (°C)
System circuit temperature difference, minimum 4°K
maximum 8°K
Source circuit temperature difference, minimum 3°K
COOLING BWR MTD2
System outlet temperature (°C)
20
18
16
14
12
10
8
6
4
2
28
30
32
34
36
38
Source outlet temperature (°C)
30
WWR-MTD2 - BWR MTD2 EN 03/2011
40
42
System circuit temperature difference, minimum 4°K
maximum 8°K
Source circuit temperature difference, minimum 5°K
maximum 8°K
Maximum glycol content 40%
U I A
PUMP CURVE
AVAILABLE PRESSURE HEAD CURVES, SYSTEM CIRCUIT, WWR MTD2 XE 0011
Available pressure head [kPa]
80
70
Curve 3
60
50
Curve 2
40
30
Curve 1
20
10
0
0
1
2
Water flow-rate [m3/h]
AVAILABLE PRESSURE HEAD CURVES, SYSTEM CIRCUIT, WWR MTD2 XE 0025
90
Curve 3
Available pressure head [kPa]
80
70
Curve 2
60
50
Curve 1
40
30
20
10
0
0
1
2
3
Water flow-rate [m3/h]
AVAILABLE PRESSURE HEAD CURVES, SYSTEM CIRCUIT, WWR MTD2 XE 0031
Available pressure head [kPa]
120
100
80
60
Curve 3
40
Curve 1
Curve 2
20
0
0
1
2
3
4
Water flow-rate [m3/h]
AVAILABLE PRESSURE HEAD CURVES, SYSTEM CIRCUIT, WWR MTD2 XE 0041
Available pressure head [kPa]
120
100
80
60
Curve 3
40
Curve 2
20
Curve 1
0
0
1
2
3
4
Water flow-rate [m3/h]
The pressure head refers to the values at the fittings.
EN 03/2011 WWR-MTD2 - BWR MTD2
31
U I A
PUMP CURVE
AVAILABLE PRESSURE HEAD CURVES, SYSTEM CIRCUIT, WWR MTD2 XE 0061
Available pressure head [kPa]
120
100
80
60
Curve 3
40
Curve 2
20
Curve 1
0
0
1
2
3
4
5
Water flow-rate [m3/h]
AVAILABLE PRESSURE HEAD CURVES, SYSTEM CIRCUIT, WWR MTD2 XE 0071-0091-0101-0121
Available pressure head [kPa]
250
200
150
100
0091
50
0121
0071
0101
0
0
1
2
3
4
5
6
7
8
9
10
11
12
Water flow-rate [m3/h]
SOURCE HEAT EXCHANGER PRESSURE DROP, WWR MTD2 XE
0025
0011 0031
150
0061
0041
0071
0091
0101
0121
Pressure drop [kPa]
120
90
60
30
0
0
2
4
6
8
10
3
Water flow-rate [m /h]
The pressure head refers to the values at the fittings.
32
WWR-MTD2 - BWR MTD2 EN 03/2011
12
14
PUMP CURVE
AVAILABLE PRESSURE HEAD CURVES, SYSTEM CIRCUIT, BWR MTD2 XE 0011
Available pressure head [kPa]
80
70
Curve 3
60
50
Curve 2
40
30
Curve 1
20
10
0
0
1
2
Water flow-rate [m3/h]
AVAILABLE PRESSURE HEAD CURVES, SYSTEM CIRCUIT, BWR MTD2 XE 0025
90
Curve 3
Available pressure head [kPa]
80
70
Curve 2
60
50
Curve 1
40
30
20
10
0
0
1
2
3
Water flow-rate [m3/h]
AVAILABLE PRESSURE HEAD CURVES, SYSTEM CIRCUIT, BWR MTD2 XE 0031
Available pressure head [kPa]
120
100
80
60
Curve 3
40
Curve 2
20
Curve 1
0
0
1
2
3
4
Water flow-rate [m3/h]
AVAILABLE PRESSURE HEAD CURVES, SYSTEM CIRCUIT, BWR MTD2 XE 0041
Available pressure head [kPa]
120
100
80
60
Curve 3
40
Curve 2
20
Curve 1
0
0
1
2
3
4
Water flow-rate [m3/h]
The pressure head refers to the values at the fittings.
EN 03/2011 WWR-MTD2 - BWR MTD2
33
U I A
PUMP CURVE
AVAILABLE PRESSURE HEAD CURVES, SYSTEM CIRCUIT, BWR MTD2 XE 0061
120
Available pressure head [kPa]
100
80
60
Curve 3
40
Curve 2
20
Curve 1
0
0
1
2
3
4
5
Water flow-rate [m3/h]
AVAILABLE PRESSURE HEAD CURVES, SYSTEM CIRCUIT, BWR MTD2 XE 0071-0091-0101-0121
Available pressure head [kPa]
250
200
150
100
0091
0071
50
0121
0101
0
0
1
2
3
4
5
6
7
Water flow-rate [m3/h]
The pressure head refers to the values at the fittings.
34
WWR-MTD2 - BWR MTD2 EN 03/2011
8
9
10
11
12
U I A
PUMP CURVE
AVAILABLE PRESSURE HEAD CURVES, SOURCE CIRCUIT, BWR MTD2 XE 0011
90
Curve 3
Available pressure head [kPa]
80
70
Curve 2
60
50
Curve 1
40
30
20
10
0
0
1
2
3
Water flow-rate [m3/h]
AVAILABLE PRESSURE HEAD CURVES, SOURCE CIRCUIT, BWR MTD2 XE 0025
Available pressure head [kPa]
120
100
80
60
40
Curve 3
Curve 2
20
Curve 1
0
0
1
2
3
4
Water flow-rate [m3/h]
AVAILABLE PRESSURE HEAD CURVES, SOURCE CIRCUIT, BWR MTD2 XE 0031
Available pressure head [kPa]
120
100
80
60
Curve 3
40
Curve 2
20
Curve 1
0
0
1
2
3
4
Water flow-rate [m3/h]
AVAILABLE PRESSURE HEAD CURVES, SOURCE CIRCUIT, BWR MTD2 XE 0041-0061-0071-0091-0101-0121
400
Available pressure head [kPa]
350
300
250
200
150
0091
100
0121
50
0041
0061
0071
0101
0
0
1
2
3
4
5
6
7
8
9
10
11
12
13
14
Water flow-rate [m3/h]
The pressure head refers to the values at the fittings.
EN 03/2011 WWR-MTD2 - BWR MTD2
35
A
CHECKING AND STARTING UP THE UNIT
CHECKS BEFORE STARTING THE UNIT
• the vibration damping feet are fitted
• inlet filters are fitted on the system
• suitably-sized expansion vessel and safety valve installed
on the DHW circuit
• an expansion vessel is installed if the expansion vessel on
the unit is undersized
• make sure vibration damper joints are installed on water
connections
• a low-loss header is installed if the water content is insufficient
• make sure the position of the outside air probe corresponds to the instructions shown in the manual
• make sure the position of the room control unit corresponds to the instructions shown in the manual
• make sure that the electrical power available is adequate
for the unit installed
• make sure the non-return valve is installed on the DHW
circuit
PREPARING FOR FIRST START UP
The unit must be started up for the first time by the Technical Service. Before starting up the unit, make sure that:
• the unit has been properly installed as described in this
manual
• All safety conditions have been respected;;
• The unit is adequately fixed to the surface it rests on;
• Clearances have been respected;
• Water connections have been carried out as indicated in
the instruction manual;
• All water connections are tight.
• Make sure the water circuit has been washed and drained.
• The water circuit is filled and vented.
• Make sure there is no air in the system. If necessary vent
the system using the vent valve.
If venting after operation in heat pump mode, be careful as
the water may be hot;
• The water valves are open;
• Electrical connections have been carried out correctly;
• Voltage is within a tolerance of 10% of the rated voltage
for the unit;
• Make sure that unbalance between phases is less than
3%, for three-phase units.
• The unit is correctly earthed;
• All electrical connections are tight.
• make sure that the outside air and water temperature are
within the unit operating limits shown in this manual.
Before starting up, power up the unit for at least two hours
by switching QF1 and QS1 to ON (see the wiring diagram)
to allow the oil in the compressor sump to heat up.
STARTING UP FOR THE FIRST TIME
Before starting the unit:
• Make sure the switch QF1 is in the OFF position, Fig. 1.
• Make sure the contact of the on/off device SA1 (see the
wiring diagram) is open (if featured).
• Make sure the “A5” room controller is off.
1
ON
OFF
• Position the main unit switch QS1 in the ON position, Fig.
2.
2
0 OFF
ON
• Move switch QF1 (outside the unit) to “ON”, Fig. 3.
3
ON
OFF
36
WWR-MTD2 - BWR MTD2 EN 03/2011
A
CHECKING AND STARTING UP THE UNIT
• Once having powered up the heat pump, the display on
the room control unit shows this message (1):
1
• Followed by (2):
2
• Wait a few minutes, the unit is ready to operate when the
display shows (3):
3
Before starting up, power up the unit for at least two
hours, with the compressor off, so as to allow the oil
in the compressor sump to heat up.
When commissioning the heat pump, the user must configure the type of system.
See the chapter “System configuration”, check the application diagrams that the control unit is able to manage.
• Set the current date and time on the A5 room controller
• Configure the type of system and the number of A5 room
controllers. See the chapter "System configuration".
• Switch on the unit by pressing button 3
• Select the required operating mode by pressing button 5
• Select the required room temperature by turning knob 4
For further information on the operation and functions of the
room controller, see "Operation and functions of the room
controller".
A5 room controller
5
mode
3
4
EN 03/2011 WWR-MTD2 - BWR MTD2
37
DESCRIPTION OR ROOM CONTROLLER BUTTONS AND DISPLAY
BUTTONS
5
mode
1
NO.
1
2
2
3
4
6
3
7
DISPLAY
5
6
7
4
A
Description
Temperature and humidity probe
Domestic hot water (DHW) production button
ON/OFF button
ESC button in parameter programming mode
Knob
- Turning: scroll room temperature values,
parameters and menus
- Pressing: Confirm settings
Select operating mode button
Set time bands button
Backlit display
1
3
2
4
5
10
6
9
7
8
N°
Description
1
Operating mode
Symbol
Function
Heating
Cooling
automatic mode changeover based on outside air temperature
Domestic hot water production enabled
2
Main field
Room temperature/humidity, room set point, parameter value display
3
Temperature unit of measure
4
Set point
5
Relative humidity
6
Time band
7
Day of the week
On indicates room set point programming
Indicates the type of active time band
error message
system pump active
- flashing: compressor timer, delay
8
Actuator operating
- fixed: compressor active
Defrost active
Boiler or electric heater active
Frost protection active
9
Secondary field
Time, menu, parameter number display
10
Active time band
On indicates active time band
38
WWR-MTD2 - BWR MTD2 EN 03/2011
A
OPERATION AND FUNCTIONS OF THE ROOM CONTROLLER
Meaning of the symbols
Symbol
Meaning
Press and release
x3 sec.
Hold for 3 seconds
Turn the knob
Display
During normal operation of the unit, the display shows the
following information:
1
2
3
4
5
operating mode selected
domestic hot water production enabled
room temperature
hour and minutes
day
1
2
3
4
5
Additional information displayed
During operation of the unit, pressing the knob displays the information described below.
Press the knob
Room temperature set point
Press the knob
Humidity set point
Press the knob
Outside air temperature
Press the knob
Domestic hot water set point
Press the knob
Room humidity
Press the knob
EN 03/2011 WWR-MTD2 - BWR MTD2
39
A
OPERATION AND FUNCTIONS OF THE ROOM CONTROLLER
Setting the time and date
1
2
3
x3 sec.
Press the
button for 3 seconds
4
Press the knob
5
• Press the knob to confirm
7
• The minutes flash
• Turn the knob to select the minutes value
8
• The day flashes
• Turn the knob to select the day**
• Press the knob to confirm
• The hours flash
• Turn the knob to select the hour value
6
• Press the knob to confirm
9
• Press the
button to exit.
10
• Main display
** Mon = Lunedi, Tue = Martedi, Wed = Mercoledi, Thu = Giovedi, Fri = Venerdi, Sat = Sabato, Sun = Domenica
40
WWR-MTD2 - BWR MTD2 EN 03/2011
A
OPERATION AND FUNCTIONS OF THE ROOM CONTROLLER
Switching ON
The
button enables operation of the pump or the zone valve controlled by the room controller, the heat pump is activated by
selecting the operating mode using the
button, as shown below.
1
2
3
x3 sec.
ZONE OFF
Press the
ZONE ON**
button for 3 seconds
** The heat pump is not yet operating, the mode has to be selected: heating, cooling, auto or domestic hot water production.
Selecting the operating mode
None
No operating mode selected.
Heat in OFF.
Automatic mode changeover
Cooling
• Press the mode button
• Press the mode button
• AUTOMATIC** mode changeover • COOLING mode selected
selected
Heating
• Press the mode button
• HEATING mode selected
** AUTO automatic mode changeover based on the outside air temperature
Selecting the room temperature set point
1
2
• Turn the knob
• The room temperature set point
is displayed
3
4
• Turn the knob to change the room • The display shows the room temtemperature set point
perature
• Wait a few seconds for confirmation
EN 03/2011 WWR-MTD2 - BWR MTD2
41
A
OPERATION AND FUNCTIONS OF THE ROOM CONTROLLER
Domestic hot water production
1
2
Domestic hot water production not enabled
Press the
3
• Domestic hot water production enabled
• The
symbol is displayed
.
Selecting the domestic hot water set point
The domestic hot water temperature is measured by the probe installed inside the DHW storage tank.
1
2
• Press thei
seconds
4
x3 sec.
+
buttons together for 3
5
• Press the knob to confirm
7
• Press the knob to confirm
8
• Press the knob
• Turn the knob to select the domestic hot
water set point
3
• Turn the knob and select the value of parameter 012
6
• Turn the knob and select parameter 0023
9
• Press the knob to confirm
➔
42
WWR-MTD2 - BWR MTD2 EN 03/2011
A
OPERATION AND FUNCTIONS OF THE ROOM CONTROLLER
10
11
• Press the
button twice until reaching the
main display.
• Main display
EN 03/2011 WWR-MTD2 - BWR MTD2
43
A
OPERATION AND FUNCTIONS OF THE ROOM CONTROLLER
Programming the time bands
The room controller can customise on/off times for each zone in the system, based on six time bands.
The six time bands are identified by the following symbols, selected by turning the knob:
Time band 1
Time band 2
Time band 3
Time band 4
Time band 5
Time band 6
The time bands on systems with multiple zones, each of which is managed by its own room controller (maximum 6), must be
programmed on each room controller.
For installations with heap pump connected directly to the system, without storage tanks and secondary pumps, parameter
011D must be set to 0. This means that heat pump operation will be managed based on the time bands.
1
2
3
x5 sec.
• Press the
• Turn the knob
button for 5 seconds
• Press to confirm
The time bands can be programmed by selecting the days in preset groups or for each individual day.
4
5
A
6
A
B
GROUP OF 7 DAYS
A Turn the knob
B Press the knob to confirm
8
A
B
GROUP OF 5 DAYS
A Turn the knob
B Press the knob to confirm
9
A
44
Time band 1 start hours
A Turn the knob
B Press the knob to confirm the
hour value
WWR-MTD2 - BWR MTD2 EN 03/2011
A
B
B
GROUP OF 2 DAYS
A Turn the knob
B Press the knob to confirm
INDIVIDUAL DAY
A Turn the knob
B Press the knob to confirm
10
11
A
B
Time band 1
• Press the knob to confirm
7
A
B
Time band 1 start minutes
A Turn the knob
B Press the knob to confirm the
minutes value
B
Time band 1 room temp. set point
A Turn the knob
B Press the knob to confirm
8 + 9 .... 10 .... 11
12
13
14
• Press the
button twice until
reaching the main display.
• Main display
A
B
Time band 2
• Press the knob to confirm
Continue as described from
step 8 to step 11 to set the
hours, minutes and room temperature set point for the other
time bands
Press the
Once the time bands have been
set
A Turn the knob and select ESC
B Press to confirm
button to exit programming mode
Time band program example
Below is an example of a time band program with two temperature levels, Comfort 20°C, Economy 18°C, and OFF.
Time
band 1
20°C
Time
band 2
Time
band 3
Time
band 4
Time
band 5
16
20
Time
band 6
18°C
OFF
0
4
8
12
24
Activating time bands
1
• Press the
2
button.
• The
symbol is displayed
• Time band ACTIVE
Deactivating time bands
1
• Press the
2
button.
• The
symbol is no longer displayed
• Time band DEACTIVATED
Once the time bands have been deactivated check that the room set point is
at the required value, otherwise turn the
knob to select the desired temperature.
EN 03/2011 WWR-MTD2 - BWR MTD2
45
A
OPERATION AND FUNCTIONS OF THE ROOM CONTROLLER
Switching OFF
The
button disables operation of the pump or the zone valve controlled by the room controller, the heat pump is deactivated
using the
button, as shown in " Selecting the operating mode".
1
2
3
x3 sec.
ZONE ON
• Press the
ZONE OFF
button for 3 seconds
ACCESSING THE PROGRAMMING LEVELS
The room controller has a menu structure, divided into levels so as to allow access only to authorised users, as shown below:
Level
Password
Menu description
User
012
Room unit
Mnu00
022
Zone room terminal address setting
System configuration
DHW
Supplem. sources
Cascade/Forced fan
Primary and DHW exchanger
input / output
Addr
Mnu01
Mnu02
Mnu03
Mnu04
Mnu06
Mnu09
Compressor
Source heat exchanger
Defrost
Alarm log
Serial protocol
Mnu05
Mnu07
Mnu08
Mnu11
Mnu12
Installer
034
Authorised technical service
Menu code
Procedure for accessing the menu
1
2
• Main display
• Press the
onds
x3 sec.
+
3
buttons together for 3 sec- • Turn the knob and select the password (as
shown in the table)
➔
46
WWR-MTD2 - BWR MTD2 EN 03/2011
A
OPERATION AND FUNCTIONS OF THE ROOM CONTROLLER
4
5
6
A
B
• Press the knob to confirm
7
A Turn the knob to select the menu
B Press the knob to confirm
• Turn the knob and select the parameter to
be set
8
9
• Press the knob
• The parameter value flashes
• Turn the knob to change the parameter value
10
11
• Press the
button twice until reaching the
main display
• Main display
Press the
• Press the knob to confirm
button to exit programming mode
EN 03/2011 WWR-MTD2 - BWR MTD2
47
A
CONTROL AND OPERATING CHARACTERISTICS
Temperature control
The heating or cooling circuit water temperature is calculated by the controller and depends on the following factors:
A) system water set point compensation in heating or cooling (see paragraph)
B) room temperature influence (see paragraph)
C) minimum and maximum heating water temperature limit
(see paragraph)
D) room temperature set point
A) System water temperature set point compensation
The water temperature set point in heating or cooling is calculated based on the outside temperature trend according to
settable curves.
Water set point compensation diagram in HEATING
The compensation curve in heating mode can be modified
to allow correct heat pump operation depending on the heating system used (radiant panels, radiators, fan coils).
2,2
2
1,8
1,6
A heating curve that is too high gives an excessive outlet
temperature, a curve that is too low may mean the desired
room temperature is not reached.
1,4
Water set point °C
Example: Selecting heating curve 1.4 with an outside air
temperature of -5°C gives a water temperature of +55°C.
0,6
0,2
-5
-25
Outside air temp. °C
Compensation curve number
0.25÷0.7
0,9÷1,1
1,2÷1,5
The compensation curves in HEATING are divided into:
• SYSTEM curve: determines the set point for heat pump operation and any high temperature zones. The set point calculated refers to the heat pump return water temperature.
The water outlet temperature is usually 5°C higher than
the return temperature.
This temperature difference may change depending on the
flow-rate and the type of system.
Make sure that the temperature difference is within the
limits required by the manufacturer.
• ZONE curve determines the water outlet temperature in
the mixed circuit.
For systems configured with mixed zones, the SYSTEM
curve and ZONE curve must be selected.
The system and zone curve work in cascading, the mixed
zone curve may therefore not request a higher value than
the one supplied by the system curve.
48
1
0,8
0,4
The curve can be set separately for each zone, depending
on the type of room terminal.
The following compensation curves are recommended:
Type of terminal
Radiant panels
Fan coils
Radiators
1,2
WWR-MTD2 - BWR MTD2 EN 03/2011
Description
Enable SYSTEM compensation
curve
0= Disabled
1= Enabled
SYSTEM compensation curve
number
Menu Parameter
no.
Mn01
0152
Default
0
Mn01
0159
0,8
Enable compensation curve zone Mn01
LT1
0= Disabled
1= Enabled
Compensation curve number zone LT1 Mn01
0167
0
0174
0,7
Enable compensation curve zone Mn01
LT2
0= Disabled
1= Enabled
Compensation curve number zone LT2 Mn01
0182
0
0189
0,7
Enable compensation curve zone Mn01
LT3
0= Disabled
1= Enabled
Compensation curve number zone LT3 Mn01
015E
0
012A
0,7
UOM
A
B) Room temperature influence in HEATING
The compensation curve determines the heating water temperature; this may then be corrected based on the difference
between the desired room set point and the actual room temperature.
The correction made to the water temperature depends on
the “Room Authority” coefficient.
The higher the value of the Room Authority the higher the
correction to the system water temperature, and vice-versa.
System or zone water temperature deviation (°C)
CONTROL AND OPERATING CHARACTERISTICS
Example referred to compensation curve 1.0
60
50
40
30
20
10
0
-10
10 %
25 %
-20
50 %
-30
75 %
99 %
-40
-2.5
2
-1,5
-1
This allows the water temperature to adapt quickly to
changes in the conditions inside the room.
Description
The function can only be ENABLED if the A5 room controller
is positioned in the room and used to measure the reference
temperature.
Enable room temperature influence on SYSTEM
0= Disabled
1= Enabled
SYSTEM Room Authority
Set authority values for the SYSTEM equal to or greater than
those for zones LT1, LT2, LT3.
Enabling room temperature influence on SYSTEM deviates
the calculated heat pump return water temperature set point.
Enabling room temperature influence on ZONE LT1, LT2,
LT3 deviates the calculated water outlet temperature set
point to the system, controlled by the mixing valve.
0
0,5
1
1,5
Menu Parameter
no.
Mn01
0163
Default
2
UOM
0
Mn01
0164
30
Enable Room temperature influence on LT1
0= Disabled
1= Enabled
LT1 Room Authority
Mn01
0178
0
Mn01
0179
30
Enable Room temperature influence on LT2
0= Disabled
1= Enabled
LT2 Room Authority
Mn01
0193
0
Mn01
0194
30
Enable Room temperature influence on LT3
0= Disabled
1= Enabled
LT3 Room Authority
Mn01
012D
0
Mn01
012E
30
C) System water temperature limits in HEATING
%
%
%
%
Outlet set point with room temp. 20°C
100
90
80
Outlet temp. (°C)
These define the temperature limits (minimum and maximum) that can be requested from the circuit and never
exceeded.
In the figure the minimum limit is 30°C and the maximum is
40°.
Between 30 and 40°C the water temperature will be able to
vary based on the trend in outside temperature.
-0,5
DT (Room temperature °C - Room set point °C)
70
60
50
40
30
20
For systems configured with mixed zones, the limits for the
SYSTEM curve and ZONE curve must be selected.
10
20
15
10
5
0
-5
-10
-15
-20
-25
-30
Outside temp. (°C)
Menu Parameter
no
Mn01
0165
Valore di
UOM
30
°C
0166
48
°C
MINIMUM outlet set point limit for Mn01
compensation curve in zone LT1
MAXIMUM outlet set point limit for Mn01
compensation curve in zone LT1
0180
23
°C
0181
45
°C
MINIMUM outlet set point limit for Mn01
compensation curve in zone LT2
MAXIMUM outlet set point limit for Mn01
compensation curve in zone LT2
0195
23
°C
0196
45
°C
MINIMUM outlet set point limit for Mn01
compensation curve in zone LT3
MAXIMUM outlet set point limit for Mn01
compensation curve in zone LT3
012F
23
°C
012G
45
°C
Description
MINIMUM outlet set point limit for
SYSTEM curve
MAXIMUM outlet set point limit for Mn01
SYSTEM curve
EN 03/2011 WWR-MTD2 - BWR MTD2
49
A
CONTROL AND OPERATING CHARACTERISTIC
Water outlet set point compensation diagram in COOLING
The compensation curve in cooling mode can be modified to
allow correct heat pump operation depending on the cooling
system used (radiant panels, fan coils).
Points T1 and T2 correspond to two outside temperature
values that respectively identify the maximum and minimum
system outlet temperature.
Outlet
set point
Tm1
Tm2
Te1
Te2
Outside temp.
The compensation curves in COOLING are divided into:
• SYSTEM curve: determines the set point for heat pump
operation and any high temperature zones. The set point
calculated refers to the heat pump return water temperature. The water outlet temperature is usually 5°C lower
than the return temperature. This temperature difference
may change depending on the flow-rate and the type of
system. Make sure that the temperature difference is within the limits required by the manufacturer.
• ZONE curve determines the water outlet temperature in
the mixed circuit.
For systems configured with mixed zones, the SYSTEM
curve and ZONE curve must be selected.
The system and zone curve work in cascading, the mixed
zone curve may therefore not request a higher value than
the one supplied by the system curve.
Maximum room humidity compensation
The water temperature set point, calculated based on the
compensation curve, can be compensated according to the
maximum relative humidity in the room.
The water temperature value can increase so as to avoid
possible formation of condensate in the radiant cooling systems (underfloor, ceiling, wall, etc.).
If the relative humidity measured by the A5 room unit A5
exceeds the value set for parameter 0157, 0172, 0187, the
water temperature set point increases until reaching the
maximum temperature.
The maximum water temperature is the set point calculated
according to the compensation curve in cooling mode plus
the value set for parameter 0158, 0173, 0188.
Enabling room humidity compensation on SYSTEM deviates
the calculated heat pump return water temperature set point.
Enabling room humidity compensation on ZONE LT1, LT2,
LT3 deviates the calculated water outlet temperature set
point to the system, controlled by the mixing valve.
Outlet
temperature
hysteresis (°C)
Value:
parameter 0158
parameter 0173
parameter 0188
Value parameter 0157
Value parameter 0172
Value parameter 0187
50
100% UR%
Room
humidity (RH%)
WWR-MTD2 - BWR MTD2 EN 03/2011
Description
Enable SYSTEM compensation curve
0= Disabled
1= Enabled
Maximum return temperature set point limit
in cooling mode (Tm1)
Minimum outside temperature corresponding
to max. return temperature (Te1)
Minimum return temperature set point limit in
cooling mode (Tm2)
Maximum outside temperature corresponding to min. return temperature (Te2)
Enable compensation curve zone LT1
0= Disabled
1= Enabled
Maximum outlet temperature set point limit
in cooling mode (Tm1)
Minimum outside temperature corresponding to max. outlet temperature (Te1)
Minimum outlet temperature set point limit in
cooling mode (Tm2)
Maximum outside temperature corresponding to min. outlet temperature (Te2)
Enable compensation curve zone LT2
0= Disabled
1= Enabled
Maximum outlet temperature set point limit
in cooling mode (Tm1)
Minimum outside temperature corresponding
to max. outlet temperature (Te1)
Minimum outlet temperature set point limit in
cooling mode (Tm2)
Maximum outside temperature corresponding to min. outlet temperature (Te2)
Enable compensation curve zone LT3
0= Disabled
1= Enabled
Maximum outlet temperature set point limit
in cooling mode (Tm1)
Minimum outside temperature corresponding
to max. outlet temperature (Te1)
Minimum outlet temperature set point limit in
cooling mode (Tm2)
Maximum outside temperature corresponding to min. outlet temperature (Te2)
Description
Menu
Enable compensation for room
humidity, SYSTEM
0= Disabled
1= Enabled
Room relative humidity value to start
increasing SYSTEM water return
temperature set point
Maximum return temperature hysteresis corresponding to 100% relative humidity
Enable compensation for room
humidity, ZONE LT1
0= Disabled
1= Enabled
Room relative humidity value to start
increasing water outlet temperature
set point ZONE LT1
Maximum outlet temperature hysteresis corresponding to 100% relative humidity
Enable compensation for room
humidity, ZONE LT2
0= Disabled
1= Enabled
Room relative humidity value to start
increasing water outlet temperature
set point ZONE LT2
Maximum outlet temperature hysteresis corresponding to 100% relative humidity
Enable compensation for room
humidity, ZONE LT3
0= Disabled
1= Enabled
Room relative humidity value to start
increasing water outlet temperature
set point ZONE LT2
Maximum outlet temperature hysteresis corresponding to 100% relative humidity
Menù Parameter
no.
Mn01
0154
Default
UOM
0
Mn01
0128
25
°C
Mn01
0129
23
°C
Mn01
0130
23
°C
Mn01
0131
36
°C
Mn01
0169
0
Mn01
0132
20
°C
Mn01
0133
23
°C
Mn01
0134
18
°C
Mn01
0135
36
°C
Mn01
0184
0
Mn01
0136
20
°C
Mn01
0137
23
°C
Mn01
0138
18
°C
Mn01
0139
36
°C
Mn01
011T
0
Mn01
012H
20
°C
Mn01
012J
23
°C
Mn01
012L
18
°C
Mn01
012M
36
°C
UOM
Mn01
Parameter
no.
0156
U.M.
Mn01
0157
70
%
Mn01
0158
15
°C
Mn01
0171
0
Mn01
0172
70
%
Mn01
0173
15
°C
Mn01
0186
0
Mn01
0187
70
%
Mn01
0188
15
°C
Mn01
012N
0
Mn01
012P
70
%
Mn01
012R
15
°C
0
A
CONTROL AND OPERATING CHARACTERISTICS
Automatic mode changeover based on outside
temperature
In
mode, the operating mode (heating / cooling)
changes automatically, avoiding the need for the user to
change the mode manually.
Mode changeover is based on the diagram shown in the figure.
The centre zone A corresponds to an area of inactivity, as
the outside climate conditions mean neither heating nor
cooling is required.
Heating
ON
Cooling
A
OFF
0108=26°C
0106= 16°C
0106+0107=18°C
Description
Automatic mode changeover set
point in HEATING
Automatic mode changeover differential in HEATING
Automatic mode changeover set
point in COOLING
Automatic mode changeover differential in COOLING
Outside temp.
0108-0109=24°C
Menu Parameter
no.
Mn01
0106
Default
UOM
16
°C
Mn01
0107
2
°C
Mn01
0108
24
°C
Mn01
0109
2
°C
System pump operation
When reaching the system water set point, the compressor
stops and the system pump is activated periodically, so as
to minimise energy consumption.
Pump operating time can be selected using parameter
0147, while the interval between one sniffing cycle and the
next is set using parameter 0148.
Intermittent activation of system pump operation can be
selected using parameter 0143 (0= system pump always on
to, 1=system pump activated at intervals).
In systems with fan coils, the time between one sniffing
cycle and the next should be reduced in order to avoid cooling excessive of the water, and if the system water content
is equal to the minimum value shown in the paragraph on
"water connections", parameter 0143 should be set to 0.
EN 03/2011 WWR-MTD2 - BWR MTD2
51
U I A
CONTROL AND OPERATING CHARACTERISTICS
Heat pump operation with fixed set point
Description
System water set point compensation using the compensation curves can be disabled.
To enable fixed set point operation, set parameter 0152=0
and 0154=0
The heat pump will operate based on the fixed return set
point defined by parameters 0153 (Heating) and 0155 (cooling).
Enable return set point in
HEATING
0= Fixed set point in heating
ENABLED
1= Fixed set point in heating
DISABLED
Fixed return water temperature
set point in HEATING
Enable return set point in
COOLING
0= Fixed set point in cooling
ENABLED
1= Fixed set point in cooling
DISABLED
Fixed return water temperature
set point in COOLING
Menu Parameter
no.
Mn01
0152
Default
UOM
0
-
Mn01
0153
40
°C
Mn01
0154
0
-
Mn01
0155
12
°C
FROST PROTECTION
Frost protection based on system water temperature
The frost protection function is active even if the controller is
in standby. To prevent the water freezing and damaging the
plate heat exchanger, the microprocessor shuts down the
compressor and activates the system heat exchanger
heater if the temperature measured by the heat exchanger
outlet temperature probe is than +4°C. The frost prevention
temperature set point can only be modified by an authorised
service centre, and only after verifying that the water circuit
contains antifreeze. Tripping of this alarm shuts down the
compressor but not the pump, which remains active.
To reset normal operation, the water outlet temperature
must rise to more than: +7°C on the system side. Reset is
automatic.
Frost protection based on inside temperature
Frost protection on the heating circuit is always active, even
when the heat pump is off.
The heat pump and/or supplementary sources of heat (outlet heater or boiler) are activated if the room temperature
falls below the value set for parameter 0140, to prevent the
pipes inside the home from freezing.
Description
Inside temperature to enable frost
protection
Menu Parameter
no.
Mn01
0140
Default
UOM
14
°C
Outside temperature to enable
frost protection
ON
OFF
Outside air T
0140 Inside temperature
Frost protection based on outside air temperature
Frost protection on the heating and domestic hot water circuits based on outside air temperature is always active,
even when the heat pump is off.
The system and domestic hot water pumps are activated
when the outside air temperature falls below the value set
for parameter 0141.
Description
1°C
Heat pump
Menu Parameter
no.
Mn01
0141
Default
UOM
4
°C
System and DHW
circuit water pump
1°C
ON
OFF
Outside air T
0141 Outside air temperature to enable frost protection
52
WWR-MTD2 - BWR MTD2 EN 03/2011
U I A
SYSTEM CONFIGURATION
Il controllore della pompa di calore permette la configurazione di 15 differenti tipologie di impianto selezionabili impostando il
parametro 0101.
La tabella seguente riporta gli impianti configurabili.
Menu
Parameter
0101
Mixed zone 1
Mixed zone 2
ZONA "1"
Mixed zone 3
ZONA "1"
5
High temperature High temperature High temperature DHW
N-EM1
zone 1 (fan coils / zone 2 (fan coils / zone 3 (fan coils / recircu- expansion
radiators)
radiators)
radiators)
lation
module
ZONA "1"
5
ZONA "1"
5
ZONA "1"
5
ZONA "1"
5
5
n°
T
T
M
T
T
M
T
T
M
T
T
T
T
T
T
Mn01
0
X
Mn01
1
X
0
Mn01
2
X
Mn01
3
X
X
Mn01
4
X
X
Mn01
5
X
X
X
Mn01
6
X
X
X
Mn01
7
X
X
X
X
Mn01
8
X
X
X
X
Mn01
9
X
X
Mn01
10
X
X
Mn01
11
X
X
X
Mn01
12
X
X
X
X
Mn01
13
X
X
X
X
Mn01
14
X
X
X
1
1
1
X
2
2
X
2
2
X
2
2
X
X
X
2
X
2
X
3
X
3
X
3
Configuration 0 does NOT require additional expansion modules
Configurations from 1 to 3 require 1 additional N-EM1 expansion module
Configurations from 4 to 11 require 2 additional N-EM1 expansion modules
Configurations 12, 13 and 14 require 3 additional N-EM1 expansion modules
The water connection and wiring diagrams for configurations from 1 to 14 are shown on the instruction sheet enclosed with the
N-EM1 expansion module.
The parameters required for correct system operation can be set on the A5 room controller supplied with the heat pump.
The next few pages are divided into the following sections:
Section 1 WATER CIRCUIT DIAGRAM
Section 2 WIRING DIAGRAM
Section 3 PARAMETER CONFIGURATION
EN 03/2011 WWR-MTD2 - BWR MTD2
53
54
Water circuit diagram (not a working drawing)
WWR-MTD2 - BWR MTD2 EN 03/2011
T
N.C.
INSIDE
F
T
T
N.B.: Typical water circuit diagram.
1
INDICATES ACCESSORIES
FROM/TO THE GEOTERMAL PROBES
2
OUTSIDE
T
T
F
MEMBRANE EXPANSION
VESSEL
ELECTRICAL CONNECTIONS
DOMESTIC COLD WATER
DOMESTIC HOT WATER
HEAT PUMP RETURN
HEAT PUMP OUTLET
SAFETY VALVE WITH
PIPED DISCHARGE
“Y” FILTER
DRAIN VALVE
THERMOSTATIC MIXER
SHUT-OFF VALVE
MT
VENT VALVE
FLOW SWITCH
F
CALIBRATING VALVE
VIBRATION DAMPER JOINT
THERMOMETER
T
CHECK VALVE
KEY TO THE SYMBOLS
PRESSURE GAUGE
ROOM UNIT (SUPPLIED AS STANDARD WITH THE HEAT PUMP)
3
N.C.
4
D
5
(*) INSTALL A STORAGE TANK ON THE HEAT PUMP RETURN
IF THE SYSTEM WATER CONTENT IS LESS THAN THE VALUE DESCRIBED
IN THE TECHNICAL BULLETIN.
STORAGE TANK FOR HEATED AND CHILLED WATER,
MODEL BT35, BT100 OR BT200 (*)
8
DHW STORAGE TANK, MODEL HWC 300 OR HWC 500
ELECTRIC HEATER KIT, 1-2-3 kW
5
6
7
REMOVABLE METAL MESH FILTER (1"1/4, 1"1/2 OR 2")
1”1/4 THREE-WAY SELECTOR VALVE FOR DHW PRODUCTION
3
4
OUTSIDE AIR TEMPERATURE PROBE
(SUPPLIED AS STANDARD WITH THE HEAT PUMP)
2
APPLIANCES
MEDIUM TEMPERATURE REVERSE-CYCLE UNIT, MODEL BWR MTD2
1
T
MT
6
ACS
7
AUTOMATIC FILL
ASSEMBLY
T
T
ZONE "1"
BWR_MTD2_0000.0
CONFIGURATION "0"
SELF-CLEANING
FILTER
FROM WATER
MAINS
REV_00 27/01/2011
LOW-LOSS
HEADER
8
SYSTEM CONFIGURATION
U I A
Heat pump connection to the system without low-loss header. Make sure the useful pressure head of the circulating
pump on the unit is sufficient for the pressure drop in the system. If the minimum system content does not reach values shown in this manual, install an additional storage tank on the heat pump return pipe. No system configurations
are required.
Water circuit diagram
U I A
SYSTEM CONFIGURATION
Parameter configuration
Menu
Parameter
no.
Default
Mn01
0152
0
-
Mn01
0159
1
-
Mn01
0163
0
-
SYSTEM Room Authority
Mn01
0164
30
%
MINIMUM return set point limit for SYSTEM curve
Mn01
0165
30
°C
MAXIMUM return set point limit for SYSTEM curve
Mn01
0166
48
°C
Mn01
0154
0
-
Mn01
0128
25
°C
Mn01
0129
23
°C
Mn01
0130
23
°C
Mn01
0131
36
°C
Description
Write
set value
UOM
SYSTEM compensation curves in heating mode
Enable SYSTEM compensation curve
0= Disabled
1= Enabled
SYSTEM compensation curve number
Enable room temperature influence on SYSTEM
0= Disabled
1= Enabled
SYSTEM compensation curves in cooling mode
Enable SYSTEM compensation curve
0= Disabled
1= Enabled
Maximum return temperature set point limit in cooling mode (Tm1)
Minimum outside temperature corresponding to max. return
temperature (Te1)
Minimum return temperature set point limit in cooling mode (Tm2)
Maximum outside temperature corresponding to min. return
temperature (Te2)
EN 03/2011 WWR-MTD2 - BWR MTD2
55
56
Water circuit diagram (not a working drawing)
WWR-MTD2 - BWR MTD2 EN 03/2011
T
N.C.
INSIDE
F
T
T
N.B.: Typical water circuit diagram.
1
INDICATES ACCESSORIES
FROM/TO THE GEOTERMAL PROBES
2
OUTSIDE
T
T
F
MEMBRANE EXPANSION
VESSEL
ELECTRICAL CONNECTIONS
DOMESTIC COLD WATER
DOMESTIC HOT WATER
HEAT PUMP RETURN
HEAT PUMP OUTLET
SAFETY VALVE WITH
PIPED DISCHARGE
“Y” FILTER
DRAIN VALVE
THERMOSTATIC MIXER
SHUT-OFF VALVE
MT
VENT VALVE
FLOW SWITCH
F
CALIBRATING VALVE
VIBRATION DAMPER JOINT
THERMOMETER
T
CHECK VALVE
KEY TO THE SYMBOLS
PRESSURE GAUGE
3
4
D
ROOM UNIT (SUPPLIED AS STANDARD WITH THE HEAT PUMP)
N.C.
STORAGE TANK FOR HEATED AND CHILLED WATER,
MODEL BT35, BT100 OR BT200 (*)
8
DHW STORAGE TANK, MODEL HWC 300 OR HWC 500
ELECTRIC HEATER KIT, 1-2-3 kW
5
6
7
REMOVABLE METAL MESH FILTER (1"1/4, 1"1/2 OR 2")
1”1/4 THREE-WAY SELECTOR VALVE FOR DHW PRODUCTION
3
4
5
OUTSIDE AIR TEMPERATURE PROBE
(SUPPLIED AS STANDARD WITH THE HEAT PUMP)
2
APPLIANCES
MEDIUM TEMPERATURE REVERSE-CYCLE UNIT, MODEL BWR MTD2
1
T
MT
6
ACS
7
AUTOMATIC FILL
ASSEMBLY
T
T
ZONA "1"
BWR_MTD2_0000.1
CONFIGURATION "0"
SELF-CLEANING
FILTER
FROM WATER
MAINS
REV_00 27/01/2011
LOW-LOSS
HEADER
8
SYSTEM CONFIGURATION
U I A
System number 0
Water circuit diagram
2
T
OUTSIDE
1
OUTSIDE AIR PROBE
TERMINAL BLOCK
INSIDE
41 42
1
10 11
4
D
230V
50 Hz
21 22
L
9 12 13
2
45 46
A5
51 52 53 54 55
GND
HL1
TxRx+
KM4
TxRxGiallo/Verde
BT8
Ausiliary
contact
Nero
Blu
SELECTOR VALVE
TERMINAL BLOCK
Verde
YV5
GND
24
VAC
Rosso
BT11
INSTALLER TERMINAL BLOCK
(CONTACTS USED)
Marrone
5
6
230V
50 Hz
N
1
2
T1 T2
N 11 21 31
ELECTRIC HEATER
TERMINAL BLOCK
U
ELECTRIC HEATER PANEL
TERMINAL BLOCK
7
24V
AC
L
N
5
8
7
6
EN 03/2011 WWR-MTD2 - BWR MTD2
BWR_MTD2_0000.1
CONFIGURATION "0"
REV_01 15/02/2011
ROOM UNIT (SUPPLIED AS STANDARD WITH THE HEAT PUMP)
STORAGE TANK FOR HEATED AND CHILLED WATER,
MODEL BT35, BT100 OR BT200
ELECTRIC HEATER KIT, 1-2-3 kW
DHW STORAGE TANK, MODEL HWC 300 OR HWC 500
1”1/4 THREE-WAY SELECTOR VALVE FOR DHW PRODUCTION
OUTSIDE AIR TEMPERATURE PROBE
(SUPPLIED AS STANDARD WITH THE HEAT PUMP)
4
2
APPLIANCES
ZONE "1"
MEDIUM TEMPERATURE REVERSE-CYCLE UNIT, MODEL BWR MTD2
230V
50 Hz
8
1
PUMP TERMINAL BLOCK
GNDTxRx- TxRx+ GND
ROOM CONTROLLER
TERMINAL BLOCK
SYSTEM CONFIGURATION
U I A
System number 0
Wiring diagram
57
U I A
SYSTEM CONFIGURATION
System number 0
Parameter configuration
Description
Menu
Parameter
no.
Default
Write
set value
UOM
System type (table 1)
Mn01
0101
0
0*
-
Mn01
0152
0
-
Mn01
0159
1
-
Mn01
0163
0
-
SYSTEM Room Authority
Mn01
0164
30
%
MINIMUM return set point limit for SYSTEM curve
Mn01
0165
30
°C
MAXIMUM return set point limit for SYSTEM curve
Mn01
0166
48
°C
Mn01
0154
0
-
Mn01
0128
25
°C
Mn01
0129
23
°C
Mn01
0130
23
°C
Mn01
0131
36
°C
Mn01
015A
0
SYSTEM compensation curves in heating mode
Enable SYSTEM compensation curve
0= Disabled
1= Enabled
SYSTEM compensation curve number
Enable room temperature influence on SYSTEM
0= Disabled
1= Enabled
SYSTEM compensation curves in cooling mode
Enable SYSTEM compensation curve
0= Disabled
1= Enabled
Maximum return temperature set point limit in cooling mode (Tm1)
Minimum outside temperature corresponding to max. return
temperature (Te1)
Minimum return temperature set point limit in cooling mode (Tm2)
Maximum outside temperature corresponding to min. return
temperature (Te2)
Contact HL1 configuration, secondary circuit pump
Enable contact HL1 HIGH TEMPERATURE ZONE
The contact closes and the pump or motor-driven shut-off valve
is activated)
* obligatory values for the present configuration
58
WWR-MTD2 - BWR MTD2 EN 03/2011
3*
U I A
REGOLAZIONE IMPIANTO
MAINTENANCE
AND SERVICE
E CARATTERISTICHE DI FUNZIONAMENTO
Alarm signals
When an alarm is activated, the
symbol comes one.
Displaying alarms
1
2
3
x3 sec.
• Press the
onds
and
buttons for 3 sec-
• Turn the knob
• Display the alarm codes
• Press the knob to confirm
• Resolve the problem and then reset the
alarms using the procedure described in
“Resetting alarms”
Resetting alarms
1
2
3
x3 sec.
• Press the
onds
and
buttons for 3 sec-
• Turn the knob
• Press the knob to confirm
• Alarms reset
• Select
Alarm log
The alarm log can only be displayed using the service keypad. Contact an authorised service centre.
The room controller can display the most recently activated
alarm code from Mn11:
- parameter 1100 = no. of alarms saved in the log (visible
only with service keypad)
- parameter 1101= code of last alarm activated
-
parameter 1102= alarm activation hour
parameter 1103= alarm activation minutes
parameter 1104= alarm activation day
parameter 1105= alarm activation month
parameter 1106= alarm activation year
EN 03/2011 WWR-MTD2 - BWR MTD2
59
A
MAINTENANCE AND SERVICE
ALARM TABLE
Alarm code
A001
A002
A003
A004
A005
A006
A007
Cause
BT1 System heat exchanger water inlet temperature probe
BT2 System heat exchanger water outlet temperature probe
BT8 DHW storage temperature probe
BT7 Transfer heat exchanger water outlet temperature probe
BT9 Storage tank temperature probe
BT11 Outside air temperature probe
BP1 High pressure transducer
A013
F1 High pressure switch
A014
High pressure measured by transducer BP1
A019
Difference between low and high pressure in refrigerant circuit too low
A022
Operation outside of limits
A023
Source differential pressure switch/flow switch activated
A025
Differential pressure switch / system flow switch F3 activated
A030
A033
A034
A035
A036
A038
A041
A042
Compressor operating hours reached
System pump operating hours reached
Domestic hot water pump operating hours reached
Mixed zone pump operating hours reached
Fan operating hours reached
System heat exchanger frost prevention alarm
DHW storage temperature too high
Inside frost prevention alarm
A045
Outside air temperature probe
Check connections
Faulty probes, replace terminal
Thermostatic valve driver
Contact service centre
A047
A048
A049
A050
A051
A052
A053
A054
Check refrigerant circuit pressure
Check refrigerant charge
Make sure outside air temperature and water temperature set point are inside the specified operating limits
Make sure the filter is clean
Make sure the system is filled with water
Check water flow-rate
Verifica pulizia filtri
Verifica flusso acqua
Verifica presenza aria nell'impianto
Scheduled maintenance
Scheduled maintenance
Scheduled maintenance
Scheduled maintenance
Scheduled maintenance
Scheduled maintenance
Legionella prevention alarm
A055
Temperature probe N-THC n.1
A056
Address setting error on remote terminal supplied with the unit
A057
Address setting error on expansion module 2
A058
Temperature probe in low temperature zone LT2, expansion 2
A063
Address setting error on expansion module 3
A064
A075
A077
A094
Temperature probe in low temperature zone LT3, expansion 3
Water temperature too high in mixed circuit, expansion module 1
Water temperature too high in mixed circuit, expansion module 2
End defrost due to maximum time
A095
Temperature probe N-THC n.2
A096
Address setting error on zone remote terminal
A097
Temperature probe N-THC n.3
A098
Address setting error on zone remote terminal
A099
Temperature probe N-THC n.4
A100
Address setting error on zone remote terminal
A101
Temperature probe N-THC n.5
A102
Address setting error on zone remote terminal
A103
Address setting error on expansion module 1
A104
Low temperature zone LT1 temperature probe, expansion 1
A109
Low pressure alarm from low pressure switch
A114
Solar/pool module address setting error
A115
A116
A117
A120
Solar/pool module general alarm
Master unit not connected, cascade control
Slave unit not connected, cascade control
Water temperature too high in mixed circuit, expansion module, expansion module 3
A121
Temperature probe N-THC n.6
A122
Address setting error on zone LT3 remote terminal
60
Solution
Probe faulty or disconnected
Probe faulty or disconnected
Probe faulty or disconnected
Probe faulty or disconnected
Probe faulty or disconnected
Probe faulty or disconnected
Transducer faulty or disconnected
Check connection
Check refrigerant circuit pressure
WWR-MTD2 - BWR MTD2 EN 03/2011
Check connections
Probe faulty or disconnected
Check connections
Check address
Check connections
Check address, must be 1
Probe faulty or disconnected
Check connections
Check address, must be 2
Probe faulty or disconnected
Check connections
Probe faulty or disconnected
Check connections
Check address
Check connections
Probe faulty or disconnected
Check connections
Check address
Check connections
Probe faulty or disconnected
Check connections
Check address
Check connections
Probe faulty or disconnected
Check connections
Check address
Check connections
Check address, must be 1
Probe faulty or disconnected
Check connection
Check refrigerant circuit pressure
Check connections
Check address
Check connections
Probe faulty or disconnected
Check connections
Check address
A
MAINTENANCE AND SERVICE
ALARM TABLE
Alarm code
Cause
A124
Humidity probe N-THC n.1
A125
Humidity probe N-THC n.2
A126
Humidity probe N-THC n.3
A127
Humidity probe N-THC n.4
A128
Humidity probe N-THC n.5
A129
Humidity probe N-THC n.6
Solution
Check connections
Probe faulty or disconnected
Check connections
Probe faulty or disconnected
Check connections
Probe faulty or disconnected
Check connections
Probe faulty or disconnected
Check connections
Probe faulty or disconnected
Check connections
Probe faulty or disconnected
A
PEAK LIMITER ALARM SIGNALS
The heat pumps can be fitted with a single-phase or three-phase peak limiter to reduce compressor start-up current.
Peak limiter single-phase
The LED on the peak limiter identifies different operating or alarm conditions based on the sequence of flashes:
• 2 flashes every 5 sec.: line voltage present, correct operation
• LED on for 5 sec. and LED off for 5 sec.: peak limiter faulty
• quick flashes for 10 sec.: line voltage out-of-range
EN 03/2011 WWR-MTD2 - BWR MTD2
61
A
MAINTENANCE AND SERVICE
SYSTEM emergency operation
If the heat pump is not working correctly or the compressor
has shut down, emergency operation can be activated.
Emergency operation involves heating the water using the
electric heaters available on the system (outlet, storage
tank).
The compressor remains off.
To enable manual operation of system heaters, set parameter 0620 = 1 (manual)
Description
Menu Parameter
no.
Type of outlet electric heater oper- Mn01
010G
ation
0 = Supplementary
1 = Replacement
Mn06
0620
Enable manual heater operation
Default
UOM
1
1
Set the parameters following the sequence described in
the table
DOMESTIC HOT WATER emergency operation
If the heat pump is not working correctly or the compressor
has shut down, emergency operation can be activated.
Emergency operation involves heating the domestic hot
water using the electric heater inside the storage tank.
Description
Electric heater operating mode
0 = heat pump only
1 = electric heater only
2 = heat pump + electric heater
Menu Parameter Valore da
impostare
no.
Mn02
1
0202
UOM
To enable manual operation of DHW storage heaters, set
parameter 0202 = 1
SHUTTING DOWN FOR LONG PERIODS
After deactivating the heat pump:
- Disconnect the unit from the power supply.
- Make sure the remote keypad is in the “OFF” position.
- Place QF1 in the OFF position (see wiring diagram).
- Deactivate the indoor terminal units by placing the switch
of each unit in the “OFF” position.
- Close the water valves.
If the outside temperature may fall below zero; there is
the risk of freezing.
The water circuit MUST BE EMPTIED AND CLOSED (if
draining after operation in heat pump mode, beware that
SCHEDULED MAINTENANCE
Never perform any cleaning operations before having
disconnected the unit from the mains power supply.
Make sure power is not connected before proceeding.
Control maintenance is fundamental to maintain the efficiency of the unit both in terms of operation and energy consumption.
The Technical Service maintenance plan must be observed,
with an annual service which includes the following operations and checks:
- Filling of the water circuit;
- Presence of air bubbles in the water circuit;
- Efficiency of safety devices;
- Power supply voltage;
- Electrical power input;
- Tightness of electrical and water connections;
62
WWR-MTD2 - BWR MTD2 EN 03/2011
A
the water may be hot), or antifreeze must be added in
the proportion recommended by the manufacturer.
It is recommended to use non-toxic food grade
antifreeze, compliant with the standards in force in the
countries where the unit is used, if domestic hot water
production is also featured.
If the mains switch is turned to “off” for more than four
hours, after turning it on and before reactivating the unit,
leave the power on but the unit deactivated for at least
two hours to preheat the oil in the compressor sump.
A
- Condition of the compressor contactor;
- Efficiency of the plate heat exchanger resistor;
- Verification of operating pressure, superheating and subcooling
- Efficiency of the compressor heater
- Cleaning of water filters.
- For BWR check freezing point of the glycol solution on the
source side.
For units installed near the sea, the intervals between maintenance should be halved.
A
UNSCHEDULED MAINTENANCE
Never perform any cleaning operations before having
disconnected the unit from the mains power supply.
Make sure power is not connected before proceeding.
CHEMICAL WASHING
It is recommended to chemically flush the plate heat
exchanger after every 3 years of operation.
To perform this operation, contact a specialist technician.
REFRIGERANT GAS CHARGE
The chillers are filled with R410A refrigerant gas and tested
in the factory.
In normal conditions, there should be no need for the Technical Service to intervene to check the refrigerant gas.
However, over time, small leaks may develop at the joints
leading to loss of refrigerant and draining of the circuit,
causing the unit to function poorly.
In this case, the leaks of refrigerant must be identified and
repaired and the refrigerant circuit recharged.
Proceed as follows:
- Empty and dry the entire refrigerant circuit using a vacuum
pump connected to the low and high pressure tap until the
vacuometer reads about 10 Pa.
Wait a couple of minutes and check that this value does
not rise to more than 50 Pa.
- Connect the refrigerant gas cylinder or a filling cylinder to
the low pressure line pressure gauge connection
- Charge the quantity of refrigerant indicated on the unit’s
rating plate.
- Always check the superheating and subcooling values,
which should be between 5 and 10°C and 4 and 8°C.
- After a couple of hours operation, check that the liquid
indicator indicates a dry circuit (dry-green).
In the event of partial leaks, the circuit must be completely emptied before being recharged.
The R410A refrigerant must only be charged in the liquid state.
Operating conditions other than rated conditions may
produce considerably different values.
Tightness testing or identification of leaks must only be
carried out using R410A refrigerant gas, checking with a
suitable leak detector.
The refrigerant circuit must not be charged with a
refrigerant other than that indicated on the rating plate
and in this manual.
The use of a different refrigerant may cause serious
damage to the compressor.
Oxygen, acetylene or other flammable or poisonous gases must never be used in the refrigerant circuit as they
may cause explosion or poisoning.
Oils other than those indicated must not be used.
The use of different oil may cause serious damage to the
compressor.
A
DISPOSAL
The unit must be disposed of according to the legislation
in force in the country concerned
U I A
USEFUL INFORMATION
For information on technical assistance and obtaining spare parts, contact
CLIMAVENETA S.P.A.
AFTER SALES DEPARTMENT - RESIDENTIAL BUSINESS
Via Duca d’Aosta 121 - 31031 Mignagola di Carbonera (TV) ITALY
Tel: +39.0424.509500
Fax: +39.0424.509563
www.climaveneta.com - [email protected]
EN 03/2011 WWR-MTD2 - BWR MTD2
63
U I A
LIST OF PARAMETERS
Description
Menu
Parameter no.
Enable domestic hot water set point: 0 = Economy, 1 = Comfort
Mn00
0015
Domestic hot water Economy set point
Mn00
0022
°C
Domestic hot water Comfort set point
Mn00
0023
°C
User password
Mn00
0036
Enable remote contact: 0= remote contact enabled, 1= remote contact disabled (selection from keypad only)
Mn01
0100
Automatic mode changeover set point in HEATING
Mn01
0106
°C
Automatic mode changeover differential in HEATING
Mn01
0107
°C
Automatic mode changeover set point in COOLING
Mn01
0108
°C
Automatic mode changeover differential in COOLING
Mn01
0109
°C
Type of outlet heater operation: 0 = Supplementary , 1 = Replacement
Mn01
010G
Type of boiler operation: 0 = Supplementary , 1 = Replacement
Mn01
010H
Relationship between plant and ambient: 0 = Unit work on ambient request, 1 = Unit work indipendent
Mn01
011D
Password Installatore
Mn01
011G
Enable compensation curve for LT3 in HEATING 0= Disabled (fixed set point operation) 1= Enabled
Mn01
011R
Enable compensation curve for zone LT3: 0= Disabled, 1= Enabled
Mn01
011T
Fixed water outlet temperature set point for LT3 in HEATING
Mn01
011U
°C
Maximum return set point limit in cooling mode (Tm1)
Mn01
0128
°C
Outside minimum temperature corresponding to max. return temperature (Te1)
Mn01
0129
°C
Zone LT3 compensation curve number
Mn01
012A
Enable room temperature influence on LT3 0= Disabled 1= Enabled
Mn01
012D
LT3 Room Authority
Mn01
012E
%
MINIMUM outlet set point limit for compensation curve in zone LT3
Mn01
012F
°C
MAXIMUM outlet set point limit for compensation curve in zone LT3
Mn01
012G
°C
Maximum outlet temperature set point limit in cooling mode (Tm1)
Mn01
012H
°C
Minimum outside temperature corresponding to max. outlet temperature (Te1)
Mn01
012J
°C
Minimum outlet set point limit in cooling mode (Tm2)
Mn01
012L
°C
Minimum outside temperature corresponding to min. outlet temperature (Te2)
Mn01
012M
°C
Enable compensation for room humidity, ZONE LT3: 0= Disabled , 1= Enabled
Mn01
012N
Room relative humidity value to start increasing water outlet temperature set point, ZONE LT3
Mn01
012P
%
Maximum outlet temperature hysteresis corresponding to 100% relative humidity
Mn01
012R
°C
Minimum return set point limit in cooling mode (Tm2)
Mn01
0130
°C
Maximum outside temperature corresponding to min. return temperature (Te2)
Mn01
0131
°C
Maximum outlet temperature set point limit in cooling mode (Tm1)
Mn01
0132
°C
Minimum outside temperature corresponding to max. outlet temperature (Te1)
Mn01
0133
°C
Minimum outlet temperature set point limit in cooling mode (Tm2)
Mn01
0134
°C
Maximum outside temperature corresponding to min. outlet temperature (Te2)
Mn01
0135
°C
Maximum outlet temperature set point limit in cooling mode (Tm1)
Mn01
0136
°C
Minimum outside temperature corresponding to max. outlet temperature (Te1)
Mn01
0137
°C
Minimum outlet temperature set point limit in cooling mode (Tm2)
Mn01
0138
°C
Maximum outside temperature corresponding to min. outlet temperature (Te2)
Mn01
0139
°C
Inside temperature to enable frost protection
Mn01
0140
°C
Outside air temperature for frost protection
Mn01
0141
°C
Activation of system pump operation at intervals:
0= system pump always on, 1=system pump operation at intervals
Mn01
0143
System pump operating time in sniffing mode
Mn01
0147
System pump off time between one sniffing cycle and the next
Mn01
0148
Enable SYSTEM compensation curve 0= Disabled 1= Enabled
Mn01
0152
Fixed return water temperature set point in HEATING
Mn01
0153
Enable SYSTEM compensation curve: 0= Disabled, 1= Enabled
Mn01
0154
Fixed return water temperature set point in COOLING
Mn01
0155
Enable compensation for room humidity, SYSTEM: 0= Disabled , 1= Enabled
Mn01
0156
Room relative humidity value to start increasing SYSTEM return water set point
Mn01
0157
%
Maximum return temperature hysteresis corresponding to 100% relative humidity
Mn01
0158
°C
SYSTEM compensation curve number
Mn01
0159
Enable contact as: 0= Alarm signal, 1= Dehumidifier, 3= Secondary circuit pump
Mn01
015A
Enable contact as: 0 =Reduced electricity rate, 1=Stop operation due to excess power consumption
Mn01
015D
Enable compensation curve for zone LT3 0= Disabled 1= Enabled
Mn01
015E
Enable room temperature influence on SYSTEM 0= Disabled 1= Enabled
Mn01
0163
SYSTEM Room Authority
Mn01
0164
%
Minimum set point limit for SYSTEM curve
Mn01
0165
°C
Maximum set point limit for SYSTEM curve
Mn01
0166
°C
Enable compensation curve for zone LT1 0= Disabled 1= Enabled
Mn01
0167
Enable compensation curve for LT1 in HEATING 0= Disabled (fixed set point operation) 1= Enabled
Mn01
0168
Enable compensation curve for zone LT1: 0= Disabled, 1= Enabled
Mn01
0169
Fixed water outlet temperature set point for LT1 in HEATING
Mn01
0170
64
WWR-MTD2 - BWR MTD2 EN 03/2011
UOM
°C
°C
°C
U I A
LIST OF PARAMETERS
Description
Menu
Parameter no.
Enable compensation for room humidity, ZONE LT1: 0= Disabled , 1= Enabled
Mn01
0171
Room relative humidity value to start increasing water outlet temperature set point, ZONE LT1
Mn01
0172
%
Maximum outlet temperature hysteresis corresponding to 100% relative humidity
Mn01
0173
°C
Zone LT1 compensation curve number
Mn01
0174
Enable room temperature influence on LT1 0= Disabled 1= Enabled
Mn01
0178
LT1 Room Authority
Mn01
0179
%
MINIMUM outlet set point limit for compensation curve in zone LT1
Mn01
0180
°C
MAXIMUM outlet set point limit for compensation curve in zone LT1
Mn01
0181
°C
Enable compensation curve for zone LT2 0= Disabled 1= Enabled
Mn01
0182
Enable compensation curve for LT2 in HEATING 0= Disabled (fixed set point operation) 1= Enabled
Mn01
0183
Enable compensation curve for zone LT2: 0= Disabled, 1= Enabled
Mn01
0184
Fixed water outlet temperature set point for LT2 in HEATING
Mn01
0185
Enable compensation for room humidity, ZONE LT2: 0= Disabled , 1= Enabled
Mn01
0186
Room relative humidity value to start increasing water outlet temperature set point, ZONE LT2
Mn01
0187
%
Maximum outlet temperature hysteresis corresponding to 100% relative humidity
Mn01
0188
°C
Zone LT2 compensation curve number
Mn01
0189
Enable room temperature influence on LT2 0= Disabled 1= Enabled
Mn01
0193
LT2 Room Authority
Mn01
0194
%
MINIMUM outlet set point limit for compensation curve in zone LT2
Mn01
0195
°C
MAXIMUM outlet set point limit for compensation curve in zone LT2
Mn01
0196
°C
Electric heater operating mode: 0 = heat pump only, 1 = electric heater only, 2 = heat pump + electric heater
Mn02
0202
Domestic hot water set point with heater
Mn02
0209
°C
Domestic hot water temperature set point for Legionella prevention
Mn02
0211
°C
Legionella prevention cycle day MONDAY (0=no 1=yes)
Mn02
0213
Legionella prevention cycle day TUESDAY (0=no 1=yes)
Mn02
0214
Legionella prevention cycle day WEDNESDAY (0=no 1=yes)
Mn02
0215
Legionella prevention cycle day THURSDAY (0=no 1=yes)
Mn02
0216
Legionella prevention cycle day FRIDAY (0=no 1=yes)
Mn02
0218
Legionella prevention cycle day SATURDAY (0=no 1=yes)
Mn02
0219
Legionella prevention cycle day SUNDAY (0=no 1=yes)
Mn02
0220
Legionella prevention cycle time
Mn02
0221
Enable Legionella prevention function 0 = Not enabled 1 = Enabled
Mn02
0222
Legionella prevention function with: 0 = heat pump only 1 = electric heater only 2 = heat pump + electric heater
Mn02
0223
Maximum Legionella prevention function duration
Mn02
0225
Minimum heat pump operating time for system
Mn02
0226
Maximum heat pump operating time to reach domestic hot water set point
Mn02
0227
Three-way valve travel time for domestic hot water production
Mn02
0231
Enable electric heater: 0 = Heater not enabled, 1 = Heater enabled
Mn03
0300
Enable boiler: 0 = Boiler not enabled, 1 = Boiler enabled
Mn03
0301
Activation for low outside air temperature: 0 = Function not enabled, 1 = Function enabled
Mn03
0303
Outside air temperature to enable electric heater
Mn03
0304
Activation for low outside air temperature: 0 = Function not enabled, 1 = Function enabled
Mn03
0306
Outside air temperature to enable boiler
Mn03
0307
°C
Minimum outside air temperature for heat pump operation
(make sure the value shown in the table is set)
Mn03
0311
°C
Electric heater activation delay time
(allows the heat pump to reach steady operation and thus avoid activating the heater when not needed)
Mn06
0616
min.
Integration time to activate outlet electric heaters
Mn06
0617
°C*sec
Boiler activation delay time
(allows the heat pump to reach steady operation and thus avoid activating the boiler when not needed)
Mn06
0618
min.
Integration time to activate boiler
Mn06
0619
°C*sec
Enable manual heater operation
Mn06
0620
BT1 Heat exchanger water inlet temperature probe
Mn09
0900
°C
BT2 Heat exchanger water outlet temperature probe
Mn09
0901
°C
BT8 Domestic hot water probe
Mn09
0902
°C
BT7 Unit control air temperature probe
Mn09
0903
°C
BT9 Storage tank probe
Mn09
0904
°C
BT11 Outside air temperature probe for set point management
Mn09
0905
°C
BP1 Condenser/evaporator control pressure transducer
Mn09
0906
bar
EN 03/2011 WWR-MTD2 - BWR MTD2
UOM
°C
h
min.
sec.
°C
65
U I A
INSTALLER OPERATIONS CHECKLIST
Installer: __________________________________________ Designer: _______________________________________
Type of application:___________________________________________________________________________________
Street ___________________________________________________________________________ number _____________
City/town __________________________ Postcode/ZIP code _____________ Province/State _________________________
Unit model installed ________________________________________ Serial number _________________________________
Is there a system design? YES ❑ NO ❑
If YES, has the system been developed completely in accordance with the design? YES ❑ NO ❑
Installation date: ____________________________________
Systems included:
• Winter heating AT (radiators)
❑
• Summer cooling
❑
• Winter heating MT (fan coil)
❑
• DHW production
❑
• Winter heating BT (radiant panels)
❑
• Solar thermal installed
❑
Mark the type of system installed and describe the components in the corresponding tables
Heating system circuit
Storage tank
Additional
expansion vessel
Volume [l]
Type/model
HEAT
PUMP
HEAT
PUMP
Secondary pump
Installed?
Type/model
❑
❑
Hot water set point:
__________ °C
Cold water set point:
__________ °C
Domestic hot water circuit
HEAT
PUMP
HEAT
PUMP
Storage tank Storage
with coil
cylinder
Expansion
vessel
Volume [l]
❑
❑
Type/model
Coil water
volume [l]
Coil heat
exchange area
[m2]
HEAT
PUMP
Domestic hot water set point: __________ °C
❑
66
WWR-MTD2 - BWR MTD2 EN 03/2011
U I A
INSTALLER OPERATIONS CHECKLIST
CONCERNING UNIT INSTALLATION OPERATIONS AND SETUP FOR COMMISSIONING,
HAVE THE FOLLOWING CHECKS BEEN COMPLETED?
Components installed (as described in the paragraph on "Water circuit connections")
YES
NO
• Two pressure gauges with a suitable scale are installed on the inlet and outlet
❑
❑
• Shut-off valves are installed on the heating system circuit and domestic hot water circuit inlet and outlet
❑
❑
• Two thermometers are installed, on the inlet and outlet
❑
❑
• All pipes are insulated with suitable vapour barrier material to prevent formation of condensate and heat loss,
with control and shut-off devices protruding from the insulation
❑
❑
• Drain valves are installed at the lowest points in the system
❑
❑
• Automatic or manual air vent valves are installed at the highest points in the system
❑
❑
• An additional expansion vessel is installed on the system if the standard vessel is insufficient
❑
❑
• Vibration damper joints are installed on the inlet and outlet water pipes
❑
❑
• A low-loss header is installed if the water content is insufficient
❑
❑
• Vibration damper supports are installed on the unit
❑
❑
• The domestic hot water production system is installed
❑
❑
• The safety valve is installed and suitably sized
❑
❑
• The domestic hot water expansion vessel is installed and suitably sized
❑
❑
Checks (as described in the paragraph on "Checking and starting up the unit")
CHECKED
• Two pressure gauges with a suitable scale are installed on the inlet and outlet
❑
• The unit is positioned as described in the chapter on "Positioning" in this manual
❑
• The filter is installed on the system return/inlet as close as possible to the unit and in a position that is easy to
access for maintenance. REQUIRED component, this must be installed before water circulates through the heat
exchanger otherwise the warranty will be void
❑
• The filter is installed on the domestic hot water return/inlet as close as possible to the unit and in a position that
is easy to access for maintenance. REQUIRED component, this must be installed before water circulates
through the heat exchanger otherwise the warranty will be void
❑
• (Water-to-water units only) The filter is installed on the source return/inlet as close as possible to the unit and in
a position that is easy to access for maintenance. REQUIRED component, this must be installed before water
circulates through the heat exchanger otherwise the warranty will be void
❑
• The flow switch is installed on the unit's outlet to the heating system circuit and is electrically connected.
REQUIRED component, this must be installed before water circulates through the heat exchanger otherwise
the warranty will be void
❑
• (Water-to-water units only) The flow switch is installed unit's outlet to the source circuit and is electrically
connected. REQUIRED component, this must be installed before water circulates through the heat exchanger
otherwise the warranty will be void
❑
EN 03/2011 WWR-MTD2 - BWR MTD2
67
U I A
INSTALLER OPERATIONS CHECKLIST
Checks (as described in the paragraph on "Checking and starting up the unit")
CHECKED
• The connection pipes are suitably supported so that these do not weigh on the appliance
❑
• Correct sizing of the expansion vessel has been verified according to the system water content and the
expected operating temperature
❑
• The position of the outside air temperature probe complies with the information provided in the installation manual
❑
• The position of the room controllers installed complies with the information provided in the installation manual
❑
• The position of the DHW storage tank probe complies with the information provided in the installation manual
❑
• (Units with heat recovery only) The non-return valve is fitted on the domestic hot water circuit
❑
• All safety conditions have been respected
❑
• The unit is fixed to the surface it rests on
❑
• Water connections have been carried out as indicated in the installation manual
❑
• All water connections are tight
❑
• All electrical connections are tight
❑
• Make sure the water circuit has been washed and drained
❑
• There is no air in the system (vent if necessary)
❑
• The valves on the water circuit are open
❑
• Electrical connections have been carried out correctly
❑
• Voltage is within a tolerance of 10% of the rated voltage for the unit
❑
• Unbalance between phases is less than 2%, for three-phase units
❑
• Maintenance clearances comply with the specifications in the Installation manual under the section on
POSITIONING
❑
• Power supply electrical complies with the data on the rating plate and specified in the Installation manual under
the section on MAINS POWER SUPPLY CONNECTION
❑
• The system water content complies with the specifications in the Installation manual under the section on
WATER CONNECTIONS
❑
• Suitable water flow-rate for operation of the entire unit is guaranteed as specified in the Installation manual
under the section on WATER CONNECTIONS
❑
• (Air-to-water units only) The system has been protected with antifreeze, respecting the quantities shown in the
Installation manual under the section on WATER CONNECTIONS
❑
• The DHW storage tank has been fitted with an electric heater for Legionella prevention
❑
It is hereby declared that the site and access to the site where the unit to be operated or serviced is installed has been made
safely accessible in compliance with all safety standards specified by Italian law 81/08 in force. A supervisor must be present on
site to inform workers of residual risks in the workplace.
WARNING:
Failure to complete commissioning due to causes not attributable to the unit will require a second visit, to be charged to the customer directly by the local service centre.
Installer's signature ___________________________________________________
68
WWR-MTD2 - BWR MTD2 EN 03/2011
Date ________________________
COD. C01001700E_03
Climaveneta S.p.A.
Via Sarson 57/c
36061 Bassano del Grappa (VI)
Italy
Tel +39 0424 509500
Fax +39 0424 509509
[email protected]
www.climaveneta.com
Climaveneta France
3, Village d’Entreprises
ZA de la Couronne des Prés
Avenue de la Mauldre
78680 Epone
France
Tel +33 (0)1 30 95 19 19
Fax +33 (0)1 30 95 18 18
[email protected]
www.climaveneta.fr
Climaveneta Deutschland
Rhenus Platz, 2
59439 Holzwickede
Germany
Tel +49 2301 91222-0
Fax +49 2301 91222-99
[email protected]
www.climaveneta.de
Climaveneta
Espana - Top Clima
Londres 67, 1° 4°
08036 Barcelona
Spain
Tel +34 963 195 600
Fax +34 963 615 167
[email protected]
www.climaveneta.com
Climaveneta Chat Union
Refrig. Equipment Co Ltd
88 Bai Yun Rd, Pudong Xinghuo
New dev. zone 201419 Shanghai
China
Tel 008 621 575 055 66
Fax 008 621 575 057 97
Climaveneta Polska Sp. z o.o.
Ul. Sienkiewicza 13A
05-120 Legionowo
Poland
Tel +48 22 766 34 55-57
Fax +48 22 784 39 09
[email protected]
www.climaveneta.pl
Climaveneta India
Climate Technologies (P) LTD
#3487, 14th Main, HAL 2nd stage,
Indiranagar, Bangalore 560008
India
Tel +91-80-42466900 - 949
Fax +91-80-25203540
[email protected]
Climaveneta UK LTD
Highlands Road,
Shirley Solihull
West Midlands B90 4NL
Tel: +44 (0)871 663 0664
Fax: +44 (0)871 663 1664
Freephone: 0800 801 819
[email protected]
www.climaveneta.co.uk
www.climaveneta.com