1
6. The MIC 1 (19) input (found on the front panel) accepts a 1/4" connector.
The MIC 2 (14) input (found on the rear panel) accepts 1/4" connector.
They both accept BALANCED or UNBALANCED microphones.
INTRODUCTION:
Congratulations on purchasing a Gemini FX-7000 DSP EFFECTS
mixer. This state of the art mixer is backed by a three-year warranty,
excluding crossfader and channel slides. Prior to use, we suggest that
you carefully read all the instructions.
OPERATION:
1. POWER ON: Once you have made all the equipment connections to
your mixer, press the POWER SWITCH (2). The power will turn on and
the VU METER (40) LEDS will glow.
FEATURES:
• 14 Variable Effects: Delay, Echo, Reverb, Pitch Shifters,
Filters, Brake, Auto-Pan, Flanger, Phaser, Rotary, Ambient,
& 9 Additional Preset Reverbs
• Parameter Adjustment & LED Display for easy Effect Settings
• Wet/Dry Adjustment Knob for Proper Program/Effect Mix
• Reversible Crossfader and Curve Switch
• Crossfader with a RAIL-GLIDETM Fader
• 3 Channel DSP 10" Mixer
• 3 Phono/5 Line/2 Mic Inputs
• Effect Loop Send & Return
• Mic with Talkover
• Split Cueing
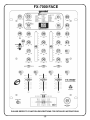
2. CHANNEL 1: The GAIN (39), HIGH (38), MID (37), and LOW (36)
controls allows you to fully adjust the selected source. CH-1 SWITCH
(33) allows you to select either the MIC 2 (14) or the PHONO 1/LINE 1 (13)
input. The CHANNEL 1 SLIDE (26) controls the output level of this channel.
3. CHANNEL 2: The GAIN (39), HIGH (38), MID (37), and LOW (36)
controls allows you to fully adjust the selected source. CH-2 SWITCH
(34) allows you to select the PHONO 2/LINE 2 (12) or the LINE 3 (11)
input. The CHANNEL 2 SLIDE (27) controls the input level of this channel.
CAUTIONS:
4. CHANNEL 3: The GAIN (39), HIGH (38), MID (37), and LOW (36)
controls allows you to fully adjust the selected source. CH-3 SWITCH
(12) allows you to select the PHONO 3/LINE 4 (10) or the LINE 5 (9)
input. The CHANNEL 3 SLIDE (28) controls the input level of this channel.
1. All operating instructions should be read before using this equipment.
2. To reduce the risk of electrical shock, do not open the unit. There are,
NO USER REPLACEABLE PARTS INSIDE. Please refer servicing to a
qualified Gemini Sound Products service technician.
NOTE: THERE IS LOW, MID AND HIGH EQUALIZATION FOR EACH CHANNEL WITH AN
EXTREMELY WIDE RANGE OF ADJUSTMENT.
SUGGESTION: YOU CAN USE THE CUT FEATURES ON EACH CHANNEL TO REMOVE LOW,
MID AND/OR HIGH RANGE TO CREATE SPECIAL EFFECTS.
In the USA: If you experience problems with this unit, please call 1 (732) 738-9003 for Gemini
Customer Service. Do not attempt to return this equipment to your dealer.
4. This unit should be cleaned only with a damp cloth. Avoid solvents or
other cleaning detergents.
5. CROSSFADER CURVE: The CROSSFADER CURVE (21) button allows
you to adjust the kind of curve the crossfader has. Depress the
CROSSFADER CURVE (21) button
to make the curve steep and
cutting (perfect for scratching). Release the CROSSFADER CURVE
to make the curve gradual and gentle.
(21) button
5. When moving this equipment, it should be placed in its original carton
and packaging. This will reduce the risk of damage during transit.
6. X-FADER ASSIGN: The X-FADER ASSIGN (22) enables you to set the
left side of the crossfader to either CHANNEL 1 or 2.
6. DO NOT EXPOSE THIS UNIT TO RAIN OR MOISTURE.
7. CROSSFADER SECTION: The CROSSFADER (23) allows the mixing
of one source into another. The left side of the CROSSFADER (23) is
CHANNEL 1 or 2 and the right side is CHANNEL 3. The CROSSFADER
(23) in your unit is removable and if the need arises can be easily
replaced. Your Gemini mixer comes with an RG-45 PRO
(RAILGLIDE™) Dual-Rail Crossfader. RAIL GLIDE™ crossfaders
have internal dual stainless steel rails that allow the slider to ride
smoothly and accurately from end to end. Also available is our CF-45
PRO (PROGLIDE™) Dual-Rail Crossfader. This unique crossfader
features, state of the art conductive plastic technology, for unlimited
usage. Another crossfader we have available is the PSF-45 (PRO
SCRATCH™) crossfader with a special curve designed for scratch
mixing. Just purchase one from your Gemini dealer and follow the
instructions:
3. Do not expose this unit to direct sunlight or to a heat source such as a
radiator or stove.
7. DO NOT USE ANY SPRAY CLEANER OR LUBRICANT ON ANY
CONTROLS OR SWITCHES.
CONNECTIONS:
1. Before plugging the adapter in the AC 15V (1) input, make sure that the
POWER (2) switch is in the off position. The VU METER LEDS (40) will
be off.
2. The FX-7000 is supplied with 4 sets of output jacks:
• The 1/4" BALANCED OUTPUT (3) jacks are used to connect to your
main amplifier using standard balanced cables. We recommend using
BALANCED OUTPUT (3) if the cables to your amp are 25 feet or more.
• The MASTER OUTPUT (4) (RCA type) jacks are unbalanced and used
to connect to your main amplifier.
• The ZONE OUTPUT (5) (RCA type) jacks allow you to hook up an
additional amplifier.
• The REC OUTPUT (6) (RCA type) jacks can be used to connect the mixer to
the record input of your recorder enabling you to record your mix.
1. Unscrew the outside FADER PLATE SCREWS (B).
Do not touch the INSIDE SCREWS (C).
2. Carefully lift the fader and unplug the CABLE (D).
3. Plug the new fader into the cable and place it back in
the mixer.
4. Screw the fader to the mixer.
3. The FX-7000 also has an effect SEND (7) output and RETURN (8) input,
for use with an outboard processor or effects unit.
8. CROSSFADER REVERSE SWITCH: The CROSSFADER REVERSE
SWITCH (24) allows you to reverse the crossfader so that the left side
of the crossfader controls CHANNEL 3 and CHANNEL 1 or 2 is
controlled by the right side of the crossfader.
4. On the rear panel are 3 STEREO PHONO/LINE INPUTS (10, 12, 13)
and 2 STEREO LINE INPUTS (9, 11). The PHONO/LINE SWITCH (15)
enables you to set the PHONO 3/LINE 4 INPUT (10) to PHONO or LINE.
The PHONO/LINE SWITCH (16) enables you to set the PHONO 2/LINE 2
INPUT (12) to PHONO or LINE. The PHONO/LINE SWITCH (17)
enables you to set the PHONO 1/LINE 1 INPUT (13) to PHONO or LINE.
The PHONO inputs will accept only turntables with a magnetic cartridge.
A GROUND SCREW (18) for you to ground your turntables is located on
the rear panel. The STEREO LINE INPUTS (9, 11) will accept any line
level input such as a CD, DAT, MiniDisc, etc.
NOTE: WHEN THE CROSSFADER REVERSE SWITCH (24) IS ACTIVATED, ONLY THE CROSSFADER
REVERSES. THE CHANNEL SLIDES, GAIN, AND TONAL CONTROLS DO NOT REVERSE.
9. OUTPUT CONTROL SECTION: The level of the MASTER OUTPUT (4)
& BALANCED OUTPUT (3) are controlled by the MASTER (45) control.
The ZONE (46) control adjusts the level of the ZONE OUTPUT (5).
HINT: ZONE OUTPUT (5) IS USED BY SOME DJS TO RUN MONITOR SPEAKERS IN THE DJ
BOOTH. YOU CAN ALSO USE IT AS A SECOND ZONE OR AMP OUTPUT.
5. Headphones can be plugged into the front panel mounted HEADPHONES
(20) jack.
NOTE: THE RECORD OUT (6) HAS NO LEVEL CONTROL. THE LEVEL IS SET BY THE
CHANNEL SLIDES AND THE GAIN CONTROLS OF THE SELECTED CHANNEL. TONAL
QUALITIES ARE SET BY THE LOW, MID AND HIGH CONTROLS OF THE SAME CHANNEL.
(5)