1
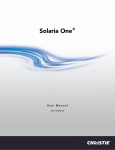
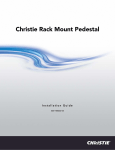
Applies to the Following Products Prepared For Internal and External Operators and Service Technicians Solaria One Solaria One+ Christie IMB-S2 External Customers Christie Field Application Engineers (FAE) Christie Service Technicians Christie Personnel This document provides information and procedures for replacing the SanDisk CompactFlash (CF) card with an Advantech CF card on the Christie IMB-S2. The existing SanDisk CF card in the Christie IMB-S2 can fail when the maximum read-modify-write cycles are reached. A failed CF card can disrupt playback or make the Christie IMB-S2 unresponsive. The number of replacement CF cards provided by Christie Digital Systems will match the quantity of Christie IMB-S2s. SanDisk CF card replacement is MANDATORY on all Christie IMB-S2s manufactured before December 2013. ELECTRICAL SHOCK HAZARD! Always turn off, disconnect, and disengage all power sources to the projector before servicing. Failure to comply results in death or serious injury. Only Christie accredited service technicians are permitted to open any enclosure on the projector and only if the AC power has been fully disconnected. Failure to comply could result in minor or moderate injury. When removing or installing the Christie IMB, wear an anti-static wrist strap and follow anti-static protocols. Failure to comply could result in equipment or property damage. Christie IMB-S2 Replacement Advantech CompactFlash (CF) card (003-004700-02) Replacement anti-tamper label (Christie Solaria One and Christie Solaria One+ only) Christie IMB-S2 CompactFlash Card Replacement 020-200260-01 Rev. 1 (11-2013) 1 Use these procedures to remove the SanDisk CompactFlash (CF) card and replace it with an Advantech CF card. A backup can only be completed when the SMS can be started. 1. Tap Menu > Christie IMB > System. 2. Tap General > Backup/Restore. 3. Tap Backup. 4. Enter a name for the backup file. 5. Tap Enter. 6. Tap OK. This procedure describes the removal of a Christie IMB-S2 from a Christie Solaria One+ projector. For removal instructions that are specific to your projector model, see the projector Service Manual. 1. Turn the lamp off and allow it to cool for a minimum of 15 minutes. 2. Turn the projector off and disconnect it from AC power. 3. Remove the card cage surround. 4. Remove the 8 card cage faceplate screws. Christie IMB-S2 CompactFlash Card Replacement 020-200260-01 Rev. 1 (11-2013) 2 5. Remove the card cage faceplate by the handles and set it on a stable surface. 1. On the underside of the Christie IMB-S2, pull the CF card retaining clip down and out of the way. 2. Pull the CF card (A) out of the housing and discard it following your local regulations for electronic waste disposal. 3. Slide the new CF card into the housing and then push the retaining clip down. 1. Push the card cage faceplate into the projector. 2. Install the 8 card cage faceplate screws. 3. Replace the anti-tamper label on the side of the card cage. 4. Install the card cage surround. 5. Connect the projector to AC power and then turn it on. Christie IMB-S2 CompactFlash Card Replacement 020-200260-01 Rev. 1 (11-2013) 3 You must complete the Marriage wizard to display secure content. Marriage permission is required to complete marriage and only Christie accredited technicians are authorized to activate projector marriage. 1. Tap Menu > Service Setup > IMB Marriage. 2. Complete the Marriage wizard. 3. Tap Finish. If a back up file is not available, you will need to manually re-configure these settings: Network and storage settings Speaker and audio channel mapping Automation macro definitions Multi-projector configuration Scheduled entries For these procedures, see the Christie IMB User Manual on the Christie web site. 1. Tap Menu > Christie IMB > System. 2. Tap General > Backup/Restore. 3. Tap Browse and browse to the location of the file. 4. Select the file. 5. Tap Accept. 6. Select the backup file in the Restore Files on Server list. 7. Tap Restore. 8. Tap Yes. Upload and install the latest Christie IMB software so all of the Christie IMB software components are the same version. Contact Christie Technical Support to request the latest version of the Christie IMB software. 1. Insert a USB flash drive with the upgrade package into the USB port on the side of the touch panel controller (TPC). 2. Tap Menu > Christie IMB > System. 3. Tap General > IMB Upgrade. 4. Tap Browse and browse to the location of the file. 5. Select the file. 6. Tap Accept. Christie IMB-S2 CompactFlash Card Replacement 020-200260-01 Rev. 1 (11-2013) 4 1. Tap Menu > Christie IMB > System. 2. Tap General > IMB Upgrade. 3. Select an upgrade file in the Upgrade Files on Server list. 4. Select Full Install to upgrade all files - or Select Differences to upgrade the files that are different from the upgrade file. - or Select Factory Install to upgrade all files to the factory settings. 5. Tap Upgrade. 6. Tap Yes. 7. Restart the Christie IMB-S2 twice when the software upgrade is complete. If you purchased licenses to enable additional features, you do not need to purchase new licenses. However, you will need to upload them again when you replace the CF card. 1. Tap Menu > Christie IMB > System > Licenses. 2. Tap Add. 3. Insert a USB flash drive with the Christie IMB license into the USB port on the side of the touch panel controller (TPC). 4. Select a license file and then tap Accept. North and South America: +1-800-221-8025 or [email protected] Europe, Middle East, and Africa: +44 (0) 1189 778111 or [email protected] Asia Pacific: [email protected] Christie IMB-S2 CompactFlash Card Replacement 020-200260-01 Rev. 1 (11-2013) 5