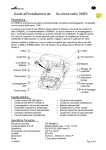
1
PARTS & SERVICE
MANUAL
Ansi Part Number: 511128-201
MAY 2013
Serial Number 21691 - Current
ULII - 25/32/40
Portable Personnel Lifts
When contacting Snorkel for service or parts information, be
sure to include the MODEL and SERIAL NUMBERS from the
equipment nameplate. Should the nameplate be missing, the
SERIAL NUMBER is also stamped on the chassis tube on
the right side of the mast.
Snorkel,
Vigo Centre, Birtley Road,
Washington, Tyne & Wear,
NE38 9DA, U.K.
MODEL
NUMBER
SERIAL
NUMBER
UL 25 A/C
MONTH / YEAR
OF MANUFACTURE
SLOPE SENSOR ALARM SETTING
NON-LOADED
MACHINE
WEIGHT
ENGINE
POWERED
MODELS
MAXIMUM
OUTRIGGER
LOAD
MAXIMUM
GRADEABILITY
Indoors
MAXIMUM
ALLOWABLE
-----MANUAL FORCE
(SIDE PULL)
200
MAXIMUM
PLATFORM
HEIGHT
Snorkel
Vigo Centre,
Birtley Road,
Washington,
Tyne & Wear,
NE38 9DA, U.K.
T: +44 (0)845 1557 755
F: +44 (0)845 1557 756
Indoors
RATED NUMBER
OF OCCUPANTS
1
------360
lbs
kg
N/A
hp
kW
------170
lbs
kg
N/A
%
Outdoors
N/A
lbs
N
-----7.6
ft
m
Outdoors
N/A
ASSEMBLED IN
FRONT
TO BACK
N/A
SIDE
deg TO SIDE
MAXIMUM
WHEEL
LOAD
deg
N/A
lbs
kg
DRIVE
MOTORS
N/A
V
BATTERIES
N/A
V
Ah
BATTERY
POWERED
MODELS
CHARGER
INPUT
MAXIMUM
ALLOWABLE
WIND SPEED
N/A
V
-----0
mph
m/s
---------
MAXIMUM
PLATFORM
REACH
MAXIMUM
DRIVE
HEIGHT
N/A
ft
m
ft
m
N/A
MAXIMUM 159 KG = 1 PERSON
PLATFORM
+ 79KG TOOLS
LOAD
CAUTION
ONLY trained and authorised personnel may operate this machine.Consult the Operation Manual before using this machine.
DO NOT make any changes to this machine, any changes made will invalidate the manufactures warranty and
may contravene legislation.
Axle weights with machine in the stowed position.
lbs
STEER AXLE
kg
DRIVE AXLE
N/A
lbs
N/A
kg
512582-000
Section
Contents
i
Table of Contents
Section
Number
List of Illustrations
Page
No.
1.0 Introduction ............................................................. 1-1
Purpose of Equipment ........................................ 1-1
General Description ............................................ 1-1
Platform ............................................................ 1-1
Mast .................................................................. 1-1
Chassis.............................................................. 1-1
Operator Controls ............................................ 1-1
2.0 Introduction ............................................................. 4-1
Special Tools ...................................................... 4-1
2.1 Preventative Maintenance (Table 2-1) ................. 4-1
Preventative Maintenance Table Key ............. 4-2
Preventative Maintenance Report ................... 4-2
2.2 Lubrication ............................................................... 4-3
Casters ................................................................. 4-3
Chains ................................................................. 4-3
Screw Jacks ......................................................... 4-3
Hydraulic Oil Reservoir (Figure 2-2) ................ 4-3
2.3 Battery Maintenance
(DC units only) ........................................................ 4-4
Battery Inspection and Cleaning ........................ 4-4
Battery Charging (Figure 2-3) ........................... 4-4
Battery Cell Equalization ................................... 4-5
2.5 Mast Assembly (Figure 2-6,2-7) Disassembly ...... 4-6
Platform Assembly Removal
(Figure 2-6) ..................................................... 4-6
#6 Mast ............................................................. 4-6
#5 Mast ............................................................. 4-6
#4 Mast ............................................................. 4-6
2.5 Mast Assembly (Cont.) ............................................ 4-9
#3 Mast ............................................................. 4-9
#2 Mast ............................................................. 4-9
Assembly (Figure 2-7) ........................................ 4-9
#2 Mast ............................................................. 4-9
#3 Mast ............................................................. 4-9
#4 Mast ............................................................. 4-9
#5 Mast ............................................................. 4-9
#6 Mast ............................................................. 4-9
2.5 Mast Assembly (Cont.) ............................................ 4-10
Platform Support Assembly ............................ 4-10
Sequencing Strap Installation ......................... 4-10
2.6 Cylinder Assembly .................................................. 4-10
Seal Replacement (Figure 2-8) .......................... 4-10
2.6 Cylinder Assembly (Cont.) ..................................... 4-12
Orifice Valve Cleaning ...................................... 4-12
Cylinder Removal (Figure 2-9) .......................... 4-13
Installation .......................................................... 4-13
2.6 Cylinder Assembly (Cont.) ..................................... 4-14
Installation (Cont.) ............................................. 4-14
Fasteners ............................................................. 4-14
2.7 Torque Specifications .............................................. 4-14
Hydraulic Components ....................................... 4-14
3.0 Introduction ............................................................. 5-1
General Procedure .............................................. 5-1
4.0 Introduction ............................................................. 6-1
Index.................................................................... 6-1
4.1 Electrical Schematics .............................................. 6-2
4.2 Hydraulic Schematic ............................................... 6-4
UL-25/32/40 Portable Personnel Lifts
Figure
Number
1-1
2-1
2-2
2-3
2-4
2-5
2-6
2-7
2-8
2-9
3-1
3-1
3-2
3-3
Page
No.
UL Portable Personnel Lifts ...................................... 1-1
Lubrication ................................................................. 2-3
Hydraulic Power Unit ................................................ 2-3
Battery Charger .......................................................... 2-5
System Relief Valve .................................................. 2-5
Lifting / Lowering UL Lift ........................................ 2-6
Mast Assembly, Strap and Chain Detail ................... 2-7
Mast Assembly Bearing Detail ................................. 2-8
Lift Cylinder ............................................................... 2-11
Chain Tensioning, Cylinder Installation ................... 2-13
Circuit Board .............................................................. 3-5
Electrical Schematic, AC Models ............................. 3-3
Electrical Schematic, DC Models ............................. 3-3
Hydraulic Schematic .................................................. 3-4
List of Tables
Table
Number
1-1
2-1
2-2
2-2
3-1
4-1
4-2
4-3
Page
No.
Specifications ............................................................. 1-2
Preventative Maintenance ......................................... 2-2
Hydraulic Component Torque .................................. 2-14
Bolt Torque ................................................................ 2-14
Troubleshooting ......................................................... 3-2
Electrical Schematic Legend, AC ............................. 4-2
Electrical Schematic Legend, DC ............................. 4-2
Hydraulic Schematic Legend .................................... 4-4
I
UL-25/32/40 SEVICE AND PARTS MANUAL
FOREWORD
HOW TO USE THIS MANUAL
This manual is divided into six sections.
S ECTION 1 I NTRODUCTION
General description and machine specifications.
S ECTION 2
O PERATION
AND
S PECIFICATIONS
Information on how to operate the work platform and how to prepare it for operation.
S ECTION 3
M AINTENANCE
Preventative maintenance and service information.
S ECTION 4
TROUBLESHOOTING
Causes and solutions to typical problems.
S ECTION 5
S CHEMATICS
Schematics and valve block diagram with description and location of components. Large schematic drawings may be located in the back of the manual.
S ECTION 6 I LLUSTRATED
P ARTS B REAKDOWN
Complete parts lists with illustrations. Large parts drawings may be located in the back of the
manual.
SPECIAL INFORMATION
!
D A N G E R
!
Indicates an imminently hazardous situation which, if not avoided, will result
in severe injury or death.
!
W A R N I N G
!
Indicates a potentially hazardous situation which, if not avoided, could result
in severe injury or death.
!
C A U T I O N
!
Indicates a potentially hazardous situation which, if not avoided, may result
in minor or moderate injury.
NOTE: Gives helpful information.
Page i
Foreword
-
WORKSHOP PROCEDURES
All information contained in this manual is based on the latest product information available at
the time of printing. We reserve the right to make changes at any time without notice. No part of
this publication may be reproduced, stored in retrieval system, or transmitted, in any form by any
means, electronic, mechanical, photocopying, recording, or otherwise, without the prior written
permission of the publisher. This includes text, figures, and tables.
!
C A U T I O N
!
Detailed descriptions of standard workshop procedures, safety principles and
service operations are not included. Note that this manual does contain
warnings and cautions against some specific service methods that could cause
personal injury, or could damage a machine or make it unsafe. Please
understand that these warnings cannot cover all conceivable ways in which
service, whether or not recommended by Snorkel, might be done, or of the
possible hazardous consequences of each conceivable way, nor could Snorkel
investigate all such ways. Anyone using service procedures or tools, whether or
not recommended by Snorkel must satisfy themselves thoroughly that neither
personal safety nor machine safety will be jeopardized. When in doubt, contact
your local distributor or Snorkel.
Page ii
Introduction & Specifications
1.1 INTRODUCTION
P URPOSE
The purpose of this service and parts manual is to provide instructions and illustrations for the
operation and maintenance of the UL25/32/40 manufactured by Snorke. l
This manual must be stored on the machine at all times.
Read, understand and follow all safety rules and operating instructions before
attempting to operate the machine.
S COPE
The manual includes procedures for proper operation, maintenance, adjustment, and repair of
the UL25/32/40 as well as recommended maintenance schedules and troubleshooting.
1.2 GENERAL DESCRIPTION
The UL25/32/40 consists of the platform, controller, elevating assembly, power / control module, and chassis.
!
W A R N I N G
!
DO NOT use the work platform without guardrails properly assembled and in
place.
Figure 1-1: UL25/32/40 Work Platform
P LATFORM
The platform has a reinforced steel floor, 1.11m (43.75 inch) high guardrails with midrail
6 inch (152 mm) toeboards, and an entrance gate at the rear of the platform.
P LATFORM C ONTROLLER
The platform controller contains the controls to operate the machine. It is located at the
front of the platform. A complete explanation of control functions can be found in Section 2.
E LEVATING A SSEMBLY
The platform is raised and lowered by the ele-vating assembly. The hydraulic pump, driven
by an electric motor, powers the cylinder.
Solenoid operated valves control raising and lowering.
UL-25/32/40 Portable Personnel Lifts
Section
1.0
OPERATION MANUAL
WARNING
All personnel shall carefully read, understand and follow all safety rules and operating
instructions before operating or performing maintenance on any Snorkel aerial work platform.
THIS MACHINE IS
NOT INSULATED!
NEVER elevate the
platform unless all
four (4) outriggers
have been properly
installed.
NEVER elevate the
platform without first
leveling the base.
NEVER attempt to
push the Snorkel Lift
with people or
materials on the
platform or with the
platform elevated.
NEVER position the
platform without first
checking for overhead
obstructions or other
hazards.
NEVER climb, stand,
or sit on platform
guardrails or midrail.
THIS MACHINE IS FOR INDOOR USE ONLY! Do not use out of doors.
USE OF THE AERIAL WORK PLATFORM: This aerial work platform is intended to lift persons and his tools as well as the material
used for the job. It is designed for repair and assembly jobs and assignments at overhead workplaces (ceilings, cranes, roof structures,
buildings etc.). All other uses of the aerial work platform are prohibited!
THIS AERIAL WORK PLATFORM IS NOT INSULATED! For this reason it is imperative to keep a safe distance from live parts of electrical equipment! DO NOT get closer than the minimum distance recommended by the “National Regulations”.
Exceeding the specified permissible maximum load is prohibited! See “Special Limitations” on page 4 for details.
The use and operation of the aerial work platform as a lifting tool or a crane (lifting of loads from below upwards or from up high on
down) is prohibited!
NEVER exceed the manual force allowed for this machine. See “Special Limitations” on page 4 for details.
DISTRIBUTE all platform loads evenly on the platform.
NEVER operate the machine without first surveying the work area for surface hazards such as holes, drop-offs, bumps, curbs, or debris;
and avoiding them.
OPERATE machine only on surfaces capable of supporting outriggers.
IN CASE OF EMERGENCY push EMERGENCY STOP switch to deactivate all powered functions.
Climbing up the railing of the platform, standing on or stepping from the platform onto buildings, steel or prefab concrete structures, etc.,
is prohibited!
Dismantling the entry gate or other railing components is prohibited! Always make certain that the entry gate is closed and securely
locked!
It is prohibited to keep the entry gate in an open position (held open with tie-straps) when the platform is raised!
To extend the height or the range by placing of ladders, scaffolds or similar devices on the platform is prohibited!
NEVER perform service on machine while platform is elevated without blocking elevating assembly.
INSPECT the machine thoroughly for cracked welds, loose or missing hardware, hydraulic leaks, loose wire connections, and damaged
cables or hoses before using.
VERIFY that all labels are in place and legible before using.
NEVER use a machine that is damaged, not functioning properly, or has damaged or missing labels.
To bypass any safety equipment is prohibited and presents a danger for the persons on the aerial work platform and in its working
range.
NEVER charge batteries near sparks or open flame. Charging batteries emit explosive hydrogen gas.
Modifications to the aerial work platform are prohibited or permissible only at the approval by Snorkel.
AFTER USE, secure the work platform from unauthorized use by turning keyswitches off and removing key.
Page 1
Introduction . . . . . . . . . . . . . . . . . . . . . . . . . . . . . . . . . . . . . . . . . . . . . . . . . . . . . . . . . . . . . . . . . . . . . . . . . .3
General Description . . . . . . . . . . . . . . . . . . . . . . . . . . . . . . . . . . . . . . . . . . . . . . . . . . . . . . . . . . . . . . . . . . .3
Special Limitations . . . . . . . . . . . . . . . . . . . . . . . . . . . . . . . . . . . . . . . . . . . . . . . . . . . . . . . . . . . . . . . . . . . .4
Platform Capacity . . . . . . . . . . . . . . . . . . . . . . . . . . . . . . . . . . . . . . . . . . . . . . . . . . . . . . . . . . . . . . . . . . . . . . . . . . . 4
Manual Force . . . . . . . . . . . . . . . . . . . . . . . . . . . . . . . . . . . . . . . . . . . . . . . . . . . . . . . . . . . . . . . . . . . . . . . . . . . . . . 4
Controls and Indicators . . . . . . . . . . . . . . . . . . . . . . . . . . . . . . . . . . . . . . . . . . . . . . . . . . . . . . . . . . . . . . . .5
Outrigger Installation . . . . . . . . . . . . . . . . . . . . . . . . . . . . . . . . . . . . . . . . . . . . . . . . . . . . . . . . . . . . . . . . . .6
Safety Interlock Test . . . . . . . . . . . . . . . . . . . . . . . . . . . . . . . . . . . . . . . . . . . . . . . . . . . . . . . . . . . . . . . . . . . . . . . . . 6
Pre-Operation Safety Inspection . . . . . . . . . . . . . . . . . . . . . . . . . . . . . . . . . . . . . . . . . . . . . . . . . . . . . . . . .7
System Function Inspection . . . . . . . . . . . . . . . . . . . . . . . . . . . . . . . . . . . . . . . . . . . . . . . . . . . . . . . . . . . .7
Perform all tests from the ground. . . . . . . . . . . . . . . . . . . . . . . . . . . . . . . . . . . . . . . . . . . . . . . . . . . . . . . . . . . . 7
Operation . . . . . . . . . . . . . . . . . . . . . . . . . . . . . . . . . . . . . . . . . . . . . . . . . . . . . . . . . . . . . . . . . . . . . . . . . . . .8
Elevating the Platform . . . . . . . . . . . . . . . . . . . . . . . . . . . . . . . . . . . . . . . . . . . . . . . . . . . . . . . . . . . . . . . . . . . . 8
Lowering the Platform . . . . . . . . . . . . . . . . . . . . . . . . . . . . . . . . . . . . . . . . . . . . . . . . . . . . . . . . . . . . . . . . . . . . 8
Emergency Lowering . . . . . . . . . . . . . . . . . . . . . . . . . . . . . . . . . . . . . . . . . . . . . . . . . . . . . . . . . . . . . . . . . .8
Transporting the Work Platform . . . . . . . . . . . . . . . . . . . . . . . . . . . . . . . . . . . . . . . . . . . . . . . . . . . . . . . . .9
DC Models . . . . . . . . . . . . . . . . . . . . . . . . . . . . . . . . . . . . . . . . . . . . . . . . . . . . . . . . . . . . . . . . . . . . . . . . . . . . . 9
Loading . . . . . . . . . . . . . . . . . . . . . . . . . . . . . . . . . . . . . . . . . . . . . . . . . . . . . . . . . . . . . . . . . . . . . . . . . . . . . . . . . . . 9
Unloading . . . . . . . . . . . . . . . . . . . . . . . . . . . . . . . . . . . . . . . . . . . . . . . . . . . . . . . . . . . . . . . . . . . . . . . . . . . . . . . . 10
DC Models . . . . . . . . . . . . . . . . . . . . . . . . . . . . . . . . . . . . . . . . . . . . . . . . . . . . . . . . . . . . . . . . . . . . . . . . . . . . 10
Passage Through a Doorway . . . . . . . . . . . . . . . . . . . . . . . . . . . . . . . . . . . . . . . . . . . . . . . . . . . . . . . . . .11
Lowering . . . . . . . . . . . . . . . . . . . . . . . . . . . . . . . . . . . . . . . . . . . . . . . . . . . . . . . . . . . . . . . . . . . . . . . . . . . . . . . . . 11
Raising . . . . . . . . . . . . . . . . . . . . . . . . . . . . . . . . . . . . . . . . . . . . . . . . . . . . . . . . . . . . . . . . . . . . . . . . . . . . . . . . . . 11
Maintenance . . . . . . . . . . . . . . . . . . . . . . . . . . . . . . . . . . . . . . . . . . . . . . . . . . . . . . . . . . . . . . . . . . . . . . . .13
Battery Maintenance . . . . . . . . . . . . . . . . . . . . . . . . . . . . . . . . . . . . . . . . . . . . . . . . . . . . . . . . . . . . . . . . . . . . . . . . 13
Battery Charging . . . . . . . . . . . . . . . . . . . . . . . . . . . . . . . . . . . . . . . . . . . . . . . . . . . . . . . . . . . . . . . . . . . . . . . . . . . 13
Inspection and Maintenance Schedule. . . . . . . . . . . . . . . . . . . . . . . . . . . . . . . . . . . . . . . . . . . . . . . . . . .14
Daily Preventative Maintenance Checklist . . . . . . . . . . . . . . . . . . . . . . . . . . . . . . . . . . . . . . . . . . . . . . . .14
Labels . . . . . . . . . . . . . . . . . . . . . . . . . . . . . . . . . . . . . . . . . . . . . . . . . . . . . . . . . . . . . . . . . . . . . . . . . . . . .16
Specifications . . . . . . . . . . . . . . . . . . . . . . . . . . . . . . . . . . . . . . . . . . . . . . . . . . . . . . . . . . . . . . . . . . . . . . .18
Page 2
Operation Manual
Introduction
Figure 1-1: UL Portable Personnel Lift
Work Platform
2
8
7
5
8
13
6
9
14
1
12
4
3
10
1. Platform
2. Mast
3. Chassis
4. Outriggers
5. Guardrail
6. Entry Drop Bar
7. Chassis Controls
9. Battery Box (DC Units)
• Battery
• Battery Charger
10. Casters
11. Rear Wheels
12. Screw Jacks
13. Loader Assembly
14. Emergency Lowering Valve
8. Power Unit
• Motor
• Hydraulic Reservoir
Operation Manual
Page 3
DO NOT attempt to move this machine with the mast in an elevated position.
This machine weighs in excess of 760lb (345kg) and MUST only be manoeuvred on firm, level ground.
Controls and Indicators
Controls and Indicators
Platform Controls
Chassis Controls
5
1
3
3
2
1
6
2
4
1 Power Indicator
2. Emergency Stop
Switch
3. Key Switch
1
2.
3.
4.
4. Emergency Lowering
Valve
5. Orbit Level
6. Outrigger Indicator
Lights
Emergency Stop Switch
Power On Button
Up Button
Down Button
4
Operation Manual
Page 5
Outrigger Installation
Installing Outriggers
1. Remove the outriggers from storage
locations on the sides of the mast.
Indicator Lights
Bubble Level
2. Insert into the outrigger socket in the
base (Figure 1).
3. Push in until the locking pin engages
the hole in the end of the outrigger. Pull
outward on the outrigger to ensure
engagement.
Locking Pin
Screwjack
4. Repeat the above steps for all other
outriggers. Make sure all four (4) locking pins are engaged.
5. Level the base, centering the bubble in
the orbit level on the base by adjusting the screwjacks (turn clockwise) at the end of each outrigger. DO
NOT release the tension (turn counterclockwise) on an outrigger to level the base.
6. All four (4) screwjack pads must be in solid contact with a firm surface and each outrigger indicator light
must be lit before the platform is elevated.
NEVER perform this test from the platform.
1. Properly install all four (4) outriggers and level the base.
2. Release the tension on one (1) outrigger by turning the screwjack counter clockwise until the indicator
light is no longer lit.
3. While standing on the ground, activate the control panel to elevate the platform. The platform should
not elevate.
4. Re-level the base.
5. Repeat steps 2, 3 and 4 until all four (4) outriggers have been tested.
DO NOT use a machine that elevates when the tension has been released on an outrigger. The
machine must be repaired before using.
Page 6
Operation Manual
Pre-Operation Safety Inspection
Hydraulic Reservoir
NOTE: Carefully read, understand and follow all safety rules,
operating instructions, labels and National Safety
Instructions/Requirements. Perform the following steps each day
before use.
3
1. Check that all four (4) outriggers are properly installed.
2. Check that the base is level.
2
3. AC Units: connect the power unit plug to an approved extension cord.
4. DC Units: Verify that batteries are charged.
1
5. Perform the Safety Interlock test.
6. Check for external damage to the mast.
7. Check the level of the hydraulic fluid with the platform fully lowered:
• Remove the reservoir cap and check the fluid level on the dipstick.
• Add hydraulic fluid if necessary. Oil should be visible on the end of
the dip stick
8. Check that fluid level in the batteries is correct. See “Battery Maintenance” on page 13.
9. Check that all guardrails are in place and all fasteners are properly
tightened.
4
1
2.
3.
4.
Hydraulic Reservoir
Reservoir Cap/Dipstick
Motor (AC Shown)
Mast
10. Inspect the machine thoroughly for cracked welds and structural damage, loose or missing hardware, hydraulic leaks, damaged control cable, and loose wire connections.
Refer to Figure 2: “Controls and Indicators,” on page 5 for the locations of various controls and indicators.
STAND CLEAR of the work platform while performing the following checks.
Check above the work platform for obstructions and electrical conductors.
NOTE: The outriggers will not elevate unless all four outriggers are properly installed
with screwjack pads firmly in contact with floor and each outrigger indicator lamp lit.
PERFORM
ALL TESTS FROM THE GROUND
1. Pull the Chassis Emergency Stop Switch to the ON position.
2. Turn the Key to ON.
3. Pull the Platform Emergency Stop Switch to the ON position.
4. Push both the middle and top buttons (POWER and UP) on the Control Box at the same time to elevate
the platform. Release the buttons to stop.
5. Push both the middle and bottom buttons (POWER and DOWN) at the same time to lower the platform.
Release the buttons to stop.
6. Open the Emergency Lowering Valve to verify proper operation.
7. Push the Chassis Emergency Stop Switch to verify proper operation. All machine functions should be
disabled. Pull out the Chassis Emergency Stop Switch to resume.
8. Push the Platform Emergency Stop Switch to verify proper operation. All machine functions should be
disabled. Pull out the Platform Emergency Stop Switch to resume.
Operation Manual
Page 7
Operation
Before operating the machine, ensure that the Pre-Operation Safety Inspection has been completed and
that any deficiencies have been corrected. Never operate a damaged or malfunctioning machine. The
operator must be thoroughly trained on this machine.
1. AC Units: connect the power unit plug to an approved extension cord.
2. DC Units: verify that the battery charger is turned OFF and that the extension cord is removed.
3. Pull the Chassis Emergency Stop Switch to the ON position.
4. Turn the Key to ON.
5. Enter the platform by raising the drop bar.
6. Ensure the drop bar falls freely to its lowered position.
ELEVATING
THE
PLATFORM
7. Check that the area above the platform is clear before elevating the platform.
8. Pull the Platform Emergency Stop Switch to the ON position.
9. Push both the middle and top buttons (POWER and UP) on the Control Box at the same time to elevate
the platform. Release the buttons to stop.
10. In the event of an emergency, push the Emergency Stop Button.
11. Visually inspect the mast assembly for cracked welds and structural damage, loose hardware, hydraulic
leaks, loose wire connections, and erratic operation. Check for missing or loose parts.
LOWERING
THE
PLATFORM
12. Check that the area below the platform is clear before lowering the platform.
13. Push both the middle and bottom buttons (POWER and DOWN) at the same time to lower the platform.
Release the buttons to stop.
Refer to Figure 2: “Controls and Indicators,” on page 5 for the location of the Emergency Lowering Valve.
If the platform should fail to lower, NEVER climb down the elevating assembly.
Stand clear of the elevating assembly while operating the Emergency Lowering Valve Knob.
Ask a person on the ground to open the Emergency Lowering Valve to lower the platform. This valve is
located at the rear of the machine.
1. Pull the knob to open the valve.
2. To close the valve, release the knob.
Note: The platform will not elevate if the Emergency Lowering Valve is Open
AFTER USE EACH DAY
1. Ensure that the platform is fully lowered.
2. Park the machine on a firm level surface, preferably under cover, secure against vandals
children and unauthorized operation.
3. Turn the Chassis Key Switch to OFF and remove the key to prevent unauthorized operation.
Page 8
Operation Manual
Transporting the Work Platform
!
!
and be certain that forklift is of adequate capacity to lift the machine.
Forklift from the rear by lifting from fork pockets.
BY TRUCK
1. Maneuver the machine into transport position and
chock wheels.
2. Secure the machine to the transport vehicle
with chains or straps of adequate load capacity
attached to the chassis lifting/tie down points.
CENTRE OF GRAVITY
DC MODELS
Disconnect the plug from the battery box and
remove the battery box from the rear of the
machine.
!
Battery Box (DC Models Only)
Charger
!
The battery box is heavy, 23,6 kg (52 lbs.). Lift
properly to prevent back injury.
Refer to Figure 6: “Loading the UL for Transportation,” on page 10.
Battery Box Plug
Make sure the loader fully engages the tailgate or
vehicle bed.
1. Raise the loader support brackets and engage
the retaining pin in the top hole of the loader
channel.
2. Secure the loader to the loader support bracket with the gravity hook.
3. Position the unit so the back of the machine comes into contact with the tailgate or vehicle bed.
4. Release the gravity hook and slide the loader down until it comes into contact with the tailgate or vehicle
bed. Then reposition the loader support bracket so that the retaining pin is in the first available hole
above the loader.
5. Release the locking pin and pull the T-handle out until the locking pin engages the hole in the end of the
T-handle.
6. Lift up on the T-handle, using the loader as a pivot, until the unit rotates to a horizontal position in the
vehicle bed.
7. Push the base of the unit towards the front of the vehicle bed. The machine will slide on the loader until
the rear wheels are on the bed. The unit may then be rolled on the rear wheels and upper casters.
8. Return the T-handle to the stored position, making sure that the locking pin engages the T-handle.
9. Secure the unit with suitable tie straps using the forklift pockets located under the base of the unit, and
either the upper caster axle on the UL25 models or the tilt back frame on the UL32 and UL40 models.
To prevent damage to the mast assembly, do not place rope or tie straps across the mast assembly when
securing the unit for transportation.
DO NOT overtighten the rope or tie straps or damage to the machine will result.
Operation Manual
Page 9
Transporting the Work Platform
1. Unsecure the unit.
2. Release the locking pin and pull the T-handle out until the locking pin engages the hole in the end of the
T-handle.
3. Roll the unit back until the rear wheels are off the edge of the tailgate or vehicle bed.
4. Pull downward on the T-handle, allowing the unit to slide on the loader.
• As the unit stops sliding on the loader, it will pivot on the loader to an upright position.
• Gradually counterbalance the unit’s weight by applying an upward force on the T-handle. This allows
the unit to settle gently on the wheels, avoiding undue impact on the unit.
5. Return the T-handle to the stored position, making sure that the locking pin engages the T-handle.
DC MODELS
Replace the battery and reconnect the battery box plug, making certain it is fully engaged.
Loading the UL for Transportation
Loader Channel
Retaining Pin
Loader Support
Bracket
Retaining Pin
Gravity Hook
Tailgate
Loader
Loader in Load Position
Retaining Pin
T-Handle Positioning
Tilting the Machine Onto or Off of a Vehicle
Page 10
Operation Manual
Passage Through a Doorway
The UL32 and UL40 are equipped with a castered rear Tilt Back assembly. When the unit is tilted back
onto this support frame, the overall height is reduced to allow the unit to pass through a standard doorway.
Refer to Figure 7: “Passing Through Doorways,” on page 12.
Before tilting the machine onto the rear Tilt Back assembly, be sure that the retaining pin is fully inserted
with the hair pin retainer installed and the cylinder assembly is fully extended.
DO NOT drop the Tilt Back frame.
Keep out from under the Tilt Back frame and machine when tilting.
1. Be sure that the area is clear of personnel and obstructions.
2. While holding the Tilt Back frame, remove the hair pin retainer and the retaining pin.
3. Lower the Tilt Back frame until the hole in the cylinder assembly align with the upper mounting bracket
pin hole. Secure the cylinder assembly to the upper mounting bracket using the retaining pin and hair pin
retainer.
4. Extend the Tilt Back Handle to the tilt/lift position by releasing the locking pin and pulling the handle out
of the Tilt Back assembly until the locking pin engages.
5. Push down on the Tilt Back Handle until the unit comes to rest on the Tilt Back frame.
• As the mast tilts back, counterbalance the machine’s weight by increasing upward force on the end of
the Tilt Back Handle. This allows the machine to gently come to rest on the Tilt Back casters.
6. Pull down on the handle on the back of the mast to compress the cylinder assembly.
7. Return the Tilt Back Handle to the storage position, making sure that the locking pin engages the handle.
1. Lift up on the mast handle to extend the cylinder assembly.
2. Fully engage the Tilt Back Handle until the locking pin engages.
3. Lift up on the Tilt Back Handle.
• As the mast approaches vertical, counterbalance the machine’s weight by increasing downward force
on the end of the tilt Back Handle. This allows the machine to settle gently on the front casters.
4. Return the Tilt Back handle to the storage position, making sure that the locking pin engages the handle.
5. While holding the Tilt Back frame, remove the retaining pin and raise the Tilt Back assembly to the
stowed position.
6. Secure with the retaining pin, making sure that the retaining pin is fully inserted, and that the hair pin
retainer is installed.
Operation Manual
Page 11
Passage Through a Doorway
Passing Through Doorways
Retaining Pin
Tilt Back Handle
Hair Pin Retainer
Cylinder Assembly
Cylinder Secured with Retaining Pin
Retaining Pin
Lowering and Raising with the Tilt Back Handle
Compressing the Cylinder Assembly
Page 12
Operation Manual
Maintenance
Hazard of explosive gas mixture. Keep sparks, flame, and smoking material away from batteries.
Always wear safety glasses when working near batteries.
Battery fluid is highly corrosive. Thoroughly rinse away any spilled fluid with clean water.
Always replace batteries with Snorkel batteries or manufacturer approved replacements weighing
22 kg (48 lbs.) each.
• Check the battery fluid level daily, especially if the work platform is being used in a warm, dry climate.
• If electrolyte level is lower than 10 mm (3/8 in.) above the plates add distilled water only. DO NOT use
tap water with high mineral content, as it will shorten battery life.
• Keep the terminals and tops of the batteries clean.
• Refer to the Service Manual to extend battery life and for complete service instructions.
Figure 8: Battery Charger
Battery
(inside box)
Charge the batteries at the end of each work shift
or sooner if the batteries have been discharged.
Charger
Charge the batteries in a well ventilated area.
Do not charge the batteries when the work
platform is near a source of sparks or flames.
Permanent damage to the batteries will result if
the batteries are not immediately recharged after
discharging.
Never disconnect the cables from the batteries
when the charger is operating.
Keep the charger dry.
Timer light
1. Check the battery fluid level. If the battery fluid
level is lower than 10 mm (3/8 in.) above the
plates add distilled water only.
2. Verify the charger voltage switch is set to 12 volts.
3. Connect an appropriate extension cord to the charger plug. Plug the extension cord into a properly
grounded outlet of proper voltage and frequency.
HYDRAULIC FLUID
under the power unit cover.
CHECK HYDRAULIC FLUID
1. Make sure that the platform is fully lowered.
2. Open the chassis door.
end of
Operation Manual
Page 13
The Complete Inspection consists of periodic visual and operational checks, along with periodic minor
adjustments that assure proper performance. Daily inspection will prevent abnormal wear and prolong the
life of all systems. The inspection and maintenance schedule should be performed at the specified intervals. Inspection and maintenance shall be performed by personnel who are trained and familiar with
mechanical and electrical procedures.
NOTE: The frequency and extent of periodic maintenance should also take into
account Local/National Regulations.
Before performing preventative maintenance, familiarize yourself with the operation of the machine.
Always block the elevating assembly whenever it is necessary to perform maintenance while the
platform is elevated.
The daily preventative maintenance checklist has been designed for machine service and maintenance.
Please photocopy the Daily Preventative Maintenance Checklist and use the checklist when inspecting
the machine.
MAINTENANCE TABLE KEY
PREVENTATIVE MAINTENANCE REPORT
Y = Yes/Acceptable
Date: _______________________________________
N = No/Not Acceptable
Owner:______________________________________
R = Repaired/Acceptable
Model No: ___________________________________
Serial No:____________________________________
Serviced By: _________________________________
Page 14
Operation Manual
Daily Preventative Maintenance Checklist
NOTES:
Operation Manual
Page 15
Labels
Name Plate
UL25D/C 512581-001 UL25A/C 512582-001
UL32D/C 512586-001 UL32A/C 512585-001
UL40D/C 512584-001 UL40A/C 512583-001
These labels shall be present and in good condition before operating the work platform. Be sure to read,
understand and follow these labels when operating the work platform.
Page 16
Operation Manual
Specifications
390Kg (860lbs)
435Kg (960lbs)
470Kg (1040lbs)
2.06m (81 in)
1.98m (78 in)
2.06m (81 in)
2.95m (116 in)
2.84m (112 in)
2.53m (100 in)
1.94m (76 in)
1.32m (52 in)
1.94m (76 in)
2.90m (114 in)
1.32m (52in)
3.05m (120 in)
Toeboard
Max Chassis Inclination
Outrigger Loading
Vibration
Sound Pressure
Operating Temperature Range
152mm (6 in) High
Zero Degrees in all directions
170 Kg (374lbs)
2.5m/sec2
68dB (A) at Control Station
-20° C to +50° C
*Specifications are subject to change without notice. Hot weather or heavy use may affect performance.
Refer to the Service Manual for complete parts and service information.
The UL25/32/40 meets or exceeds the requirements of ANSI A92.3 - 1990
Page 18
Operation Manual
Maintenance
S ER VICE
AND
Section
2.0
R EPAIR
This section contains instructions for the maintenance of the Work Platform. Refer to the General Information section for information relevant to all Snorkel work platforms. Referring to the
Operator Manual will aid in understanding the operation and function of the various components and
systems of the work platform, and help in diagnosing and repair of the machine.
Owners of this work platform must set up a maintenance programme and have prepared
a safety statement in advance as required by the relevant National Body. The frequency and extent of periodic
maintenance should also take into account Local/National regulations.
!
W A R N I N G
!
Be sure to read, understand and follow all information in the Operation Section of this manual before
attempting to operate or perform service on any Work Platform.
!
D A N G E R
!
Never perform service on the work platform in the elevating assembly area while platform is elevated
without first blocking the elevating assembly.
DO NOT stand in elevating assembly area while deploying or storing brace.
TABLE OF C ONTENTS
2.0 Introduction .................................................................................................................................. 2-1
2.1 Preventative Maintenance ........................................................................................................... 2-1
Preventative Maintenance Table ................................................................................................... 2-2
2.2 Lubrication .................................................................................................................................... 2-1
Casters .............................................................................................................................................. 2-3
Chains ............................................................................................................................................... 2-3
Screw Jacks....................................................................................................................................... 2-3
Hydraulic Oil Reservoir ..................................................................................................................... 2-3
2.3 Battery Maintenance .................................................................................................................... 2-4
Battery Inspection & Cleaning ......................................................................................................... 2-4
Battery Charging............................................................................................................................... 2-4
Battery Cell Equalization .................................................................................................................. 2-5
2.4 Setting System Relief Valve .......................................................................................................... 2-5
UL-25/32/40 Portable Personnel Lifts
2-1
Maintenance
Section
2.0
2.5 Mast Assembly - Disassembly ......................................................................................................2-6
Pla orm Assembly Removal ............................................................................................................ 2-6
#6 Mast Disassembly........................................................................................................................ 2-6
#5 Mast Disassembly ....................................................................................................................... 2-6
#3 Mast Disassembly ....................................................................................................................... 2-9
#2 Mast Disassembly ....................................................................................................................... 2-9
#2 Mast Assembly ............................................................................................................................ 2-9
#3 Mast Assembly ............................................................................................................................ 2-9
#4 Mast Assembly ............................................................................................................................ 2-9
#5 Mast Assembly ............................................................................................................................ 2-9
#6 Mast Assembly ............................................................................................................................ 2-9
#2 M ast Assembly ............................................................................................................................ 2-9
Pla orm Support Assembly ........................................................................................................... 2-10
Sequencing Installa on .................................................................................................................. 2-10
2.6 Cylinder Assembly ......................................................................................................................2-10
Seal Replacement ........................................................................................................................... 2-10
Orifice Valve Cleaning .................................................................................................................... 2-12
Cylinder Removal ........................................................................................................................... 2-13
Installa on...................................................................................................................................... 2-13
2.7 Torque Specifica ons ..................................................................................................................2-14
Hydraulic Components .................................................................................................................. 2-14
Fasteners ........................................................................................................................................ 2-14
3.0 Troubleshoo ng ............................................................................................................................3-1
Introduc on .................................................................................................................................... 3-1
General Procedure ........................................................................................................................... 3-1
3.1 Troubleshoo ng Cont’d ................................................................................................................3-4
Li Does Not Turn On -DC ................................................................................................................ 3-4
Li Does Not Raise -DC .................................................................................................................... 3-4
Li Does Not Lower-DC .................................................................................................................... 3-5
4.0 Schema cs .....................................................................................................................................4-1
Introduc on ..................................................................................................................................... 4-1
List of Figures ................................................................................................................................... 4-1
2-1
UL-25/32/40 Portable Personnel Lifts
Maintenance
Section
2.0
4.1 Electrical Schematics ..................................................................................................................... 4-2
Electrical Schematic Legend AC ....................................................................................................... 4-2
Electrical Schematic Legend DC ....................................................................................................... 4-2
4.2 Hydraulic Schematics .................................................................................................................... 4-4
Hydraulic Schematic Legend ........................................................................................................... 4-4
5.0 Illustrated Parts Breakdown ........................................................................................................ 5-1
Table of Contents ................................................................................................................................ 5-1
UL-25/32/40 Portable Personnel Lifts
2-1
Maintenance
2.0 Introduction
This section contains instructions for the maintenance of
the UL-Series Lifts. Procedures for the operational checkout adjustment, scheduled maintenance, and repair/
removal are included.
Referring to the Operator Manual will aid in understanding the operation and function of the various components
and systems of the UL-Series Lifts and help in diagnosing
and repair of the machine.
SPECIAL TOOLS
The following is a list of special tools that are required to
perform certain maintenance procedures. These tools may
be purchased from your dealer.
Description
Part Number
Spanner Wrench
062521-010
For UL25,32,40
Strap Wrench
062482-000
Tie Rod Tensioner (2 req'd.) 062738-000
Tensioner Bracket (2 req'd.)
062739-000
Section
2.0
2.1 Preventative Maintenance
(Table 2-1)
The complete inspection consists of periodic visual and
operational checks, together with all necessary adjustments
to assure proper performance. Daily inspection will
prevent abnormal wear and prolong the life of all systems.
The inspection and maintenance schedule is to be performed at regular intervals. Inspection and maintenance
shall be performed by personnel who are trained and
familiar with mechanical and electrical procedures. Complete descriptions of the procedures are in the text following the table.
Before performing preventative maintenance,
familiarize yourself with the operation of the
machine.
Never enter the area below the Platform
when the Platform is elevated.
The Preventative Maintenance Table has been designed to
be used for machine service and maintenance repair.
Please copy the following page and use the Preventative Maintenance Table as a checklist when inspecting
a machine for service.
2-1
UL-25/32/40 Portable Personnel Lifts
Section
2.1
Maintenance
Table 2-1: Preventative Maintenance
Preventative Maintenance Table Key
Interval
Daily=each shift or every day
30d=every month or 30 days
3m=every 3 months
1y=every year
Y=Yes/Acceptable
N=No/Not Acceptable
R=Repaired/Acceptable
Preventative Maintenance Report
Date: ____________
Owner: _______________________________________
Model No: ______________ Serial No: _____________
Serviced By: __________________________________
Service Interval: _______________________________
2-2
COMPONENT
Battery
System
(DC Units
only)
INSPECTION OR SERVICES
Check electrolyte level
Check battery cable condition
Charge batteries
Check charger condition & operation
Check specific gravity
Clean exterior
Clean terminals
Hydraulic Oil Check oil level
Drain and replace oil (ISO #46)
Hydraulic
Check for leaks
System
Check line connections
Check for exterior wear
Emergency
Open the emergency lowering
Hydraulic
valve and check for
System
serviceability
Emergency
Check procedure for Emergency
Down
Down batteries
Hydraulic
Check for fitting leaks
Pump
Wipe clean
Check for leaks at mating surfaces
Check mounting bolts for
proper torque
Controls
Check condition & operation
Control
Check the exterior of the cable
Cable
for pinching, binding or wear
Platform
Check fasteners for proper torque
Deck and
Check welds for cracks
Rails
Check condition of deck
Check entry way closure
Elevating
Inspect for external damage, dents,
Assembly
loose rivets or cracks
Check chains and sheaves for wear
Inspect and adjust sequence straps
Chassis
Check cables for pinch or
rubbing points
Check welds for cracks
Check casters for damage
Check component mounting
for proper torque
Lift
Check for leaks
Cylinder
Check fitting for proper torque
Entire
Perform pre-operation inspection
Unit
Check for and repair collision damage
Lubricate
Check fasteners for proper torque
Check for corrosion; remove
and repaint
Labels
Check for peeling, missing, or
unreadable labels & replace
INTERVAL
Y
N
R
Daily
Daily
Daily
Daily
30d
3m
3m
Daily
1y
Daily
30d
30d
Daily
3m
Daily
30d
30d
30d
Daily
Daily
Daily
Daily
Daily
Daily
Daily
3m
30d
Daily
Daily
Daily
3m
Daily
30d
Daily
Daily
3m
3m
3m
Daily
UL-25/32/40 Portable Personnel Lifts
Section
Maintenance
2.2
2.2 Lubrication
Refer to Figure 2-1 for location of items that require
lubrication service. Use an aerosol chain lubricant for all
components to be lubricated that require oil.
1
CASTERS
Using a grease gun, apply 1 or 2 shots of multi-purpose
bearing grease to each zerk fitting. Swivel casters have
two zerk fittings, one at the wheel bearing and one at the
swivel.
CHAINS
1. Ensure that Platform is fully lowered.
2. Apply enough aerosol chain lubricant to exposed
section of chain to allow lubricant to run down chain.
2
4
SCREW JACKS
Apply a moderate amount of aerosol chain lubricant to
each screwjack assembly.
5&6
3
1.
2.
3.
4.
Chains
Casters
Rear Wheels
Screw Jacks
1.
2.
3.
4.
5.
6.
Motor
Pump
Reservoir
Breather/Dipstick
Capscrew (under pump)
Grip Plate (under pump)
Figure 2-2: Hydraulic Power Unit
HYDRAULIC OIL RESERVOIR
(Figure 2-2)
Verify that Platform is fully lowered.
1. Remove hydraulic reservoir from pump by removing
four screws and four grip plates.
2. Provide a suitable container (reservoir has a 5,7 liter
[1.5 U.S. gal.] capacity) and dispose of hydraulic fluid
properly; contact your local oil recycler.
Note: Ensure o-ring is in place on pump when installing hydraulic reservoir.
3. Reinstall hydraulic reservoir to pump assembly with
grip plates and screws.
4. Fill hydraulic reservoir through the dipstick hole with
ISO #46 hydraulic fluid. Hydraulic reservoir has a 5,7
liter [1.5 U.S. gal.] capacity. Ensure that oil is visible
on the end of the dipstick.
Figure 2-1: Lubrication
UL-25/32/40 Portable Personnel Lifts
2-3
Section
2.3
Maintenance
2.3 Battery Maintenance
(DC units only)
Electrical energy for the motor is supplied by a 12-volt
battery. Proper care and maintenance of the battery and
motor will ensure maximum performance from the lift.
Hazard of explosive gas mixture. Keep
sparks, flame and smoking materials away
from batteries.
Always wear safety glasses when working
with batteries.
Battery fluid is highly corrosive. Rinse away
any spilled fluid thoroughly with clear water.
BATTERY INSPECTION AND
CLEANING
Check battery fluid level daily, especially if work platform
is being used in a warm, dry climate. If required, add
distilled water only; use of tap water with high mineral
content will shorten battery life.
If battery water level is not maintained,
battery will not fully charge, creating a low
discharge rate which will damage Motor/
Pump unit and void warranty.
Battery should be inspected periodically for signs of
cracks in the cases, electrolyte leakage and corrosion of the
terminals. Inspect cables for worn spots or breaks in the
insulation and for broken cable terminals.
Clean battery that shows signs of corrosion at the terminals or onto which electrolyte has overflowed during
charging. Use a baking soda solution to clean the battery,
taking care not to get the solution inside the cells. Rinse
thoroughly with clear water. Clean battery and cable
contact surfaces to a bright metal finish whenever a cable
is removed.
2-4
2.2
BATTERY CHARGING (Figure 2-3)
Charge battery at end of each work shift or sooner if
battery has been discharged.
Charge battery in a well-ventilated area.
Do not charge battery when the lift is in an
area containing sparks or flames.
Permanent damage to battery will result if
battery is not immediately recharged after
discharging.
Never leave charger operating unattended
for more than two days.
Never disconnect cables from battery when
charger is operating.
Keep charger dry.
When night air temperatures fall below 18°C (65°F) a battery
charged in an unheated area should be placed on charger as
soon after use as possible. Under such conditions a 4 hour
equalize charge once a week in the early afternoon will
improve state of charge and battery life.
1. Check battery fluid level. If electrolyte level is lower than
10 mm (3/8 in.) above plates add distilled water only.
2. Verify charger voltage switch is set to 12 volts.
3. The battery charger is located at the rear of the mast. Connect
extension cord (1,5 mm2 [12 gauge] conductor minimum and
15 m [50 ft.] in length maximum) to the charger plug.
Connect other end of extension cord to properly grounded
outlet of proper voltage and frequency.
4. Set charger control to "conventional" setting. Charger
ammeter should indicate charge rate.
5. When battery is fully charged, charger automatically
turns itself off. Disconnect extension cord.
UL-25/32/40 Portable Personnel Lifts
Section
Maintenance
2.3
2.4
BATTERY CELL EQUALIZATION
The specific gravity of the electrolyte in the battery cells
should be equalized monthly. To do this, charge batteries
as outlined in Battery Charging. After this initial charge,
check the electrolyte level in all cells and add distilled
water as necessary. Then, turn the charger on for an
additional eight hours. During this time, the charging
current will be low (four amps) as cells are equalizing.
After equalization, the specific gravity of all cells should
be checked with a hydrometer. The temperature corrected
specific gravity in this state should be 1.260. If any
corrected readings are below 1.230, the battery should be
replaced.
Do not check the specific gravity in a cell to which water
has just been added. If there is not enough electrolyte in a
fully charged cell to obtain a sample for the hydrometer,
add water and continue charging for one to two hours to
adequately mix the water and electrolyte.
Charger
Check the hydraulic system pressure whenever the
pump or relief valve has been serviced or replaced.
The hydraulic oil may be of sufficient
temperature to cause burns. Wear safety
gloves and safety glasses when handling hot
oil.
1. Install outriggers and level unit as normal, (see Operator Manual 3 for operating instructions), and operate
the hydraulic system for 5-10 minutes to warm the
hydraulic oil.
2. Remove Cover from Power Unit Assembly
3. Place rated load on the platform (see table 1-1 for
specifications). Do Not use live weight for this
procedure.
4. Install pressure gauge on gauge port.
5. Remove the cap from the System Relief Valve
(fig. 2-4), and turn the adjustment screw counterclockwise two full turns.
6. Operate controls to elevate machine. (Machine will not
raise until Relief Valve is properly adjusted.)
7. Turn the System Relief Valve Clockwise (fig. 2-4)
until the machine begins to rise.
8. Elevate the platform fully and verify that the pressure
does not exceed 165 bar (2400 PSI) at any time during
the lift cycle.
9. Replace cap on System Relief Valve, reassemble
Cover.
Relief Valve
Gauge Port
Figure 2-3: Battery Charger
UL-25/32/40 Portable Personnel Lifts
Figure 2-4: System Relief Valve
2-5
Section
Maintenance
2.5
2.5 Mast Assembly (Figure 2-6,2-7)
Disassembly
Using a suitable lifting device, lower the work platform
into a horizontal position (Figure 2-5). If possible, place
the machine onto a sturdy work table using a forklift.
Never attempt to lower lift into a horizontal
position without the use of a suitable lifting
device; bodily injury or damage to the
machine may result.
NOTE: Mark all components as they are removed so
they can be reinstalled in the correct sequence and
location.
Platform Assembly Removal
(Figure 2-6)
1. Extend elevating assembly far enough to expose the
eight screws attaching the cage support assembly to
stage 6 by opening the emergency lowering valve and
pulling on the cage guardrail.
2. Remove cover from front of platform assembly.
2.5
3. Remove cotter pins, and drive out chain retaining pins
from the top front of stage 5.
4. Loosen screws from strap retainer on stage 5 top
casting. Pull strap free of retainer.
5. Remove cage support screws, slide the cage support
out of the sixth stage mast and set aside. It should not
be necessary to remove the pinch sheild. Be careful
not to damage the control cable.
Note: to remove the platform assembly from the cage
support assembly, follow steps 6-10 below.
6. Remove cable sheaves from cage support weldment,
and strain reliefs from stage 5 top casting.
7. Loosen screws from strap retainer on platform assembly weldment and free strap from retainer.
8. Remove two screws and washers holding stop bracket
located at top of platform assembly weldment. Remove the stop bracket.
9. Slide the cage support weldment out of the top of the
platform assembly weldment.
10. Slide bearings in platform assembly may now be
inspected / replaced if necessary.
#6 Mast
1. Remove sequence strap retainer on the top of #4 mast.
2. Remove the Allen head screws holding the top mast
bearings between the #5 and #6 mast. Remove the top
mast bearings.
3. Slide #6 mast out of #5 mast. As mast is removed, the
bottom four mast bearings will fall out; note their
orientation for re-assembly.
4. Disconnect chain from top of #4 mast.
#5 Mast
1. Remove sequence strap retainer on the top of #3 mast.
2. Remove the Allen head screws holding the top mast
bearings between the #4 and #5 mast. Remove the top
mast bearings.
3. Slide #5 mast out of #4 mast. As mast is removed, the
bottom four mast bearings will fall out; note their
orientation for re-assembly.
4. Disconnect chain from top of #3 mast.
#4 Mast
Forklift
Figure 2-5: Lifting/Lowering UL Lift
2-6
1. Remove sequence strap retainer on the top of #2 mast.
2. Remove the Allen head screws holding the top mast
bearings between the #3 and #4 mast. Remove the top
mast bearings.
3. Slide #4 mast out of #3 mast. As mast is removed, the
bottom four mast bearings will fall out; note their
orientation for re-assembly.
UL-25/32/40 Portable Personnel Lifts
Maintenance
Section
2.5
Figure 2-6: Mast Assembly, Strap and Chain Detail
UL-25/32/40 Portable Personnel Lifts
2-7
Section
2.5
Maintenance
2.5
Figure 2-7: Mast Assembly, Bearing Detail
2-8
UL-25/32/40 Portable Personnel Lifts
2.5
Maintenance
Section
2.5
2.5 Mast Assembly (Cont.)
#4 Mast
4. Disconnect chain from top of #2 mast.
5. Remove cylinder by following instructions in Section 2.7.
1. Set #4 mast in place with the sequencing strap inside
and the chains on the bottom.
2. Install bottom lower bearings.
3. Install bottom upper bearings.
4. Slide mast #4 in, make sure chains are not twisted.
5. Install top bearings and secure with retaining screws
using Loctite® 242 or equivalent on the threads.
6. Install chains around #3 sheave and down through #3
casting, secure to #2 casting with new roll pins.
7. Use a center punch to dimple pin hole after roll pins
are installed.
#3 Mast
1. Remove sequence strap retainer on the top of #1 mast.
2. Remove the Allen head screws holding the top mast
bearings between the #2 and #3 mast. Remove the top
mast bearings.
3. Slide #3 mast out of #2 mast. As mast is removed, the
bottom four mast bearings will fall out; note their
orientation for re-assembly.
#2 Mast
1. Remove the Allen head screws holding the top mast
bearings between the #1 and #2 mast. Remove the top
mast bearings.
2. Slide #2 mast out of #1 mast. As mast is removed, the
bottom four mast bearings will fall out; note their
orientation for re-assembly.
ASSEMBLY (Figure 2-7)
Note: Use WD-40 lubricant as necessary to aid in
reassembly.
#2 Mast
1.
2.
3.
4.
5.
Set #2 mast in place.
Install bottom lower bearings.
Install bottom upper bearings.
Slide #2 mast in all the way except 30 -38 cm (12-15").
Install top bearings and secure with retaining screws
using Loctite® 242 or equivalent on the threads.
6. Slide #2 mast in completely.
#3 Mast
1.
2.
3.
4.
5.
Set #3 mast in place with the sequencing strap inside.
Install bottom lower bearings.
Install bottom upper bearings.
Slide #3 mast in all the way except 30 -38 cm (12-15").
Install top bearings and secure with retaining screws
using Loctite® 242 or equivalent on the threads.
6. Place a 10" (25 cm) long wood block between #3 and
#2 masts, slide #3 mast down tight against block. Pull
sequencing strap completely out of the bottom of
assembly.
7. Install cylinder assembly by following instructions in
section 2.6.
UL-25/32/40 Portable Personnel Lifts
#5 Mast
1.
2.
3.
4.
5.
Set #5 mast in place with the sequencing strap inside.
Install bottom lower bearings.
Install bottom upper bearings.
Slide #5 mast in, make sure chains are not twisted.
Install top bearings and secure with retaining screws
using Loctite® 242 or equivalent on the threads.
6. Install chains around #4 sheaves and down through #4
casting, secure to #3 casting with new roll pins.
7. Use a center punch to dimple pin holes after all roll
pins are installed.
8. Slide mast in, leaving 25 cm (10") exposed.
#6 Mast
1. Set #6 mast in place with the sequencing strap inside.
2. Run the remaining sequencing strap (from platform
assembly) through the slot in the bottom of stage #6
and up through the inside. Leave just enough slack on
the outside to reach the attachment point at the top of
stage #5.
3. Install bottom lower bearings.
4. Install bottom upper bearings.
5. Slide #6 mast in, make sure chains are not twisted.
6. Install top bearings and secure with retaining screws
using Loctite® 242 or equivalent on the threads.
7. Install #6 chain around #5 sheave and through casting,
secure to #4 casting with new roll pins.
8. Use a center punch to dimple pin holes after all roll
pins are installed.
9. Pull the sequencing strap attached to the bottom of
mast #6 out through the bottom of the mast assembly.
Be sure not to pull the strap that is attached to the top
of mast #5.
2-9
Section
2.6
Maintenance
2.5 Mast Assembly (Cont.)
2.6 Cylinder Assembly
Platform Support Assembly
SEAL REPLACEMENT (Figure 2-8)
1. Slide cage support weldment into the top of the
platform assembly weldment.
2. Install stop bracket and retaining screws / washers.
3. Feed chains over sheave.
4. Install cable sheaves with cables to the top of cage
support weldment.
5. Feed sequencing strap from inside mast #6 over
sheave and out through the slot in the top of the cage
support weldment.
6. Install cage support weldment to mast #6 using eight
screws, tighten.
7. Attach chains to #5 casting front using new cotter pins.
Note: The Lift Cylinder Seal can be accessed from the
bottom of the Lift without removing the Cylinder
Assembly.
Sequencing Strap Installation
When installing straps, make sure they are not twisted.
1. Feed fish tape up throug the bottom slot in cage
support weldment and out through the top slot.
2. Attach strap to fish tape and pull out through bottom
slot.
3. Feed fish tape down through the opening in the front of
the platform support weldment and out through the
bottom of the platform support weldment.
4. Attach strap to fish tape and pull out through opening.
Attach strap to platform support weldment, pull tightly
and secure with strap clamp and screws using Loctite ®
242 or equivalent on the threads.
5. Fish #6 strap up through mast between fourth and fifth
stages with fish tape.
6. Fish #5 strap up through mast between third and fourth
stages with fish tape.
7. Fish #4 strap up through mast between third and
second stages with fish tape.
8. Fish #3 strap up through mast between first and
second stages with fish tape.
9. Install strap #6 to #4 top casting.
10. Install strap #5 to #3 top casting.
11. Install strap #4 to #2 top casting.
12. Install strap #3 to top of #1 mast weldment.
13. Install the strap clamps and retaining screws using
Loctite® 242 or equivalent on the threads. Pull straps
tight while tightening retaining screws.
2-10
Using a suitable lifting device, lower the work platform
into a horizontal position (Figure 2-5). If possible, place
the machine onto a sturdy work table using a forklift.
Never attempt to lower lift into a horizontal
position without the use of a suitable lifting
device; bodily injury or damage to the
machine may result.
1. Remove cylinder mounting plate fasteners and retaining ring.
2. Remove tie rod nuts, count the number of turns
required to bring the nut flush with the tie rod end and
record for reference during installation. The tension
on the tie rods maintains the left / right positioning of
the cylinder within the mast assembly, reinstalling the
nuts with the proper tension will speed up adjustment
later.
3. Remove the cylinder mounting plate. Be careful not
to allow the tie rods to suck back inside of the mast
assembly, replace the nuts on the tie rod ends temporarily to prevent this.
4. Remove hydraulic line from the cylinder fitting and
cap the cylinder fitting to prevent contaminants from
entering the cylinder.
Marring the surface of the cylinder rod will
damage cylinder seals and cause leakage. Use
a strap wrench to prevent rod damage.
5. Extend cylinder rod at least twelve inches by hand.
Apply heat to rod near end cap to loosen Loc-tite®.
Wear safety glasses and heat resistant gloves
when operating torch. Do not touch hot
surfaces without proper protection.
6. Using a Strap Wrench, 062482-000, to secure the
cylinder rod, unscrew the cylinder rod end. If necessary, thread a 9/16 x 18 bolt into end cap port to use as
a lever. Remove rod end cap and orifice / bleeder tube
assembly.
UL-25/32/40 Portable Personnel Lifts
Maintenance
7. Remove the seal retainer, using the spanner wrench,
062521-010.
8. Clean all sealing surfaces with solvent. Inspect
cylinder rod for excessive wear, replace if necessary.
9. Remove all seals from seal retainer, rod end cap and
discard.
Note: Apply clean hydraulic fluid to new cylinder seal,
threads and all sliding surfaces prior to assembly. If
necessary, soften new seals with warm water (82°c
[180°F]) to aid in installation.
10. Twist the pressure seal into a 'C' shape and snap into
seal groove in seal retainer, making sure the lip of the
seal is facing inward.
11. Using the same method, install the rod wiper into the
seal retainer outer groove, making sure that the blade of
the seal is facing outward from the seal retainer.
12. Replace static seals in rod end cap and seal retainer by
streatching them into place. Be carefull not to cut the
seal during installation.
13. Install the seal retainer onto rod using a sharp blow
from a hard rubber mallet to overcome seal squeeze.
Slide seal retainer into place and tighten using the
spanner wrench.
1.
2.
3.
4.
Seal Kit
A. Static Seal #1
B. Rod Wiper
C. Pressure Seal
D. Static Seal #2
Rod End Cap
Seal Retainer
Cylinder Rod
Cylinder Body
Section
2.6
14. Rod and rod end threads must be absoloutly clean.
Spray threads with Loctite ® primer #7471, allow to
dry for five minutes. Coat threads liberally with
Loctite® #242. Thread rod end cap onto rod, tighten
using strap wrench to hold rod.
15. Push rod back into cylinder for reassembly.
16. Reconnect hydraulic line.
17. Remove nuts from tie rod ends and set the cylinder
mounting plate into place. Secure mounting plate with
fasteners.
18. Install tie rod nuts flush with tie rod ends, torque each
nut the exact number of turns used to remove it.
19. Reinstall retaining ring.
20. Using a suitable lifting device, raise the lift to its
normal vertical position.
22. Bleed air from cylinder by cycling the mast to full
extension several times. The cylinder is self bleeding;
air will be forced out of the cylinder during the lowering cycle.
23. If necessary, remove pinch shield and check alignment
of cylinder within mast assembly by peering down the
mast with a flashlight. The cylinder may be moved
left or right by tightening one or the other of the tie
rod nuts.
If cylinder is not centered, mast may "hang"
when lowering.
1
Keep hands clear of the mast assembly when
the pinch shield is removed for inspection
purposes; pinching injury to hands may
result .
Never operate a machine with the pinch
shield removed, except for inspection.
2
3
4
A
B
Seal Profiles
C
D
Figure 2-8: lift Cylinder
UL-25/32/40 Portable Personnel Lifts
2-11
Section
2.6
Maintenance
2.6 Cylinder Assembly (Cont.)
ORIFICE VALVE CLEANING
Using a suitable lifting device, lower the work platform
into a horizontal position (Figure 2-5). If possible, place
the machine onto a sturdy work table using a forklift.
Never attempt to lower lift into a horizontal
position without the use of a suitable lifting
device; bodily injury or damage to the
machine may result.
1. Remove cylinder mounting plate fasteners and retaining ring.
2. Remove tie rod nuts, count the number of turns
required to bring the nut flush with the tie rod end and
record for reference during installation. The tension
on the tie rods maintains the left / right positioning of
the cylinder within the mast assembly, reinstalling the
nuts with the proper tension will speed up adjustment
later.
3. Remove the cylinder mounting plate. Be careful not
to allow the tie rods to suck back inside of the mast
assembly, replace the nuts on the tie rod ends temporarily to prevent this.
4. Remove hydraulic line from the cylinder fitting and
cap the cylinder fitting to prevent contaminants from
entering the cylinder.
Marring the surface of the cylinder rod will
damage cylinder seals and cause leakage. Use
a strap wrench to prevent rod damage.
5. Extend cylinder rod at least twelve inches by hand.
Apply heat to rod near end cap to loosen Loc-tite®.
Wear safety glasses and heat resistant gloves
when operating torch. Do not touch hot
surfaces without proper protection.
6. Using a Strap Wrench, 062482-000, to secure the
cylinder rod, unscrew the cylinder rod end. If necessary, thread a 9/16 x 18 bolt into end cap port to use as
a lever. Remove rod end cap and orifice / bleeder tube
assembly.
7. Remove snap ring to release orifice / bleeder tube from
rod end cap.
2-12
8. Clean orifice valve hole with a straight pin. Flush with
solvent to remove any contamination that may remain
in bleeder tube.
9. Reinstall orifice / bleeder tube into rod end cap and
secure with snap ring.
10. Replace static seal on red end. Existing seal may have
been damaged by heating rod.
11. Rod and rod end threads must be absoloutly clean.
Spray threads with Loctite ® primer #7471, allow to
dry for five minutes. Coat threads liberally with
Loctite® #242. Thread rod end cap onto rod, tighten
using strap wrench to hold rod.
12. Push rod back into cylinder for reassembly.
13. Reconnect hydraulic line.
14. Remove nuts from tie rod ends and set the cylinder
mounting plate into place. Secure mounting plate with
fasteners.
15. Install tie rod nuts flush with tie rod ends, torque each
nut the exact number of turns used to remove it.
16. Reinstall retaining ring.
17. Using a suitable lifting device, raise the lift to its
normal vertical position.
18. Bleed air from cylinder by cycling the mast to full
extension several times. The cylinder is self bleeding;
air will be forced out of the cylinder during the lowering cycle.
19. If necessary, remove pinch shield and check alignment
of cylinder within mast assembly by peering down the
mast with a flashlight. The cylinder guide bearings
must not be touching the inside surface of #6 mast.
The cylinder may be moved left or right by tightening
the left or right tie rod nuts respectively.
If cylinder is not centered, mast may "hang"
when lowering.
Keep hands clear of the mast assembly when
the pinch shield is removed for inspection
purposes; pinching injury to hands may
result .
Never operate a machine with the pinch
shield removed, except for inspection.
UL-25/32/40 Portable Personnel Lifts
Maintenance
2
3
1
6
5
Section
2.6
7. Remove the screws and washers, attaching the #2 and
#3 bottom castings to the #2 and #3 mast assemblies.
8. While keeping tension on the tie rods, slide the
cylinder and #2 and #3 bottom castings out the bottom
of the UL Lift far enough to expose both castings.
9. Install cylinder Tensioner Brackets, 062739-000 on #2
and #3 bottom castings. Remove tie rod nuts and
install the Tie Rod Tensioners, 062738-000. Remove
all slack from the chains with the Tie Rod Tensioners.
10. Remove cylinder assembly from mast assembly.
INSTALLATION
4
4.Bottom Casting, Mast #2
1.Tensioner Bracket (062739-000)
2.Tie Rod Tensioners (0 62738-000) 5.Bottom Casting, Mast #3
6.Cylinder
3.Tie Rods
Figure 2-9: Cylinder Assembly Installation
CYLINDER REMOVAL (Figure 2-9)
Using a suitable lifting device, lower the work platform
into a horizontal position (Figure 2-5). If possible, place
the machine onto a sturdy work table using a forklift.
Never attempt to lower lift into a horizontal
position without the use of a suitable lifting
device; bodily injury or damage to the
machine may result.
1. Remove cylinder mounting plate fasteners and retaining ring.
2. Remove tie rod nuts, count the number of turns
required to bring the nut flush with the tie rod end and
record for reference during installation. The tension
on the tie rods maintains the left / right positioning of
the cylinder within the mast assembly, reinstalling the
nuts with the proper tension will speed up adjustment
later.
3. Remove the cylinder mounting plate. Be careful not
to allow the tie rods to suck back inside of the mast
assembly, replace the nuts on the tie rod ends temporarily to prevent this.
4. Remove hydraulic line from the cylinder fitting and
cap the cylinder fitting to prevent contaminants from
entering the cylinder.
5. Remove sequence strap retainers on the top of #3 and
#2 masts.
6. Remove front and rear mast access plates from the
bottom of the #1 mast.
UL-25/32/40 Portable Personnel Lifts
NOTE: Cylinder assembly must have Tension Brackets, Tensioner Spacer and Tie Rod Tensioners installed
to remove slack from chain.
1. Slide cylinder assembly into mast assembly until #3
bottom casting is at the bottom of the mast assembly.
2. Install the screws and washers attaching the #3 bottom
casting to the #3 mast assemby.
3. Remove cylinder Tensioner Brackets from #2 and #3
bottom castings and Tie Rod Tensioners from tie rods.
Install tie rod nuts finger tight.
4. While maintaining tension on the tie rods to keep slack
out of the chains, slide cylinder assembly completely
into the mast assembly.
5. Install the screws and washers attaching the #2 bottom
casting to the #2 mast assembly.
6. Install front and rear mast cover plates on the bottom
of #1 mast.
7. Fish #4 strap between #3 and #2 mast with fish tape.
8. Slide #4 strap through #2 casting.
9. Fish #3 strap between #2 and #1 mast with fish tape.
10. Install strap #4 to #2 top casting.
11. Install strap #3 to #1 top casting.
12. While maintaining tension on the sequencing straps,
install strap retainers using Loctite ® 242 or equivalent
on the threads of the retainer screws.
13. Reconnect hydraulic line.
14. Remove nuts from tie rod ends and set the cylinder
mounting plate into place. Secure mounting plate with
fasteners.
15. Install tie rod nuts flush with tie rod ends, torque each
nut the exact number of turns used to remove it.
16. Reinstall retaining ring.
2-13
Section
2.7
Maintenance
2.6 Cylinder Assembly (Cont.)
2.7 Torque Specifications
INSTALLATION (CONT.)
HYDRAULIC COMPONENTS
17. Using a suitable lifting device, raise the lift to its
normal vertical position.
18. Bleed air from cylinder by cycling the mast to full
extension several times. The cylinder is self bleeding;
air will be forced out of the cylinder during the lowering cycle.
19. If necessary, remove pinch shield and check alignment
of cylinder within mast assembly by peering down the
mast with a flashlight. The cylinder guide bearings
must not be touching the inside surface of #6 mast.
The cylinder may be moved left or right by tightening
the left or right tie rod nuts respectively.
Use the following values to torque hydraulic components
used on Snorkel Work Platforms.
Note: Always lubricate threads with clean hydraulic oil
prior to installation.
Table 2-2: Hydraulic Component Torque
TYPE:
CARTRIDGE
SAE PART
POPPET
SERIES
(Ft/Lbs
Nm)
HOSES
FITTINGS
(Ft/Lbs
(In/Lbs
Nm)
Nm)
N/A
N/A
N/A
135-145
15-16
N/A
N/A
10-20
14-27
215-245
24-28
25-30
34-41
25-30
34-41
430-470
49-53
#10
35-40
47-54
35-40
47-54
680-750
77-85
#12
85-90
950-1050
107-131
1300-1368
147-155
#4
N/A
#6
#8
Keep hands clear of the mast assembly when
the pinch shield is removed for inspection
purposes; pinching injury to hands may
result.
Coil nuts: 3 Nm (30 In/Lbs)
Never operate a machine with the pinch
shield removed, except for inspection.
FASTENERS
115-122
115-122 85-90
130-140
176-190
130-140 176-190
#16
Use the following values to torque fasteners used on Snorkel
Work Platforms unless a specific torque value is
called out for the part being installed.
Table 2-3: Bolt Torque
2-14
THREAD
WIDTH
SIZE
ACROSS
American National
Standard-UNF (fine)
FLATS
TORQUE
VALUE
ENGLISH
METRIC
In/Lbs
12
Nm
1
/4
7
/16
110
5
/16
1
/2
190
In/Lbs
22
Nm
3
/8
9
/16
30
Ft/Lbs
41
Nm
7
/16
5
/8
50
Ft/Lbs
68
Nm
1
/2
3
/4
75
Ft/Lbs
102
Nm
5
/8
15
/16
150
Ft/Lbs
203
Nm
3
/4
1 1/8
250
Ft/Lbs
339
Nm
7
/8
5
1 /16
400
Ft/Lbs
542
Nm
1
1 1/2
600
Ft/Lbs
813
Nm
UL-25/32/40 Portable Personnel Lifts
Troubleshooting
Section
3.0
3.0 Introduction
GENERAL PROCEDURE
Table 3-1 provides a logical sequence of tests that are
designed to isolate problems with the Snorkel Lift. This
table includes a list of probable causes and remedies.
Troubleshooting should be carried out in two steps. First,
thoroughly study both hydraulic and electric schematics to
determine possible causes. Loose terminal connections and
short circuits are always a potential cause when troubleshooting. Second, check suspect components electrically,
hydraulically and mechanically to determine if they are at
fault. Refer to Tables 4-1 and 4-2 for Reference Designations used in Table 3-1.
When troubleshooting, ensure that the work
platform is resting on a firm, level surface.
When performing any service which requires the Platform to be raised, ensure that
all four (4) outriggers are properly installed.
Unplug the machine or disconnect the battery when replacing or testing the continuity
of any electrical component.
UL-25/32/40 Portable Personnel Lifts
3-1
Section
Troubleshooting
3.1
Table 3-1: Troubleshooting
TROUBLE
Lift Function
inoperable,
electric motor
does not start.
PROBABLE CAUSE
1. Extension cord too
long or insufficient
capacity.
2. Not plugged in or
faulty connection (AC
only).
3. No power at wall
outlet (AC only).
4. Faulty Battery Charger
(DC only).
REMEDY
Use minimum 1,5 mm2 (12 ga.) cord of
16m (50 feet) or less in length.
Check all AC plugs and cords used.
Check power output at wall outlet.
Check the voltage output of the Battery
Charger. If less than 12 VDC, repair or
replace.
5. Faulty Battery (BAT). After completely charging Battery, test
Battery. Replace asrequired.
6. Key Switch (S2),
With the switch in the ON position,
Emergency Stop
check continuity across the contacts. If
Switch (S1, S3) or
none, replace.
Push-button Switch
(S4, S5) failed open.
7. Outrigger Interlock
Make sure all four outriggers are in
Switch (S7,S8, 9,S10). firm contact with floor. Check
continuity of interlock switches.
8. Open circuit in cable to Test for continuity through cable
assembly and repair or replace.
motor control box.
9. Faulty Electric Motor
(M1).
Use minimum 11,5 mm2 (12 ga.) cord
of 16m (50 feet) or less in length.
One or more, but 1. Indicator light
not all indicator
damaged or faulty.
lights fail to
2. Outrigger limit switch
operate
damaged or faulty.
3. Chassis harness
damaged or improperly
connected.
Replace indicator light.
Lift function
inoperable,
Electric Motor
starts when
control is
activated.
Close valve.
3-2
PROBABLE CAUSE
REMEDY
1. Down Valve Solenoid Test for continuity across Solenoid.
Platform does
Repair or replace.
(SOL1) faulty.
not lower using
2. Electrical malfunction. Check all AC plugs and cords used (AC
electrical
only). Check power output at wall outlet
switches.
(AC only).
(Will lower
With each switch (S1,S2,S3,S4,S6) in
using emergency
the ON position, check continuity
lowering valve.)
across the contacts. If none, replace.
Platform does
not lower or
lowers very
slowly.
Platform
continues to
lower when
controls are
released.
1. Down Orifice (ORF)
plugged.
2. Down Valve (V2)
blocked or stuck
closed.
2. Mechanical
interference.
Remove and clean Down Orifice check
valve.
Check function / clear blockage of
Down Valve.
1. Down Valve (V1)
stuck open
Clean or replace Down Valve.
Inspect Mast Assembly, correct
interference.
While operating the Lift function, check
the voltage to the Electric Motor. If
voltage is present (12VDC or 120/
240VAC), replace the motor. In case of
low AC voltage, see #1.
Lift turns on and 1. Low line voltage or
off repeatedly.
battery charge.
1. Emergency Lowering
Valve (V2) open.
2. Hydraulic Reservoir
Low.
3. Down Valve (V2)
stuck.
4. Relief Valve (RV) out
of adjustment or faulty.
5. Lift Valve (V1) faulty.
6. Faulty Hydraulic Pump
(P).
TROUBLE
Replace switch.
Repair damage, insure proper
connection.
Check hydraulic fluid level, top off as
required.
Check or replace Down Valve (V2).
Adjust the Relief Valve (RV). If not
adjustable, replace.
Check or replace Lift Valve (V1).
Check pressure and delivery of the
Hydraulic Pump. Replace if required.
UL-25/32/40 Portable Personnel Lifts
Section
Troubleshooting
3.1
Table 3-1: Troubleshooting (cont'd)
LIFT DOES NOT TURN ON - AC
All voltages are referenced to Chassis ground. Using a voltmeter, place the negative probe
directly to a clean ground source onthe AC motor. If equipped with battery back up,
remove back up battery before proceeding. Diconnect both chassisconnector and coil
cord connector. Set voltmeter for DC voltage. Plug lift into outlet.
1) Check for voltage at the power terminals of the circuit board. Turn off key
switch and E-Stop switch. Power terminal is S28 and ground terminal is GND.
See drawing.
a) Extension harness excessive in length.
b) Low line voltage.
c) Damaged or faulty circuit board.
a) Damaged or faulty motor harness.
1b) Voltage is found at the ground
b) Damaged or faulty circuit board.
terminal.
1c) Between 11 VDC and 26 VDCfound a) Continue to #2.
at S28. Zero volts found at GND.
1a) DC voltage at S28 is less than
11 VDC.
2) Check for voltage at the terminals of the key switch. Turn the key switch on
and and the E-Stop switch off.
2a) No voltage is found on either
a) Circuit board is damaged.
terminal.
2b) Voltage is found only on one of the a) Ignition key switch is faulty.
two key switch terminals.
2c) Voltage is found at both sides of the a) Continue to step 3.
key switch.
3) Check voltages at the chassis harness. Turn on the ignition key and turn off the EStop. Disconnect the chassis harness. Check voltage of pin 6 and pin 1 of chassis
connector on the circuit board.
3a) Voltage at pin 6 does not exist or is a) Circuit board is damaged.
less than 11 volts DC.
3b) Voltage at ground pin 1 is not zero. a) Circuit board is damaged.
b) Ground on motor harness damaged or
connected improperly.
3c) Voltage at pin 6 is between 10 and 12 a) Continue to step 4.
VDC, voltage at pin 1 is zero.
4) Plug in Chassis harness. Turn on ignition key, turn off E-Stop switch. Check
voltages at pin 1 and 6 of the chassis harness. This may require the use of a
sharp probe to pierce the insulation of the corresponding wires.
4a) Pin 6 is not between 10 and 12 VDC. a) Damaged or shorted chassis harness.
4b) Voltage found at pin 1.
a) Circuit board is damaged.
b) Ground on motor harness damaged or
connected improperly.
LIFT DOES NOT RAISE - AC
1) Plug lift into outlet. Make sure all outriggers are extended and raised. Turn
off the E-Stop switch and turn on the ignition key. Wait five seconds for machine
to turn on and outrigger lights to light.
1a) Outrigger lights do not turn on.
a) See LIFT DOES NOT TURN ON
1b) Outrigger lights tun on immediately b) Circuit board is damaged. Replace circuit
and no five second delay is present.
board.
1c) Fewer than four indicator lights will a) Indicator light is damaged.
operate.
b) Chassis harness damaged or incorrectly
connected.
c) Outrigger limit switch defective or
improperly connected.
1d) All four indicator lights turn on five a) Continue to step 2.
seconds after ignition key is turned on.
UL-25/32/40 Portable Personnel Lifts
2) Pull out both E-Stop switches. Activate the common and up switch on the
upper control box.
2a) Motor does not run.
2b) Motor runs but will not raise.
a) Continue to step 3.
a) Hydraulic system failure.
b) Damaged or improperly connected motor
harness.
c) Damaged pump solenoid.
2c) Motor attempts to start but machine a) Improperly connected or damaged motor
turns off and then restarts in five seconds. harness.
b) Improperly connected or damaged coil
cord or upper control box.
c) Damaged pump solenoid.
d) Extension harness excessive in length.
e) Low line voltage.
f) Damaged pump motor.
3) Open the lid on the lower control box. Check for voltage at the E-Stop switch.
Ignition key is turned on E-Stop is pulled out on both the upper and lower box.
3a) No voltage is present at either of the
terminals on the E-Stop.
3b) Voltage is present on both terminals
of the E-Stop switch.
3c) Voltage is only present at one side of
the E-Stop switch.
a) Circuit board is damaged. Replace circuit
board.
a) Check for correct operation of upper E-Stop
switch. Continue to step 4.
a) Replace E-Stop switch in whole or in
part.
4) Check Circuit board lift circuit. Place voltmeter probe at lift terminal S26 at
the upper right hand side of the circuit board. See drawing(Page 3-5). Activate
the common and up switch on the upper control box.
4a) When up button is pressed, 10-12
a) Improperly connected or damaged coil
VDC is not present at pin S26.
cord or upper control control box.
b) Improperly connected or damaged
chassis harness.
c) Damaged circuit board.
4b) When up button is pressed, 10-12
a) Continue to step 5.
VDC is present at pin S26.
5) Set voltometer for AC voltage. Place one probe of the voltometer on -120 and
the other probe on motor. See drawing(Page 3-5). Plug the lift into an outlet. Set
outriggers, turn on ignition key, and pull out both E-Stops. Press the common
and up switches on the upper control box.
5a) Line voltage is found between -120
and motor.
a) Damaged or improperly connected motor
harness.
b) Damaged motor.
5b) Line voltage is not found between - a) Circuit board damaged.
120 and motor.
LIFT DOES NOT LOWER - AC
1) Lift will raise but will not lower. Turn on key switch, pull out both upper and
lower E-Stops. Press the common and down push buttons on the upper control box.
1a) Lift turns off and restarts in five
seconds.
1b) Outrigger lights turn on immediately
and no five second delay is present.
a) Low line voltage.
b) Extension harness excessive in length.
c) Improperly connected or damaged motor
harness.
d) Improperly connected or damaged coil
cord or upper control box.
e) Damaged down solenoid.
a) Continue to step 2.
3-3
Section
Troubleshooting
3.1
Table 3-1: Troubleshooting (cont'd)
2) Check circuit board for correct output. Open the lid on the lower control box.
LIFT DOES NOT RAISE - DC
Using a voltmeter, check the voltage terminal S27 found on the upper right hand
side of the circuit board. See drawing. Turn on ignition key and pull out both EStop switches. Depress the common and down switches on the upper control
box.
2a) Motor does not run.
Continue to step 3.
2b) Motor runs but will not raise.
a) Hydraulic system failure.
b) Damaged or improperly connected motor
harness.
c) Damaged pump solenoid.
2c) Motor attempts to start but machine a) Improperly connected or damaged motor
turns off and then restarts in five seconds. harness.
b) Improperly connected or damaged coil
cord or upper control box.
c) Damaged pump solenoid.
d) Extension harness excessive in length.
e) Low line voltage.
f) Damaged pump motor.
LIFT DOES NOT TURN ON - DC
All voltages are referenced to Battery ground. Using avoltmeter, place the negative probe
directly to the negative pole of the battery. If equipped with battery back up, remove
back up battery before proceeding. Disconnect both chassisconnector and coil cord
connector from the control box.
1) Turn off key switch and E-Stop switch. Check power connections on circuit
board S28 and GND found on the lower right hand side of the circuit board. See
drawing (Page 3-5).
a) Improperly connected or damaged motor
1a) S28 is less than battery voltage.
harness.
b) Poor battery connections.
1b) GND is not zero volts.
1c) Battery voltage is found at S28 and
zero volts is found on GND.
a) Improperly connected or damaged motor
harness.
a) Battery power is present at PCB.
Continue to step 2.
2) Check for voltage at the terminals of the key switch. Turn the key switch on
and the E-Stop switch off.
2a) No voltage is found on either
terminal.
2b) Voltage is found only on one of the
two key switch terminals.
2c) Voltage is found at both sides of the
key switch.
a) Circuit board is damaged. Replace circuit
board.
a) Ignition key switch is faulty. Replace
ignition key switch.
a) Key switch is working properly. Continue
to step 3.
3) Check for voltage at the terminals of the key switch. Turn the key switch on
and the E-Stop switch off.
3a) Voltage at pin 6 does not exist or is
less than 11 volts DC.
3b) Voltage at ground pin 1 is not zero.
1) Does the lift turn on? Make sure all outriggers are extended and raised. Turn
off the E-Stop switch and turn on the ignition key. Wait five seconds for machine
to turn on and outrigger lifgts to light.
a) See section LIFT DOES NOT TURN ON.
b) Circuit board is damaged. Replace
circuit board.
a) Indicator light is damaged.
b) Chassis harness damaged or
incorrectly connected.
c) Outrigger limit switch defective or
improperly connected.
1d) All four indicator lights turn on five a) Continnue to step 2.
seconds after ignition key is turned on.
1a) Outrigger lights do not turn on.
1b) Outrigger lights turn on immediately
and five second delay is not present.
1c) Fewer than four indicator lights
operate.
2) Pull out both E-Stop switches. Activate the common and up switch on the
upper control box.
a) Continue to step 3.
2a) Motor does not run.
a) Hydraulic system failure.
2b) Motor runs but will not raise.
b) Coil cord is damaged
c) Damaged or improperly connected
pump solenoids.
a) Improperly connected or damaged
2c) Lift turns off and restarts in five
motor harness.
seconds.
b) Improperly connected or damaged coil
cord or upper control box.
c) Damaged pump solenoid or motor
solenoid.
d) Battery charge is low.
3) Open the lid on the lower control box. Check for voltage at the E-Stop switch.
Ignition key is turned on E-Stop is pulled out on both the upper box and lower
box.
3a) No voltage is present at either of the a) Circuit board is damaged. Replace
circuit board.
terminals on the E-Stop switch.
3b) Voltage is present on both terminals a) Check for correct operation of upper
E-Stop switch. Continue to step 4.
of the E-Stop switch.
3c) Voltage is only present at one side of a) Replace E-Stop switch in whole or in
part.
the E-Stop switch.
4) Click circuit board lift circuit. Place voltmeter probe at terminal S26 at the
upper right hand side of the circuit board. See drawing (Page 3-5). Activate the
common and up switch on the upper control box.
4a) When button is pressed, 10-12 VDC a) Improperly connected or damaged coil
cord or upper control box.
is not present at pin S26.
b) Damaged circuit board.
a) Damaged or improperly wired motor
4b) When up button is pressed, 10-12
harness.
VDC is present at pin S26.
b) Damaged motor starter relay.
a) Circuit board is damaged.
a) Circuit board is damaged.
b) Ground on motor harness damaged or
connected improperly.
3c) Voltage at pin 6 is between 10 and 12 Continue to step 4.
VDC, voltage at pin 1 is zero.
4) Plug in Chassis harness. Turn on ignition key, turn off E-Stop switch. Check
voltages at pin 1 and pin 6 of the chassis harness. This may require the use of a
sharp probe to pierce the insulation of the corresponding wires.
4a) Pin 6 is not between 10 and 12 VDC.
4b) Voltage at ground pin 1 is not zero.
3-4
a) Damaged or shorted chassis harness.
a) Circuit board is damaged.
b) Ground on motor harness damaged or
connected improperly.
UL-25/32/40 Portable Personnel Lifts
Troubleshooting
Section
3.1
Table 3-1: Troubleshooting (cont'd)
LIFT DOES NOT LOWER - DC
1) Lift will raise but will not lower. Turn on key switch, pull out both upper and
lower E-Stops. Press the common and down push buttons on the upper control
box.
1a) Lift turns off and restarts in five
seconds.
1b) Lift will not lower.
a) Improperly connected or damaged
motor harness.
b) Improperly connected or damaged coil
cord or upper control box.
c) Damaged down solenoid.
a) Continue to step 2.
2) Check circuit board for correct output. Open lid on the lower box. Using a
voltmeter, check the voltage on terminal S27 found on the upper right hand side of
the circuit board. See drawing. Turn on ignition key and pull out both E-Stop
switches. Depress the common and down switches on the upper control box.
2a) Lift turns off and restarts in five
seconds.
2b) Lift will not lower.
a) Improperly connected or damaged
motor harness.
b) Improperly connected or damaged coil
cord or upper control box.
c) Damaged down solenoid.
a) Continue to step 2.
Figure 3-1: Circuit Board
UL-25/32/40 Portable Personnel Lifts
3-5
Section
3.1
Troubleshooting
NOTES:
3-6
UL-25/32/40 Portable Personnel Lifts
Schematics
4.0 Introduction
This section contains electrical and hydraulic power schematics and associated information for maintenance purposes.
The diagrams are to be used in conjunction with Table 3-1:
Troubleshooting Guide. They allow understanding of the
makeup and functions of the systems for checking, tracing,
and faultfinding during troubleshooting analysis.
Section
4.0
LIST OF FIGURES
Figure
Page
Figure 4-1: Electrical Schematic, AC Models ................. 4-3
Figure 4-2: Electrical Schematic, DC Models ................. 4-3
Figure 4-3: Hydraulic Schematic ...................................... 4-4
The components that comprise the electrical and hydraulic
systems are given a reference designation and are explained
as to function and location in the following tables.
UL-25/32/40 Portable Personnel Lifts
4-1
Section
Schematics
4.1
4.1 Electrical Schematics
Table 4-1: Electrical Schematic Legend AC
REFERENCE
DESIGNATION
NAME
BR
Bridge Rectifier
C1-4
Relay Contacts
Norm. Open for
R1-4.
L1-4
Indicator Light
M1
Electric Motor
R1-4
Relay Coil
R5
Motor Contactor
S1
Switch, Chassis
Emergency Stop
Switch, Key
S2
S3
S4
Switch, Platform
Emegency Stop
Switch. Power
On
S5
Switch, Lift
S6
Switch, Lower
S7-10
Switch, Outrigger
Interlock
Solenoid, Lower
(coil)
Solenoid, Lift
(coil)
Transformer
SOL1
SOL2
T1
4-2
FUNCTION
Converts AC to DC
for control circuit.
Completes ground
circuit to motor
and Lift Valve
when R1-4 are
energized.
Lights when Outrigger
Interlock Switches
are closed.
Supplies power to
drive hydraulic
pump.
When energized
closes relay contacts
1-4.
Switches power to
Electric Motor.
Control circuit
shut off.
Provides power to
upper controls.
Control Circuit
shut off.
Supplies power to
either Up or Down
Switch.
Supplies power to
up circuit.
Supplies power to
down circuit.
Supplies power to
L1-L4 and R1-R4.
Opens down valve.
Opens Up Valve.
Steps down AC
voltage.
Table 4-2: Electrical Schematic Legend DC
LOCATION
REFERENCE
DESIGNATION
NAME
In Control Box.
BAT
Battery
In Control Box.
CH
Charger
C1-4
Relay Contacts
Norm. Open for
R1-4.
L1-4
Indicator Light
M1
Electric Motor
R1-4
Relay Coil
In Control Box.
R5
Relay, Motor
In Control Box.
S1
In Control Box.
S2
Switch, Chassis
Emergency Stop
Switch, Key
Center button of
platform controls.
S3
On chassis next to
Outrigger socket.
Upper portion of
Power Unit.
In Control Box.
In Control Box.
S4
Switch, Platform
Emegency Stop
Switch. Power
On
Upper button of
platform controls.
Lower button of
platform controls.
In Outrigger Sockets.
S5
Switch, Lift
S6
Switch, Lower
Power Unit front.
S7-10
Power Unit left
hand side.
Inside electrical
Control Box.
SOL1
Switch, Outrigger
Interlock
Solenoid, Lower
(coil)
Solenoid, Lift
(coil)
SOL2
FUNCTION
Supplies current to
circuit.
Maintains Charge
level in Battery.
Completes ground
circuit to motor
and Lift Valve
when R1-4 are
energized.
Lights when Outrigger
Interlock Switches
are closed.
Supplies power to
drive hydraulic
pump.
When energized
closes relay contacts
1-4.
Supplies power to
Motor.
Control circuit
shut off.
Provides power to
upper controls.
Control Circuit
shut off.
Supplies power to
either Up or Down
Switch.
Supplies power to
up circuit.
Supplies power to
down circuit.
Supplies power to
L1-L4 and R1-R4.
Opens down valve.
Opens Up Valve.
LOCATION
In Power Module.
In Power Module.
In Control Box.
On chassis next to
Outrigger socket.
Upper portion of
Power Unit.
In Control Box.
Lower Power Module.
In Control Box.
In Control Box.
In Control Box.
Center button of
platform controls.
Upper button of
platform controls.
Lower button of
platform controls.
In Outrigger Sockets.
Power Unit front.
Power Unit left
hand side.
UL-25/32/40 Portable Personnel Lifts
Section
Schematics
4.1
M1
SOL1
SOL2
R5
S7
S8
S9
S10
BR
S1
S5
S2
S6
S3 S4
T1
Figure 4-1: Electrical Schematic, AC Models
Figure 4-2: Electrical Schematic, DC Models
UL-25/32/40 Portable Personnel Lifts
4-3
Section
Schematics
4.2
4.2 Hydraulic Schematic
Table 4-3: Hydraulic Scematic Legend
REFERENCE
DESIGNATION
NAME
CV
Valve, Check
CYL
FLT
Cylinder
Filter
ORF
Orifice
P
Pump
RV
Relief Valve
V1
Valve, Two-Way
Norm. Open
Valve, Two-Way
Norm. Closed
V2
FUNCTION
Allows flow in one
direction.
Operates Lift
Seperates matter
held in suspension
from fluid.
Controls flow out
of CYL.
Supplies hydraulic
pressure to system.
Limits maximum
pressure by releasing
oil.
Stops flow when
energized.
Allows flow when
energized.
LOCATION
Valve Block Assembly
On lift assembly.
Inline with Pump.
Inline with CYL.
Lower Power Module.
Valve Assembly
Lower Power Module.
Valve Block Assembly.
Lift Cylinder Assembly.
CYL
CV
ORF
P
V2
RV
V1
FLT
Figure 4-3: Hydraulic Schematic
4-4
UL-25/32/40 Portable Personnel Lifts
Illustrated Parts Breakdown
Section
5.0
European Specifications
This section lists and illustrates the replaceable assemblies and parts of this
product, as manufactured by Snorkel, Inc. Each parts list contains the
component parts for that assembly.
C ONTENTS
Final Assembly, ULII Series
UL25 068001-002, 068001-003, . . . . . . . . . . . . . . . . . .5-2
UL32 068002-002, 068002-003, . . . . . . . . . . . . . . . . . 5-2
UL40 068003-002, 068003-003 . . . . . . . . . . . . . . . . . . .5-2
Basic Assembly
UL25 068006-024 . . . . . . . . . . . . . . . . . . . . . . . . . . . . .5-4
UL32 068006-025 . . . . . . . . . . . . . . . . . . . . . . . . . . . . .5-4
UL40 068006-026 . . . . . . . . . . . . . . . . . . . . . . . . . . . . .5-4
Miscellaneous Installation
069039-000 . . . . . . . . . . . . . . . . . . . . . . . . . . . . . . . . . . .5-7
AC Power Option
068008-011 . . . . . . . . . . . . . . . . . . . . . . . . . . . . . . . . . . .5-8
DC Power Option
068009-011 . . . . . . . . . . . . . . . . . . . . . . . . . . . . . . . . . .5-10
AC Control Box
068007-021 . . . . . . . . . . . . . . . . . . . . . . . . . . . . . . . . . .5-12
DC Control Box
068007-023 . . . . . . . . . . . . . . . . . . . . . . . . . . . . . . . . . .5-14
Lift Cylinder
UL25 068074-020 . . . . . . . . . . . . . . . . . . . . . . . . . . . .5-16
UL32 068074-021 . . . . . . . . . . . . . . . . . . . . . . . . . . . .5-16
UL40 068074-022 . . . . . . . . . . . . . . . . . . . . . . . . . . . .5-16
2nd Stage Mast Assembly
UL25 068050-001 . . . . . . . . . . . . . . . . . . . . . . . . . . . .5-18
UL32 068050-002 . . . . . . . . . . . . . . . . . . . . . . . . . . . .5-18
UL40 068050-003 . . . . . . . . . . . . . . . . . . . . . . . . . . . .5-18
3rd Stage Mast Assembly
UL25 068056-001 . . . . . . . . . . . . . . . . . . . . . . . . . . . .5-19
UL32 068056-002 . . . . . . . . . . . . . . . . . . . . . . . . . . . .5-19
UL40 068056-003 . . . . . . . . . . . . . . . . . . . . . . . . . . . .5-19
4th Stage Mast Assembly
UL25 068061-001 . . . . . . . . . . . . . . . . . . . . . . . . . . . .5-20
UL32 068061-002 . . . . . . . . . . . . . . . . . . . . . . . . . . . .5-20
UL40 068061-003 . . . . . . . . . . . . . . . . . . . . . . . . . . . .5-20
5th Stage Mast Assembly
UL25 068066-001 . . . . . . . . . . . . . . . . . . . . . . . . . . . .5-21
UL32 068066-002 . . . . . . . . . . . . . . . . . . . . . . . . . . . .5-21
UL40 068066-003 . . . . . . . . . . . . . . . . . . . . . . . . . . . .5-21
6th Stage Mast Assembly
UL25 068070-001 . . . . . . . . . . . . . . . . . . . . . . . . . . . .5-22
UL32 068070-002 . . . . . . . . . . . . . . . . . . . . . . . . . . . .5-22
UL40 068070-003 . . . . . . . . . . . . . . . . . . . . . . . . . . . .5-22
Cage Support Assembly
UL25 068160-009 . . . . . . . . . . . . . . . . . . . . . . . . . . . .5-24
UL32 068160-010 . . . . . . . . . . . . . . . . . . . . . . . . . . . .5-24
UL40 068160-011 . . . . . . . . . . . . . . . . . . . . . . . . . . . .5-24
UL-25/32/40 Portable Personnel Lifts
Platform Assembly, UL25
068179-003 . . . . . . . . . . . . . . . . . . . . . . . . . . . . . . . . . .5-26
Platform Assembly, UL32/UL40
068179-004 . . . . . . . . . . . . . . . . . . . . . . . . . . . . . . . . . .5-28
Loader Assembly, UL25
068194-000 . . . . . . . . . . . . . . . . . . . . . . . . . . . . . . . . . .5-30
Tilt Back Assembly, UL32
068200-000 . . . . . . . . . . . . . . . . . . . . . . . . . . . . . . . . . .5-32
Tilt Back Assembly, UL40
068200-001 . . . . . . . . . . . . . . . . . . . . . . . . . . . . . . . . . .5-34
Loader Stop Bracket Assembly
068190-000 . . . . . . . . . . . . . . . . . . . . . . . . . . . . . . . . . .5-36
Loader Bar Assembly
068186-000 . . . . . . . . . . . . . . . . . . . . . . . . . . . . . . . . . .5-37
Outrigger Assembly
UL25 068157-000 . . . . . . . . . . . . . . . . . . . . . . . . . . . .5-38
UL32 068157-001 . . . . . . . . . . . . . . . . . . . . . . . . . . . .5-38
UL40 068157-002 . . . . . . . . . . . . . . . . . . . . . . . . . . . .5-38
Label Kit, UL25
AC 068013-012 . . . . . . . . . . . . . . . . . . . . . . . . . . . . . .5-40
DC 068013-013 . . . . . . . . . . . . . . . . . . . . . . . . . . . . . .5-40
Label Kit, UL32
AC 068014-012 . . . . . . . . . . . . . . . . . . . . . . . . . . . . . .5-42
DC 068014-013 . . . . . . . . . . . . . . . . . . . . . . . . . . . . . .5-42
Label Kit, UL40
AC 068015-012 . . . . . . . . . . . . . . . . . . . . . . . . . . . . . .5-44
DC 068015-013 . . . . . . . . . . . . . . . . . . . . . . . . . . . . . .5-44
Power Pack Option
068100-001 . . . . . . . . . . . . . . . . . . . . . . . . . . . . . . . . . .5-46
Electrical Schematic, AC
068010-000 . . . . . . . . . . . . . . . . . . . . . . . . . . . . . . . . . .5-47
Electrical Schematic, DC
068010-001 . . . . . . . . . . . . . . . . . . . . . . . . . . . . . . . . . .5-48
Hydraulic Schematic
068011-002 . . . . . . . . . . . . . . . . . . . . . . . . . . . . . . . . . .5-49
5-1
Final Assembly, ULII Series
UL25 068001-002, 068001-003,
UL32 068002-002, 068002-003,
UL40 068003-002, 068003-003
1
2
3
4
5
5-2
068006-024
068006-025
068006-026
068008-011
068009-011
068013-012
068013-013
068014-012
068014-013
068015-012
068015-013
BASIC ASSY
BASIC ASSY
BASIC ASSY
POWER OPTION AC EUR.
POWER OPTION DC EUR.
LABEL KIT/INST.
LABEL KIT/INST.
LABEL KIT/INST.
LABEL KIT/INST.
LABEL KIT/INST.
LABEL KIT/INST.
511128-000-EN OPERATOR MANUAL
511128-200 PARTS & SERVICE MANUAL
ULII Series Parts Manual
ULII Series Parts Manual
5-3
Basic Assembly
UL25 068006-024
UL32 068006-025
UL40 068006-026
512805-000
512789-000
512806-000
5-4
ULII Series Parts Manual
Drawing # 1 of 2
ULII Series Parts Manual
5-5
Drawing # 2 of 2
5-6
ULII Series Parts Manual
AC Power Option
068008-011
020809-001 FITTING, TEE 6MJ-6MB-6FJX
ULII Series Parts Manual
5-7
5-8
ULII Series Parts Manual
DC Power Option
068009-011
ULII Series Parts Manual
5-9
5-10
ULII Series Parts Manual
AC Control Box
068007-021
ULII Series Parts Manual
5-11
5-12
ULII Series Parts Manual
DC Control Box
068007-023
ULII Series Parts Manual
5-13
ULII Series Parts Manual
Page 15
Lift Cylinder
UL25 068074-020
UL32 068074-021
UL40 068074-022
Page 16
ULII Series Parts Manual
ULII Series Parts Manual
Page 17
2nd Stage Mast Assembly
UL25 068050-001
UL32 068050-002
UL40 068050-003
Page 18
ULII Series Parts Manual
3rd Stage Mast Assembly
UL25 068056-001
UL32 068056-002
UL40 068056-003
ULII Series Parts Manual
Page 19
4th Stage Mast Assembly
UL25 068061-001
UL32 068061-002
UL40 068061-003
Page 20
ULII Series Parts Manual
5th Stage Mast Assembly
UL25 068066-001
UL32 068066-002
UL40 068066-003
ULII Series Parts Manual
Page 21
6th Stage Mast Assembly
UL25 068070-001
UL32 068070-002
UL40 068070-003
Page 22
ULII Series Parts Manual
NOTES:
ULII Series Parts Manual
Page 23
Cage Support Assembly
UL25 068160-009
UL32 068160-010
UL40 068160-011
Page 24
ULII Series Parts Manual
ULII Series Parts Manual
Page 25
Platform Assembly, UL25
068179-003
506275-001
057524-001 DROP BAR ASSY
510524-000
510542-000 PUSH BUTTON ENABLE
0120804
0120803
Page 26
PUSH BUTTON DOWN
PUSH BUTTON UP
ULII Series Parts Manual
ULII Series Parts Manual
Page 27
Platform Assembly, UL32/UL40
068179-004
506275-001
057524-001 DROP BAR ASSY
026551-007 RIVET 1/8 .251 - .312 GRIP
Page 28
ULII Series Parts Manual
ILLUSTRATION OF CE CAGE
ULII Series Parts Manual
Page 29
Loader Assembly, UL25
068194-000
Page 30
ULII Series Parts Manual
NOTES:
ULII Series Parts Manual
Page 31
Tilt Back Assembly, UL32
068200-000
Page 32
ULII Series Parts Manual
ULII Series Parts Manual
Page 33
Tilt Back Assembly, UL40
068200-001
Page 34
ULII Series Parts Manual
ULII Series Parts Manual
Page 35
Loader Stop Bracket Assembly
068190-000
Drawing #
Page 36
ULII Series Parts Manual
Loader Bar Assembly
068186-000
ULII Series Parts Manual
Page 37
Outrigger Assembly
UL25 068157-000
UL32 068157-001
UL40 068157-002
Page 38
ULII Series Parts Manual
ULII Series Parts Manual
Page 39
Power Pack Option
068100-001
ULII Series Parts Manual
Page 40
Electrical Schematic, AC
068010-000
Page 41
ULII Series Parts Manual
Electrical Schematic, DC
068010-001
ULII Series Parts Manual
Page 42
Hydraulic Schematic
068011-002
Page 43
ULII Series Parts Manual
Local Distributor / Lokaler Vertiebshändler / Distributeur local
El Distribuidor local / ll Distributore locale
EUROPE, MIDDLE EAST
AFRICA & ASIA
PHONE: +44 (0) 845 1550 057
FAX: +44 (0) 845 1557 756
NORTH & SOUTH AMERICA
PHONE: +1 785 989 3000
TOLL FREE: +1 800 225 0317
FAX: +1 785 989 3070
AUSTRALIA
PHONE: +61 2 9725 4000
FAX: +61 2 9609 3057
NEW ZEALAND
PHONE: +64 6 3689 168
FAX: +64 6 3689 164